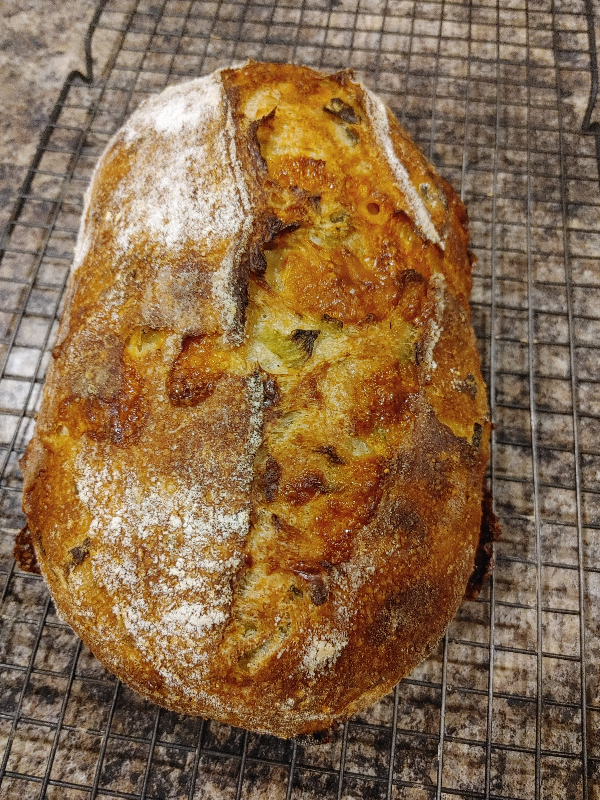
Hello friends!
After lots of researching and reading through Ankarsrum-related posts here, I compiled advice and how-to tips that new mixer owners such as myself may find helpful. If you have additional tips or info to contribute, please do leave a comment below!
--
Kitchen Aid vs. Ankarsrum
Tip #1: One of the biggest problems for first-time users is familiarity with their previous mixer, like the KitchenAid. Your visual experience will be different; with the Ankarsrum, mix by faith and not by sight. Mixing times in the Ankarsrum are much longer to develop the dough, but that's okay because it is much gentler and more like hand mixing.
For your first batch of bread:
- Make a dough that is at least 800 grams in total weight. The mixer will do smaller batches, but larger will make things a little simpler. Start with a dough that is not too dry.
- Put your flour (maybe mix in salt and yeast) in the mixing bowl. Then add the required water. If using a levain, mix it into the water in a separate bowl before adding to the dry ingredients.
- Turn the mixer on, setting it to the slowest speed. Let it mix until the flour and water are incorporated, just to the point where the flour is no longer dry.
- Stop the mixer, remove the roller and scraper, and put the white plastic cover on top the bowl to prevent evaporation.
- Let the dough rest for 30 minutes, then continue mixing. You can manually move the roller and/or the scraper back and forth to get a better mix if you wish.
Tip #2: It takes some practice to get the “kneading mind set” of the KitchenAid out of your mind. It’s difficult to believe that the Ankarsrum’s gentle kneading is so efficient and effective.
- Between the KA and the Ankarsrum mixing the same cake batter, the Ankarsrum takes longer to make full contact with the dough. However, it produces the same result after the same amount of total time mixing.
- The Ankarsrum is completely capable of handling the dough up to the bulk fermentation phase. Let the machine mix and knead; then remove the dough and put it in a clean bowl to bulk ferment in the proofer. (Though the Ank bowl will fit in the B&T proofer – it might be harder to tell how much the dough has risen in it.)
- Consider using the dough hook with the Ankarsrum to get started; it kneads similar (but much better) than the KitchenAid. Eventually, move on to the roller and scraper; its kneading is efficient and doesn’t use as much friction on the dough. With time and practice, you’ll get used to it.
- Always use the dough scraper (even if you’re using the dough hook and not the roller).
- For high hydration doughs, use the roller (it’s good with very wet doughs). But if the bowl starts rocking, then you probably have too much flour and you should switch to the dough hook.
If you have preconceived notions of how a mixer's action should look, it may not look like the roller is working, but it is, and it reaches the same degree of gluten development in less time than the KitchenAid. The roller does a lot of unseen work; toward the end of gluten development, the action will include stretching from the scraper while twisting and squeezing. One way to help understand how well it mixes is to add a bunch of seeds to the dough after you've mixed it for a few minutes. In the Ankarsrum, it doesn't take long for them to be evenly mixed throughout the dough; whereas it takes much longer in the KA, and sometimes they don’t get fully incorporated and will need hand mixing.
Tip #3: The dough will develop and look different because the Ankarsrum is engineered differently than a planetary mixer like the KitchenAid. If you are frustrated trying to learn the Ankarsrum, forge on! All you need is a short period of adjustment until you get used to it. Be patient and read the Ankarsrum manual carefully.
- After mixing, the dough tends to be a bit sticky, but it’ll become beautifully soft and stretchy after a couple of stretch-and-folds.
- The Ankarsrum is engineered very differently from the KitchenAid. You don’t have to watch the machine and the whole dough the entire time. No babying here – just turn on the timer and walk away. You don’t have to worry about overheating the unit or stripping gears, and it won’t move or jump around when mixing at higher speeds.
- Autolyse will reduce mixing time and make the dough much suppler for the roller or hook.
- Depending on the dough, you can let the Ankarsrum mix continuously for 4-8 minutes without worrying about overheating the dough. This means you can really develop strong gluten!
- The 'recipe book' that comes with the Ankarsrum recommends 10-15 minutes mixing time for most of the recipes. Try making a small batch of dough and watch it develop to see at what point it gets to where you like it.
We are often advised to watch for the dough to release from the sides of the bowl as an indication of gluten development. However, this isn’t a sign you’ll see in the Ankarsrum unless your dough is quite low-hydration.
- When mixing at 2-3 o’clock, you’ll start seeing the dough release from the center of the bowl more and more. You won’t necessarily see the dough looking smooth because of the grooves in the roller.
- It is helpful to periodically stop the machine and do a windowpane test to check for gluten. Do this often when you’re starting out and you’ll start to see what the dough looks like in different stages of gluten development.
- Once out of the bowl, do a letter fold or a few slap-and-folds and you’ll see how smooth the dough actually is.
User Tips
The tension knob on the arm: The arm should be able to swing toward the center of bowl with a light pull. You want the roller to stop just short of the edge of the bowl.
- If the tension knob is too tight: The roller will stay towards the middle of the bowl, and not squeeze the dough against the edge of the bowl as it goes around.
- If the tension knob is too loose: The roller will squeeze the dough so much that it will climb up and over the edge of the bowl.
Positioning of the dough hook: The screw at the bottom of the hook mounting hole adjusts the clearance between hook and bowl bottom. If the hook is too close to the bottom of the bowl, adjust it to the manual's recommendation of 4-5mm (~⅙-⅕in, close to the thickness of a stack of 3 US quarters). Make sure that the dough hook does not touch the bottom of the bowl.
Positioning of the scraper: The scraper should touch the side of the bowl from the bottom to the top, and should rest on the bottom. How low the scraper sits in the bowl can be adjusted by twisting a screw at the bottom of the hole that the scraper arm sits in.
Getting the dough out of the bowl: Use the rigid spatula that came with the mixer, or a flexible, generic dough scraper.
- For stiff doughs: Dust a bit flour on and around the dough, then use quick little scrapes to pull the dough into a ball. You should be able to lift the dough out of the bowl with your hands.
- For sticky doughs: Mist the dough and bowl with water. Lay the bowl on its side and use the spatula to pull the dough together and scoop it onto the bench. Laying the bowl on its side will help with stiff doughs too if hand strength is a problem.
When in doubt, use the dough roller over the dough hook. The dough roller can handle high- and low-hydration doughs, and everything in between. The dough hook is better suited for lower-hydration doughs; it doesn’t move in the bowl, but the spaces in the hook grab the dough in a taffy-like stretching motion.
The dough hook may be more useful for doughs that are 78% hydration or higher. Although it doesn’t rotate like the dough roller, you can move the dough hook back and forth toward the center of the bowl. In general, when the dough forms a beautiful figure-eight pattern around the hook, this means it’s starting to build strength. At this point, work the dough to the desired strength in the machine, or only go partially and use stretch-and-folds for the last stage.
Develop the gluten before adding anything – including salt. Adding the salt and watching the gluten tighten up is one of the better demonstrations of bread biochemistry in action. If adding levain, use the dough hook to mix it in (about 4 min.). The dough will settle to the bottom of the bowl; when it starts forming stringy strands, it's time to add the salt. Continue kneading the salt in for 4 more minutes. The dough will tighten up leaving the bottom of the bowl forming a ball that the hook will knead into a ball of dough ready for bulk fermentation.
Hydration
- Hydration is the sum of the weights of the liquids (water, milk, eggs, oils (not fat, e.g. lard, butter) divided by the weight of the flour.
- In general: less than 60% is low; between 60 and 70% is medium; and over 70% hydration is high.
- By touch, low hydration feels dry, medium hydration feels tacky and high hydration is sticky. Different grains will have different tells.
Use the roller and scraper for:
- Normal doughs up to 4 kg: use the roller and scraper.
- Heavy doughs (e.g. whole grains, lots of nuts or grains, etc.) up to 2.5 kg (5.5. lbs)
Your mileage will vary, so use these metrics as a starting point. Above the weights indicated, switch to the hook and scraper.
Dough hydration shouldn’t be affected by different mixers. If you carefully weigh your ingredients, the mixer just isn’t going to change how “wet” the dough is. The ratio of flour to water is a constant, but the dough itself can look different in different mixers.
- It may take a bit longer to knead a dough with the Ankarsrum, but it’s very gentle with the dough and doesn’t heat it up as much as other mixers (like the KitchenAid).
- If your dough looks “loose,” transfer it to a lightly floured work surface after it's done kneading, then stretch-and-fold it a couple of times. This almost always results in "recognizable" dough that comes together right away.
- You can't judge the dough in the bowl the same way that you would judge a Bosch or KitchenAid dough. Just wait for the dough to form a donut shape, and you're done.
With the Ankarsrum, it’s easier to add in all of the water at once with the flour. Trying to add more water to an already-kneaded dough is challenging: the dough just slides around because the water reduces the friction on the side of the bowl.
Bassinage: When working with high hydration doughs, you hold back a little water, let the machine knead until it develops a window pane, then add the remaining water.
- If you do need to add water for some reason, add it slowly to the center and allow it to fly into the roller from centrifugal force without getting it onto the bowl.
- If you’re using the dough hook, you’ll notice the lack of friction between the dough and the bowl. It will come back eventually, but it will take time to regain the mixing/kneading action.
For higher-hydration doughs:
- Try turning the speed dial up higher (around 3 o'clock position or even 4 or 5 o'clock).
- For a small batch of dough, set the roller 1 in (2.5 cm) from the rim and set the speed to dead slow to make the initial mix. In about three minutes, it should be well mixed. Let rest for 5-10 minutes to let the flour fully hydrate. Then restart the mixer and raise the speed to medium-low (dial turned to 2-3 o'clock).
How to Use the Dough Roller & Scraper
Tip #1: Always, always, always add liquids to the mixer bowl first, no matter what the recipe says. if you add dry ingredients first, you may not be able to hydrate all your flour.
- Add the dry ingredients a little at a time to the liquids. (Example: Warm water first, then the yeast; mix on lowest speed and let sit for the yeast to bloom before adding the flour a little bit at a time.)
- Start with the roller against the side of the bowl. Start adding the flour. Once you’ve added about half of the flour, turn up the speed slightly.
- Put salt and yeast at opposite ends of your recipe. Bloom the yeast first, then add the salt in with the flour. (Or if you use instant yeast added in with the flour, add the salt to the water.)
Tip #2: Two things are important when mixing: the spacing of the roller from the bowl's rim, and the speed.
- Spacing is primarily dependent on the amount of flour. For one or two loaves, space at one inch (2.54cm) or slightly more depending on hydration; but that's the ballpark figure.
- Speed is a more variable target, but a good starting point is medium-low, the knob turned to 2:30 o’clock. If the roller arm is banging or the mixer is trying to walk off the table, your speed is too high and/or the spacing is too little. You won’t need much higher speed than the 3:00 o'clock position for the dough roller; you don’t want the dough to smack around the bowl and slam into the scraper.
- Consider taking the temperature of your mixed dough. It should be 77-80°F. Start mixing at a med-low speed for, say, 4 minutes or so, moving to a higher speed for a final 1-2 minutes.
- The mixing time depends a lot on the amount of enrichment. Doughs with milk, sugar, fat or eggs need more kneading to give the same gluten development than do lean doughs.
Example: A Viennese style sandwich bread (65% water, 6.5% DMS, and 10% butterfat) requires 10-12 twelve minutes at 2:30 o’clock speed. A lean dough at the same hydration and speed would be ready to ferment in three minutes or so.
- Initial mixing is almost always 2-3 minutes at dead slow with proper spacing. The exceptions are very stiff doughs like bagels and pretzels. After mixing, let the dough rest for a while to even out the wetting of the flour.
Tip #3: Adjust the position of the roller as needed. The placement of the dough roller and the speed of the mixer affect how gentle or aggressive the kneading is.
During the initial mix (before autolyse): Move the roller towards the center for a second or two and let it move back (the arm is free to move). Do this several times so the roller can help pick up the dry flour and mix it into the wet ingredients.
If ingredients are bunching up together unmixed in the center of the bowl: Push on the attachment arm to move it side to side, or to the middle of the bowl as needed to incorporate the ingredients.
Depending on the type of dough and volume of dough, change the roller’s position:
- For small batches of dough or for silkier higher-hydration doughs = the dough roller should be closer to the bowl edge
- For large batches of dough or for stiffer lower-hydration doughs = the dough roller should be farther away from the bowl edge
Why it’s important to adjust the roller position: You want the roller to apply gentle pressure to the dough as it moves between the roller and the inside edge of the bowl. The dough gets kneaded against the side of the bowl while the scraper picks up and folds the dough; just like hand kneading. You don’t want the arm jostling back and forth as the dough moves. Move the arm to where it doesn’t jostle. (Remember: the lower the hydration, the greater the banging; e.g. pizza dough.)
- Try 1.5 inches to start with. It will vary depending on how dense and wet the dough is. Denser and dryer doughs will need more clearance.
- Start with the roller touching the side of the bowl. A small loaf won’t need much adjustment, if any. A larger loaf or batch of dough will need adjustment. Watch it for a few minutes as the dough starts to come together, and adjust the roller’s position so that the dough does not come close to being squeezed all the way up the side of the bowl. If you have a lot of dough, without this adjustment, the roller will squeeze the dough up the side of the bowl, and eventually some if it will come out the top.
- Once the dough is starting to get shaggy, keep an eye on the dough and move the roller closer to the center of the bowl. Continue to add the rest of the flour, then slightly increase the speed.
If the roller is banging against the bowl: Adjust the roller out from the bowl or slow the machine's speed. Some of the banging may come from the dough slapping the scraper. The scraper plays an important role in kneading. One of its functions is to turn the dough a bit so that it goes through the roller's scallops at a slightly different angle each time around. It sometimes looks as if nothing is happening, but simply going through the roller squeezes the dough.
Very small changes in the roller position will change how the dough behaves:
- Close to the bowl edge – for smaller batches of dough (e.g. 400-600 grams), the roller stretches the dough and slaps it against the scraper (kind of like a slap-and-fold).
- A little more towards the center of the bowl – a ball of dough can form, with one edge of it stuck to the roller and the bottom being twisted in center of the bowl
- Even more towards the center – the dough looks more like a doughnut, with the roller in the middle (*Note: If the entire dough ball gets centered and doesn’t touch the scraper or the roller, just pull the roller into the center for a second so it can grab the dough and start kneading it again.)
Tip #4: A few times during kneading, you may notice a small amount of dough on the back side of the scraper. Use a spatula to knock off dough from the back side of the scraper. Or, while the machine is running, pull the scraper away from the side of the bowl; this lets a larger amount of dough go behind the scraper so it takes that small blob of dough with it.
Tip #5: Move the scraper back and forth to mix in any inclusions once the dough has come together.
Tip #6: If your recipe calls for butter, make sure it is very, very soft first (around 75-90°F). Hard, cold butter will break the beater gears.
There are a few different ways you can mix in butter:
Method 1: Chill the dry ingredients and the butter. Cut the cold butter into small cubes (like 10 mm cubes) and then cut it into the flour as you would with pie crusts or biscuits. Add the dry ingredients to the wet while mixing.
Method 2: Soften or melt the butter and mix at a medium-high speed with the other wet ingredients. (To soften, try cutting it up into pats and place it in a proofing box at a warm temperature, like 82°F).
Method 3: To use the roller, try holding back some of the liquid (bassinage), developing the dough, then adding the butter slowly. After everything is incorporated and the gluten is developed, slowly add the remaining liquids.
Method 4: Soft, warm butter may smear around and coat the inside surface of the bowl, resulting in a loss of friction that makes it challenging for all the butter to be fully incorporated. Try patting a chunk of butter, not too thickly, on the surface of the dough and pull a flap of dough over it to encase it. Then turn the mixer back on, starting slowly but steadily increasing the speed as tolerated until the butter is fully incorporated.
Method 5: Grate the cold butter if you need to add it in colder than room temperature.
Basic Mixing Method
1. Liquids first: Add your liquids in the mixing bowl first (e.g. levain, water). Combine your dry ingredients (including salt and yeast) in a separate bowl.
- When premixing liquid ingredients, do so with the roller against the rim and run at high speed.
- Mix your water, milk, juice, eggs, oil, your wet starter or poolish somewhat vigorously. If you include yeast in any form with the wet ingredients, mix with the speed set high for just long enough to aerate the mix (oxygenation helps yeast to be more reproductively frisky).
- For poolish, mix it in the water as you run the mixer at a high-ish speed.
- With firm preferments like biga, pat it out and cut into small <1" squares, coat in flour and stir into the dry ingredients. From there, it is the same as with a liquid starter.
2. Install the roller and scraper: Transfer the bowl to the mixer and install the roller and scraper. Turn on the mixer on low speed (2 o’clock position). Let the roller run against the side to get the water and levain mixed.
*Note: Never change between the roller and dough hook midstream in a recipe unless it's your first time making it and need to adjust. If the arm is swinging back and forth from a too dense dough, change to the dough hook and make a note in the recipe. The hook might be inefficient at the start of a recipe where the yeast is being mixed with the liquid, but that changes rapidly after dry ingredients are added.
3. Add the dry ingredients: Adjust the speed to dead slow and adjust the roller to ¾" to 1". Quickly add most of the flour at the beginning; don't hold back much, if any, from the initial mix. As the mixture gets thicker with the added flour, adjust the roller so that it’s about 1 inch from the bowl’s edge.
- As the dough comes together and goes through the roller, watch and adjust the roller’s position as needed so that it does not squeeze the dough up over the edge of the bowl.
- If the mixer is trying to walk or the arm/roller is slapping against its stops, you are running too fast or the roller spacing from the rim is insufficient.
4. Initial mix: Mix for 1-3 minutes until the flour is fully wet and ragged. When you first mix the dough, it helps to push the roller to the middle and then release it a few times, to make sure it is incorporating everything in the middle. At this point, you're trying to get a shaggy mass for autolyse, but be sure to let it run longer than a traditional mixer since it's a great deal gentler.
5. Autolyse: Take off the roller and scraper, keep them in the bowl, and then put the lid on the bowl; or, if you want to keep the roller and scraper attached, find a shower cap that will fit over the bowl and the rear of the machine. Allow the dough to sit for 30 minutes to 1 hour. (During this time, your dry ingredients are hydrated, making mixing much more efficient.)
*Note: If you use a preferment, poolish or wet starter, or make enriched breads, you don’t need a long autolyse; a 5-10-minute rest to allow the flour to absorb the liquids is plenty.
6. Final mix: Add the salt and knead for 4-5 minutes to make sure it’s incorporated.
7. Kneading: Knead at low-medium speed (2:30 or 3:00 o'clock) to get a smooth dough. You’re looking for the dough to go from a rough shaggy appearance to getting a smooth exterior. The dough should consistently form, roll and reform in the bowl. When you go to take the dough out of the bowl, it should come out in one mass with nothing stuck to the roller.
- Do not use low speed with the roller after adding dry ingredients as it defeats the action of the roller, bowl, and scraper to do so. The mixer requires centrifugal force to work and that only happens when the bowl is spinning rapidly.
- The knead time will vary according to the degree of gluten strength your bread requires. For example, 3 minutes is plenty for most lean breads, while enriched sandwich breads may take upwards of 10-15 minutes.
- Use the hook only for large (exceeding ~3 kg) batches, though really stiff doughs may benefit at smaller sizes say 1.5 kg of bagel dough.
- The manual's recommendations are very good; trust them. It doesn't always look like it's doing much, but there's a lot going on. It's just different and mostly better than the actions of a planetary mixer.
- For some dough sizes and hydrations, the dough will form a donut around the roller and the roller will stay in the same place, and for others, it will form a more classic lump of dough that gets kneaded each time it goes past the roller, and the roller will go in and out with each rotation. Both seem to work as well, just look different.
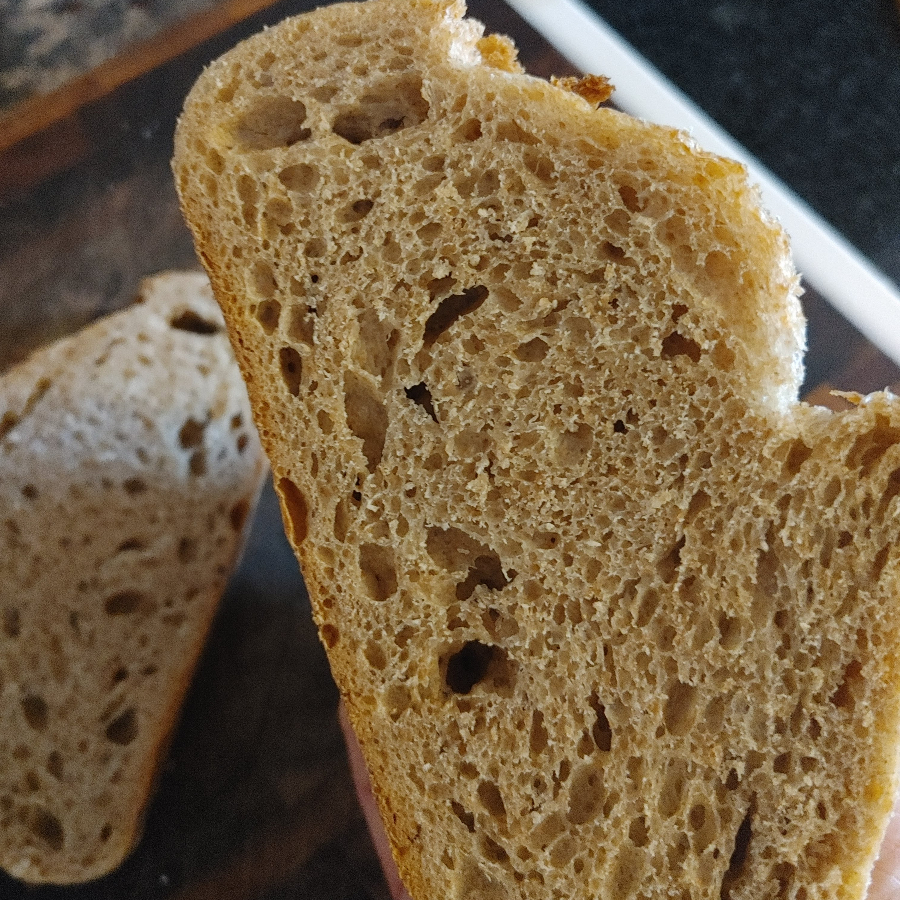
*Note: 60-80% hydration dough takes a while to develop. Watch the dough – it is fascinating to see the gluten as it pulls off the roller! This should take about 15 minutes.
- Low hydration dough – around 3 minutes
- ~70% hydration dough with a fairly strong flour – 6 to 7 minutes
- High hydration (80-100%) dough – 12 to 18 minutes
8. Bench rest: When the timer goes off, use a bowl scraper to gather the dough and lift it out of the bowl (rather than pour and scrape). This helps keep the dough from gathering under the lip at the top of the bowl, which can be hard to clean. Set the dough on a countertop under the mixer bowl lid.
9. Gentle folding: Do a stretch-and-fold in 20 minutes and a second or third in 30-minute intervals as needed. Then transfer to a clean container and cover for bulk fermentation.
Mixing Tips
Remember: The Ankarsrum is a gentle worker. Speed isn’t everything!
Keep in mind that you're not mixing for time, you're mixing to achieve a particular dough consistency. When the gluten is appropriately developed, stop. If you're not sure, stop early and do some extra folds during the bulk phase if needed. Machine mixing could affect your bulk time if your dough is more or less developed at the end of the mix, the same as if you over- or under-mixed by hand or with any other machine.
Try and stop thinking about using time as a dough development cue. You need to mix until your dough is developed to the degree you want it regardless of whether that takes 3 minutes or 30. If you crank the speed all the way up, you could have a windowpane in a few minutes, but it might take 30 minutes on the first speed. Or, it might take 10 minutes using all-purpose flour but 5 minutes using strong bread flour. It's all relative, and the ingredients factor in too.
You have to make some judgment calls, but trust your senses and it will be alright. Here are some suggestions to help you make those judgments:
You need to know the degree to which you want your dough developed. The formula might say "mix to full development" or maybe "Mix to windowpane" or "Mix to medium development." If you don't really have a sense of how well-developed your dough was when you used to hand mix it, hand mix the dough again and take note of the dough's appearance: Does it hold its shape, is it firm, does it spread out, is it shiny? Then, tug on the dough to get a sense of its strength. Then try to pull a windowpane and see how the windowpane looks. Write down your observations, then refer to your notes and try to achieve those same qualities with the mixer next time you bake.
You can hold back some water when you mix your final dough (bassinage). Some bakers do this as a matter of routine because how much water your flour can hold varies from day to day depending on many factors including the humidity. Add in the withheld water a bit at a time if you believe your dough will tolerate it. You may need to reduce the mixer speed when you do this but if you just add a little bit at a time, it should be fine.
Take notes when you mix: what speed you were using, how long at each speed, what the dough consistency was like at various stages. (You can turn the mixer off and check the dough whenever you want.) Refer to those notes the next time you bake and adjust accordingly. Do that every time you bake and you will soon hit upon the sweet spot for that particular dough. If you feel your doughs end up a little over- or under-developed, make a note of it so you can adjust the time or speed next time.
To incorporate ingredients (including autolysed dough): swing the roller arm away from the side bowl and more into the center to capture any dough or loose ingredients that are not being taken up. You can also do this with the scraper. Keep the speed low to keep water and/or flour from splashing out and all over your kitchen. In most cases, you will incorporate ingredients at a much slower speed than the actual mix speed.
Start mixing slow until you get more comfortable with the machine. You can always mix a little longer if you need to, but once you over-develop the dough (which is easy to do on a fast speed) you can't undo it. For starters, try mixing with the 4th or 5th box at the top of the speed dial to help you learn how fast or slow the dough comes along at a particular speed. If you adjust the speed, do it in small increments and write down the times and results. Check the dough as often as necessary.
How to Use the Dough Hook
Method:
1. Start with the hook and scraper, add the liquids and stir them around a bit, then dump the rest of the ingredients in the bowl, sans the salt. Start on a low speed and let the ingredients incorporate to shaggy.
2. Remove the hook and scraper, sprinkle the salt on top, and put the bowl cover on while the autolyse takes place (20-30 minutes). When the autolyse time is up, replace the hook and scraper, then start the final mix on a slow speed again.
3. During the final mix, the dough to climb up the hook all the way to the top arm, so have a dull knife on hand to release the dough from the top of the hook. (A spatula will push the dough down but the knife actually slices the dough and makes for a better release.) Scrape the dough off the hook and the mass should fold around a time or two before it climbs back up again. Repeat often.
4. Once things come together the scraper may no long be needed, and may become an impediment to the kneading process. Pull it out and see if you really need it. You will likely need to raise the speed to keep the kneading progressing and you may need to move the hook assembly to the middle or left side of the bowl. Keep an eye on the dough to ensure it doesn’t get over-kneaded
Additional Tips:
- Use the dough hook and scraper for the initial mix to start the autolyse. Run it first at high speed, then slow down while adding the flour as it thickens. Take out the hook and let it autolyse for an hour or so, then put in the roller and scraper, add salt and levain, and mix fairly slowly for 8-10 minutes.
- Add the salt last, after the gluten has been developed. The dough will firm up quickly once the salt is added (5 seconds or so).


 that I can bake two loaves in the air fryer at once whenever I feel like it.