Ingredients matter, but nearly as important as the ingredients you put into a loaf of bread are the techniques you use. Appropriate mixing, folding, and shaping results in a beautiful loaf with an uneven crumb and a crispy crust. Poor mixing and shaping can lead to a loaf that more closely resembles a brick than something you want to eat.
This is the part of baking that is intimidating to many new bakers, and it doesn't need to be. Please take a few minutes to read this section and begin to learn what the dough should feel like and how to get it feeling like it is well developed. Many of us started baking by using a bread machine or a Kitchen Aid stand mixer to mix and knead the dough. While this works reasonably well, and other methods are described below, you will learn more quickly how the dough should feel in the different stages of development if you use the tools god gives us, our hands. For thousands of years humans have made good bread using only a crude bowl and their hands as tools. While commercial bakeries don't have the time to hand mix and shape thousands of loaves daily, much of what is wrong with commercial bread starts here in the first phase of bread making.
Mixing: Start by gathering all of the needed ingredients for the recipe. If you are making a basic French style bread that uses just the basic four ingredients (flour, water, salt and yeast), measure or better, weigh each item carefully ahead of time and have it in front of you ready to use. This might seem like over simplifying this procedure but I can tell you from experience you will forget the salt or pour all the water in without having measured it or can't remember some additional ingredient, if you don't get organized, first.
In a large bowl, add all of the dry ingredients first and stir or mix them together well. This means that Instant Dry Yeast and salt are added to the flour and any other dry ingredients you may be using with your recipe. NOTE: If you are using Active Dry Yeast, the directions for re activating this type of yeast call for adding the yeast to a cup or so of the water (warmed) needed for the recipe 5 or 10 minutes ahead of mixing the dough. If you are using Cake Yeast, crumble it with and into the flour using your fingers.
Continuing; Next, add all of the water and begin combining the flour into the water. You can use your fingers, (yes it will be a mess but it is supposed to be) or a spoon to accomplish this first mixing. Wood, Stainless Steel, Plastic, any kind of spoon or bowl will do fine. When the mixture is mostly a shaggy mass and looks like most of the dry flour is combined into the mass, you can stop, clean your hands over the bowl and cover the bowl with a plastic bag or a damp towel or plastic wrap. Plastic grocery bags are my favorite. Wait at least 15 minutes and as long as an hour for the flour to absorb the water. When you come back to the mix, it won't feel anything like it did after first mixing. Scrape everything you can onto a clean counter and quickly clean and dry the mixing bowl.
Kneading or Developing: This is the fun part of bread making. You are starting with a mixture of flour, water, salt and yeast. At the moment it is just those things put together in a bowl. We need to develop these things into something more, a smooth dough. The best way to show you or tell you how to accomplish this is with a video. There are many video clips that show similar techniques but this one I like the best. Richard Bertinet has produced an excellent video [1] with Gourmet Magazine that shows the mixing technique above, and the slap and fold kneading technique that many of us now use in some form or another. I urge you to watch this video and learn to do this maneuver with the dough. As you will see in the video, the dough gradually comes together and becomes smooth and flexible. Bertinet is making a sweet dough with eggs and sugar but the method works on any kind of dough or bread type. Finish by rounding and putting tension on the outer skin of the dough and forming a ball.
Once the dough is well developed, smooth and rounded, lightly oil the now clean mixing bowl with a few drops of oil on your fingers (or lightly spray regular cooking oil into the bowl) and place the dough into the bowl, seams down and roll the ball around to coat all the surfaces. Cover the bowl as before during what is called the Primary Ferment. During the primary ferment, the dough will expand in volume as the yeast begins to eat the sugars in the flour and create Carbon Dioxide. Your well developed dough will trap those CO2 bubbles and form pockets that will become the air pockets in the bread, making it lighter.
NOTE: For Whole Grain and Multi-Grain breads, It is advisable to not try and develop the dough entirely by kneading. The sharper grains will cut the gluten strands and allow the CO2 gas to escape. A Stretch and Fold will often work as well, done during the primary ferment. A link to this procedure is provided below.
You can always come back to using some appliance to mix and knead your dough. In fact some doughs are somewhat better suited to machine mixing, but not many. You can easily produce wonderful bread in the manner of our ancestors.
Once the dough has doubled in volume you are ready for the next step, Shaping [2]
There are a number of ways to develop dough. The easiest is probably to put it in a KitchenAid-type mixer. About 8 to 10 minutes of mixing the ingredients in a KitchenAid on low speed will generally do the trick.
There’s no need to buy a KitchenAid, though, to make good bread. Here are three ways of developing dough by hand.
Traditional Kneading: Use this method when the dough will rise fairly quickly (1-2 hours for the first rise) or if I’m in a hurry to get it developed.
First, mix the ingredients with a spoon until everything is hydrated. Cover and wait about 15 to 20 minutes – this way, you’ll let the water do most of your work for you (if you don’t have time for this step, feel free to skip it – you may have knead just a little more, though). After this waiting period is done, scrape the dough out of the bowl onto a smooth surface, and push on the down and forward with the heels of your hands. Fold it up back on itself, give the dough a quarter turn, and repeat.
Knead for about 4-5 minutes, and then cover it. Let it rest about 5 minutes, and then knead once again for 1-2 minutes. It should be well developed at this point.
One way to test dough development is to tear off a small chunk and then gently stretch it. If the dough is ready, you should be able to stretch it thin enough so that it becomes translucent. This is called the “windowpane” test.
Stretch and Fold: This method adds about an hour to the rise of an ordinary yeasted loaf, but when you’re working with sourdoughs or yeasted breads that have a long rise anyway, it doesn’t make that much difference. And it takes hardly active time at all – just a few minutes total. Really!
Mix the ingredients with a spoon until hydrated. Cover and wait 30 minutes to 1 hour. After this rest, scrape the dough out of the bowl and stretch it to about twice its length, if possible. For the first fold, the dough will still be pretty shaggy, so only go as far as you can without ripping. Fold the dough like a letter, give it a quarter turn, and then stretch and fold once again. Place it back in the bowl and cover.
Repeat this folding process twice more with 20-30 minutes in between each one.
More information and a video may be found here: http://www.sourdoughhome.com/stretchandfold.html [3]
Stretching and Folding Illustrated: Here is the Stretch and Fold method illustrated by Mebake (Khalid) [4]. He has artfully depicted the process of keeping the dough in the bowl while developing the gluten and incorporating air into the dough. This easy to do technique is employed by many members here and allows the baker the opportunity to develop the gluten in a bowl during fermentation with little effort and no mess. Once you understand how this works, I'm sure you will use it every time.
French fold: This is a great, quick method for developing dough, but it requires a relatively long rest after everything is hydrated, so it’s most appropriate for doughs with a long bulk rise.
Once everything is hydrated, cover and let the dough rest for a least an hour. Remove the dough from the bowl onto a smooth surface. With one hand on either side of the dough and your thumbs underneath, stretch the dough parallel to your body while simultaneously folding it in half along its length with your thumbs.
Give the dough a quarter turn, pick it up, and then throw it down onto the surface, smooth side down. Really, smack it down. Stretch it again while simultaneously folding it over with your thumbs, make another quarter turn, and give it yet another smack with the smooth side down.
Do this about 10 times, and you’ll have a well developed dough. If it doesn't seem as developed as you'd like or if it starts to tear, let it rest for 5 minutes, and repeat.
A good video of this technique may be found here: http://www.gourmet.com/magazine/video/2008/03/bertinet_sweetdough [1]
An alternative method: that keeps the dough in the bowl and all of the kneading is done there.
I use my fingers and scrape the dough into a single lump and flatten it and then fold it in half, turn it a quarter turn and fold again and flatten it. I continue this for about twenty folds. Often it gets very stiff and needs to rest for a few minutes to relax. As noted the dough will let you know when you have done enough. This stretches the original surface a million times the size it was at the start and assures a complete blending of the ingredients. I use this method because it confines the mess and permits making bread in less than ideal places. See the illustration mentioned above for a pictorial that describes this process.
There is no wrong way to knead bread but some ways are much better than others. Some breads benefit from special kneading and handling and some are very hard to get wrong. Before kitchens and mechanical mixers and tables there were dough troughs and all of the mixing and kneading was done there. You could make bread in a dough trough and bake it on a hot flat stone on an open fire.
No knead bread: For bread mixes that use very little leavening and are fairly wet, time provides the development.
Simply mix everything up until hydrated, cover and go to sleep. Anywhere from 12 to 18 hours later, give the dough one stretch and fold, shape as necessary, and then let it rise a couple of hours until it’s ready to bake. Learning to use a plastic scraper to handle dough in the mixing bowl, as described below, is a big help.
Alternative video: If you are just a little adventurous, Check out this excellent video, provided by Mark Sinclair [5] of The Back Home Bakery. Mark demonstrates folding in the bowl using a plastic scraper over a period of time to develop strength in the dough. This and all of Marks videos are excellent training aids.
For breads that contain butter and sweeteners, I usually bake them at 350 degrees F for about 55 minutes to an hour for loaves, and 25 to 30 minutes for rolls.
For “lean” breads, which contain only the basic four ingredients, I bake them at 450 degrees F. Baguettes and rolls bake for about 20 – 25 minutes, while most other loaves bake for 35 to 45 minutes.
An instant read thermometer is a big help in telling when a loaf is done. Stick the thermometer into the bottom of the loaf and push until the tip is in the center of the bread. Breads with butter and sweeteners are done at about 195 degrees F, while lean loaves should be at about 205 degrees F.
For lean breads that are freeform (i.e. not panned), I like to use a baking stone to get better volume and a crisper crust, though you don’t need one – a greased cookie sheet will work just fine. If you use a stone, it needs to pre-heat for at least 45 minutes before baking. When you place the dough on the hot stone, it absorbs a lot of heat very quickly, causing it to spring beautifully in the oven.
You can purchase these at most cooking stores or online for anywhere from $30 to $70, depending on the size and thickness. Mine is one-half inch thick and measures 14.5” by 16”. It’s plenty big enough and works great.
If you’re feeling frugal, many people I know prefer to use unglazed quarry tiles, which can sometimes be had from home supply stores for much less than a baking stone. I haven’t used them, myself, though.
To get the bread onto the stone, either use a baker’s peel or the back of a cookie sheet that has been well dusted with cornmeal or semolina flour. Then, slide the bread off its back and onto the stone with a quick jerk.
Steaming: A crackling, crunchy crust requires more than just a hot oven. It also needs steam, and that’s not easy to do in a home oven. But it can be done. Here are a couple of methods:
• The Cast Iron Pan Method: Under the stone, even on the bottom of the oven, if you like, place a cast iron pan and let it heat up along with the stone. Not one you like to use day-to-day, because this process will rip the seasoning right off.
Just before you put the bread in the oven, boil some water. Get a towel and, after you open the oven door, cover the glass of the oven door with the towel. This will prevent water droplets from hitting the hot glass and shattering it (ask me how I know.) You may also want to shield the front of the pan with aluminum foil so that droplets don’t jump out of the pan onto the glass and crack it (again, ask me how I know).
Load the bread and dump one cup of boiling water in the pan. WEAR MITTS WHEN YOU DO THIS. Close the oven door, and let it bake. About halfway through the bake, remove the pan so that the bread can finish in a dry oven.
• Covered Cooker Method: In this method, do not use a baking stone. Instead, place a cast-iron Dutch oven (enameled and non-enameled both work fine) or a clay cloche (Sassafras makes a good one – you can find them at Amazon or King Arthur Flour for about $50) in the oven and let it heat up for 45 minutes. Pull out the oven rack, take off the lid, plop your bread into the bottom, score it quickly and replace the top and the rack.
About 15 to 20 minutes before the bake is done, remove the top so that the bread can finish in a dry oven.
The covered cooker captures the steam given off by the dough, and so mimics a wood-fired brick oven. Unfortunately, this method only works for round loaves (though Sassafras also makes a 14 1/2 x 5 1/8 inch clay cooker which works for batards).
Breads should cool for about an hour on a rack (or something else that will allow air to circulate underneath) before slicing.
Lean crusty loaves can be stored on the counter, cut side down. Really, this works just fine, though you can also store them in a paper bag and cover the cut side with foil -- this will stave off drying out a little longer. Lean yeasted loaves will keep for a day, maybe two, but not much longer. Sourdoughs, on the other hand, will keep for 4-5 days.
Loaves with sweeteners and / or fats should be stored in a plastic bag or an airtight container at room temperature. They'll keep for 3-4 days before they begin to stale.
DON’T store bread in the refrigerator. While this will prevent the bread from going moldy, unfortunately, bread goes stale very quickly at temperatures in the 30s and 40s.
Bread freezes very well. Let it cool to room temperature, and then wrap it in foil or place it in a plastic bag. You can either let it thaw out on its own (which takes half a day or so), or wrap it in foil and bake it at 350 degrees for about 45 minutes.
What is scoring?
“Scoring” is the word used to describe the cuts made in a loaf of bread before it is baked. Some breads are not scored. For example many loaves baked in pans are not. However, almost all free-formed “hearth breads” are scored.
When is scoring done?
Scoring is generally performed just prior to loading the loaves in the oven. French rye breads (pains de siegle) are sometimes scored right after shaping, before proofing.
Why are breads scored?
Intentionally creating a weak spot on the surface of the loaf prevents the loaf from bursting at weak spots created during shaping.
The type of scoring performed controls the direction in which the bread will expand during “oven spring.”
The pattern of cuts made, the angle at which they are made and the depth of the cuts influences the rate of expansion and the formation of an “ear” - a raised flap of crust at the edge of a cut.
The pattern of cuts can create a pleasing visual pattern on the surface of the loaf. While there are some very traditional patterns, for example for baguettes, the baker can use the scoring pattern to identify the type of bread or to create an unique pattern that identifies the loaf as coming from his or her oven.
The effects of scoring on loaf shape are discussed in more detail below.
What do you use to score bread?
The blade used to score bread is often referred to as a lame (pronounced “lahm.”) This is simply a French word with means “blade.” Breads may be scored with straight or curved razor blades, either held in the hand or mounted on a handle. Scoring may be performed with other sharp, straight blades, even with a straight razor. Some bakers prefer serrated blades.
For some types of scoring, a straight blade is preferred. Straight bladed knives are preferred for cuts made with the blade held perpendicular to the loaf's surface. This sort of cut is generally used for round loaves (“boules”). For other types of scoring, a curved blade works better. Curved lames are generally used for long breads like baguettes which are scored with cuts parallel to the long axis of the loaf.
Video on Choosing a Blade: http://youtu.be/vF7eFluzHXc
How are the cuts made?
The scoring stroke should be firm, rapid, smooth and decisive. For the beginner, it may help to take “practice swings” or to visualize the movements and totally focus one's attention before making the cuts. Understanding the functions of scoring and the effects of the variables described can help, but there is no substitute for experience. In this respect, scoring bread is no different from an athletic skill or any other art or craft. (Tourist: “Please, sir, can you tell me how to get to Carnegie Hall?” New Yorker: “Practice, practice, practice.”)
The cuts should generally be 1/4 to 1/2 inch deep. A wet, sticky dough requires a more shallow cut than one would make in a dryer dough.
Scoring a boule (round loaf)
The angle the blade of the knife makes with the surface of the loaf is important in determining how the cut will open up. If you want the cuts to spread equally from the cut and to open quickly, as is traditional with round loaves (boules), the knife should be held vertically – at 90 degrees to the surface of the loaf.
Video on Scoring a Boule: http://youtu.be/gnL7mvR9wFg
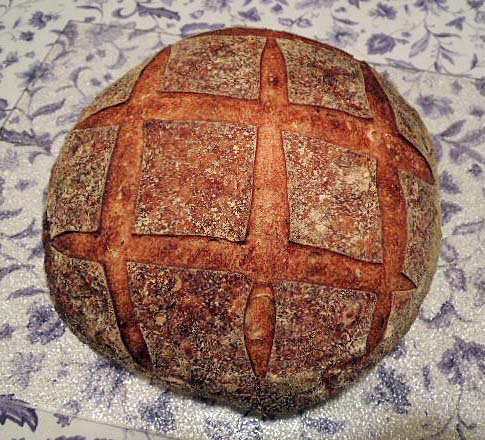
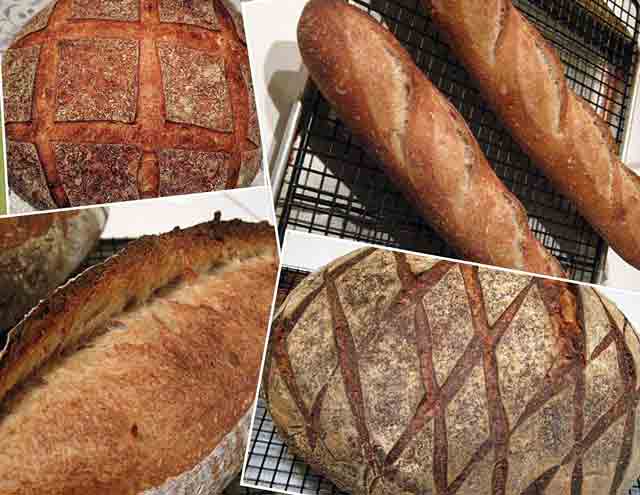
Besides the “tic-tac-toe” pattern, boules can be scored with diamond patterns, simple crosses or much more elaborate and creative patterns.

Miche scored with a diamond pattern
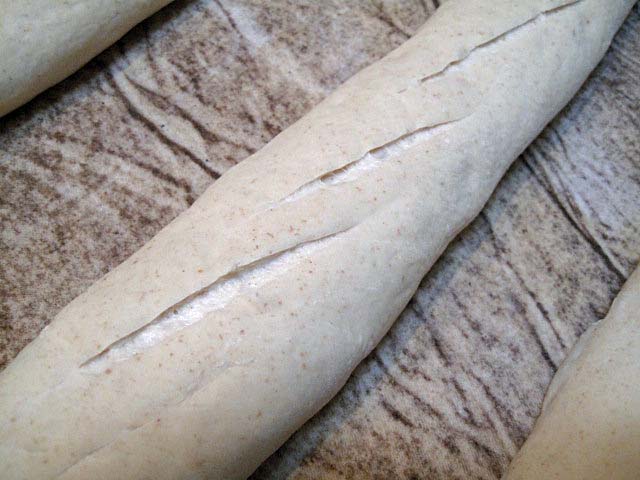
Scoring a long loaf (bâtard)
If you want the cuts to spread more slowly and create an “ear,” as is generally desired with long loaves (baguettes and bâtards), the knife blade should be held at a shallow angle with the surface of the loaf, at about 20-30 degrees or so. Many find using a curved blade helps make this type of cut. The blade is held with the concave surface facing up (away from the loaf). A flap of dough is created that will lift up to create an “ear” as the loaf expands and, by lifting gradually, slows the expansion of the loaf. This prolongs the time during which new areas of dough are exposed to the direct heat of the oven and results in greater overall expansion – a larger “bloom.”
Video on Scoring a Bâtard: http://youtu.be/UC5HLCWAyMo
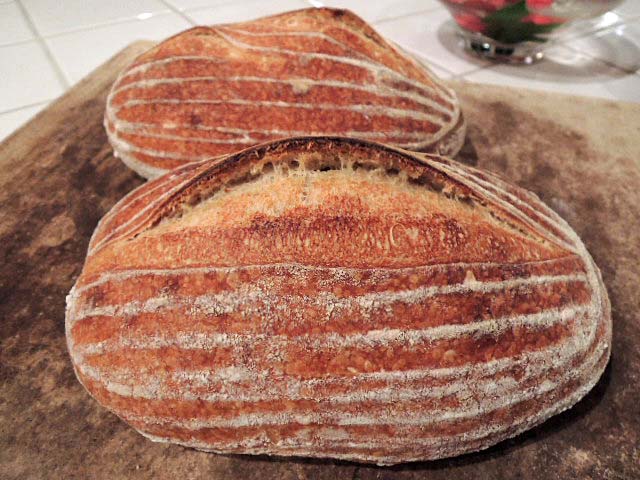
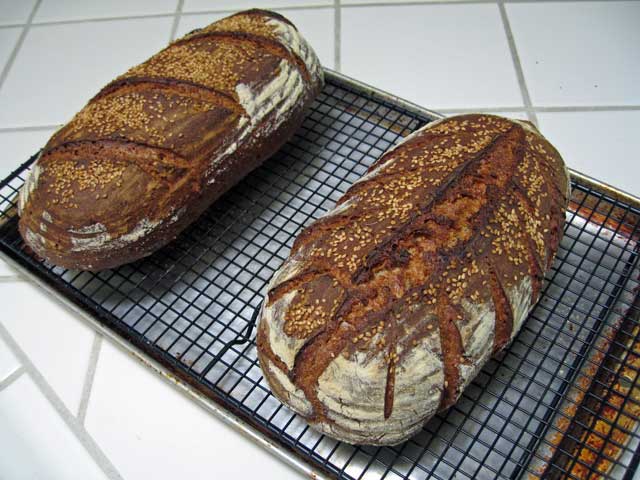
Bâtards
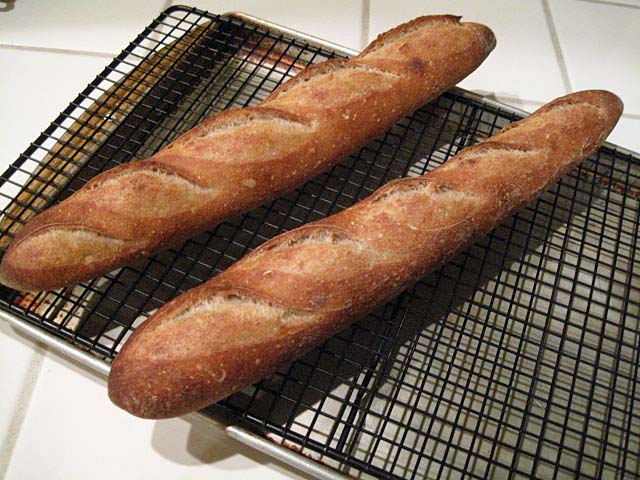
Baguettes
The effect of scoring on loaf shape
Michael Suas, in his book "Advanced Bread & Pastry," provides some information about how scoring patterns influence loaf shape. Scoring is not just to make a visually pretty design on the top of a loaf. It is also how the baker controls the direction in which the loaf expands. This impacts the shape of the loaf cross section (rounder or more oval), the height of the loaf and, for a boule, whether it stays round or ends up more oblong.
According to Suas, long loaves like bâtards and baguettes are traditionally scored parallel to their long axis. This may be a single long cut or multiple cuts that are almost parallel and overlap somewhat (for ¼ to 1/3 of their length, generally). This pattern promotes sideways expansion of the loaf, resulting in an oval cross section when the loaf is sliced.

Baguette showing overlapping cuts, almost parallel to the long axis of the loaf
For breads with high-rye content which have lower gluten and less oven spring, the traditional objective is to encourage a higher rise in the oven spring resulting in a rounder cross section. This is achieved by "sausage" or "chevron" cuts.
"Sausage cut" on the left. "Chevron cut" on the right.
Boules are scored in a variety of patterns with differing effects on how the loaf expands. The common "tic-tac-toe" pattern and a simple cross will direct the expansion upward. More complex patterns like diamonds result in a relatively flatter loaf.
One of most interesting effects is that scoring a boule with multiple parallel cuts encourages expansion at a right angle to the cuts. This results in an oblong loaf shape.
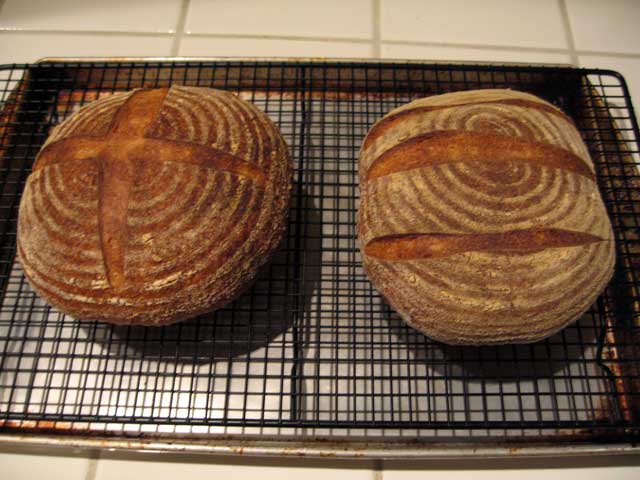
Two boules scored differently. Note the effects of the scoring pattern on the final shape of the baked loaves.
What's the point of an ear? Controlled bloom!
This topic is not about the auricular anatomy of elves (or Vulcans). It's about scoring breads.
Scoring loaves creates a visually pleasing pattern, and it helps control the expansion of the loaf as it bakes.
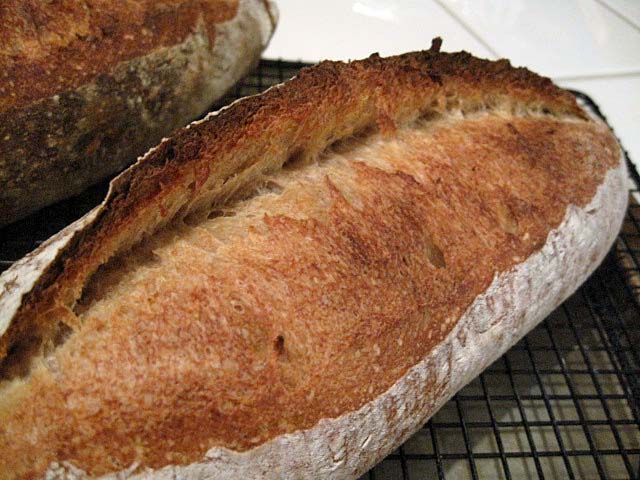
What Suas called "the classic cut" is parallel to the long axis of a baguette or a bâtard. The cut is made with the blade at a shallow angle to the surface of the loaf. The cut should be shallow - about 1/4 inch deep. Paradoxically, this shallow cut results in the flap lifting better than a deeper cut would, thus forming a nice "ear." Hamelman (pg. 80) points out that "a deep cut will simply collapse from its own weight."
The angle of the blade is important. "If the angle is not achieved and the cut is done with the blade vertical to the loaf, the two sides of the dough will spread very quickly during oven spring and expose an enormous surface area to the heat. The crust will begin to form too soon - sometimes before the end of oven spring - penalizing the development of the bread. If the cut is properly horizontal, the sides of the loaf will spread slower. The layer of dough created by the incision will partially and temporarily protect the surface from the heat and encourage a better oven spring and development." (Suas, pg. 116.)
These photos illustrate nice "ears," but they also show that the bloom occurred slowly, as it should. Notice that the color of the crust in the opening has 3 distinct degrees of browning, decreasing from left to right. The darker part on the left obviously opened first and was exposed to the direct heat of the oven for longer. If the bloom occurred too rapidly, it would have a more even coloration.
In summary, in order to achieve an optimal bloom in baguettes and bâtards, one must attend to 3 variables when scoring them:
The cuts should be almost parallel to the long axis of the loaf.
The blade should be held at about a 30 degree angle to the surface of the loaf.
The depth of the cut should be shallow - about 1/4 inch.
Variable shading of the bloomed crust confirms that the desired slow but prolonged opening of the cut during oven spring occurred.
A final word
This tutorial focused on the mechanics of scoring, but the other steps in bread making impact the behavior of the cuts you make and the final appearance of your loaves. In fact, every single step, from your choice of ingredients and their proportions – your formula – to how you steam your oven plays a role in how your cuts will open. Your best looking loaves will result from a series of choices that are mutually dependent, where how you score a loaf takes into account the other choices you have made about the formula, mixing, fermentation, shaping, proofing and baking.
Happy baking!
David
Community member Mebakes has created a few helpful diagrams showing how to shape loaves.
Bread can take just about any shape you desire, from sandwich loaves to mock turkeys. It’s hard to learn how to shape loaves from written descriptions, however. So, instead of writing up how to shape loaves, here are links to YouTube videos that do a good job of showing how it’s done.
Before you shape the dough, you’ll want to pre-shape it first. There are two basic pre-shapes. The first, a basic oval or rectangle, is shown in the sandwich loaf video. The second, a round, is exactly the same as making a round loaf.
Sandwich loaf (Jeff, Aurora and Iris) - http://www.youtube.com/watch?v=Q_3zBaKkxMY
Oval loaf (batard) (Floyd Mann) - http://www.youtube.com/watch?v=pqzRprovXTU
Round loaf (boule) (Fourno Bravo) - http://www.youtube.com/watch?v=I5t-1sJwzFs
Baguette
http://www.youtube.com/watch?v=Idx4QJwcPHA
You’ll want a safe place for your shaped loaf to rise. Bannetons are wonderful for round loaves – you can buy these at King Arthur Flour (http://www.kingarthurflour.com). But you can also take a colander or a large bowl and line it with either baker’s linen (also at King Arthur Flour) or a linen napkin dusted liberally with either white flour or, even better, white rice flour (NOTHING sticks to this stuff – it’s great).
For an oval loaf, simply place the loaf on a dusted linen napkin or baker’s linen and bunch up the cloth on both sides. If you like, you can brace it with glasses on either side to keep it in place.
While it rises, make sure it’s covered so that the surface doesn’t dry out and form a crust.
Links
[1] http://www.gourmet.com/magazine/video/2008/03/bertinet_sweetdough
[2] https://www.thefreshloaf.com/handbook/shaping
[3] http://www.sourdoughhome.com/stretchandfold.html
[4] https://www.thefreshloaf.com/node/22990/illustration-stretch-and-fold-bowl
[5] http://www.thebackhomebakery.com/Tutorials/NoKnead.html
[6] https://www.thefreshloaf.com/user/login?destination=node/23207%23comment-form
[7] https://www.thefreshloaf.com/user/register?destination=node/23207%23comment-form
[8] http://www.thefreshloaf.com/node/24865/shaping-batard
[9] http://www.thefreshloaf.com/node/24998/shaping-boule-illustration
[10] http://www.thefreshloaf.com/node/30405/shaping-sandwich-loaf-illustration