
Benito's 100% Stoneground Whole-Wheat Hokkaido Milk Bread, Almost

I've been intrigued by several recent posts that feature a 100% whole-wheat Hokkaido milk bread, such as this one by Benito [1]. So I decided to try my hand at it. Almost. The "almost" being that I changed it from a sourdough bread to a yeasted bread.
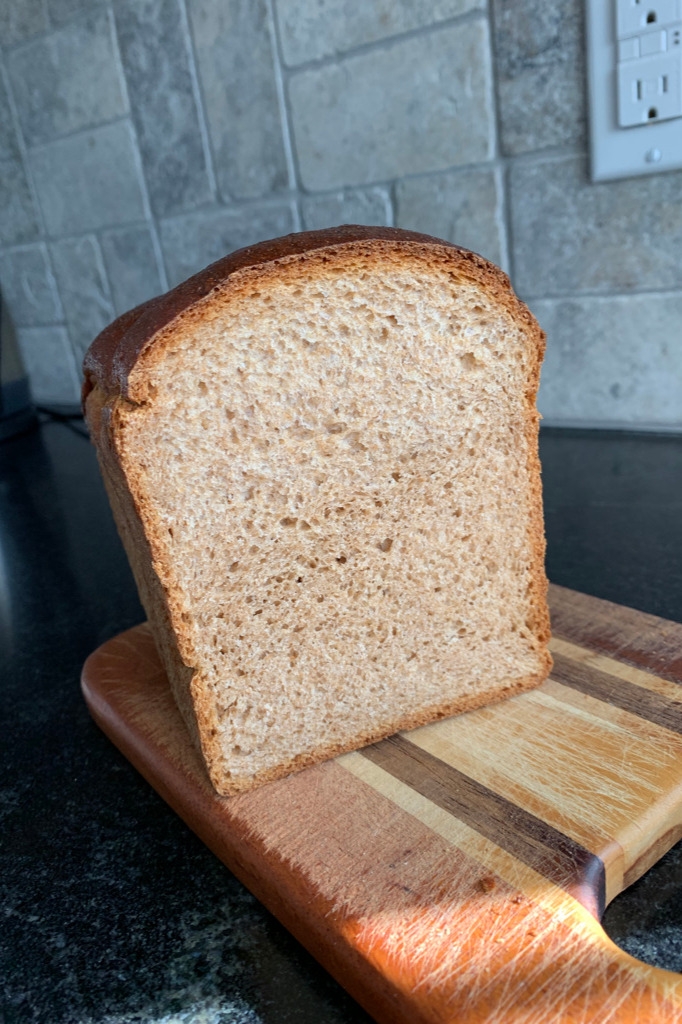
Actually, there were two variations from the bread that Benito posted. First from sourdough to yeast, as mentioned above. Second, I had no vital wheat gluten on hand, so subbed in flour in its place so as to keep the hydration more or less in balance. The second change was the one that concerned me more since I wasn't sure how much the bread relied on the VWG for structure. As you can see in the lead photo, it turned out quite nicely.
Rather than repeating the formula and process here, I'll refer you to Benito's excellent post [1]. My adjustments were quite simple. I moved all of the levain ingredients to the final dough ingredient list, including the flour and water that were part of the 100% hydration starter for the levain. I added 6g of active dry yeast in the final dough ingredients, too, since it was needed in lieu of the starter for leavening the bread. My flour was home milled from hard red wheat. Fermentation times had to be shortened, since the ADY moves quite a bit faster than the wild yeasts in a starter.
The dough was very wet. I realized, too late, that I hadn't followed Benito's advice about reserving some of the milk and had simply added all of it. After a bit of thought, I added some more flour, perhaps 20g or so. It was enough to turn the dough into something manageable but not so much as to require additional salt or yeast. Between the dough consistency and the extended kneading that the bread requires, I decided to let the KichenAid mixer do all of the work. Because I had to stop the machine occasionally to scrape down the dough from the walls of the bowl, I extended the mix duration about three minutes past the recommended time. That developed the gluten in the dough very well. The dough was about 85F coming off the mixer.
The dough was given 30 minutes for bulk ferment; it had expanded perhaps 50%. After that, it was set out in our screen porch for another 30 minutes to firm up. The temperature out there was in the 25F-30F range, so it cooled down quickly. Then I followed Benito's process for shaping and placed each of the rolls in a greased Pullman pan for the final fermentation. When the top of the bread was about 1cm below the pan rim, I started the oven preheating and egg-washed the top of the loaf. A second coat of egg wash was applied just before the bread went into the oven. The bread was baked in the pan and then an additional 10 minutes out of the pan, per instructions. While I don't think the bread required the last 10 minutes to keep the sides from caving in when it cooled, it certainly helped remove some of the moisture. I elected to forego brushing the top of the loaf with butter at the end of the bake.
There's a lot to like about this bread. The finished loaf is about treble the height of the just-shaped loaf, so plenty of expansion between final fermentation and oven-spring. As expected, the crumb is very fine-grained with evenly distributed and evenly sized small bubbles throughout. In spite of its loft, this is a substantial loaf of bread. It isn't what I would describe as airy or cottony. Though it yields easily to chewing, the crumb is firm and moist and feels almost cool in the mouth. You can sense the presence of the bran, even though it is finely ground. The sugar offsets the natural bitterness of the red wheat. It is delicious with just a bit of butter, and toasted.
For a future bake of this bread, I'd be interested in trying an autolyse to see if that might have a positive effect on dough consistency and the ultimate tenderness of the crumb. I'd also like to see how the flavor would shift when using honey as the sweetener. One thing is certain: I will make more of this bread.
Paul