
Toaster Oven Sourdough - BIG SUCCESS
I've come across a few posts questioning what's the best way to create steam in a toaster oven (or counter top oven) because their dutch ovens do not fit in there. I asked myself, "why not start it in the dutch oven, stove top. then finish it in the small oven?" So, this was my experiment.
The tools:
-Lodge 3.2qt skillet/dutch oven cast iron set
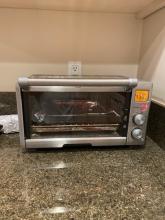
-Breville counter top/toaster oven
- laser temp gun
The bread:
- Whole wheat sourdough (a la Sune / Foodgeek - Beginner's Sourdough Recipe)
"Those were the words... this is the experiment"
First I preheated the Lodge dutch oven top and bottom on stove top on high heat separately (I have a high output stove top, but i think any home stove should do). At the same time i preheated my Breville oven

My goal was to get the Dutch oven close to 500F. Using the laser temp gun I monitored on each side. I found that the sides where heating up higher than the center bottom because of how the burner ring is shaped. That is a good thing for this. I was actually able to get them above 500F.


626F is probably too high.. i let it cool back down a bit. But the plan is to use the deep side as the bottom as it will retain and conduct more heat. I will keep it on stove with low heat to maintain the temperature.
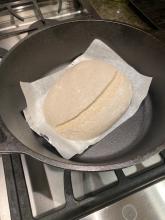

This is the scored dough loaded into the deep side. I've placed a double layer of foil and a parchment under it. my concern is that the bottom might burn due to the direct heating under it. A few spritz of water and the lid goes on.
Both the top and bottom start at 500F. I monitor the temp periodically and adjust the burner as needed.
Start: Top 500F Bottom 500F
5 mins: Top 360F Bottom 380F (increased heat after)
10 mins: Top 290F Bottom 430F (hindsight, this is too much)
15 mins: Top 250F Bottom 390F
20 mins: Top 230F Bottom 390F
Then.... the moment of truth...
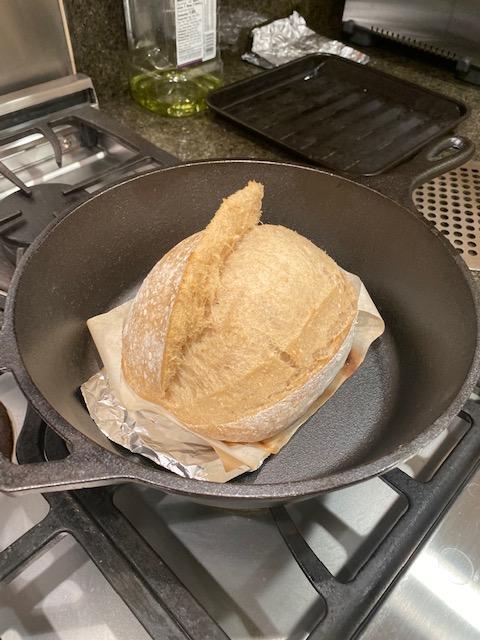
HUGE oven spring! Look at that ear on that guy! Everything appears to be on track. The bottom was looking a little brown but nothing tragic. The problem is fitting it into the small oven with that ear now.
Small oven is preheated to 450F on bake which is the highest it will go. but i noticed that when i set it to 450F, the top heating element goes on as well. I played around with it a bit and concluded that under 450F the top elements do not come on in Bake mode.

Barely fits in there. Just to be safe i put a small piece of aluminum foil just over the ear. Baked for 30 minutes. rotating every 7 minutes or so. at the end of 30 mins, it wasn't quite dark enough yet, so i went on for another 5 with the foil removed from the top.
Here is it:
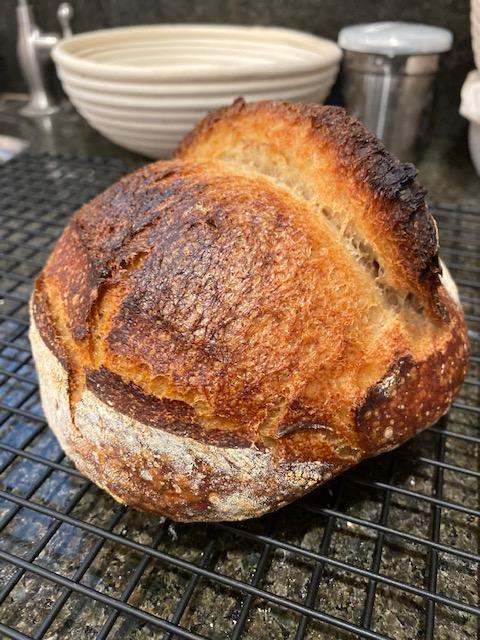
Great oven spring from the dutch oven segment. nice little blisters from the spritz and steam. Good shine. Ear didn't get burnt too much. (I do like that little bit of char). Overall big success!
Only issue I had, and it was my initial concern is that the bottom would burn. it did get a little bit too dark. but certainly edible. Nothing too tragic.

Lesson learned here is that I could have used another layer or two of foil under (i thought about sandwiching a few layers of foil , parchment alternating) and that i shouldn't let the bottom get above 400F on the stove heat. i think 360F is a good goal. I lasered the dutch oven bottom in the regular oven and it reads around 360F range even when set to 450F heat.
As this is an experiment, I baked another loaf in the regular oven inside dutch oven as we do. From the same batch of dough for comparison. Same 20 minute in the dutch oven, then uncovered for 35 minutes.
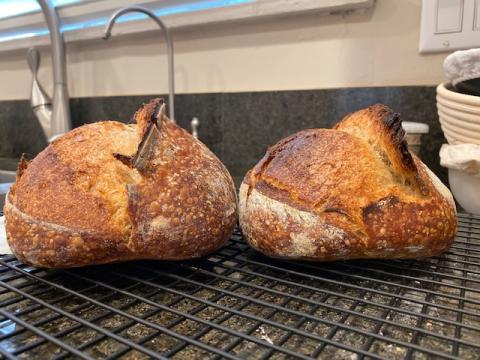
The one on the right is our toaster oven baby (dressed with a little more rice flour). The one on the left in the regular full sized oven. Overall very similar. The full sized oven one seems to have a bit more spring, but not significant. Both attained good color, good shine, and little blisters. The full size oven one had a nicer bottom that's not charred, but i think we can remedy that.
So, there you go. You don't need a big oven to achieve a solid sourdough loaf.
I will post a crumb shot when it's completely cooled down.