Miche, Pointe-à-Callière
Hello,
I've been wanting to try making Mr. Hamelman's / Mr. MacGuire's Miche, Pointe-à-Callière.
This is the third of three tries, based on Andy's recent post on his beautiful Miche (thank you Andy, for your beautiful example of a Miche, and for the helpful instruction in your post!).
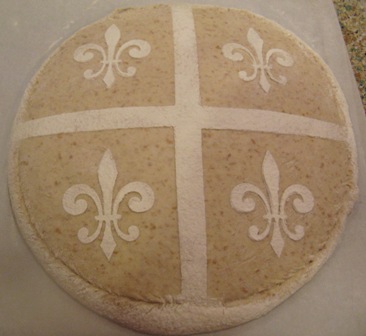
Given the historical note in Mr. Hamelman's book regarding this bread, this miche was stencilled to try and mimic
the Quebec flag:
I used a combination of 53% bread flour, with the remainder evenly divided between 75% sifted Red Fife whole-wheat, and coarsely-ground whole-wheat (Cliff's flour from fol epi bakery). The hydration ended up being 80% overall.
My first two tries I overfermented the dough. This time, to try to slow down fermentation, I used Andy's method for cold autolyse, but first sifted out the larger pieces of bran from Cliff's flour, soaked the bran in twice its weight of water. (Thanks, Mini!, for that idea). The bran soaker was refrigerated for same length of time as the water/flour autolyse. When building the levain, I used only bread and Red Fife flour.
The dough was much easier to manage using Andy's method for the mixing / cold autolyse.
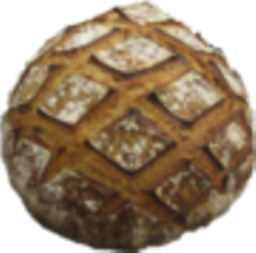
This miche had the best oven spring of the three, and measured 10" across.
The crumb (not outstanding!):
The was the first one (made with 85% coarsely-ground whole wheat and 15% bread flour); the dough started to spread after turning out of banetton onto the peel, and there was virtually zero oven spring while baking; measured 13" across!:
Four things I can identify that went wrong (I'm sure there were more, that I'm not aware of!):
-underdeveloped dough
-not the right substitution for high-extraction flour
-forgetting to reduce water in the final dough for the ounce of so of water I used to dissolve the coarse sea salt
-over-proofing (two hours for final proof was too mich, I think, for this dough)
This was the second one (made with same flour mix as the third try, above, but without separating/soaking the bran); this one spread out more than the first, overflowing the peel. As the dough was spreading, I couldn't stencil fast enough! And what a mess I made of it :^) This one had a bit of oven spring, and measured 12" across:
This time, my levain was over-ripe by the time I could mix the dough, and I think the dough was underdeveloped too.
I also decided to bulk ferment a little longer, to try and get lots of bubbles in the finished crumb, and shortened the final proof to 1 hour. Given how the dough behaved after turning out of the banetton, this method was not successful.
Thinking about what I liked about each miche:
First try: best flavor of the three
Second try: best crumb of the three
Third try: best oven spring of the three
I'll be happy to keep trying this formula in hopes of improving on the finished bread, as actually each time, we've really liked the flavor!
Happy baking everyone,
from breadsong


Comments
Breadsong that is lovely !
Ron
Thanks so much, Ron!
...as always, Breadsong. Your bread is so beautiful to look at.
Here's somthing you could try: use only bread flour in your leaven, and use a combination of your Red Fife wholewheat and 75% sifted. That would be a close approximation to what I made, and chould give you something closer to high extraction flour.
Keep on enjoying the experimentation with this bread
Very best wishes
Andy
Thank you Andy - for your compliment, and for your helpful advice!
I will note this for next time. I enjoyed making this, this last time, using your cold autolyse;
I was able to autolyse for 8 hours only, but I sure did notice greater ease in handling the dough.
:^) from breadsong
Beautifully done all the way around!
Sylvia
Hello Sylvia, That's so kind of you to say!
I hope to do better on the crumb next time though.
:^) from breadsong
The bread looks beautiful. I have stenciled bread before and found that it isn't that easy to do. Yours look really great.
Hello LeadDog,
I'm glad you like the stencilling! Stencilling was harder to do the first two times, because I was trying to use squares of parchment paper to block off the four 'corners' of the miche. This didn't work too well, as the parchment wanted to roll up and curl, even when I sprayed the loaf with water first. Trying to keep four of those squares to stay put with one hand, while sprinking flour with the other, was quite comical!
For the third miche, I cut a piece of overhead transparency film into four pieces and used that. This material was close to that of the stencil itself; it had 90-degree corners, didn't curl and didn't stick to the dough :^)
After the 'cross' had been stencilled, the next challenge was the fleur-de-lys stencil - it was big enough in dimension to overlap what had already been stencilled, but I managed to lay it down and get it up again without messing up what had already been done (sigh of relief).
:^) from breadsong
wow! That came out absolutely beautiful!!!!
Thank you so much, dstroy! :^)
What a beautiful stencil work, I enjoyed to read your all of your miche, breadsong! Each of the miche have nice character! :P
I want to try Andy's formula with cold autolyze soon. :)
Best wishes,
Akiko
Thanks Akiko - yes, these three all did have different character, and behavior!
I was very happy using Andy's method, and know you'll do a great job when you try it - your breads are always so lovely!
:^) from breadsong
Of course the third one looks fantastic, but interesting to hear the first had the most flavor. There must be a way to incorporate a high percentage of whole grains into the levain without problems but I haven't figured it out yet. It seems to lead to issues with dough breakdown. I love your stencilling. -Varda
Hello Varda,
Glad you liked the stencilling :^)
I just took a look at Mr. Reinhart's High Extraction Flour Miche in his book Whole Grain Breads. This bread has a whole-wheat and high-extraction starter, and a flour soaker (cold autolyse is an option). I'd like to try this one too, and see how this one works out, in contrast to this miche formula.
I certainly did have challenges with dough breakdown on the first two tries for this miche, and it's been a learning experience re: fermentation with the flour mixtures I was using.
Thanks, from breadsong
It not easy to go from an all white pain au levain to high extraction/ wholegrain flours, especially with SD starters.. These things ferment very fast.. plenty of enzymes and ash content... But your artistic stenciling.. overwhelms me, breadsong!
Well , well done!
Thanks so much, Khalid, for your comments - and it's been interesting trying to learn about enzymes and ash, and their effect on fermentation and the dough. I'm happy you liked the stencil!
:^) from breadsong
You did so well with the stencilling. What a precision! All three look great, I'll have them anytime.
Sue
http://youcandoitathome.blogspot.com
Hello Sue, Thank you - that's so nice of you to say!
I am happy with the sharply-cut stencil I used for this.
The fleur-de-lys stencil happened to come as part of a set, when I bought the floral stencil I used for my
cherry blossom bread.
This miche seemed a good occasion to use the fleur-de-lys!
:^) from breadsong
Beautiful stenciling! You have been working really hard on this loaf, Breadsong. Hopefully, with a few more tweaks you will get where you want to go with it. I think you have done a fantastic job.
Syd
Hello Syd,
Thanks so much!
I was delighted when I saw Andy's post...so helpful, and so timely (he posted just as I was starting to get organized to make this bread for the third try). His pointers definitely made it easier this time around, and I was encouraged by the outcome.
:^) from breadsong
Hello Breadsong,
I always love your stenciling work (very impress in my opinion). I have to use cold autolyse when I’m back home baking in Malaysia and also near where I live right now. My apt heat up easily in summer, the average temperature inside my apt is 82F (89F currently). I think you did very good jobs on your miche. I think your whole wheat flours are very fresh (locally milled) so they are even more active in my opinion because I do feel big differences in between store bought and freshly milled flours. Thank you for the great experimental bakes. I enjoy reading your post very much.
Kimmy
Hello Kimmy, Thanks so much for writing and thanks for your kind words!
I think Andy's cold autolyse method would be really good to use in a warm climate, and something I'd like to try again as we swing into summer here.
That's interesting about the flour's activity being stronger when fresh.
I used some of Cliff's flour, from fol epi bakery (flour is milled on site); this flour was purchased in March;
I'm not sure if it's still fresh enough to have an effect on activity, but I sure have appreciated the great flavor of his flour.
It makes me want to try milling my own!
from breadsong
Hello Breadsong,
I think your flour still consider fresh compare to store bought as long as you store your flour inside freezer or fridge. I did a comparison before; given any options I prefer bulk section flour especially whole grain flours with high turnout rate from my local co-op. I think you also taste differently from your other brand flour too? I’m just curious.
Kimmy
Hi Kimmy,
The breads made with a smaller portion of Cliff's flour have tasted really good, and the first miche made predominantly with Cliff's flour had a rich, full taste. I've really enjoyed breads made with 75% Red Fife wheat flour too; which have been very good also, although the flavor different. (I wish I had better ability to describe the taste of bread!)
I've kept Cliff's flour out at room temperature, and sadly, it's almost all gone now.
I don't have access to bulk flour but can purchase whole-grain and other flours direct from the local mill;
I am so grateful for the quality and variety!
:^) from breadsong
great success. I have been watching your wonderful bread for five months. It is inspiring. I am going to try stenciling again and will post result. I can't figure out how you get so much flour to stick...or is it just a dark bread?
Pam
Hello Pam,

That's quite a compliment - thank you so much! :^)
Please do post your stencilled bread - I'd love to see it!
For the cross, I sprayed a little bit of water where I'd be stencilling, to help the flour stick.
I didn't spray any water where I'd be laying down the fleur-de-lys stencil, though, as I didn't want the stencil to stick.
When the stencil doesn't stick and releases gently and smoothly, this seems to be the easiest way not to disturb the stencilled pattern. This is a picture of the loaf before the bake - to try and show how much flour was applied:
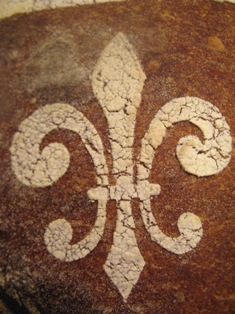
Here's a close-up after the bake; the flour stays put during the bake but can smudge afterwards.
I try not to disturb it while slicing or wrapping the bread (not always successful!):
I am not sure if you have seen this post of farine's, but I am so grateful to her for her instruction and inspiration for stencilling!
:^) from breadsong
Where would I look for farina's post? Thanks for the extra pics.
Pam
Hi Pam, You're welcome! And I've added the link now - hope you enjoy her post!
from breadsong