The Fresh Loaf

A Community of Amateur Bakers and Artisan Bread Enthusiasts.

Most bookmarked

pain de provence

It is getting to be harvest season in my part of the world, and that means herbs are cheap and plentiful. Now is a great time to try baking an herb bread.

You can bake wonderful herb breads with whatever you have on hand: rosemary, dill, basil, thyme, mint, chives, you name it. I happen to have an excess of Herbes De Provence on hand, a mixture of savory, thyme, fennel, and lavender that you can find in most specialty grocery stores or order online.

I used my standard poolish french bread as the base for this, then added the liqueur and herbs recommended by Bernard Clayton in his recipe for Pain de Provence in his Complete Book of Breads. Feel free to experiment and use a different dough as the base.

pain de provence

Pain De Provence

Makes 1 large loaf

Poolish:
1 cup bread or all-purpose unbleached flour
1 cup water
1/2 teaspoon instant yeast

Dough:
All of the poolish
2 cups bread or all-purpose unbleached flour
1/2 cup Herbes de Provence
1 1/2 teaspoon instant yeast
1 teaspoon salt
1/4 cup liqueur such as Beauchant, Grand Marnier, or orange Curaçao
1/4-1/2 cup water, as necessary

The night before baking, make the poolish by mixing together 1 cup of flour, 1 cup of water, and 1/2 teaspoon of yeast to make a batter. Cover the container with plastic wrap and set aside for 8 to 16 hours until you are ready to make the final dough.

To make the dough, combine the remaining flour with the remaining yeast, salt, and herbs. Add the poolish, the liqueur, and 1/4 cup of the additional water. Mix the ingredients, and, if necessary, add more water or flour until the proper consistency is reached (tacky but not so sticky that the dough sticks to your hands).

Knead by hand for 10 to 15 minutes or in a mixer for 5 to 10 minutes. Place the dough in a well-greased bowl and cover the bowl with plastic wrap. Set aside to rise until doubled in size, approximately 90 minutes. Remove it from the bowl and gently degas it, then return it to the bowl, cover it, and allow it to double in size again.

Remove the dough from the bowl and shape it into a ball or long loaf. Cover the loaf with a damp towel and allow it to rise again until doubled in size, which takes between 60 and 90 more minutes.

While the loaf is in its final rise, preheat the oven and baking stone, if you are using one, to 450. I also preheat a brownie pan into which I pour a cup of hot water just after placing the loaf in the oven. This creates steam in the oven which increases the crunchiness of the crust.

Just prior to placing the loaf in the oven, score the top of it with a sharp knife or razor blade.

Place the loaf in the oven and bake for 20 minutes at 450, then rotate it 180 degrees and reduce the oven temperature to 375 and baked it another 25 minutes. The internal temperature of the loaf should be in the ball park of 200 degrees when you remove it from the oven.

Remove from the oven and allow to cool for at least a half an hour before serving, if you can resist.

pain de provence

I couldn't.

Pain de Provence

bwraith's picture
bwraith

Maintaining a 100% Hydration White Flour Starter

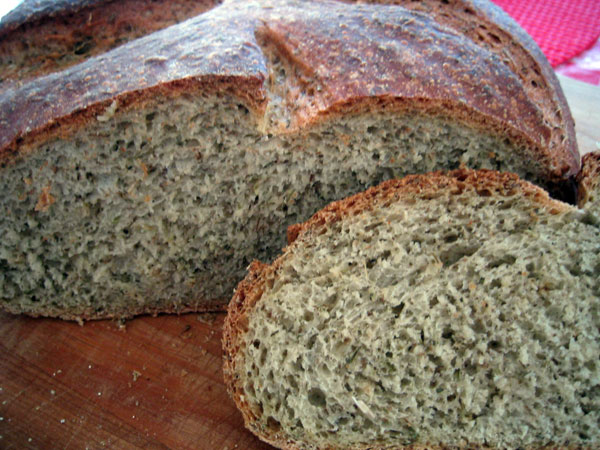
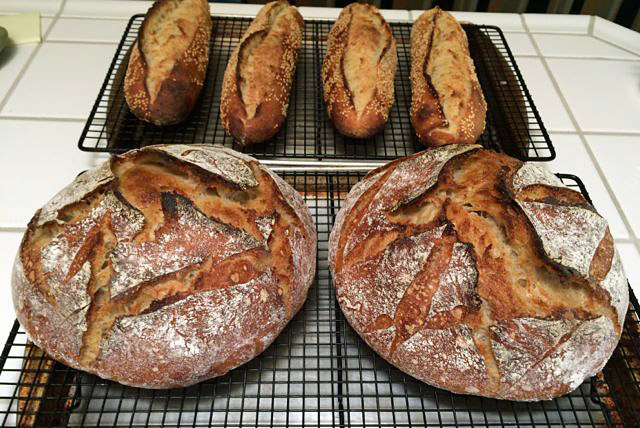
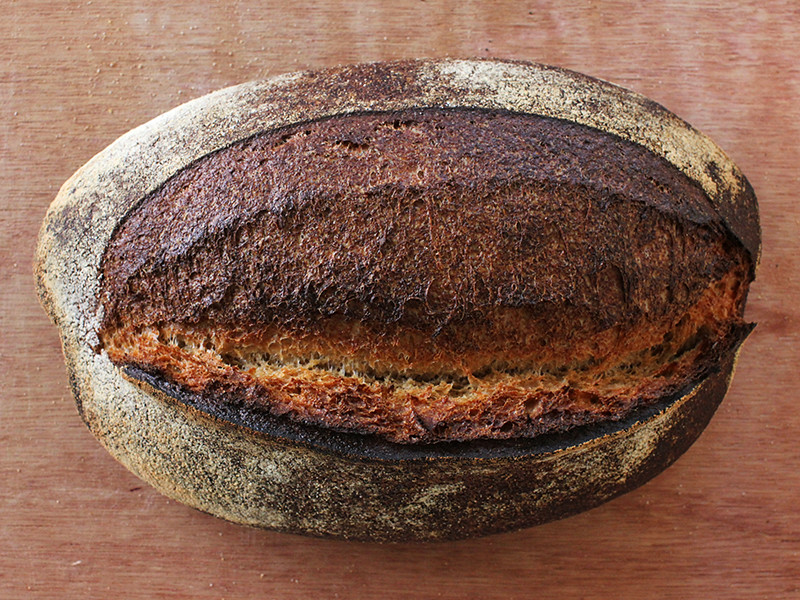
The following is a description of how I maintain my 100% hydration (1:1 flour:water by weight) starter. The term 100% hydration refers to the baker's percentage of water in the starter, i.e. the water in the starter is 100% of the weight of the flour in the starter.

This maintenance regime assumes that your starter is already healthy, fresh, and active. This is not what I would do to "start a starter", but rather it is the maintenance regime I follow to store, revive, and use my starter over time.

The following characteristics are for a 100% hydration starter. The characteristics, signs of health, problems, and readiness for use are different for starters maintained at different hydration levels.

Characteristics of my 100% hydration white flour starter:

  • The weight of flour and water in the starter are equal.
  • The flour is either bread or AP flour with protein content around 11-13%.
  • The water is bottled (Poland Spring).
  • Normally fed at room temperature.
  • Stored in the refrigerator when not being fed.
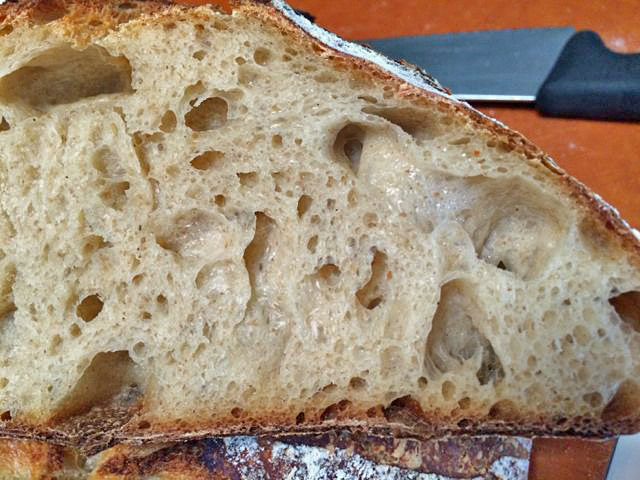
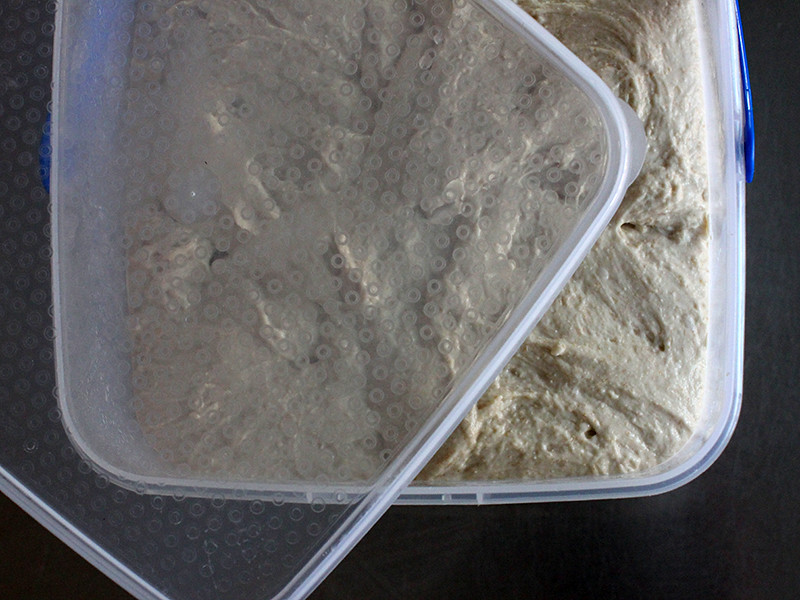
  • The consistency can be described as a thick, stirrable paste after it is fed.

Characteristics of a recently fed, fresh, active 100% hydration starter:

  • It rises by double in about 4-5 hours at room temperature after a feeding of 1:2:2 (starter:flour:water by weight)
  • It maintains a reasonably thick, elastic consistency after rising by double.
  • It smells very pleasant. The smell could be described as flowery, tangy, and slightly sweet.
  • No liquid layers develop on top or in the middle even hours after rising by double.
  • Hooch (an alcoholic layer of liquid on top) forms eventually when it is stored in the refrigerator for a week or more or left out for a long time at room temperature after doubling.

Characteristics of a 100% hydration starter that is not yet ready or is possibly unhealthy:

  • Unpleasant odors a few hours after feeding.
  • Separated layers of liquid form a few hours after feeding.
  • Takes longer than 4-6 hours to rise by double at room temperature after a 1:2:2 feeding (starter:flour:water by weight).
  • Develops a runny consistency a few hours after feeding.

An Important Note on the Large Effect of Temperature on Rise Times

Before launching into the information below on maintaining starters, it is worthwhile to point out one of the largest points of confusion in sourdough starter maintenance. Temperature has a big effect on the speed of reproduction and the activity of the organisms in a sourdough culture. For example my kitchen may average 76F in the summer and only 69F in the winter. At 76F, my starter may rise by double after a 1:2:2 feeding in 4.2 hours, whereas at 69F it will double in 6.4 hours. At 64F, it would take 9.4 hours. It is not a problem to follow the procedures below in a kitchen with a temperature averaging 64F; but clearly, you need to allow for rise times of roughly double in the various discussions below. So, adjust your expectations and timing accordingly, if your temperatures don't hover fairly close to 74F or so, which is the temperature assumed for the discussions below.

Assuming a healthy, active starter, here is the maintenance regime I follow to feed, store, revive, and use my starter.

Feeding

I almost always feed my starter 1:2:2 (starter:flour:water by weight) and then allow it to rise by double at room temperature, which should take about 4.5 hours when it is fully active and recently fed. Once it has risen by double, it is placed in the refrigerator. The starter can then be used directly from the refrigerator in a recipe for the next 3 days. On the first day, it is almost the same as it was right after it rose by double. On the second day, it has a little more flavor and may be ever so slightly weaker, but it is still at an excellent point to use in a recipe. After 3 days, it can still be used, but it will have stronger, more sour flavors, and it will be noticeably weaker in terms of rising power. If you have a recipe that uses a very small percentage of starter in the dough, it won't matter much if you use old starter. I've used week old starter in recipes where the flour contributed to the dough was only 5% of the total flour weight. If you are using the starter in a recipe that has a high percentage of starter, it may be better to use the starter after 2 days or less in the refrigerator.

Although it may not make much difference, I actually maintain my starter with a 1:2:2.2 feeding ratio, i.e. at a 90% hydration. With the bread flour I use (KA Bread Flour) that results in a consistency of a thick paste that is a little difficult to stir once you mix it up well. The amounts you work with don't matter much, either, other than the amount of flour being thrown out. I typically work with a total culture size of about 80 grams. My scale will measure down to 1 gram of precision. A typical 1:2:2.2 feeding would be (16g:30g:34g) of (old starter:water:flour). Below I am doing 1:10:11 feedings, which are done by feeding (4g:40g:44g) of (old starter:water:flour).

The above method works great, but see in the variation section below for an update on how I am feeding most recently to better accomodate a 12 hour feeding cycle. Also, I now use an even thicker consistency, around 80% hydration. It seems to keep longer this way on the counter or in the refrigerator.

Storage

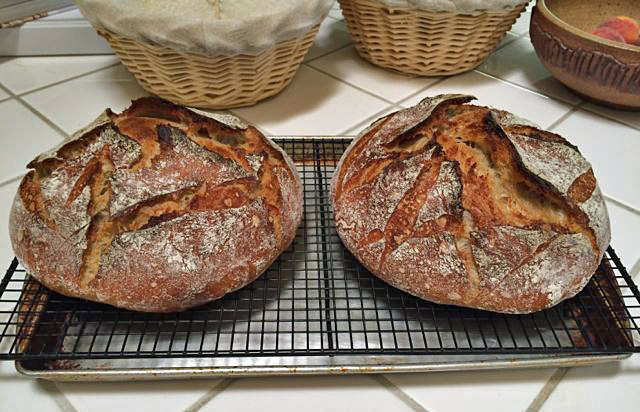
Once the starter has been in the refrigerator for more than three days, I consider it to be in storage. It can't be used directly in a recipe, but instead will have to be revived. If I plan to store my starter for a period of time longer than 2 weeks, I usually will thicken it up, as it keeps better at a thicker consistency. However, even at 100% hydration, I've had no problems reviving my starter after 2 months. At thicker consistencies, the starter can last for many months in the refrigerator. I believe Glezer says it can last more than a year in a very stiff consistency, like 50% hydration. However, the longest I've gone with my starter is 2 months. I use glass canisters for both feeding and storage. I usually pour the ready to refrigerate starter into a fresh container, so that the sides are clean and the starter is stirred down to take up less volume. The containers have a rubber gasket that seals them from the air in the refrigerator but allows some gas to escape if pressure and gasses build up in the container.

Revival

When the starter has been in the refrigerator for more than a few days, it must be revived first before it can be used in a recipe. I do this by simply feeding it once or twice in the manner described under "Feeding". After being stored for a week or two or more, rising by double after a 1:2:2 feeding may take something like 6-8 hours at room temperature. If it only takes 6 hours, one feeding works fine. However, if it takes more than 6 hours to rise by double at room temperature, I generally feed it one more time. The second feeding usually takes much closer to 4.5 hours, which is an indication it is fully revived. On the occasion where it had been stored for 2 months, it took a third feeding at room temperature before the starter would rise by double in 4.5 hours at room temperature after a 1:2:2 feeding.

One subtle aspect of all this is the question of how long after the starter has doubled should you wait to feed it again. The starter needs to ripen enough to bring the cell counts up to their maximum level. In the period after you feed the starter, the cell counts of yeast and lactobacillus will double every couple of hours or so. Once the starter is ripe enough, the yeast and lactobacillus cell counts will stop increasing. The pH and acid levels get to a point where they attenuate the cell activity, and they can no longer multiply in numbers. So, you want to let the starter mature enough to reach that maximum cell count, and then feed it again or store it. Just based on experience, it seems like my starter does well as long as I let it sit for an hour or two beyond the point it doubles. I usually "stir it down" at the point it doubles, and then let it rise some more. However, I refrigerate it right when it doubles, since it will continue to ripen in the refrigerator. Recently, I was rushing my feeding schedule and slowed my starter down by trying to feed too early, just before it had completely doubled, in fact. The result was that it was taking longer than usual to rise. The solution was to let it sit a while longer for a few feedings in a row. It didn't take long at all for it to bounce back to doubling in 4.5 hours from a 1:2:2 feeding at room temperature.

Variations

You can feed at a lower or higher ratio than 1:2:2 in order to adjust the amount of starter you want to build to match a recipe or to better match the times when you can feed the starter conveniently. However, I never feed at a lower ratio than 1:1:1 to avoid any problems with acid building up or the starter becoming too ripe or underfed. Higher ratios can be used to lengthen out the rise time if you know you will not be back within 4-6 hours to store the starter in the refrigerator before it becomes too ripe. At warmer temperatures, the starter will rise by double much more quickly after a 1:2:2 feeding, taking something like 2.5 hours at about 85F, for example. At 85F the timing for rising by double will be very roughly half as long as at room temperature, and at 65F the timing will be very roughly twice as long (very, very roughly).

Recently, I've been experimenting with feeding ratios for a 12 hour room temperature maintenance schedule. I have found that feeding 1:10:11 (for a slightly thicker consistency I'm using 90% hydration), results in a 12 hour cycle. The starter will double 8 hours after the 1:10:11 feeding, and then I stir it down and let it ripen some more. If I feed every 12 hours on this cycle, the starter is at full strength from about 8 to 12 hours after being fed (all this at room temperature). When you feed a starter routinely at higher ratios, like 1:10:11, it will ferment for longer periods of time at higher pH. The result should be that the starter will have relatively more lactobacillus in it compared to a starter maintained with a 1:2:2 feeding ratio, since the lactobacillus thrive in a slightly higher pH environment (around 5 pH).  I can't say what the effect on flavor would be, but it makes sense that the aromatic compounds and acids produced by the lactobacillus would be more evident in the one maintained with the high feeding ratio. Although this is not at all scientific, I do think that the starter I've maintained with a 1:10:11 feeding ratio has a more intense aroma than the one fed with a 1:2:2 ratio.

Even more recently (added 12/14/2007), I've settled on feeding every 12-17 hours using a feeding of 1:4:5 (starter:water:flour by weight). Using this procedure, the starter doubles in volume in about 4.75 hours at 76F or about 7.25 hours at 69F. Even at 69F, the starter has peaked in 12 hours, so it can be fed again. At 76F, it will peak and fall after 12 hours, but it is still at full strength and will rise vigorously when fed. It seems like a good compromise that can be used year-round for a 12 hour cycle. The starter can be maintained on the counter at room temperature indefinitely using this procedure. If I know I won't be baking bread for a while, I thicken up the starter by feeding it 1:4:7 to thicken it up when I feed it next, and put it in the refrigerator immediately after feeding. Then, I take it out a day or two in advance of the next bread-making session and revive by letting it rise by double and feeding 1:4:5 every 12 hours. Although I generally go through the revival procedure, I've found that the starter is at close to full strength even after 7 days in the refrigerator when stored this way. So, it's possible to take the starter out of the refrigerator, let it rise by double, and use most of it in a bread recipe, and take a tiny portion of it to revive for a couple of feeding cycles before returning it again to the refrigerator using the 1:4:7 feeding and refrigerating immediately.

When to Refrigerate

I like flavors to be less sour and more mild in sourdough breads I make. I've found that the right flavors and lower amounts of sour flavor seem to be there when I don't let the starter become overly ripe before using it in a recipe. That's why I tend to refrigerate when the starter has just doubled. You can experiment with feeding schedules that allow the starter to become more ripe before refrigerating. It will change the balance of organisms in the culture and therefore the flavor. Also, when you use a large percentage of starter, the larger amount of accumulated byproducts of fermentation in a more ripe starter will contribute directly to the flavor and texture of the dough, in addition to the contribution made by the subsequent fermentation.

An Additional Tip on Refrigerated Starter Storage

If you are using your starter fairly frequently, like once a week, then just refrigerating it when it doubles will work very well. You can use the starter directly out of the refrigerator for a period of time if stored that way. For storage it works well, as I've had no problem reviving my starter after 2 months when stored just after doubling. However, as Mike Avery commented below, and I've verified as well, feeding a well revived and healthy starter in such a way as to thicken it to a firm consistency and then refrigerating it immediately allows the starter to keep very well for longer periods of time. It can be removed from the refrigerator and allowed to rise by double or a little more and used directly in a recipe, even after a week, I've found. If you use this procedure, the starter should still be "revived" with enough feedings, usually one or two more, at room temperature to verify that the starter is rising at full strength again before it is again stored in the refrigerator.

Converting Starters

I sometimes make a recipe starter for a whole grain bread by feeding some of my starter with spelt or whole wheat. I have never fed a starter with whole grain repeatedly to completely convert it, so I have to accept the flavor as is and a small amount of white flour in my whole grain recipes. I'm sure there are many subtle flavor differences if you feed repeatedly and fully convert a starter from being fed exclusively with white flour to being fed exclusively with a whole grain flour. I've found the feeding and rising process works about the same way with whole grains for a recipe starter, except that the rise times seem a little bit faster with the whole grain flours.

Mistakes

It's pretty hard to kill a healthy starter, but here are a few ways to possibly send yours over the edge.

  • Heat the starter to over 95F and kill the organisms - easier than you might think, for example...
    • Use actual oven heat and get up over 100F very quickly.
    • Place the starter in an oven with the light on - check carefully first - it can be much hotter than you think in there with just the oven light on and the door closed.
    • Use hot water to feed your starter
  • Put acids in the culture
    • The culture doesn't need acid if it's healthy. It generates all the acid it needs on its own.
    • Sometimes a small shot of vinegar or other acid, such as pineapple juice, may help fix a sluggish culture, but if you feed acid repeatedly, you can put too much in and kill the starter.
  • Not feeding the culture for too long at warm temperatures or repeatedly underfeeding over long periods.
    • When out of the refrigerator, the culture will be very active and must be fed to stay healthy.
    • It is especially easy to underfeed a culture when temperatures are warmer.
  • Overfeeding the culture
    • If you feed before the culture has ripened enough repeatedly you can dilute the culture and eventually kill it.
    • More likely to happen at colder temperatures, stiffer consistencies, or higher feeding ratios. Let the culture rise by double, then let it ripen for a number of hours beyond that. A dip should form in the middle when the culture is at its peak. You can let it go for a number of hours beyond the point it dips, but it should be ready to feed at the point it is dipping or collapsing on itself.
    • If you refrigerate the culture for storage, you can let it just rise by double and then refrigerate it. It will continue to ripen in the refrigerator. However, allow it to come to full ripeness at room temperature over a couple of feedings once in a while, normally done when reviving the culture for baking, to avoid any decline similar to overfeeding caused by repeatedly refrigerating when it has just doubled.

Given the above, it makes a lot of sense to keep back a small amount of old starter in the refrigerator, even if just the scrapings from the inside of the container that came out of the refrigerator, until you're sure the feeding went well. It's also not a bad idea to make a small amount of stiff starter and keep as a backup. Some dry their starter and freeze or store it for backup.

Tips on Quantities Used, Mixing Technique, and Volumes (a scale is highly recommended, but to use measuring spoons...)

As I've gained experience, the amounts of starter I work with have dropped. I haven't found any disadvantages to using smaller quantities. For example, my most recent feeding routine (mentioned in the variations section above) is 1:4:5 (starter:water:flour by weight) is done by taking a clean jar, putting it on the scale and adding 5 grams of starter and 20 grams of water. I stir vigorously with a tiny whisk to aerate and thoroughly mix the starter into the water. Then, I add 25g of flour and use a fork to thoroughly mix the flour into water, forming a fairly thick paste - not quite a dough, but very thick. I then take a small spatula and scrape down the sides, put the lid on the jar, and place the jar in a nice unobtrusive spot on my counter where hopefully no one will disturb it.

If you don't have a scale, my first advice is to get one. It makes baking much more reliable, especially when you are trying to reproduce another baker's recipe. A good digital scale costs about $25 and is very much worth the trouble. Still, the procedure in the previous paragraph is easy to do by taking 1 teaspoon of starter, adding 2 tablespoons of water, and stirring vigorously to aerate and completely mix the starter into the water. Then, add 3 tablespoons and possibly another teaspoon or so of flour, and mix thoroughly with a fork. Scrape down the sides of the jar, cover, and place on the counter.

If you are planning to store the starter for a long time in the refrigerator, it helps to carefully drop the recently fed and thickened starter into a clean jar, so that there is no film of flour or paste stuck to the sides at all. Over a longer period, it is possible for mold to grow on a residue of flour paste left on the sides of the jar.

Comments

What I describe above is just one way to do it. I'm sure there are many other ways, but I find this method convenient and robust. It's hard to kill a healthy freshly fed and risen starter that is stored in the refrigerator. It is convenient that the starter remains in a good usable state for several days. Very small amounts can be used when storing it for long periods to avoid large amounts of flour waste. I store something like 100 grams when I'm planning to store the starter for more than a few days, so my revival can be used in a recipe without wasting much if any flour. Maintaining only one starter and converting it for recipes each time is easy and convenient, although by not fully converting the starter to a whole grain flour some flavor or other characteristics may be missed with this approach.

Almost every weekend I bake. Lately I've been trying different recipes using my sourdough starter. At other times I baked yeasted artisan breads and sandwich breads. But one thing has remained constant: almost every time I have the oven heated for baking I make a batch of banana bread. I can safely say that I've made more batches of banana bread than any other bread.

I've tried a number of different recipes, but the majority of the time I fall back on the recipe below. It tastes great, it keeps well, it takes less than 10 minutes to prepare. You can't ask for much more than that.

This recipe is from the 1997 revision of the Joy of Cooking. There is at least one step in the Joy recipe (mixing the butter and sugar with a hand mixer for 2-3 minutes) that I skip. Doing so may make a slightly lighter loaf, but I find it unnecessary.

As I said, I've tried close to a dozen different banana bread recipes but I like this one the best. It is a little drier than recipes made with Vegetable or Canola Oil, but I like the flavor of butter and consistency of this bread better.

I've also found that we enjoy this a lot more baking it in small loaf pans rather than a regular bread pan. In the large pan I tended to have a harder time getting it to bake evenly, often resulting in overbaked ends and a gooey center. It also would go stale before we could eat the entire thing. With the small loaves, I bake 2 or 3 a weekend and freeze all but one. Every couple of days we pull a new one out of the freezer and never have any trouble with it going stale.

The other breads in the photo, by the way, are two whole wheat sourdough loaves and a sourdough rye. I haven't had a chance to even try them all yet. If they turn out good I will definitely share the recipes.


Banana Bread

Makes 1 full-sized loaf or 2 small loaves

Preheat the oven to 350.

In one bowl, combine:

1/2 stick (4-5 tablespoons) butter, softened
2 eggs
2 or 3 very ripe bananas
2/3 cup sugar

Use a potato masher, fork, or spoon to squish the banana and mix the ingredients together. It is alright for there to be small (1 centimeter) chunks of banana in the batter, but you want most of the banana to be reduced to mush.

In another bowl, combine:

1 1/3 cup all-purpose unbleached flour
3/4 teaspoon salt
1/2 teaspoon baking soda
1/4 teaspoon baking powder
1/2 teaspoon cinnamon (optional)

Combine the wet and dry ingredients and mix until the ingredients are blended together.

If you like, stir in additional ingredients here, such as chopped walnuts or pecans, dried cherries or apricots, or chocolate chips. A handful (about a half a cup) is about right.

Pour the dough into greased baking pans and bake until a toothpick inserted in the center comes out clean. Small loaves take around 30 minutes, a normal-sized loaf takes around 50 minutes.

Remove from the oven. This bread is great warm, but it is excellent cold too.

After they have cooled for 5 or 10 minutes the loaves can be removed from the pan to cool. Once they are cool they can be individually wrapped and frozen.

Enjoy!

Related Recipes: Better Banana Bread,Eggless Banana Bread

10 Minute Banana Bread

dmsnyder's picture
dmsnyder

Sourdough Italian Baguettes

Sourdough Italian Demi-Baguettes: Variations on a Theme 

David M. Snyder

May 3, 2015


Last month, I made some Sourdough Italian Rolls, using a formula I had developed and used previously to make bâtards. This week, I continued to play with this formula. I increased the proportion of durum flour in the dough, doubling the amount in the final dough, and I shaped the dough as demi-baguettes. (I wanted to make bâtards. My wife wanted more rolls to use for sandwiches. Demi-Baguettes was the compromise. We use that shape for sandwiches frequently.)


Total Dough


Ingredient

Amount (gms)

Bakers' %

AP flour

334

60.7

Fine Durum flour

200

36.4

WW flour

11

2

Whole Rye flour

5

1

Water

400

72.7

Salt

10

1.8

Sugar

14

2.5

EVOO

14

2.5

Total

988

179.6


Liquid Levain


Ingredient

Amount (gms)

Bakers' %

Liquid starter

40

40

Water

100

100

AP flour

70

70

WW flour

20

20

Whole Rye flour

10

10

Total

240

240

  1. Disperse the liquid starter in the water.

  2. Add the flours and mix thoroughly.

  3. Ferment at room temperature until expanded and bubbly (8-12 hours). If necessary, refrigerate overnight and let warm up for an hour before using.


Final Dough


Ingredient

Amount (gms)

AP flour

300

Fine Durum flour

200

Water

350

Salt

10

Sugar

14

Active liquid levain

100

EVOO

14

Total

988

Procedures

  1. In a large bowl, disperse the levain in the water.

  2. Add the flours and sugar to the liquid and mix to a shaggy mass.

  3. Cover the bowl and let it rest for 20-60 minutes.

  4. Add the salt and olive oil and mix thoroughly. (Note: I squish the dough with my hands until it comes back together, then do stretch and folds in the bowl until it forms a smooth ball and the oil appears completely incorporated.)

  5. Transfer the dough to a 2 quart lightly oiled bowl, and cover the bowl tightly.

  6. After 30 minutes, do stretch and folds in the bowl. Repeat 3 more times at 30 minute intervals.

  7. Continue bulk fermentation for another 30-90 minutes, until the dough is puffy. If fermented in a glass bowl, you should see lots of little bubbles throughout the dough. Volume of the dough may have increased by 50% or so.

  8. Refrigerate for 12-36 hours.

  9. Divide the dough into 4 equal pieces and pre-shape as rounds or logs. Cover with a clean towel, baker's linen or plasti-crap and let rest for one hour.

  10. Shape as Demi-Baguettes or Ficelles.

  11. Roll the loaves on damp paper towels, then in a tray of sesame seeds. Alternatively, you can brush the loaves with water and sprinkle with sesame seeds.

  12. Proof for about 45 minutes, seam-side down, on parchment paper pleated to separate the loaves and supported at both long sides by rolled-up dish towels. Cover with a damp towel, baker's linen or plasti-crap.

  13. One hour before baking, pre-heat the oven to 480ºF with a baking stone and steaming apparatus in place.

  14. When ready to bake, uncover the loaves. Pull the parchment from both long sides to flatten out the pleats and separate the loaves.

  15. Transfer the loaves, on the parchment, to a peel. Score them as baguettes. Transfer them to the baking stone. 

  16. Steam the oven, and turn the temperature down to 460ºF.

  17. After 10-12 minutes, remove the steaming apparatus. (Note: If you have a convection oven, switch to convection bake and turn the oven down to 435ºF for the remainder of the bake.) Continue baking for another 6-8 minutes or until the loaves are nicely browned and the internal temperature is at least 205ºF.

  18. Transfer the loaves to a cooling rack. Cool completely before eating.


After cooling, the Italian bread crust was soft. The crumb was nicely aerated, but not as open as expected for this level of hydration. I suspect this is because of the durum flour (higher protein but poorer quality gluten) and the extra handling installing the sesame seeds. The flavor is heavenly. This is a sweet white roll with the nuttiness of durum and sesame seeds, dipped in high quality EVOO. How could that not be delicious?

One of the baguettes was consumed for dinner. 

Panino with roast chicken breast, caramelized onions with balsamic vinegar, sliced dried calmyrna figs, emmenthaler cheese and a light smear of Dijon mustard.

Such a sandwich can only be washed down with good Italian beer, of course. 

I also baked a couple boules based on the "Overnight Country Blonde" from Ken Forkish's Flour Water Salt Yeast. Summer has arrived, and my kitchen is running 75 to 78 dF, so fermentation runs faster than the book specifies. The result is that bulk fermentation was complete in 5 hours. I refrigerated the dough overnight and divided and shaped the next morning. Even with the dough starting out cold, proofing was complete in about 2 hours. 

All of the sourdough breads I have made from FWSY have a strong family resemblance but more or less distinctive flavor profiles, depending on the flour mix used, the percentage pre-fermented flour and the fermentation routine. This bread had a crunchy crust and cool, chewy crumb. The flavor had that nice wheaty sweetness and a quite present but mild sourdough tang, with the creamy lactic acid tone dominating. Although this is a higher hydration dough, the flavor profile is very much like the Pain de Campagne from Hamelman's Bread. And that's not bad! Like my San Joaquin Sourdough, it contains mostly AP flour but with about 10% whole grain flours, divided between whole wheat and whole rye. The procedures I used for this bake, with the overnight retardation before dividing and shaping, gave such nice results, I am going to use it for a while and try increasing the whole grain flours, maybe adding some toasted wheat germ for its nutty flavor and who knows what else.

It has been a good bread baking day.

Happy baking!

David

Floydm's picture
Floydm

Lazy Man's Brioche

In The Bread Baker's Apprentice Peter Reinhart offers up three variations of brioche: Poor Man's Brioche, Middle-Class Brioche, and Rich Man's Brioche, each version getting more full of eggs and butter than the previous.

This weekend I came up with a brioche recipe that I'm extremely happy with. I dubbed it the "Lazy Man's Brioche."

This recipe is based on the brioche recipe from Ciril Hitz's Baking Artisan Bread. I started with Hitz's recipe but then rounded every number and cut every corner I could. The result is perhaps not as authentic as Hitz's recipe but still delicious.

There are two pieces of gear required to keep this recipe lazy: a mixer and a scale. I'm sure you could make the same thing using measuring cups and kneading by hand but that would take work. Using brioche pans or adding little tetes on top of each bun would also be more authentic and attractive, but the goal here was not to be beautiful or complex, just come up with something simple, repeatable, and delicious.

Lazy Man's Brioche


My baking notes

Makes 12 buns
 
Dough
500g bread flour
250g milk
2 eggs
50g sugar
15g instant yeast
5g salt
1 stick (113g) unsalted butter, diced
 
Filling
1/2 cup chocolate chips (optional)
 
Egg Wash
1 egg
a pinch of salt
a teaspoon water
 

Add all of the ingredients to your mixer and mix it until the dough becomes silky. This takes a long time, somewhere in the 10-20 minute range (I think I did around 15). If the dough sticks to the sides or the paddle too much, take breaks and scrape the dough back down into the bowl.

When it is well mixed, shape the dough into a ball and place in a greased bowl. Cover and let rise until doubled in size, approximately 1 hour. Degas the dough and allow it to rise a second time, for another hour or so.

Cut the dough into 12 pieces (I used the scale and weighed them out at 3 ounces each). Shape the dough into balls. If you want to fill them, do so here by placing the chocolate chips on them before pinching them closed.

(Those are mini-chocolate chips by the way... the entire bun is only two or three inches across.)

Place the dough balls seam side down in brioche pans or muffin tins. Cover loosely with plastic and allow to rise until doubled in size and well above the pan, approximately 45 minutes.

While they are rising, make the egg wash and preheat the oven to 365.

Brush the brioche gently with egg wash before putting the pans near the middle of the preheated oven. I placed mine on the third shelf down out of four.

Bake the brioche for 10 minutes then rotate the pan. Bake them another 10 minutes or until they appear to be done.

If your pans were greased well, you should be able to shake the brioche out of the pan while they are still hot. Be careful if the eggwash spilled onto the pans though, because the cooked egg will "glue" the brioche into the pans. I had to gently break through the eggwash with a knife before I could get a few of my buns out of the pans.

Enjoy!

PiPs's picture
PiPs

Home with bread / Fighting gravity

For the first time in five months I baked bread at home and it made me very nervous.

It is an entirely different proposition to make a hand full of breads in a home oven as opposed to the rhythm and flow that working in large batches provides. My attention and perfectionist streak is focused on too few ... the dough is essentially the same (though not quite as rewarding) ... but the loading of a home oven is problematic and inefficient.

... the nicest dough in the world can be ruined by a lousy oven.

So while my time with a wood-oven at Chester St has come to a close it seems that more possibilities may be ahead of me soon. Bread is my way forward ... it is my future ... but in the meantime I am thankful for some time to spend with my family and friends ... they have missed this busy baker.


There has been sadness this week though, as my good friend Daryl sadly lost his father Keith Taylor. Daryl worked with me in the kitchen at Chester St and his parents would visit us on occasions which was always a treat. Keith would stand opposite my bench and chat as I busied myself shaping or rounding loaves. He loved bread ... it was from his past ... it was a part of him.  As a young boy his father owned a bakery in Brisbane running a large scotch wood-fired oven and Keith was granted a special license at the age of 14 to deliver bread to the local community. The smell of dough and baked bread transported him back and he had many tales to tell. I will cherish those talks.

These breads are for you Keith ...

Keith Ian Taylor 23/12/1933 - 3/6/2013. R.I.P


My time at home has also allowed me to catch up on another activity ... reading. The latest book I am ploughing through is Cooked: A Natural History of Transformation by Michael PollanIn it he has a chapter called "Air" which is related to bread fermentation where he discusses the many aspects of bread and its production with the likes of Richard Bourdon, Chad Robertson and Dave Miller (my biggest bread influences).

While reading this I was inspired to begin milling and fermenting freshly milled flour. I couldn't help but do it ... I had to ... It has been so long since I have made honest heart-felt bread like this. This formula is influenced by Dave Miller's method of milling and mixing on one day then shaping and baking the next.

Fresh milled wholewheat (4 x 1000g)

Formula


Final starter build – 3 hrs 27°C


Starter

93g

50%

Freshly milled organic wheat flour

186g

100%

Water

120g

65%


Final dough - 24°C


Whole wheat starter @ 65%

348g

18%

Freshly milled organic wheat flour

1899g

100%

Water

1709g

90%

Salt

44g

2.3%


Method

  1. Mix final starter and leave to ferment for 3 hours at 27°C
  2. Mill flour and allow to cool to room temperature before mixing with water (hold back 100 grams of water) and autolyse for a one hour.
  3. Add starter to autolyse then knead (French fold) 5 mins. Return the dough to a bowl and add salt and remaining 100 grams of water and squeeze through bread to incorporate (dough will separate then come back together smoothly) then knead a further 10 mins.
  4. Bulk ferment for one hour at room temperature. Stretch-and-fold after one hour and place in a fridge at 4°C for 12 hours.
  5. Remove from fridge. Divide. Preshape.
  6. Bench rest 30 mins. Shape.
  7. Final proof was for 1.5 hours at 22°C
  8. Bake in a preheated oven at 250°C for 10 mins with steam then bake for a further 40 mins. 


While shaping the bread the words of Dave Miller resounded in my head "You're always fighting gravity with wholegrains" ... I shaped them tight ... If I was going to struggle to get loft then I wanted bloom!

... and after 5 months of baking in ovens without windows I was again awestruck as I sat before my glass fronted home oven and watched oven spring unfold ... perhaps my home oven is good for something :)

Happy baking everyone ...
Phil 

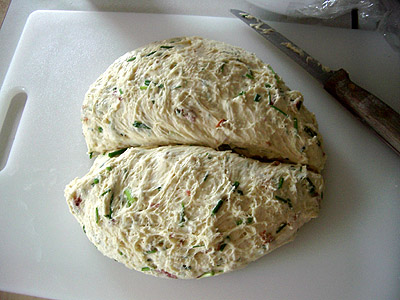
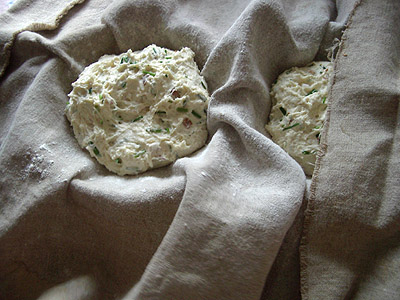
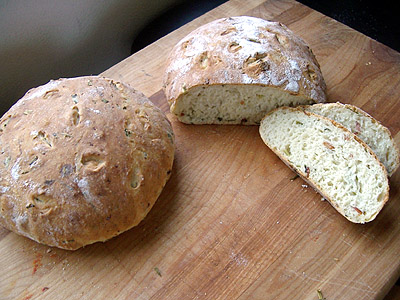
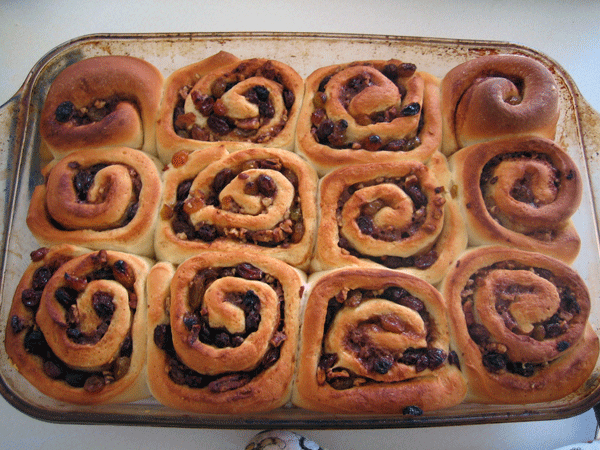
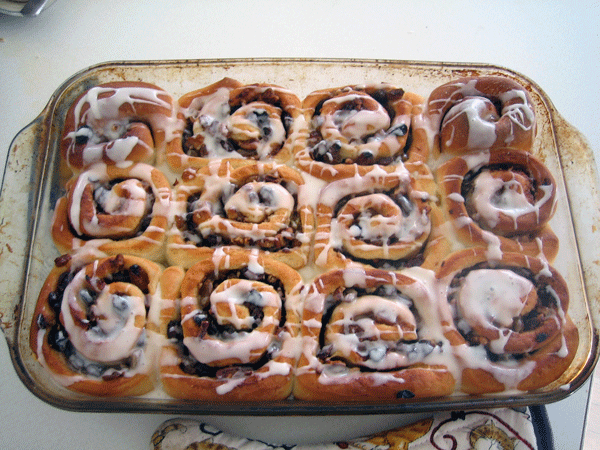
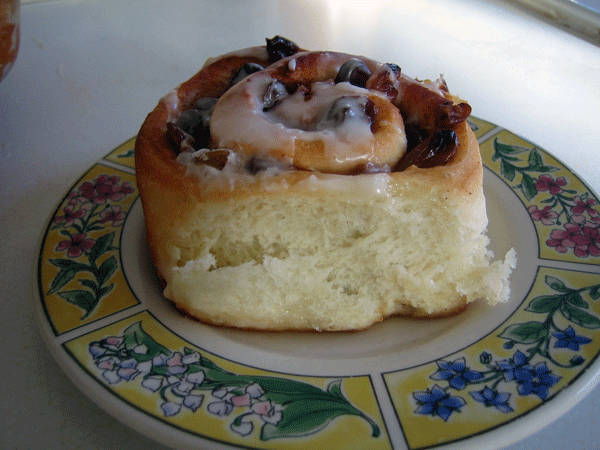
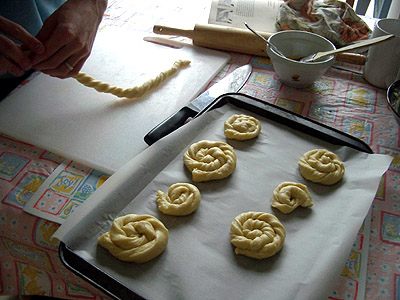
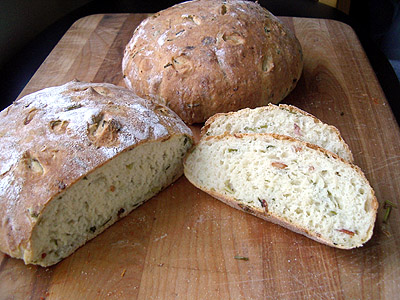
This weekend I found myself staring out the window at the abundant chives growing in my garden. What could I possibly do with them, I wondered, except eat them on baked potatoes? And how many baked potatoes can I eat before I never want to see another spud again?

Then it occurred to me that I've made potato bread before, so why not add chives to potato bread? And, heck, while I'm at it, why not throw in some other tater toppings like sour cream and bacon and have a full-on Baked Potato Bread?

By the time I had second thoughts about it, all of the ingredients were mixed together. But, you know what? It turned out excellent, the perfect accompaniment to a pot of corn chowder on a rainy day.

The full recipe is below.
Freestyle Baking

As I have written about time and time again, I think the real fun in baking comes once you have mastered the basics and understand how adding different ingredients in different proportions will change the character of your loaf.

Whether I am making up a recipe or checking out a new recipe in a cookbook, my point of reference is always the loaf I introduced in lesson 1, which is 3 cups flour, 1 + a little cups of water, 2 teaspoons yeast, 2 teaspoons salt. If I read a recipe and it has more water than, say, a cup and a quarter of water per three cups of flour I know it is going to a slack dough; more fats (butter, milk): a softer loaf; contains sugars: a sweet loaf; and so on.

When thinking up this recipe, I took the lesson one recipe, substituted potatoes for about 20 percent of the flour, substituted sour cream for about 50% of the water, and added the chives and bacon and bacon fat. It sounded easy enough, though I made some adjustments as I started baking, as you'll see below.

Potato Bread

I don't believe that I've every posted about a potato bread on this site, so a little introduction is in order.

Replacing between 10 and 30 percent of your flour with mashed potatoes results in a wonderful soft, moist loaf of bread. Potato flakes or potato starch can be used, as well, but leftover mashed potatoes work great even if they have some butter or milk or salt in them.

Do be careful, though: potatoes are considerably lower in gluten than wheat, so add too much potato and you will end with a dense, moist loaf, probably too much like a baked potato for anyone's liking. I find 1/2 cup potatoes to around 3 cups flour to be plenty.

In this recipe I used a couple of small red potatoes that we had steamed up as a side dish for dinner the night before. All I did was mash them up with a fork and mix them into the flour. I left the skins on before mashing them because I find the little red flakes speckling the loaf to be quite attractive.

Bacon isn't to everyone's liking, either for dietary or religious reasons. I see no reason why this recipe wouldn't be good even if you excluded it, but if it something you are able to indulge in I suggest you do. I definitely think it improved the flavor and consistency (and appearance, for that matter) of the loaf.

Enough blabbing. On to the recipe!

Baked Potato Bread

Makes 2 small (one pound) loaves or one large loaf

1/2 cup mashed potatoes
3 to 4 cups all-purpose unbleached flour (I'll explain the ambiguity below)
3/4 cup water
1/2 cup sour cream
2 teaspoons instant yeast
1 teaspoon salt
1/4 cup cooked bacon
1/2 cup chopped fresh chives

To begin, chop up two or three slices of bacon and fry them up. Remove them from the heat.

Mix the mashed potatoes, yeast, salt, and 2 cups of the flour together in a large mixing bowl or the bowl of an electric mixer. If you have active dry yeast and want to substitute, read this. Add the sour cream, water, chives, and bacon and mix together until all ingredients are combined. I also mixed in the bacon fat, which there was about a tablespoon of in the pan, because it improves the flavor of the loaf.

At this point you'll have a very wet, sticky mess, probably more of a batter than a dough. Add additional flour a handful (1/8 cup) at a time and mix or knead it in.

(I lost track of exactly how much extra flour I added, but it seems like it was around 9 or 10 hands full. I added 4 or 5 hands full and mixed them in while the dough was still in the bowl, then I poured the dough out onto a well-floured cutting board and added more, kneading it with my hands which I repeatedly dipped in flour to keep the dough from sticking to them. After 5 or 10 minutes of this I ended up with something that was still quite sticky, but was definitely in the realm of a dough and not a batter: it could be formed into a ball and generally held its shape.)

Once you have combined the ingredients well and gotten the balance of flour and water to a level that seems acceptable, return the dough to a well-oiled bowl. Cover the bowl with plastic wrap and allow the dough to rise for 90 minutes at room temperature or until it has doubled in size.

Remove the dough from the bowl and shape the loaf or loaves. Notice how moist and gummy my dough was when I cut it to shape it into two loaves:

One probably could add more flour and make an acceptable loaf of bread with a drier dough, but I've been finding that I get better results the wetter I am able to leave it. But this really is an art, not a science, so use your own best judgement.

At this point you need to shape the loaves, cover them loosely and let them rise until they double in size again, about 45 minutes. You could put them in greased baking pans and let them rise and bake them in those. I wanted round loaves, so I put them in a couple of couche lined baskets:

Professional bakers use these kinds of baskets, which are very nice but completely out of my price range. I found two small baskets at Goodwill for 49 cents each and have found that they help keep the shape of my rounds very well.

The baking couche I got from a neighbor who works in bakery. It works very well, but you can fake the same thing with a well floured kitchen towel (the linen kind, not a fuzzy one).

As you can see in the picture above, I placed the baskets on a table, the couche over the baskets, and the dough in the floured couche in the baskets. I wrapped the edges of the couche around the balls of dough and let them rise. When they had risen I simply unwrapped the loaves and shook them out of the couche onto my peel (which I dust with semolina flour) and threw them into the oven.

While the loaves are rising again, preheat the oven to 425. If you have a baking stone, be sure to put it in early to heat.

When they have doubled in size (as I said before, about 45 minutes after shaping), put the loaves in the oven to bake. I baked them at 425 for 5 minutes and then reduce the temperature to 350 and baked them another half an hour. The loaves are done when the internal temperature reaches the 185 to 195 degree range (as read with an instant-read thermometer) or when they are nice and brown on the outside and sound hollow when tapped on the bottom. For me this took about 35 minutes.

And there we have it. The bread was wonderful while still warm with a pot of soup, but I actually think I preferred it the next day cold. With the bacon fat and sour cream, there was plenty of fat in the bread so it didn't need to be buttered; just plain it was rich and moist enough.

Baked Potato Bread

mountaindog's picture
mountaindog

Thom Leonard Country French Boule recipe

 Hole-y-ness:

I've been asked how I get the big holes, and how I fold. Whether you are working with a bread dough that uses commercial yeast, or with sourdough, the same principles seem to apply from what I've experienced. Obviously, there are others here more experienced in sourdough who may have different techniques. It depends on what works for you.

What gives me the big holes is to use a very wet, soft dough, fold it 2-3 times for the first 60-90 minutes of fermenting to strengthen the gluten, and when you're ready to shape, VERY GENTLY pour it out onto your counter, VERY GENTLY fold the sides into the center to gather it up into a boule without degassing it in the least, flip upside down in your hand and tighten it into a boule by pinching the seam underneath closed. Then place it smooth-side down (seam-side up) into a floured banneton or proofing basket. Do not skimp on the rising time - if it needs 5 or 6 hours rather than the 3 stated in the recipe, let it rise all the way, and make sure your starter is very active.

I really like this bread, I just made it again this past weekend and it came out equally well as it did in the photo at top. It had more of a sour bite to it this time from the wet rye starter.

Thom Leonard’s Country French Bread (from "Artisan Baking" by Maggie Glezer)

Makes one 4 lb. (1.8 kilo) loaf

Time: about 18 hrs. with 30 minutes of active work


The evening before baking make the Levain as follows:

45 g ( 1 oz) fermented rye sourdough starter refreshed 8-12 hrs before (I use a batter-like starter made with equal weights water to rye flour, not a firm starter. If you only have a white flour starter, use that and just substitute 30 g of the white flour in the final dough with rye flour)

120 g (3.3 oz) lukewarm water

140 g (5.3 oz) unbleached all-purpose or bread flour (see my note below on flour)

Dissolve starter in the water in a small bowl, then add flour and beat this batter-like dough until very smooth. Place in covered container and ferment at room temp (@70F) until doubled, 8-12 hrs.

NOTE: I use only King Arthur All-Purpose flour rather than bread flour as it has a high enough protein content and a high ash content compared to other all-purpose flour. The high amount of protein found in most “bread flours” makes the crumb too tough for my taste.

Next day make the final dough as follows:

100 g (3.5 oz) Whole Wheat Flour (if you like your bread a little darker add up to 350 g whole wheat here and use 250 g less white flour below)

1030 g (36 oz) unbleached all-purpose flour (King Arthur has best protein and ash content. If using a white flour starter in the levain rather than rye, substitute 30 g of the white flour here with 30 g rye flour)

660 g (24 oz) warm water

all the fermented levain you made the night before (305 g or 10.6 oz)

23 g (0.8 oz) sea salt (preferably grey Celtic sea salt if you can find it, often sold in health food stores)

Mix By hand: combine all flours in large bowl. Add the warm water to the fermented levain to loosen it from container. Pour the watered levain into the flours and mix with spoon, dough whisk, or hands until just combined. Cover with plastic wrap and let rest (autolyse) for 20-30 minutes. Turn dough out onto work surface, knead for 10 minutes, then add salt, and knead for another 5 minutes until salt has dissolved and dough is very smooth and shiny.

Mix By stand mixer: same as by hand except leave in mixer bowl after autolyse, then mix with dough hook on lowest speed for 5 minutes. Add salt and knead in mixer at low speed for another 4-5 minutes until very smooth and almost cleans the bottom of the mixing bowl.

The dough should feel soft, sticky, and extensible at end of kneading. If it is too stiff and dry, add a few more drops of water until dough just barely clears bottom of mixing bowl at end of kneading if using a stand mixer, or until dough feels soft and stretchy, and slightly sticky, if hand kneading. Softer, wetter doughs give you larger air holes in the baked loaf, which also gives the bread more flavor.

Fermenting: Place dough in lightly-oiled bowl at least 3 times its size and cover with plastic wrap. Let ferment for 3 hours at room temp (@70F) until well-expanded but not yet doubled in bulk. Turn dough 3 times at 30 minute intervals by gently folding like a business letter and flipping upside-down, (that is, turn once at 30, 60, and 90 minutes into fermenting time), then leave the dough undisturbed for remainder of time. OR: for even more flavor, ferment at room temperature for one hour (turning 2 times, once at after 30 and once after 60 minutes), then retard overnight in fridge, warming up again next day at room temp. for 2-3 hours before shaping.


Rounding and resting: Turn dough out onto floured work surface, and very gently round it into a tight boule. Cover with plastic and let rest for 10-15 min. to relax the gluten. While resting, prepare your basket or banneton by dusting with flour. If you’d rather make 2 smaller boules than one large one, divide the dough in half with a dough cutter, and gently form each piece into a tight boule.

Shaping and proofing: Shape the dough into an even and tight round loaf (or leaves if making 2 smaller boules) without deflating it. Place dough topside down into the floured basket or banneton. Lightly sprinkle the top of the dough with flour, cover with plastic wrap and proof for 4 to 4.5 hours at room temperature (@70F) until at least doubled in volume and a slight dent remains when pressed with finger.

Preheating oven: At least 45 minutes before dough is fully-proofed, preheat oven with baking stone on middle rack to 500F.

Bake: Gently flip the dough upside down to release it from the banneton/basket onto semolina-dusted parchment on an over-turned baking sheet or wooden peel, or directly onto a semolina-dusted peel if not using parchment. Slash the boule with a razor in a pound sign (#) design, or in a spiral, cross, or any other desired pattern, as long as the slashes go completely across the top to allow for even expansion during baking. Slide parchment onto hot baking stone in oven, or onto semolina dusted baking stone if not using parchment, and quickly mist side walls of oven with water in a mister (do not spray near the oven light!) and quickly shut the oven door to prevent heat and steam from escaping. The steam helps the dough rise very quickly in the hot oven (called “oven spring”) and also makes the crust more brown and crisp. Turn oven down from 500F to 400F and set oven timer for 30 minutes (20 minutes if making 2 smaller boules). Continue misting every 30 seconds just 3 or 4 times for first 2 or 3 minutes of baking, then leave to bake. When first 30 minutes are up, open oven and rotate loaves around to even out browning. Set timer for another 30 minutes (20 minutes for 2 smaller boules) and check the loaf when that time is up. If it is still a light color brown, leave in for another 5-10 minutes until it is a deeper brown but not burnt, then probe center of loaf with instant-read thermometer, loaves are done when thermometer reads at least 205F in center. If they are getting burnt but center is not done, your oven is too hot, turn it down another 25 degrees or so next time. Let cool thoroughly on rack before cutting as the centers are still cooking, at least 2 hours.

There must be a hundred different cinnamon roll recipes, from the French pain aux raisin to the British Chelsea buns to Philadelphia style sticky buns to the Midwest American truck stop cinnamon rolls that are as big as your head.

Here is the recipe I grew up with and still bake most often.

Cinnamon Rolls
Makes 12 rolls
Dough:
16 oz all-purpose flour
10 oz warm milk
2 teaspoons instant yeast
2 tablespoons melted butter
1/4 cup sugar
1 teaspoon salt

Filling:
4 tablespoons melted butter
1 cup raisins
1/2 cup brown sugar
1 teaspoon cinnamon
1/2 cup choppped walnuts or pecans

Glaze
1 cup powdered sugar
1 tablespoon lemon juice

Make the dough by combining all of the ingredients and kneading until smooth, 5 to 10 minutes. The dough should be tacky but not sticky. If it is too moist add a handful of extra flour. Place the dough in a bowl, cover the bowl, and set aside to rise until it has doubled in size (roughly an hour).

While I'm waiting for the dough to rise, I like to plump the raisins by pouring very hot water on them and letting them sit in the water for 15 minutes before draining them. This keeps them moister when you bake them, but this step isn't necessary if you are short on time.

Sometimes I prepare my filling as you'll see below: by combining the softened butter, cinnamon, and brown sugar in a bowl so they can be spread together. Again, this isn't necessary: you can simply spread the butter and sprinkle the sugar and spices as best as you can by hand. It is up to you.

When the dough is risen, roll it out on a floured surface.

Cinnamon Rolls

Spread the filling on the risen dough.

Cinnamon Rolls

Also sprinkle the raisins on top.

Roll the dough up, trying as best as you can to prevent the filling form spilling out. Slice the roll into 12 even pieces.

Cinnamon Rolls

A tip from the Department of Slow Learners: I have no idea why it took me 25 years to figure out this trick, but it did. In the past, when I needed to slice something like this into 12 even pieces, I would eyeball it and then start carving one slice at a time off the end. Inevitably as I reached the final couple of slices I'd have either too much or too little left, so the final couple rolls are never the same size as the rest.

The trick I learned is to first slice the roll into two even pieces. Then slice slice each of these pieces into two even pieces, so you have four pieces total. Each of those pieces only needs to be cut twice more for you to have twelve pieces. Eyeballing how to cut a small piece of dough into three even pieces is much easier than eyeballing a twelfth of a large piece of dough.

Cinnamon Rolls

Moving on....

Now that your roll is cut into twelve even pieces, place those pieces in a baking pan.

Cinnamon Rolls

Cover the pan and let the buns rise for another 45 minutes to an hour until they've roughly doubled in size.

Cinnamon Rolls

Bake them at 375 for 20 to 25 minutes. Be careful about oven positioning and overbaking: because there is quite a bit of sugar in the filling it is quite easy to burn the bottom of the rolls. I find that the second rack from the top works best in my oven, and I try to pull them out as soon as they look baked.

Cinnamon Rolls

Let the rolls cool for 20 minutes or so before glazing them. The glaze will thicken as it cools, but if it is extremely runny feel free to add some additional powdered sugar to thicken it up.

Cinnamon Rolls

There is it.

Cinnamon Rolls

I'd be interested in hearing about other people's favorite Cinnamon Roll recipes/techniques. Please share your recipes, ideas, and photos.

Cinnamon Rolls


Authentic Pain Aux Raisins are one of my favorite treats. Rich and sweet without being cloyingly so like your typical donut or danish, they make the perfect accompaniment to a good cup of joe.

Reading The Village Baker I came across a recipe for them and was surprised at how simple they are to make. So last weekend I tried making them and have been blissed out eating them all week.

The one type of danish that I have a weakness for is a cream cheese danish. Wouldn't you know it, the next recipe in the book is for a cheese danish. It even uses the same base recipe. I couldn't resist.

Without further ado, the recipes.

I lied: a little further ado.

If you don't have powdered milk in the house, don't sweat it: just replace 1/2 cup of the water with milk.

Note that this Pain Au Lait is essentially a Poor Man's Brioche. If you want you snails to be richer you could substitute a higher class (more butter) Brioche recipe. I find these to be plenty rich for my taste.

Pain Au Lait

1 package (2 1/2 teaspoon) active dry yeast or 2 teaspoons instant yeast
3/4 cup water
3 1/2 cup all-purpose unbleached flour
1 1/2 teaspoons salt
2 Tablespoons powdered milk
4 tablespoons sugar
3 eggs
6 tablespoons butter, softened

If using active dry yeast, proof it in 1/2 cup of warm water for 10 minutes. If you are using instant yeast, as I did, it can just be mixed in with the dry ingredients in the next step.

In a large bowl combine the flour, salt, powdered milk, and sugar. Add the yeast, water, and eggs and mix until ingredients are combined. Add the softened butter and mix or knead until the ingredients are thoroughly combined (Ortiz doesn't describe an extensive kneading step in this recipe, so I guess it is unnecessary). You should have a fairly sticky, satiny dough.

Place the dough in a greased bowl, cover with plastic wrap, and allow the dough to rise until doubled in size (approximately 1 to 1 1/2 hours). Punch the dough down, return it to the bowl and cover it again, and place it in the refrigerator overnight.

In the morning, divide the dough in half and, while still cold, use each half to prepare one batch (8) of each type of snails (or two batches of one of them, if the other doesn't interest you).

Before beginning, you'll need to make a simple egg glaze that you will use in both recipes:

Egg Glaze

1 egg
1 tablespoon milk

Whisk to combine.

Cream Cheese Snails

(makes 8 snails)

Filling:
3/4 cup cream cheese
2 tablespoons sugar
1/2 teaspoon vanilla extract
1 tablespoon egg glaze

Roll the dough out into a large rectangle, approximately 8 by 12 inches. Slice the rectangle into 8 long strips.

Stretch each strip as long and thin as you can (Ortiz says out to 24 inches. I only got mine about 12 to 15 inches long but they were still fine). Twist each strip and then curl each up to make a snail shape.

Place the snails on a parchment-lined or well greased baking sheet and brush them gently with the egg glaze.

Use your fingers to create a well in the center of the snail and then place one tablespoon of the cheese mixture on top. Ortiz also recommends adding a tablespoon of jam, but I find the cheese alone the be plenty sweet.

Let the snails rise for 1 to 1 1/4 hours until they are puffy. Preheat the oven to 385 degrees and bake the snails for between 15 to 17 minutes, until they are golden brown.

Immediately after removing from the oven, paint then with a light sugar glaze:

1/4 cup water
1/4 cup sugar
1/8 teaspoon vanilla extract

If you like them to be extremely sweet, you can dribble them with a fondant glaze (1 to 2 teaspoons of hot water combined with 2/3 cup of powdered sugar) after they have cooled. I did not.

Pain Aux Raisins

(makes 8 snails)

Filling:
1/4 cup sugar
1/2 teaspoon cinnamon
1/3 cup raisins

Roll the dough out into a large rectangle, approximately 8 by 10 inches. Coat the rectangle with the egg glaze and then spread the cinnamon, raisin, and sugar mixture over it.

Roll the the dough up into a large log and then slice it into 8 pieces. Place each of the pieces onto a parchment-lined or well greased baking sheet, press down on them with the palm of your hand to flatten them, and then paint them gently with the egg glaze.

Let the snails rise for 45 minutes to 1 hour until they are puffy. Preheat the oven to 385 degrees and bake the snails for between 15 to 17 minutes, until they are golden brown.

Immediately after removing from the oven, paint then with the same sugar glaze you painted the cream cheese snails with above. Once again, If you like them on the sweet side dribble them with a fondant glaze (1 to 2 teaspoons of hot water combined with 2/3 cup of powdered sugar) after they have cooled. I did not think this was necessary.

Pain Aux Raisins and Cream Cheese Snails

Pages