The Fresh Loaf

A Community of Amateur Bakers and Artisan Bread Enthusiasts.

Most bookmarked

mcs's picture
mcs

Potato Rolls - video

OK TFLers,
I know it's been a long time, but here I am with a new video from the new bakery.  This is a pretty simple Potato Bread recipe of mine that I mix by hand and shape into rolls.  It's a decent high quality soft bread that makes tasty burger buns, dinner rolls, and also works well for filling with stuff like chicken teriyaki :)  I use an overnight bulk fermentation to add some flavor and keeping quality, plus I use the yellow/golden potatoes that add a buttery, smooth texture to it.

Enjoy the video, the recipe is at the end.

-Mark

http://SinclairsBakery.com


txfarmer's picture
txfarmer

New Orleans Po-Boy Bread - it's all Eric's fault

Sending this to Yeastspotting.

Click here for my blog index.

Honestly, I do blame it on Eric. Firstly, he posted a mouth watering blog about his initial attempt at replicating the famous NO French bread (see here); then he emailed me and asked me to do futher investigation; just to make it final, he even fowarded me some links and pictures to get me started. After a few tries, my final version actually is not that different from Eric's original formula, with the following modification:

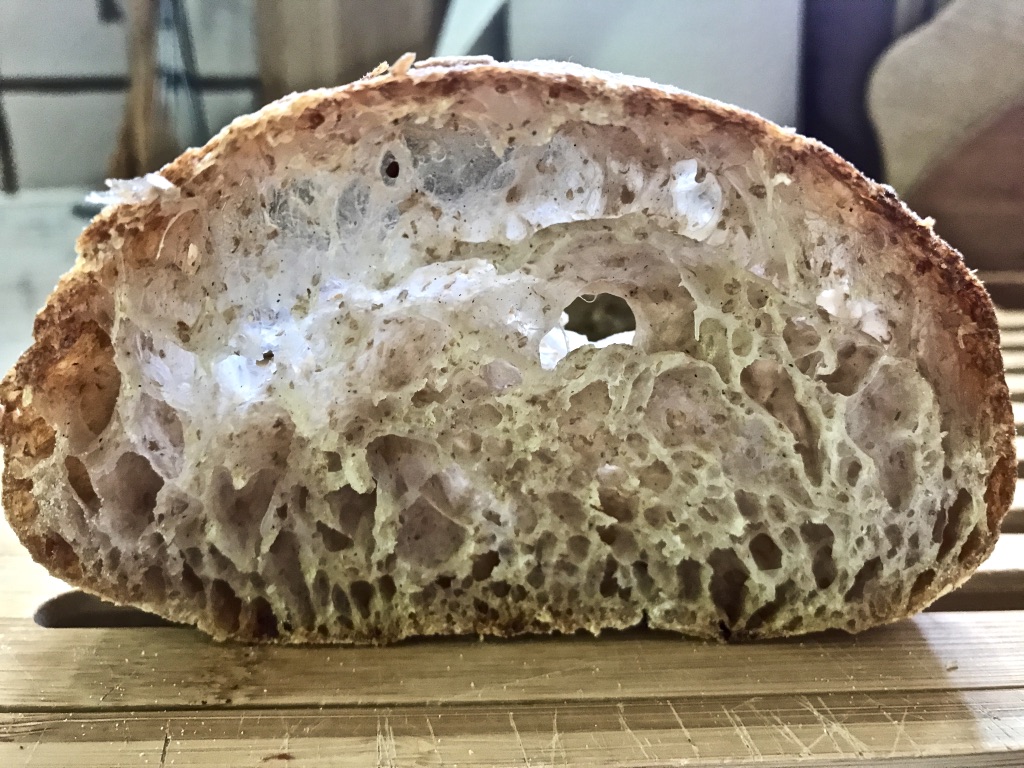
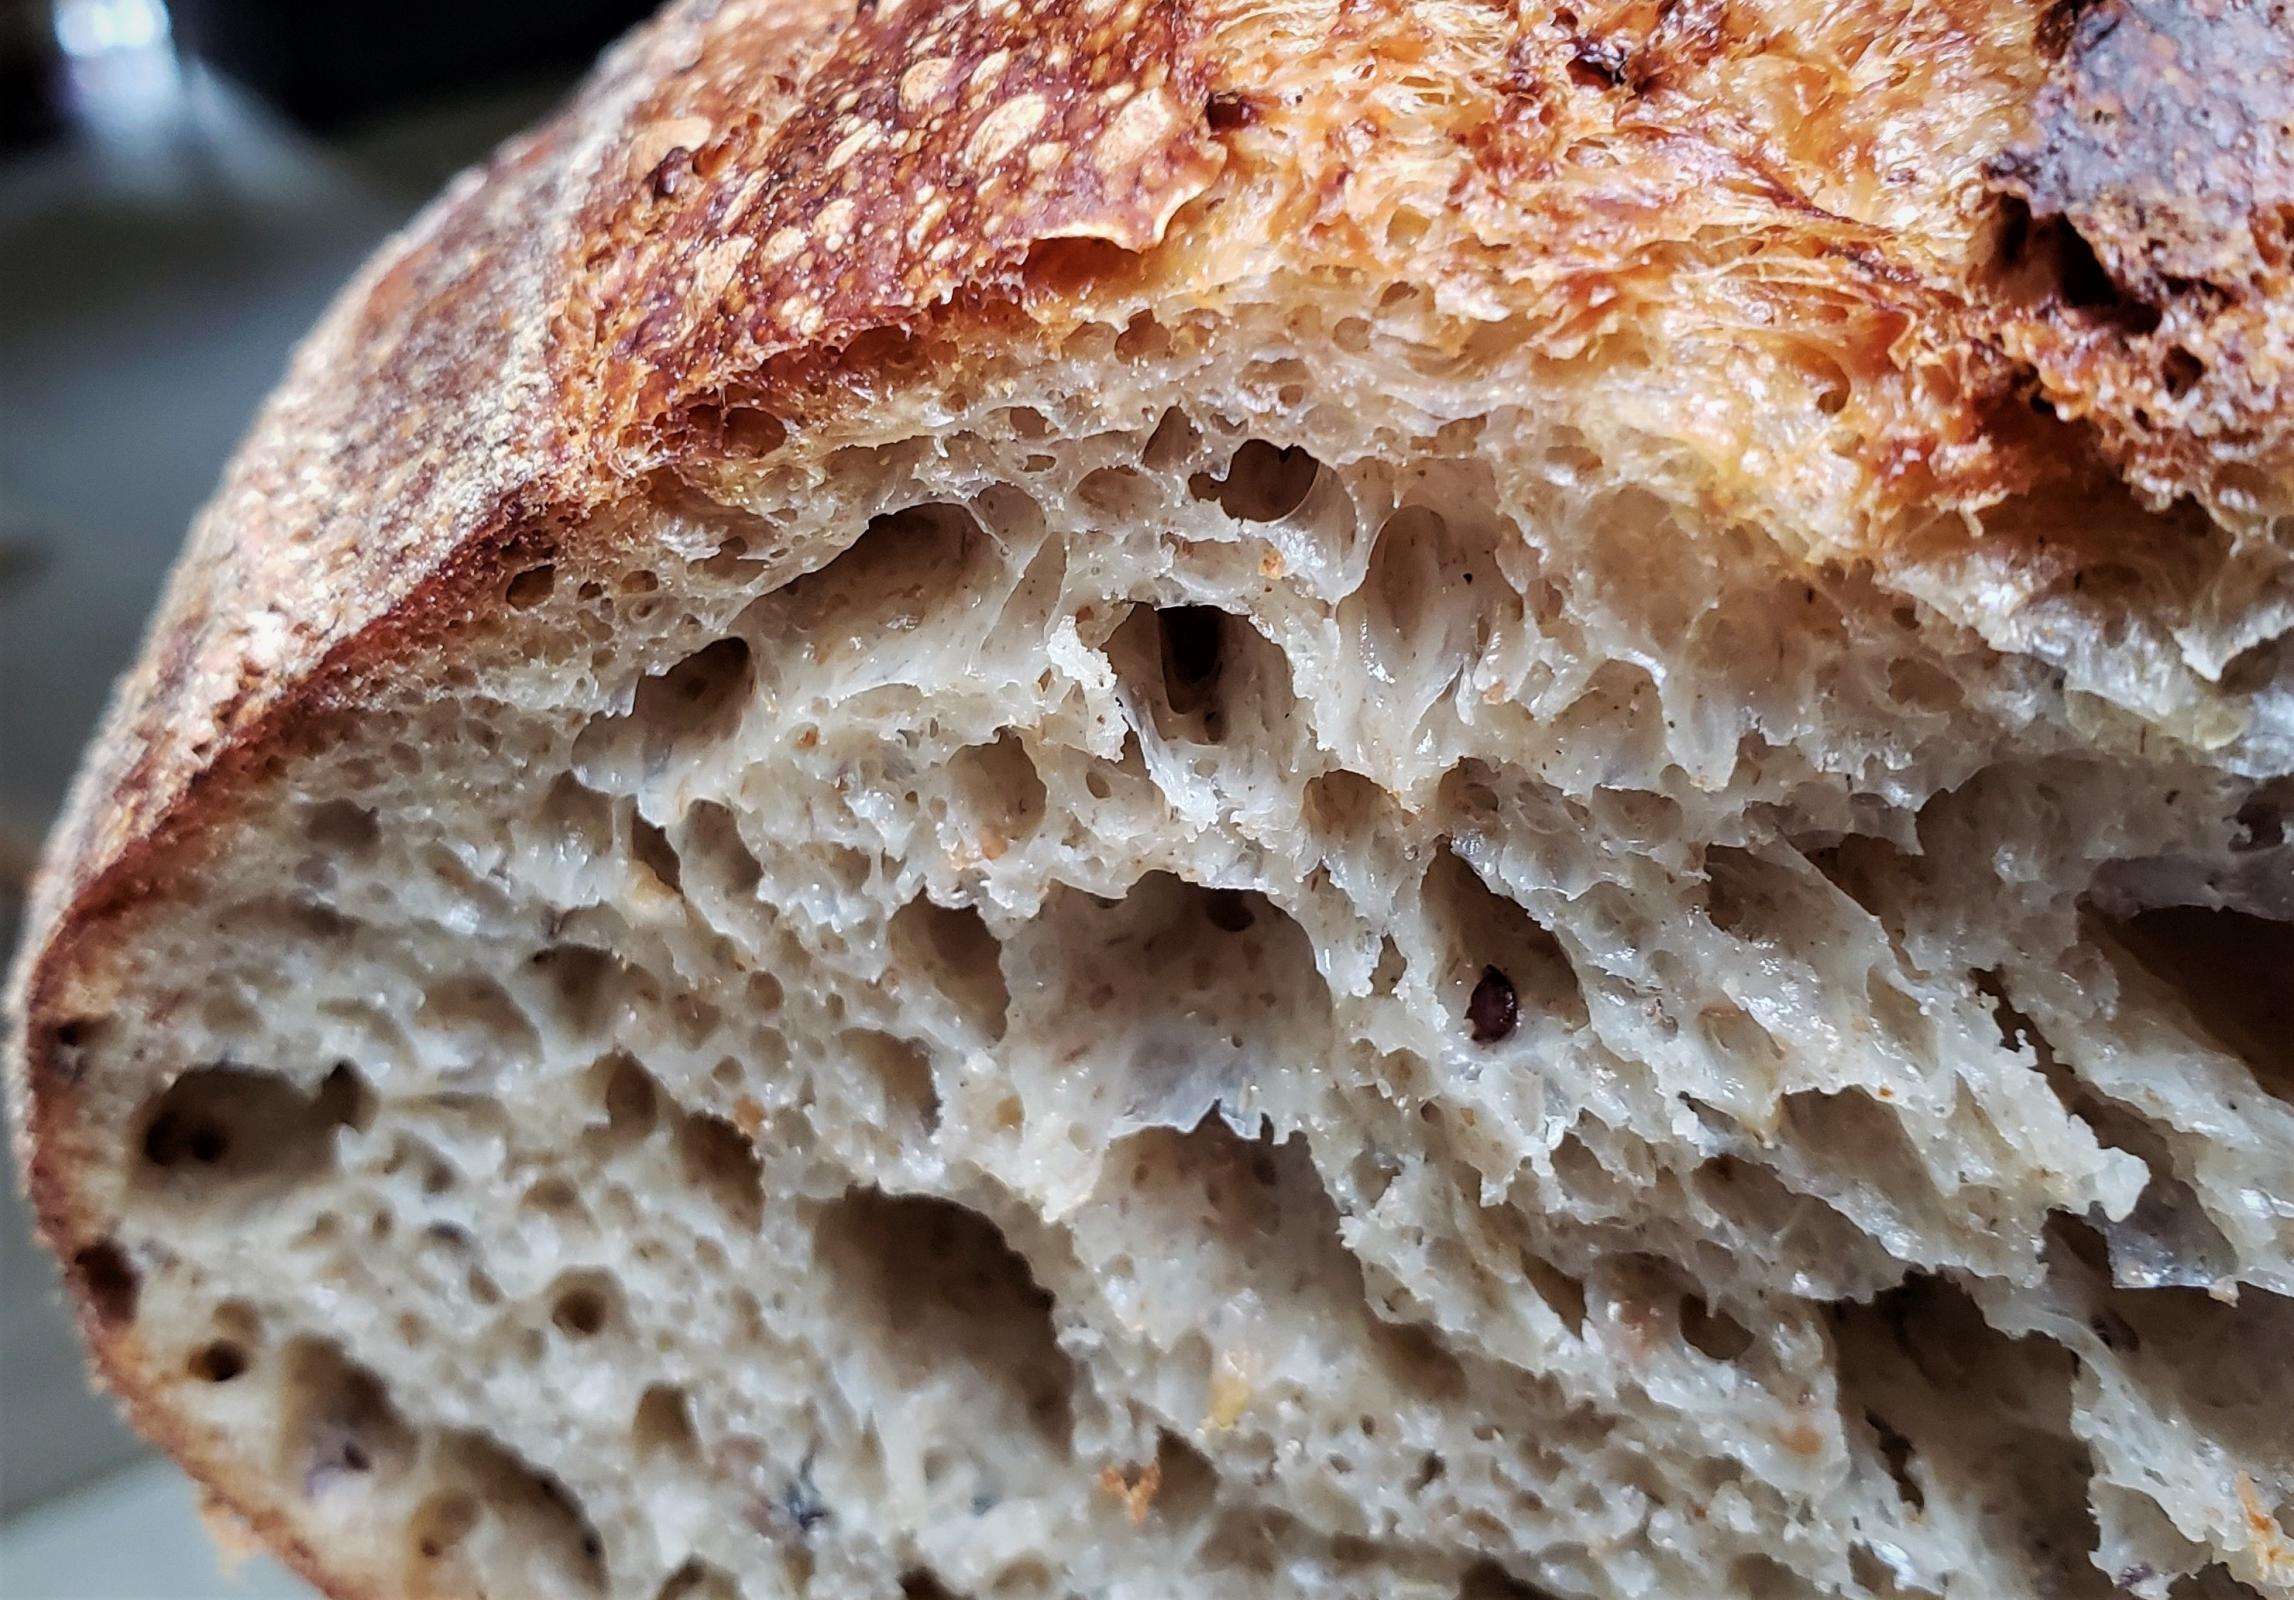
- To make crumb velvety soft
* Knead, knead, and knead, see this post for details. If your bread is too dense, too tough, knead more.
* Some enriching ingredients like sugar, powdered milk, and fat. However if there are too much enriching ingredients, the crust will become soft too. Eric's original formula provides a good balance.
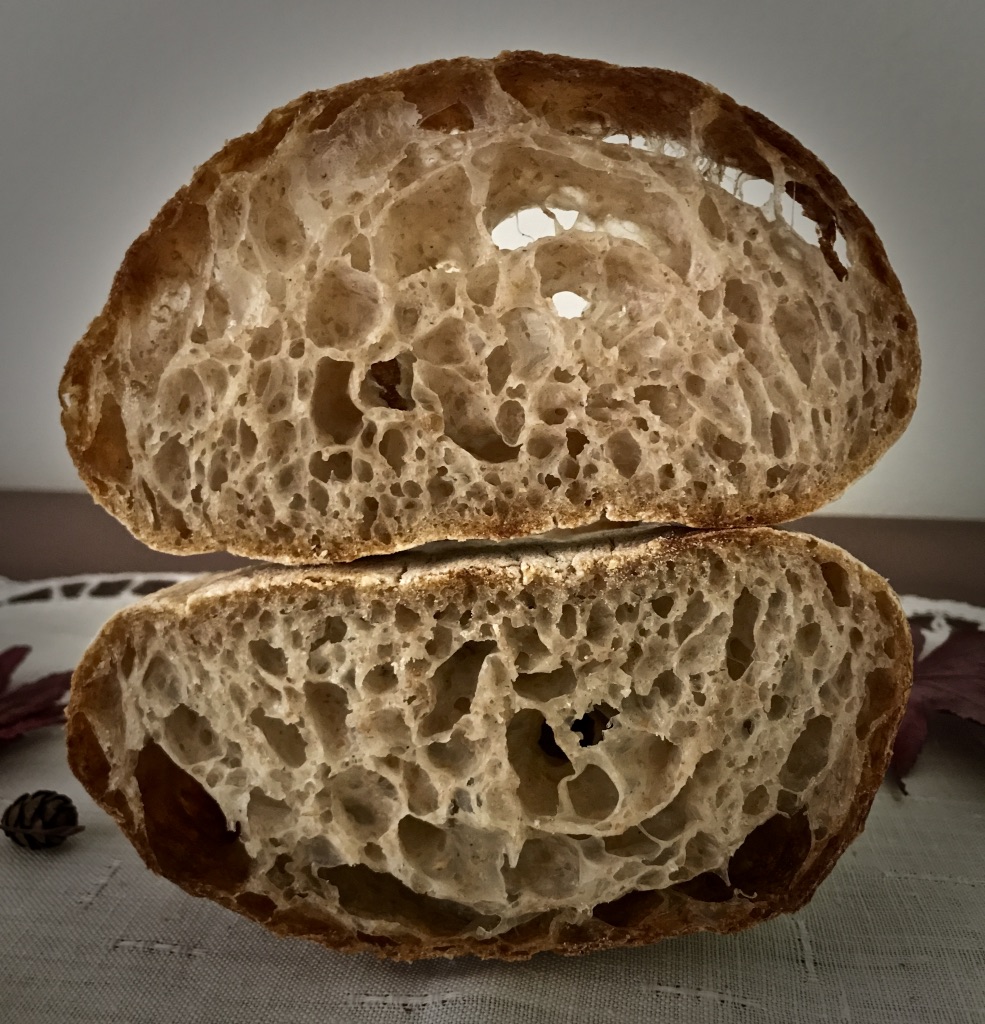
* I used a combination of AP and Bread Flour. BF is there to ensure enough strength, so the bread can have a lot of volume, thus guarantee a soft mouthfeel, as well as some "bounciness". AP flour is used to add tenderness. You can certainly adjust the AP/BF ratio to get the crumb you like.

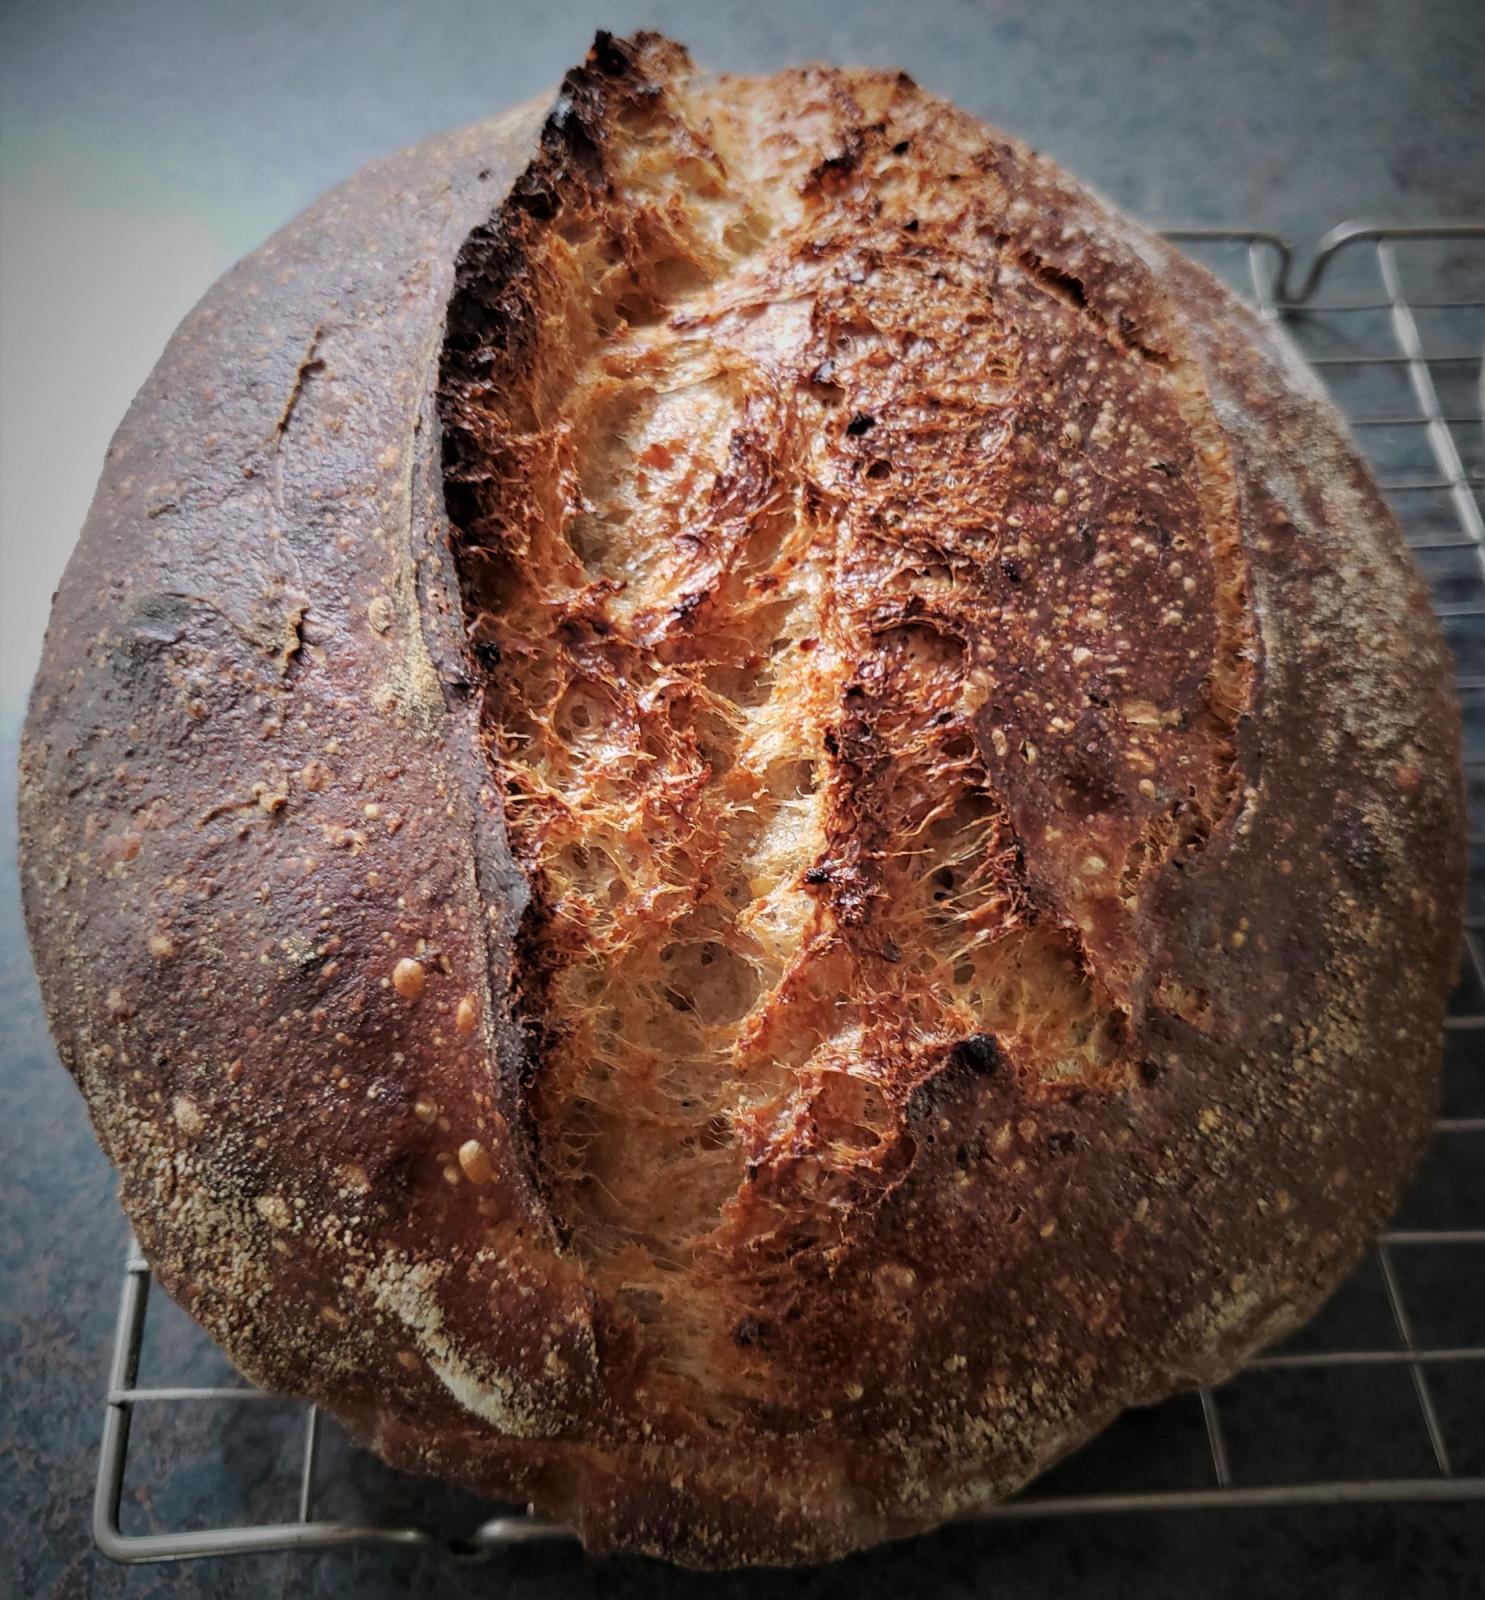
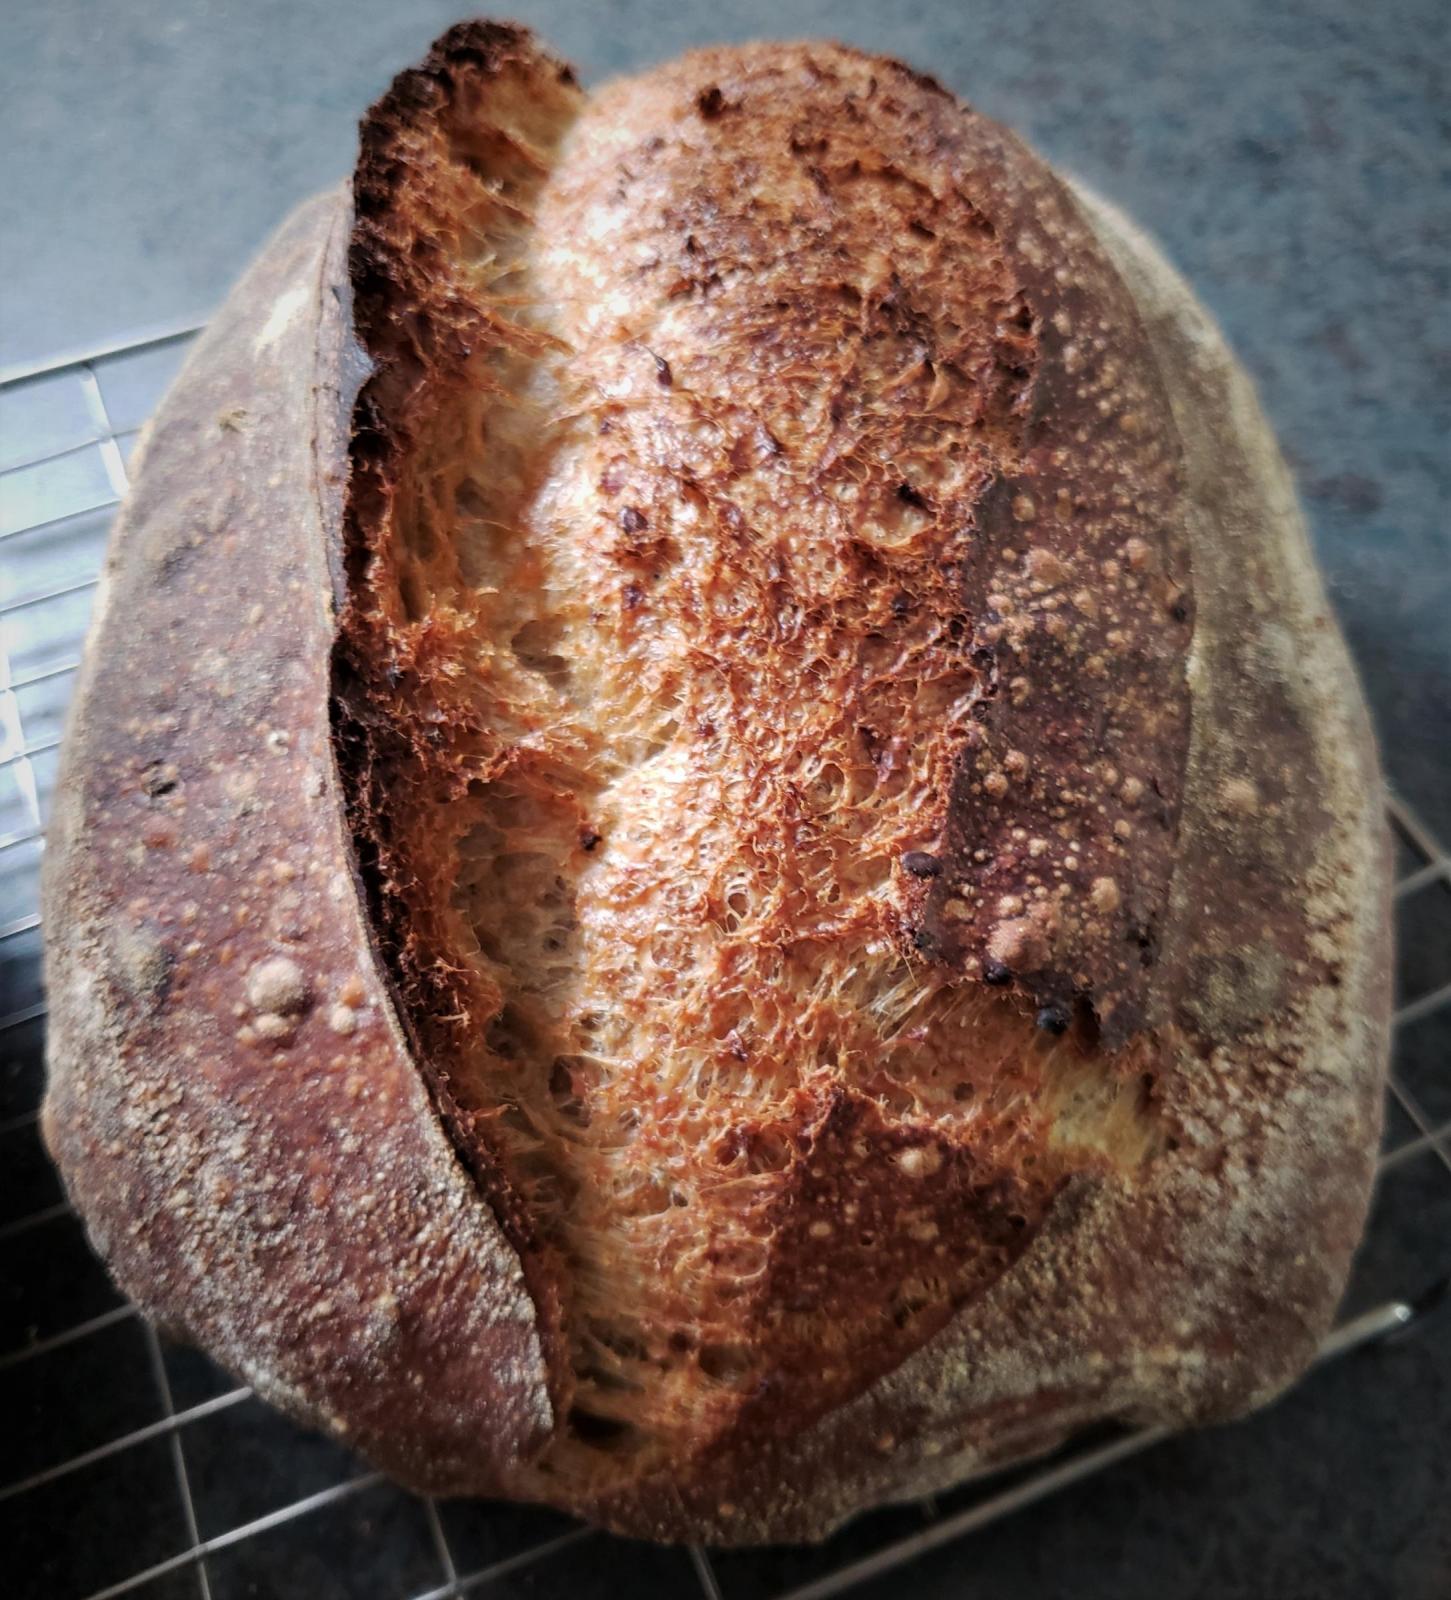
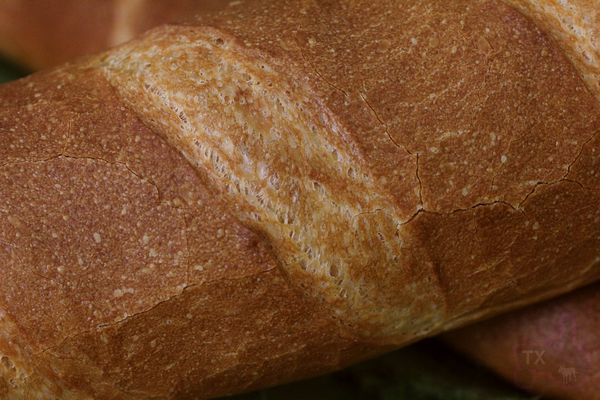
- To make crust very thin and crispy
* 10% of rice flour. I have made baguettes with rice flour before with very good and crispy crust, it does the same thig here.
* Bake with steam (Eric's version does that too).
* Brush the dough with liquid before baking. I tried different liquid with different results: cold water -> thin, crispy, probably the most "authentic" version; egg whites/corn starch+ water -> even crispier than water but thicker; olive oil -> still crispy but less crackly, very fragrant, my favorite
* Size matters. I tried to make them smaller, but the baking time ended up too short to create a very crackly crust. If the size is too big, crust would be baked too long , which means too thick. The size I am making below is smaller than Eric's original version, but still big enough to get the crust right.

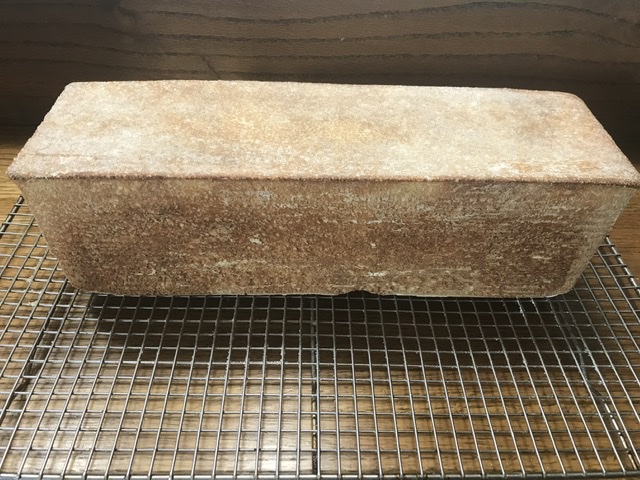
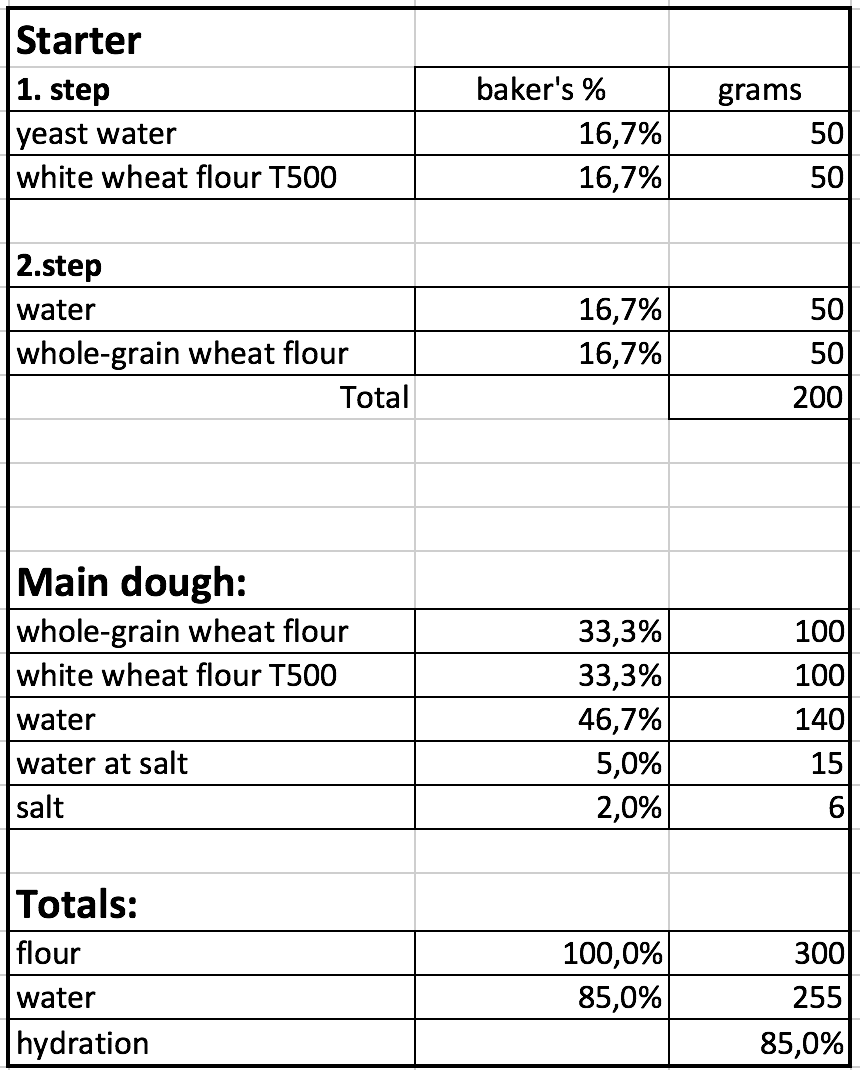
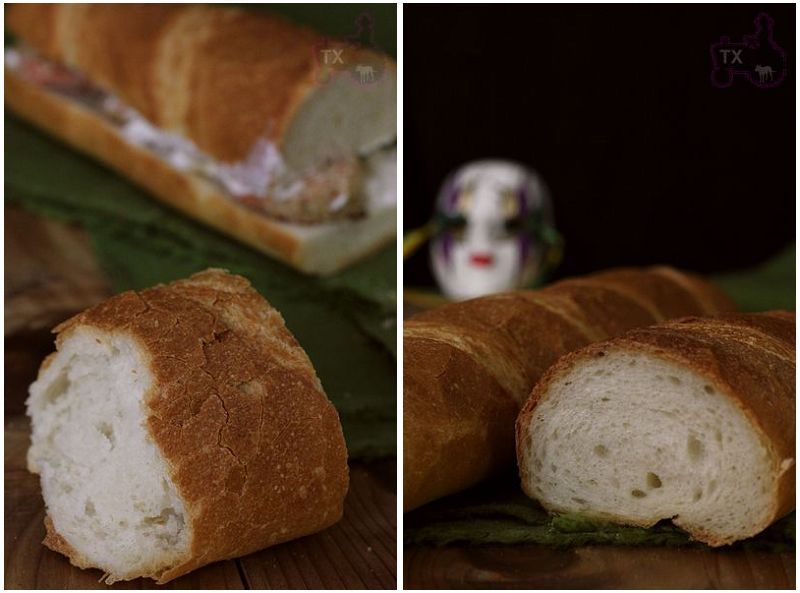
New Orleans Po-Boy French Bread (adapted from Bernard Clayton's "New Complete Book of Breads")
Note: makes 2X400g loaves

Bread Flour , 225g
AP Flour, 150g
Rice Flour, 45g
Water, 300g
Instant yeast, 1.5t
Salt, 8g
Sugar, 10g
Powdered Milk, 5g
Butter, 10g, softened

1.Mix everything but butter, knead until gluten starts to form, add in butter, knead until pass windowpane test, see this post for details. Note that rice flour is pretty coarse, may interfere with gluten formation, so the kneading would take a while, and the windown pane would be a bit thick.

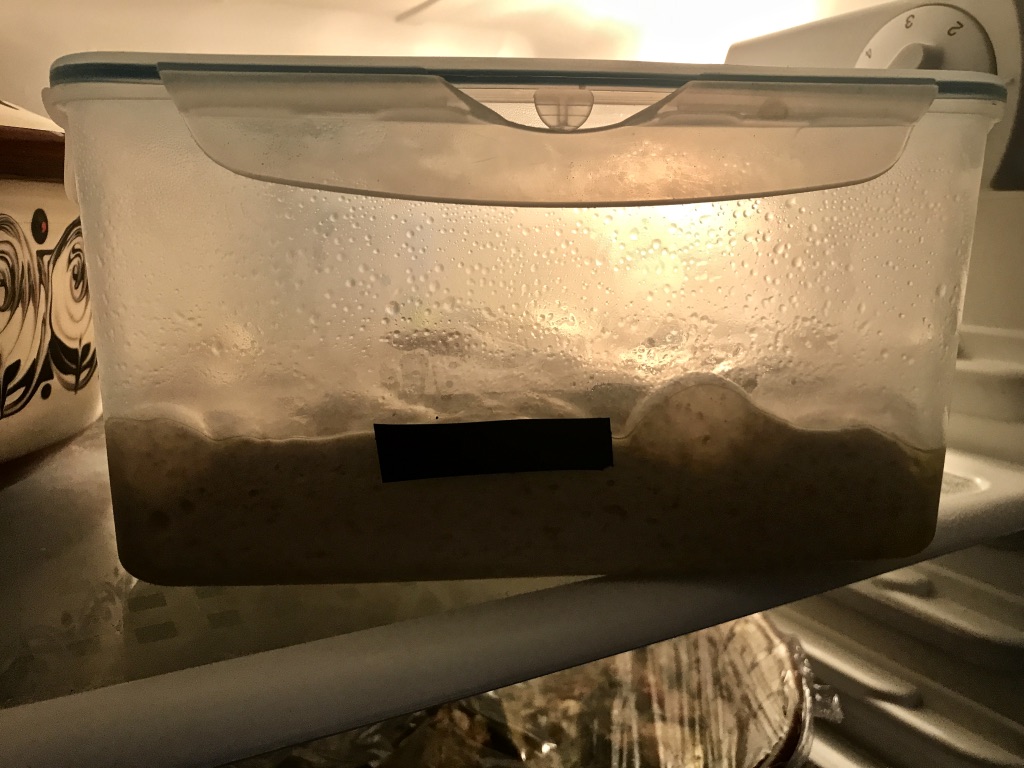
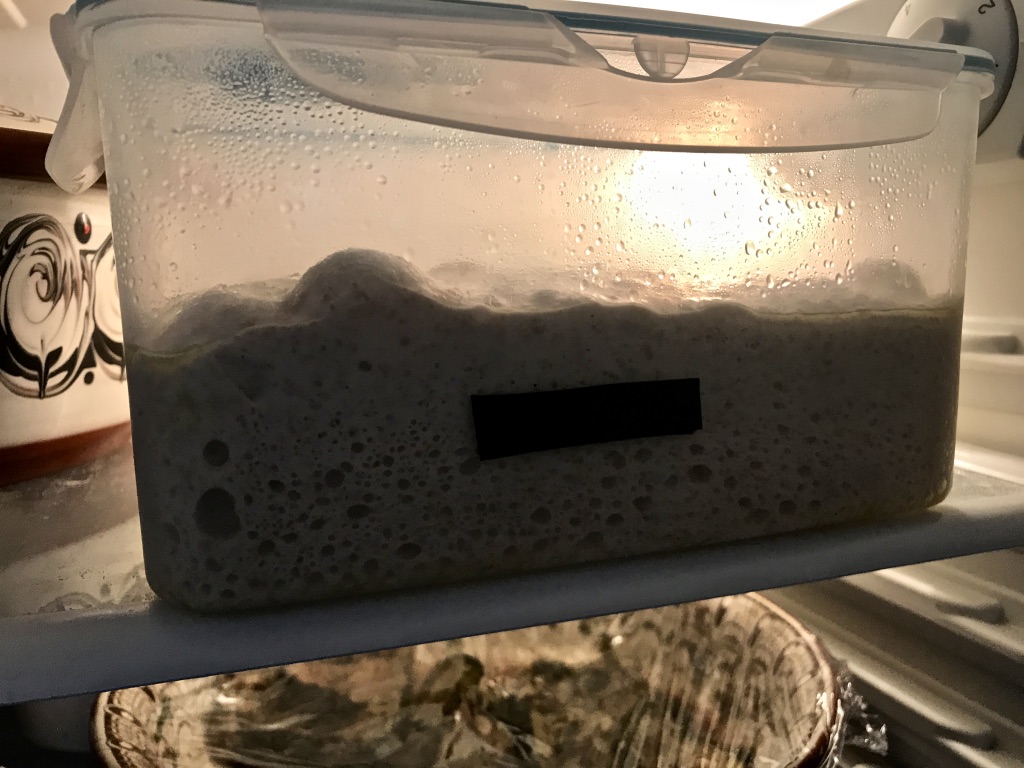
2. Bulk rise at room temp (75F) for 70min until more than doubled, S&F at min 50.
3. Divide into 2 parts, preshape and relax for 20min. For each dough, roll out to 14X6inch, get rid of all air bubbles, roll up, seal, roll out to 16inch in length.

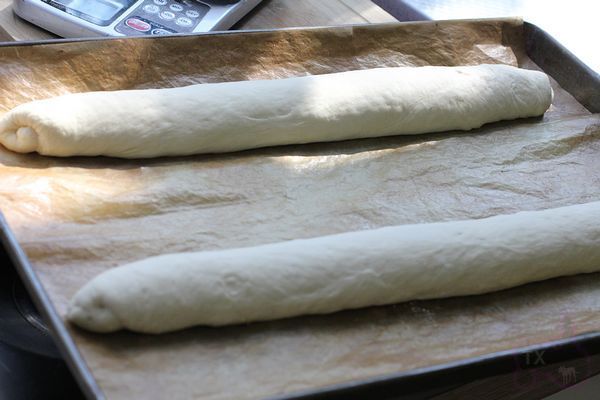
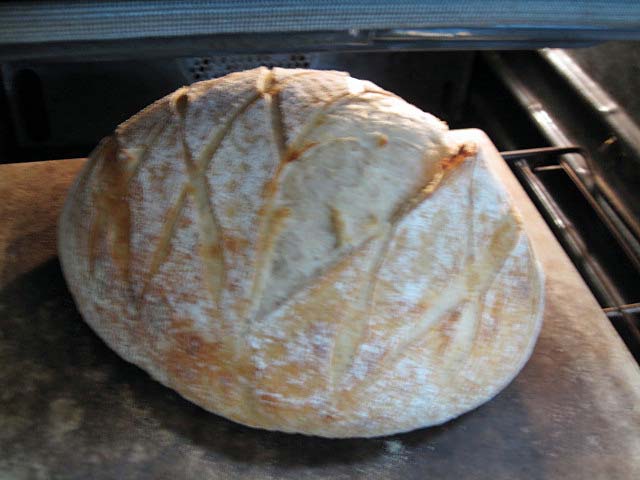
4. Proof at room temp until double, 45min to 60min. Brush with water (or other luqid), score.

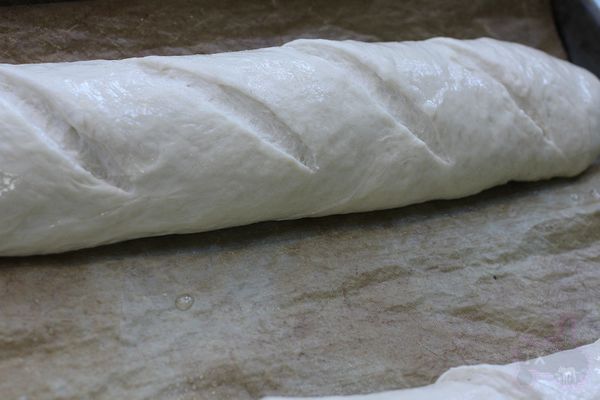
5. Bake at 425F for 20min with steam, lower to 375F, rotate baking sheet, and keep baking for another 20min. The last 5min with door cracked open.


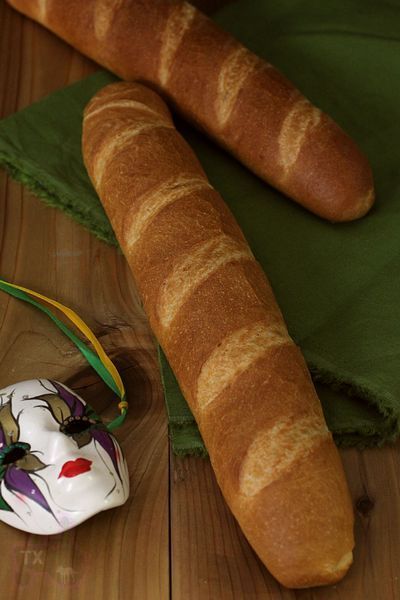
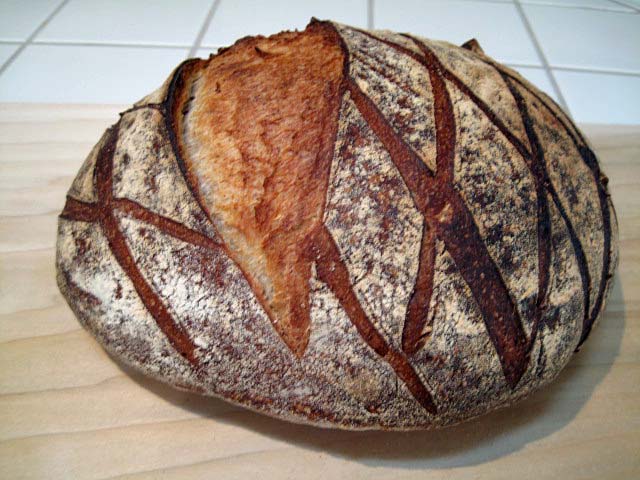
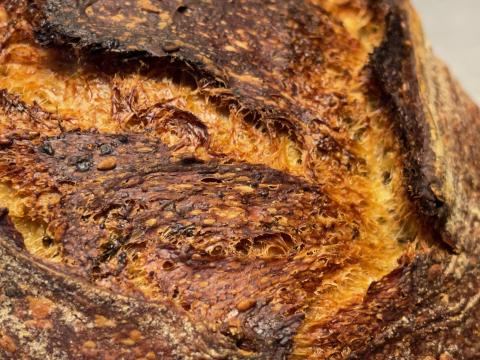
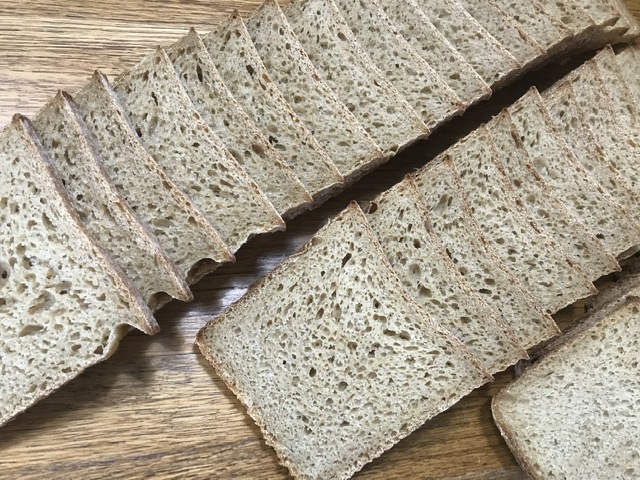
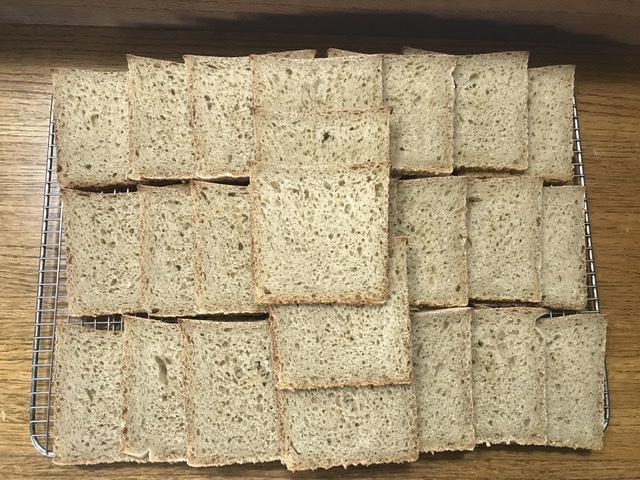
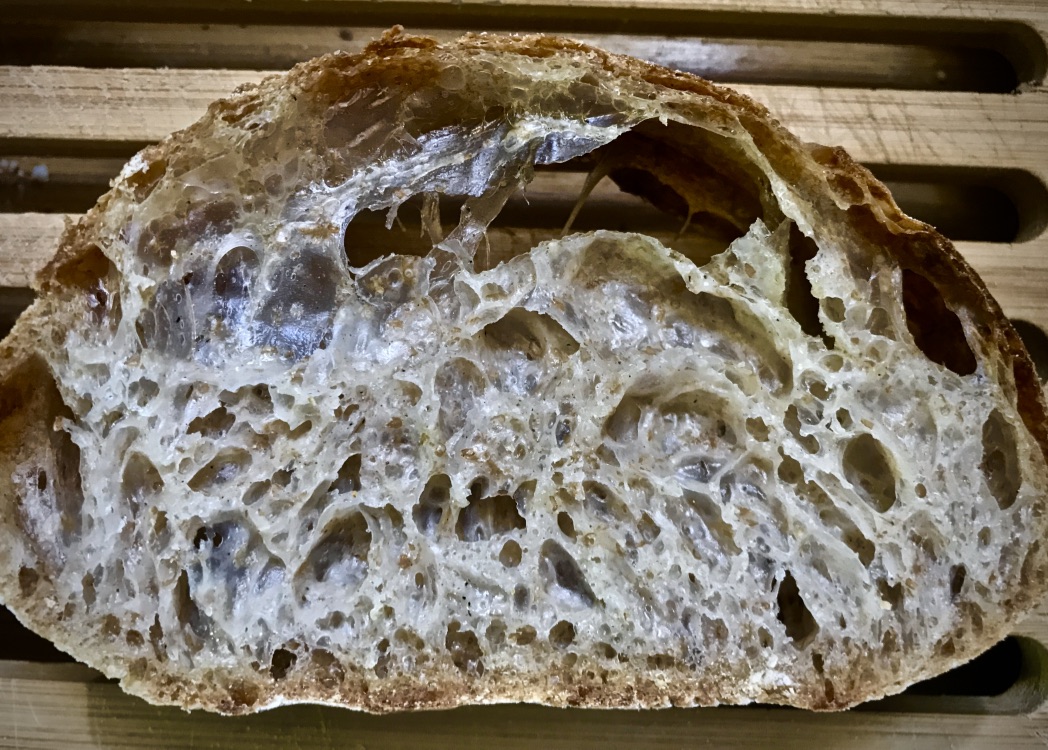
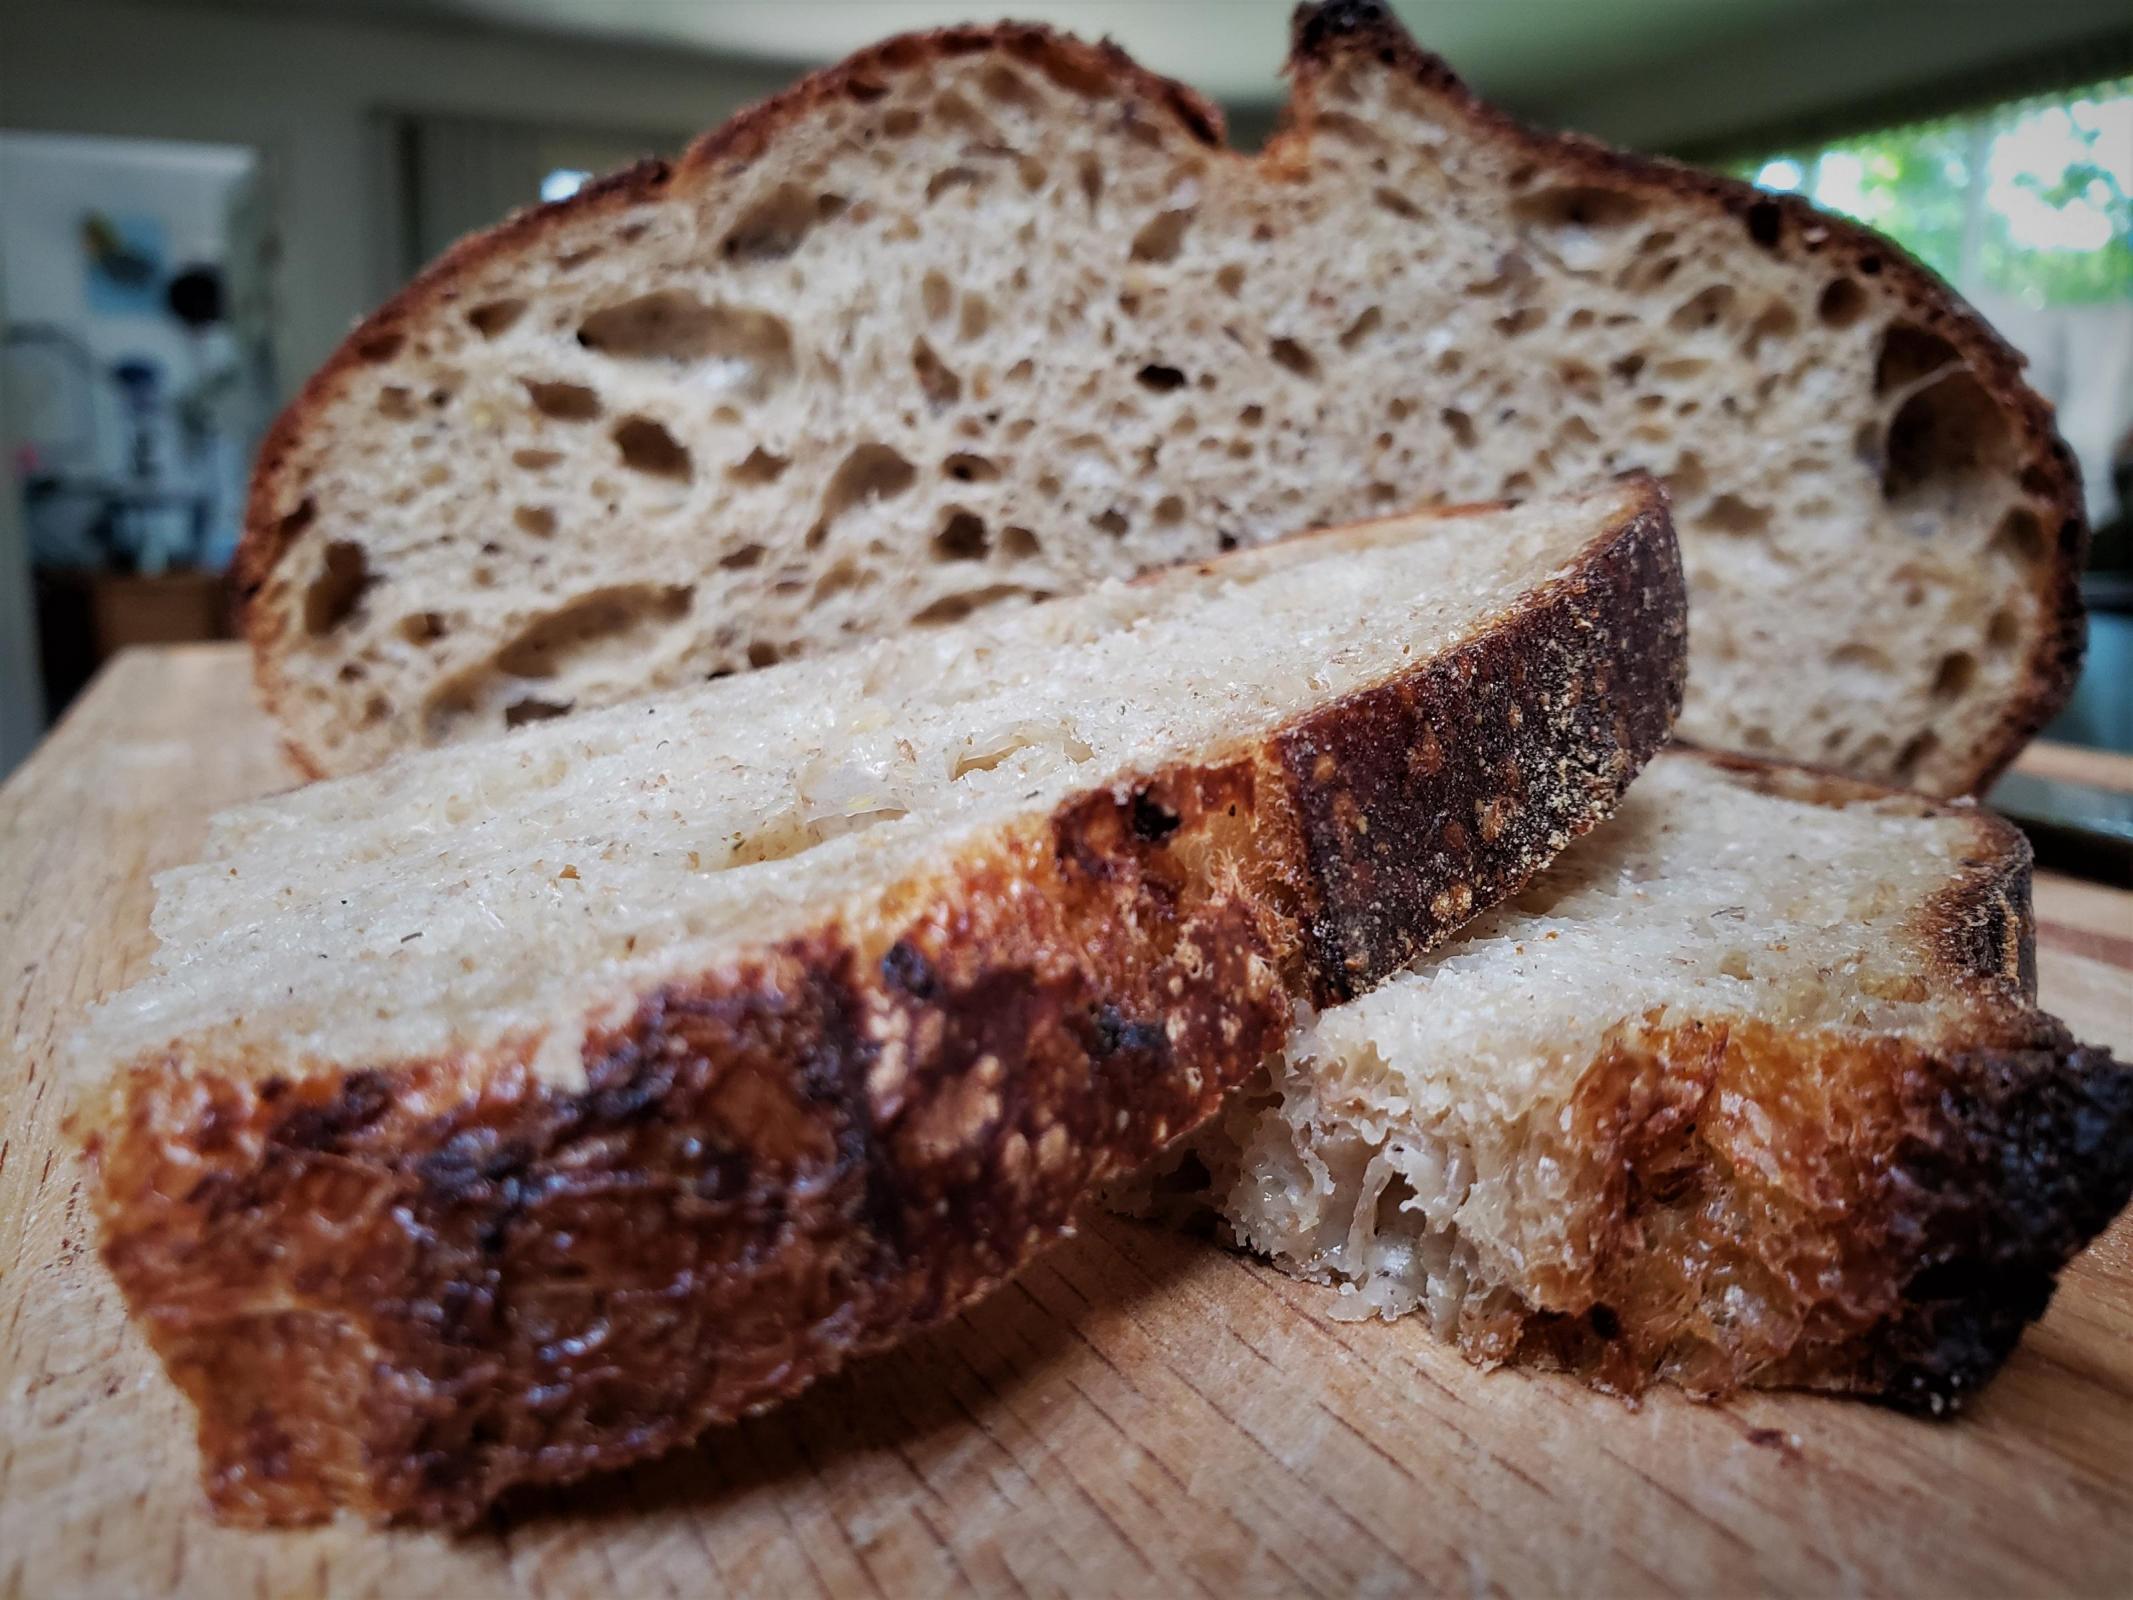
Very crispy and crackly crust, crumbs everywhere when cut or torn


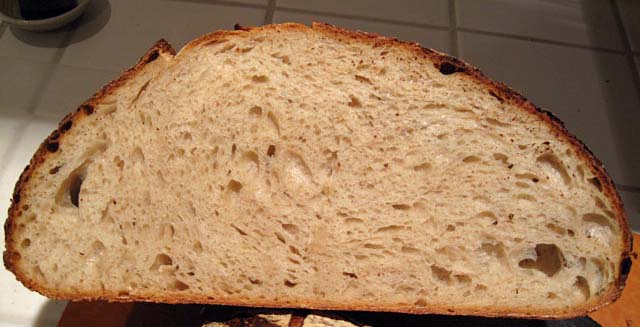
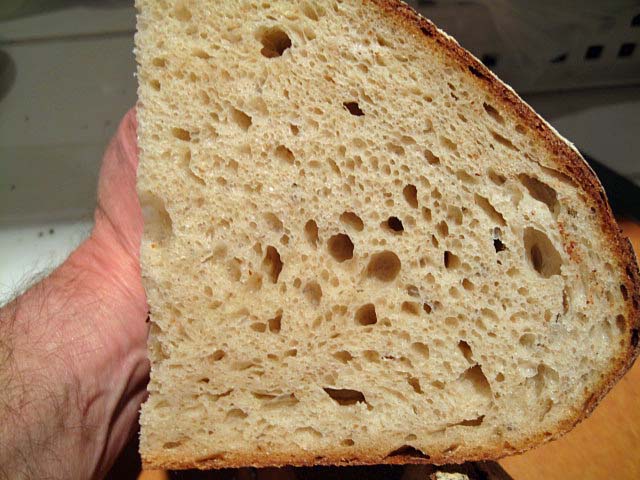
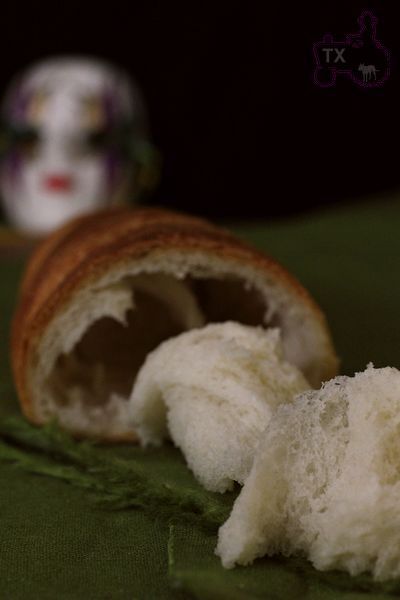
Crumb is velvety soft and shreddy, I could pull the inside out like this


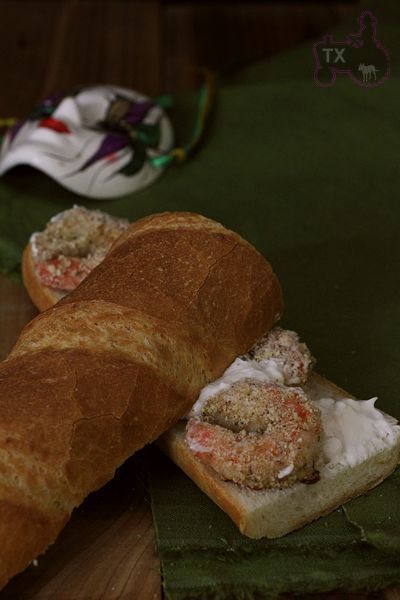
I know the most popular Po-Boy sandwich is pulled pork/beef, but I love fried shrimp filling. This time I just rolled shrimps in bread crumb, then baked until done. Equally delicious.

dmsnyder's picture
dmsnyder

Miche from SFBI Artisan II - 2 kg


One of the breads we baked at the SFBI Artisan II Workshop last month was a miche. Everyone thought it was one of the best breads we baked. I made it at home for the first time two weeks ago, but used “Organic Type 85” high-extraction flour from Central Milling rather than the mix of white and whole wheat with the addition of toasted wheat germ we had used at SFBI. (See This miche is a hit!)

This bread was delicious, but I did want to make it at least once using the formula we had used at the SFBI, just to see how it turned out at home compared to baked in a commercial steam injected deck oven. Certainly the several TFL members who have baked this miche in their home ovens since I posted the formula have found it to be good. Also, at the SFBI, we had found that miches scaled at 2.5 to 3 kg somehow had an even better flavor than those scaled at 1.25 kg. So, today I baked a 2 kg miche using the original SFBI Artisan II formula.

For those who would like to make this larger version, here is the formula for a 2 kg miche:


Total Dough

Bakers %

Weight (g)

AP Flour

96.67

1087

WW Flour

3.33

38

Water

73.33

824

Salt

2

23

Wheat germ toasted

2.5

28

Total

177.83

2000


Pre-ferment

Bakers %

Weight (g)

AP Flour

75

112

WW Flour

25

38

Water

100

150

Salt

0

0

Liquid starter

50

75

Total

250

375


Final Dough

Bakers %

Weight (g)

AP Flour

100

975

Water

69

675

Salt

2

23

Wheat germ toasted

2.5

28

Levain

31

299

Total

204.5

2000

The procedure used was the same as in my previous blog entry about this bread with one exception – shooting for a slightly lighter crust, I baked with steam for 20 minutes at 450ºF, then turned the oven to convection bake at 425ºF for another 40 minutes. I did not leave the miche in the turned off oven to dry out before removing it to the cooling rack. I did leave it in the oven while I heated the oven back up to 460ºF conventional bake for the next loaves (about 5 minutes).

I was concerned about over-proofing this loaf, and it was lined up ahead of a couple San Joaquin Sourdough breads waiting to bake.

Miche after baking 20 minutes with steam at 450ºF

The blowout I got suggests the loaf was a bit under-proofed. I also shaped the boule really tight, which may well have been a second factor.

The miche sang loud and long while cooling. The crust had some crackles, but not like the last miche.

Crust crackles

Loaf profile, cut through the middle

Crumb

Crumb close-up

2 kg miche beside 514 g San Joaquin Sourdough bâtards

The crust was crunchy-chewy - much thinner than the last bake. It was much less caramelized, and this was apparent in the less wonderful crunch and flavor. The crumb was nice. It was quite noticeably denser in the center of the loaf. I think this is expectable with a miche of this size. I thought the crumb structure was pretty consistent from the center of a slice to the crust.

6 hours after baking: The aroma of the crumb had a pronounced whole wheat grassiness. The crumb was moderately chewy. From past experience, I expect it to be softer tomorrow. The flavor was good - mildly sour with a nice wheaty flavor - but I didn't enjoy it quite as much as the miche made with Central Milling's "Type 85" flour. I think the flavor would have been better had I used fresh-milled whole wheat. That's what I will do the next time I bake this miche.

24 hours after baking: The aroma and flavor have mellowed and melded. The grassy aroma is gone. It just smells like a good sourdough country bread. The flavor is now delightful - very complex - nuttier and sweeter. A very thin smear of unsalted butter makes this bread ambrosial.

I froze half the miche. The other half will be croutons for onion soup gratiné tonight, breakfast toast with almond butter and crostini with ribollita for dinner tomorrow. (The ribollitta was my wife's all-morning project.) That should leave another quarter loaf for sandwiches, panini, French toast ... 

David

Submitted to YeastSpotting


ZD's picture
ZD

Home Tempering, Grinding, and Bolting Wheat to get High Extraction Flour

Wheat Tempering

Success begins with perfectly tempered wheat. Tempering consists of adding water to dry grain and allowing the grain to rest for a period of time before it is milled. The purpose of tempering is to toughen the bran and thus make it resist being broken into small particles during milling and to soften or "mellow" the endosperm and make it easier to grind. It also helps obtain bran with lowest possible starch content and flour that has ideal quality and higher extraction.


Temper at 77°F or longer if colder. Cooler temps increase flour output and ash. Hotter temps shorten tempering time and can improve gluten properties. 72 hours is not too long to temper.

For milling it is essential that the tempering water is fully absorbed and evenly distributed in the endosperm. Too short a tempering time results in more granular flour, and more power required to mill. Don't mill cold wheat. Milling cold wheat will tend to cause the bran to shatter and not flake off making it hard to sift off.

Ideal Moisture and Tempering Time

For roller mills

- Spring Wheat: 17.5% / 48 - 72 hrs.
- Hard Wheat: 16.5% / 36 - 48 hrs.
- Soft Wheat: 15.5% / 12 - 24 hrs.
- Durum Wheat: 17.0% / 4 - 12 hrs.

Use lower percentages for other milling methods.

These moisture levels may seem high. These are not necessarily the moisture levels used at commercial mills. They can't sell flour with a moisture level over 14% as it is much more likely to mold, draw insects, and have bacterial problems. This is not and issue for home milling if you are going to use in right away. Try to use your flour within 24 hours of milling.
 
The bite method

What moisture level is the grain you are starting with? No grain moisture meter? No problem. Take a couple grains of your wheat and bite it. The harder the grain is more water it will need to be tempered with. Long ago millers didn't have moisture meters. They used the bite method. Practice and learn the feel of grain. To achieve ideal tempering is to learn to feel and to observe.

How to Temper

Add the desired amount of water to wheat cover container and shake until water is dispersed and for 10 seconds every minute for 5 minutes. Don't add more that 5% per day. Temper at 77°F for 2 to 3 days. If your temperature is much lower than 77°F add a day.

Milling

Warning! Protect your mill. Don't grind any grain in your mill you are not comfortable with. You know your mill better then I do. Grind at your own risk.

I used Wheat Montana Hard Red Spring Wheat for the milling tests.

Impact Mills

Every one says don't temper wheat for impact mills, but I have used my impact mill with estimated moisture of 14% and it worked great. About 9% of the bran was large and sifted out easily. I also tried 20% moisture in the impact mill and I think it was too high but it didn't ruin the mill and was not hard to clean up. It also had large bran but not an improvement over the lower moisture batch.

Bur Mills

The Kitchen Aid Grain Mill (KAGM) worked well but not as well as the impact mill. It has very limited ability to grind fine.

Stone Mills

The Wonder Junior Mill is hand cranked and it is easier to mill if the wheat is tempered. It works well at 13% to 15% moisture. I ran 20% through it and it glazed the stones. They were easy to clean with water and then let dry.


Bolted Flour aka High Extraction Flour


Bolted flour contains almost all of the germ, and the softer parts of the bran. Bolted flour was historically sifted through a piece of cloth. It is now typically sifted through a metal or plastic screen. The higher the percentage the closer to whole grain flour it is. The total flour out of the sifter divided by the total grain in to the mill would give you the extraction percentage. 100% extraction is whole wheat.

Home grinding and bolting wheat will get flavor that can't be beat.

History of flour bolting http://www.angelfire.com/journal/millbuilder/boulting.html

After grinding sift your flour through a sieve. I have a 55 mesh I got here. http://www.fantes.com/sifters-shakers.html also a 30 mesh I have had for years. Using a magnifying glass helps to inspect your work.

I have been tempering 10% moisture HRS wheat to 15% moisture by adding 50g of water to 1000g of wheat and putting it in my 80 °F proof box for 3 days. Grind the wheat in my impact mill on fine. Sift through a 30 mesh sieve and remove about 9% pure bran. Sift through a 55 mesh sieve and save the 74% very white flour. Take the middlings that were caught by the 55mesh sieve and look at them under a magnifying glass. You will see small flat brown bran and small roundish sand looking endosperm. Run this through a stone mill and sieve through the 55 mesh. Stone mill and sieve one more time. Discard the bran. You should have 84% to 88% extraction flour. I have been using about 65% hydration with this flour. It tastes wonderful.

 Greg R

Sourdough Starters

(These instructions have been adapted from a posting at thefreshloaf.com by Sourdolady.)

Procedure for Making Sourdough Starter

Day 1: mix...
2 T. whole grain flour (rye and/or wheat)
2 T. unsweetened pineapple juice or orange juice
Cover and let sit at room temperature for 24 hours.

Day 2: add...
2 T. whole grain flour
2 T. juice
Stir well, cover and let sit at room temperature 24 hours. At day 2 you may (or may not) start to see some small bubbles.

Day 3: add...
2 T. whole grain flour
2 T. juice
Stir well, cover and let sit at room temperature 24 hours.

Day 4:
Stir down, measure out 1/4 cup and discard the rest.
To the 1/4 cup add...
1/4 cup flour*
2 Tbs water

*You can feed the starter whatever type of flour you want at this point (unbleached white, whole wheat, rye). If you are new to sourdough, a white starter is probably the best choice. Unbleached all-purpose flour is fine.

Repeat Day 4:
Once daily until the mixture starts to expand and smell yeasty. It is not unusual for the mixture to get very bubbly around Day 3 or 4 and then go completely flat and appear dead. If the mixture does not start to grow again by Day 6, add 1/4 tsp. apple cider vinegar with the daily feeding. This will lower the pH level a bit more and it should kill off competitors to the yeast, allowing them to thrive.

How it Works
The yeast we are trying to cultivate will only become active when the environment is right. When you mix flour and water together, you end up with a mixture that is close to neutral in pH, and our yeasties need it a bit more on the acid side. This is why we are using the acidic fruit juice. There are other microbes in the flour that prefer a more neutral pH, and so they are the first to wake up and grow. Some will produce acids as by-products. That helps to lower the pH to the point that they can no longer grow, until the environment is just right for wild yeast to activate. The length of time it takes for this to happen varies.

When using just flour and water, many nascent starters will grow a gas-producing bacteria that slows down the process. It can raise the starter to three times its volume in a relatively short time. Don't worry--it is harmless. It is a bacterium sometimes used in other food fermentations like cheeses, and it is in the environment, including wheat fields and flours. It does not grow at a low pH, and the fruit juices keep the pH low enough to stop it from growing. Things will still progress, but this is the point at which people get frustrated and quit, because the gassy bacteria stop growing. It will appear that the "yeast" died on you, when in fact, you haven't begun to grow yeast yet. When the pH drops below 3.5--4 or so, the yeast will activate, begin to grow, and the starter will expand again. You just need to keep it fed and cared for until then.

Once your wild yeast is growing, the character and flavor will improve if you continue to give it daily feedings and keep it at room temperature for a couple of weeks longer.

After that time, it should be kept in the refrigerator between uses/feedings. Every week or so, take it out of the fridge, feed it by retaining only ¼ cup of starter and then feed it ¼ cup flour and 2 Tbs water.

Floydm's picture
Floydm

Gingerbread

I baked gingerbread for the first time last night. Yum.

gingerbread

I was amazed at how good the house smelled when I came home from work today. It really smells festive, like the holidays are here, even 24 hours after baking it.

I looked at a few different recipes before settling on something closest to the recipe from the Joy of Cooking.

Gingerbread Makes 1 large or 3 small loaves

1 3/4 cups all-purpose unbleached flour
1 teaspoon baking soda
1 tablespoon ground ginger
2 teaspoons ground cinnamon
1/4 teaspoon ground cloves
1/4 teaspoon salt (can be omitted if using salted butter)
1 stick (8 tablespoons) butter
1 egg
1/2 cup brown sugar
1 cup molasses
1/2 cup warm water
3 tablespoons crystalized ginger, 1/2 cup raisins or other dried fruit (optional)

Preheat oven to 350.

Combine the butter, egg, brown sugar, and molasses in a bowl and stir until combined. Mix in the dry ingredients, then add hot water and stir until just combined.

Pour batter into greased baking pans. Bake until a toothpick inserted into the center comes out clean, between 30 and 50 minutes. Remove from the oven and let cool for at least 10 minutes before removing from the pan.

gingerbread

Benito's picture
Benito

Red Miso Furikake (Sesame seeds and Nori) Sourdough

In order to bring out much more miso flavour I used my red miso and increased it to 10%.

Total Flour 494 g 


Bread Flour 88.5% 437 g


Whole Wheat 11.5% 57 g all in levain 


Total Water 387.5 g 78.5% hydration 


Levain 115 g


Miso 49 g 10% 


Salt 7.5 g 


Overnight Levain build 1:6:6 


In the morning dissolve ripe levain and miso in the water holding back 10 g of water.  Add flour and mix until no dry flour visible.  Rest for 20 mins.

Add salt and gradually add the hold back water 10 g.

Rubaud kneading x 5 mins.  Rest 30 mins.

Strong bench letter fold.  Set up aliquot jar.  Rest 30 mins.

Lamination sprinkling on furikake (I do not measure how much is added but I like to sprinkle on quite a bit)

Do coil folds at 30 mins intervals until good window pane achieved.

Bulk ends when aliquot jar shows 60% rise.  Bulk was done at 80ºF and was completed in 4.25 hours.

Shape into batard.

Left on bench until aliquot jar shows 70% rise then place in 3ºC fridge for cold retard overnight.


Next morning 

Preheated oven at 500ºF

Bake 450ºF lid on for 30 mins


Dropped to 420ºF lid off 20 mins


DanAyo's picture
DanAyo

Tip - Pan Breads Simplified

As I write this, we’re in the midst of the Covid-19 Pandemic and many of us are home baking bread. Whereas a few short months ago large numbers of us were focused on “The Perfect Loaf”, now we are happy to be able to bake our own nutritious sandwich bread for utilitarian purposes.

I have become hooked on Covered Pullman Pans. By the way (at this time), Amazon has a great deal on 2 large covered Pullman Pans. Anyway, in an effort to simplify and streamline the sandwich bread I wondered if the dough could be shaped immediately after mixing and then placed in the Pullman to BF and later bake. I supposed that the pan would constrain the dough from spreading so shaping might be done at the beginning of fermentation rather than towards the end after the BF. With typical free formed loaves the dough is pre-shaped and shaped after the BF in order to build structure and strength back into the slackened dough. With SD many bakers are careful to maintain as much of the gas created during the BF as possible. With the method above the dough is never touched again after the initial mix, so maximum gas retention would be expected.

For those contemplating baking in a large Covered Pullman (13x4x4”), this 70/25% (WW/BF) used a total dough weight of 1550. I didn’t weight the actual dough before panning but it started out at 1550g. When determining your dough weight for a covered Pullman you need to consider the type of flours used. Obviously whole wheat will require more dough than and all white flour dough.

How to calculate Total Dough Weight (TDW) for a different sized pan. This method should at least get you in the ball park.
Since we know that this formula at 1550 fills a larger (13x4x4”) pan and bakes up well, we can easily calculate the cubic inches of the pan and determine how much dough will be needed to fill a pan of a different size.

It is important to note that different doughs with produce different crumb structure and densities. A light and airy all white flour formula may only take 1200 grams to fill a large Pullman. Experimentation is needed to dial in your particular dough. It is probable best to guess a lower weight of total dough and proof and bake with the top off initially. 

An example -

  • 13*4*4=208 cubic inches.
  • 1550g of dough is needed for 208 cubic inches. For each cubic inch 7.45g of dough is needed.
  • the smaller USA Pullman is 9x4x4” and that equals 9*4*4=144 cubic inches.
  • Since the smaller pan is 144 cubic inches, it will require 1073g of dough (144*7.45=1072.8)

For an even more accurate method of converting Total Dough Weight for a different sized pan.
The beauty of grams (weight) and milliliters (volume) is that 1 gram of water is equal to 1 milliliter.

  • Put your pan on the scale and tare it out
  • fill the pan with water and record the weight in grams. If the pan leaks try lining with plastic wrap
  • Weigh your next pan as above
  • Divide the two weights as shown above using the same math

Since many bakers use USA Pans here are the milliliter weights for the small and large Pullman pans -
Large USA Pullman          3185
Small USA Pullman          2266
(9x5x3") USA Bread Pan  1460
NOTE - I like the Pullman pans much better because they are both 4" high and the Bread Pan is only 3" high.

I am dangerously close to the end of my frozen bread stash. The dough above was thrown together in “Easy Peasy” fashion. I figured if it baked up a brick, I’d eat it anyway :D Thank God! That wasn’t the case.

This large loaf produced 36 thin slices. They will be frozen individually and uncovered for ~1 hr on a cooling rack, then separated and placed back in the freezer in a ZipLok for our supply of daily bread.

I may never again bake pan breads any other way.

Dan

joc1954's picture
joc1954

50% Wholewheat Community Bake - Joze's version

Many people wanted to get details how to make the bread with translucent alveoli walls which I have published in the community bake 50% wholewheat thread. So I promised to make notes about the process. However, this bread was not made with sourdough starter but rather with tomato and basil yeast water.

For those who don't like to read too much here are the major differences to what most of people usually do:

1.) Longer autolyse (this time 4 hours) at room temperature

2.) Extended bulk fermentation in the fridge for 18 hours

3.) Bread was shaped as ciabatta.

4.) There was almost no final proofing - just time needed to warm up the oven

5.) Staring baking temperature was 500 dF (260 dC).

This are by my opinion the differences which are not common in most recipes or traditional procedures.

The reason for 4 hour long autolyse is giving more extensibility to the dough caused by enzymatic activity of protease. Second reason is to hydrate well the bran particles so they will have less sharp edges and will not cut the gluten network so much.

I made this bread only from 300g of flour mixture with 50% of whole-grain wheat flour and 50% of type 500 white bread flour with unknown protein content but estimated to be between 11 and 12%. Definitely with significantly smaller protein content than American or Canadian flours.   The plan was to shape it as ciabatta.

The process is as follows:

1.) Two stage levain build: first stage with 50g of white flour T500 and 50g of yeast water. When doubled add 50g of whole-grain wheat flour and 50g of water (better if you use here yeast water again). The levain build will take about 5-8 hours.

2.) Mix whole-grain wheat flour and white wheat flour type 500 with 70% of water (70% of weight of flour for the main dough) and let it rest for 4 hours at room temperature.

3.) Mix levain and alutolysed flour with hand and develop gluten by using scoop & stretch method (rhubaud method of mixing). This usually takes about 2-4 minutes and as result you get a cohesive dough. Let the dough rest for about 20-30 minutes.

4.) Add 2% of salt and additional 5% of water (if necessary) in my case this was 15g. Incorporate the salt and water into the dough and repeat gluten development with scoop & stretch method.

5.) During the bulk fermentation make 6 stretch & folds at 30 minutes interval.

6.) When the signs of the dough are clearly visible: dough is well aerated, billowy, has risen for about 40-50%, the traces of previous folding are clearly visible at next folding then transfer the dough into rectangular container which is well oiled with olive oil and put it in the fridge for at least 12 to 24 hours. See the attached video.

7.) When the dough has risen nicely and one can see a lot of alveoli - after at least 12 hours, tip the dough out of the container and shape it as ciabattas. See the attached video.

8.) As this dough contains 50% of whole-grain flour it does not need a lot of final proofing. I just preheated the oven to 500 dF (260 dC) and baked the ciabatta in iron-cast skillet. No scoring needed! The temperature should be reduced to 430 dF (220 dC) after 8 minutes, uncover after 15 minutes of baking (from the start)  and continue baking at  410 dF (210 dC) for 10 minutes more. Overall baking time for ciabatta is about 25-30 minutes.

In the picture above one can easily spot the bran particles in the translucent alveoli walls.

I hope that the instructions are clear enough that you will be able to make such bread. Happy baking!

Joze


Cedarmountain's picture
Cedarmountain

Cracked Grain Porridge Sourdough Bread

The basic ingredients for good bread - flour, salt, water, yeast - are simple yet can produce such a wonderful variety of breads with complex flavours, crumb textures, crusts.  Sometimes in my tinkering and experimenting I need to remind myself that bread made just with these basic ingredients can be really good bread!  So with that in mind, today's bake focused on the basics - good grain, salt, water and yeast. 

Cracked Grain Porridge Sourdough Bread

  • 250 g sifted mix of freshly ground organic rye, emmer and Marquis wheat (bran set aside for coating the loaves)
  • 750 g organic all purpose flour
  • 750 g filtered water (est.FDH 82% after addition of porridge)
  • 22 g sea salt
  • 225 g levain (4 hour)
  • 300 g mixed cracked grains (rye, emmer, khorasan, Marquis, hulless oats, flax) cooked into a porridge

The cracked grain porridge was gently mixed into the dough after the second of four stretch/folds. After four hours the loaves were pre-shaped, rested for thirty minutes and then shaped and cold proofed overnight for 10 hours. I baked the loaves directly out of the fridge; covered for 25 minutes at 500 F; 10 minutes at 450 F and then uncovered, directly on the baking stone for 20 minutes at 450 F.  


Pages