The Fresh Loaf

A Community of Amateur Bakers and Artisan Bread Enthusiasts.

Most bookmarked

hanseata's picture
hanseata

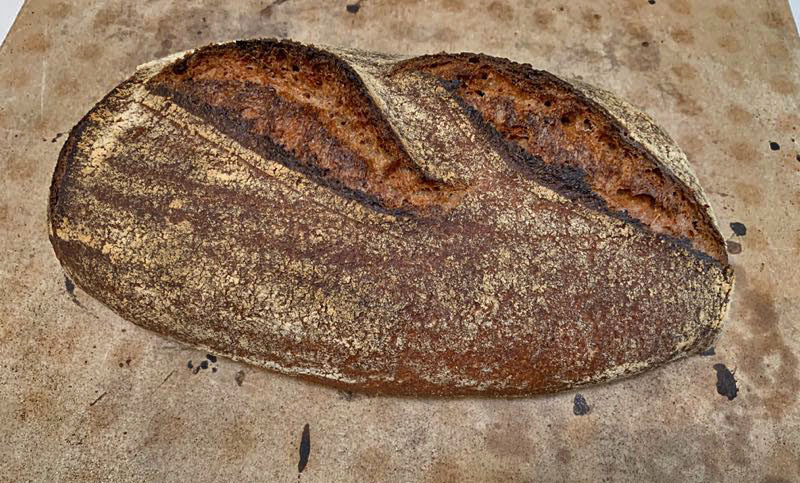
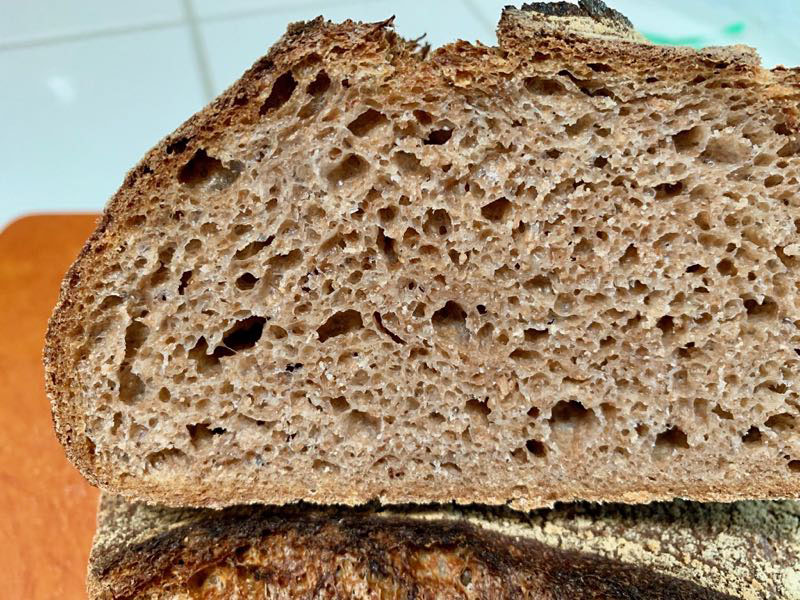
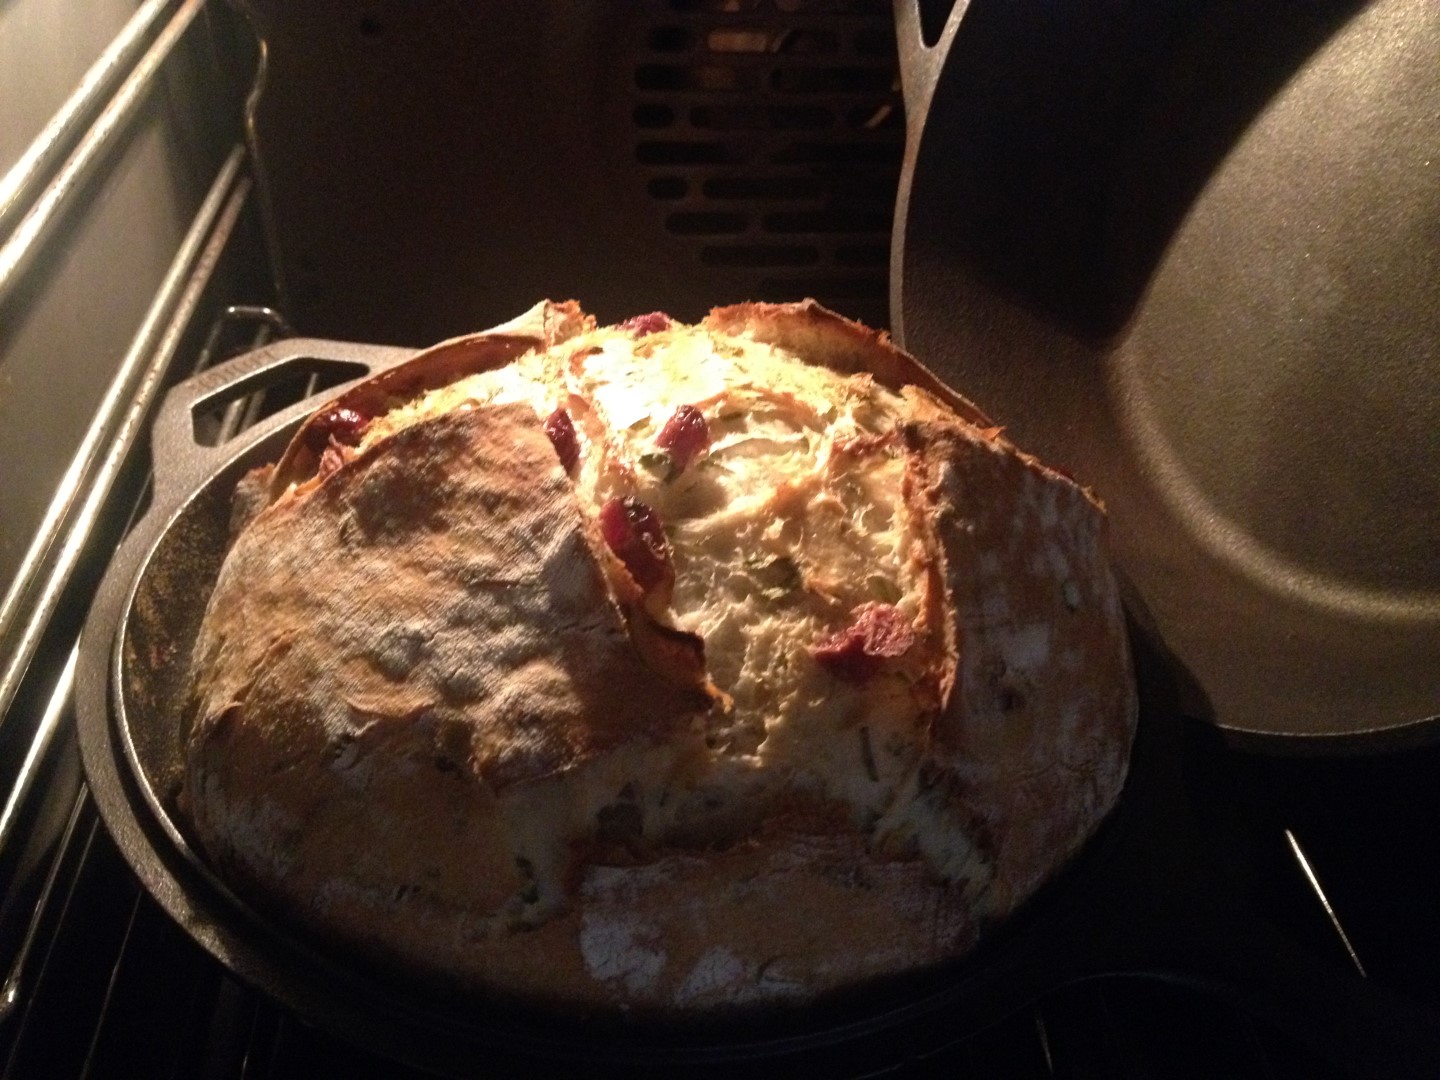
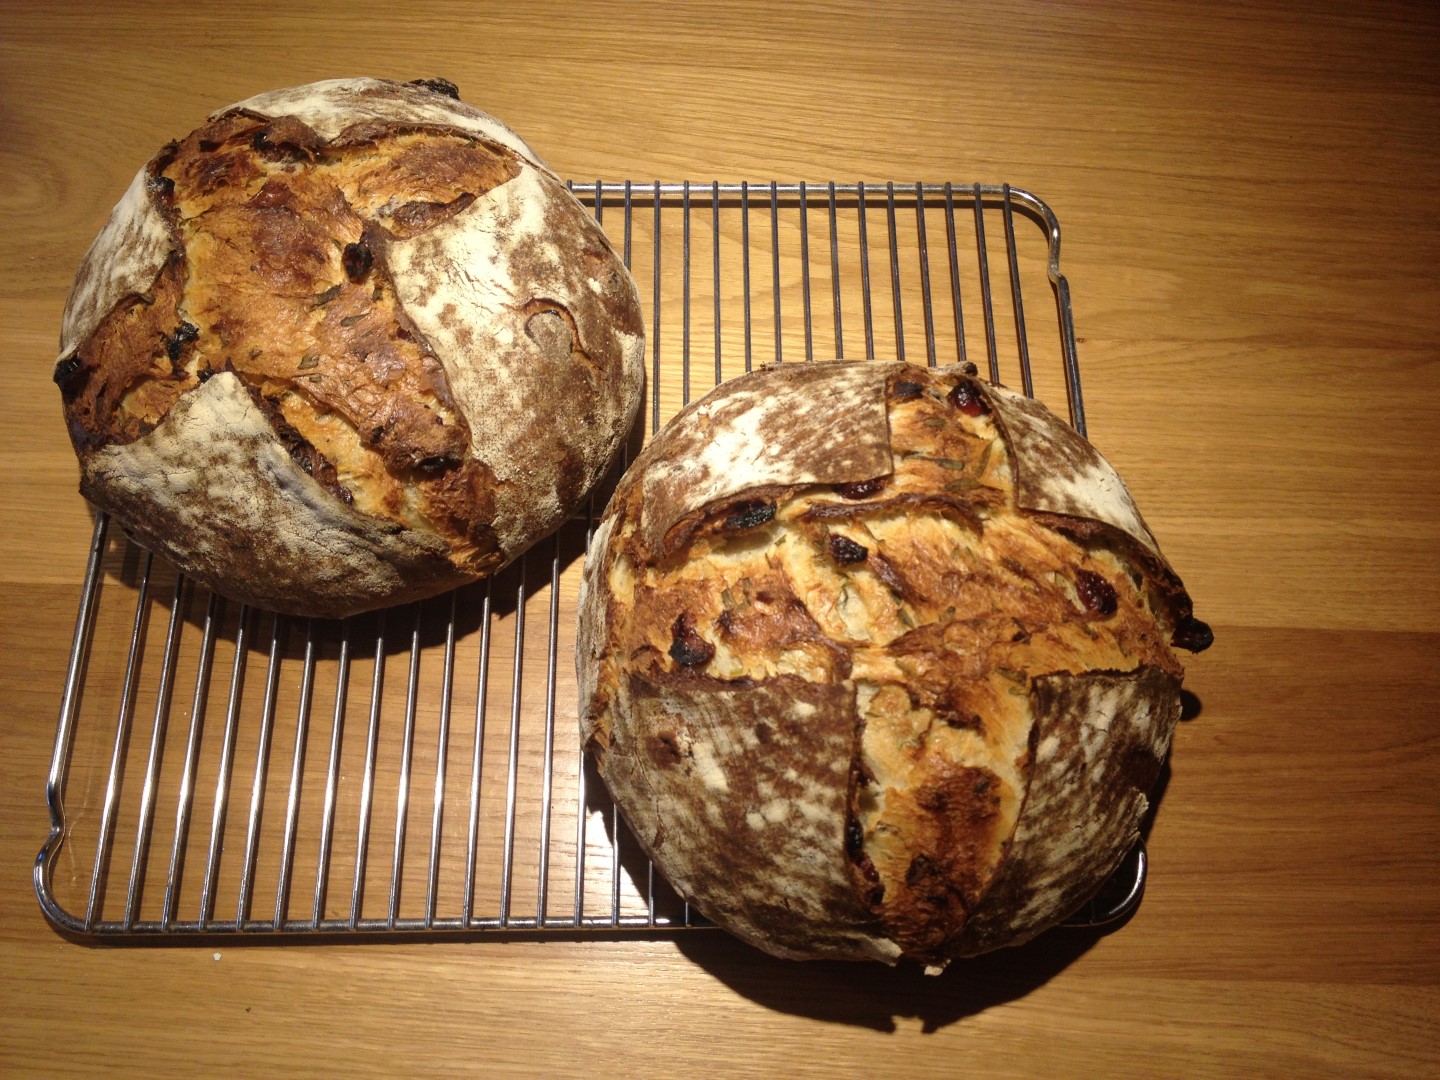
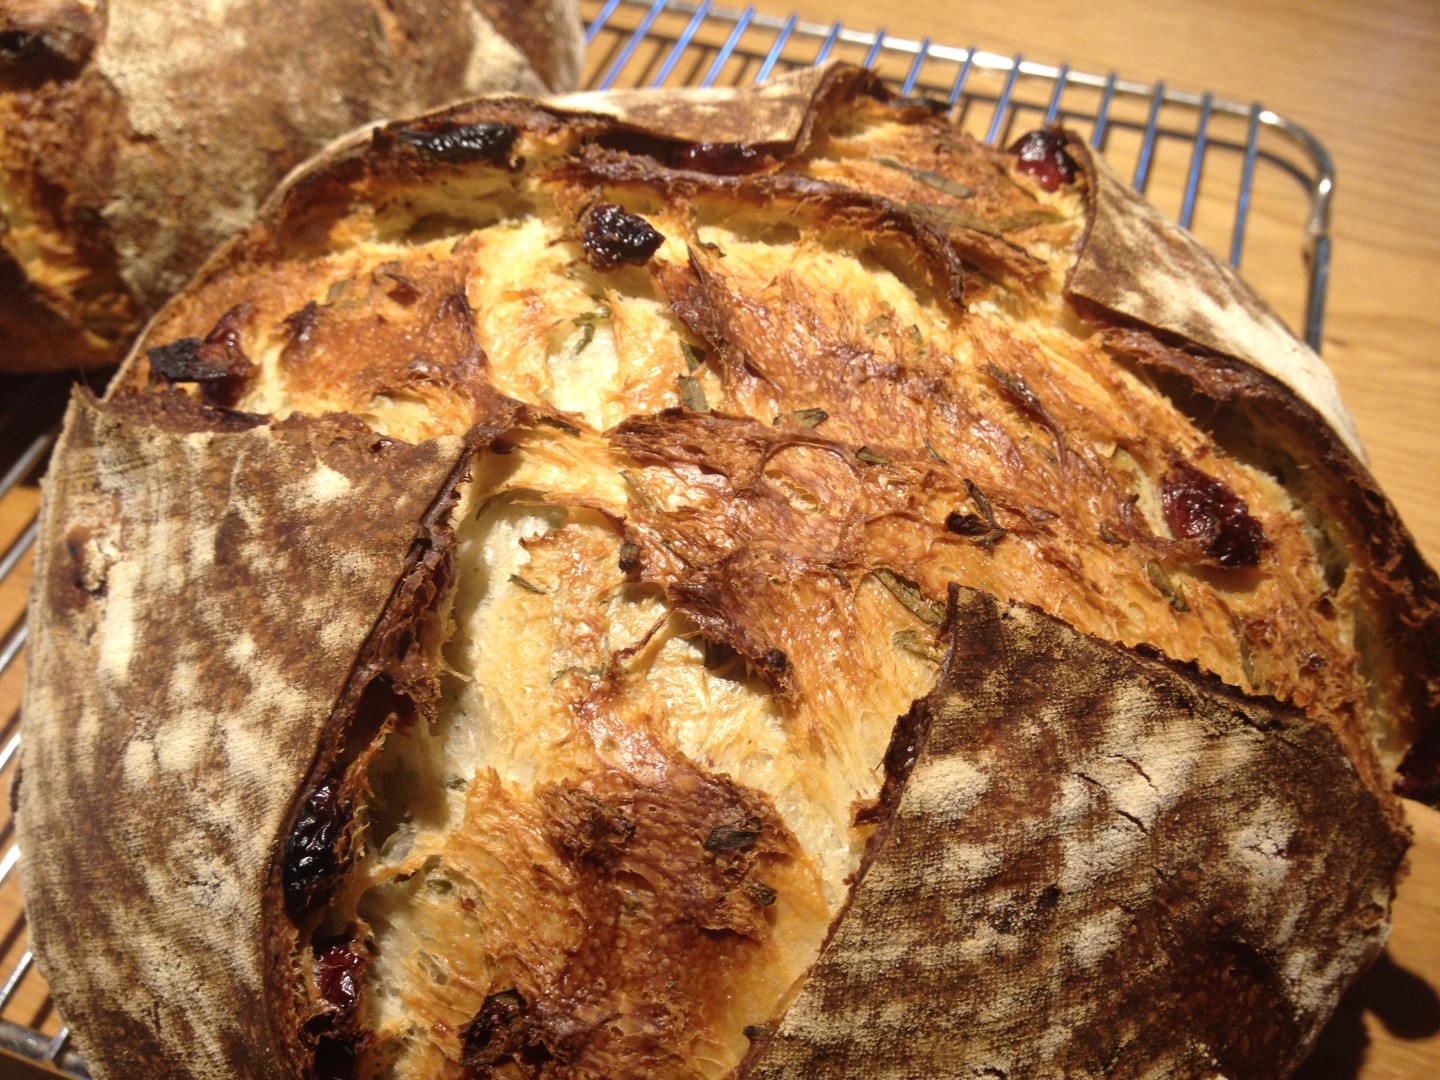
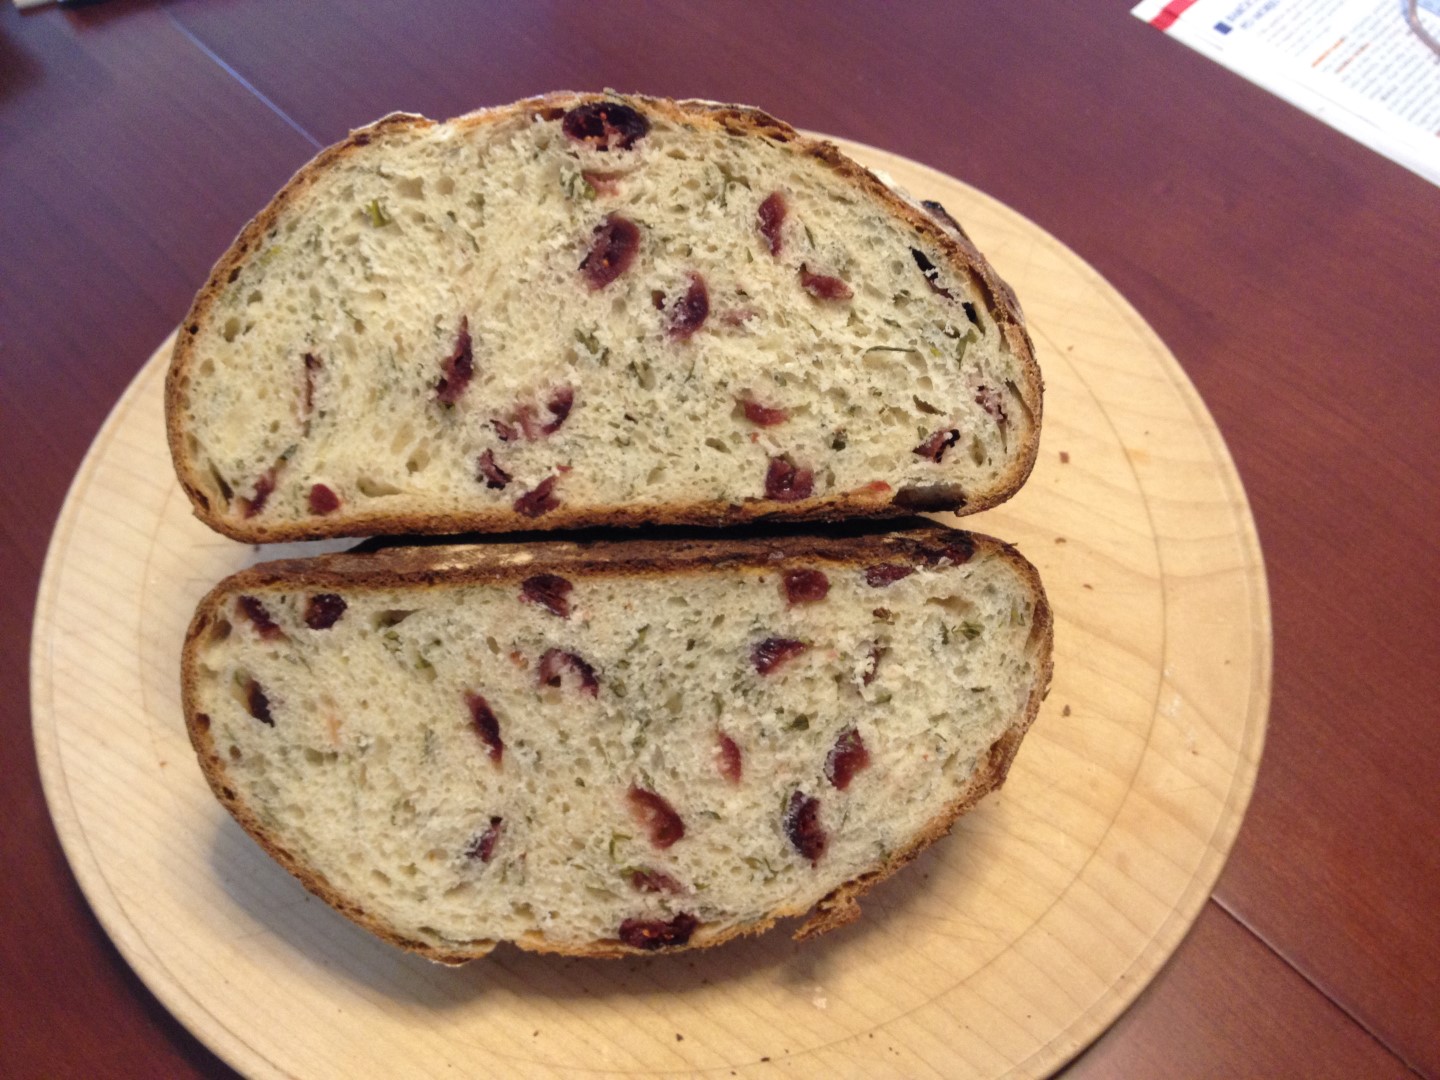
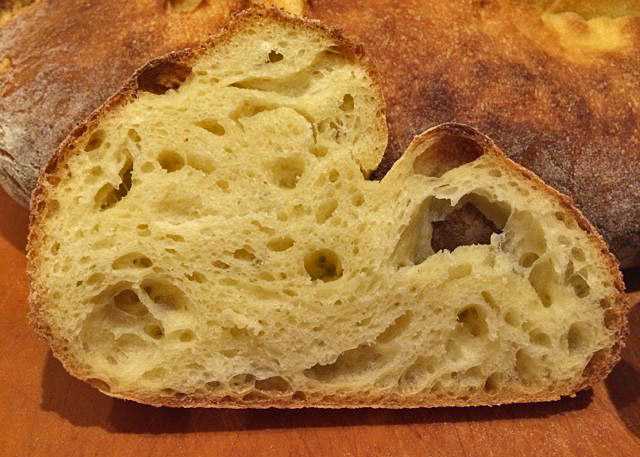
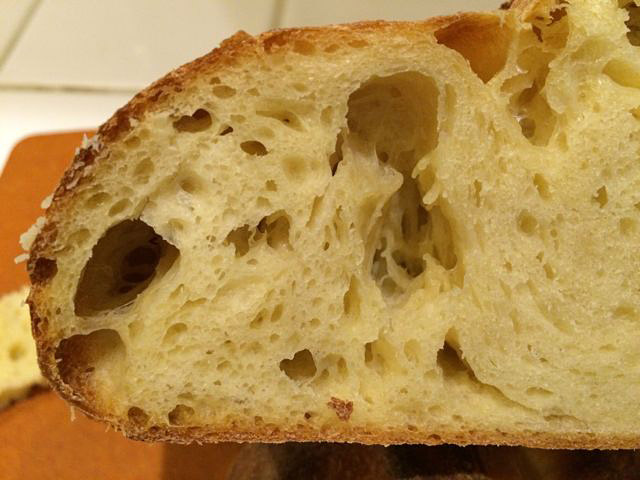
Leinsamenbrot - German Flaxseed Bread

Ingredients (2 Loaves)

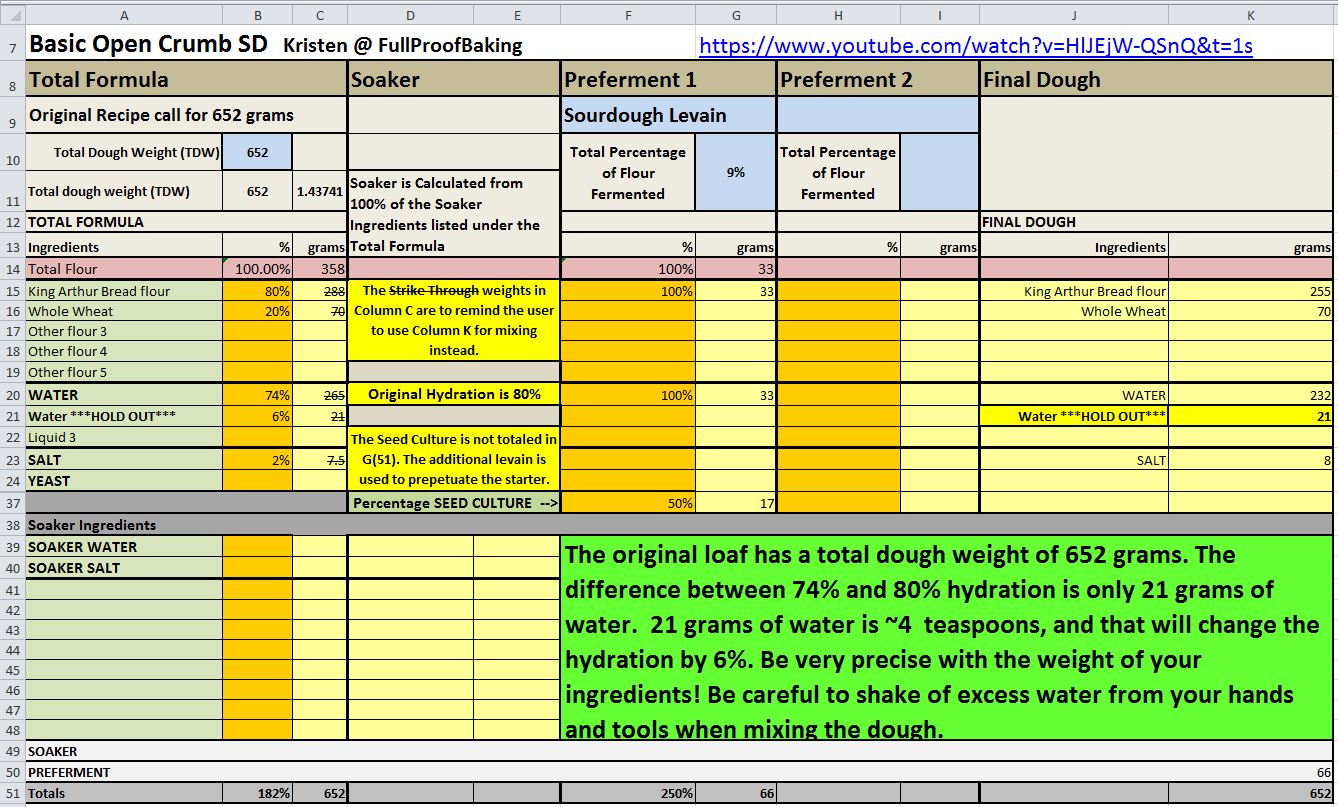
SOAKER                                                            APPROXIMATE VOLUME MEASUREMENTS
200 g rye flour                                                  1cup + 1/2 cup + 2 tbsp. rye flour
111 g whole wheat flour                                     3/4 cup + 1 tbsp. + 1 tsp. whole wheat flour
5 g salt                                                             1/2 tsp.  salt
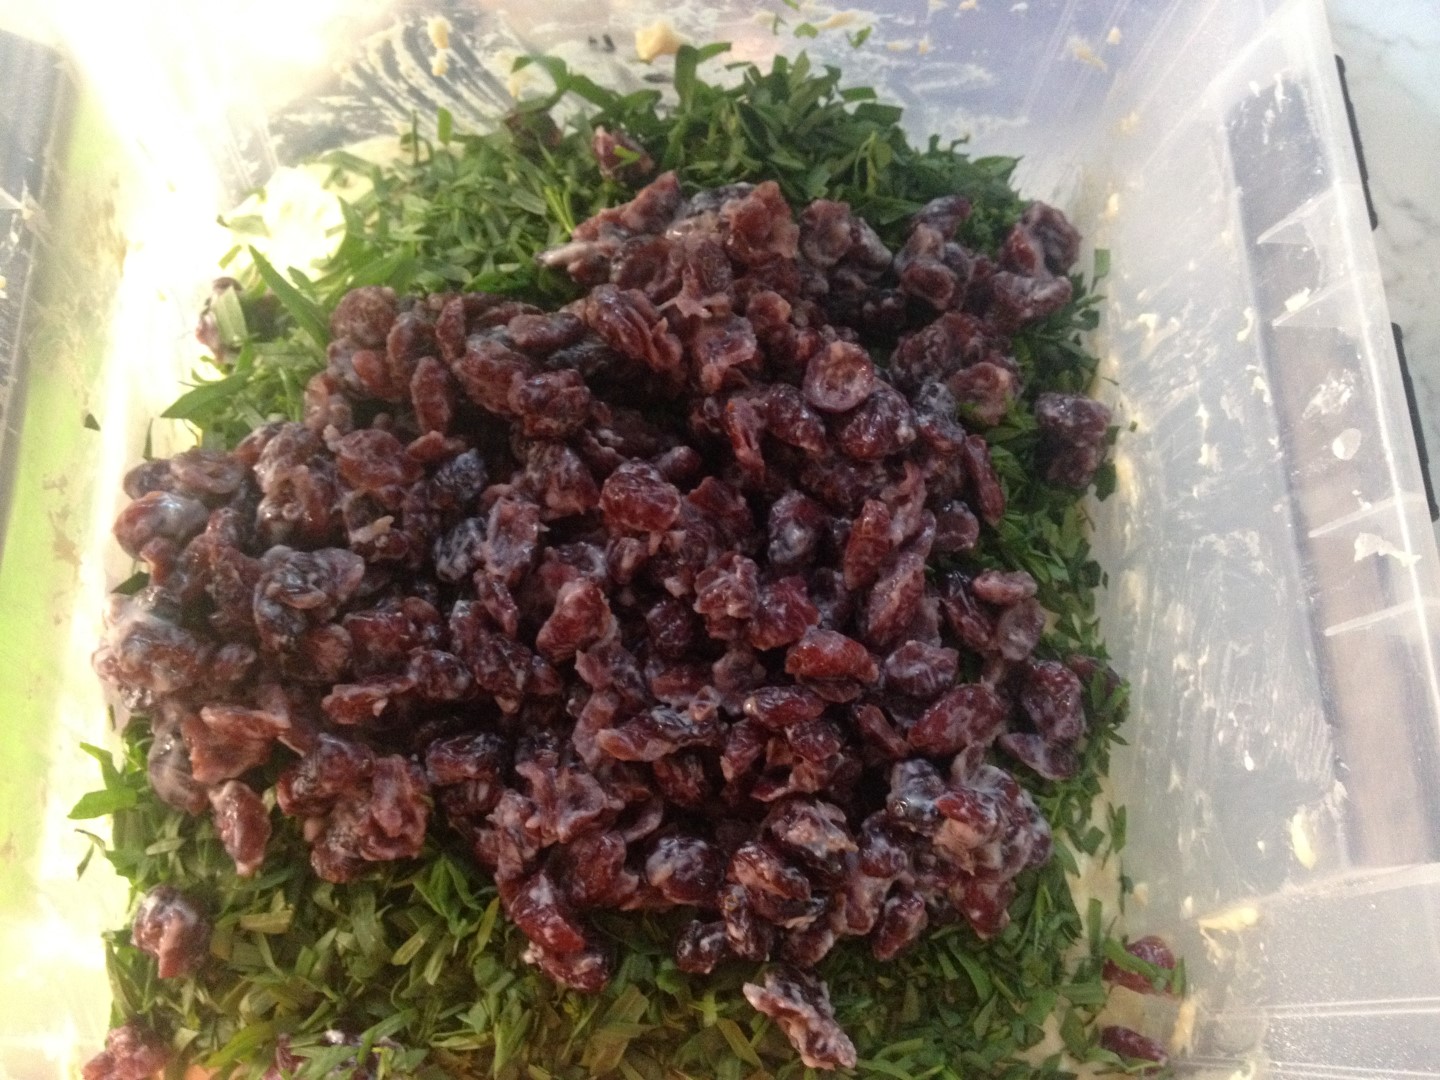
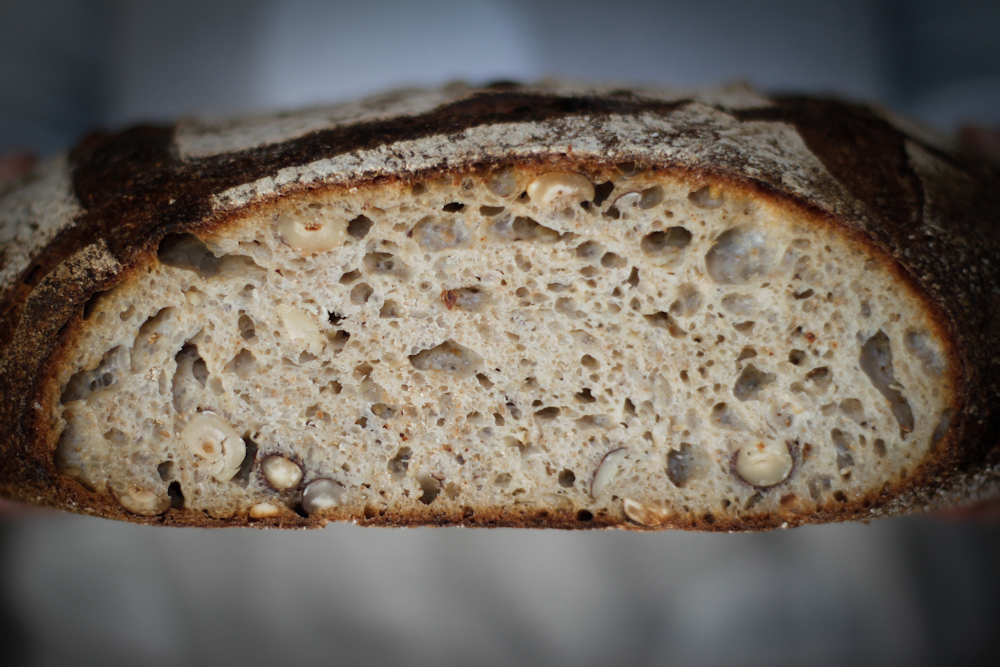
150 g flax seeds                                                 1 cup - 1 tbsp. flaxseeds (whole)
272 g buttermilk                                                1 cup + 3 tbsp. buttermilk

33 g water


BIGA

311 g bread flour                                               2 cups + 1/3 cup + 1 tbsp. bread flour

1 g instant yeast                                                1/4 tsp. instant yeast

203 g water                                                       3/4 cup + 2 tbsp. + 1 tsp. water


FINAL DOUGH

all soaker and biga                                            all soaker and biga
78 g bread flour                                               1/2 cup + 1 tbsp. +  1 1/2 tsp. bread flour                                         
7 g salt                                                            1 tsp. salt
7 g instant yeast                                             2 3/4 tsp. instant yeast
19 g honey                                                       1 tbsp. honey
14 g pumpkin seed oil (or other vegetable oil)     1 tbsp. pumpkin seed oil (or other vegetable oil)
milk, for brushing                                              milk, for brushing

Directions:

DAY 1

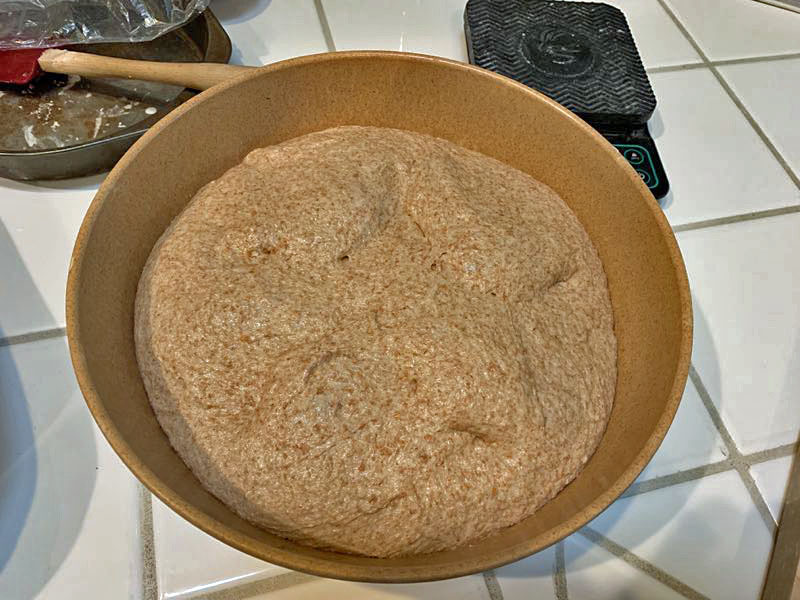
In the morning, stir together all soaker ingredients until well hydrated. Let sit at room temperature for 12 - 24 hrs.

Mix together all biga ingredients at low speed (mixer or hand) for 1 - 2 min., until no flour is left on bottom of bowl. Knead for 2 min. on medium-low speed. Let dough rest for 5 min., then knead for 1 more min. Place biga in lightly oiled bowl, cover and refrigerate.

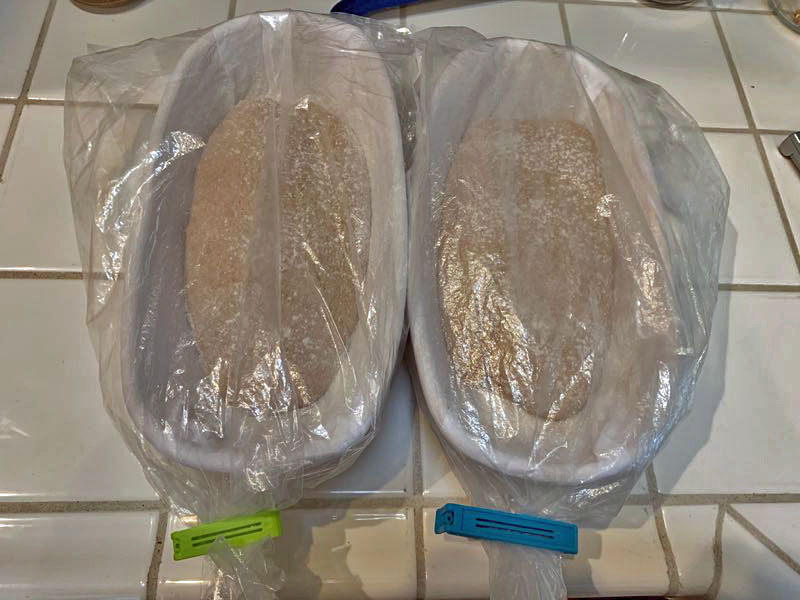
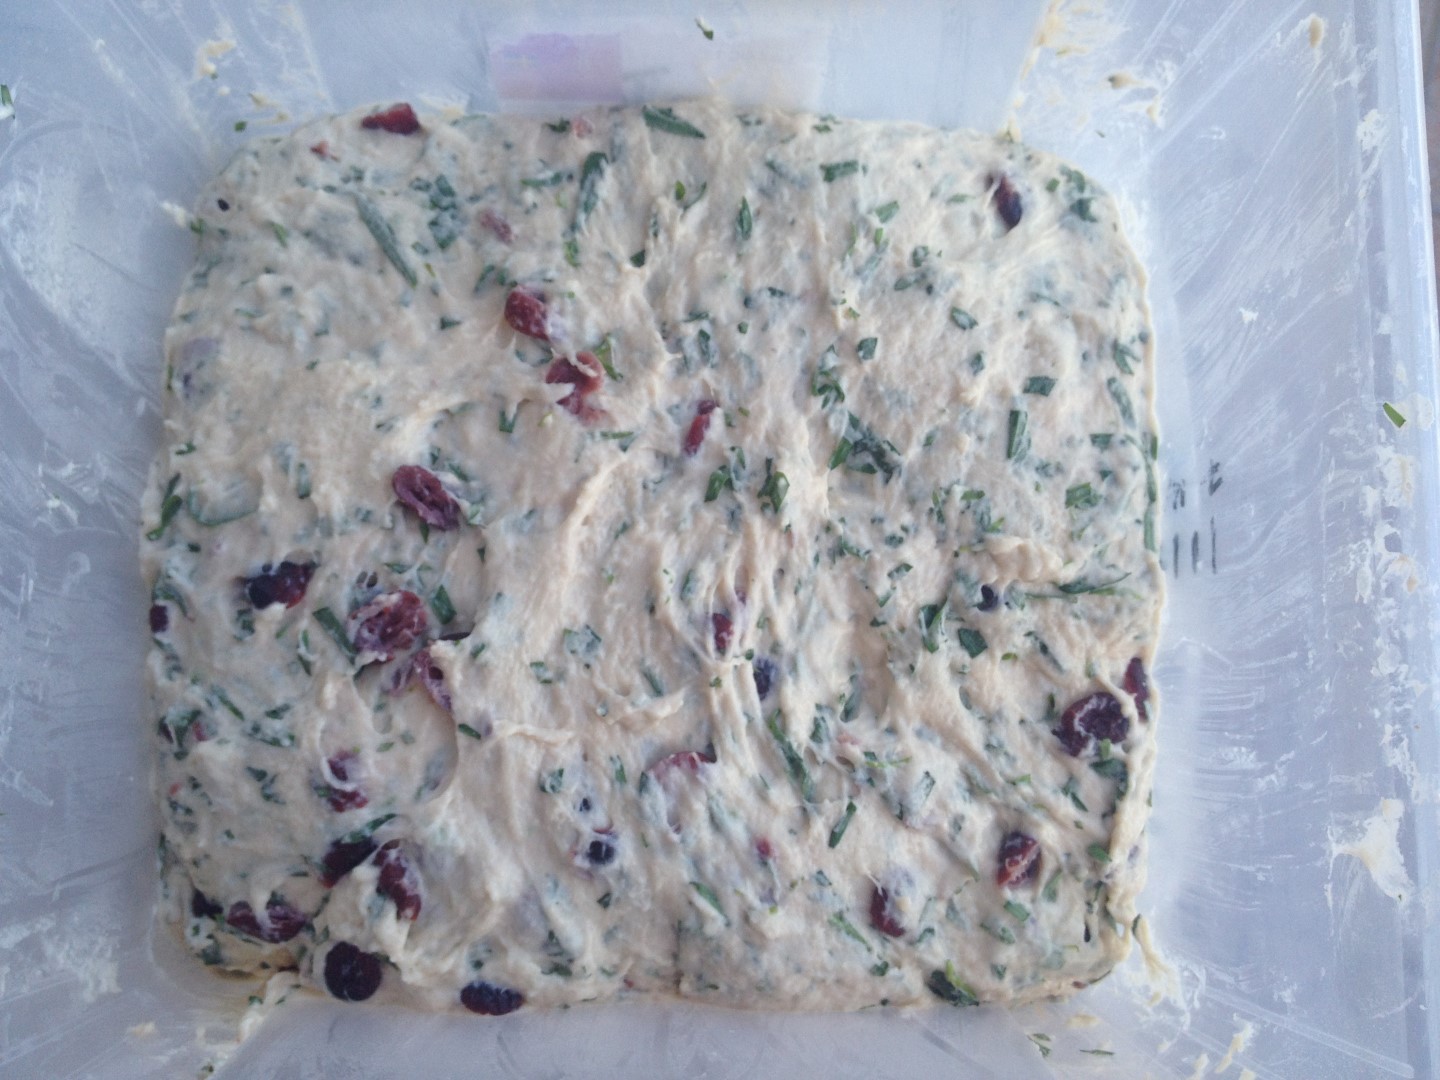
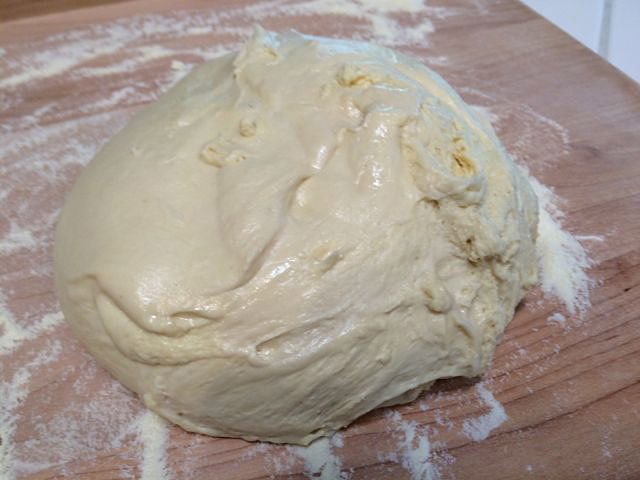
In the evening, mix together all ingredients fo final dough until well combined (1 - 2 min. on low speed or by hand). Knead for 4 min. on medium-low speed. Let dough rest for 5 min., then resume kneading for another min.  Divide into 2 portions and place dough balls in lightly oiled 1-quart plastic containers (or bowls). Cover and refrigerate overnight.


DAY 2

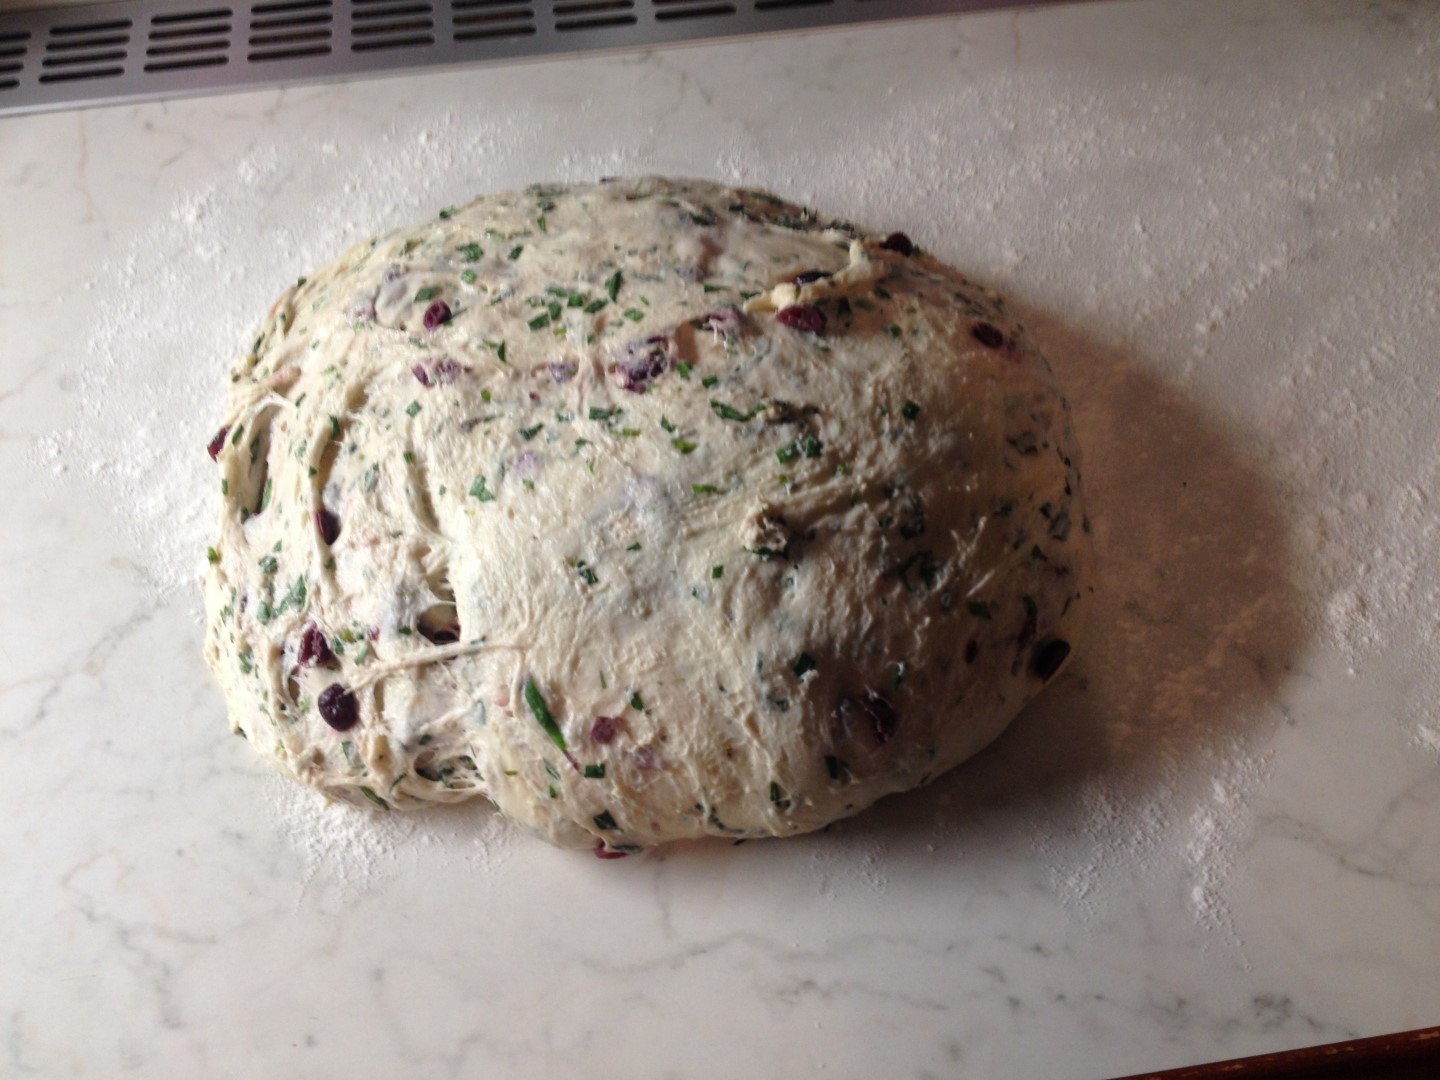
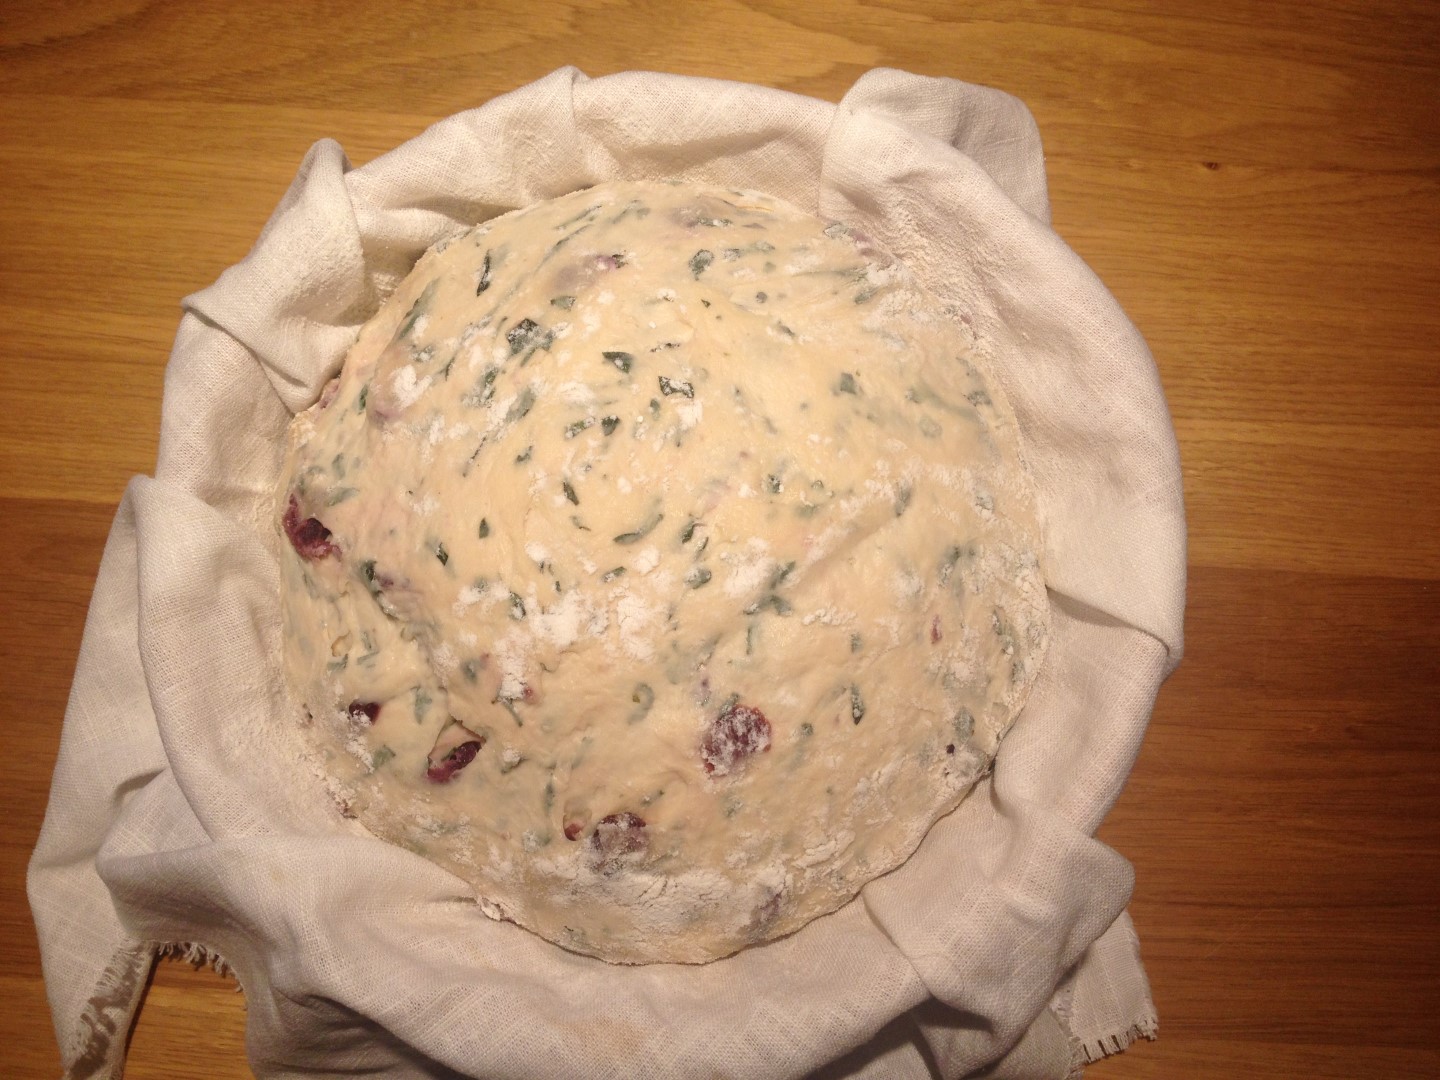
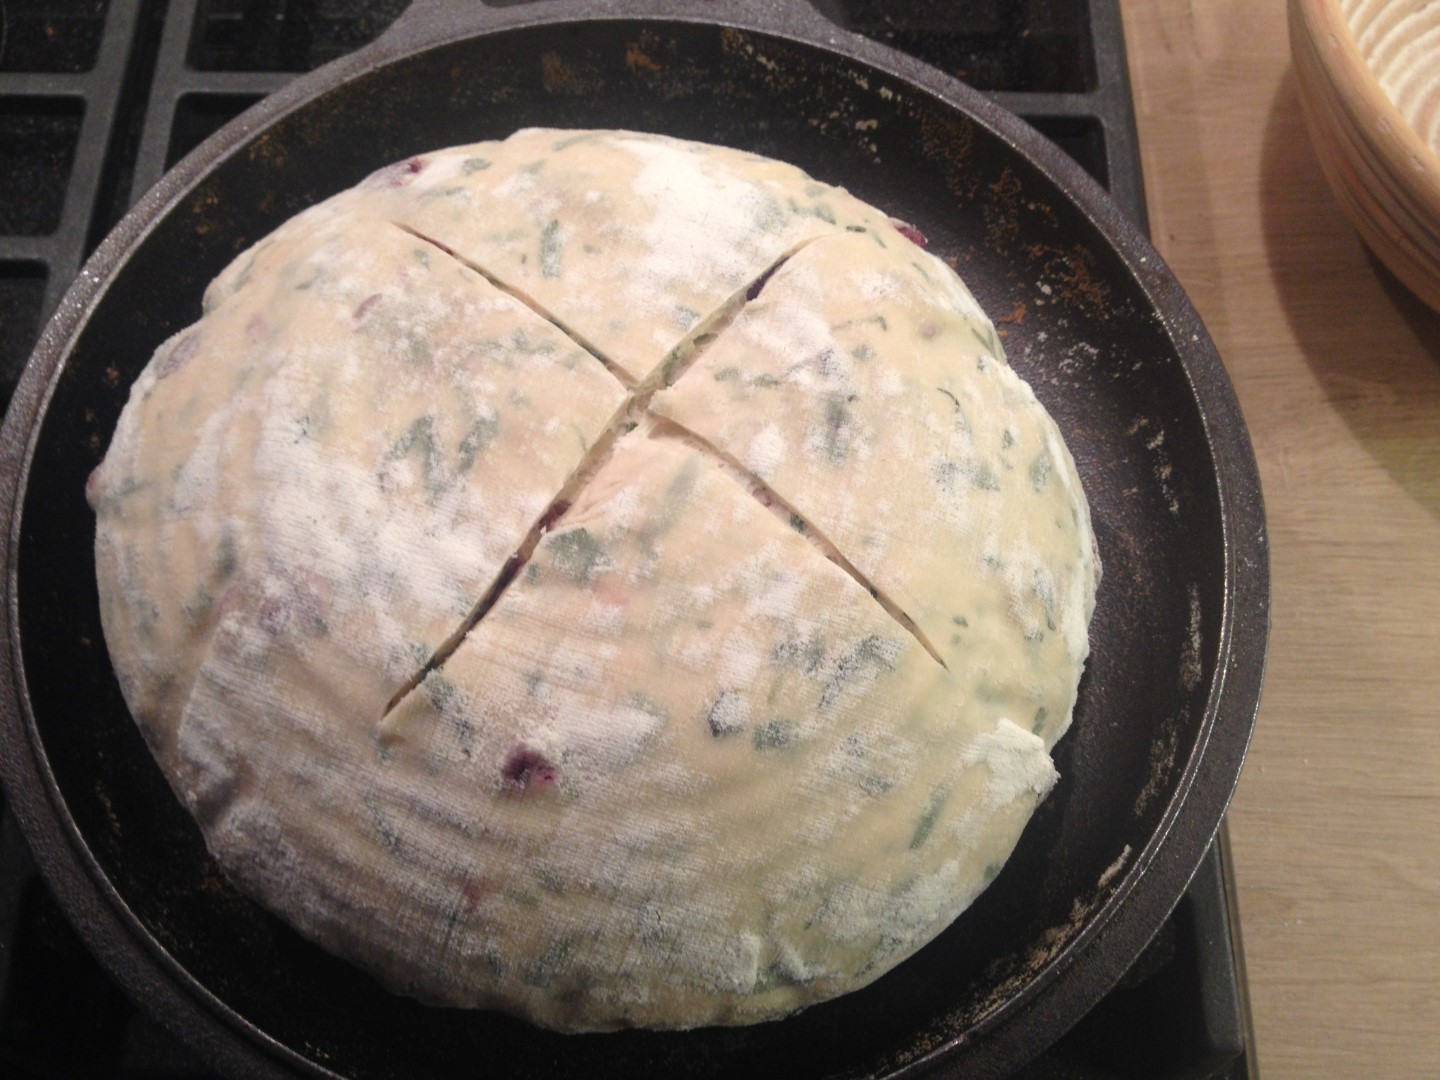
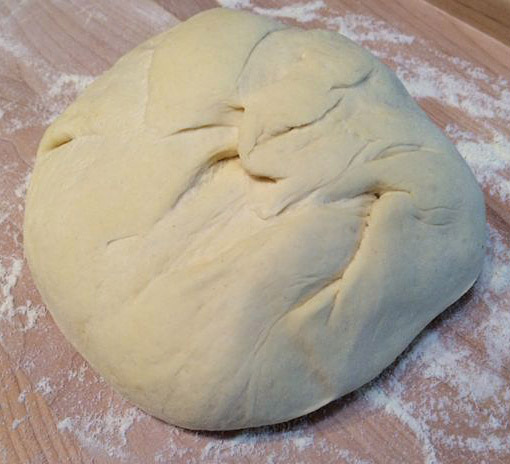
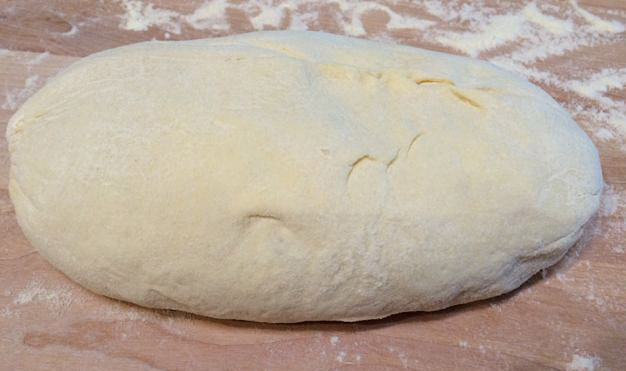
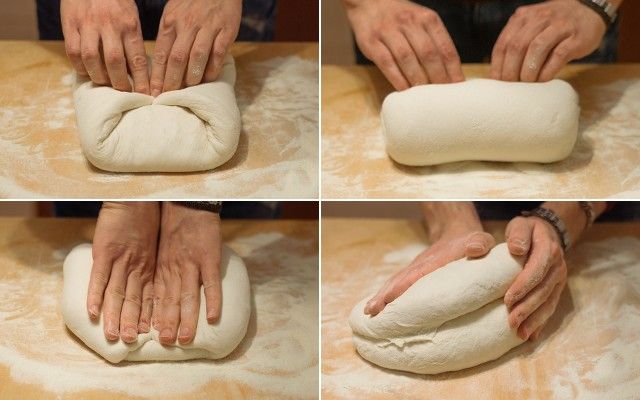
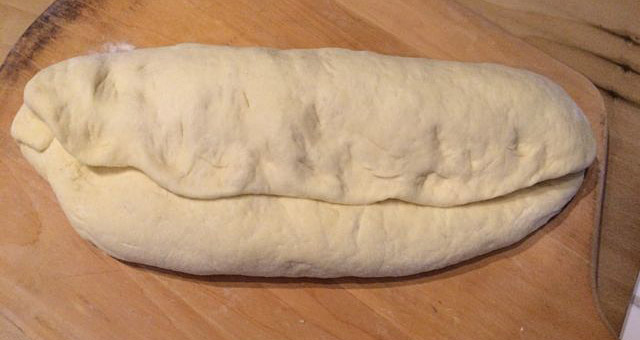
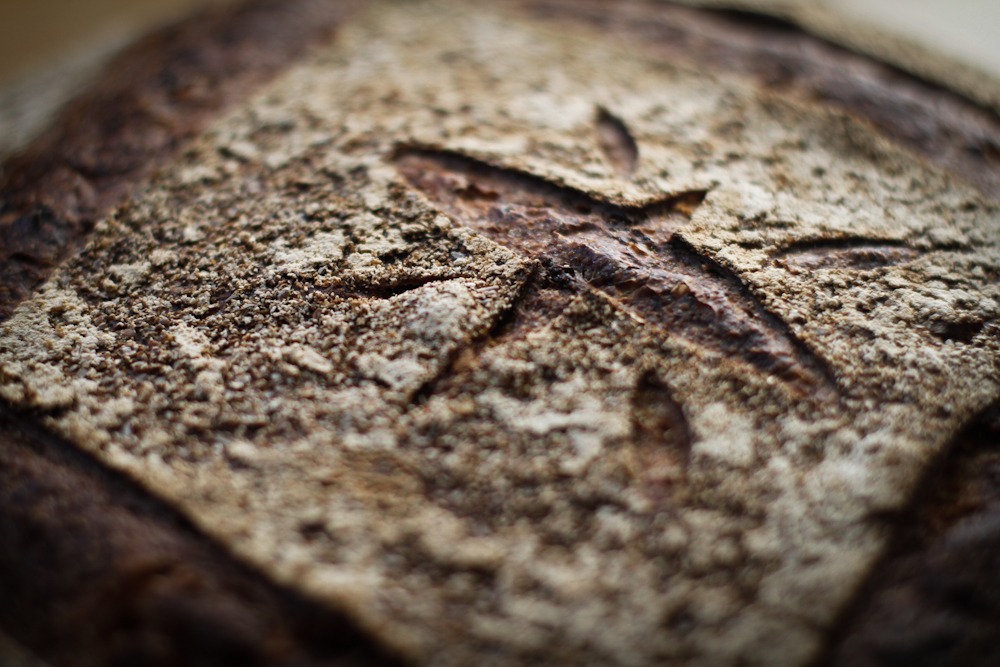
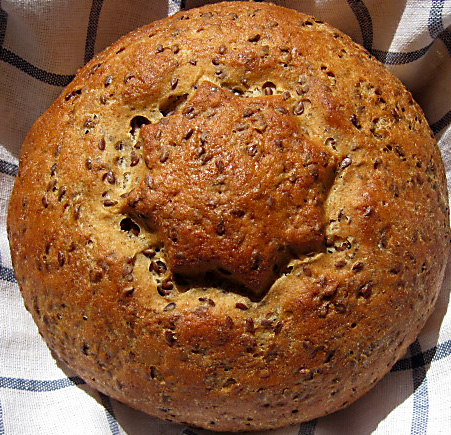
Remove dough from refrigerator 2 hrs. before using. Shape into 2 boules and place on parchment lined baking sheet. Brush with milk. Score with big star shaped  (or round or square) cookie cutter.

Preheat oven to 425 F, including steam pan.

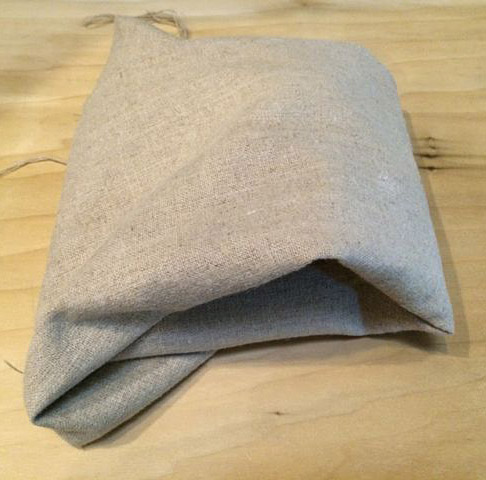
Let breads rise at room temperature for 45 - 60 min., or until they have grown to 1 1/2 times their original size.

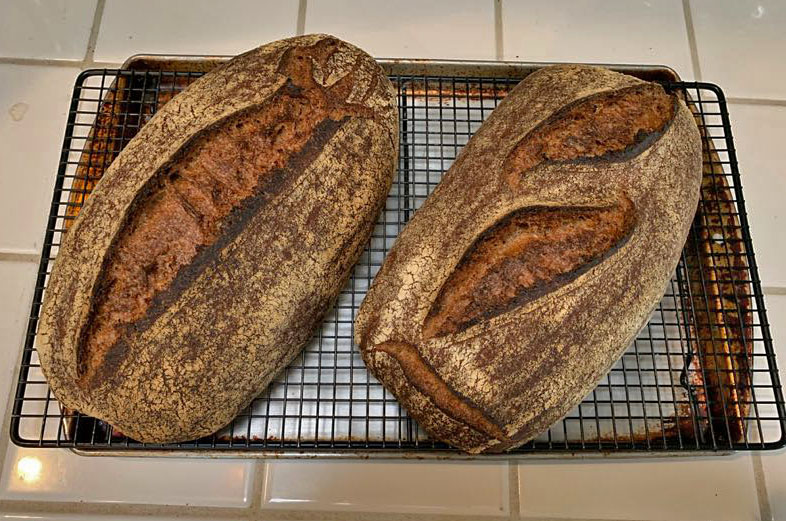
Bake breads at 350 F for 20 min. (with steam), rotate them 180 degrees and continue baking for another 20 - 25 min. (internal temperature at least 195 F). Let cool on wire rack.


STRETCH AND FOLD TECHNIQUE:

Leinsamenbrot can also be made with stretch and fold technique. Prepare only soaker as pre-dough (the flax seeds need 24 hours for thorough soaking!). Add biga ingredients to final dough.

For final dough, dissolve yeast in lukewarm water. Mix it with soaker and all other ingredients for 1 min. at low speed. Let dough sit for 5 min. Knead on medium-low speed for 2 min. Dough should be supple and very tacky, bordering on sticky (adjust with water if needed). Continue kneading for 4 more min., increasing speed to medium-high for last 30 sec. Dough should be tacky.

Stretch and fold dough 4 times, every 10 min. (40 min. total time). Refrigerate overnight.

Remove dough from refrigerator 3 hrs. before baking.

Shape cold dough into 2 boules. Place seam side down on parchment lined baking sheet. Brush with milk, then score with big cookie cutter. Let breads rise for ca. 2 - 3 hrs., or until grown 1 1/2 times their original size. Continue as in recipe above.


VOLUME MEASUREMENTS are only approximate calculations - you have to adjust with water or flour according to what the dough consistency should be like!!!

Updated 7/20/13: I added water to the soaker, and reduced the yeast in the final dough.


LindyD's picture
LindyD

Jeffrey Hamelman's sourdough seed bread

My daughter’s birthday is this week and as she loves hearty, artisan breads, I decided to bake Jeffrey Hamelman’s sourdough seed bread instead of a cake.  

I used King Arthur bread flour and Arrowhead Organic rye.  The seeds were purchased from an organic food coop.  The recipe was tweaked a bit.

Day one (of three): Assemble the liquid levain, soak the flax seeds, and toast the sunflower and sesame seeds:
  

Liquid levain: 
4.8 oz. bread flour
6 oz. water
1 oz. mature culture

The recipe calls for a liquid culture.  I opted to try one ounce of my stiff sourdough culture straight from the refrigerator [it had been refreshed the day before] as an experiment.

Mix the levain and allow it to stand (covered, at 70F) for 12 to 16 hours.  The photo shows my levain about two hours after it had been mixed.

Flax seed soaker:   
2.2 oz. flax seeds
6.7 oz. cold water

After you’ve mixed the levain, place 2.2 oz. flax seeds in a container and gently add  6.7 oz. cold water.  Cover and let stand for 12 to 16 hours.   As the flax seeds absorb the water, the mixture will appear gelatinous.

Toast the sunflower and sesame seeds:
3.8 oz. sunflower seeds (shelled)
1.9 oz sesame seeds

The sunflower seeds were toasted on a cookie sheet in a 325F oven for about 20 minutes (stirred occasionally) until browned.  The sesame seeds were browned in a cast iron pan over direct flame.  Stir constantly or they’ll pop out of the pan all over your stove top.

The toasted  seeds were mixed together (smelling oh, so heavenly), moved to a glass bowl, then covered and allowed to rest overnight so the nutty flavors could meld.  

Day two:  Mixing, fermentation, shape, and retard:
1 lb. 8.6 oz. bread flour
2.6 oz whole rye flour
11.3 oz. water.  
.7 oz salt (1 T plus ½ tsp)
All (8.9 oz) of the flax seed soaker
All (5.7 oz) of the toasted sunflower and sesame seeds
10.8 oz. liquid levain (all of the liquid levain except for 2T [1 oz]) (I added all 10.9 oz.)

The desired dough temperature is 76F (see note at the end of this text).

All of the ingredients were added to my KA spiral mixer.  Hamelman instructs to mix at first speed for three minutes, then at second speed for another three minutes.  I think Bread was written primarily for professional bakers and that those mixing instructions are for a heavy duty commercial mixer, so I don’t follow them.

I used the first speed only long enough to make sure the levain, water, salt, flour, and seeds were well mixed, then let the dough autolyse for 20 minutes.  After the autolyse, the dough was moved to my counter top where I stretched and folded until it felt supple.

Bulk fermentation is 2.5 hours.  The dough next was placed in a bowl for the bulk fermentation.  I folded it twice at 50-minute intervals.

I retarded the bread on a full sheet of parchment placed on a three-sided cookie sheet.  These three loaves were placed in a large food-grade plastic bag and moved to the refrigerator. The recipe calls for two large loaves, but I prefer three smaller loaves.

Final fermentation: The final fermentation can be up to 18 hours at 42F.

Day three: Bake and cool.

These loaves rose nicely during the final fermentation and even while unbaked, the perfume of the toasted seeds was quite wonderful.

The retarded breads had about an hour’s warm-up time while the oven was preheated to 460F.  They were scored and moved to the hot oven stone, then half a cup of hot water was dumped in the broiler pan under the stone.  Total bake time was 45 minutes.

The fragrance of the cooling bread was awesome.

I’ll give myself a “D” for scoring, but at least it’s a small improvement.

I waited 24 hours before slicing the bread, to allow the flavors to combine and mature.  The mix of the sunflower, flax, and sesame seeds, combined with the caramelized crust, provides a burst of flavor that borders on smokiness.  I loved the taste, fragrance, and texture of this bread.

A different take on crumb:  The kids and grandkids claim that too many holes means there’s too little bread, so they call it diet bread.  This should make them all happy.

If you enjoy an aromatic hearty bread, I’d encourage you to try Hamelman’s SD seed bread.  It's delicious toasted for breakfast, or with a bit of unsalted butter with a salad.  Or even plain!

Now, about desired dough temperature.  If you have Hamelman’s Bread, you’ll have read pages 382-385.  If you’re not familiar with the term, it is a formula used to determine the correct temperature of the water to be added to your flour and other ingredients.  It makes a difference in the quality of your bread.

Rather than reinventing the wheel, I direct you to WildYeast's blog where she so masterfully covers the subject and even provides a free downloadable calculator.  (Thank you, Susan!).

Benito's picture
Benito

100% Stoneground Whole Wheat Hokkaido Sourdough Milk Bread

Back from two weeks off without any baking. My starter was refreshed two weeks ago at 50% hydration, given 1 hour at room temperature then refrigerated. The pH had only dropped to 4.4 or so when I returned so there was plenty of food left. I discarded some, then brought the hydration up to 100% and did a small feed. He tripled in 3 hours but had not yet peaked, so I discarded and fed him again. 5 hours later he had peaked at 3.5-4x with the dome just starting to flatten. He was ready to build a levain for this bake.

You may have noticed my gradually increasing the whole wheat in my Hokkaido sourdough milk breads lately. I finally decided it was time to do 100% whole wheat and this didn’t disappoint.

For a 9” x 4” x 4” pullman pan

Sweet Stiff Starter
• 53g stoneground unsifted organic whole wheat flour
• 24g water
• 18g light brown sugar
• 18g sourdough starter ~100% hydration
1:1.33:2.9:1 starter:water:flour:sugar

Tangzhong classic 1:5 ratio
• 89g milk (adjusted down to 1:5 ratio from original)
• 18g stoneground unsifted organic whole wheat flour

Dough Dry Ingredients
• 9 g vital wheat gluten
· 424 g stoneground unsifted organic whole wheat flour
• 54g sugar 12.5%
• 7g salt 1.6%

Dough Wet Ingredients
• 180g milk (consider adding more milk 5 g next time, dough was stiff)
• 50g egg beaten (about 1 lg egg)
• 60g butter 13.9% softened but do not melt, unless you are mixing with the mixer then melt. Combine with 30 g of flour to make easier to add to dough if hand mixing.

Total flour = 513 g

Total weight 1004 g

Pre-bake Wash
• 1 egg beaten
• 1 Tbsp milk

Post-bake Wash
• 1 Tbsp butter

Instructions
Starter
Mix the starter ingredients in a jar or pyrex container with space for at least 50% growth.  In fact I usually get 2.5-3.5x growth.
Press down with your knuckles to create a uniform surface and to push out air.
At room temperature, it typically takes up to 10 hours for this sweet stiff levain to be at peak.
Tangzhong
In a sauce pan set on med-low heat, whisk the milk and flour until blended. Then cook for several minutes until thickened, stirring regularly with a spoon or heat-resistant spatula. Let cool in the pan or, for faster results, in a new bowl.

Dough
In the bowl of a stand mixer, briefly whisk the dry dough ingredients, and then add the sweet stiff starter, separating it into 5-6 portions as you add it to the bowl.
Now pour/scrape in all the wet ingredients (including the tangzhong), with the melted butter last. With the dough hook attachment, mix on low speed for a minute, scrape down the sides, and then mix on medium speed for 15-20 minutes. The dough will seem very soft, but as you approach the 15-20 minute mark, it should not stick to your hands and should pass the windowpane test.
Transfer the dough to a lightly oiled bowl, form it into a ball, flip it smooth side up, cover and let rise for 6-12 hours depending on room temperature. You can place the dough into the fridge to chill the dough for about 1.5 hours, this makes rolling the dough easier.
Prepare your pans by greasing them or line with parchment paper.
Scrape the dough out onto a clean counter top. Lightly flour the bench. Press the dough into a rectangle and divide it into four. Shape each tightly into a boule, allow to rest 5 mins. Using a rolling pin roll each ball out and then letterfold. Turn 90* and using a rolling pin roll each out to at least 8”. Roll each into a tight roll with some tension. Arrange the rolls of dough inside your lined pan alternating the direction of the swirls. This should allow a greater rise during proof and in the oven.
Cover and let proof for 2-4 hours (more if you put the dough in the refrigerator). I proof until the top of the dough comes to within 1 cm of the top edge of the pan.
Preheat the oven to 350F and brush the dough with the egg-milk wash. Just prior to baking brush with the egg-milk wash again.

Bake the loaves for 50 minutes or until the internal temperature is at least 190F. Shield your loaf if it gets brown early in the baking process. After 50 mins remove the bread from the pan and bake a further 10 mins by placing the loaf directly in the oven on the rack with the oven turned down to 325ºF. You can brush the top of the loaf with butter if you wish at this point while the bread is still hot.

Wonderful flavour, there isn’t any real sour tang and certainly no bitterness that I had always thought was characteristic of 100% whole wheat breads like this that I ate as a child. I’m not sure that the Vital Wheat Gluten was necessary, but I wanted to ensure that I was able to get the shreddable crumb that this type of bread should have.

Benny


DanAyo's picture
DanAyo

Community Bake featuring Kristen of FullProofBaking

It is exciting to have Kristen of FullProofBaking as our featured baker. For those that are not familiar with her work, take a look at this link for her bio and other related information.

For those that may be new to our Community Bakes (CB) check out the initial post at this link for a general idea of what to expect, and also the purpose and focus of these on-line events.

The focus bread is Kristen's Basic Open Crumb Sourdough (BOCSD). As with all CBs, I bake the bread following the author's instruction. After baking this bread over 6 consecutive times, I can say with confidence that this bread is an excellent sourdough formula. Done properly, you can expect a nice ear with good bloom, AND the potential oven spring is huge!

The spreadsheet below (published with Kristen's permission) is set to the total dough weight of Kristen's original formula. ***NOTE - Kristen uses 80% hydration, but some (me for sure) may find that challenging. So, the sheet shows 74% water and just below that 6% "Hold Out Water". For those that want to alter the hydration upwards, just add 3.5 grams of water for each 1% increase in hydration. See this link for a helpful tip.

 Basic Open Crumb SD

by Kristen @ FullProofBaking
Resource --- https://www.youtube.com/watch?v=HlJEjW-QSnQ&t=1s                         
Wednesday, October 16, 2019

1.    Liquid Levain   (0:00) --- I build mine at around 1:2:2 and let it sit at about 80°F until it more than triples in volume and “peaks”. For my starter, this takes approximately 5-6 hours.
Flour for my starter feeds is composed of a mix of 10% rye, 90% bread flour

2.    Autolyse  (+3:00) --- This is a pre-soak of the flour and water. If concerned about the hydration hold back some of the water. You can add it back later, if necessary. Leave the autolyse for anywhere from 2-4 hours (I prefer 3 hours) while the levain finishes fermenting.

3.    Add Levain  (+6:00)  --- Spread on top of dough and work in using your hands. This is a good time to evaluate the feel (hydration) of the dough.

4.    Add Salt  (+6:30)  --- Place salt on top of dough and work in with hands. Dough will start to strengthen.

5.    Light Fold   (+7:00) --- With dough on a slightly wet bench do a Letter Fold from both ways. NOTE: If baking more than one loaf, divide the dough before folding.

6.    Lamination  (+7:45) --- Place dough on wet counter and spread out into a large rectangle. Do a Letter Fold both ways.

7.    Coil Fold   (+8:30) --- Do a 4 way Stretch and Fold (Coil Fold) inside the BF container.

8.    Coil Fold   (+9:15) --- Do a 4 way Stretch and Fold (Coil Fold) inside the BF container.

9.    Coil Fold   (+10:00) --- Do a 4 way Stretch and Fold (Coil Fold) inside the BF container.

10. End of BF - Shaping   (~11:30) --- The duration of the BF is a judgement call. Shoot for 50-60% rise (assuming my fridge temp is set very low). Warmer fridge (above 39F) means your dough will continue to rise... so in this case, bulk to more like 40%. Divide and shape

11. Retard Overnight & Bake   --- Score cold and bake in a pre-heated 500F oven for 20 minutes with steam

12. Vent Oven 20 minutes into the bake --- Vent oven and bake for 20 or more minutes at 450F.

Everyone is encouraged to join in on the fun. We especially welcome novice baker's. It's a excellent opportunity to learn and a great chance to meet others.

Danny

As promised, for those that are more advanced and want to take a ride on the "wild side", here is a link to Kristen's Cuttlefish Ink Swirl bread. In order to avoid confusion, please post anything that pertains to the Cuttlefish Ink Swirl on that page instead of using this one.


dmsnyder's picture
dmsnyder

Whole Wheat Sourdough Bread from "Josey Baker Bread"

Josey Baker Whole Wheat Sourdough Bread

David Snyder

February, 2019

Browsing cookbooks at a branch library, I found Josey Baker's “Josey Baker Bread.” I have driven by and peeked into his bakery in San Francisco, but have never tasted his products. I confess I found what he charged for a slice of toast off-putting. But, folks seem to like his bread. Looking through the book, I found some recipes for 100% Whole Wheat sourdough bread. It certainly looked good in the photos, and I am still looking for my personal favorite 100% whole wheat sourdough. So, I checked out the book.

I won't comment on the book's style except to say it is an attempt to seduce some one into baking bread at home who is still a bit frightened and mystified by the whole process. It is certainly a worthy objective.

Anyway, here's my first bake of this bread.

Note: Baker does not call for a true autolyse. He combines all the ingredients in the “Final Dough” at once and, after a mix to just distribute them evenly in the dough, he lets it sit for a half hour before beginning a series of stretch and folds at half-hourly intervals. The procedure described below is what I actually did. I mixed the final dough, including the levain but not the salt, and let it rest for a period before adding the salt. This is the way I was taught at the San Francisco Baking Institute to autolyse dough when a liquid levain is used.


Total Dough

1 loaf

2 loaves

4 loaves


Ingredient

Wt (g)

Bakers' %

Whole Wheat flour

508

1016

2032

100

Water

423

846

1692

83

Salt

11

21

42

2.1

Total

942

1883

3766

185.1


Levain

1 loaf

2 loaves

4 loaves


Ingredient

Wt (g)

Bakers' %

Whole Wheat flour

50

100

200

100

Water (cool)

60

120

240

120

Sourdough starter

6

12

24

12

Total

116

232

464

232

  1. Mix the levain ingredients well in a 4-6 cup bowl. Cover well.

  2. Ferment at room temperature (72-76ºF) for 8-12 hours.

Note: The sourdough starter I used to seed the levain is 100% hydration. It is actually 70% AP, 20% WW and 10% whole rye. For purposes of the “Total Dough” formula, I treated it as if it were entirely whole wheat.

Note: Because of a social obligation, I was not able to mix the final dough right when the levain was ripe. I refrigerated the ripe levain overnight and continued the process the next morning.


Final Dough

1 loaf

2 loaves

4 loaves

Ingredient

Wt (g)

Whole Wheat Flour

455

910

1820

Water (warm)

360

720

1440

Salt

11

21

42

Ripe levain

116

232

464

Total

942

1883

3766

Procedures

  1. Mix the flour and water and levain to a shaggy mass. Cover and let rest for 30-60 minutes. (Note: I actually autolysed for a bit over 2 hours.)

  2. Sprinkle the salt over the dough and mix it in with a spatula, spoon or your hand.

  3. Distribute the salt evenly using a pinching procedure (as described in FWSY or Tartine No. 2), alternating with stretch and folds in the bowl.

  4. Cover the bowl and ferment until increased in volume by 50% and well aerated with bubbles (about 3 hours at 80ºF). Perform stretch and folds in the bowl every 30 minutes for the first 2 hours.

  5. If making more than one loaf, divide the dough evenly into the desired number of pieces.

  6. Pre-shape piece(s) into balls. Cover and let rest for 10-30 minutes.

  7. Shape into boules or bâtards. Place in floured baskets and cover or place in food-safe plastic bags.

  8. Proof the loaves 3-4 hours (per Josey Baker). I proofed 1 hour at room temperature, then refrigerated to bake the next day.

  9. Pre-heat oven to 475ºF 45-60 minutes before baking.

  10. Bake either on a baking stone with steam for the first 15 minutes or in a Dutch oven, covered for the first 20 minutes. The total bake time should be 45-50 minutes, to an internal temperature of 205ºF.

  11. Remove to a cooling rack. Cool completely before slicing.

Note: Baker says one can cold retard this bread, either in bulk (after Step 4.) or as formed loaves. (after Step 8.) He does not say whether or not he would ever do both retardations.

The flour I used was Turkey Red wheat, freshly milled in a Mockmill 100 set at its finest setting. I did not sift out or remill any of the bran. The dough was soft and tacky but very manageable. It seemed to be developing some strength curing the stretch and folds, but was quite loose during shaping.

Lovely dough made with 100% home-milled Red Turkey wheat

Formed loaves, ready for a 12 hour nap at 40ºF

Baked loaves, cooling

The crumb

I sliced the bread after it had cooled for about 3 hours. The crust was chewy, except for the ears which were crunchy. The crumb was very moist and tender with a wheaty and mildly sour flavor. My experience has been that this type of bread improves after a day or so.

Happy baking!

David

Ru007's picture
Ru007

(Mostly) white sourdough

Hello friends! 

Happy monday :) This is was my bake yesterday...

I've been working on this formula for a couple of months and I've almost settled on a flour blend that I really like. 70% white, 25% whole grain and 5% rye. I'm still working on what grain the 25% is. I'm not really spoiled for choice in terms of flour, but I've tried 25% spelt, and 25% whole wheat and a few variations in between. This one is 25% whole wheat. 

The hydration has varied from 75% to 85% this week. I must say this has been my favorite version of the dough to work with. I use 2.4% salt.

Method: 

1. Levain build the night before mixing 16g 80% hydration 100% rye NMNF starter, 6g rye, 36g whole wheat, 33g water. I typically use the levain when its some where between 10 and 12 hours old (although I do want to try using it when its a bit younger, just to see what happens)

2. 2 hour autolyse on mixing day (316g water, 296 white unbleached bread flour, 67g whole wheat flour)

3. Add 10 g salt and 90g levain to flour and hand mix for a couple of minutes. Rest for 10mins and mix again. Repeat 3 -4 times. 

4. S&F 60, 120 and 180 mins after mixing. 

5. Bulk ferment for another 3 hours or until the dough is jiggly (yes, this is a very technical term!)

6. Preshape and rest for 30mins then shape. 

7. Proof at room temp for another 1 -2 hours (depending on the weather, it was cold this weekend so I let it go for 2 hours).  

8. Retard overnight, bake straight from the fridge. 250dC with steam for 20mins ,230dC without steam for another 25mins.

Result... 

I'm happy with the crumb on this one, its nice and soft.

I've tried this leafy scoring pattern before, but I think I like this version better, with the more aggressive slashes down the side... but I might change my mind next week! 

Have a great week everyone and happy baking :)

Ru

joc1954's picture
joc1954

Tarragon and Cranberries Bread

There are several posts on TFL for bread with cranberries but there are almost no posts using tarragon and nothing about a combination of tarragon and cranberries. In Slovenia, where I live, one of very popular national dishes (cakes) is tarragon cake ( in Slovenian language “pehtranova potica” ). In this cake, which is made for different holidays, we mostly use fresh (green) tarragon. “Potica” is made from dough typical for Italian panettone. The dough is spread after bulk rise and topped with a mixture of fresh tarragon, young or cottage cheese, crème fraiche or something like this with some sugar added. Then everything is usually rolled together and put in a typical model for the final raise. For a while I had idea to combine cranberries and tarragon and make special kind of bread which would not be as sweet as a cake, but would be an ideal one for eating at breakfast topped with butter and cranberry jam or with some camembert cheese.

Tarragon Plant

My wife likes cranberry jam and her birthday was just a perfect occasion to put my idea in practice. The dough recipe is following the idea for a Tartine County Loaf. The additions are dried but rehydrated cranberries, chopped fresh tarragon (one can also use dried tarragon) and 2 teaspoons of honey. I used fresh tarragon from our garden. If you don’t like sweet bread you can omit completely two teaspoons of honey.

The recipe calls for using milk but one can use water instead. However, be prepared that the taste in this case will be quite different.

Several hours before you start mixing the dough you should soak the cranberries in the water and dry them before you put them in the dough. However, soaking them in the water will cause that a lot of their juice will be dissolved in water so it is good to use the water from the soaker for mixing the dough. Alternatively what I do is soaking cranberries in milk which is used in the recipe and strain that milk away before mixing the dough. It might happen that the milk will coagulate a little bit due to the acid in the cranberries but when you add cranberries to the dough you will not notice this at all. If you are using milk then after straining add missing quantity of milk to have 200 grams of milk for mixing the dough. Sometimes cranberries can be quite thirsty and you have to correct this by adding more milk.  One can also use re-hydrated cranberries. In this case there is no need for soaker.

Dough after bulk fermentation before divide


Cranberry Soaker


Ingredient

Grams

Baker's %

dried cranberries

200

20%

Milk/water

200

20%

Total soaker

400


Levain


Ingredient

Grams

Baker's %

AP flour

200

20%

water

200

20%

SD culture (SD starter)

50

5%

Total levain

450


Final Dough


Ingredient

Grams

Baker's %

bread flour

400

40%

AP flour

400

40%

milk

200

20%

levain

450

45%

butter

70

7%

2 eggs

130

13%

salt

20

2%

honey

20

2%

tarragon fresh

100

10%

cranberry soaker

400

40%

Final dough weight

2190

219%


Totals:


Ingredient

Grams

Baker's %

flour

1000

100%

milk/water

730

73%

hydration

73,00%


Preparation:
 
1.) Mix with mixer 2 eggs, butter (leave it on room temp for a while to soften), honey, about 100g of the flour and some milk to get a thick batter. Then add strained milk from cranberries, levain, rest of milk/water and rest of flour and mix with hand to get a shaggy mass and let it rest from 20-60 minutes.
2.) Add 20 grams of salt and mix thoroughly with hand.  
3.) Do stretch & fold every 30 minutes. Add cranberries and tarragon one hour into bulk fermentation (at second stretch & fold).
4.) After three to four hours of bulk fermentation (watch the dough, not the hour) divide the dough and let it rest for 15-30 minutes on the bench.
5.) Do final shaping and let it rise for about 2 hours or retard immediately and bake it direct from refrigerator after 8-12 hours.
6.) Bake in Dutch oven – for 10 minutes at 240 dC (460 dF) and then reduce to 220 dC (435 dF). Open the lid after 30 minutes and bake for another 10-20 minutes.   Alternatively bake with steam for 15 minutes, after that continue with convection bake. CAUTION: As this dough contains more sugar it will brown faster so it is a good idea to reduce the baking temperatures for about 10-20 degrees. 
7.) Cool on a rack for at least 1 hour before slicing.

Tarragon  & Cranberries Bread
 
Taste of this bread is really great in if you like tarragon you will love this bread. One can use dry tarragon for the recipe as well; however in this case use only 30 grams of dry tarragon. Actually the quantity of tarragon in this bread is completely arbitrary and depends on your taste.


Update 4.8.2016

Today I was baking this bread for my mother who turned 91 and also for our neighbor who turned 61. I took several pictures which I am publishing now. My today's baking is with excellent Italian "00" flour.

Italian flour type "00"

Italian flour type "00"


Adding tarragon to the dough

Adding tarragon to the dough


Adding cranberries soaked in milk

Adding cranberries soaked in milk (see some milk coagulation around berries)


Dough with added tarragon and cranberries

Dough with added tarragon and cranberries


Dough after 8 hours in fridge

Dough after 8 hours in fridge before going into DO


Scored dough

Scored dough in LODGE skillet


After removing lid

After removing lid 30 minutes later


 Final result

Final result


 Final result - details

Final result - details


 After slicing

After slicing - crumb was very soft, not too open (this was my intention), the crust was not too strong. This bread amazes me every time I eat.


Happy baking!


dmsnyder's picture
dmsnyder

Pane Tipo di Altamura - March 31, 2016

Pane Tipo di Altamura

31 March, 2016

David Snyder


Back in 2011, several TFL bakers worked on trying to replicate Pane di Altamura at home. I participate with one bake (see: http://www.thefreshloaf.com/node/24139/pane-tipo-di-altamura-quotlocal-breadsquot), but did not work to refine it and have not baked this bread since. Abe's (A BakEr on TFL) recent efforts have inspired me to give this bread another go.

Since my prior attempt, I have had a little experience baking in a wood-fired oven, which is how Pane di Altamura is baked. I realize how different that oven is from my home electric oven. I have further amended Abe's amendment of the Italian DOP specification based on this experience. Most significantly, almost all instructions for baking this bread omit steaming the oven. My thinking is that, in a wood-fired oven, generally there are multiple loaves baking at once, and the water that evaporates from them, in effect, steams the oven without the addition of any water by the baker. This effect is much less with a single loaf in an electric oven. Therefore, I did steam my oven for the first part of the bake. That said, the formula and procedures I used are largely based on the information Abe kindly shared with us.


Total Dough

Wt. (g)

Baker's %

Semola Rimacinata (Fine Durum flour)

550

100

Water

330

60

Salt

10

1.8

Total

890

161.8


Biga Naturale

Wt. (g)

Baker's %

Semola Rimacinata (Fine Durum flour)

50

100

Water (80-90ºF)

30

60

Semola Rimacinata starter

20

40

Total

100

200

I already had a biga naturale from a previous bake in my refrigerator. So, the biga used in the Final Dough was fed three times with about 12 hours' fermentation of each build.

  1. Place the starter in a medium bowl.

  2. Add the water and mix until the starter is in pea-size pieces.

  3. Add the flour and mix until there is no dry flour and the biga feels like a bread dough.

  4. Place the biga in a clean bowl and cover tightly.

  5. Ferment for about 12 hours at 70-76ºF.

  6. Repeat twice more.


Final Dough

Wt. (g)

Baker's %

Semola Rimacinata (Fine Durum flour)

500

100

Water

300

60

Salt

10

2

Biga Naturale

100

20

Total

910

182

 Procedures

  1. Mix the flour and water well in a large bowl. (There should be no dry flour in the bowl.)

  2. Cover the bowl tightly and let it rest at room temperature for an hour.

  3. Add the salt and the biga to the bowl. Mix thoroughly using the French “pinch and fold” method.

  4. Knead in the bowl or on an un-floured board for about 10 minutes.

  5. Cover the dough and let it rest for 10 minutes.

  6. Knead for another 10 minutes.

  7. Transfer the dough to a clean bowl. Cover the bowl tightly.

  8. Ferment for 6 hours at 76ºF. (I used a Brød and Taylor Proofing Box set to 76ºF.) The dough should be expanded to double its original volume and feel soft and puffy.

  9. Transfer the dough to a board lightly dusted with durum flour and pre-shape as a boule.

  10. Pre-heat the oven to 500ºF with a baking stone and steaming apparatus in place.

  11. Place the boule on baker's linen and cover well. Let it rest for 30 minutes.

  12. Transfer the dough to the board and pre-shape as a bâtard, taking care to de-gas the dough as little as possible. (Note: Pane di Altamura is traditionally shaped as a boule. I elected to shape it as a long loaf. If shaped as a boule, the bake time should be increased, since the loaf would be thicker.)

  13. Place the bâtard on the baker's linen and cover well. Let it rest for another 30 minutes.

  14. Transfer the bâtard to the board. Gently stretch it by grasping the two long sides and pulling it into a flat oval.

  15. Using the sides of your two hands, make a wide groove down the long axis of the loaf. Then fold the loaf at the groove so that the upper half over-laps the lower half 3/4 of the way. Gently seal the seam between the upper and lower layers.

  16. Transfer the loaf to a peel.

  17. Turn the oven down to 450ºF, steam the oven and transfer the loaf to the baking stone.

  18. Bake with steam for 15 minutes.

  19. Remove the steam source from the oven. Turn the oven temperature down to 420ºF (or 400ºF convection bake).

  20. Bake for another 15-18 minutes. The loaf should be nicely browned. It should sound hollow when the bottom is thumped with a knuckle. The internal temperature should be at least 205ºF.

  21. Transfer the loaf to a cooling rack and cool thoroughly before slicing.


Tasting Notes

When fully cooled and first sliced, the crust is thin and chewy. The crumb is amazingly open for such a low-hydration bread, and a most attractive yellow color. The slices show that the multiple shaping steps did not over-de-gas the dough. The profile shape is pleasing. On tasting, the crumb is mildly chewy. There is a slight yeasty aroma. The flavor is balanced and mild with some nutty, some sweet and very little if any sour tang. When eaten toasted the next morning, the crust becomes pleasingly crisp. The crumb is a bit more tender. The flavor is similar to that of a couple hours after baking.

When tasted dipped in a local, low-acid, fruity EVOO, this bread is transformed into something ambrosial. Of course, Puglia is famous for both Pane di Altamura and for its ancient olive groves, so it is no surprise. The neutral flavor of the bread allows the full, complex flavor of the oil to come through, and the oil brings out the sourdough tang that was otherwise faintly present in the bread. Delicious!  

Photo Gallery

Fully fermented dough, on the board prior to first pre-shaping (Step 9) 

Pre-shaped dough, wrapped in baker's linen for a rest

After first pre-shaping and a 30 minute rest wrapped in linen

Dough after second pre-shaping as a bâtard (Step 12)


A helpful illustration of shaping I found on the agradolce.it web site (Pane di Altamura | Agrodolce)


My loaf, after final shaping. On a peel, ready to bake. (Step 15)

Pane Tipo di Altamura

A slice

Crumb, close-up


Final Notes

This bread is fun to make. The dough is easy to mix and enjoyable to handle. Shaping is a challenge. I am pleased with the result. The baked loaf is attractive.

 I do not find the bread provides outstanding eating by itself or with butter, however, dipped in olive oil as is traditional, it is transformed into a wonderful food. It is not merely a vehicle. The olive oil and the bread each compliment the other. (See "Tasting Notes," above.) I still need to taste this bread grilled then rubbed with garlic, another traditional way of eating it.

The obvious necessity is a trip to Altamura to calibrate my expectations.

 David 


WoodenSpoon's picture
WoodenSpoon

Oatmeal Hazelnut Miche

Over my last two days off I made this really big Oatmeal Miche. Its subtle and earthy and maybe a little too big but it will last all week until I have time to make another so I'm pleased.

Here's how I made it

Levain build one 

  • 20g rye chef
  • 50g fresh ground hard red
  • 20g water

Levain build two

  • 25g firm levain
  • 100g fresh ground hard red
  •  50g water

Final Dough

  • 1100g Bread Flour (69%)
  • 320g Hard White (20%)
  • 70g Hard Red (4%)
  • 10g Rye (1ish%)
  • 150g Levain (6.6%hard red 3.3%water)
  • 1150g water (72%) (hold 100g)
  • 400g Cooked oatmeal (25%)
  • 235g Toasted Hazelnuts (15%)
  • 32g Salt (2%)

First I mixed all the flours and let the dough autolyse  at room temp holding 100 grams of water for later.

Eight hours later I dissolved the levain in the leftover water and incorporated it into the dough. Fifteen minutes later added the salt and have the dough a few slap and folds. followed by a ten minute rest and a set of stretch and folds followed by a 20 minute rest.

During that 20 minutes I roasted and cracked the hazelnuts and cooked the oatmeal.

I incorporated the nuts and oatmeal and for the next hour and forty minutes I have the dough 4 sets of semi evenly spaced out stretch and folds. then I left it alone for around six hours. Then I shaped it and put it right in the fridge to proof

21 hours later I removed it from the fridge and put it right in a 500degree oven. 5 minutes later I reduced the heat to 450 and continued baking for another 55 or so minutes. once the the loaf was done I turned the oven off and left it in with the door cracked for an additional ten minutes.


varda's picture
varda

Jewish Corn Rye

Several years ago, when I first started haunting TFL for clues on how to make Jewish Rye, I came across references to George Greenstein's Secrets of a Jewish Baker.   The breads I made from this book were god awful which had nothing to do with George Greenstein and everything to do with the (lack of) skill of the baker.   As time went on and I learned more about bread baking in general and Jewish Rye in particular, SOAJB got pushed to the back of the shelf and almost forgotten.  And yet people like David Snyder reminded me of it with his occasional Jewish Corn Rye bakes.    See for instance here.   Yum.  

The other day I came back to it   I decided to handle the volume measurements in Greenstein by pulling out the old measuring cups and then weighing what I did as I went along.   Then make adjustments from the weighed measurements going forward.   Since then this bread has become my new favorite.   I already make Tzitzel and Flaxseed Rye and Borodinsky and Schuster Loaf, so do I really need another rye on my plate?   Absolutely.   So good.   Must have more.

Formula:

         Final        Sour        Total  Bakers %
KAAP181 18145%
Whole Rye1338621955%
Water2146928371%
Caraway9 92.3%
Salt7 71.7%
Rye Sour (80%)156 15622%
Cornstarch glaze   
Caraway to sprinkle 700 

Method:

Ripen 80% rye sour until pungent

Mix all ingredients

Bulk ferment until somewhat puffy (this took two hours today in 70degF kitchen)

Shape into a jelly roll and mold the ends shut

Proof until it starts to soften (this took 1 hour today)

Glaze with cornstarch mix (boil two cups water - dissolve 2 tbsp cornstarch in 1/4 cup cold water.   Whisk into boiling water until thickens and clear.)

Sprinkle with caraway seeds

Preheat oven to 500.  Load bread with steam for 1 minute.   Turn off oven for 6 minutes.   Bake at 430 for 20 minutes. 

Note that I did not use yeast in addition to the rye sour as Greenstein does.  Nor did I keep the fermenting dough wet as Greenstein says - just the regular old bulk ferment in a covered bowl.  

Pages