June 3, 2020 - 4:10am

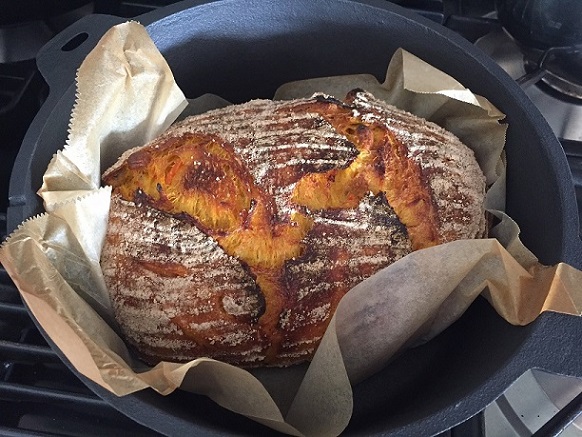
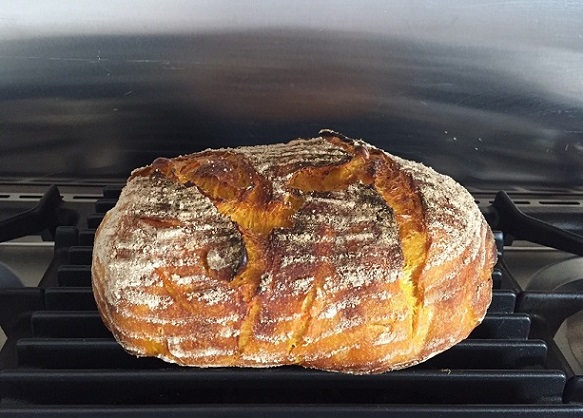
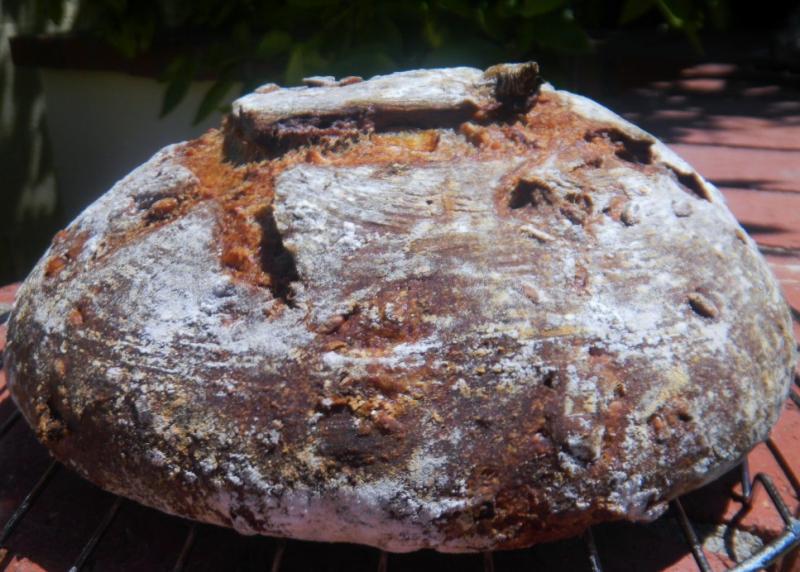
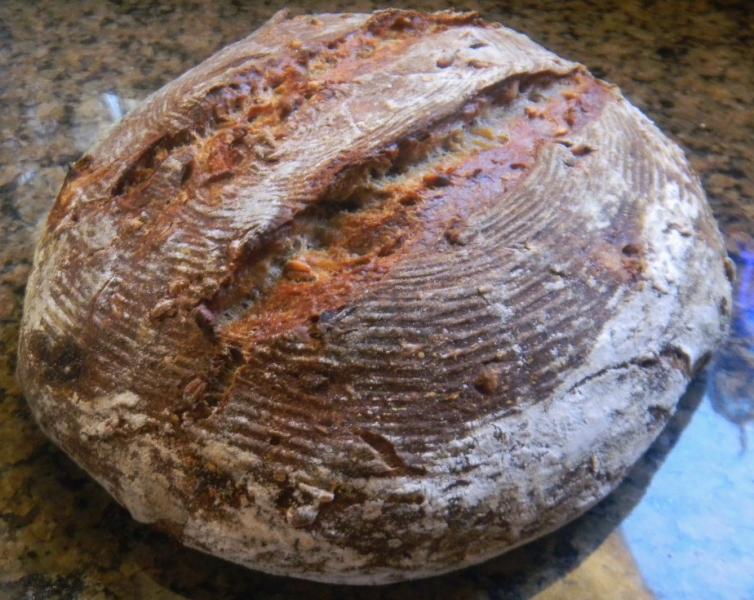
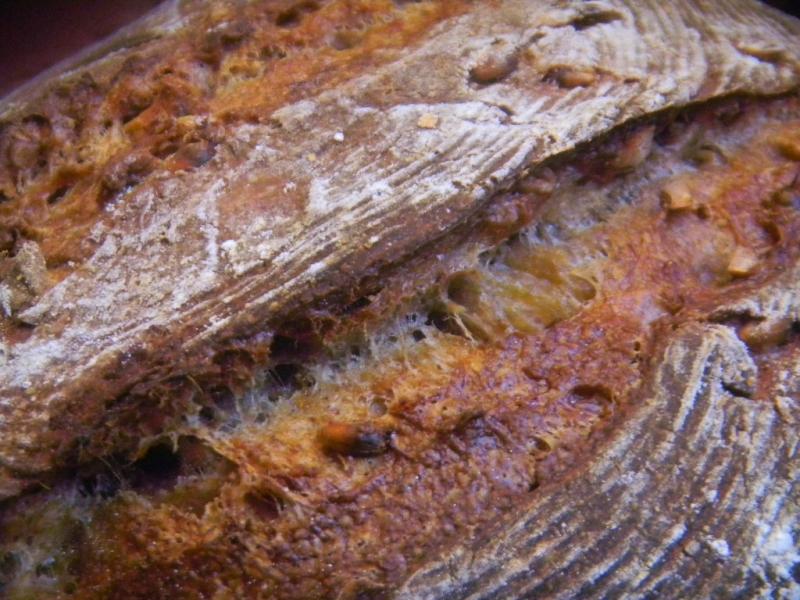
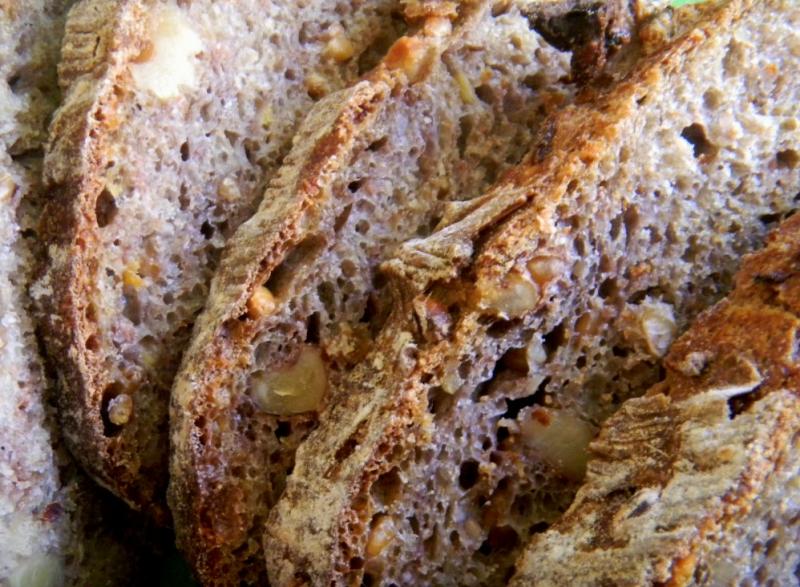
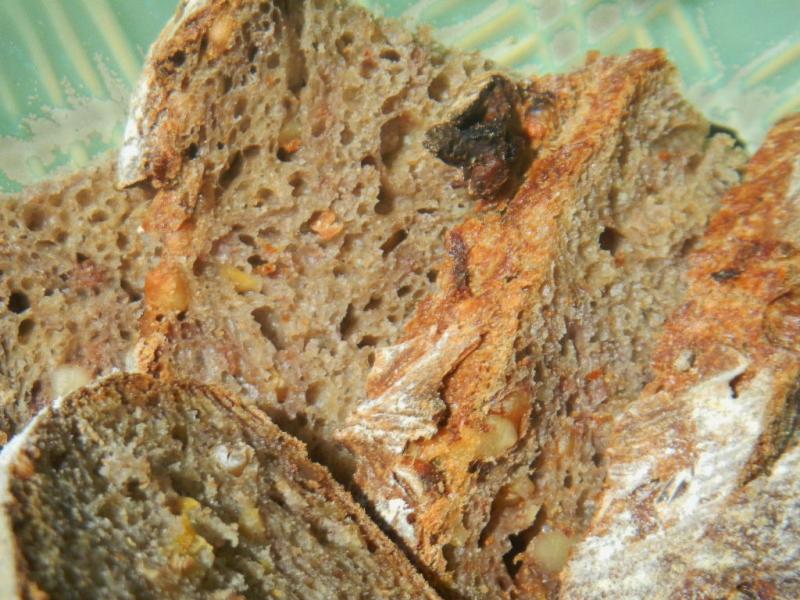
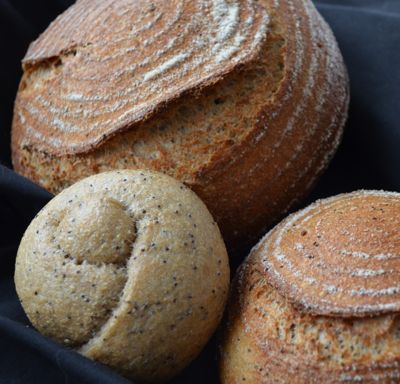
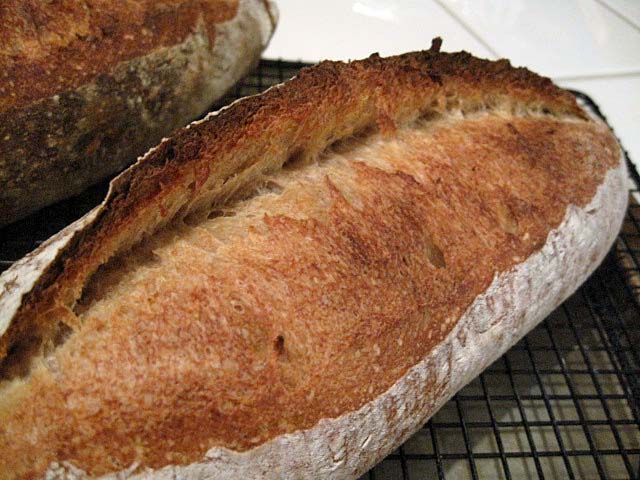
100% sourdough spelt bread
100% whole grain sourdough with a three stage levain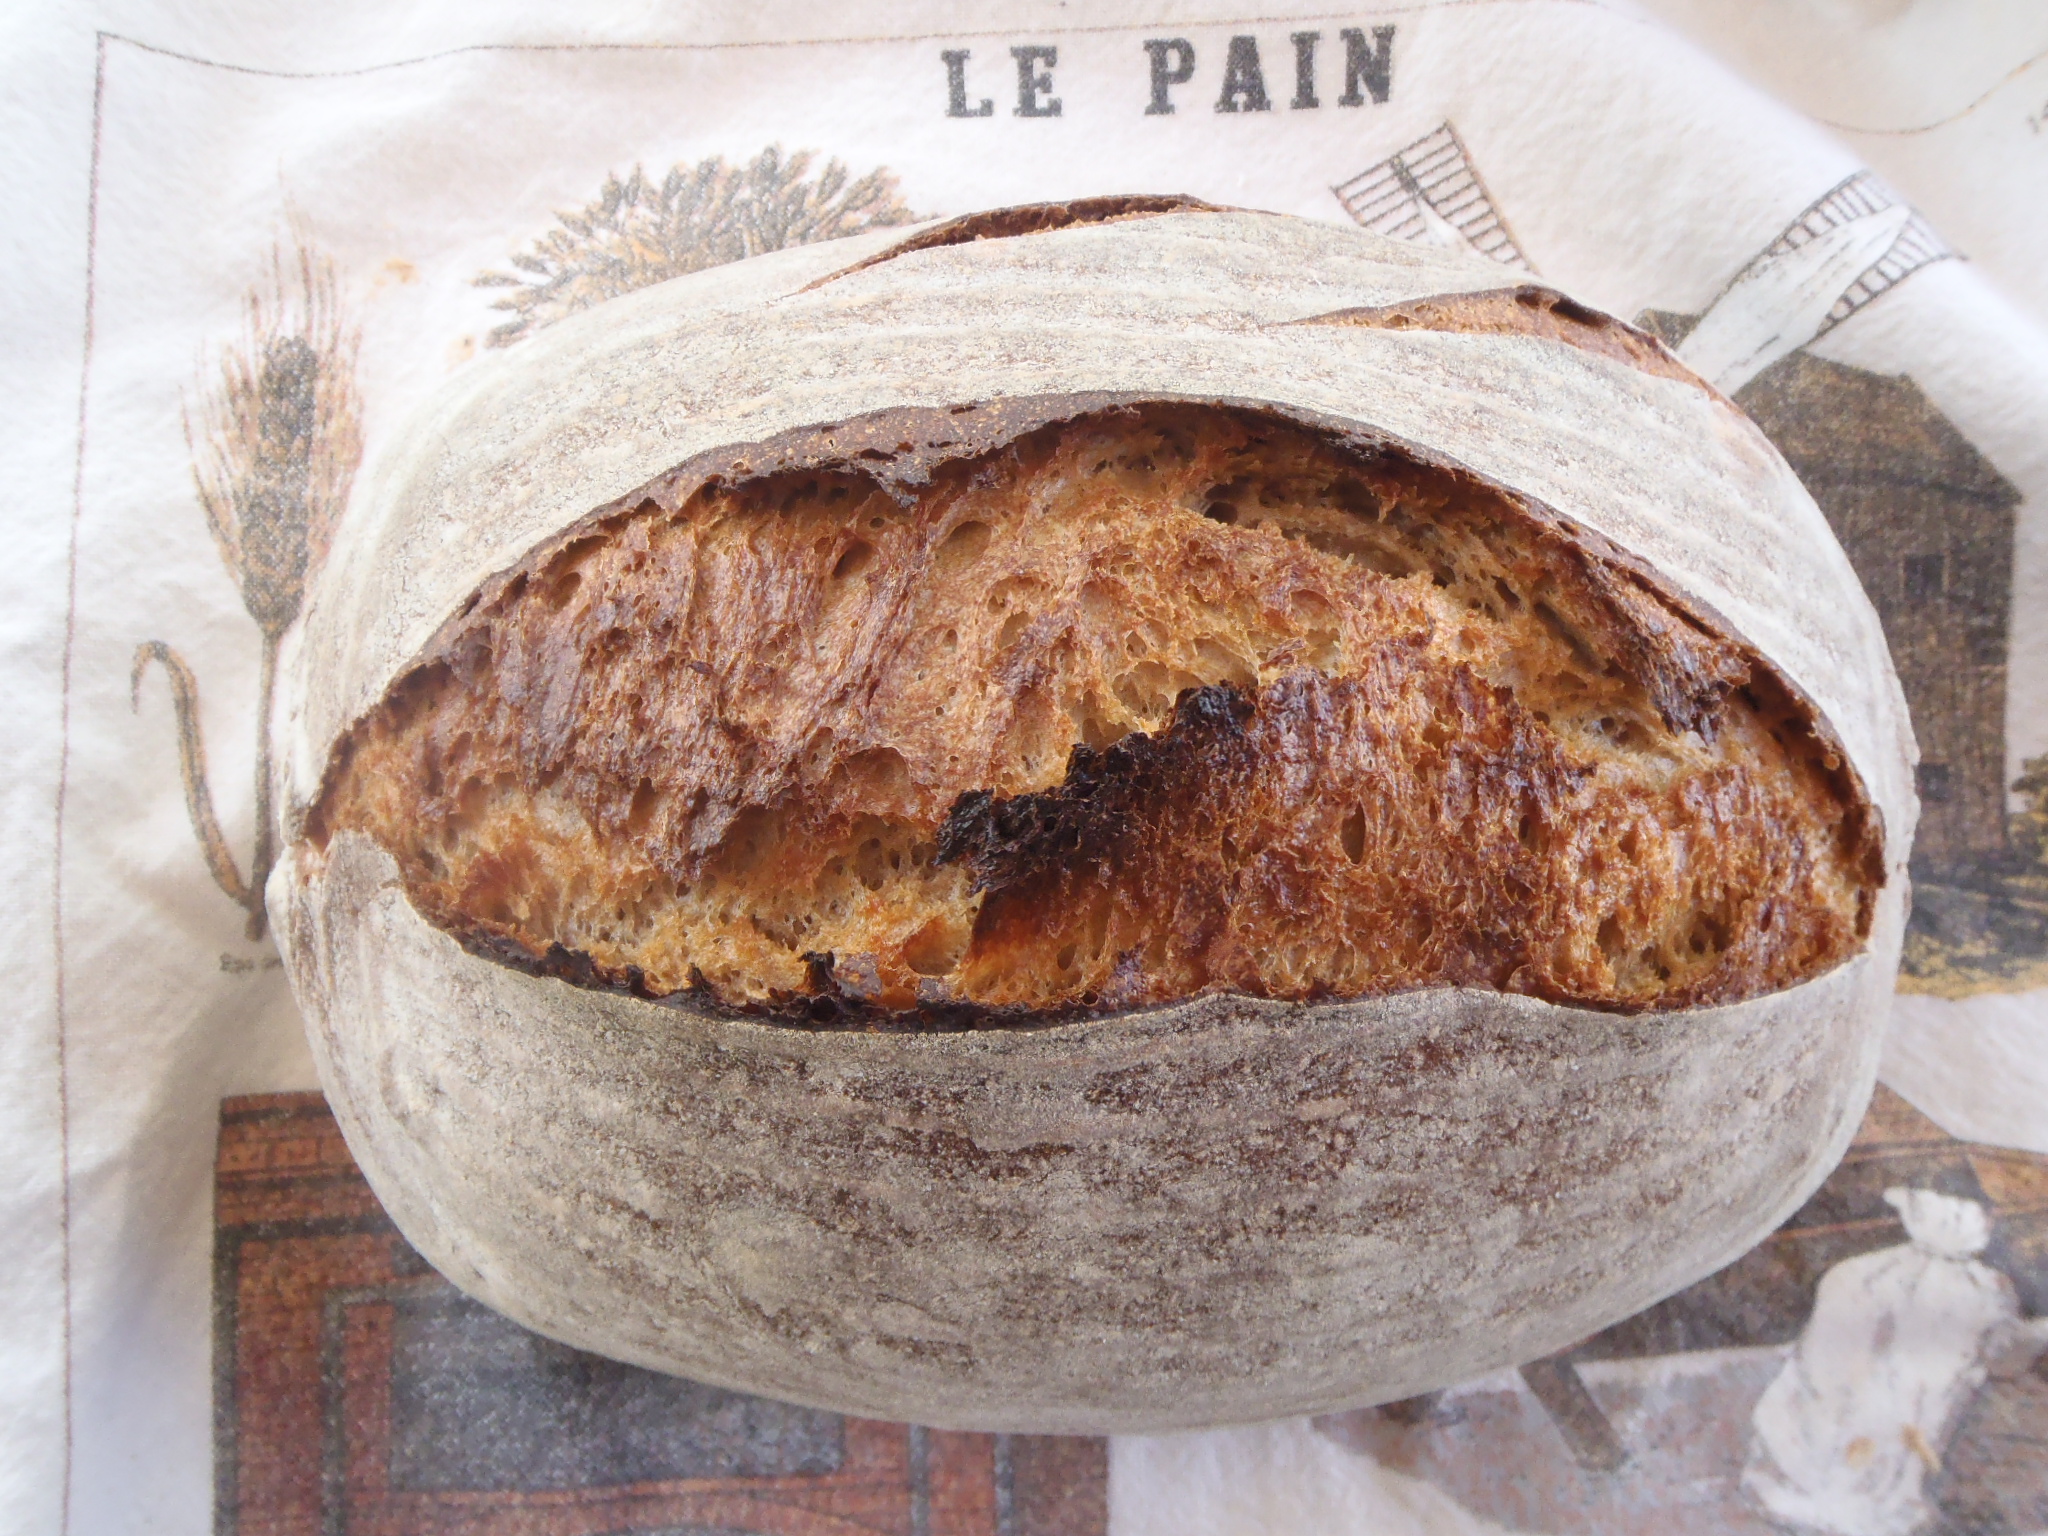
Share
100% whole grain sourdough with a three stage levain


George Bernard Shaw once said “there is no love sincerer than the love of food;” I am re-writing that sentence: “there is no love more sincere than the love of bread.”
Sourdough is one of life’s simplest pleasures. How lucky I am to not have gluten intolerance.
It’s been nearly four years since I last posted. Is anyone familiar with an Australian aborigines’ rite called “walkabout”? I feel like I had gone on a long walkabout and have just found my way home. A lot had transpired in between, but at this very moment, I feel not much has changed between me and sourdough.
So, Hello friends, I see a few familiar faces but most I don’t recognize. I guess that won’t matter; bread is our common language.
I never thought I would lose it, but I did – a few times I tried to make bread during my time away but failed miserably and I never quite knew what went wrong. A year or 18 months ago, I bought my sister Orange Jim Layhey’s famous No Knead bread book; secretly I wanted to learn it too as a way out of the mud, or quick sand, I was in with my formal way of sourdough making.
Scroll forward, a week ago, I came across a no-knead sourdough formula on Eric’s BreadTopia, I thought it was amazing and decided to give it a try. The result was really pleasing, however I could never just follow a recipe; I needed to do my own thing. So after a few experiments, I did the following:
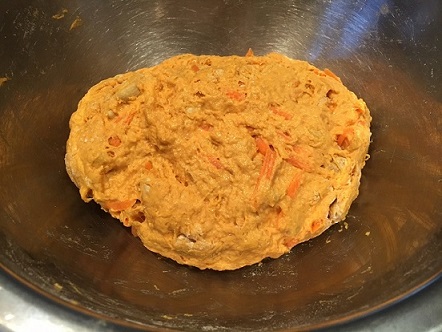
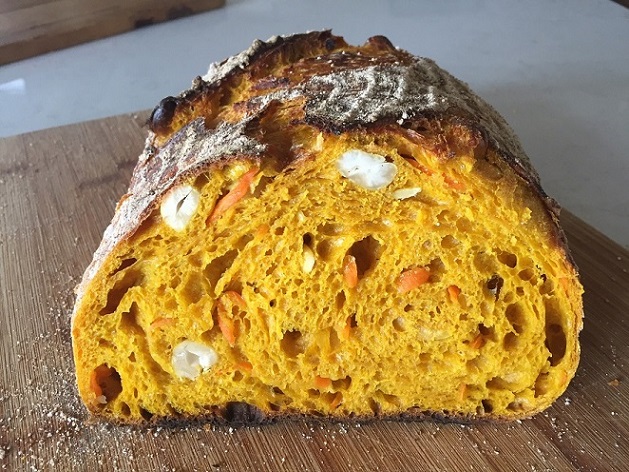
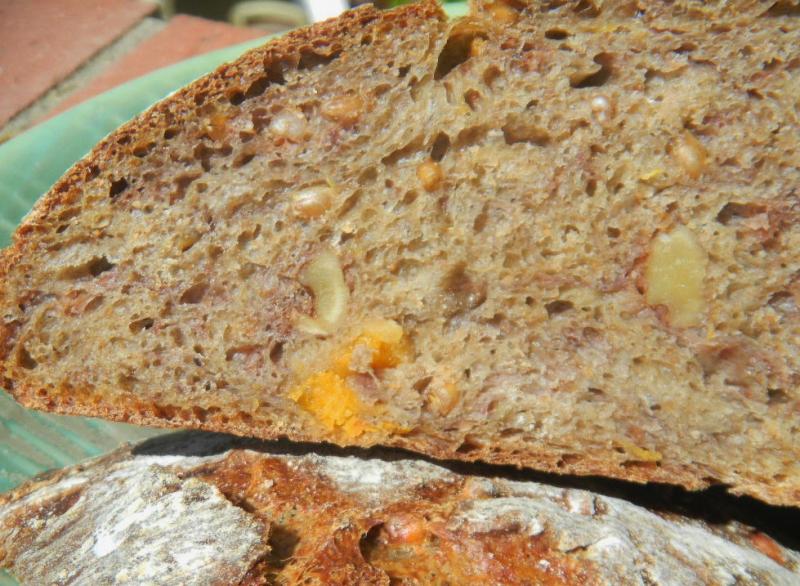
Turmeric, Cashews, and Carrot Sourdough (No-Knead version)
(adapted from BreadTopia’s no-knead cranberry & pecan sourdough, thank you, Eric!)
(Overall hydration about 81%)
Method
(1) Mix everything up in one go, and just leave it.
If you are so inclined, give it a fold or two, or none, not straightaway, but perhaps a couple of hours later, or whenever. (Being a sourdough baker, you would just be so tempted to fold it. It is not possible to not fold it; you cannot not do it.) In the 9 hours of bulk fermentation at room temp averaging 22-24C (72-75F), I did just one letter fold.
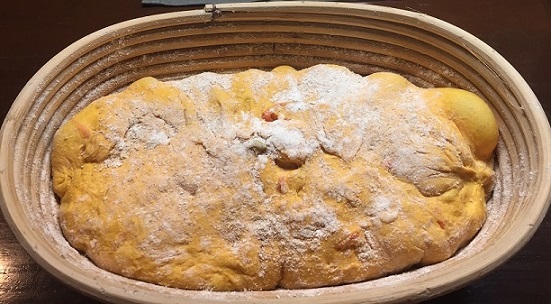
(2) Just before shaping, I did another letter fold, and I let the dough rest for 15 minutes, then shaped it (very minimalist handling); final proof a little over 2 hours.
(3) 30 minutes before baking, pre-heat with a Dutch oven inside to 225C (450F). Bake it covered for 30 minutes (no need for steaming), then open the lid, and bake a further 10 minutes.
A few notes (these are to refresh my own memory:
Not sure how much I will be posting going forward, but glad to be back and say Hi.
Cheers to all!

Shiao-Ping
Hey everybody,
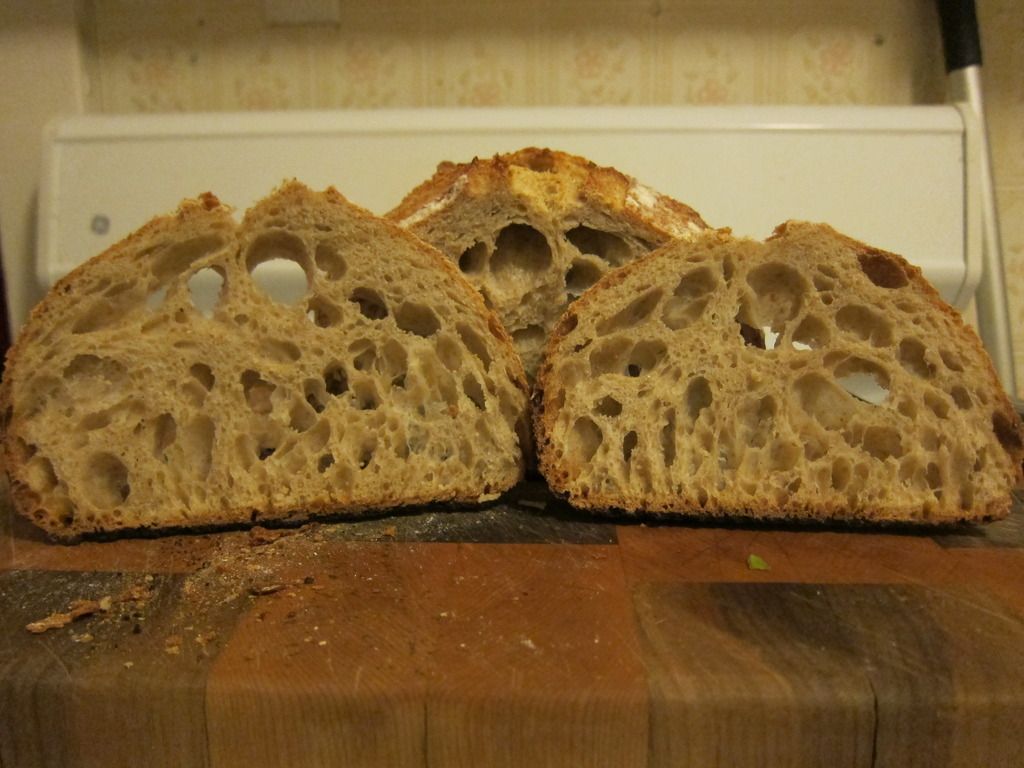
Just baked my first batch of 4. Turned out pretty good. Happy with results.
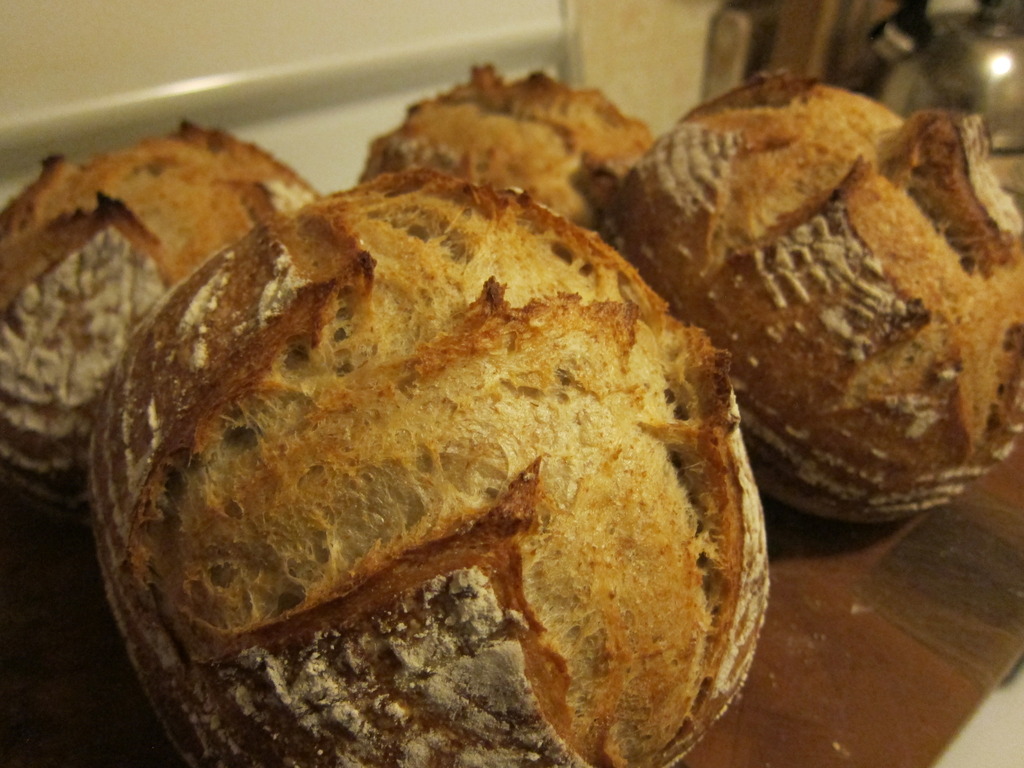
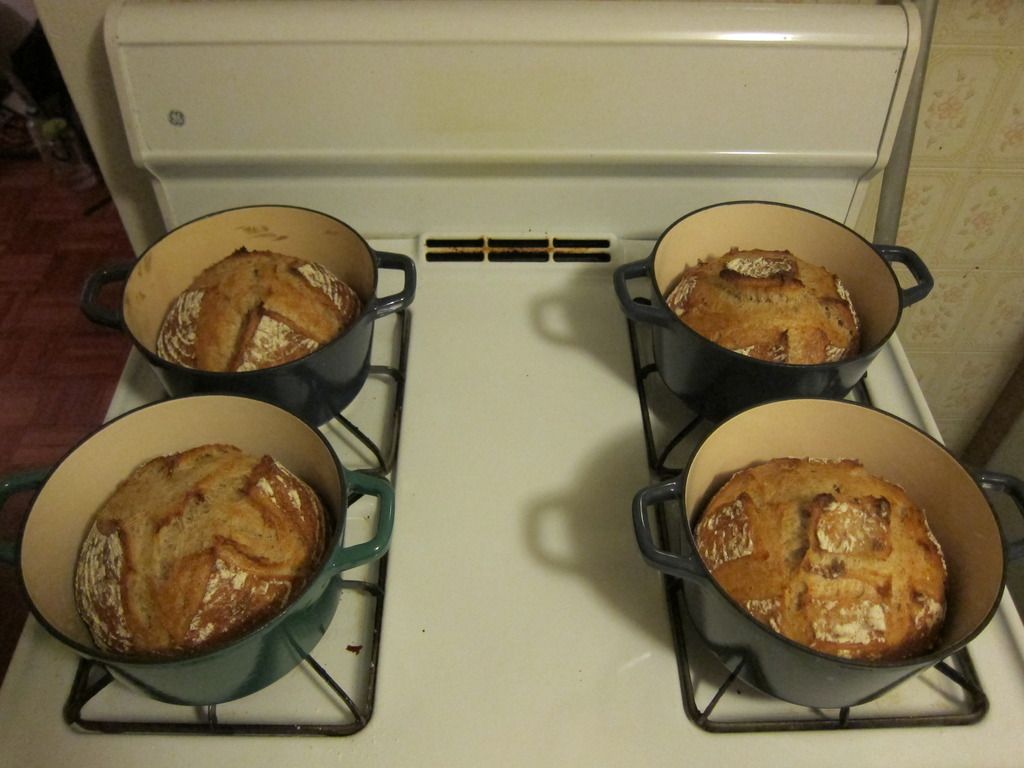
So check this out. I'm in Canadian Tire a couple of weeks ago, and like any baking/cooking geek I always stop by the kitchen section. Well luck would have it they were having a major sale on all kinds of stuff. That could be good...or it could be bad for the bank account. So I stop by the dutch oven oven section and low and behold, there is a 70% off sale. So I picked up a Cuisinart 3qt enamel on cast iron dutch oven for $49.99. Regular $169.99. What a steal! So then I decided not only do I need 1, but I think I need 8 of them!! So the deal was done. I can fit 8 of them in my home oven. Four on top and 4 on the bottom. Time to get serious!
So I just baked my first experiment of 4 boules. Next step is going to be 8. They turned out great. Only thing is the bottom ones ended up a little darker on the bottom of the loaf. I think to fix that I'm going to lay some tin foil down to deflect the heat from the bottom dutch ovens.

The great thing about this recipe is I've made it to match my work schedule. I've been seeing on the forum lately, people asking for recipe's to match their work schedule. So here is an example of mine and hope this helps out some people.
Recipe:
Organic Bread Flour 1200g 60%
Organic Whole Grain Stone Ground Red Fife 600g 30%
Starter @ 100% hydration (Organic Bread Flour) 400g 20%
Water 1100g 55%
Salt 40g 2%
Total Flour 2000g 100%
Total Water 1300g 65%
Day one:
1. 6:00am feed starter and keep out at room temp.
2. Go to work!
3. Get home. 4:00pm mix flour and water together. Autolyse for 1 hour.
4. Mix flour, starter and salt. Rest for 10 minutes.
5. Dump out of bowl. Do 1 stretch and fold, cover and rest for 20 minutes.
6. Continue to do 5 more stretch and folds with 20 minute rest periods in between. Basically 1 stretch and fold every 20 minutes. Works out to be 6 stretch and folds within 2 hours.
7. Put in bowl and bulk rise at room temp for 2 hours.
8. Put in fridge and retard until I get home from work next day. About 20-22 hours.
Day 2:
1. Take out of fridge, dump out on counter, cut four equal pieces (I scaled mine at around 800g each), and place in bannetton's. Proof for about 1.5 hours (sometimes a little more, sometimes a little less).
2. Pre-heat dutch ovens for about an hour to 500 degrees.
3. Take out dutch ovens, flip dough out of bannetton's into your hand, place in dutch ovens, score loafs, place dutch ovens with lid on back in oven and bake at 500 degrees for 20 minutes.
4. After 20 minutes take lids off dutch ovens and bake for an additional 15-30 minutes at 375 degrees.
5. When ready take out of dutch ovens and let cool overnight
Day 3:
1. ENJOY!!
This recipe allows me to finish prep by 10-10:30pm on day 1, and finish baking around 7-8:00pm on day 2. So far it has always been consistent results.
My next challenge will be to use all 8 dutch ovens at once!! EXCITING!!
I will post my results for y'all when that happens!
Cheers! And happy baking!

I'm sorry about the pictures on this post. We can't get them to line up no matter what my apprentice does :-)
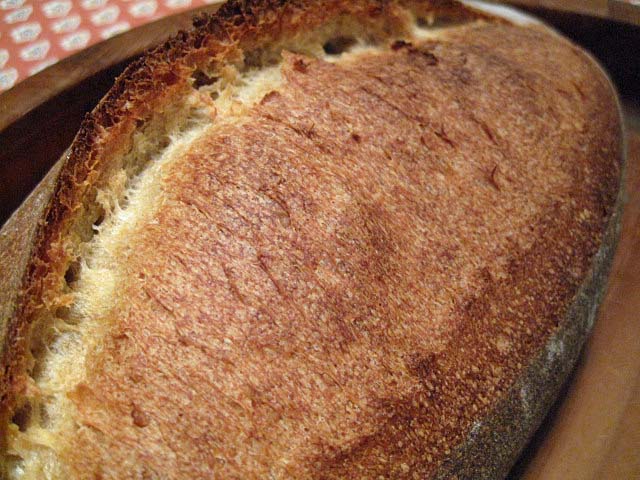
Sometime things just happen because they are triggered subtly and naturally by our senses. We are reminded of something and then these thoughts lead to other unrelated ideas. Next thing you know you have a new bread formula designed by the simplest of things - in this case smell.
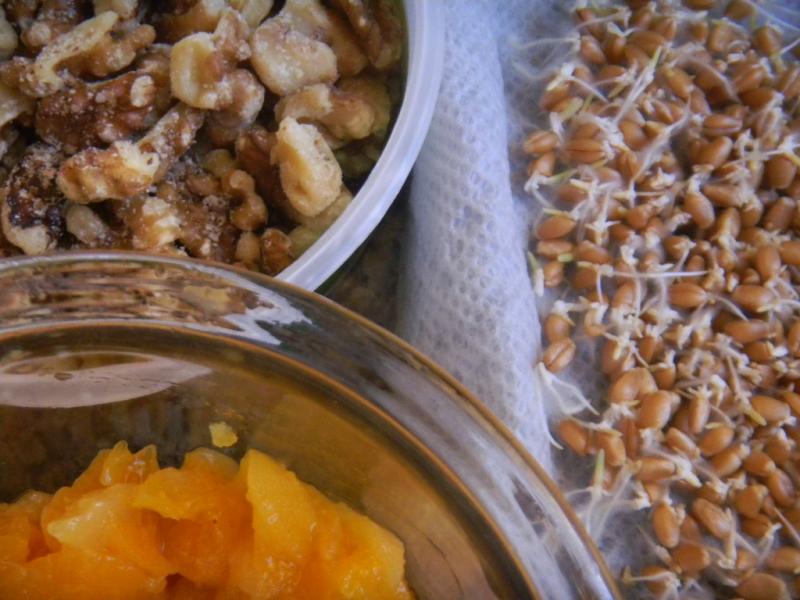
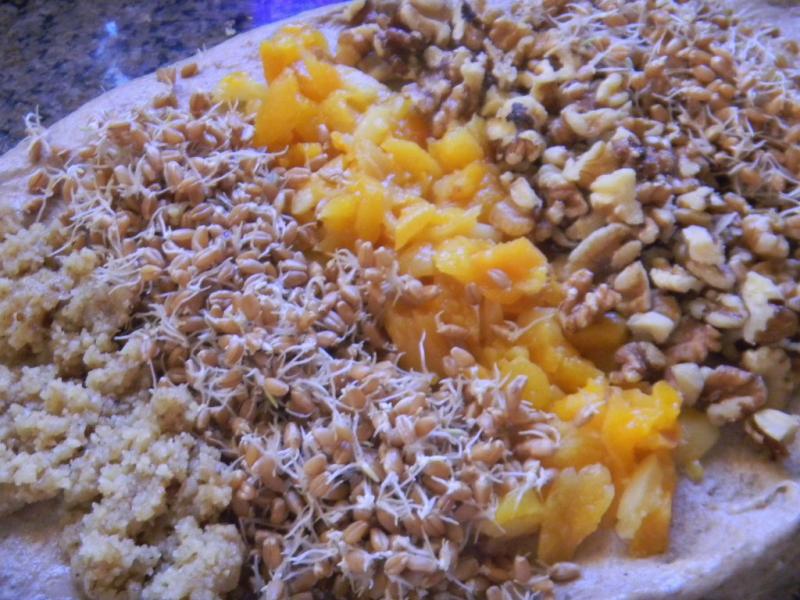
After our; very tasty and soft crumb, not to mention good looking, fig, hazelnut, Tang Zhong, Italian bread, we kept and froze some of the fig soaker water for a future bake to use as part of the liquid. We didn’t want to use figs again, but the smell of the juice made us immediately think of dried apricots so the fruit decision was made.

While looking for the apricots we noticed a little bit of some buckwheat flour that we had purchased for sweetbird’s beautiful, hard cider, Buckwheat Bread. My apprentice had reminded me to use up long ago – so it would have to go into the flour along with our usual spelt, rye and whole wheat multigrain mix. We wanted to double up the whole grains from the last bake and get them closer to 50% than 25% too.
Instead of a whole berry scald, this time we decided to do a 48 hour WW sprouting of 100 g of WW berries. It has been a while since we made sprouts for bread and this was the perfect time to get back to them.
sweetbird’s bread has a light purple cast to the crumb because of the buckwheat and knowing we couldn’t use hazelnuts two times in a row, we immediately thought of Phil’s purple and green Walnut and Sage Super Hero Bread we like so much. We love the purple color the walnut paste gives to the crumb so 25 g of walnuts a 12 g of walnut oil were crushed together in a mortar and then we decided to use 75 g of quartered walnuts in the dough too.
To try to duplicate the soft crumb that Tang Zhong provides we decided to use some yeast water in the levain. Yeast water provides a similar soft, moist crumb. This time we decided to build one levain in 3 stages using all 3 of our wild yeast starters; the WW and the rye sour to go along with the YW. This levain was very active doubling in 4 hours after the 2nd build. We fed it the all flour 3 build and let it sit on the counter for an hour before retarding it overnight.
When the starter came put of the fridge the net morning we also started the 4 hour autolyse of the fig juice, water, salt, flours, malts, VWG and Toadies. We micro waved the chopped apricots in water to get them re-hydrated and then prepared the walnut paste in the mortar and chopped the add in walnuts to get them to a more manageable size.
Once the autolyse met the levain we did a quick hand mix with a spoon in the bowl before doing 10 minutes of double slap and 1 folds. We made this dough a little stiffer than normal because the apricot soak and sprouts would give the dough a little more liquid than the hydration calculations take into account.
We incorporated the sprouts apricots and walnuts on the first of 3 sets of S&F’s that were started 15 minutes after the slap and folds and 15 minutes apart. By the end of the 3rd set the add ins were thoroughly incorporated and the dough felt like it was at 75% hydration instead of the 72% in the formula.

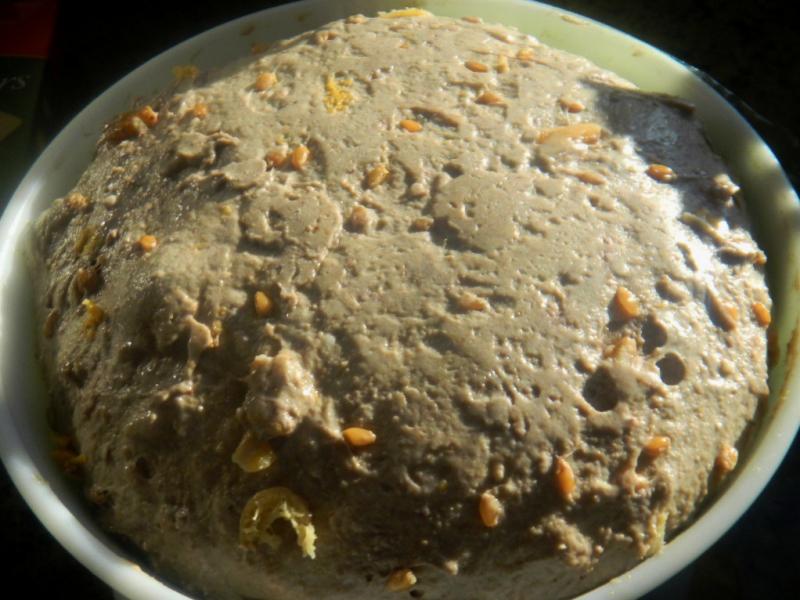
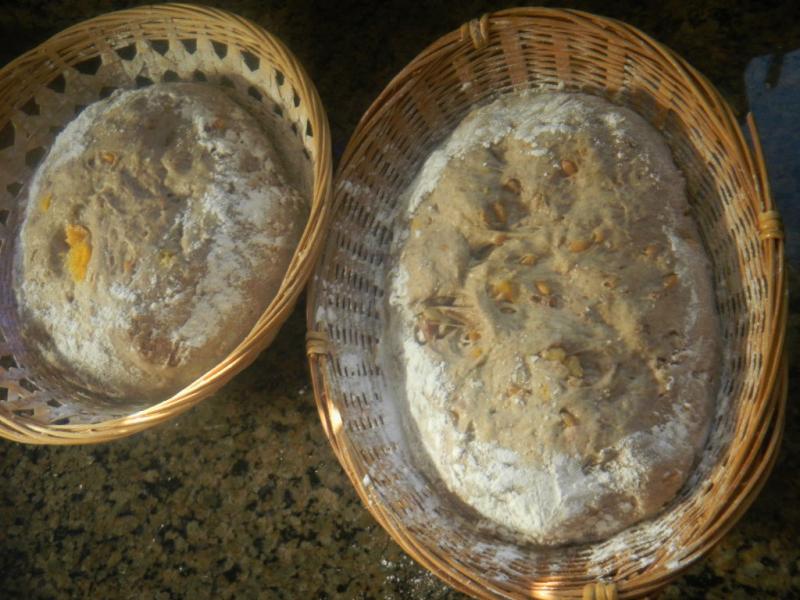
After an hour on the counter, we put the dough in the fridge for a 15 hour retard. In the morning we let it sit for 30 minutes before dividing the dough in half, shaping and placing each in a rice floured basket. We proofed them for 3 hours in a plastic trash bag before firing up Big Old Betsy to a 500 F pre-heat.

We haven’t tried shaping cold dough so we thought we would give it a try and see if it affects how our normal bread turns out in any way. After another 45 minutes the oven was ready. We upended the baskets onto parchment paper on a peel, slashed them with a paring knife (tough going for breads like these) and chucked them onto the bottom stone.

A nice YW pancake with sausage and egg.
We had another stone on the top rack of the oven and steam was supplied by a Sylvia’s large size steaming pan with two towels in it and a 12” CI pan that has lava rocks in it, ala David Snyder. Each was filled half way with water an placed in the oven at the beginning of preheat.
We turned the oven down to 475 F when the bread was loaded in and we steamed them for 12 minutes. After removing the steam, we turned the oven down to 425 F, convection this time. We rotated the bread 180 degrees on the stone every 8 minutes. The bread tested 205 F and was deemed done 16 minutes after we removed the steam.
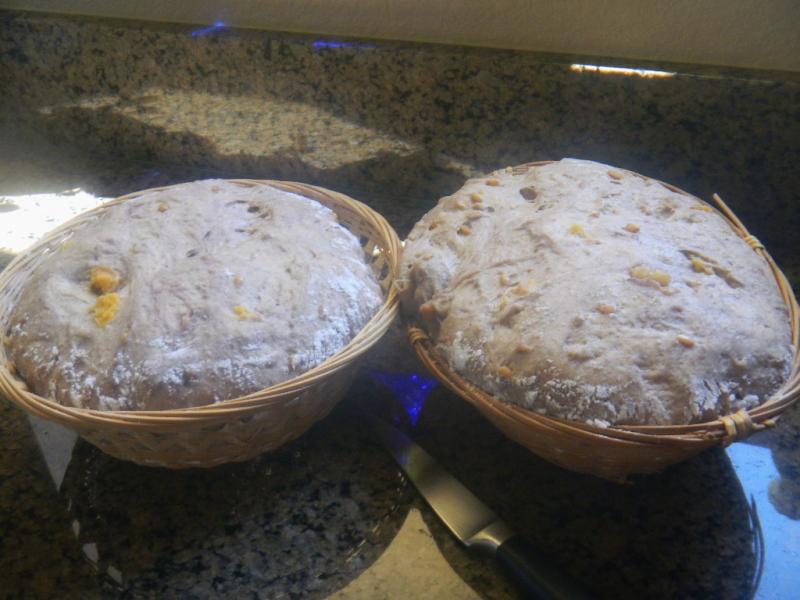
We let the crust crisp on the stone with the door ajar and the oven off for 10 minutes and then removed the bread to a cooling rack. It came out if the oven nicely browned, hardly blistered and crispy. The crust went softer as it cooled.
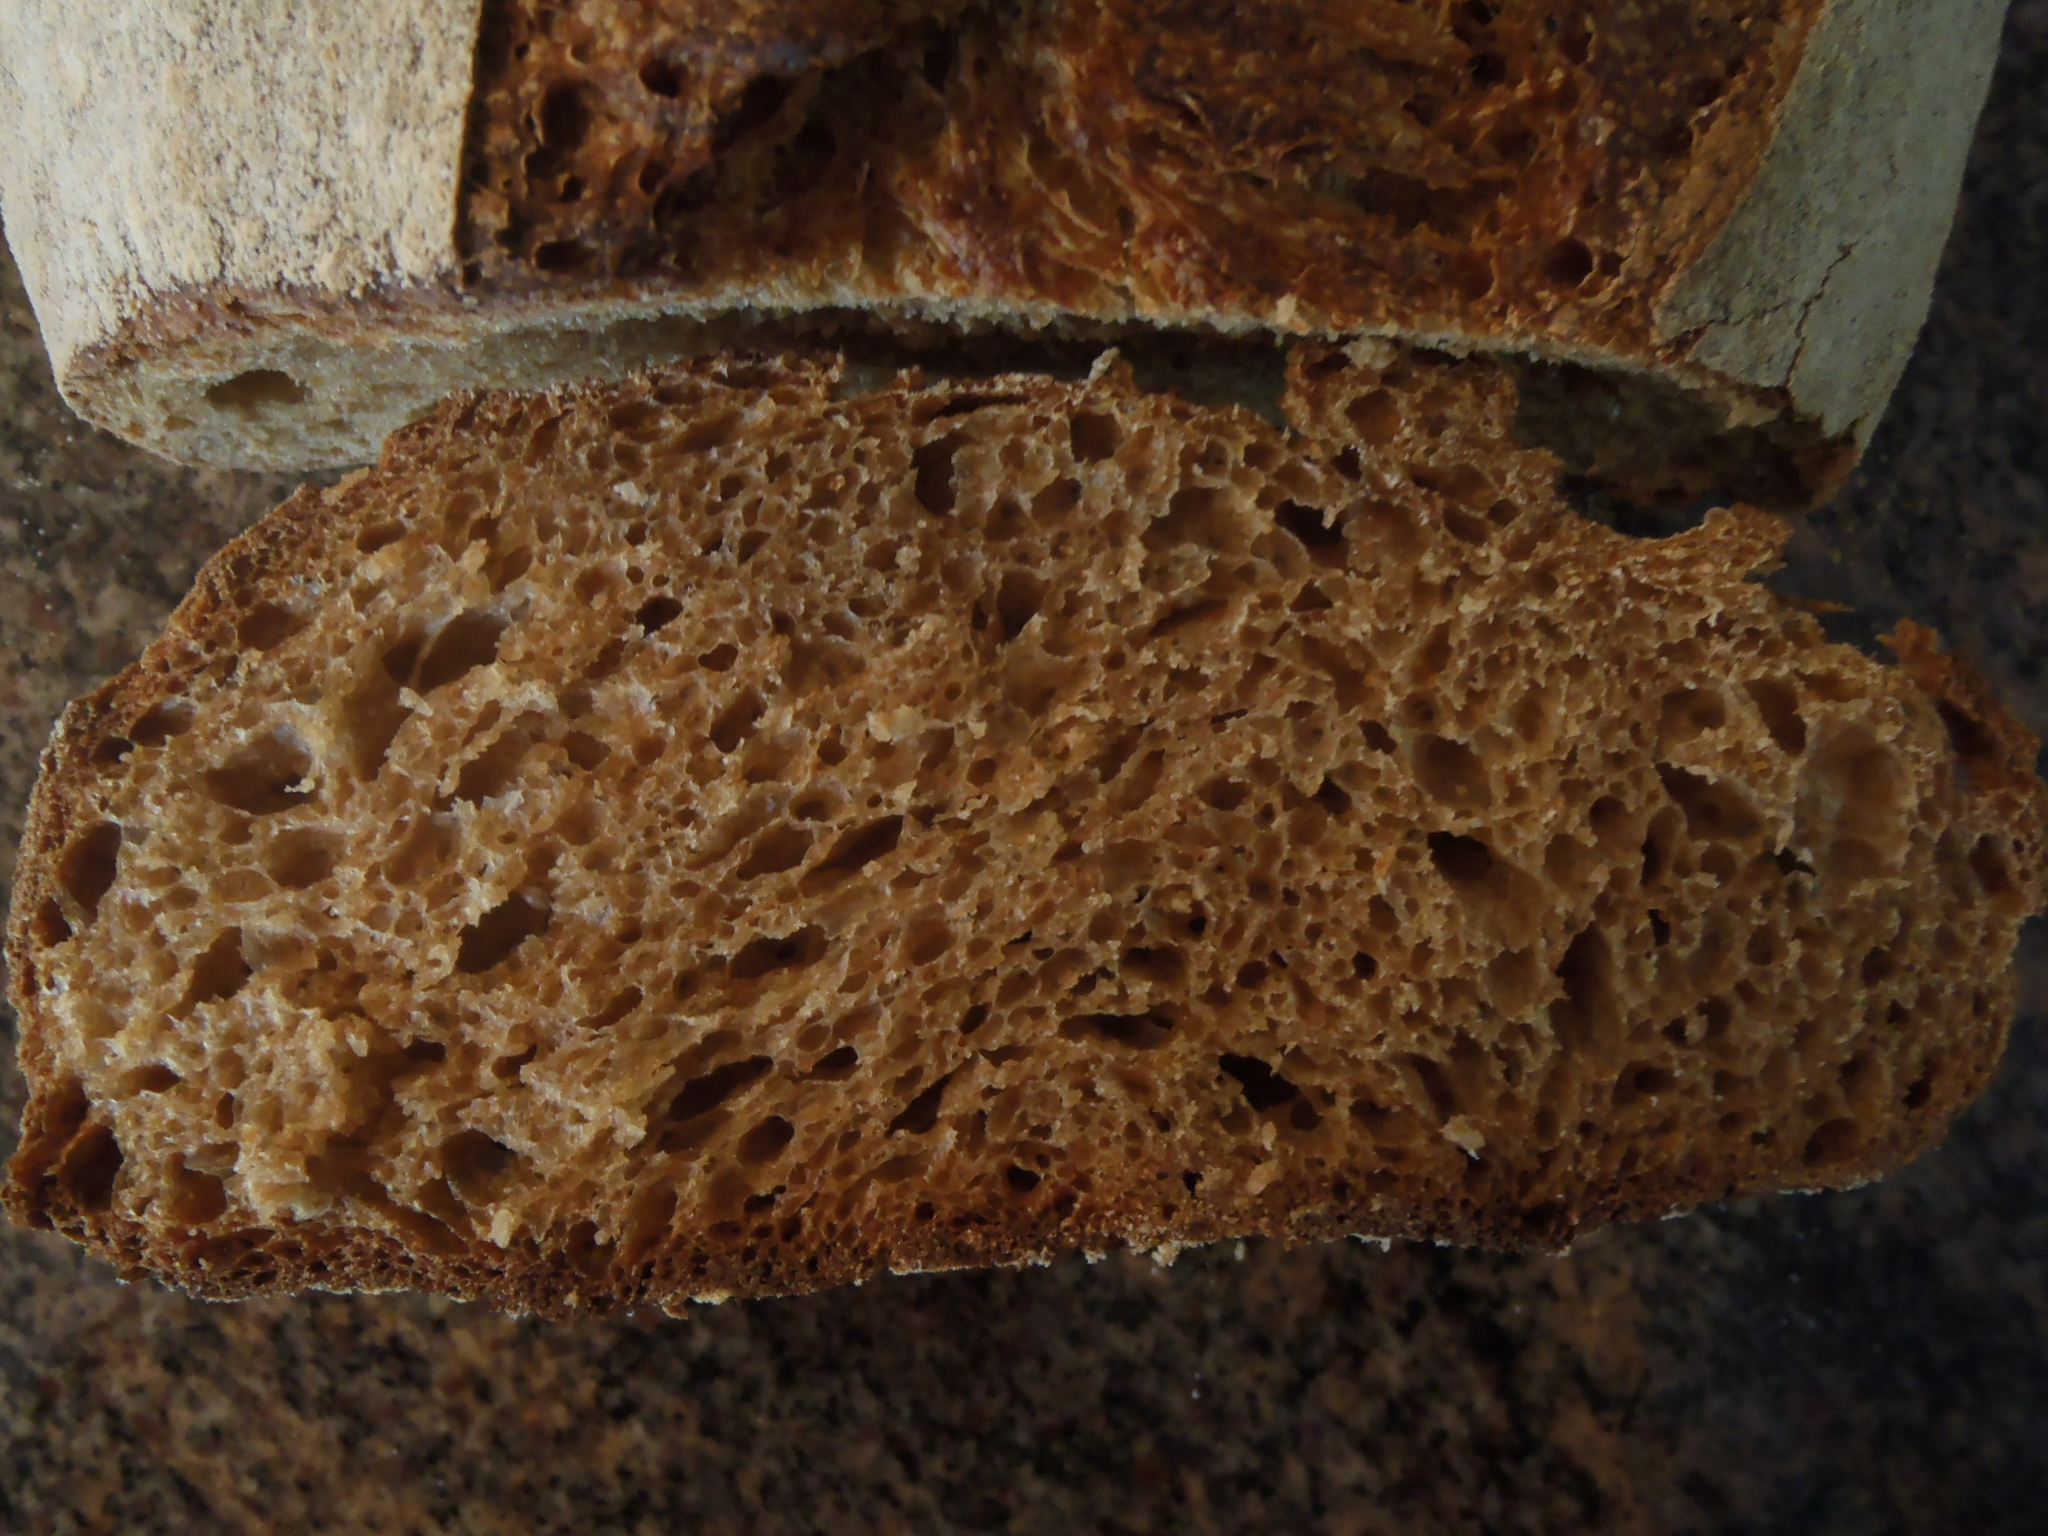
The crumb had that purple tinge we like so much. It was fairly open, moist and soft. The taste is unique, earthy and hearty. Everything works well together from a flavor perspective too. It is fun bread to make and well worth the effort. We will be making this again. Thanks to Phil and sweetbird for the fond memories of their great bread.
Formula
WW SD, YW and Rye Sour Levain | Build 1 | Build 2 | Build 3 | Total | % |
WW SD Starter | 20 | 0 | 0 | 20 | 2.77% |
Yeast Water | 80 | 0 | 0 | 80 | 14.95% |
Rye Sour Starter | 20 | 0 | 0 | 20 | 2.77% |
Spelt | 27 | 20 | 20 | 67 | 9.23% |
Dark Rye | 27 | 20 | 20 | 67 | 9.23% |
Whole Wheat | 27 | 20 | 20 | 67 | 9.23% |
Water | 0 | 60 | 0 | 60 | 8.31% |
Total | 200 | 120 | 60 | 380 | 31.39% |
|
|
|
|
|
|
|
|
|
|
|
|
Levain Totals |
| % |
|
|
|
Flour | 220 | 30.47% |
|
|
|
Water | 160 | 22.16% |
|
|
|
Hydration | 72.73% |
|
|
|
|
|
|
|
|
|
|
Levain % of Total | 24.34% |
|
|
|
|
|
|
|
|
|
|
Dough Flour |
| % |
|
|
|
Buckwheat | 102 | 14.13% |
|
|
|
AP | 400 | 55.40% |
|
|
|
Dough Flour | 502 | 69.53% |
|
|
|
|
|
|
|
|
|
Salt | 11 | 1.52% |
|
|
|
Fig Water 175 Water 200 | 375 | 51.94% |
|
|
|
Dough Hydration | 74.70% |
|
|
|
|
|
|
|
|
|
|
Total Flour | 722 |
|
|
|
|
Fig Water 175 & Water | 535 |
|
|
|
|
T. Dough Hydration | 74.10% |
|
|
|
|
Whole Grain % | 46.81% |
|
|
|
|
|
|
|
|
|
|
Hydration w/ Adds | 71.73% |
|
|
|
|
Total Weight | 1,561 |
|
|
|
|
|
|
|
|
|
|
Add - Ins |
| % |
|
|
|
White Rye Malt | 3 | 0.42% |
|
|
|
Red Rye Malt | 3 | 0.42% |
|
|
|
Toadies | 10 | 1.39% |
|
|
|
VW Gluten | 15 | 2.08% |
|
|
|
Walnut Oil | 12 | 1.66% |
|
|
|
Apricots | 50 | 6.93% |
|
|
|
Walnuts 25 g in walnut oil paste | 100 | 13.85% |
|
|
|
Total | 193 | 26.73% |
|
|
|
|
|
|
|
|
|
Weight of apricots is pre re-hydrated weight |
|
|
|
| |
|
|
|
|
|
|
Sprouts |
| % |
|
|
|
Whole Wheat | 100 | 13.85% |
|
|
|


Sometimes there is a loaf that I just love baking. This is such a loaf and I think it is due to the fact that it is a simple dough that has a luxurious feel to it - especially after it has fermented all night in the refrigerator. It also has a wonderful aroma created by the lemon zest and the poppy seeds add a delightful texture and, I think, simply look spunky.
The original recipe if from Daniel Leader's book Bread Alone. I found it after reading about one of the challenges posted here where the '3grandmas' were baking his lemon cake. All raved about its results. I prefer baking breads to cakes so this is what I ended up with.
I adapted his recipe to my sourdough starter, my use of whole grains and use of an overnight bulk ferment.
TOTAL FLOUR 860g
TOTAL WATER 677g 79%
TOTAL PREFERMENTED FLOUR 129g 15%
LEAVEN 219g 26%
DOUGH
Hard White WW Flour 731g 85%
Water 587g 68%
Salt 21g 2.4%
Honey 28g 3.2%
Lemon Zest 8g 1%
Poppy Seeds 21g 2.4%
METHOD
• Build leaven during the day. I do 2 builds total each about 3 hours apart.
• Mix leaven, water and 3/4ths of the flour into a shaggy mass and let it sit for about an hour to allow the flour to hydrate and the gluten to develop a bit.
• Add remainder of the flour, honey, salt and the zest and knead on low until medium gluten devel. is reached.
• Add poppy seeds.
• Knead until seeds are distributed evenly.
• Place dough in an oiled bowl, cover and allow it to sit at room temp. until it has expanded by about 25%
• Place in refrig. for the night.
• Allow dough to warm up for about 2 hours the next morning.
• Shape and proof.
• Bake (I have convection with steam so I pre-heat to 425°. When bread is loaded I turn off the oven, steam and let it expand without heat for 10 minutes. The remainder of the bake is then at 325° until internal temp. reaches approx 200°.)

The roll is lighter in color simply because the rolls were baked with the boules but, obviously, they baked much more quickly. They have a softer texture which my husband prefers while the boules have a crustier crust.
Our house now smells heavenly.
Sorry, no crumb shots. Boules are for friends that I bake for. Husband gets a couple of rolls. They don't present much of a crumb shot......I can tell you the crumb is soft though. Lemon conditions the grains and makes for a very soft crumb.
I will give you all a snow shot instead since we got 12" of much needed snow today.

What is scoring?
“Scoring” is the word used to describe the cuts made in a loaf of bread before it is baked. Some breads are not scored. For example many loaves baked in pans are not. However, almost all free-formed “hearth breads” are scored.
When is scoring done?
Scoring is generally performed just prior to loading the loaves in the oven. French rye breads (pains de siegle) are sometimes scored right after shaping, before proofing.
Why are breads scored?
Intentionally creating a weak spot on the surface of the loaf prevents the loaf from bursting at weak spots created during shaping.
The type of scoring performed controls the direction in which the bread will expand during “oven spring.”
The pattern of cuts made, the angle at which they are made and the depth of the cuts influences the rate of expansion and the formation of an “ear” - a raised flap of crust at the edge of a cut.
The pattern of cuts can create a pleasing visual pattern on the surface of the loaf. While there are some very traditional patterns, for example for baguettes, the baker can use the scoring pattern to identify the type of bread or to create an unique pattern that identifies the loaf as coming from his or her oven.
The effects of scoring on loaf shape are discussed in more detail below.
What do you use to score bread?
The blade used to score bread is often referred to as a lame (pronounced “lahm.”) This is simply a French word with means “blade.” Breads may be scored with straight or curved razor blades, either held in the hand or mounted on a handle. Scoring may be performed with other sharp, straight blades, even with a straight razor. Some bakers prefer serrated blades.
For some types of scoring, a straight blade is preferred. Straight bladed knives are preferred for cuts made with the blade held perpendicular to the loaf's surface. This sort of cut is generally used for round loaves (“boules”). For other types of scoring, a curved blade works better. Curved lames are generally used for long breads like baguettes which are scored with cuts parallel to the long axis of the loaf.
Video on Choosing a Blade: http://youtu.be/vF7eFluzHXc
How are the cuts made?
The scoring stroke should be firm, rapid, smooth and decisive. For the beginner, it may help to take “practice swings” or to visualize the movements and totally focus one's attention before making the cuts. Understanding the functions of scoring and the effects of the variables described can help, but there is no substitute for experience. In this respect, scoring bread is no different from an athletic skill or any other art or craft. (Tourist: “Please, sir, can you tell me how to get to Carnegie Hall?” New Yorker: “Practice, practice, practice.”)
The cuts should generally be 1/4 to 1/2 inch deep. A wet, sticky dough requires a more shallow cut than one would make in a dryer dough.
Scoring a boule (round loaf)
The angle the blade of the knife makes with the surface of the loaf is important in determining how the cut will open up. If you want the cuts to spread equally from the cut and to open quickly, as is traditional with round loaves (boules), the knife should be held vertically – at 90 degrees to the surface of the loaf.
Video on Scoring a Boule: http://youtu.be/gnL7mvR9wFg
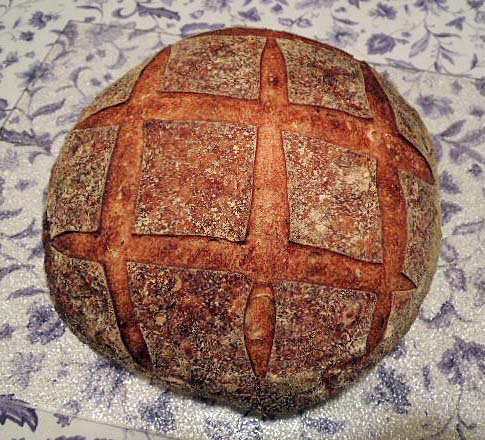
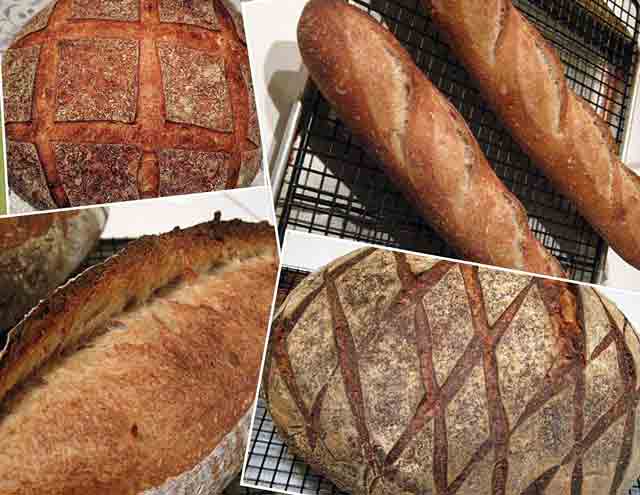
Besides the “tic-tac-toe” pattern, boules can be scored with diamond patterns, simple crosses or much more elaborate and creative patterns.

Miche scored with a diamond pattern
Scoring a long loaf (bâtard)
If you want the cuts to spread more slowly and create an “ear,” as is generally desired with long loaves (baguettes and bâtards), the knife blade should be held at a shallow angle with the surface of the loaf, at about 20-30 degrees or so. Many find using a curved blade helps make this type of cut. The blade is held with the concave surface facing up (away from the loaf). A flap of dough is created that will lift up to create an “ear” as the loaf expands and, by lifting gradually, slows the expansion of the loaf. This prolongs the time during which new areas of dough are exposed to the direct heat of the oven and results in greater overall expansion – a larger “bloom.”
Video on Scoring a Bâtard: http://youtu.be/UC5HLCWAyMo
Bâtards
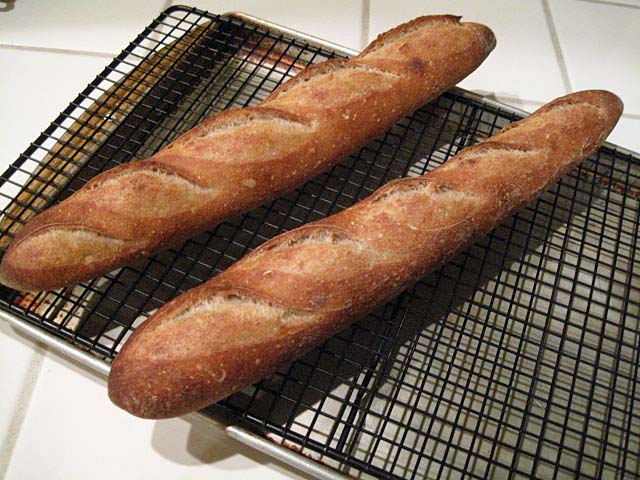
Baguettes
The effect of scoring on loaf shape
Michael Suas, in his book "Advanced Bread & Pastry," provides some information about how scoring patterns influence loaf shape. Scoring is not just to make a visually pretty design on the top of a loaf. It is also how the baker controls the direction in which the loaf expands. This impacts the shape of the loaf cross section (rounder or more oval), the height of the loaf and, for a boule, whether it stays round or ends up more oblong.
According to Suas, long loaves like bâtards and baguettes are traditionally scored parallel to their long axis. This may be a single long cut or multiple cuts that are almost parallel and overlap somewhat (for ¼ to 1/3 of their length, generally). This pattern promotes sideways expansion of the loaf, resulting in an oval cross section when the loaf is sliced.

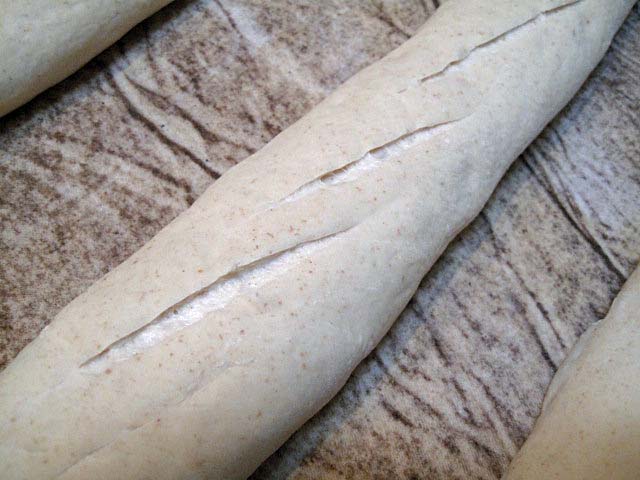
Baguette showing overlapping cuts, almost parallel to the long axis of the loaf
For breads with high-rye content which have lower gluten and less oven spring, the traditional objective is to encourage a higher rise in the oven spring resulting in a rounder cross section. This is achieved by "sausage" or "chevron" cuts.
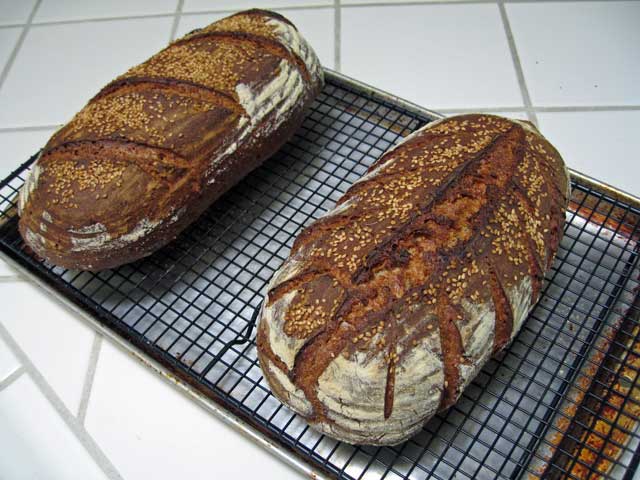
"Sausage cut" on the left. "Chevron cut" on the right.
Boules are scored in a variety of patterns with differing effects on how the loaf expands. The common "tic-tac-toe" pattern and a simple cross will direct the expansion upward. More complex patterns like diamonds result in a relatively flatter loaf.
One of most interesting effects is that scoring a boule with multiple parallel cuts encourages expansion at a right angle to the cuts. This results in an oblong loaf shape.
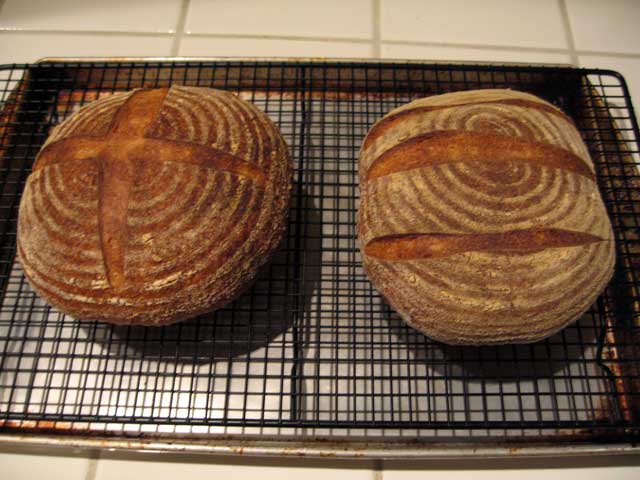
Two boules scored differently. Note the effects of the scoring pattern on the final shape of the baked loaves.
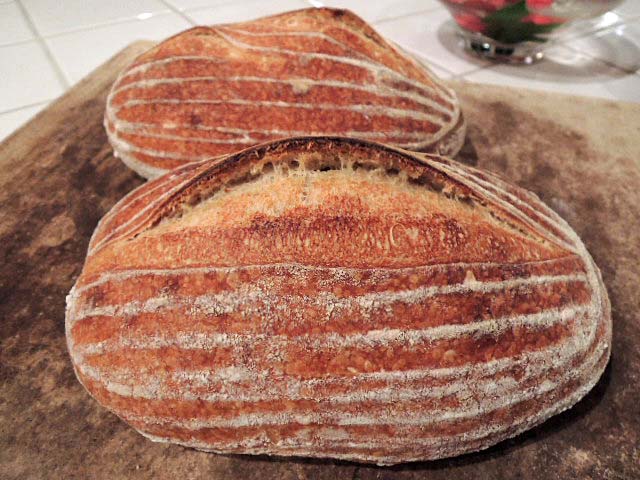
What's the point of an ear? Controlled bloom!
This topic is not about the auricular anatomy of elves (or Vulcans). It's about scoring breads.
Scoring loaves creates a visually pleasing pattern, and it helps control the expansion of the loaf as it bakes.
What Suas called "the classic cut" is parallel to the long axis of a baguette or a bâtard. The cut is made with the blade at a shallow angle to the surface of the loaf. The cut should be shallow - about 1/4 inch deep. Paradoxically, this shallow cut results in the flap lifting better than a deeper cut would, thus forming a nice "ear." Hamelman (pg. 80) points out that "a deep cut will simply collapse from its own weight."
The angle of the blade is important. "If the angle is not achieved and the cut is done with the blade vertical to the loaf, the two sides of the dough will spread very quickly during oven spring and expose an enormous surface area to the heat. The crust will begin to form too soon - sometimes before the end of oven spring - penalizing the development of the bread. If the cut is properly horizontal, the sides of the loaf will spread slower. The layer of dough created by the incision will partially and temporarily protect the surface from the heat and encourage a better oven spring and development." (Suas, pg. 116.)
These photos illustrate nice "ears," but they also show that the bloom occurred slowly, as it should. Notice that the color of the crust in the opening has 3 distinct degrees of browning, decreasing from left to right. The darker part on the left obviously opened first and was exposed to the direct heat of the oven for longer. If the bloom occurred too rapidly, it would have a more even coloration.
In summary, in order to achieve an optimal bloom in baguettes and bâtards, one must attend to 3 variables when scoring them:
The cuts should be almost parallel to the long axis of the loaf.
The blade should be held at about a 30 degree angle to the surface of the loaf.
The depth of the cut should be shallow - about 1/4 inch.
Variable shading of the bloomed crust confirms that the desired slow but prolonged opening of the cut during oven spring occurred.
A final word
This tutorial focused on the mechanics of scoring, but the other steps in bread making impact the behavior of the cuts you make and the final appearance of your loaves. In fact, every single step, from your choice of ingredients and their proportions – your formula – to how you steam your oven plays a role in how your cuts will open. Your best looking loaves will result from a series of choices that are mutually dependent, where how you score a loaf takes into account the other choices you have made about the formula, mixing, fermentation, shaping, proofing and baking.
Happy baking!
David

Nice recipe for some one day buns for sandwiches, hot dogs, or burgers. Adapted from a Beth Hensperger recipe. I had just written out the recipe with instructions and deleted the whole thing ; / So here goes again!
8 oz. Spring Water
1 Large Egg
4 TBsp. soft unsalted Butter
2 TBsp. Sugar or Honey
15 oz. Bread Flour with extra to adjust hydration if needed. I used Gold Medal Bread Flour on sale here for less than 2 bucks a 5 lb. bag.
1/4 cup King Arthur dry Milk Powder
1/4 cup mashed potato - I used a microwaved potato. Fast and easy
1 1/2 tsp. sea salt
2 1/4 tsp. IADYeast
1 egg yolk plus 2 Tbsp. water and 2 Tbsp. milk for glazing
Sesame and Poppy seeds, springs of fresh Rosemary.
Add liquid ingredients to KA Mixer, add dry ingredients, I sift my flour and dry milk powder together. The KA Dry Milk Powder tends to be sticky and can clump together and become hard if left with moisture for to long..so I just always sift it with my flour..using a wisk or a wire scoop. Mixed until shaggy adding more flour as needed to adjust hydration. Cover and rest 25 minutes. Knead until gluten formation just begins. Stretch and folds 30 minutes apart until gluten has formed nice windowpane. Pour out onto counter, shape even weighed rolls, I made 8. Place on parchment lined pan and press down to shape buns. I pressed a biscuit cutter nearly all the way through just for a little extra pattern on rolls. Let rise till nearly double. Glaze and sprinkle on seeds. Baked 350F in a convection oven setting till nicely browned..about 20-25 minutes.
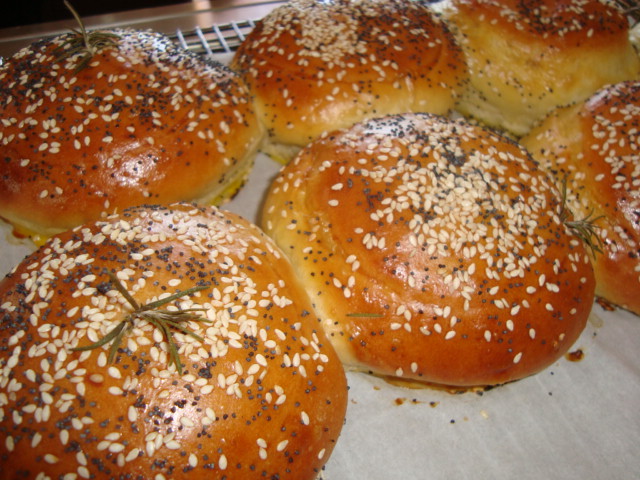
The pattern from the biscuit cutter was not very pronouned..
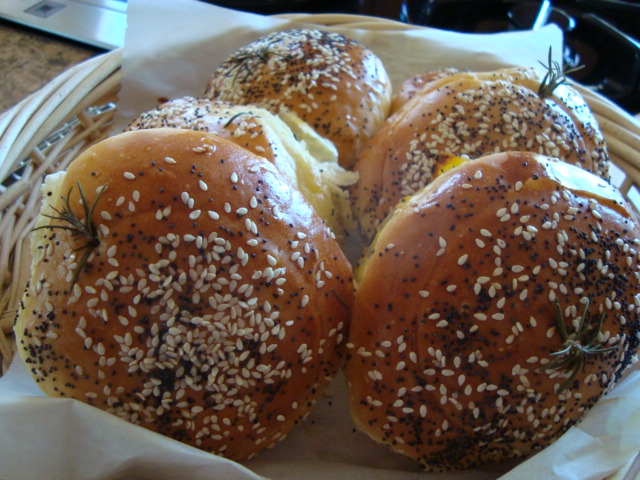

I called these my Aussie Sandwiches : )
Sylvia
JMonkey
I don’t make white breads often, but there’s nothing quite like a few homemade baguettes to accompany an elegant meal. This recipe was adapted from “Bread” by Jeffrey Hammelman.
Overall formula:
* White flour: 100%
* Water: 66%
* Salt: 2%
* Instant yeast: 0.36%
* 33% of the flour is pre-fermented as a poolish at 100% hydration with .07% yeast
Poolish:
* White flour: 160 grams or 1.25 cups
* Water: 160 grams or ½ cup + 3 Tbs
* Instant yeast: Just an eeny-weeny pinch (about 1/32 of a tsp)
Final dough:
* All of the poolish
* White flour: 320 grams oz or 2.5 cups
* Water: 160 gram or ½ cup + 3 Tbs
* Salt: 9 grams or 1.25 tsp
* Instant yeast: 1 to 2 grams or 1/2 + 1/8 tsp
The night before: Preferment
The night before, dissolve the yeast into the water for the poolish, and then mix in the flour. Cover and let it ferment at room temperature for 12-16 hours. Once the poolish has bubbles breaking on top and has started to wrinkle, it's ready. It'll also smell really nice - sweet and nutty. Mmmm.
Mixing and dough development
For the final dough, measure out the water and pour it into the poolish to loosen it up. Then pour the entire mixture into a bowl. Mix together the salt, yeast and flour, and then add it to the bowl as well. Mix it all up with a spoon and, once everything is hydrated, knead it the traditional way, until it passes the windowpane test. Cover and let it ferment for two hours, giving it a stretch-and-fold at the one hour mark.
Shaping
If you’re making baguettes, divide the dough into three pieces, and preshape into rounds. Cover and let them rest about 20 minutes. Then shape into baguettes about 12 inches longg and cover, letting them rise for about 1 hour to 90 minutes.
Score and bake on a preheated stone in a 460 degree oven with steam for about 25 minutes.
If you want to make a round or a batard, you’ll need to bake for about 35 to 40 minutes.

(makes 1 medium or 2 small loaves)
Firm Starter
100g AP flour
50g (approx) water
50g ripe storage starter (mine is at 100% hydration)
Mix the flour and starter, adding just enough water to make a firm white dough ball.
Proof for 5 hours at room temperature or until well over doubled in volume.

Final Mix
200g all purpose flour
200g bread flour
80g sugar
7g salt (more if using unsalted butter)
200g firm white starter
100g (approx) milk
150g butter (soft enough to easily mix)
3 large eggs + 1 egg yolk
1/2 tsp lemon extract + grated zest of 1 lemon (optional)
Beat the eggs, sugar, lemon zest, lemon extract, salt and bread flour together into a smooth paste. Set aside for at least half an hour.

Mix the all purpose flour and milk, using just enough milk to make a smooth stiff dough. Set aside for 15 to 20 minutes.
Knead the starter and flour/milk dough together well. Set aside for 15 to 20 minutes.

Fold the egg mixture into the dough, a little at a time. This will get very messy but stick with it. It will come together eventually.

Using frissage (http://www.thefreshloaf.com/node/2882/eye-opening-techniques) incorporate the butter into the dough, a little at a time.
You will end up with a very slack, shiny dough which barely holds together.
Apply a few french folds (http://home.att.net/~carlsfriends/jimpics/index.html) to increase strength in the dough. Allow the dough to rest for an hour in a bowl.

After resting, turn out the dough onto a well floured surface.
Divide and shape as desired (traditional brioche à tête may not be possible with such a slack dough).
Place into appropriate baking tins and cover loosely.
Proof until doubled in bulk (up to 8 hours!)

Preheat the oven to 400F
Very carefully brush the tops with beaten egg and score lengthwise with a serrated blade.
Bake the brioche for 30 minutes (or until a poked skewer comes out clean). If the top crust gets too brown then cover with foil for the remainder of the baking time.
Allow to cool for at least half an hour. Enjoy!


--FP

Eagleswings' struggles with a rye starter and the current interest in Jewish sour rye and corn bread have prompted me to re-post my response regarding the care and feeding of rye sour. After making sour rye breads last weekend, I took some photos of my rye sour refreshment which might be helpful to those undertaking rye bread baking for the first time.
The photos that follow illustrate the progression of each stage's ripening. The volume of the sour is, of course, increased with each stage.
DMSnyder's adaptation of Greenstein's Rye Sour:
There are 3 "stages" to make a sour ready to use in a rye bread recipe. You can refrigerate overnight after any of the stages. If you do refrigerate it, use warm water in the next build. The mature sour will probaby be okay to use for a couple of days, but I try to time it to spend no longer that 12 hours since the last feeding. If you have kept it longer under refrigeration, it should be refreshed.
Stage 1:

50 gms of Rye sour refreshed with 100 gms water and 75 gms rye flour, mixed into a paste, scraped down and smoothed over.
 rye flour sprinkled over the surface.")
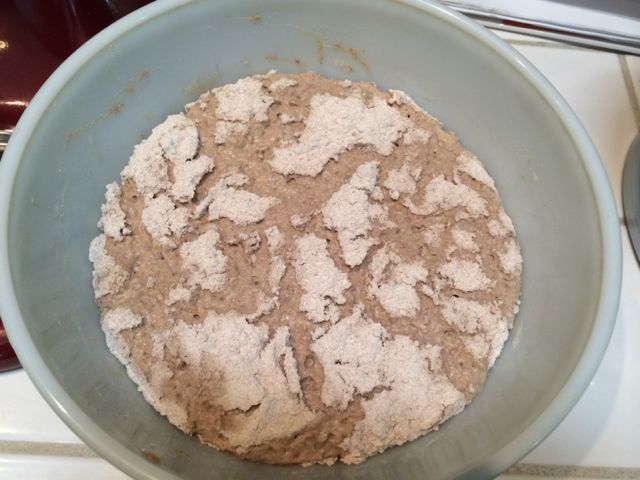
Refreshed rye sour with 25 gms (1/4 cup) rye flour sprinkled over the surface. This prevents drying out. Cover airtight (more or less) to ripen.

Ripening refreshed rye sour after 3 hours or so, starting to rise and form a dome, spreading the dry rye flour. Keep covered. Be patient.

Ripening refreshed rye sour after 4-5 hours. Expanded further with more pronounced spreading of dry flour.
Fully ripe rye sour. This should be used immediately. If you are not ready for it, I have refrigerated it overnight. What you don't want is for fermentation to continue until the sour collapses.
Stage 2:
All of the Stage 1 starter
1/2 cup water
3/4 cup rye flour
Mix thoroughly into a thick paste. Scrape down and smooth the surface.
Sprinkle 1/4 cup of rye flour all over the surface. Cover the bowl and let rise for 4-8 hours or untile the dry rye on the surface has spread into "continents" and the surface has domed. Don't wait until it collapses.
Stage 3:
All of the Stage 1 starter
1/2 cup of water
1 cup of rye flour.
You may have to transfer this to a larger bowl. Mix thoroughly into a thicker paste - It should pull away from the sides of the bowl as you mix it. If it is too thin, you can add more rye flour until it is more "dough-like." Cover the starter and let it rise 4-8 hours. It should nearly double in volume and be bubbly.
It's now ready to use to make rye bread.
Greenstein advises to keep the starter refrigerated and stir the starter every 3-4 days and refresh it every 10-12 days by throwing out half of it and mixing in "equal amounts of flour and water."
Greenstein says, if you are going to refrigerate the sour for any length of time, keep it in a covered container in the refrigerator and float a layer of water over it. (I don't generally do the water cover trick.)
I hope this helps some one.
David