The Fresh Loaf

A Community of Amateur Bakers and Artisan Bread Enthusiasts.

Most bookmarked

Elagins's picture
Elagins

Another one for Norm: onion rolls?

Norm, I haven't had a decent onion roll since I left NY about 25 years ago, and I'd kill for one -- you know the kind I'm talking about -- the big ones, 4" in diameter, browned with a crisp crust and flecked with chopped onions and (maybe) poppy seeds ... the kind that needs nothing more than a schmear of cold, unsalted butter ....

Can you help?

Stan

Floydm's picture
Floydm

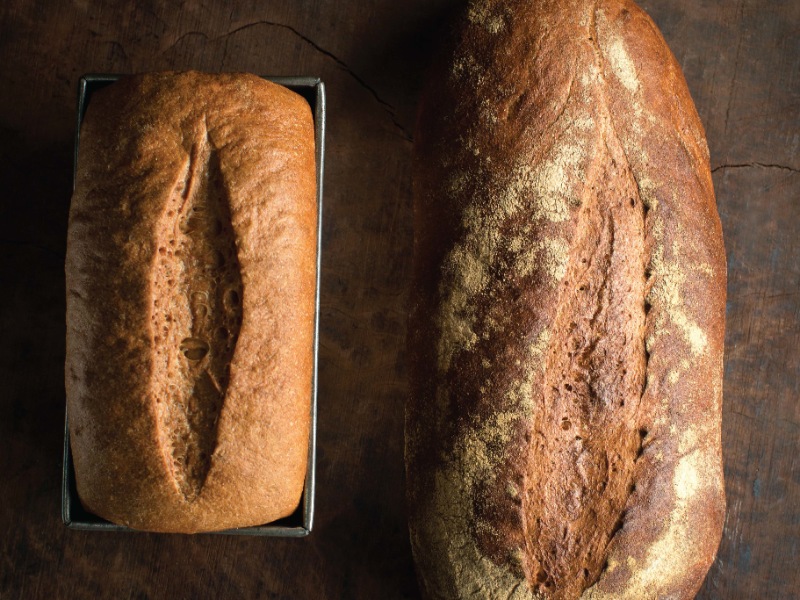
Peter Reinhart's Sprouted Whole Wheat Bread


Peter Reinhart's new book, Bread Revolution, is focused on breads made with sprouted grains and sprouted grain flours.  Below is one recipe from the book reprinted here with permission.


Sprouted Whole Wheat Bread
Makes 1 large loaf, 2 smaller loaves, or up to 15 rolls


This master dough can be used to make bread in any shape or size. It showcases the natural sweetness and tenderness of sprouted whole wheat flour without any added oil, fat, or other enrichments, such as milk, eggs, or sweeteners. Sprouting the wheat changes it so much that many of the "rules" for artisan breads, such as using pre-ferments and long, slow rising times, are unnecessary. The aims of those techniques can be achieved in less time with sprouted flour because the sprouting phase has already accomplished what pre-ferments and long fermentation typically do.

I suggest that you make this bread before attempting any of the more elaborate recipes that follow. This will familiarize you with the flavors and performance of sprouted whole wheat flour. In fact, it may be the only recipe you need for everyday breads, as it works equally well as a loaf pan bread and a crusty hearth bread.

Dough
INGREDIENTVOLUMEOUNCESGRAMS%
sprouted whole wheat flour3¾ cups16454100
salt1 teaspoon0.2571.6
instant yeast 1½ teaspoons0.164.51
water, at room temperature1 ¾ cups plus one tablespoon14.541190
TOTAL30.91876.5192.6


1. In the bowl of a stand mixer fitted with the paddle attachment, or in a large bowl, stir together the flour, salt, and yeast (on low speed if using a stand mixer). Add the water and mix or stir until the flour is hydrated and a coarse, wet dough forms, about 1 minute. Don’t add more flour, as the dough will thicken while it rests.

2. Let the dough rest, uncovered, for 5 minutes. Then switch to the dough hook or use a wet spoon or wet hands and mix for 1 minute, on medium-low speed if using a stand mixer. The dough should be smooth but still very soft and sticky (similar to ciabatta dough). Add flour or water only if necessary to achieve that texture; the dough will firm up as you continue to work it.

3. Spread about 1 teaspoon of vegetable oil or olive oil on a work surface. Using a wet or oiled bowl scraper or rubber spatula, transfer the dough to the oiled area. Lightly oil your hands, then stretch and fold the dough as shown on page 20, folding it over itself four times: once each from the top, bottom, and sides. The dough will firm up slightly but still be very soft and somewhat sticky. Cover the dough with the mixing bowl and then, at intervals of 5 minutes or up to 20 minutes, perform three additional sequences of stretching and folding. For each stretch and fold sequence, lightly oil your hands to prevent sticking. The dough will firm up a bit more with each stretch and fold. After the final fold it should be soft, supple, and tacky and have a springy or bouncy quality when patted.

4. Oil a large bowl and put the dough in the bowl. Mist the top of the dough with vegetable spray oil and cover the bowl with a lid or plastic wrap; if using plastic wrap, stretch it tightly over the bowl rather than laying it directly on the dough. Ferment the dough at room temperature for 1½ to 2 hours, until double in size. (This time can be shortened by using a warm proof box set at about 90°F / 32°C.)

5. Oil the work surface again and use an oiled bowl scraper or rubber spatula to transfer the dough to the oiled area. For hearth loaves, prepare two bannetons or a couche as described on page 26. Divide the dough in half and shape each piece into a boule or bâtard as shown on page 21, then put the shaped loaves in the prepared proofing vessels. For pan loaves, mist two 4½ by 8-inch loaf pans with vegetable spray oil. Divide the dough in half and shape the pieces into sandwich loaves as shown on pages 23 and 24, then put the shaped loaves in the prepared pans. For rolls, line two sheet pans with parchment paper or silicone mats. Divide the dough into the desired number of pieces and shape as desired (see page 24). Put half of the rolls on each lined pan.

6. Mist the top of the dough with vegetable spray oil, then cover it loosely with plastic wrap. Proof for 1 to 1½ hours at room temperature, until the dough increases in size by 1½ times. When poked with a finger, it should spring back within a few seconds; if it holds the dimple, it’s risen for too long. (Because the dough is so hydrated, it’s fragile and will fall if you proof it until double in size. It’s better to bake it while it’s still on the rise.)

7. To bake a hearth loaf, about 45 minutes before you plan to bake, prepare the oven for hearth baking with a baking stone and steam pan as shown on page 29, then preheat the oven to 450°F (232°C). Transfer the shaped loaf to a floured peel (or keep it on the sheet pan for baking). Score the top as desired (see page 29). Transfer the loaf onto the baking stone (or put the sheet pan on the baking stone). Pour about 1 cup of hot water into the steam pan. Bake for 15 minutes, then rotate and bake for 15 to 20 minutes longer, until the loaf is golden brown on all sides and sounds hollow when thumped on the bottom. The internal temperature should be about 200°F (93°C).Transfer to a wire rack and let cool for at least 30 minutes before slicing and serving.

8. To bake pan loaves, preheat the oven to 375°F (191°C); steam is optional. Bake for 25 minutes, then rotate and bake for 25 to 40 minutes longer, until the bread is golden brown all around, the side walls are firm and not squishy, and the loaf sounds hollow when thumped on the bottom. The internal temperature should be at least 190°F (88°C). Let cool in the pans for at least 10 minutes, then transfer to a wire rack and let cool for at least 20 to 30 minutes longer before slicing and serving.

9. To bake rolls, preheat the oven to 400°F (204°C); steam is optional. Bake for 12 minutes, then rotate and bake for about 10 to 15 minutes longer, until the rolls are golden brown and sound hollow when thumped on the bottom (they will soften as they cool). The internal temperature should be about 190°F (88°C). Transfer to a wire rack and let cool for at least 10 minutes before serving. 

NOTE: If it is more convenient for you to use an overnight method, put the covered bowl of dough in the refrigerator immediately after the final stretch and fold. The next day, remove it from the refrigerator 2½ hours before you plan to bake. Shape the cold dough and proof it at room tempera¬ture until it increases in size by 1½ times, then bake as directed.


Reprinted with permission from Bread Revolution by Peter Reinhart (Ten Speed Press, © 2014). Photo Credit: Paige Green. Bread Revolution is available now from Amazon, Powell's Books, Amazon.ca, or your local bookseller.

MarkS's picture
MarkS

Help me understand "builds".

Peter Reinhart touched on this briefly in The Bread Baker's Apprentice, but did not elaborate.

I am working on a sourdough recipe. I want a 350 gram leaven in the final dough, so I am starting with 50 grams of 100% starter.

If I understand the meaning, my leaven has three builds with a fourth when added to the final dough, as follows:

First build: 50 grams of starter, plus 15 grams of flour to bring it to 60% hydration. Ferment overnight at room temp.

Second build: 100 grams flour plus 59 grams water, and ferment again at room temp.

Third build: 70 grams of flour plus 56 grams of water and ferment.

The final build will be adding it to the final dough. This, to me, seems what is meant by "build". Is this correct, and if so, what purpose is there in doing this as opposed to just adding the correct amount of flour and water to bring it to 350 grams and letting it ferment?

teketeke's picture
teketeke

How I make and maintain raisin yeast water

 Because all of the pictures below are broken. Very sorry for this inconvenience, that my computer crushed and lost all pictures I had.


--------------------------------------------------------------------------------------------------------------------------------------------------------------------------------


Once I had made my raisin yeast water, I really didn't care about methods to make - I had mine, and that was all I cared about. After I was asked by some TFL members about yeast water, I realized that I really didn't know what the nature of raisin yeast water was. I 'd like to leave my recent research and thoughts here for anyone who is interested in for reference.

How to make raisin yeast water

Ingredients:

  •   45 g    Raisins( * I use organic Thompson raisins. they are NOT coated with oil, I recommend to use organic one)
  •   Water  ( I used purified this time, I also use filtered water from a refrigerator. NO using chlorine water .
    •  A jar ( I use emptied jelly jars all the time.)
Method    

Day1:

 1) Sterilize your jar:   put the jar in the boiling water for a few minutes and take it out .     Leave it until it is dry.  2) Add the raisins and the water as to 1:1 ratio like the picture below.
(No chlorine water! It kills yeast!) 3)    Shook the jar vigorously  * Tighten the lid Before shakingAfter shaking vigorously  /   Close up4) Keep the jar at 82 F / 28℃. * Tighten the lid ( The right one is correct. the left jar is the other way to make yeast water )5) 4-5 hours later :  * Keep the jar at 82 F / 28℃. Tighten the lid  Before shaking After shaking vigorously * The raisins are soaked with the water. Now it is the time to add more water.6) Add  some purified water until double the raisins.  After shaking vigorously,* Keep the jar at 82 F / 28℃. Tighten the lid 


Day 2  7)  Shake the jar vigorously as many as you can. * Keep the jar at 82 F / 28℃. Tighten the lid

----   I did that was 6:30 am ~  8:20 pm ---    shook  the jar vigorously 13 times. * Tighten the lid* All of the raisins stayed up to the top of the water.     6:20 am  Before shaking 
 After shaking vigorously   * Tighten the lid


8) At the night *Close the lid not too tight not too loose. 
* I think that the yeast needs to get some little oxygen to breath to activate for over night so I didn'tclose the lid tight anymore because the raisins stayed up to the top of the water for a half day.Day 39) In the morning  Shake the jar vigorously.     *Close the lid not too tight not too loose Before shaking    close up After shaking vigorously      Close up10)   Refrigerate it when you hear shwwwwww... sounds while it was fermented at 82 F.).  *Close the lid tightly  after shaking vigorously.Day 411) in the morning: *Close the lid tightly after shaking vigorously andPut it back in the refrigerator . Before shaking  Close up After shaking vigorously     Close upDay 512) In the morning: Shake the jar vigorously.   Tighten the lid and put it back in the refrigerator.   Before shaking   * I smell a bit strong alcohol smell which means fully fermented but it needs more rest before baking bread.     After shaking vigorously  * The alcohol smells was weaken.( mild level)13) At the night( Approximately 12 hours later)-- READY TO BAKE!To make levain for my sandwich loaf with raisin yeast water.Levain:
  • King Arthur all purpose flour   149g
  •  Raisin yeast water                          107g
----------------The day before-----------1. Pour 107 g raisin yeast water into the container. The taste:  Sweet and little bit of alcohol.The result of the PH level test Between PH 5.5 and 5.75.Added 149 g KA AP  and made the levain.Viscosity: Hard. I had to knead by hand.* "Hard " means that there is a lot of sugar in the dough.------------------------------------------------------------------------------Next day--- Final dough
  •  King Arthur bread flour                       281g
  • 1 egg yolk + Whipping heavy cream=58g
  •  Water                                                            144g
  • Sugar                                                                 13g
  • Butter                                                                29g
  • Salt                                                                    6.8g
Method
  1.  Mix all the final ingredients and the levain except the butter and salt.
  2.  Autolyze 30minutes.
  3.  Add the salt and butter and knead until you pass a window pane test.
  4. Bulk fermentation at the room temperature until triples.
  5. Preshape
  6. Shape
  7. Bake  35 minutes at 410F until golden brown.    *Cold oven method:  Spray a couple time  in the oven and put the loaf in.  Set up 284F for 20 minutes. increase the temperature to 410F for 10 minutes, lotate 180 degree the loaf pan and bake 10 more minutes until golden brown.
The levain rose tripled ( 9 hours later)Bulk fermentation: The final dough rose almost tripled in 5 hours at 72-73F.Final proof: The dough rose over the top of the tin in 2 hours at 82F.Baked for 35 minutes at 410 F.( I couldn't use " cold oven method" because I was using the oven a hour ago before )When I ferment the final dough at colder temp, I can see the cracks.          The taste was really good. nice volume.  The crumb was not wet, it was nice texture.I smelled a bit of fruity smell from the raisins when I sliced it after 5 hours I baked, but the smell was very slightly and very pleasant.-------------------------------------------------------------  Comparison:5/267 :00 am--   From left: No lid / Vigorous shakes/ my old one - generous shakes10:30 am--  From left: No lid/ Vigorous shakes/ my old one5/27 5:50 am  From left: No lid/ Vigorous shakes/ my old one (I just refreshed)Comparison of the crumb:   ( 12 g sugar not 13g  used in the final dough)  Vigorous shakes    No lid* I didn't like No lid bread because I smelled strong yeast like Active dry yeast when I put it in my mouth.No lid raisin yeast water itself  has no strong yeast smell neither taste , which gave me a surprise.Our taste gives us more details than this PH test in my opinion.----------------------------------------------

For reference,  I want to mention about yeast water that I found from some Japanese sites  and the others from winery .

"Yeasts will activate in two different ways:
1. with oxygen:
{Sugar -C6H12O6+Oxygen--O2}→{ Carbon dioxide-Co2+Water -H2O} 
(* We call it " Breath" which means the yeast is active. )

2. with no oxygen:

{Sugar-C6H12O6 }→{Carbon dioxide gas 2(CO2) + Alcohol(Ethyl alcohol)-2(CH3CH2OH)}

(※ We call it "Alcohol fermentation")When there is no sugar in, it turns to acetic acid ( quite sour), except apple and raisin which contain malic acid. ( milder )

When we make raisin yeast water using a jar, The yeast water will activate with the oxygen in the jar first ( Breath), and occur alcohol fermentation when it is no oxygen in the jar. Alcohol has bactericidal action which prevents to have mold and unwanted bacteria. Natural yeast is tolerant to alcohol so that they live together, however, he doesn't grow without new oxygen.While alcohol fermentation is working, natural yeast stops growing, therefore, it is not time to congratulate yourself yet because of the bubbles ( carbon dioxide gas) , you have to get more oxygen to have your yeast water activate by loosing a lid to access air ( oxygen) into your yeast water.

To make non sour bread, grow Saccharomyces cerevisiae ( S.ellipsoides) in the raisin yeast BEFORE Lactic and acetic acid bacterias grow at proper temperature. Saccharomayces cerecisiae will be tolerant to them. ( Saccharomayces cerecisiae >Lactic acid and acetic bacteria)

*Lactic bacteria and acetic bacteria are in the air. Especially acetic bacteria increases in summer. They exist in the air and grow in all kind of fruit and vegetables and other kind of food that they contain glucose. To make kimchi, we use the power of lactic bacteria that is in the Chinese cabbage. Japanese sake is also used the power of lactic acid bacteria that is in the rice. Acetic bacteria will really activate at over 30℃. To make sweet raisin yeast water ( or other fruit yeast), We should fully grow Saccharomyces cerevisiae ( S.ellipsoides) in the raisin yeast ( or other fruit yeast) BEFORE lactic and acetic bacteria grow. Lactic bacteria is not bad when we make yogurt yeast to make sweet bread. When Lactic bacteria is fully grown in yogurt yeast, Other unwanted bacteria can't grow in the yogurt yeast because the lactic bacteria is tolerant to them at proper temperature. * Exception: Sourdough

-----------------------------------------------------------------------------------------------------*How I maintain my raisin yeast water: *Use a sterilized jar and filtered water. (no chlorine water) 

*And the raisins are NOT coated with OIL. Organic ones taste much better.
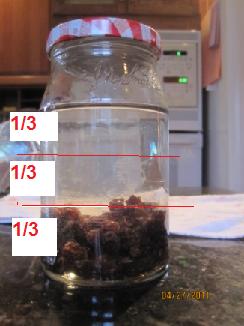

* I don't measure the water actually but by volume like the picture above.

Ingredients:This volume will be about
  • 13-25g raisin yeast water (5-7% -in the summer  10-11% in the winter) *  The temperature by the snake light differs from all season so that I adjust the raisin yeast water amount by the room temperature.
  • 45 g raisins                   (20%)
  • 225 g water                   ( 100%)
Method:1) Shake the jar vigorously after putting all the ingredients in the jar.2) Close the lid not too tight /not too loose and keep it at 76-82F around for overnight.3) Shake the jar vigorously and store it in the refrigerator. ( I don't discard the raisins in the jar)* It is very important to keep some sugar in your yeast water not to get your yeast water hungry. I use the refreshed raisin yeast water after 12 hours I store it in the refrigerator to stabilize.

4) Shake the jar vigorously every morning 1 time to get some f your raisin yeast water.     I shake it vigorously every morning and night which is  2 times in total  now.  (September,20011)

If you store it more than several days, I will  *refresh it before baking.*Using this maintain raisin yeast water method.

Here is the link that you might be interested in:http://en.wikipedia.org/wiki/Yeast--------------------------------------------------------------Other methods that I found in Japanese sites1)http://levadura.exblog.jp/12421595/

I read one of Japanese home baker’s method of making raisin yeast water: To make non sour (sweet) and well risen bread, she tighten the lid and shake the jar gently once or twice a day during the process, and she said" if you make bread with this yeast water, you will have dense bread because the yeast didn't get enough oxygen while it was fermented although the taste is wonderfully sweet. In according to make bread that has volume, she add mashed mixed fruit in the yeast water to ferment it again in a bowl that is covered with plastic wrap at room temperature .It sounds good, but it will give me more work. I rather make raisin yeast simply in good condition.

2) No lid method:

http://cookpad.com/recipe/543057 She tested 2 kind of methods between with lid and no lid like me.  She said that No lid doesn't have any alcohol smell and rise very well. She is right but I had a different result after baking. I smelled alcohol from the crumb and the crumb remains wetter in the crumb but I also think that no lid one rise well in the oven.

This is the result:

https://www.evernote.com/shard/s46/sh/aae4b7bd-4181-42f3-b4fd-af43f60b70d7/bfbb002b43291f87240bb662ec67d05e

----------------------------------------------------------------------------------

Q & A:

Q:  Does the taste of yeast water affect to the bread?

A: I say " Yes" That is why I smell and taste my raisin yeast water if it is fine. My raisin yeast water is  sweet with mild alcohol generally. When the raisin yeast water is just made, You may smell strong alcohol, but it will be milder and read to bake in the next day.  If you smell sour or funny, I strongly recommend you to throw away all of your raisin yeast water, and make a new one.

--------------------------------------------------------------

Q : Why do you shake it vigorously during the process?

A: I have two purposes. I can squeeze more sugar to feed the raisin yeast water by the vigorous shakes, which also activate the raisin yeast.I don't recommend this technique for fresh fruit yeast water which have bitter skins because the bitters remains in the yeast water and the bread.

----------------------------------------------------------------------------------------------

Q:  Can I use a water bottle to make raisin yeast water ?

A: I prefer a jar. It depends on you.  However, I highly recommend not to use a weak water bottle like "Walt-mart" brand.I tested it before. On the second day, I smelled some chemical from the bottle. Although I noticed that the raisin yeast water in the bottle had a lot of bubbles and very active, which reminded me of  the process to make beer.http://www.youtube.com/watch?v=sSrbukazO_Q

Day 1                   Day2 ------------------------------------------------------------Q:  How do make bread with raisin yeast water?A:  I use my yeast water like sourdough I used to have.Example: http://www.thefreshloaf.com/node/23726/thank-you-syd I also use my raisin yeast water as sherry wine or mirin ( sweet Japanese sake for cooking) to make teriyaki sauce, orange sour chicken sauce, and so on. I also keep my alcoholic raisins that are fermented in the jar for home made rum raisins. So I can make Daisy's Panettone.http://www.thfreshloaf.com/node/21104/my-first-panettone-milanese-notes-trial-run-formula-and-method-thanks-all-advice Once, I used 2 tbsp this rum syrup to fix the sour flavor when I made David's miche:http://www.thefreshloaf.com/node/23593/david039s-miche-raisin-yeast-water ( NO.5) Home made rum raisins.I add some sugar in whenever I add more alcoholic raisins.I discard the raisins that I make raisin yeast water from beginning because they are smashed and less sugar left in them.-------------------------------------------------
Q :  Is it okay to smell strong alcohol from my raisin yeast water?

A: Yes. When the raisin yeast water is just made, You may smell strong alcohol, but it will be milder and read to bake in the next day. Also,If your raisin yeast water is kept in the refrigerator for a couple days only, It will be fine. If you smell it strong, I will shake the jar vigorously. The smell will be weaken.   It is very important to see how active your raisin yeast water is. Very healthy one is the raisins keep floating  around the top of the water, and you can hear strong pops ( shwwww..) when you shake it and open it up.Here is the result of a sandwich loaf when I used my old raisin yeast water that was little strong alcohol smell.https://www.evernote.com/shard/s46/sh/039147ff-264d-4fa4-959d-65cf8cab1c3c/94659bd4a5655d3db0b0b2d4ddc79392------------------------------------------------------------Q:  How is it different from between non organic and organic raisins?

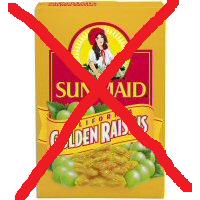
A: I have some experiments using Sun-maid raisins ( golden and regular ones)

Regular one is okay, but I tasted weird flavor in the bread a little bit when I compare to organic one.I strongly recommend not to use sun-maid golden raisins. It smelled and tasted very weird.
------------------------------------------------------------Q: Is it okay that my raisin yeast water sank on the bottom in the refrigerator?A: This is depends. If  all of the raisins doesn't float back up to the top of the water within a day after shaking vigorously, I think that the yeast is weak or some unwanted bacterias are in it.  I did throw it away and  made a new one when I had the problem. It happened when I didn't take care of the raisin yeast water for a couple weeks.------------------------------------------------------------Q; What temperature is better to make bread for raisin yeast water?

AFor Levain bread:

In the summer, I  use colder temperature around 70-73 F for bulk fermentation, 70-76 F around for final proof   .

In the winter, The temperature is around 76F for Bulk fermentation, 70-76F for final proof.

I think that raisin yeast water bread is not sour unless you retard it for a long time.  But it differs from what king of flour you use.  Rye and Whole wheat flour give it more acid or earthy flavor.

Happy baking,

Akiko

mountaindog's picture
mountaindog

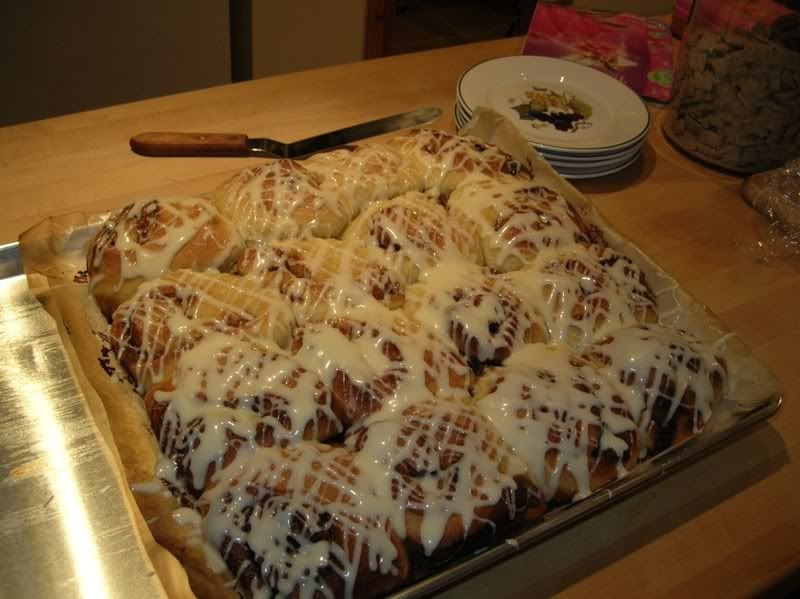
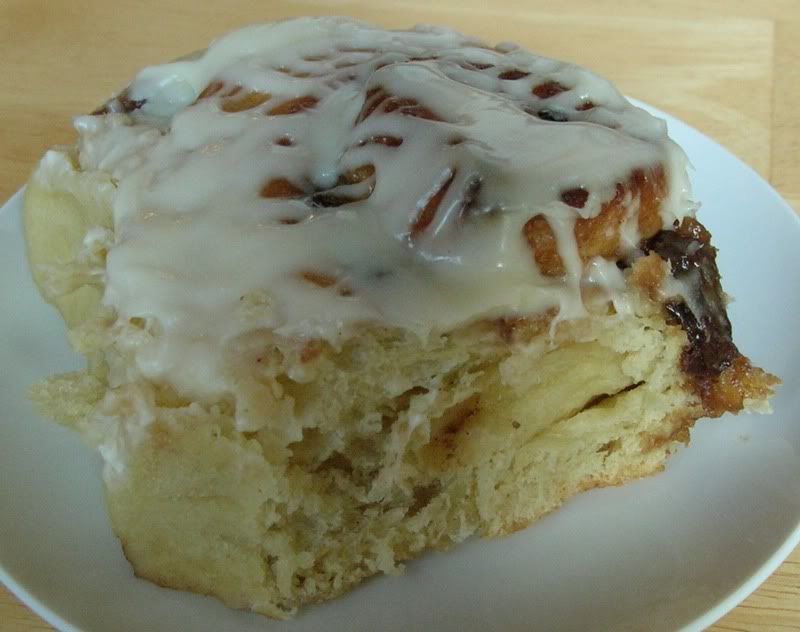
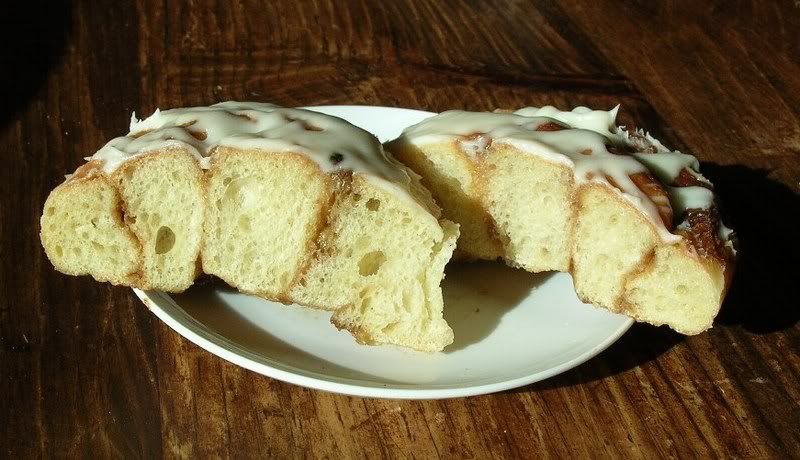
Billowy Sourdough Cinnamon Rolls with Cream Cheese Icing

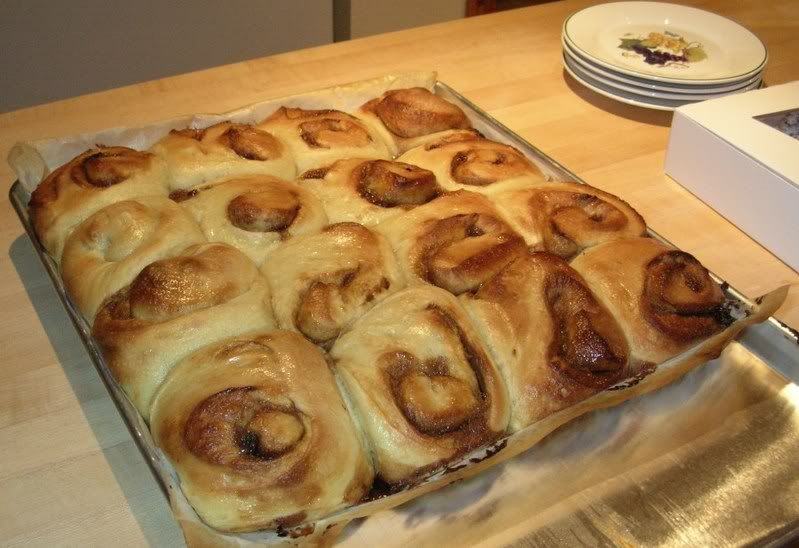
I was inspired from Teresa at her Northwest Sourdough website to try her sourdough cinnamon rolls pictured there, but the closest actual written recipe I could find to that was her Festive Hawaiian Roll recipe. After studying a lot of other sweet dough recipes and brioche recipes, I decided to make a hybrid dough with what I thought were the best aspects of each, that would also use only sourdough starter as the leavening agent. The main differences from NWSD's recipe is my addition of eggs and buttermilk, plus I added 4 times the amount of butter, bringing the butter content up to 11%, which is still not as high as many sweet doughs and not nearly as high as brioche.

This recipe will make about 16-24 large and airy, but rich and tender Cinnamon Rolls. We don't like excess cinnamon flavor in our rolls and so use about half the amount of cinnamon usually called for in the filling of similar recipes. We are also not *fond* of white fondant glaze, so I made up this cream cheese/buttercream glaze to provide a more flavorful topping that complements the flavor of the rolls well. I also did not use any nuts in these, but they could also be added to the filling if desired.

Beware of these rolls: Due to the potato and buttermilk in the dough, these are by far the richest, most moist, tender, and flavorful cinnamon rolls we've ever had, the dough itself is fragrant with vanilla and butter, it almost does not need the filling or icing. The sourdough made these extraordinarily airy and puffy with no commercial yeast added. Because these are so rich, they will be reserved for special occasions or special visitors in our house, they are far too addictive to keep around otherwise. Because they are also so light and billowy - similar to a good sourdough waffle, they are not overly filling and heavy in your stomach.

The total preparation time is about 36 hours to allow for the long cool ferments. If you want to serve these rolls on a Sunday morning, you need to build the levain the preceding Friday evening.

Approx. 12 hours before making the final dough, build the levain as follows:

Levain Build:

grams          Item
150       100% hydration sourdough starter, recently fed and ripened
340       Lukewarm water
340       AP flour
850       Total Wt.


Let this mixture sit at room temperature until doubled (usually overnight, if your starter is fast and the levain is active early, keep it in the frig. until ready to make dough). Meanwhile, make a small amount of mashed potato by boiling or microwaving (covered) 1 medium peeled & sliced potato in a little water until soft. Mash with fork and a little milk until smooth.

Final Dough:

grams     Item
113       1 stick Unsalted butter, softened
225       3 large eggs
42        1 ½ TBSP Honey
24        2 TBSP Vanilla Extract
130       Mashed potato
195       ¾ c. Buttermilk or whole milk
850       Levain
700       AP flour
21        Salt
2300       Total Wt.


Once levain is ripe, make the final dough. First cream the softened (not melted) butter by hand or in mixer with paddle attachment, then beat in eggs, honey, vanilla, and mashed potato and continue mixing. Stop to scrape down sides of bowl with spatula as needed and continue to mix just until well-blended. Switch to dough hook and add buttermilk and levain until blended, then gradually add flour and salt and continue mixing with dough hook until well-blended. Scrape down sides of bowl with spatula, cover, and let rest 20 min. After rest, uncover and continue to mix with dough hook another 2-3 minutes (or by hand, fold in bowl with plastic bowl scraper for 3 min.). This will be a very soft, sticky dough, around 71% hydration if you count the liquid from eggs and milk, but not counting the butter.

Place the dough into a container sprayed with cooking oil, cover, and bulk ferment in a cool location (55-65F) until doubled, approx. 8-12 hours depending on temperature and how fast a riser your starter is. Every few hours, give the dough a stretch and fold, for a total of about 2 folds.

Meanwhile, make the filling as follows:

Filling:

grams       Item
170       1 ½ sticks Unsalted butter, softened
85        Cream or half&half
300       Dark brown sugar
180       Raisins
3         1 ½ tsp. Cinnamon
12        1 TBSP Vanilla extract
750       Total Wt.


For the filling, add all above ingredients to a medium sized saucepan and bring to a low boil over medium heat while stirring. As soon as the mixture boils, take off heat and chill to a spreadable consistency before using.

After dough has doubled, divide it into 2 pieces on a flour-dusted surface (it may be sticky even though the butter should be solid from the cool temps), then roll out each piece of dough into a rectangle shape about 10 x 16 inches across. Spread the filling across each rectangle of dough, leaving 1 inch clean where the outer seam edge of the roll will be and then taking the opposite edge, roll up the dough gently but firmly and seal the seam.

Slice each log into 8 or 12 rolls (depending on how big a rectangle you rolled out and how large you want the rolls to be) with serrated knife and place them just barely touching each other on baking parchment on sheet pan. Don't worry if log gets flattened as you slice each roll, you can straighten them out once placed on the sheet pan, and they should rise very high and straighten out when proofing. Spray tops of rolls lightly with cooking spray, cover with plastic wrap, and slowly proof rolls overnight or up to 12 hrs. in the refrigerator or cool place between 45 and 55F until the dough is about doubled and puffy looking. Bake right out of frig. at 400 degrees for about 25-35 minutes until light golden, or until the center of dough registers about 195-200F on instant-read thermometer. Do not let the rolls get very brown. Melt about 4 TBSP of butter in microwave and as soon as rolls are out of oven, brush them with the melted butter to keep crust soft before icing them.

Here are the rolls right out of oven and after being brushed with butter, they had a great amount of oven spring and rose tremendously during the bake:

While rolls are baking, make a glaze/icing as follows:

Cream Cheese Glaze:

grams       Item
56        ½ (4 TBSP) stick Unsalted butter, softened
56        4 TBSP. Cream cheese
165       ¾ c. Confectioner's sugar
65        ¼ c. Milk, whole
2         ½ tsp. Vanilla extract
344       Total Wt.


Microwave the butter and cream cheese together until very soft but not melted. Whisk them together while adding the vanilla, powdered sugar, and enough milk to thin out the icing to a drip-able consistency.

Let the rolls mostly cool before glazing them with icing. Dip a wire whisk in the icing and drizzle across surface of each roll in crisscross pattern. Serve and enjoy.

(NOTE: I've not yet tried this, but it should also be possible to chill the un-sliced logs in frig overnight and slice just before baking, or freeze the logs for up to 1 month, take out the night before baking and defrost in frig. Next morning, remove from frig., slice, and let warm up at room temp about 1-2 hours before baking.)

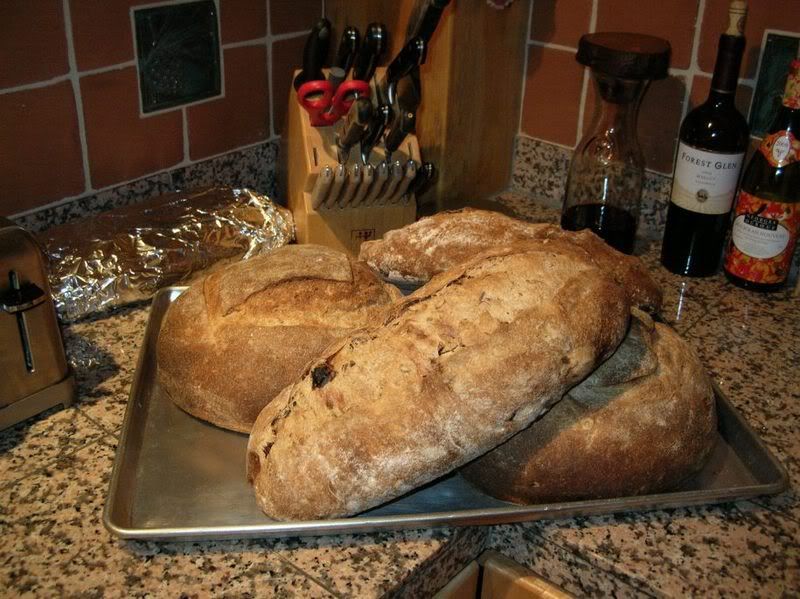
It's a good thing we had a house full of guests this past weekend to help us put away not only the cinnamon rolls, but also these Vermont Sourdough boules, and cherry-sunflower-seed levains.


Overnight Sourdough Pizza Crust (with 60% whole wheat)

JMonkey


This recipe makes four doughballs, each of which will make a pizza that's about 12" in diameter. They freeze well, and will keep for at least a month. To use a frozen doughball, just transfer it to the fridge the night before you want to bake. Then follow the baking instructions as written.

If you wish to make this as a 100% white flour pizza, reduce the water to 510 grams.


Formula

* Whole wheat flour: 60%
* All-purpose white flour: 40%
* Water: 80%
* Olive oil: 5%
* Starter accounts for 2% of the flour at 60% hydration

Ingredients

* Whole wheat flour: 420 grams
* AP flour: 290 grams
* Water: 570 grams
* Salt: 15 grams
* Olive oil: 36 grams
* Whole wheat starter: 25 grams

The night before, dissolve the starter into the water, and then add the salt and the oil. Finally, mix in the flours, until everything is nicely mixed. Then, let it rest for about an hour, and then do three stretch and folds with about 20-30 minutes between each. Cover the dough, and let it rise all night.

The next morning, see whether the dough has risen enough (8 - 10 hours is usually enough) and then divide it into 4 doughballs of about 340 grams a piece. Two dough balls go into the plastic baggies in the fridge, while the others go in plastic baggies in the freezer.

Remove the fridge doughballs two hours before baking, and shape them into tight balls. Then cover each with a cereal bowl. While they warm up, prepare the toppings.

Tomato sauce (for two pies -- makes more than you'll probably need)

  • 1 14 to 16 oz. can crushed tomatoes
  • Oregano: 1/2 tsp
  • Basil: 1/2 tsp
  • Garlic: 2 cloves, diced
  • Lemon juice or red wine vinegar: 1 Tbs

Mix this up, and set it aside, adding salt if it needs it. Some canned tomatoes are already well salted. With the brand I use, though, I usually have to add 1/2 tsp or so.

Cheese blend (for two pies)

  • Whole fat mozzarella, grated: 4 oz.
  • Parmesan, grated: 2 ounces
  • Feta, crumbled: 2 oz

Other toppings are, of course, up to you. I like chicken sausage, black olives and mushrooms, myself. Roasted red bell peppers are awesome. Fresh tomatoes are great (under the cheese), when available, as are fresh basil leaves, added just after the pie comes out of the oven.

Shaping the pie
First, an hour before I'm ready to bake, insert a stone and set the oven as high as it will go. When you're finally ready to shape, generously dust a peel with semolina flour or cornmeal. Then, make a small pile of AP flour next to where you'll shape. Coat your hands in flour, take a dough ball, coat it in flour on both sides, and then place it on your knuckles. Bounce the dough on your knuckles in a circle, gently stretching the dough with each bounce. When it's halfway there, place it on the peel, and stretch it all the way out. Mmake sure you stretch the edges apart -- don't stretch across the dough, because the center will be fairly thin and will tear.

Before adding the toppings, make sure that the pie will move on the peel. Then add sauce, cheese and toppings, and bake on the stone for 9-11 minutes. Let it cool for a few minutes on a rack before cutting into slices.


dmsnyder's picture
dmsnyder

Pain de Campagne

Pain_de_CampagneBatard

Pain_de_CampagneBatard

Pain_de_CampagneGrigne

Pain_de_CampagneGrigne 

Pain_de_CampagneCrumb

Pain_de_CampagneCrumb 

The formula for this bâtard is derived from that for Anis Bouabsa's baguettes, as shared with TFL by Janedo. Jane prompted me to add some sourdough starter, and this resulted in a big improvement, to my taste. We had also discussed adding some rye flour to the dough. Jane said she and her family really liked the result. The addition of rye and sourdough makes this more like a pain de campagne, which is traditionally shaped as a boule or  bâtard. The result of my mental meandering follows:


Formula

Active starter ........................100 gms

KAF French Style Flour.......450 gms

Guisto's Rye Flour..................50 gms

Water......................................370 gms

Instant yeast............................1/4 tsp

Salt............................................10 gms


Mixing

In a large bowl, mix the active starter with the water to dissolve it. Add the flours and stir to form a shaggy mass. Cover tightly and let rest (autolyse) for 20 minutes.

Sprinkle the yeast over the dough and mix with a plastic scraper. Then sprinkle the salt over the dough and mix.

Using the plastic scraper, stretch and fold the dough 20 times, rotating the bowl 1/5 turn between each stroke. Cover tightly. Repeat this stretch and fold procedure 20 minutes later and, again, after another 20 minutes.


Fermentation

After the third series of stretches and folds, scape the dough into a lightly oiled 2 quart/2 liter container and cover tightly. (I use a 2 quart glass measuring pitcher with a tightly fitting plastic lid manufactured by Anchor Glass.) Immediately place in the refrigerator and leave it there for 21 hours. (In this time, my dough doubles in volume and is full of bubbles. YMMV.)


Dividing and Shaping

(I chose to make one very large bâtard, but you could divide the dough into 2 or 3 pieces and make smaller bâtards, boules or baguettes. Or, you could just cut the dough and not shape it further to make pains rustiques.)

Take the dough out of the refrigerator and scrape it gently onto a lightly floured work surface. Gently pat it into a rectangle. To pre-shape for  a bâtard, fold the near edge up just past the center of the dough and seal the edge by gently pressing the two layers together with the ulnar (little finger) edge of your hand or the heel of your hand, whichever works best for you. Then, bring the far edge of the dough gently just over the sealed edge and seal the new seam as described.

Cover the dough with plastic wrap and/or a kitchen towel and let it rest for 30-60 minutes, with the seams facing up. (The time will depend on ambient temperature and how active your starter is. The dough should have risen slightly, but not much.)

To shape a bâtard, fold the near edge of the dough and seal the edge, as before. Now, take the far edge of the dough and bring it towards you all the way to the work surface and seal the seam with the heel of your hand. Rotate the loaf gently toward you 1/4 turn so the last seam you formed is against the work surface and roll the loaf back and forth, with minimal downward pressure, to further seal the seam. Then, with the palms of both hands resting softly on the loaf, roll it back and forth to shape a bâtard. Start with both hands in the middle of the loaf and move them outward as you roll the loaf, slightly increasing the pressure as you move outward, so the bâtard ends up with the middle highest and the ends pointed .


Preheating the oven

Place a baking stone on the middle rack and both a cast iron skillet and a metal loaf pan (or equivalent receptacles of your choosing) on the bottom shelf.  Heat the oven to 500F. (I like to pre-heat the baking stone for an hour. I think I get better oven spring. Since I expected a 30 minute rest after pre-shaping and a 45 minute proofing, I turned on the oven 15 minutes after I had pre-shaped the loaf.) I put a kettle of water to boil 10 minutes before baking.


Proofing

After shaping the loaf, transfer it to parchment paper liberally dusted with semolina. Cover the loaf with plastic wrap and/or a kitchen towel. Proof until the loaf has expanded to about 1-1/2 times it's original size. (This turned out to be 30 minutes for me.) Do not over-proof, if you want good oven-spring and bloom!


Baking

Put about a cup full of ice cubes in the loaf pan on the bottom shelf of the oven and close the door.

Slip a peel or cookie sheet under the parchment paper holding the loaf. Uncover the loaf. Score it. (The bâtard was scored with a serrated tomato knife. The knife was held with its blade at about a 30 degree angle to the surface of the loaf. One swift end-to-end cut was made, about 1/2 inch deep.)

Transfer the loaf and parchment paper to the baking stone, pour one cup of boiling water into the skillet, and close the oven door. Turn the oven down to 460F.

After 15 minutes, remove the loaf pan and the skillet from the oven. Rotate the loaf 180 degrees, if it is browning unevenly. Close the oven door.

Bake for another 15 minutes, then remove the loaf and place on a cooling rack. Check for doneness. (Nice crust color. Internal temperature of at least 205F. Hollow sound when you thump the bottom of the loaf.) If necessary, return to loaf to the oven to bake longer.


Cooling

Cool on a rack for two hours before slicing.


Comments

I got very good oven spring and bloom. This loaf has an ear by which you could carry it around. It sang to me while cooling. The crust is nice and crunchy. The crumb is well aerated and almost "fluffy" in texture, but with tender chewiness. The taste is just plain good. It is minimally sour. Based on my half-vast experience, I'd say it is fairly representative of a French Pain de Campagne, the major difference being that it is less dense than the ones I recall. 

 This is, for me, not merely a good "novelty" bread. It could join San Francisco Sourdough and Jewish Sour Rye as an "everyday" bread I would enjoy having all the time.  The method is good for those of us who work outside the home. It can be mixed in the evening and baked in time for a late dinner the next night. 


Enjoy!

 David 

DanAyo's picture
DanAyo

Community Bake - Hamelman's Five-Grain Levain

This Community Bake will feature Jeffry Hamelman's Five-Grain Levain. The formula and instructions are taken from his very popular book, "Bread: A Baker's Book of Techniques and Recipes". Many bakers consider this bread a favorite of theirs and I am in that group. The portion of whole grain along with the seeds makes this bread stand out among the best. The book can be Seen HERE.

For those not familiar with our Community Bakes see THIS LINK. The idea of a Community Bake is for those interested in baking and learning to bake with us and post the results. This way we can all learn together. This is not a bread baking competition, everyone wins!

I chose to post the bake today in order to give everyone time to gather the ingredients since there are 4 grains and/or seed add ins. It is not necessary to go out of your way to get the specified seeds or grains. I substitute all of the time and the bread is always great. Hopefully the bake will get into full swing by next weekend, but feel free to start right away.

I've included an additional image of the spreadsheet for those that want to bake a smaller batch. The formula is for 1000 grams, but you could easily divide each ingredient by 2 in order to make a 500 gram loaf.

Here are the instructions from Hamelman's book. If you don't already own the book, I suggest you give it some consideration.

Five-Grain Levain
by Jeffrey Hamelman
Resource --- Bread: A Baker’s Book of Techniques and Recipes    Pages 182 - 183

1.    Liquid Levain   --- Make the final build 12 to 16 hours before the final mix and let stand in a covered container at about 70°F. Mix Levain and Soaker at the same time.

2.    Soaker   --- Pour the boiling water over the grain blend and salt, mix thoroughly, and cover with plastic to prevent evaporation. Make the soaker at the same time as the final build of the levain and let stand at room temperature. If grains that don't require a hot soaker are used (such as rye chops in lieu of the cracked rye listed here), a cold soaker will absorb less water, and therefore it's likely that slightly less water will be needed in the final dough.

3.    Mixing   --- Add all ingredients to the mixing bowl. In a spiral mixer, mix on first speed for 3 minutes, adjusting the hydration as necessary. Mix on second speed for 3 to 3 1/2 minutes. The dough should have a moderate gluten development. Desire dough temperature 76°F.

4.    Bulk Fermentation   --- 1 to 1 1/2 hours (if yeast (.008%) is used). Otherwise see Step 7 for clarification.

5.    Folding   --- the bulk fermentation should be 2 hours with 1 fold

6.    Dividing and Shaping   --- Divide the dough into 1.5 pound pieces; shape round or oblong. Large loaves of several pounds are also a beautiful sight. And good rolls can be made from this dough. NOTE – I like to make 3 pound boules and place them into the Dutch Ovens and then refrigerate. After they are shaped I place the ball upside down on a water soaked towel and then put the wet side on a towel that is floured and filled with pumpkin seeds. This gives the bread an excellent flavor and also makes it more attractive.

7.    Final Fermentation   --- The dough can be retarded for several hours or overnight, in which case the bulk fermentation should be 2 hours with 1 fold and the yeast should be left out of the mix.


8.    Baking   --- With normal steam, 460°F for 40 to 45 minutes. There is a great deal of water retention in this bread, so be sure to bake it thoroughly.

Danny


hanseata's picture
hanseata

Dan Lepard's Pumpkin Whey Bread

I'm baking a lot, but, since it's summer, mostly for sale.

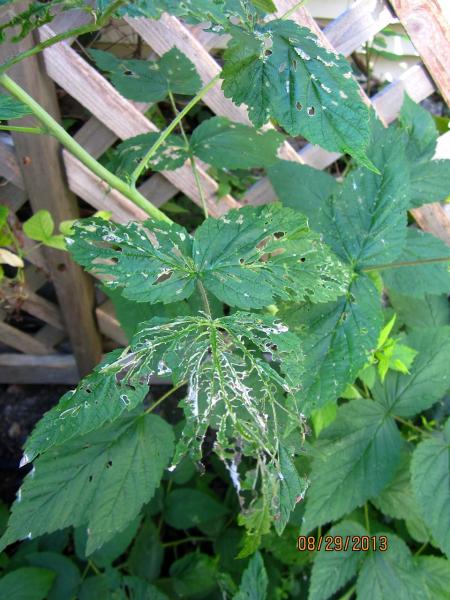
And then there are other time consuming projects like painting windows (with some tireless mosquitoes for company), massaging my husband's cramped neck (after installing aforementioned windows), and hunting for those friggin' Japanese beetles that turn my raspberry leaves into lace.

  Beetle "Lace"

My list of "Equal Opportunity Breads" still waits for more items to be checked off - I did some more, but got a bit listless after a few stubborn loaves just didn't turn out the way I liked.

But in a recent weekend edition of "The Guardian", master baker Dan Lepard published an interesting bread made with whey instead of water. From my last batch of Greek yogurt I had a lot of whey left over, sitting in my fridge, while I wondered what to do with it.

Pumpkin Whey Bread was just what I was looking for!

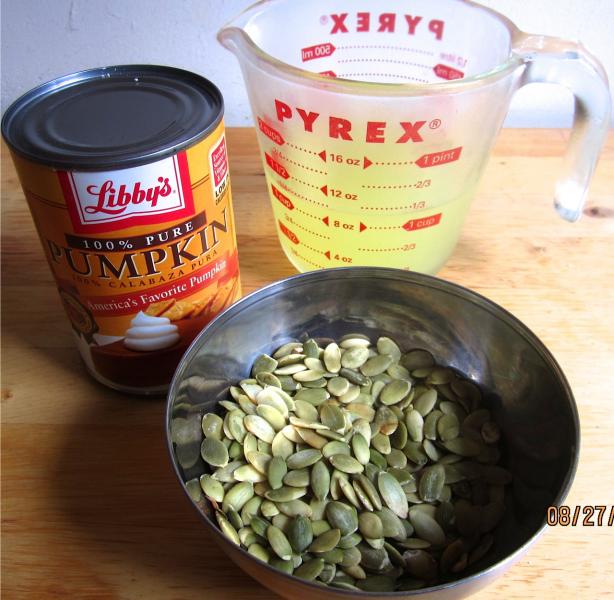
Pumpkin, Pumpkin Seeds and Whey - main ingredients for this autumn loaf

Dan Lepard cooked fresh butternut squash for his puree, but here in the US good quality canned pumpkin is readily available, and preparing and draining pumpkin puree a time consuming process.

I always have a supply of pumpkin puree in my pantry (to satisfy a sudden craving for pumpkin pancakes or pumpkin chocolate chip muffins). But for those who don't (or prefer making their own), here is a link to the procedure.

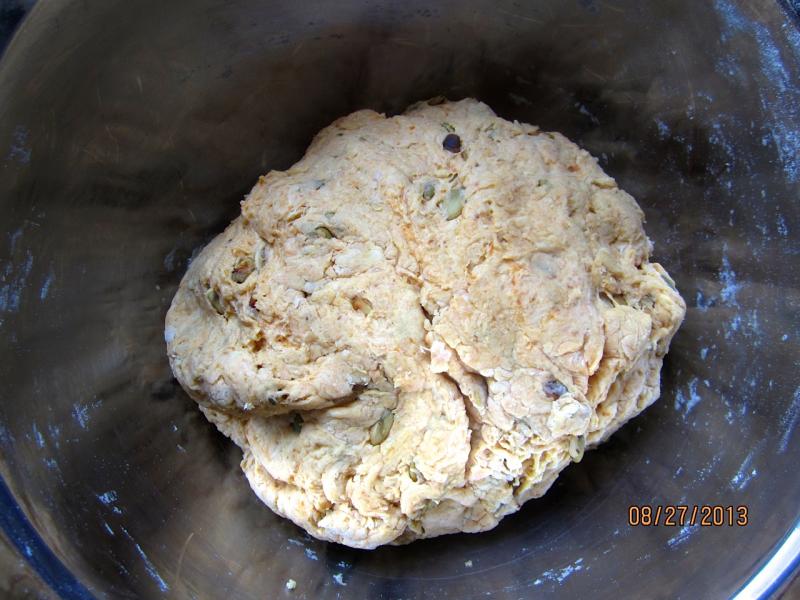
The dough looks a bit dry still, but will be soft and a bit sticky after brief kneading

What I like about Lepard's loaves is his minimalistic approach to kneading. Much as I admire Richard Bertinet's breads: compare his 30-minute-complete-upper-arm-workout to Lepards 10 seconds of gentle handling.

Normally I would use a stand mixer, but this soft dough can be easily (and less fussy) made by hand.

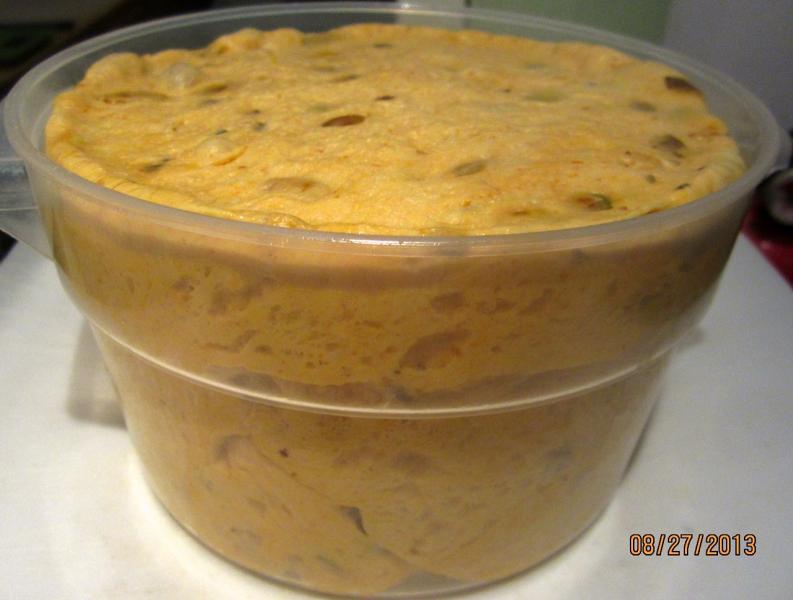
Threatening dough overflow - next time I will reduce the yeast!

Preferring longer fermentation I mixed the dough the day before, and let it slowly rise overnight in the fridge. It rose so mightily that it almost popped the lid. A sure sign that the instant yeast can be safely reduced to 5 grams down from the 7 grams the recipe requires. 

And, (for the good conscience) I substituted some of the white flour with whole wheat.

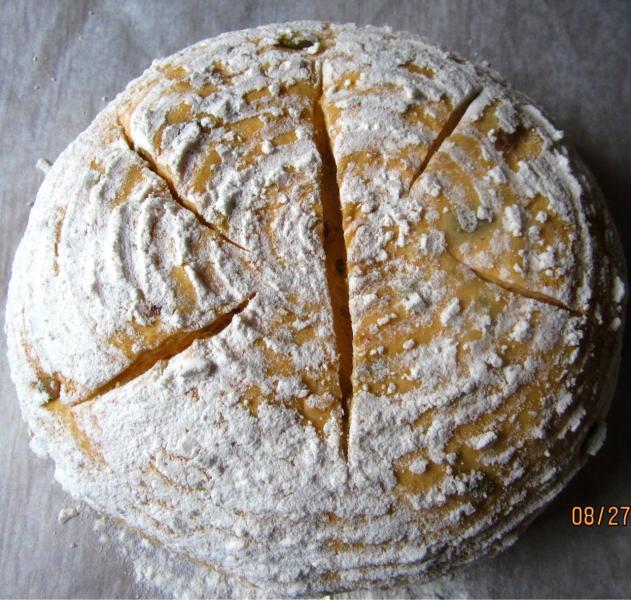
Ready for the oven

My Pumpkin Whey Bread turned out really nice. It had a delicate crisp crust, and a rich, dark golden crumb. Very flavorful, it is a true multi-purpose bread, and can be enjoyed with ham as well as jam. It is also good for toasting.

Stored in a brown paper bag, it kept fresh for several days.

Dan Lepard's formula you find HERE.


MY CHANGES:

  • Use good quality canned pumpkin (like Libby's or One-Pie) instead of fresh
  • Reduce the amount of instant yeast from 7 g to 5 g
  • Substitute 100 g of the bread flour with white whole wheat flour
  • Cold bulk fermentation in the fridge overnight (remove 2 hours before shaping)

Striking gold with this wonderful tasty loaf!

dabrownman's picture
dabrownman

Making Red Rye Malt

I took 60 g of rye berries and soaked them for 5 hours in water.  Then, taking a metal sheet tray, I moistened a paper towel and placed it on the tray and spread the berries over the paper towel.  I then took two paper towels, moistened them, placed them over the berries, covered the sheet pan with plastic wrap and covered the whole shebang with a kitchen towel.. Every day I would move the berries around and spray the top of the paper towels a little water to keep them moist - not wet.  After 96 hours from start to finish the berries were ready to dry and looked like this.

The tray looked like this.

I then dried the berries in my table top Cuisinart convection oven.  The berries were stirred and the pan was rotated 18o degrees every 15 minutes.  I used a drying schedule of 30 minutes each at 175 F (convection), 225 F, 275 F and then 20 minutes at 325 F and they were done. Here are pictures at the end of each time and temperature.

175 F

225 F

275 F

325 F

After grinding the original 60 g of berries, it made 32 G of Red Rye Malt Powder.  The powder looked like this.


Pages