The Fresh Loaf

A Community of Amateur Bakers and Artisan Bread Enthusiasts.

Most bookmarked

blackbird's picture
blackbird

rye sandwich loaf based on Eric's

This is a blog entry of a rye sandwich loaf.  Rye content is only one-third cup rye and two and two-thirds cup white bread flour.  My blog on a little rye is the opposite.

I'm using Eric's sandwich rye recipe to make larger loaves for sandwiches of normal size.  I have to make some changes due to my lack of experience and personal preference.  The recipe is a good starting point for me and I'll try to get closer to the original.  

I am not using any kind of starter at this point although I hope to improve as I have no real experience with starters. 

Overnight cold fermentation in the fridge is the main technique plus stretch and fold kneading which I'm learning.  I've learned my oven bakes unevenly so I'll rotate the loaf on the next bake.  My first loaf had caraway seeds.   Great oven spring.

I've obtained a spray bottle, a better thermometer instead of the large meat thermometer I've been using, and a dough scraper for my 2nd loaf of this type.  All nice to use.  I'm learning and will soon make my 2nd sandwich loaf.

Robert


proth5's picture
proth5

Hand Milled White Flour Baguette

 For the few of you following this adventure in milling, I thought I would post the baked results.  I used my standard baguette formula which is posted elsewhere on this site, but briefly is all levain, 65% hydration with 15% of the flour pre-fermented with an inoculation rate of 25%.  This is a formula that I have been baking every week for years with fairly consistent results.  My standard baguettes are pictured elsewhere in my blog.

 The flour used for this bake was the first batch, milled on 25 February and has been aging in an uncovered plastic container since then.  It was about 70% extraction and contained very fine flecks of bran.  Since I could not get a Falling Number measurement on this flour, I did not attempt to correct the Falling Number by malting the flour.  Details on the milling process are posted in earlier blog entries.

 My first observation is that the levain build was somewhat different than that made at the same time with commercial flour.  I would have to say that it was more fluid than the commercial flour, and matured with larger bubbles.

 Although I was attempting to go strictly "by the numbers," after the autolyse phase the dough was very stiff and I added additional water.  The dough developed "pretty much like" my normal dough after that, and bulk fermented "about like you'd expect."  The color of the dough was distinctly more grey than normal, probably reflecting a higher ash content in the flour (since it did contain some bran.)

 After dividing, I shaped the dough as normal.  It was at this phase that it felt "different."  I would describe it as being just slightly less elastic than my normal dough.

The final ferment had a duration of one hour - which is the standard length for this formula's final ferment.  I felt that the dough was somewhat under "proofed" but wanted to try to keep the process as close to "by the numbers" as possible, so I went ahead to scoring and baking.

 The crumb was a bit tight - probably reflecting my skimping on the final ferment or the lack of malt - but not horribly so.  The taste is quite nice.  I'm not good at the "notes of grass" sort of language, but it tasted "more" than my normal loaf.  A bit more there there, as it were.  Again, it may not show well in the pictures, but the crumb color was a bit deeper than my normal loaf.

 The results are pictured below.  Despite all the good advice on these pages - photography continues to elude me, but I gave it my best shot (as it were.)

Hand Milled Baguette Crust

Hand Milled Baguette Crumb


Would I hand mill this flour again?  I might. It does not have nearly the taste impact of fresh milling a whole wheat or a near whole wheat flour, but it is a nice flour with nice baking results.  Next time I might add just a pinchlette of diastatic malt.

I will say that I normally dust my peel lightly with flour and this particular flour - being a bit more "sandy" than commercial flour makes a great flour for dusting the peel.

I ate a half baguette as I typed this up.  I usually have pretty good self control around my normal baguettes.  I'm guessing this one WAS pretty darn tasty.

Hope this is of some interest to those of you contemplating advanced home milling.  I still have my second batch of "pure white" flour to bake - hopefully next week.

Happy Milling!

SylviaH's picture
SylviaH

Baguettes/Rolls -Photo

J.H. Bread Book recipe for Baguettes with Poolish.  I made a morning poolish and baked this evening baguettes and rolls.  I used KA AP flour.  The Baguettes were so light and the rolls are delicious!


These rolls are great alone or for sandwiches..so light!

Recipe made 3 small, medium and large Baguettes and half dozen medium Rolls. 

Sylvia

baltochef's picture
baltochef

20-Hour Apples Are Absolutely Fantastic!!

After using up some Granny Smith apples that were a little past their prime earlier today to make an Apple Brown Betty that only turned out so-so; I remembered just how great an apple dessert can be if the baker truly puts some effort into its creation..After tasting, and being disappointed with, my efforts with the Apple Brown Betty I for some reason remembered the 20-Hour Apples that I made for the first, and only time, back in 2000..

The recipe comes out of the book Desserts by Pierre Herme..The execution of the recipe takes the better part of 24 hours, but in reality is simplicity itself..Why I never made the 20-Hour Apples recipe again after that first time I do not know..The apple filling that results from the recipe can be used in a variety of ways, and is quite simply the best tasting apple dessert creation that I have ever eaten, bar none..Chef Herme's recipe calls for a mixture of sweet and tart apples, such as Granny Smith and Fuji..I used all Granny Smith apples back in 2000 and thought that the resulting dessert filling was simply fabulous..If I could get my hands on some heirloom Gravenstein apples I am positive that the end result would be far tastier, with additional layers of apple flavor, than what I obtained with the Granny Smith apples..

I urge anyone that loves apple desserts to try their hand at this recipe..You WILL NOT be disappointed!!..

20-Hour Apples

Pre-heat the oven to 175F

6 Granny Smith tart apples, preferably organic

4 Fuji sweet apples, preferably organic

4 tablespoons organic unsalted butter, melted

1/2 cup organic granulated cane sugar

Finely grated zest of 1-2 organic oranges

Pyrex 8"x8" square baking dish, buttered

6" diameter ceramic souffle dish half filled with baking weights (dried beans)

heavy-duty plastic wrap

Peel the apples..Core them with a suitably-sized apple coring tool..Cut the apples in half through the core..Using a very sharp knife slice the apples across the core into slices that are as thin as you can make them..The thinner the better..Twice the thickness of a piece of printer paper is about what you want to shoot for..Try to keep the slices of the apple halves neatly together..Pick up the entire half of the thinly sliced apple and fan out the slices in the bottom of the buttered baking dish as evenly as possible..Repeat the slicing and fanning out with additional apple halves until the bottom of the dish is covered in a single layer of fanned out ultra-thin apple slices..Now, brush melted butter over the layer of sliced apples..Sprinkle the layer of buttered apples with a thin layer of granulated sugar, followed with some of the finely grated orange zest..Repeat these steps until all of the apples have been used up in this way..Tightly wrap the baking dish with plastic wrap taking care to stretch it tightly across the dish like a drum head..Turn the dish 90 degrees and repeat the wrapping process..Take a sharp, pointed paring knife and poke a series of holes through the two layers of plastic wrap every inch, or so..Place the dish on a 1/2 sheet pan..Place the souffle dish half filled with dried beans on top of the plastic wrap, taking care NOT to cover up all of the holes that you just poked in the plastic wrap..Place the sheet pan with the weighted, plastic wrapped baking dish into the 175F oven..Do not worry!!..At 175F the plastic wrap will not burn..It will shrink up, and some of it might stick tightly to the Pyrex dish, but ir will easily scrape off later..Set a timer for 10 hours, and allow to bake until the time is up..Remove everything from the oven..Spill the beans out onto the sheet pan and allow them to cool to room temperature on a cooling rack..Cool the wrapped dish on a cooling rack to room temperature without removing the plastic wrap..When the apples are at room temperature, place them in the refrigerator with the weighted souffle dish back on top of the apples..Cool in the refrigerator for 10 hours..When the 10 hours in the fridge are up, remove the dishes from the refrigerator, and unwrap the apples..

The end result should be approximately 4-5 cups of a jam-like apple filling where the apples still maintain some semblance of their original shape..The taste will be out-of-this-world fantastic with an apple intensity that has to be experienced to be believed..Organic ingredients are a must for this recipe, and will pay the baker back for their higher costs in additional layers of flavor untainted by petrochemical residues..

Do not get hung up on the equipment suggestions, just use whatever equipment that you own..The ingredients are the key to 20-Hour Apples..

20-Hour Apples are fantastic over a great vanilla ice cream..They also make a fantastic tart filling, cake filling, danish filling, etc..I am sure that any baker can come up with dozens of ways to use this filling..

Bruce

vincent's picture
vincent

Plain Chinese Steamed Buns ot SioPao

to all  baker bloggers

my new recipe

Plain Chinese Steamed Buns
(Makes 12 buns)

Sponge Starter:
1/3 cup lukewarm water
1/3 cup all-purpose flour
1 tablespoon active dry yeast
2 teaspoon sugar
Dough:
1 1/2 cups all-purpose flour (for lighter texture use 3/4 cup all-purpose flour plus 3/4 cup cake flour)
2 teaspoons baking powder, divided
1/2 teaspoon salt
2 1/2 tablespoons sugar
1 tablespoon of vegetable oil (or melted lard or vegetable shortening)
Enough lukewarm water to create a smooth dough, approximately 1/2 cup

You'll also need:
A steamer
12 3"x3" waxed paper square

Directions:

·  In a large mixing bowl, mix together all the sponge ingredients and let it stand about 30 minutes (up to 2 hours)

·  Once the sponge is ready (it should puff up and have holes on the surface), add the flour, 1 teaspoon of baking powder, salt, sugar, and oil to the sponge bowl.

·  While your dominant hand is stirring the dough, add lukewarm water to the mixture a little bit at a time with your non-dominant hand. (Do I have to be this specific about the hand thing?) The moment you feel you can get a smooth dough that wipes the bowl almost clean, stop adding water.

·  Knead the dough right in the bowl, if you don't want to clean your kitchen counter afterwards. But if you need room to groove, feel free to dump the dough onto a large surface and let go of all your kneading inhibitions.

·  Once you have a smooth, satiny dough (after about 3-4 minutes), put the dough back into the mixing bowl, if you took it out, and cover tightly with a piece of plastic wrap. Let it rise for 3 hours in a warm spot.

·  You have three hours to get ready, so prepare your steamer and make the waxed paper squares.

·  After three hours, sprinkle the remaining 1 teaspoon of baking powder all over the surface of the dough and knead it in, lightly but well.

·  Roll the dough into a long log and cut into 12 equal pieces. Shape each piece into a ball by pinching and stretching. Place each dough ball, seams-side down, on a piece of waxed paper.

·  Cover the buns with a kitchen towel and let them rise once more for 30 minutes to an hour. You know the buns are ready when they have puffed up and the tops look smooth and taut.

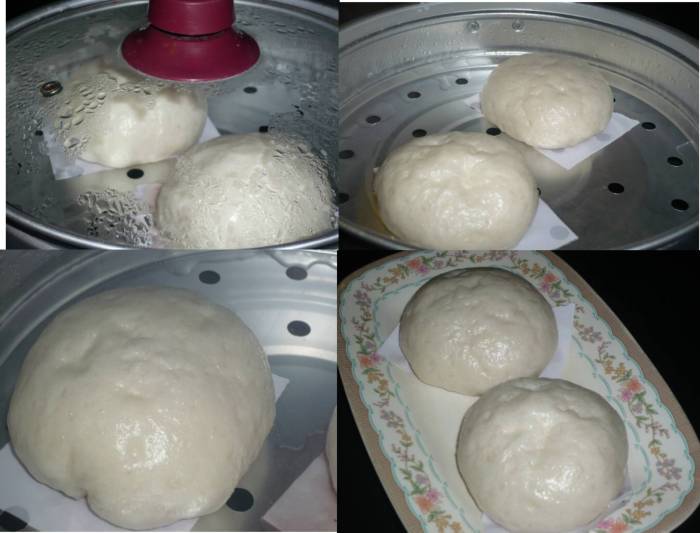
·  Gently lower the buns into the steamer, positioning them in such a way that allows for expansion. They should not touch each other or the sides of the steamer.

·  Steam the buns for 10 minutes. Remove the buns from the steamer and let them cool under a kitchen towel.

Tips:

·  Make sure you don't over-hydrate your dough. It's better to err on adding too little water as you can always add more. Adding too much water will pretty much ruin the whole thing. You could try to salvage the dough by adding more flour, but that would just cause the dough to be tough. It's not possible to prescribe an exact amount of water as this has to do with the particular brand(s) of your flour and the moisture in the air on the day you make these buns.

·  Make sure the water is lukewarm, about 85 degrees F.

·  Make sure the yeast isn't too old.

·  Make sure the piece of plastic wrap covers the entire opening of the dough bowl. Exposure to air will cause the dough to develop a tough skin on the surface.

·  Make sure you leave the dough to rise in a warm spot.

·  After the first rise, work the baking powder into the dough thoroughly. This will help the finished buns to have a smooth surface.

·  Make sure the kitchen towel covers all the buns during the second rising.

·  When you lower the buns into the steamer, grab onto the corners of the waxed paper squares, not directly on the buns as you will deflate them.

·  Do not steam over high heat. Make sure the water is gently boiling over medium heat when the buns go in. Make sure the bottoms of the buns do not touch the water.

·  Don't let the moisture collected on the lid of your steamer drop on the buns.

Answers:

·  Yes, one tablespoon of yeast. It may seem like a lot of yeast per roughly a total of 2 cups of flour. However, when you start the process with a sponge starter, the fermentation has already started before you mix the dough. This is different from the no-sponge method wherein the dry yeast is added to the dough at the same time as the other ingredients. A sponge starter is a good way to ensure reliable and quick rising.

·  Yes, these buns freeze beautifully.

 yes they can be filled..


vincent


SallyBR's picture
SallyBR

Ready to attempt my first Poilane....

I have lived in Paris for several years and of course enjoyed my Poilane bread quite often. Ever since I started baking bread regularly, I flirt with the idea of making a home-version of Poilane.

I have Bread Baker's Apprentice - so that is one possibility to try, however, I seem to have mixed results with recipes from that book and would love to have some feedback from the experts here.

I searched the forum for entries on Poilane and there is quite a few -


would anyone let me know of a tried and true that would be good for a first timer?  By the way, I have two sourdough starters going, one homemade and another from King Arthur - would either work?

rolls's picture
rolls

need help with pain ordinaire recipe from 'village baker' plz

hi all, ive been reading 'the village baker' past couple days and researching simple white french bread recipes on this site. there is heaps of information, maybe thats why i am feeling a bit confused, lol.

i thought i'd try pain ordinaire to start off and try it a few times to perfect my skills. i was going to make it in my kitchen aid using a direct method and mixing on low speed for 10-12 mins. however, i just read a lesson post on autolyse and now im not sure exactly how to go about it. i want to try this asap (u know how it is when u just can't wait and find urself baking at midnight).

i would really appreciate any feedback, tips, advice. thanks heaps!

fugalh's picture
fugalh

Gauging Growth Stage

I've been reading and thinking about sourdough growth. Most instructions refer either to time or to the activity of the start. It is asserted in at least a few places that different starts may be "faster" than others though I have a hard time believing tha if one is to believe that the dominant species in those starts are L. sf and C. milleri.

It seems to be a common belief that when the start or dough has risen as high as it goes and stops rising, that the start activity has peaked. In other words, that it enters the transition to the static phase. But I wonder if this isn't an erroneous assumption. Dough, and especially the more fluid starts, are hardly airtight. I think the only thing that can be said is that an equilibrium has been reached where gas production is at least high enough to counter gravity to the extent that the gluten structure will allow it to rise.

It seems like this may even be true even early or midway through the exponential phase, or well into the death phase. Or maybe not—I'm not sure and this is my question. Does anyone know of a good way (without scientific instruments) to estimate the growth phase of sourdough? Particularly, the transition to static phase, but any indication that it's in static phase would be useful.

flournwater's picture
flournwater

New and Confused

I've only been on board here for a few weeks.  I find that my account includes a list labled "Track" for those posts I've shown some interest in.  Some of the items on the list haven't shown a post of any kind for more than four weeks and It gets a bit difficult after a while to maintain any sense of this list and I can't identify any method for clearing out the list.  When, if ever, do these fall off the list?  Can anyone tell me how to manage this never ending list of information that I'd rather not deal with on a day to day basis?

sharonk's picture
sharonk

Gluten Free sourdough bread recipe

Hi All,

A number of weeks ago I promised to share my gluten free sourdough bread recipe. It's finally ready for you. This recipe is suitable for people with a multitude of allergies, gluten, dairy, egg, soy, corn, and yeast and sensitive digestive systems. I know most of you are eating wheat and rye with delight but most people know someone who is gluten intolerant and who would love to be able to bake their own gluten free sourdough bread. I have posted 3 recipes on my blog, the actual bread recipe, the starter recipe and the booster recipe (what's a booster?) I have found in my 3 years of experimenting that for a gluten free starter to be very dependable it needs something to boost the bacteria and yeast growth. I have found a wonderful fermented drink called Water Kefir, that does the trick nicely.

Please take a look at my blog or forward the info to someone who would appreciate it. http://glutenfreesourdough.blogspot.com/2009/03/gluten-free-dairy-free-sourdough-bread.html

Thanks and let me know if you have questions or comments.

Sharon

PS I love all the interesting posts on this site. People's successes and failures help me to develop even more gluten free recipes.


Pages