The Fresh Loaf

A Community of Amateur Bakers and Artisan Bread Enthusiasts.

Most bookmarked

merlie's picture
merlie

About to give up and/or sit down and cry!

I seem to be destined to never make my own starter ! My first attempt was Peter Reinhart's formula from  BBA. That just sat there , was very runny and did nothing. ( for days!) Next I went to my Tartine book and tried Chad Robertson's method. This resulted in it separating and forming a nasty black skin - never did bubble up or look anything like the pictures. Now , having read many posts here on TFL I am about to toss out my third attempt - PR's method from Artisan Breads Every Day with pinapple juice. I used a 50/50 blend of bread flour and WW flour. ( because Chad Robertson made me mix up 5lbs of it ! ) This attempt looked promising - a few tiny bubbles on day 3 - so I added flour and juice as per instructions and waited.....I stirred as instructed and waited......still no bubbling. When stirred there were bubbles inside but it did not  appear " active and bubbly " on the top. Day 7 came and went. I then decided to go ahead anyway just to see what would happen. Converting it to a Mother starter looked good. I formed a nice ball and followed PR's instructions to the letter, loosely covering it with plastic wrap. It could have doubled in 4 - 6hrs but it did not .As the house is a little below 70 degrees at night I put it in the oven with just the oven light on. Imagine my delight this morning to find that it had doubled ! This pleasure was short lived however when trying to follow the next step. ( "knead for a few seconds and form back into a ball ") It POURED onto my counter like a thick batter !!!  I have scraped it back into the bowl - what a mess.....It was much much wetter than a ciabatta dough. Why did it do this to me ??


So....feeling better now I've written it all down. If there is anyone near Armstrong, British Columbia throwing out starter please throw it this way !

Any communication gratfully received - Merlie

RonRay's picture
RonRay

No-Knead Multigrain Seed and Nut Loaf

No-Knead Multigrain Seed and Nut Loaf

A previous blog:

http://www.thefreshloaf.com/node/20460/banana-saga-%E9%95%B7%E7%AF%87%E6%95%85%E4%BA%8B

Last December a posting by Jaydot caught my interest http://www.thefreshloaf.com/node/21186/huge-amount-seeds-and-sugar
Her sister in law had brought a recipe back from South Africa, which seem a bit strange.

Mini Oven suggested it might be South African Seed Bread, while PmcCool suggested it could be a variation on the Cape Seed Loaf.

After I spent some time seeing what Google had to offer on these subjects I concluded the two things they all had in common was a lot of seeds and no sourdough in sight. It seemed like a fun formula to play with, so I set out trying to come up with a reasonable sourdough version of a seed loaf.

By the end of February, I had a reasonably satisfactory loaf - on my fifth try. When I compared notes with Jaydot, I found that she had independently gotten a loaf that her sister in law found acceptable as well.

I picked up her use of caraway seed and maple syrup as something I wanted to try. So, I dropped the Chia seed and brown sugar I had used, and added her idea of maple syrup and caraway seed. Both proved their worth in the eating of my version number 6.

Number Six had nine (9) types of seed, two (2) types of nuts; six (6) types of flour plus maple syrup and toasted sesame seed oil. I was afraid to calculate the calorie count, but I am certain a person could gain weight on a diet of this bread and water, alone.

The loaf was 718 grams going into the oven and 665 grams at the time it came out of the oven. The instant internal temperature reading was 209ºF (98ºC).

The crumb was as nice, if not better, than the previous version 5 and both v-5 and v-6 were by far the best of the six loaves tested thus far. Texture wise, I feel the better crumb is due to the minimal kneading. The first 4 test loaves were all kneaded gently, but in a rather normal letter fold method common to most of my loaves. I felt that the extremely high nut and seed content did more damage to the gluten during kneading than could be offset by any benefits gained. So, in both v-5 and v-6, I basically switched to a no-knead method, and it seems to have made a major improvement in the openness of the crumb.


All six versions had excellent keeping properties, when kept at room temperature in a simple a bread box.

The sourdough was a 3 build levain using KAF AP flour, and was a baker's 94.2%.


The final rise for this loaf was 7 hours in a proof box at 82ºF( 27.8ºC). By that point it was pressing tightly against the FSFilm. I removed the FSFilm, scored top with 1 whole length center scoring. Bread pan place in a Turkey Pan. The bread pan was elevated from direct bottom contact by two SS knives.

The oven stones were removed from the cold oven. One cup of water was brought to a boil and the boiling water then poured into bottom of the turkey pan and the lid placed on at once, and the turkey pan and its contents were all placed in the cold oven on the lowest rack position. The oven was set to 450ºF (232º C).

With this fabricated "Dutch Oven" - formed from the turkey pan - resting at the lowest position, the constant heat of the electric oven's lower element, while raising the oven's internal heat to its highest setting, maintains the bottom of the "Dutch Oven" well above boiling temperature for 15 to 18 minutes. Steam visibly issues from the oven vent from about 3 minutes into the baking until about 18 minutes.

At 20 minutes, the Dutch Oven's lid was removed, oven heat set to 400ºF (204º C) for the balance of the baking, and the oven door held open by about 1/2" (12 mm) to vent any steam during the remaining 25 minutes of the baking. At the end of the total 45 minute baking, the oven was turned off and the loaf removed from both oven and bread pan. The loaf was placed on wire to cool for two hours. Then it was placed in a bread box at room temperature overnight, before being cut.

At this point, I have no ideas on what I may do different when I bake version 7. In fact, I might just repeat making this same formula, before trying any other possible improvements. Perhaps, that will change
but, for the moment, I am satisfied. ;-)

=====Update: March 18, 2011

Version 7 Seed Loaf has a few changes and , to my taste, is even better. A PDF with full details and photos can be seen at this link:

https://docs.google.com/viewer?a=v&pid=explorer&chrome=true&srcid=0B_MScoZfDZkwZDNlNzk3ZjktYmQ3NC00YWZjLWI1MTgtOTg1MmMxNTM1NGZk&hl=en

=====


110307 Next blog:

http://www.thefreshloaf.com/node/22562/sourdough-crackers


SallyBR's picture
SallyBR

Has anyone tried Tartine's English muffins?

My computer is misbehaving and the search is painful =  apologies if this has been discussed...


I was browsing through Tartine, and noticed they use their baguette recipe to make English muffins, and their photo in the book is absolutely wonderful!


has anyone tried them?   THe recipe uses both a pate fermentee AND a sourdough starter.   


intelplatoon's picture
intelplatoon

Fridge too cold??

at what temperature will yeast stop working. Ive made a few different batches of dough (brioche, and a sourdough) that i let proof at room temp for about one hour. I then put them in the fridge overnight to finish proofing slowly. when i wake up in the morning and take a look at the dough, which has been in the fridge for almost 9 hours, it doesnt look like it has done much rising at all. Is my fridge too cold? or is the retard method used to ferment only for flavor and not much rise at all. then let it rise at room temp after the fridge? i hope this makes sense. basically the fridge seems to stop my dough completely and i dont think my fridge is much colder than any other? 

rick.c's picture
rick.c

Bagels, Orange Cranberry Sunflower Seed


Hello,

I have been on a bagel kick recently, I made a few batches of the BBA recipe before I got tired of topped or cinammin bagels.  So, I decided to go out on a limb and try these.

So, here is my madness in making them, measurements in Grams & I don't like to weigh less than 10 Grams so tsp measurements were used

  1. 194   Bread Flour
    231   Water             150*F water was used
    32     Flax Meal
    32     Whole Wheat Flour
    6       Diastatic Malt Powder  (2 tsp)
  2. 2       Yeast   (1 tsp)
  3. 388    Bread Flour
    50      Orange Juice
    100    Water
    13      Salt    (1.5 tsp)
    2        Yeast  (1 tsp)
  4. 6        Orange Zest,  (2.5 tsp)
    130     Sunflower Seeds, roasted unsalted
    100     Craisins
  1. Combine everything in 1. mix with paddle attachment of mixer until well combined.  it should be batter like and ~ 135 - 140 *F
  2. Allow to cool (this took mine 90 min) to ~95 *F
  3. Add 2. mix to combine
  4. Let stand for 2-3 hrs until yeast is active and bubbly
  5. Add 3, mix with dough hook or paddle until combined
  6. Let stand for 30 min
  7. Knead with dough hook for 8 min or until dough is nicely developed
  8. Add 4
  9. Knead for additional 5 min or until ingredients are uniformly mixed in
  10. Let rise for an hour, then place in fridge overnight
  11. Remove from fridge, divide into 9 pieces ~140 Grams each, shape into ball/roll, cover
  12. After 45 min, poke hole through center of ball and enlarge to get bagel shape
  13. Continue to let rise until almost doubled
  14. Boil in Baking Soda enhanced water for 1- 1.5 min / side
  15. Bake at 375 for an additional 25-35 mins until Done

I like the way these came out.  They distinctly tase orangey with a sweetness/tartness when you get a craisin, the sunflower taste is present and there is a marked afternote of the wheat and flax.  I will make these again, though I might play with my "soaker" (step 1) and I think using dried cranberries instead of craisins might be interesting.

More pics

hmm, photos aren't showing, they are here though   

http://www.flickr.com/photos/2299884466/sets/72157626053025681/


JustinB's picture
JustinB

Irish Soda Bread

Hey all! Just made a large batch of one of my favorite breads and least favorite to make (in large batches)! Took some pics :) So goooooooood


louie brown's picture
louie brown

Nancy Silverton's Hamburger Buns...

...minus the yeast, with a hand chopped 100% skirt steak burger and her friend onion rings.

This is essentially a savory brioche dough. I didn't see the need for the yeast. There's a 24 hour preferment (I did most of it in the fridge,) another one for the dough, which is very highly developed by mixer. The long fermentations contribute a lot of flavor that would be missing due to the intensive mix, which is the thing that strengthens the dough and gives it its beautiful even crumb.

This is a great bun or roll for a special filling of commensurate richness. The skirt steak filled that bill. If I wanted a bun for pulled pork or brisket, it would be a different one.

Sourdough makes a fantastic batter for frying. Add club soda, salt, that's it. The results are super crisp. I'm planning to use this batter again in a couple of days for whole clams.

yaunae1432's picture
yaunae1432

Sourdough

Ok, so I just made my first ever sourdough bread.  My pet (starter) took over a week to ferment since it's cool up here.  Surprisingly, my starter was perfect (thanks to some advice from my grandpa).  I let it sit in the fridge for about a week and, once we ran out of our other breads (I have a sister who bakes bread also), I decided it was time to bust out the starter and test my skills.  I followed some recipe on the Internet...probably not that smart but it seemed pretty legit and it was made in a really old-fashioned way.  I know alot about the chemistry of baking, the gluten and yeast, the ethanol and carbon dioxide..so I was really careful making this.  I let it rise about 12 hours, turned it out, and let it rise another 5.  The baking was a different story. I wasn't sure about the temperature because the recipe I followed called for an iron-cast dutch pan and I don't have one of those and I can't buy one (college) so I kind of browsed around. I baked it at 325 for about 30 minutes and when it was still really doughy I upped it to 425 (the original temp it called for) and it took about an hour to cook. It's still kind of doughy in the middle but it's nice and crunchy! I wish I cuold use steam in my oven but it breaks a seal on the outside and just lets the steam out. Better luck next time? 

proth5's picture
proth5

Formula Development VIII – Vampires, Mummies, and Some Holey Toast

 (Apologies to Jimmy Buffett)

One of the many objectives of the formula development project is to gain understanding of the baking process.  I have found that nothing beats working with the same general dough over and over, with very minor variations to understand the impact of various elements of the baking process.

So when comments on my last entry wound around to "intensive mix" vs. "improved mix" and the somewhat weak crumb of my last loaf, I really wanted to give them full consideration.

I may have mentioned elsewhere on these pages that my so called "normal" life contains, as a major feature, participating in the "security theatre" that is enjoying a long run in airports near you. Leaving discussion of the politics aside, it does provide me with long spaces of time where thoughts can roam free and it is wisest and best that they stray far from my actual circumstances and focus on something more pleasant - like bread.

I was idly mulling over intensive mix, when in one of those spooky out of body experiences that the doctors at The Place worry about -  The Voice in My Head (known also as "my teacher")  came rushing in on me. (It has been too long since I actually worked with "my teacher" - a situation to be remedied this year when I may be pushing it to overkill - and believe me, if you don't think I am studying and practicing in preparation for this - then I have not expressed myself well on these pages.  This frenzied activity could explain a lot.)

"Pat, please tell me two ways to achieve dough development."

"One is through the action of the mixer and another is through time - that is the time spent in bulk fermentation - and folds, sensei."

"And beyond the ingredients what produces flavor in bread?"

"Time and folds, sensei."

"What have I said about intensive mix?"

"That it is fine for panned breads where all one wants is to achieve is volume and one doesn't care about flavor, sensei."

"And why would someone who uses intensive mix see no value in a bulk ferment?"

"Because the dough is fully developed coming off the mix and many of the carotenoid pigments have been destroyed by the oxidation of the mixing process, so the bulk ferment is essentially working with damaged goods, sensei."

"Is intensive mix ever appropriate?"

"Yes, yes it is, but it will be a different style of bread than those made with longer fermentation times, sensei."

"Speaking of volume - what does bread do best at high altitudes?"

"Rises and achieves volume often collapsing in the oven since it rises higher than the baked supporting structure can sustain - forcing us to deliberately reduce the rising,  sensei."

"What must be perfect?"

"Everything, sensei?"

"You sound like you are asking."

"Everything, sensei."

"You know what to do. Bake and evaluate."

Coming to with my hands above my head and a TSA officer telling me that I could go stand on the mat, I knew what I must do.

Later, at home, giving the evening pizza crust a good twirl (my teacher once told me that this was a skill that s/he lacked and so I became obsessed with learning to twirl pizza crust) and reflecting that I had brought it to full twirl worthy development with nothing but time and some strokes with a plastic scraper, I reflected that there are indeed many ways to achieve a well developed dough.

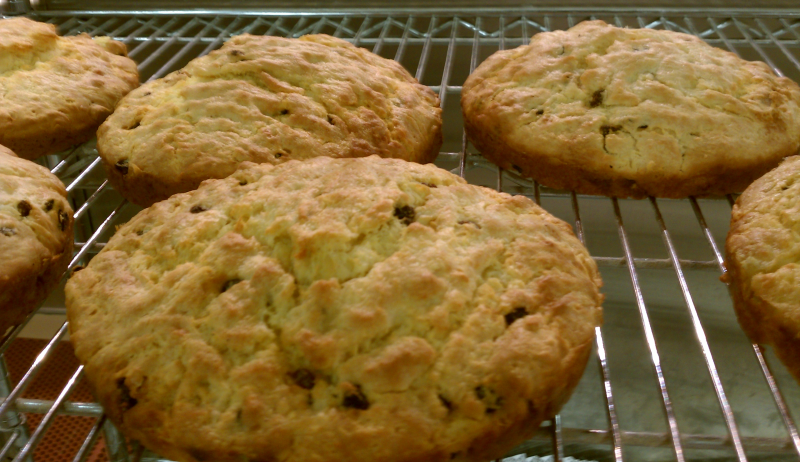
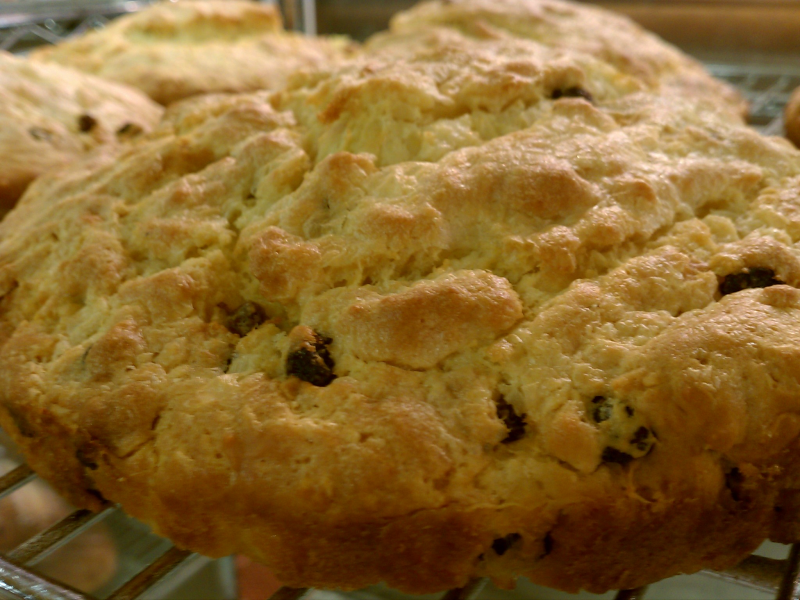
On the formula development front, I wanted to add an inclusion in the dough and had settled on flax seed.  I'm a big fan of flax - it being the thing that produces my favorite cloth - and this bread being a reflection of my favorite things; it seemed to be the logical choice.

I had some golden flax seed in the pantry and decided to use that.  I created a soaker that seemed for all the world to be "hydration neutral" - it released no water when I put it in a sieve and seemed to have no droplets in the container that held it.  Alas, as I added it to the mix, it did release some water and the dough hydration changed just a bit. Not enough ruin the dough, but definitely a change.  Truly, I will be asking questions on this concept in the near future.

I also decided to use bread flour (not high gluten flour) as a way to produce a somewhat tougher crumb - although I regret this decision because I will now have to go back and test the formula with all purpose flour, anyway.  It would be cheap and easy to just call for bread flour, but as I have told many clients - I'm easy, but I'm not cheap.

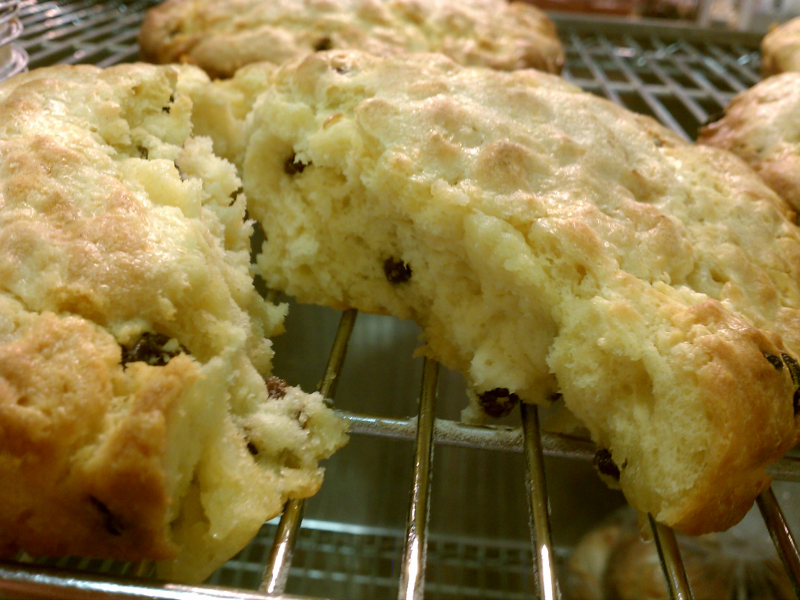
I mixed the dough for the six minutes that I had mixed it before - I feel that I might be able to mix it less, but I realize that My Precioussss is somewhat under loaded with this volume of dough and its efficiency is somewhat less at that load.  I also wanted to recheck my dough development at this timing for the mix to satisfy myself that last week's crumb was not a result of poor dough development.  It was a sufficiently developed at six minutes.  No, it did not create the glove like windowpane as required by the shredibly soft loaf, but this dough is full of oat flakes and steel cut oats and these are going to keep that type of windowpane from forming no matter how long I mixed.  The dough development was fine, and next time I will actually mix a bit less.

What I did do was degas the dough better and put a little more muscle into my shaping. I also watched the proof very carefully and didn't try to compensate for pan size by proofing longer.

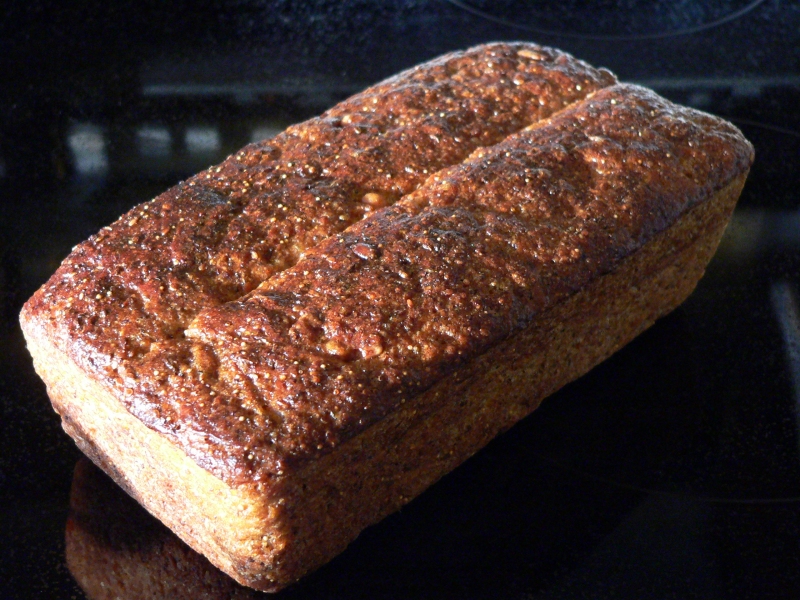
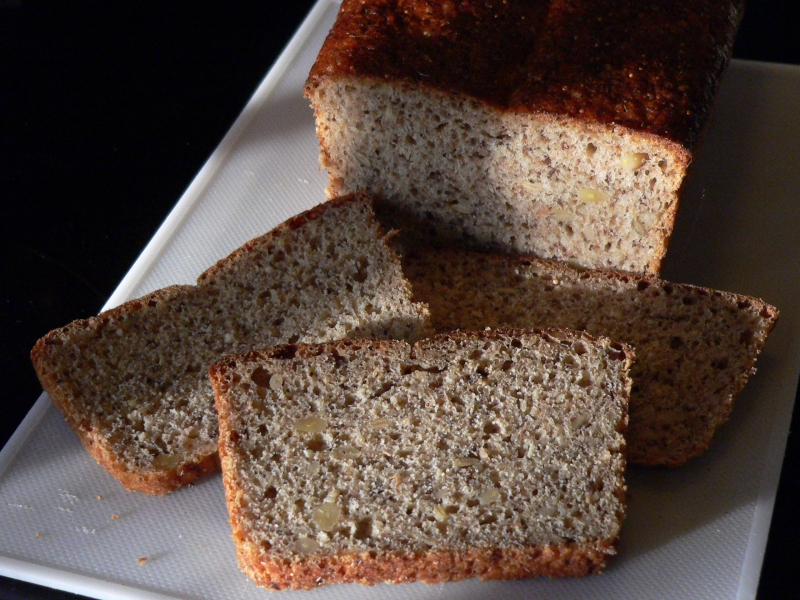
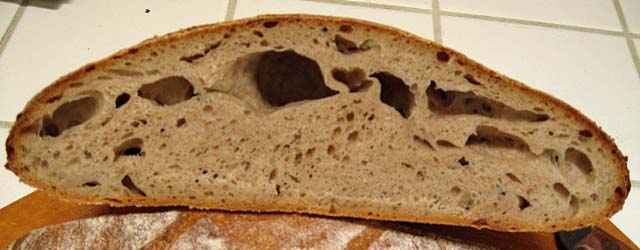
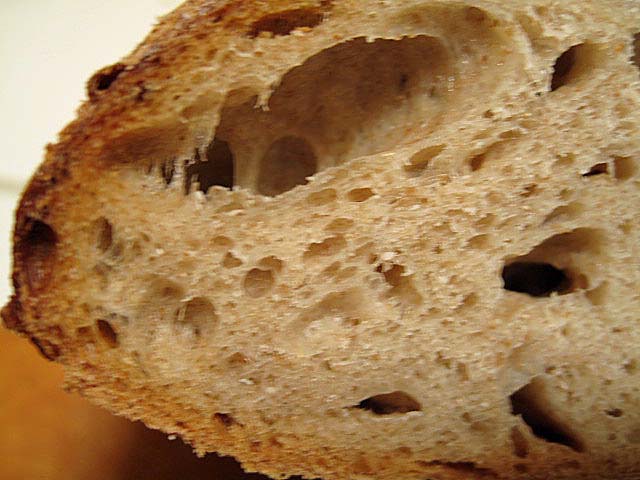
The golden flax seed no doubt added some nutrition to the bread and did create a subtle and pleasant taste change, but it didn't create the hoped for "pretty bread."   The crumb, however, was firm enough to hold a rather overstuffed grilled cheese and salsa sandwich, so I think I'll (sort of) be declaring victory on getting the crumb right by getting the shaping and proofing right. 

As I said before, now the work begins.  I will be switching out the golden flaxseed for regular flaxseed next week and have high hopes that I will get me my pretty bread at last.  But now I have to understand if I can use all purpose flour, get exact mixing times, get a better read on the soakers -and get exact weights for each type of pan and each type of shape that I wish to make.  This is tedious in the extreme and I will probably suspend my posting on this until I can organize a tasting to compare the original- original and a couple of versions of my variations. I don't know if my version will "sell out at bake sales" yet, but as I taste it, it has that elusive quality of "balance." I can taste the molasses in the bread, but I can also taste the grain- it has little crunchies, but I don't fear breaking a tooth.  If anything, the crumb is a little too light (although it passed the spread butter and the gloppy sandwich test) but by no means unacceptable. I've got a niggling little voice telling me I need to mill a lot more triticale and get to that ill conceived experiment of a high percent of pre fermented flour,  some yeast and a pan and gardening/pond cleaning season is fast approaching - so plenty of other things to do while I make tedious small tweaks.

Pictures and formula follow.
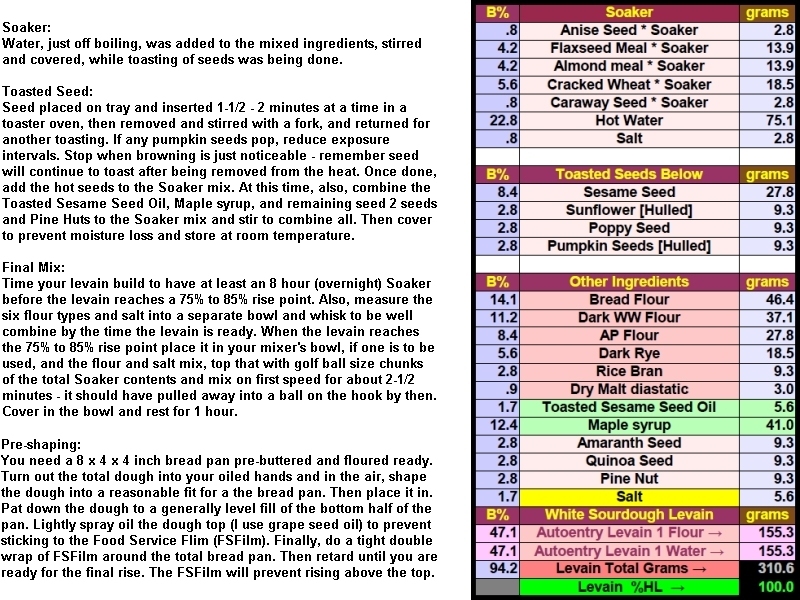
Total Dough Wt


72.88

oz


Ingredients


Soaker


Percent of Flour in Levain

0.1


Final Dough


%

Wt

UOM


%

WT

UOM

Ingredients

Wt

UOM

Total Flour

1.00

27

oz


1

2.7

oz

Total Flour

24.30

oz

Whole Wheat Flour

0.30

8.1

oz


Whole Wheat Flour

8.10

oz

KA AP Flour

0.60

16.2

oz


KA AP Flour

16.20

oz

Triticale Flour

0.10

2.7

oz


1

2.7

oz


Additional Water

0.14

3.7

oz


0.6

1.62

oz

Additional Water

2.08

oz

Rolled Oats

0.17

4.59

oz


Rolled Oats

4.59

oz

Steel Cut Oats

0.11

2.97

oz


Steel Cut Oats

2.97

oz

Boiling water

0.74

19.98

oz


Boiling water

19.98

oz

Shortening(leaf lard)

0.03

0.81

oz


Shortening(leaf lard)

0.81

oz

Molasses

0.06

1.62

oz


Molasses

1.62

oz

Agave Nectar

0.05

1.35

oz


Agave Nectar

1.35

oz

Milk Powder

0.04

1.08

oz


Milk Powder

1.08

oz

Salt

0.03

0.756

oz


Salt

0.76

oz

Yeast

0.004

0.108

oz


Yeast

0.11

oz


Golden Flax Seeds

0.1

2.7

oz

0.1

2.7

oz


Soaker Water

0.22

6

oz

0.22

6

oz


Soaker

8.7

oz


Seed

0.008

0.216

oz


0.08

0.216

oz

Levain

4.536

oz

Totals

2.399259259

72.88

oz


8.7

oz

1.68

4.536

oz


72.88


Prepare the soaker -  allow to soak 12 hours

Prepare the pre ferment - allow to mature 12 hours

Pour the boiling water over the two types of oats and allow to cool to lukewarm

Combine all ingredients except the soaker and mix 6 minutes in one speed spiral (or to moderate development by any means desired.)

Add soaker and mix only until combined (I did this mostly by hand).

Bulk ferment 4 hours - one fold

Shape

Proof 1 hour

Place in oven at 375F - immediately decrease temp to 360F and bake 45-50 minutes (I actually bake about 45 minutes and then remove the bread from the pan, return it to the oven, and bake 5 minutes - more as this gives a nicer crust on the sides - but this will be one of those minor tedious tweaks.)

Remove from pans and cool.

Have Fun!

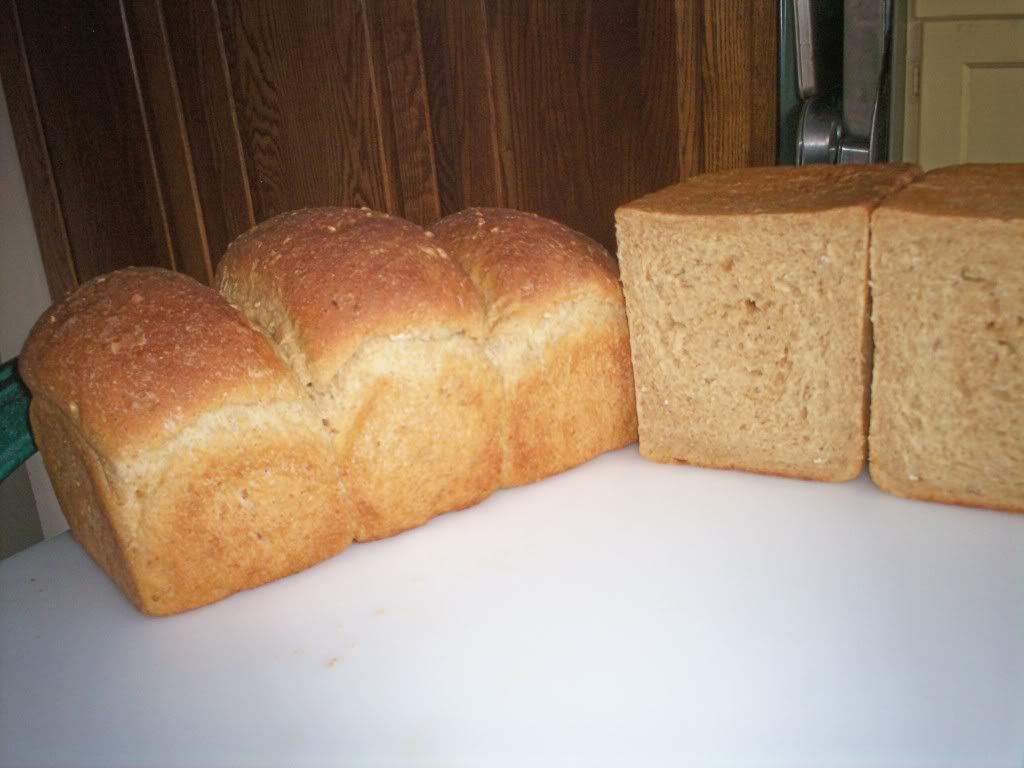
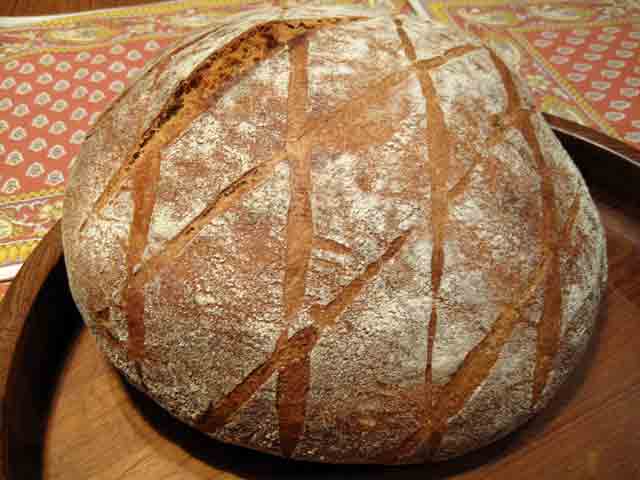
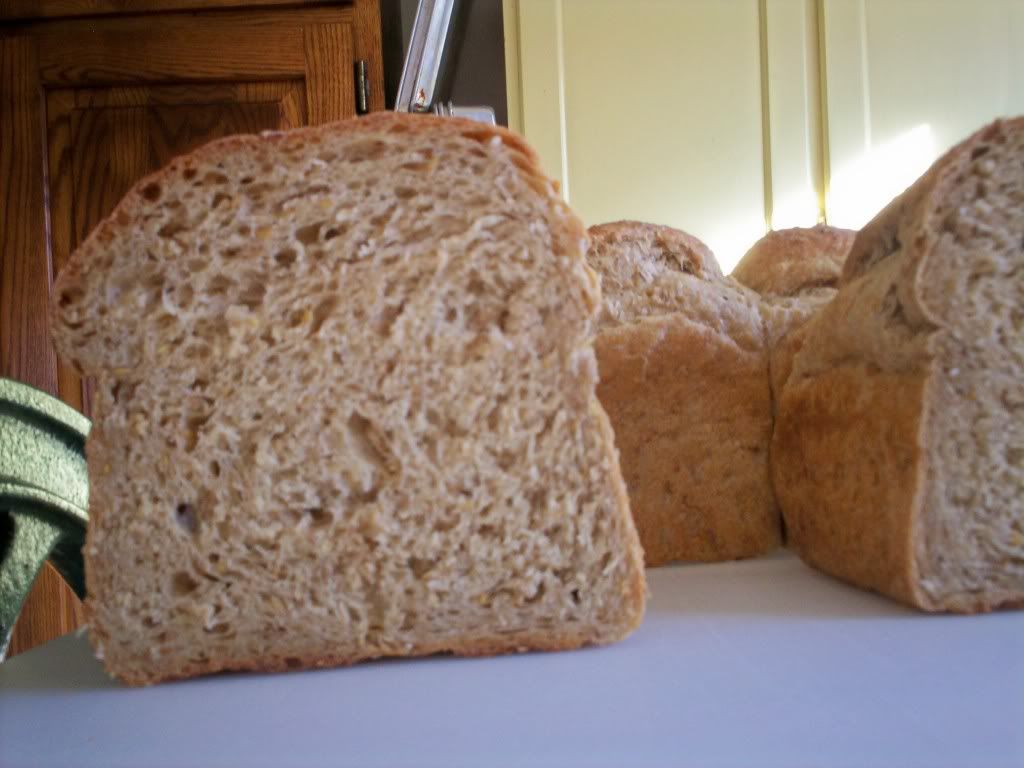
Added by edit:  I was just reflecting on the process and looked at a picture of the bread at the beginning.  I thought I would post it here so the contrast was evident.  Hardly the same loaf at all!

dmsnyder's picture
dmsnyder

Miche, Pointe-à-Callière from Hamelman's "Bread": visiting an old friend

The “Miche, Pointe-à-Callière” from Jeffrey Hamelman's Bread has been one of my favorite breads and was my favorite miche for a long time. It's been quite a while since I last baked it. Since then, I've been doing more hand mixing of doughs I formerly machine mixed. I've found a new and wonderful high-extraction flour, Central Milling's “Organic Type 85.” And last, but my no means least, I've baked miches according to the formula we used in the SFBI Artisan II workshop last December. Many TFL members have baked this marvelous miche since I posted the formula, and they know what a wonderful bread this can be.

After these months of enjoying the SFBI miche, as well as Chad Robertson's somewhat similar “Basic Country Bread” from Tartine Bread, it seemed time to revisit the “Miche, Pointe-à-Callière.” I made it using Central Milling's “Organic Type 85” flour. I followed Hamelman's formula. I altered his procedures only by mixing the dough entirely by hand.


Overall Formula

Wt.

Baker's %

High-extraction whole-wheat flour

2 lbs

100.00%

Water

1 lb, 10.2 oz

82.00%

Salt

0.6 oz

1.80%

Total

3 lb, 10.8 oz

183.80%


Levain Build

Wt.

Baker's %

High-extraction whole-wheat flour

6.4 oz

100.00%

Water

3.8 oz

60.00%

Mature culture (stiff)

1.3 oz (3 T)

20.00%

Total

11.5 oz


Final Dough

Wt.


High-extraction whole-wheat flour

1 lb, 9.6 oz


Water

1 lb, 6.4 oz


Salt

0.6 oz


Levain

10.2 oz (all less 3 T)

Total

3 lb, 10.8 oz

Procedure

  1. Make the levain about 12 hours before you want to mix the dough. Dissolve the mature culture in the water, then mix in the flour.

  2. On the day of the bake, mix the Final Dough flour and water to a shaggy mass and autolyse in a large covered bowl for 20-60 minutes.

  3. Sprinkle the salt over the dough and add the Levain in several chunks. Mix thoroughly.

  4. Transfer the dough to a clean, lightly oiled bowl and cover tightly.

  5. Ferment the dough for 150 minutes, with stretch and folds on a floured board at 50 and 100 minutes.

  6. Form the dough into a tight boule and transfer it, seam side up, to a floured banneton. Place the banneton in a large plastic bag or cover with a towel or plasti-crap. (Note: Hamelman recommends the usual pre-shaping and resting before the final shaping. I did not do this, since the dough was rather slack, and the gluten did not require “relaxing,” in my judgement.)

  7. Proof for 2-2 ½ hours.

  8. One hour before baking, pre-heat the oven to 500ºF with a baking stone and steaming apparatus in place.

  9. Transfer the miche to a peel. Score it with a single square, “tic-tac-toe” pattern or diamond pattern. Load the miche onto the baking stone.

  10. Steam the oven and turn it down to 440ºF. After 15 minutes, turn the oven down to 420ºF, and bake for about another 45 minutes.

  11. When the miche is fully baked (internal temperature is 205ºF), turn off the oven. Leave the miche on the baking stone with the oven door ajar for another 10-20 minutes to dry the crust.

  12. Transfer the miche to a cooling rack and cool thoroughly. Then wrap it in baker's linen and let it rest for at least 12 hours before slicing.

Note: All times are approximate. Watch the dough, not the clock.

Miche, Pointe-à-Callière: Profile

Miche, Pointe-à-Callière: crumb

I rested the loaf for about 18 hours before slicing. The crumb structure was similar to that pictured in “Bread,” but I think I slightly under-fermented the dough and over-proofed the loaf.The crust was chewy. The crumb was rather dense and chewy. The flavor was not really sour but was very wheaty – more intense than I recall from other bakes with this flour.

Next time I make this miche, if I hand mix it, I'll add some S&F's in the bowl during the first part of the bulk fermentation and lengthen the fermentation, hoping to increase flavor complexity.

David


Pages