The Fresh Loaf

A Community of Amateur Bakers and Artisan Bread Enthusiasts.

cherry

Epsilon's picture

Cherry Yeast Water - question on activity

August 26, 2012 - 7:42pm -- Epsilon

I've got a batch of cherry yeast water I've been brewing since 2 days ago. I recently put it in a bigger home, fed it a little snack of brown sugar (just a few sprinkles since I thinned it out when I transferred it,) and it's already developing bubbles. In fact, it's got enough bubbles developing on it that when I gave it a shake to mix it, the top popped off (since I've got the top on loosely to let out some CO2.)

Am I looking at bacterial activity, or is this just a really quickly-developing yeast? Or is this typical?

Isand66's picture
Isand66

I recently returned from my 3rd trip to China for work this year and the first bread I attempted to make was this one.  I think I must have been suffering from a bad case of jet lag since I ended up with a puddle of cherry cheese which resembled a flat bread.  I like to work with wet dough but I went overboard on this attempt and didn't take the extra cherry juice from the cut up cherries into consideration.

I am happy to say that my second attempt of this bread was much more successful as I ended up with something that actually resembles a bread rather than a pancake.  I still can't find my wife's cherry pitter so I had to de-pit the cherries by hand which is a messy job to say the least.

I used a nice Havarti style cheese in this bake which melts nicely and compliments the cherries very well.  I used fresh cherries since they are still in season and reasonably priced.  I pureed 218 grams of cherries and cut the balance of 134 grams into pieces.  I used my mini Cuisinart to puree the cherries but you can use a blender or stick blender as well.

I used my standard white flour AP SD starter which I keep at 65% hydration and I added some Oat Flour to give it a little bit of nutty flavor.  I think the next time I make this bread I would add some walnuts or pecans to make it even better.

The final dough came out terrific with a nice moist open crumb with cheese and cherries oozing from its pores.  It smelled amazing with the flavors of cherries and cheese while it was baking and it took all my self-control not to tear into it until the next morning.

Procedure

Starter

71 grams Seed (Mine is 65% AP Flour Starter)

227 grams AP Flour

151 grams Water (85 - 90 degrees F.)

Mix seed with water to break up for a few seconds and then mix in flour until the starter form a smooth dough consistency.  Put it in a lightly oiled bowl and loosely cover and leave at room temperature for at least 10 hours.  The starter should double in volume.  Put the starter in the refrigerator for up to 1-2 days or use it immediately.

Main Dough

Ingredients

425 grams Starter from above

340 grams Bread Flour (King Arthur Flour)

161 grams Oat Flour (King Arthur Flour)

63 grams European Style Flour (KAF--you can substitute bread flour or a little whole wheat)

218 grams Cherry Puree

134 grams Pitted Cherries Cut Up into Small Pieces

200 grams Havarti Cheese or Similar Style Soft Cheese

220 grams Water (85 - 90 degrees F.)  (Note: the Cherry Puree Counts as the Balance of the Liquid)

16 grams Sea Salt (or table salt)

Procedure

Weigh the cherries and remove the pits either with your hands, knife or if you are lucky a cherry pitter.  Puree the 218 grams per above in your food processor or blender and set aside. Cut the remainder of the cherries into small pieces and set aside in a strainer to drain.

Cut the cheese into small cubes and set  aside.

Mix the starter with all the water except for 20 grams just to break it up along with the pureed cherries.  Next mix in the flours for 1 minute on low in your mixer or by hand and let them autolyes for 30 minutes up to an hour.    Next add the salt and then add the remainder of your water unless you feel the dough is already too hydrated.  Mix on low-speed or by hand for 4 minutes.  Remove the dough from your mixing bowl to your work surface.

The dough will be very sticky so you may want to use a bench scraper to help you do 4-5 stretch and folds.  Leave the dough uncovered for 10 minutes on your work surface or put it in a slightly oiled bowl.  After 10 minutes either on your work surface or in your bowl do another stretch and fold, cover the dough and let it rest for 10 minutes.  Repeat this S & F procedure one more time and let it rest another 10 minutes.  Do one last S & F  and flatten the dough out into a rectangle.  Add the cherry pieces and the cheese pieces and fold up the dough onto itself.  (Note: I goofed up and did this step after the first stretch and fold which made it very difficult to do additional ones.)

Let the dough sit in your bowl for another 1.5 to 2 hours depending on the temperature of your room ( my house is usually at about 70-72 degrees F.).  Next put the dough into your refrigerator overnight up to 24 hours or longer if necessary.  I usually only wait about 24 hours but you can do 36 hours if necessary.

The next day when ready to bake, remove the dough from the refrigerator and  let the dough sit out at room temperature for 1.5 hours - 2 hours until it starts to come to room temperature and is growing slightly. You can now remove the dough from your bowl or dough bucket and form into your desired shapes.  Be careful not to handle the dough to  roughly or you will end up degassing the nice gas trapped in the dough.  Place formed loaves in floured baskets (I use rice flour to make sure they don't stick which works every time).

 Let the dough rise at room temperature for around 2 hours until they pass the poke test.  (When the dough is poked your finger should leave a small indent that springs back very slowly.)

Score the loaves as desired and prepare your oven for baking with steam.

I then baked on my oven stone with steam at 450 degrees until both loaves are golden brown and reached an internal temperature of 205 - 210 degrees F.

Let the finished bread rest on a wire rack until cool and try to resist the temptation to cut into them until thoroughly cooled.

Please feel free to visit my other blog at www.mookielovesbread.wordpress.com for all my bread recipes.

Isand66's picture
Isand66

Every time I venture to Whole Foods I manage to find something interesting to add to my bread baking and last weekend was no exception.  I was already planning on making bread with some fresh chopped cherries so when I saw some 100% Cherry Juice on the shelf I couldn't resist buying it and using it in place of most of the water.

I recently also bought some Red Quinoa so I decided  to make a soaker by using the Quinoa and also adding some Organic Oat Bran.  I used around 2 cups of boiling water (sorry but I forgot to measure) and added that to the soaker ingredients and let it sit for about 1 hour.  Beware that this combination of grains will absorb most of the liquid and it caused me to up the amount of flour in the recipe to compensate.  Even with the added flour this is a very wet dough.  If you don't count the soaker ingredients it is 69.5% hydration which doesn't take into consideration the amount of liquid absorbed by the soaker.  If you include the soaker ingredients as flour it comes in at 59% but trust me this is a wet dough.

I also used some White Whole Wheat Flour, French Style Flour (low protein flour good for baguettes) and some Spelt.

The cherries were fresh cherries with the pits removed and chopped into small pieces.  If you like bigger pieces please feel free to follow your hearts or stomach's desires.

The addition of the Cherry Juice and chopped cherries I thought would give the final bread a very distinctive cherry flavor but in actuality you don't really taste the cherry juice at all.  You definitely see it in the reddish color and the Red Quinoa also adds a nice nutty flavor and red tint to the bread.

The dough may have over-risen slightly since it was warmer in my kitchen than usual and I was zonked after cooking a pork butt and brisket since 7:00AM in the morning and I didn't pay attention as closely as I usually do.  The bread flattened out a bit when putting it in the oven but had some excellent oven spring.

The crust is nice and crispy and the crumb is incredibly moist and open.  The final product tastes amazing for a multi-grain bread and is nutty and sweet and earthy tasting.  The cherries are not overpowering at all but add along with the cherry juice a nice depth to this bake.

Procedure

For the starter, I refreshed my standard AP white starter the night before and used most of it in this bake.  I have also included the ingredients to make the exact amount of starter needed from your seed starter.  Mine is kept at 65% hydration so adjust yours accordingly.

Soaker

100 grams Red Quinoa

50 grams Organic Oat Bran

335 grams Boiling Water  (It may have been less so use your judgment and adjust accordingly)

Mix boiling water in a bowl with other ingredients and let sit covered at room temperature for 1 hour or longer.

Starter

71 grams Seed (Mine is 65% AP Flour Starter)

227 grams AP Flour

151 grams Water (85 - 90 degrees F.)

Mix seed with water to break up for a few seconds and then mix in flour until the starter form a smooth dough consistency.  Put it in a lightly oiled bowl and loosely cover and leave at room temperature for at least 10 hours.  The starter should double in volume.  Put the starter in the refrigerator for up to 1-2 days or use it immediately.

Main Dough

Ingredients

425 grams Starter from above (all of the starter)

300 grams French Style Flour (KAF)

195 grams White Whole Wheat Flour (KAF)

70 grams Spelt Flour

40 grams Chopped, Pitted Fresh Cherries (frozen would work fine if not in season)

200 grams Cherry Juice at room temperature (100% Juice with no sugar added)

200 grams Water (85 - 90 degrees F.)

18 grams Sea Salt (or table salt)

Procedure

Mix the liquids with the levain and break it up with your hands or a spoon.    Next add the flours and mix on low for 2 minutes.  Let the dough rest for 25 minutes and then add the soaker and the salt and mix on low for 3 minutes.  Add the chopped cherries and mix on low for 1 additional minute.  Transfer the dough to your work surface.  Resist the urge to add too much bench flour (I didn't add any) and use a bench scraper to do about 5-6 stretch and folds.  Put the dough into a lightly oiled container/bowl and let it sit for 15 minutes.  Do another stretch and fold in the bowl.  Cover the bowl and let it sit for another 15-20 minutes.  Do this 2 additional times waiting about 15 minutes between S&F's.  By the last S&F the dough should start developing some gluten strength.  Let the dough sit out at room temperature for around 1.5 to 2 hours.  Do one last stretch and fold and put in your refrigerator overnight for 12-24 hours.

The next day take the dough out of the refrigerator and let it sit out at room temperature for 1.5 hours.  After 1.5 hours you can form it into loaves and put them in floured bannetons and let them rise covered for 2 hours (note: make sure to watch the dough and depending on the temperature of your kitchen and the refrigerator adjust your timing as needed).

Score the loaves as desired and prepare your oven for baking with steam.  I use a heavy-duty baking sheet on the bottom rung of my oven and I pour 1 cup of boiling water into the pan as soon as I load the loaves in the oven.  Pre-heat your oven to 500 degrees F. before placing the loaves in the oven.

Once the loaves are loaded onto your baking stone and you add your steam turn the oven down to 450 degrees and bake until both loaves are golden brown and reach an internal temperature of 200 - 210 degrees F.  For an extra crispy crust once done baking turn the oven off and crack the door and leave the loaves in the oven for another 10-15 minutes.  Once done place on a wire cooling rack and resist the temptation to cut the bread until they are sufficiently cooled.

I hope you give this recipe a try and be sure to let me know how it turns out if you do.

Isand66's picture
Isand66

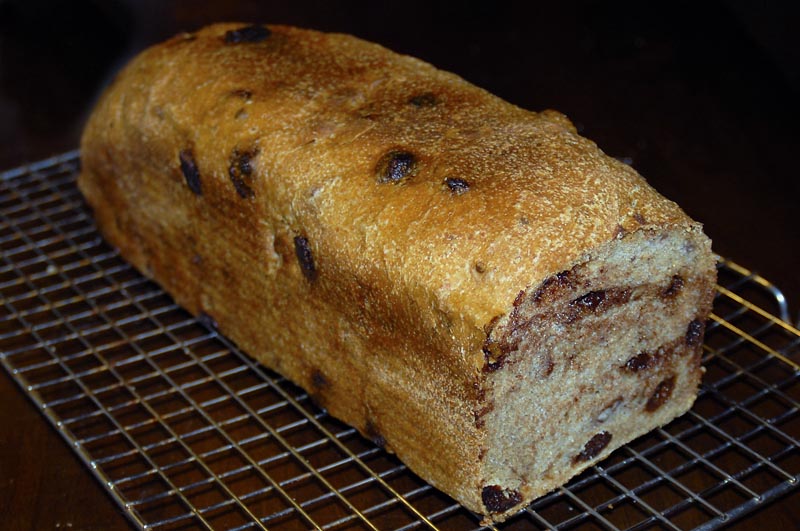
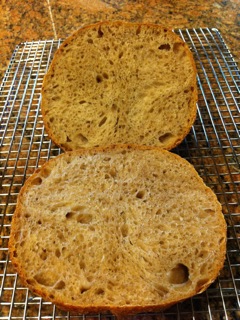
I love cherries and I love vanilla, so what better flavor combination to try to work into a bread recipe?  I have never incorporated a liquor into a bread dough before, so I'm not sure what to expect, but I do have to say it smelled fantastic mixing it up.

I started by taking my 65% hydration AP flour starter and building enough starter for 15 ounces of levain for the finished dough.  I wanted to incorporate some white rye into the starter to give it a little rye flavor so I added 22% white rye flour to the levain build along with AP flour and some water to make a 67% hydration starter.

The final dough including the starter has a hydration level of 66%.  I wanted to try to make this a moist and delicate crumb so I incorporated a large percentage of French Style low protein flour from KAF, along with a small percentage of white rye and durum flour.  After finishing the loaf in the oven and tasting it, I have decided that I added a little too much of the Cherry Marnier and vanilla so I have adjusted the amount in the recipe below.  This is a perfect bread for french toast or bread pudding or just as toast with some butter or cheese.

Starter Ingredients

7 ounces All Purpose Flour (I use KAF)

2 ounces White Rye Flour

6 ounces Water (90 degrees)

.75 ounces Starter, 65% Hydration (you can adjust the water to suit your current hydration level)

Final Dough

15 ounces Levain from above (75% Bakers Percentage)

12.6 ounces French Style Flour (80% Bakers Percentage)

3.4 ounces White Rye Flour (10% Bakers Percentage)

4 ounces Durum Semolina Flour (10% Bakers Percentage)

9.5 oz. water (90 degrees F.) (47.5% Bakers Percentage)

.5 ounce Pure Vanilla Extract (.03% Bakers Percentage)

3 ounces Cherry Marnie (15%)

2 1/2 Teaspoons, .63 ounces Sea Salt (3.2% Bakers Percentage)

Bakers % Final Dough

White Rye Flour 4 ounces

AP Flour 7 ounces

French Style 16 ounces

Durum 2 ounces

Total Flour  29 ounces   100%

Salt .63 ounces                  2.1%

All Liquids 19 ounces     66%

Directions

Using your stand mixer or by hand, mix the water with the starter to break up the starter.

Add the flours and vanilla extract and Cherry Marnier and mix on the lowest speed for 2 minutes.  Let rest for 15 minutes - 20  minutes to allow the gluten to develop.

Next, add the salt and mix for 4 minutes more on medium speed, adding more flour if necessary to produce a slightly sticky ball of dough.

Remove dough to your lightly floured work surface and need for 1 minute and form a ball.

Leave uncovered for 15 minutes.

Do a stretch and fold and form into a ball again and cover with a clean moist cloth or oiled plastic wrap.

Let the dough rest another 10-15 minutes and do a stretch and fold again.  Let it rest for an additional 15 minutes and do 1 more stretch and fold.   After this last stretch and fold cover the bowl again and let it rest at room temperature for 1.5 to 2 hours and then put it in your refrigerator overnight or up to 3 days.

When ready to bake the bread, take the bowl out of your refrigerator and let it rest at room temperature for 2 hours.  After 2 hours shape the dough as desired being careful not to handle the dough too roughly so you don't de-gas it.   Place it in your bowl, banneton or shape into baguettes.

Let it sit at room temperature for 2 hours covered with oiled plastic wrap or a wet cloth.

Pre-heat oven with baking stone (I use one on bottom and one on top shelf of my oven), to 500 degrees F.

Slash loaves as desired and place empty pan in bottom shelf of oven.

Pour 1 cup of very hot water into pan and place loaves into oven.

Lower oven to 450 Degrees and bake for 25 - 35 minutes until bread is golden brown and internal temperature reaches 200 degrees.

Let cool on cooling rack and enjoy!

The final dough had a nice open crumb and crispy crust.  The overall dough did not rise as much as I would have liked, but the oven spring was excellent.  Next time I think I would add some dried cherries and maybe some walnuts to kick it up a bit.

Szanter5339's picture
Szanter5339


The bottom of the dough.
200 gram flour
1 egg
2 tablespoons powdered sugar
1 tablespoon of fat (cold)
Pin 1 teaspoon salt
1 vanilla sugar
Baking powder ½
1 tablespoon sour cream

The sponge cake:
6 eggs
6 tablespoons powdered sugar
6evőkanál flour
2 tablespoons cocoa
Baking powder ½ Package

Spreading on the dough by 2 spoonful of jam.

Stuffing.
½ kg of sour cherry
4 medium apples
Optionally, sugar
3-4 tablespoons bread crumbs

The soft dough knead dough hozzávalóiból. If you are a bit stuck, a bit of flour to be.
Aside to rest.
Kimagozzuk Meanwhile, slice the apples and cherries. Not grated!
Put baking the dough, brush a very thin layer of jam. I had raspberry jam.

The pitted cherries and sliced ​​apples Sprinkle two tablespoons bread crumbs firstand then granulated sugar and mix. Sugar to taste.

The baking pastry brush spread with jam. It is very thin!
Alternating stripes we put cherries and apples.
I've also scattered tablespoon bread crumbs on top.

loydb's picture
loydb

My last chocolate experiment was a bit (allright, a large bit) too sweet. This time, I eliminated the extra butter, brown sugar, and maple syrup, and went with 2 oz of bittersweet choc chips and 2 oz of milk choc chips. I added 5 oz of dried cherries and 4 oz of pecans. I also used 100% home-milled flour (mix of hard red and white wheat) and the sourdo.com Russian starter. After an initial 4 hour proof, I shaped and put in a pullman pan. Because my kitchen feels like a meat locker these days, I put the pullman pan in the microwave oven and put two cups boiling water in a sealed plastic container, then stuck it inside as well. It rose for 2 more hours, then I put the pullman pan into a cold oven, set it on 375 degrees F, and baked for 2 hours 15 minutes.

The sweetness is just about perfect for a breakfast/dessert bread. I think I'll add more cherries next time, but otherwise I'm pretty happy with it.


HokeyPokey's picture
HokeyPokey

Okay, its not a good old fashioned American Cherry Pie, but its my version of it.

I just love cherries, swwet and juicy - no matter how hard you try, it always ends up all over the counter and your clothes.

Its a really easy recipe - I started in the morning, and it was ready by afternoon, quite pleased with the result too.

More photos and full recipe on my blog here

breadbythecreek's picture
breadbythecreek

I’ve been experimenting with various types of yeast water for several weeks now.  I now have five separate jars percolating on the counter or in the refrigerator.  Since I’ve discovered that very little if any fruit flavor is discernable in baked breads made from these waters, it makes sense to me to keep only one.  It also makes sense to me to keep the one that is the most effective.  I have heard that raisin yeast water is the strongest and most active.  When I first started experimenting with these waters, I made a raisin/apricot yeast water, but the color and murkiness was not appealing, so I threw it away shortly after it was created.  Today I am making a new jar with just raisins and another with just apricots.  These will be tested against the winner of this trial.

To see which of my active yeast waters are the more effective, I created test waters containing 30g each of peach, blueberry, strawberry and cherry.


 To these amounts I added 90g fresh water and one sugar cube. These jars were left out overnight to activate the yeasts.  This morning I took 3 grams from each of the jars and 3 grams of AP flour. These were mixed together and placed in identical test-tube like glasses (tall and very narrow).

9:30am, roughly 3 hours since start time

 Now it is four hours into the test.  Gauging from my ongoing work on the blueberry yeast water, this first build will take approximately 7.5 hours to plateau.  Halfway through, it seems that the growth pattern of the testers matches too closely to the order in which the tests were prepared, lagging perhaps by no more than 5 minutes from the first (cherry) to the last (peach).  Also, both the strawberry and the peach were slightly more hydrated than either blueberry or cherry.


At 12:31pm, roughly 6 hours later, it appears that the cherry levain is far stronger than either the blueberry or the peach. The strawberry levain is only slightly behind the cherry in growth.

At 2:09pm, roughly 7.5 hours later, it is still cherry in the lead.  At this point I noticed that the glasses are not identical – some are deeper than others.  This accounted for, the cherry is still slightly more effective than the strawberry.  Also, approximately at this same time, cherry had reached its maximum height, approximately double the start level.   Strawberry went on to double at approximately 8 hours, as did peach.  Blueberry, interestingly enough, did not achieve more than a 50% growth over the entire period.


So there you have it. In terms of overall effectiveness for a first level build, cherry is the strongest of the test set.  The rest are not as effective for raising culture in a given period of time.


Next trial, Cherry against raisin and apricot.  Stay tuned.


breadbythecreek's picture
breadbythecreek

Over the last couple of weeks I've been experimenting with the properties of fruit based yeast waters. Starting with a strawberry water, I've so far transformed Txfarmer's 36+ hr baguette  from a standard sourdough to one fed strawberry yeast water.  The result was as to be expected, crunchy crust, moist crumb, not a hint of sour, and interestingly, a surprisingly dark color despite the exclusive use of AP flour in the dough.

Strawberry Yeast Water Baguette, and one with Peach Yeast Water - Same recipe, same flour.
  

I have also created a number of boules using Ron Ray's Darling Clementine recipe.  I've used that same boule recipe to create a strawberry, cherry and blueberry boule.  From these loaves I have come to some conclusions.

Once out of the oven, these boules are virtually indistinguishable in terms of color, crust, and crumb. The only distinguishing feature was the strawberry loaf aroma while it was still baking. So, my conclusions are that it matters little exactly what kind of fruit one uses to cultivate yeast (except of course for those containing actinidain or actinidin), only that the yeast exist. Fruit based yeast from these types of waters will alter the color and consistency of the bread but will not impart any fruit essence upon baking.  The reddish/purplish fruits that I tested will significantly alter the color of the crust and crumb, and the relative amount of sugar present in the water will also affect the taste (the blueberry water, made from a quantity of dried blueberries was quite sweet to begin with).

 Strawberry, Cherry, Blueberry Boules: Beauty Shots, Profiles, and Crumbs


 I think after this experiment, I'll retire all but the strawberry water, as it is the most pleasing in terms of aroma, at least when it comes out of the oven.  So, in conclusion, choose your favorite fruited yeast water and keep only one type. Also, don't forget to feed your sourdough starter too because what is life without a little tang?

Happy Baking!

-Pamela


Pages

Subscribe to RSS - cherry