The Fresh Loaf

A Community of Amateur Bakers and Artisan Bread Enthusiasts.

Recent Blog Entries

dabrownman's picture
dabrownman

Pizza is one the special favorites we make when my daughter brings her sorority sisters home from college for pizza night.  What they don't expect is a very thin crust that is sourdough, has whole wheat and garbanzo flour, sun dried tomatoes, fresh rosemary and garlic in it.  They also can't believe that they can make their own from a wide range of toppings, most of which are home made including spicy sauce -  and they can load it up with worrying that the crust will not be able to handle it.

This baby is loaded!!!  Lots of sauce, caramelized onions and mushrooms, roasted red green and spicy peppers, home made Italian sausage, pepperoni, Pecorino, Parm and Mozz cheeses, olives and a few other things hardly worth mentioning - except the fresh opal basil on top after the pie came out of the 500 degree oven.  The key is to pre bake the pie crust on a stone for 3 minutes before taking it out, quickly brushing on a thin coat of garlic oil before letting folks load up what ever they want  on top - before chucking the fatso back into the oven for 4 minutes or so to finish browning it off.

dabrownman's picture
dabrownman

Before TFL came into my world, I had a multi grain, seeded, SD challah that I baked every week for my daily sandwich loaf. I called it my made up name Brachflachen Mehrere Vollkombrot. It was the standard; mix about 20 ingredients, kneed for 10 minutes let rise, punch down, let rise in the loaf pan, egg wash, slash and bake a 350 until 205 F. It took about 8 hours from start to finish - and I thought that was slow bread!! After finding out the slow bread was really 3 days - not 8 hours, I converted my old recipe to make it take nearly forever to make - instead of just a really long time :-) Now it is a 12 hour levain build, long S&F ferment, long retard and long after fridge rise bread. I really like the way it came out. Nice dark crispy, crunchy crust with Nijella and sesame seeds, soft, moist, small holed crumb with subtle SD taste that made great tasting toast too. It is still my favorite sandwich challah loaf .

The second shot of the crub says a lot about me and my foodie nature.  Home made; challah, dijon mustard, pickles, cheese, meat and home grown; lettuce and tomatoes.

The 3rd shot means it is home made Aranchello, Minneochello and Limochello time too !!!!!

dabrownman's picture
dabrownman

My first attempt at making SD using S&F, long retard and David's parchment paper technique.  The only change I made was using 50 g of home ground WW berries instead of the rye that David used.  No rye to be found anywhere.  I also used a WW, and AP flour build for the levain.  I'm not sure what David's was but I am guessing he had some rye in it.  I was very happy with the  results.  Nice exterior crust, great open crumb and fine taste.  It was better the next day too.  I liked it with oiive oil, fresh basil, pecorino, parm and pepper.  On Davids's blog you see my ordeal trying to bake the San Joaquin.  He said my saga proves his recipe is bullet proof :-)  It is bullet proof too!   There is also a photo of my second recipe of my home made Puff Paste Blueberry Cream Cheese Braid inspired by the one on TFL with bread instead of puff paste.  What a great site for bakers like me!!!

Juergen Krauss's picture
Juergen Krauss

Mischbrot variations

In earlier experiments with breads having a higher percentage of rye flour I found that adding spelt, emmer or semolina complemented the rye very well.

With this bake I wanted to compare the effect of substituting the wheat part with emmer and spelt in breads with 70% rye. The flours are all from Shipton Mill.

The outcome:


I used my tried and tested Mischbrot formula as a base, this time using a rye starter with 100% hydration. The starter is made with dark rye, while the remaining rye in the formula is light rye.

Here the formula:

Straight formula

Percent

Amount(g)

Amount (oz)

Dark Rye

24

108

3.83

Light Rye

46

208

7.33

Bread flour

30

136

4.78

Or light spelt flour

30

136

4.78

Or wholegrain emmer flour

30

136

4.78

salt

2

9

0.32

water

75

339

11.96

yield

177

800

28.22


Rye sour


Dark rye flour

24

108

3.83

Water

24

108

3.83

Mature starter

2.4

11

0.38

Yield

50.4

227

8.04


Dough


Light Rye

46

208

7.33

Bread flour

30

136

4.78

Or light spelt flour

30

136

4.78

Or wholegrain emmer flour

30

136

4.78

Salt

2

9

0.32

Water

51

231

8.13

Rye sour

48

217

7.65

Yield

177

800

28.22

At the current cooler temperatures (about 23C / 73F in my kitchen) the starter took 16 hours to mature.
With 70% rye the doughs / pastes are very sticky and require only a short mix/knead so that all materials are mixed well.

After 100 minutes of fermentation at 23C / 73F I shaped rounds with very wet hands (in mid-air), and put t hem into baskets (floured with light rye) for the final rest..After 60 minutes the rounds showed cracks, a sign that they are ready for the bake.

The bake (on a stone, with steam) started at maximum temperature (ca.  240C / 464F), after 15 minutes I turned the loaves and lowered the temperature to 210C / 410F, After another 20 minutes the bread was ready.

I am very happy with oven spring and bloom. All three breads performed equally well and were indistinguishable from the outside.

After a day I cut into the loaves. The crumb is quite similar in all three loaves, the bread containing wholegrain emmer  is a bit darker and more dense.(The wheat bread got a bit of a shadow - bad photography!)

Although the crumb looks fairly dense, the breads actually feel light.

The crust could be thicker, but that's my oven – not much I can do about this at the moment.

The taste of the three breads is also very similar – quite complex with rye dominating, and a distinctive tangy after-taste. The emmer bread has the most complex taste.

There are a few things I would like to try with this formula:
1. using all wholegrain flours
2. going back to the original German way: using all medium rye and refined flours (which would be called ”Berliner Landbrot”)
3. Reducing the amount of rye sour and using some of the wheat/emmer/spelt in a stiff starter as a second preferment
4. using a wheat/emmer/spelt poolish as a second preferment
5. adding spices

Lots to do!
Juergen

Librarian's picture
Librarian

Been trying out a lot of recipes since my last entry, nothing worth to mention what had not been done before, I played around with my sourdough starter

I exclusivly use white flour/bread flour now. The rise may it be bulk fermentation/proofing is nothing much sensational on the contrary, but every

bread i make lifts off in the oven. A guy at the mikrobiology department told me over time strains take over others, one may become dominant, and it is not

said that visibility of activity always indicates the lack of it, this starter is easy to test with the water test, when you taste it it tingles on the tongue and i have a 2-3 day window of using it since right after refreshing it goes right in the fridge, a day later to 4 days its potent, this allows for more flexibility, with

rye starters i could see more development during the rest phases but the window of opportuinity was smaller using the starter. With this i get constant great results and it is also apt to venture into spiking bakers yeast recipes with sourdough. (sourdough/bakers yeast pizzy is a delight) I was pretty amazed at this result country bread form tartine bakery....


I used bread flour instead of white flour, it has more aleurons, and much higher protein content, you could say it is partly wholegrain :)


hanseata's picture
hanseata


Fellow baker Hanaâ (http://hanaaskitchen.blogspot.com) instigated me to buy yet another baking book - as if my bookshelves were not already buckling down under the weight of my cooking library. She invited me to join her ABC baking challenge, every month trying out a new recipe, currently from Abby Dodge's: "The Weekend Baker". The author, contributing editor of one of my favorite magazines, "Fine Cooking", also posted the recipe here:

http://www.cookstr.com/recipes/glazed-cinnamon-rolls-2

My husband loves sticky buns and their sugar laden relatives, but, though I like cinnamon, I was never very fond of the overly sweet stuff he would sometimes buy. Therefore, without Hanaâ's challenge, I would probably never have thought of baking cinnamon rolls.

What I especially like about "The Weekend Baker" and this recipe, are the several "do ahead" options. I prefer working with slow fermentation for my breads, and most doughs show their appreciation for the cold treatment with a significant better taste, so, after a 30-minute rise, I put my my dough to sleep in the fridge overnight.

I always try to incorporate some whole grains in my recipes, a substitution of 10% white flour with whole grains doesn't require additional liquid, so I replaced 47 g of all-purpose flour with whole wheat pastry flour.

The recipe was easy to follow, and the next morning the dough had nicely risen in the fridge. I rolled it out cold - it will come to room temperature quickly - and the filling was no problem, either. Next time I probably would add some toasted, chopped nuts, though.

Cutting a roll of dough in even slices with a bench scraper or knife is not that easy, the layers slipping away over the crumbly filling. Using dental floss, as Hanaâ suggested, works much better.

I skipped glazing the rolls, nice as it looks, it adds even more sugar, without contributing to the taste. And even without this decoration - the cinnamon rolls looked beautiful when they came out of the oven and their wonderful aroma filled the whole house, so that I could hardly wait to try one until they had cooled down a bit.

"... now I know their taste - now I'm a believer..." you don't have to be a Monkee to love these treats!
I am converted, and my husband could wallow in them, so good are they!

They, also, freeze well, wrapped in plastic foil and then placed in a ziplock bag. To enjoy them you only have to nuke them for a few seconds, and then re-crisp them at 350ºF/175ºC for a few minutes in the oven.

varda's picture
varda

When I was complaining the other day that I couldn't catch up with Andy, I didn't mean that I would never be a professional baker and turn out staggering numbers of authentic, healthy, artisan loaves, because of course I will never do those things.   I meant that I can't even catch up with trying to bake some of his formulas.   And he just keeps making the situation worse.    Back in November he posted wholemeal pain au levain.     I have been meaning to make it, but got distracted with mixed levains and other things and didn't get to it.   After my January croissant waistline debacle I decided that I have got to start baking more lean wholegrain breads, so that brought me back to Andy's formula.   Frankly I never expected such loft and lightness out of a 60% wholegrain bread.   But then I've never made a bread out of starter and soaker before which is what this is.  

True I was unable to follow the formula 100%.   I was a bit short of whole wheat flour so substituted in some whole rye to the soaker, and I didn't do the overnight retard immediately after the mix because it didn't fit into my schedule.   Short of those (hopefully not critical) deviations, I followed directions, and I'm glad I did.   This has a delicious crunchy, nutty flavor, and the crumb isn't the least bit gummy (ok that's how I tend to think of high percentage whole grain breads - it's my problem.)


Some baking notes: 

1. Andy's instructions call for mixing the starter, soaker, and additional flour.   Then retarding overnight.   Then Bulk Ferment for 3 hours which of course includes some warm up time.   I did not do the retard and was concerned at 1.5 hours into the bulk ferment that the dough would overferment.   I decided to end  after 2 hours, which seemed to work out.  

2. There was no call for additional water to be added to the final dough.   However, I was unable to mix the raw flour into the soaker, starter combo without a little bit of water.    Thus my hydration is 73% rather than Andy's 70%.    For a 73% hydration dough, it wasn't even slightly wet which I assume is attributable to the high percentage of whole grains.  

3. When I realized that I was short of whole wheat flour, I was scratching my head about what to add to the overnight soaker.   My husband strolled into the kitchen just as I reached this conundrum and suggested whole rye.  Despite my surprise (he's not a baker and doesn't like rye) I had to agree with his suggestion, as I thought the key point was having something that could stand up to an overnight soak without turning into gum.   Should I have done something else like whole spelt?

4.  I used King Arthur All Purpose to substitute for Carr's Special CC Flour and King Arthur Whole Wheat to substitute for Allinson's Strong Wholemeal. 

Formula and Instructions as Modified

Whole Wheat Pain Au Levain


following Andy's Wholemeal PAL formula


2/1/2012


Prepare Starter day before - 2 feedings


1/31/2012


3:20 PM

9:00 PM

Total

Percent


Seed

50


KAAP

28

47

140

215

94%


Rye

2

3

8

13

6%


Water

20

34

83

137

60%


365

7.7


Prepare soaker at 9:30 night before


KAWW

315


HM Rye

80


I added some whole rye to soaker since

Water

355


I ran out of whole wheat


Salt

12


762


dissolve salt in water, add ww flour, mix with paddle for 3 minutes


Final

Starter

Soaker

Total

Percent


KAAP

80

188


268

40%


Rye


11

80

91

14%


KAWW


315

315

47%


Water

17

120

355

492

73%


Salt


12

12

1.8%


Starter

320


Soaker

762


starter factor

0.88


prefermented flour


30%


Total


1179


Note: the 17g additional water was needed to incorporate the raw flour


Mix all ingredients - first incorporate the new flour and water


Then mix for 7 minutes in Kitchenaid at low speed


with a couple pauses to scrape down


Note that dough is very strong at this point


Bulk ferment on counter for 1.5 hours


Stretch and Fold on counter very gently


Bulk ferment for 30 more minutes


Note that dough seems very fermented at this point and


starting to slacken


Cut in two and preshape


Rest 20 minutes


Shape into batards and place in couche seam side up


Proof for 2 hours until dough starts to soften


Flip onto peel dusted with coarse rye and slash


Bake for 20 minutes in 450F oven with steam


22 minutes without


theuneditedfoodie's picture
theuneditedfoodie

A couple of weeks back, I met a group of bread bakers in the Kansas City area through thefreshloaf.com. The meeting place was decided to be Barley’s Brewhaus in Shawnee, Kansas. At the meeting, one gentleman by the name of Paul had brought some sourdough starter to share. Paul told us that he had actually started that starter in 2010 in South Africa.  My knowledge in sourdough bread baking was limited then, but I was definitely curious to get started with some sourdough culture. Unfortunately, with winter still lingering and my home temperatures still hovering around 50 to 55 degrees Fahrenheit, I knew that my options of starting a seed culture were limited. At best, I would have to wait till the summer for warm weather to arrive and thus get started on the process of seed culture. Thanks to Paul and his generous contributions with the sourdough culture, I knew that I did not have to wait till summer and could get started immediately. 


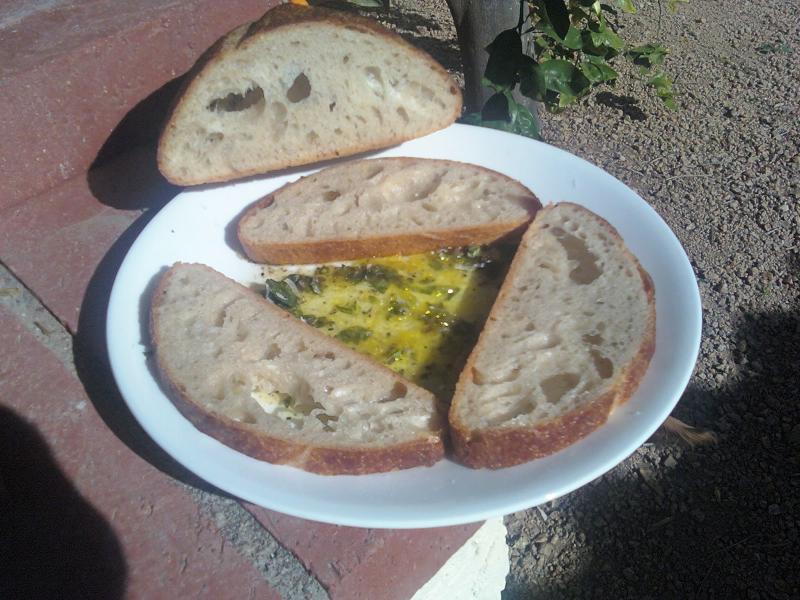
Unfortunately, baking with sourdough and keeping your sourdough culture alive is quite a process. It is almost like having a baby or even a pet. Unlike the industrial instant yeast that sits in your fridge, without crying for your attention this sourdough sucker demands regular feeding.  What is even more complicated is the math of feeding, aligned with the prediction of feeding and discarding. Unfortunately, I have never been good with numbers, whether understanding trigonometry or bakers percentage formula, and hence, I decided to write to Paul for advice on getting the sourdough thingy started. Paul was generous in replying back immediately to me on thefreshloaf.com, and his advice definitely came in handy. I mean I did bake my first sourdough bread, thanks to his number crunching. It may not be anything like the Boudin sourdough of San Francisco, but I am sure glad to have produced a loaf with just the wild yeast. So how did I get started? Here is my story.


As I told you guys before, Paul lent us some sourdough starter during our Kansas City bread bakers’ gathering. So basically, I had the sourdough starter in my fridge for about a week, before I got started on the process. Firstly, I took about 10g starter out from that chunk, right from its belly area- for the sides often tend to get a little dry. Then I fed about 10g water+20g flour to it, left it for 2 hours at room temperature, before sticking it back in the fridge.  So this was basically the feeding process, as I understood from Paul’s message.


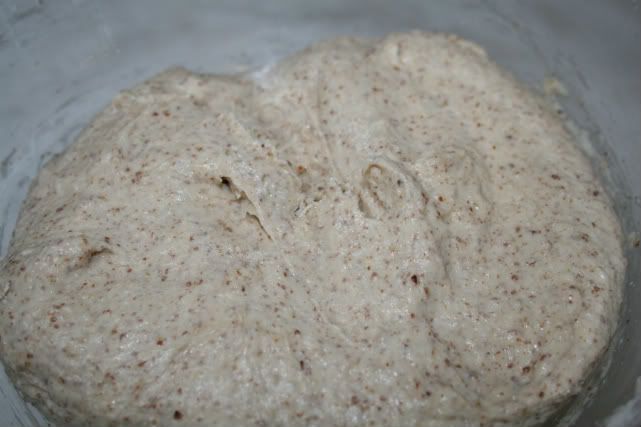
After that I started with my baking process. This being my first time for sourdough baking, I decided to do Peter Reinhart’s basic sourdough recipe from BBA. Now the recipe called for 4oz of barm in the firm starter. Unfortunately, for some reason I thought it to be 4.5oz which basically equals to 125g. Now, I decided to do a 100% hydration levain for 150g, this way I could use 125g for my recipe and the rest 25g for my sourdough culture, which I would eventually feed and use for future endeavors. So as per the previous paragraph, I already had the starter with 10g water and 20g flour, hence for a 100% hydration for 150g- I added another 65g of water and 55g of flour. Left this at room temperature for about 4 to 5 hours.


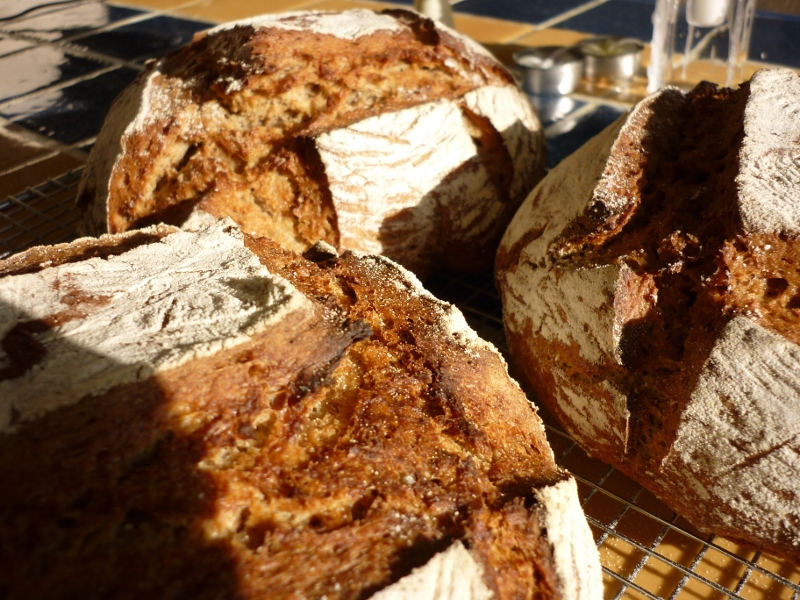
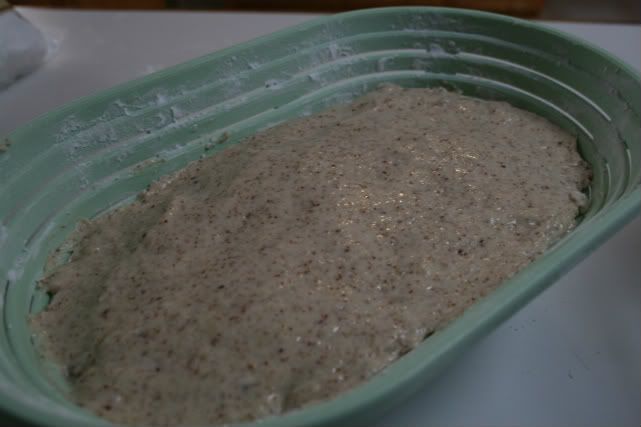
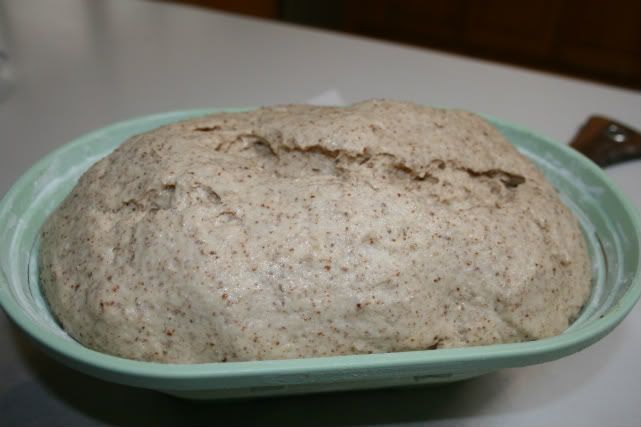
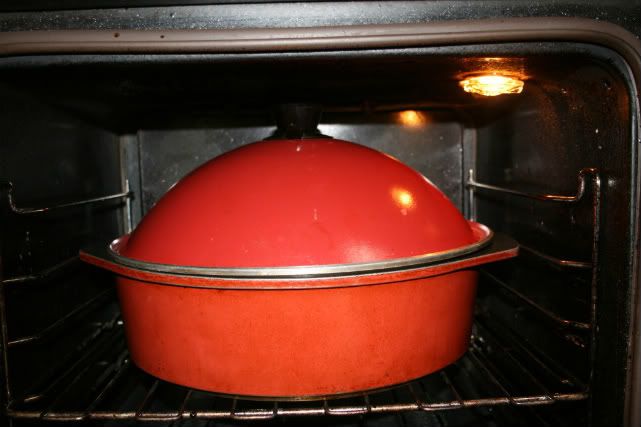
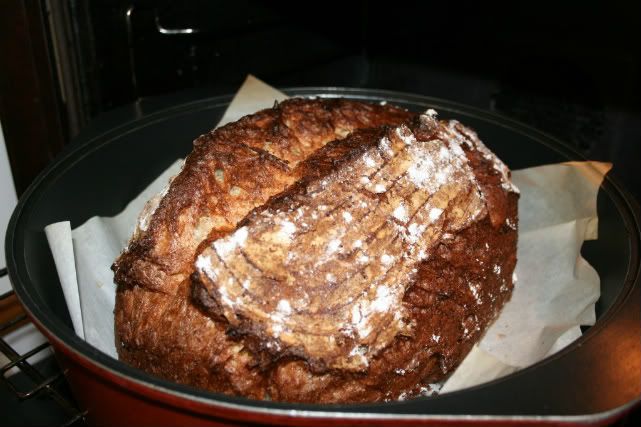
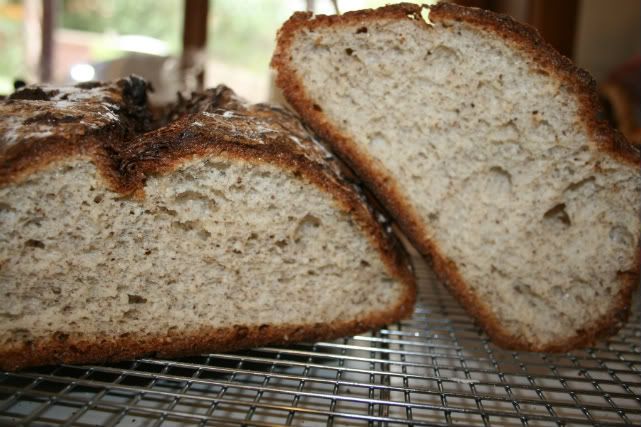
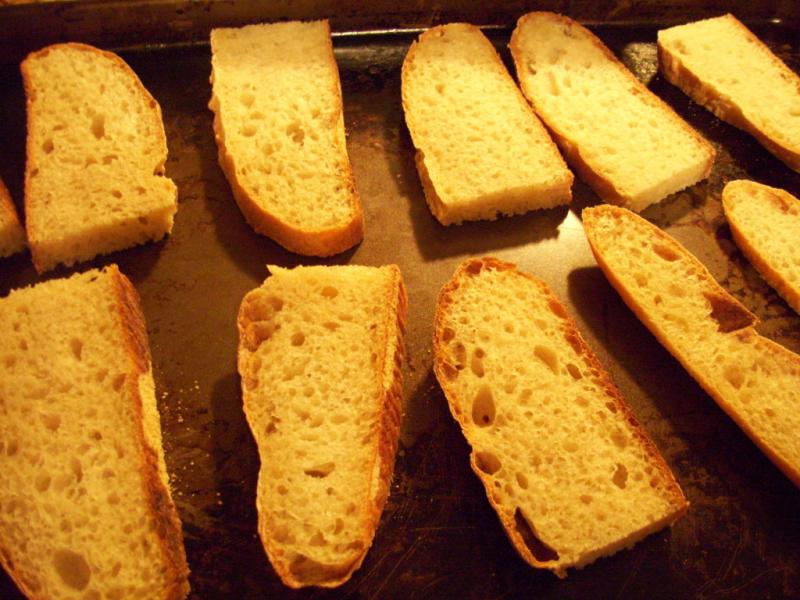
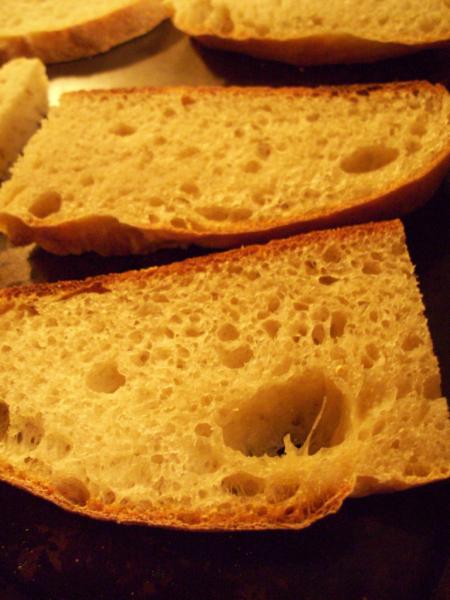
Following that I started with Reinhart’s basic sourdough recipe—for that he needed about 110g of barm, which for some reason I calculated to 125g and stored the rest 25g out of the total 150g for future baking.  The rest of the process is pretty much how the basic sourdough recipe calls in BBA, except that in step 7 which is the fermentation for 3 to 4 hours where the dough doubles in size, and then one has to divide it in two batches of about 22oz, mine only came down to 20.5oz and 21oz respectively for some reason.  Also, since for the final proofing, I used a parchment-lined sheet, my boules almost spread flat and got attached to each other like Siamese twins. What also did not help was my scoring, which is pretty poor, and I would love some advice on improving that. Eventually, the loafs did get baked and I separated them after the process; obviously I wasn’t happy with the aesthetics of the bread- but otherwise it had some lovely holes/webs, and the best thing was the smell—you could really tell that it was a sourdough with one whiff! 

ananda's picture
ananda

Borodinsky using the Auerman Process

Late last week a package arrived for me in the post from Faith, who posts here at TFL.   She had been on a visit to Russia and brought back a tub of Red Rye Malt for both Daisy_A and one for me.

My wife, Alison went out of her way yesterday to buy some Blackstrap Molasses for me to enable me to bake a Borodinsky loaf today.

Here is the detail and formula.

Rye Sour build:

Day/Time

Stock

D Rye

Water

TOTAL

Monday 08:00

64

300

500

864


Material/Stage

Formula [% of flour]

Recipe [grams]

1a] Rye Sourdough


Bacheldre Organic Dark Rye Flour

30

300

Water

50

500

TOTAL

80

800


1b] “Scald”


Bacheldre Organic Dark Rye Flour

15

150

Red Rye Malt

5

50

Blackstrap Molasses

6

60

Crushed Coriander Seeds

1

10

Boiling Water

35

350

TOTAL

62

620


2. “Sponge”


Rye Sourdough [from 1a]

80

800

“Scald” [from 1b]

62

620

TOTAL

142

1420


3. Final Paste


“Sponge” [from 2]

142

1420

Bacheldre Organic Dark Rye Flour

25

250

Marriage’s Organic Strong White flour

25

250

Salt

1.2

12

TOTAL

193.2

1932


% pre-fermented flour

30 + 20 = 50

-

% overall hydration

85

-

% wholegrain flour

75

-

FACTOR

10

-


Method:

  • Build the sourdough as described above.   Make the “scald” as follows:   crush the coriander and add it to the red rye malt and dark rye flour.   Weigh the molasses into a pan, add water and bring to a rolling boil.   Tip this onto the flour mix, and add any extra boiling water if there is evaporation.   Stir well to ensure full gelatinisation.   Cover and cool.
  • Once sufficiently cool, add the scald to the sour to make the sponge.   Cover and leave to ferment for 6 hours.
  • For the final paste combine the sponge with remaining flour and the salt, mix with the paddle beater in an upright machine, 2 minutes on first speed and 2 minutes on second speed.   Scrape down the bowl to ensure thorough mixing.
  • Bulk proof for 1 hour with DDT at 25 - 27°C.
  • Shape into a large Pullman Pan, prepared with lining of butter and coating of rye flour.   Smooth off and top with freshly crushed Coriander seeds.
  • Final proof for just 1 hour at 27°C, then bake.
  • Pre-heat the oven to 280°C.   Load the pan, apply steam, and turn the oven down to 100°C.   Keep a supply of steam in the oven and bake for a total of 4½ hours.
  • Cool on wires; wrap in linen and leave 24 hours before cutting into the bread.

CHOCOLATE, dark chocolate!


Alison’s massage therapist left half an hour ago, and bought half of this loaf.   I’m celebrating as it means I got to capture a crumb shot, and to taste a lovely thin slice too, all on its own.   Sourness and bitterness, but also just enough sweetness too from the malt.   It’s dark, dark like chocolate, and the spicy coriander is very pronounced …Taste!

All good wishes

Andy

sonia101's picture
sonia101

I've recently been baking gluten free bread as a friend has been diagnosed with celiac disease and I finally found a really nice recipe http://www.food.com/recipe/gluten-free-flax-bread-190906

My whole gluten eating family really like this bread, great flavour and can also be used for sandwiches as well as toasting.

I did make a few changes and I also cooked the bread in a dutch oven and found I got much better oven spring in the dutch oven over the pizza stone.

Gluten-Free Flax Bread

All ingredients at room temperature

brown rice flour (120 grams)
tapioca flour (70 grams)
surgham flour (33 grams)
potato starch (80 grams)
cornstarch (37 grams)
flax seed meal (37 grams
xanthan gum (7.5 grams)
active dry yeast (7 grams)
salt (6 grams)
2 eggs
2 egg whites
soda water ( 210 grams)
olive oil (23 grams)
honey (43 grams)
apple cider vinegar (8 grams)

Directions:
Combine flours, flax, starches, gum, yeast, salt.
In the mixer, combine wet ingredients, then add the dry.
Scrape the sides, and mix on medium for 4-5 minutes.


Pour into a floured bread basket, the dough is really sticky but if you wet your hands you can help shape it

and let rise to top of the basket (took about 80 minutes)I covered the basket with cling wrap

The dough is really light and needs to be handled with great care!!! I put a piece of baking paper onto the top of the bread basket and then covered it with a pizza paddle and gently invert it onto the baking paper. I then gently lifted the baking paper/bread into the dutch oven.

Bake at 220 C / 425 F for about 40 minutes in a dutch oven ( I pre heated the dutch oven for 30 minutes)

 Remove from pan and allow to fully cool before cutting.


Pages

Subscribe to Recent Blog Entries