The Fresh Loaf

A Community of Amateur Bakers and Artisan Bread Enthusiasts.

Recent Blog Entries

Isand66's picture
Isand66

I am always on the lookout for something new and different to try in a bread recipe.  I was visiting my home town of Massapequa, NY this weekend and stopped by a specialty supermarket to pick up some cookies and came across a bag of chickpea flour.  I have never used this in baking anything before and didn't know exactly what to expect.  I had some left over roasted sweet potatoes from the other night and decided to add some as well as a high percentage of a higher gluten flour to make up for the lack of protein in the chickpea flour.  I did some extra stretch and folds to make up for the higher hydration in this dough and the chickpea flour definitely caused me to add some extra flour to compensate.

The final bread had a nice chewy dark crust and a yellow color with a moist open crumb.  You could taste the nutty flavor of the chickpeas with a mild sourdough tanginess.

Ingredients

15 ounces 65% Hydration Starter AP Flour)  Refreshed

7.5 ounces Roasted Sweet Potatoes Mashed

16.7 ounces Bread Flour (KAF)

4 ounces Chickpea Flour

3 ounces White Rye Flour (KAF)

14 ounces Luke warm water, 90 - 95 degrees Fahrenheit

2 1/2 Teaspoons Sea Salt

Directions

Using your stand mixer or by hand, mix the water with the starter to break up the starter.

Add the flours and mix on the lowest speed for 2 minutes.  Let rest for 10 minutes.

Add the salt and mix for 4 minutes more on medium speed, adding more flour if necessary to produce a slightly sticky ball of dough.

Remove dough to your lightly floured work surface and do a stretch and fold and form into a ball.

Leave uncovered for 20 minutes.

Do a stretch and fold and form into a ball again and cover with a clean moist cloth or oiled plastic wrap.

Do at least 3 more additional stretch and folds letting the dough rest for 15-20 minutes each time. After the last stretch and fold, put the dough into a lightly oiled bowl that has enough room so the dough can double overnight.

Put in your refrigerator immediately for at least 12 hours or up to 3 days.

On the day you are ready to bake, take the dough out of the refrigerator and let it rest at room temperature for 2 hours.  After 2 hours shape the dough as desired being careful not to handle the dough too roughly so you don't de-gas it.

Place it in your bowl, banneton or shape into baguettes.

Let the formed loaves sit at room temperature for 2 hours covered with oiled plastic wrap or a wet cloth.

Pre-heat oven with baking stone (I use one on bottom and one on top shelf of my oven), to 500 degrees F.

Slash loaves as desired and place empty pan in bottom shelf of oven.

Pour 1 cup of very hot water into pan and place loaves into oven.

Lower oven to 450 Degrees and bake for 25 - 35 minutes until bread is golden brown and internal temperature reaches 200 degrees.

Let cool on cooling rack and enjoy!

This post has been submitted to the Yeast Spotting Site here: http://www.wildyeastblog.com/category/yeastspotting/.

A little help from my friend Cosmo...
superczech's picture
superczech

I LOVE McCormick & Schmick's bread. Not sure if their bread varies by what state they are in... This one is in Chicago on Wacker.

This lovely bread has soft golden brown crust and is nice and fluffy. It has a sour dough/vinegar taste to it.

I have baked sourdough bread before, but the crust has turned out to be very hard.... How do I get the crust to be softer?

And does anybody have any idea what kind of bread McCormick & Schmick's in Chicago bake???

Thank you!


PiPs's picture
PiPs

The idea of honest bread and its making found its way into my thinking over the weekend. I find myself slipping more and more into this way of baking. Using less but wanting more from it. I didn’t bake any differently to past weekends yet I felt more connected and relaxed throughout the process. The slightly cooler temperatures certainly helped both my peace of mind and the resulting bread. The kitchen felt less frantic.

 I haven’t been pushing the envelope. Just practising consistency while noticing and adapting to the subtle differences the change of seasons is bringing. Perhaps this might be seen as boring or lazy … nevertheless I enjoyed it thoroughly and it keeps us well fed.

I baked two small batches of 100 per cent whole-wheat desem bread and country breads on the weekend. This will feed the family during the week and left us with a loaf to take away on a picnic to a country market in the northern New South Wales town of Bangalow. We had the best handmade organic doughnuts while wandering through the markets. One of the country breads was given to Nat’s parents on our trip home to help ease their struggling brought on by home renovations.

I have been trying a new method of milling where the flour is constantly stirred and moved around in the bowl as it falls from the mill. I want to disperse the heat as quickly as possible and noticed a definite improvement in the time it took for the flour to cool. Whether this translates into the final bread I really have no idea. Any ideas? I sifted the wheat flour for the country bread as normal and retained the bran for coating the desem loaves.

Mixing the desem starter

Autolyse and desem starter

Squeezing in desem starter

Stretch-and-fold


100% Whole-wheat Desem

Formula

Overview

Weight

%

Total dough weight

2000g


Total flour

1081g

100%

Total water

919g

85%

Total salt

20g

1.8%

Prefermented flour

162g

15%


Desem starter build – 10 hrs 18-20°C


Starter

61g

50%

Freshly milled organic wheat flour

122g

100%

Water

61g

50%


Final dough


Desem starter

243g

26%

Freshly milled organic wheat flour

919g

100%

Water

838g

91%

Salt

20g

2%


Method

  1. Mix desem starter and leave to ferment for 10-12 hours at 18-20°C
  2. Mill flour and allow to cool to room temperature before mixing with water (hold back 50 grams of water) and autolyse for a minimum of one hour.
  3. Add levain to autolyse then knead (French fold) 5 mins. Return the dough to a bowl and add salt and remaining 50 grams of water and squeeze through bread to incorporate (dough will separate then come back together smoothly) then knead a further 10 mins.
  4. Bulk ferment two and a half hours with three stretch-and-fold 30 mins apart.
  5. Preshape. Bench rest 20 mins. Shape.
  6. Final proof was for 1.5 hours at 24°C
  7. Bake in a preheated dutch oven at 250°C for 10 mins then reduce temperature to 200°C and bake a further 10 mins. Remove bread from the dutch oven and continue to bake on a stone for a further 20mins to ensure even browning.


I am continuing to expand the desem starter with one build straight from the fridge and as the overnight temperature continues to cool the desem starter is achieving a more controlled fermentation and sweeter aroma by the following morning. I have been looking forward to this kind of weather all summer and it is so nice to not have sweating dough racing away from me into a sticky mess. I even had to increase proofing times by an extra half-an-hour for this bake.

For an aesthetic change to previous desem loaves I baked these without slashing in a dutch oven after coating them in bran sifted from the country breads. I was really surprised with the increased oven spring … quite possibly the best I have had with this form of bread.

Country bread baking

The most telling tale that the cooling temperatures are affecting the bread came with the cutting and tasting. Nat took a bite and then looked at me and asked quite seriously, ‘Have you added anything else to this … it tastes sweet?’ Not only does it taste sweet, but you can smell the sweetness in the kitchen while slicing through a loaf. The crust is delicate with the bran coating adding a crunchy contrast to the soft crumb within.

So far we have eaten it with Nat’s special ‘sick soup’, with honey and ricotta, toasted with peanut butter, with plum jam, with apricot jam … and the list goes on and on.

Happy baking all ...
Cheers
Phil

Juergen Krauss's picture
Juergen Krauss

Hi,

As many others these days I mainly baked my tried and tested formulas, with not much new to blog about.

With exception of my proof box - the parts were on top of a cupboard since last summer, but now I am putting them to good use.

I think the quality of my ryes have greatly improved since.

The parts for the proof box

1. cheap picnic cooler

2. reptile thermostat

3. reptile heat mat

4. cooling rack

Here a photo:

Just a few photos from last weekend's bake, which was mainly for restocking the freezer:

1. Some ITJB Vienna Bread and Hamelman's Sunflower Seed Bread with pate fermentee

2. Some Challah (DiMuzio's sweet challah) for a school function:

3. Finally my weekly batch of 40% Rye with caraway seeds, and Russian Rye a la Andrew Whitley

Keeping myself busy ...

Juergen

dmsnyder's picture
dmsnyder

San Francisco-style Sourdough Bread with and without Walnuts

This weekend, I continued trying variations of my San Francisco-style Sourdough Bread. Those who have followed this little adventure will note changes in my starter fermentation, the length of the autolyse and the use of this dough for a Sourdough Walnut Bread.

I started with my stock refrigerated 50% starter that had been fed last weekend. This feeding consisted of 50 g active starter, 100 g water and 200 g starter feeding mix. My starter feeding mix is 70% AP, 20% WW and 10% whole rye flour.

I activated the starter with a feeding of 40 g stock starter, 100 g water and 100 g starter feeding mix. This was fermented at room temperature for 8 hours. The starter was very active. It had tripled in volume and was bubbling. I then mixed the stiff levain.


Stiff levain

Bakers' %

Wt (g)

for 1 kg

Wt (g)

for 2 kg

Bread flour

95

78

157

Medium rye flour

5

4

8

Water

50

41

82

Stiff starter

80

66

132

Total

230

189

379


  1. Dissolve the starter in the water. Add the flour and mix thoroughly until the flour has been completely incorporated and moistened.

  2. Ferment at room temperature for 12 hours, then refrigerated overnight.


Final dough

Bakers' %

Wt (g)

for 1 kg

Wt (g)

for 2 kg

AP flour

90

416

832

WW Flour

10

46

92

Water

73

337

675

Salt

2.4

11

22

Stiff levain

41

189

379

Total

216.4

953

2000

Note: For today's bake, I actually mixed two 1 kg batches of dough. For one, I added about 20% (baker's percentage), or 110 g of lightly toasted walnut pieces. This was mixed at slow speed for a couple minutes after Step 3., below.

Method

  1. In a stand mixer, mix the flour and water at low speed until it forms a shaggy mass.

  2. Cover and autolyse for 20 minutes

  3. Add the salt and levain and mix at low speed for 1-2 minutes, then increase the speed to medium (Speed 2 in a KitchenAid) and mix for 5 minutes. Add flour and water as needed. The dough should be rather slack. It should clean the sides of the bowl but not the bottom.

  4. Transfer to a lightly floured board and do a stretch and fold and form a ball.

  5. Place the dough in a lightly oiled bowl and cover tightly.

  6. Ferment at 76º F for 31/2 to 4 hours with a stretch and fold at 50 and 100 minutes.

  7. Divide the walnut bread dough into two equal pieces. Leave the other dough in one piece.

  8. Pre-shape as rounds and rest, covered, for 10 minutes.

  9. Shape as boules or bâtards and place in bannetons. Place bannetons in plastic bags.

  10. Proof at room temperature (68-70º F) for 1-2 hours.

  11. Cold retard the loaves overnight.

  12. The next morning, proof the loaves at 85º F for 3-4 hours. (If you can't create a moist, 85 degree F environment, at least try to create one warmer than “room temperature.” For this bake, I took two loaves out of the fridge and started proofing them. I took the third loaf out about an hour later and stacked it balanced on top of the other two. I did one bake with the two loaves of walnut bread and a second bake with the third loaf.)

  13. 45-60 minutes before baking, pre-heat the oven to 500º F with a baking stone and steaming apparatus in place.

  14. Transfer the loaves to a peel. Score the loaves as desired, turn down the oven to 460º F for the smaller loaves or 450ºF for the larger one, steam the oven, and transfer the loaves to the baking stone.

  15. After 15 minutes, remove the steaming apparatus, and turn down the oven to 430º F/Convection. (If you don't have a convection oven, leave the temperature at 460º F.)

  16. Bake for another 15 minutes for the smaller loaves or 25 minutes for the larger loaf.

  17. Turn off the oven, and leave the loaves on the stone, with the oven door ajar, for another 15 minutes.

  18. Transfer the loaves to a cooling rack, and cool thoroughly before slicing.

 One of my personal objectives in making this bread for so many weeks running has been, first of all, to develop a formula and procedures that produce a particular style of bread, and secondly to see if I could make small changes that accommodate to my other needs without changing the end product too much.


The bread without walnuts was very similar to the last San Francisco-style Sourdough Bread I had baked. The crust was crunchy and nutty-flavored. The crumb was chewy-tender with a moderate sourdough tang and excellent, balanced flavor.


The bread with walnuts was just delicious. I love the flavor of toasted walnuts in sourdough bread. I don't know why I had waited so long to make it again.

Tonight we'll have an appetizer of sourdough walnut bread with an interesting Spanish goat cheese followed by roasted herbed chicken/gruyere panini and a green salad.

David


SylviaH's picture
SylviaH


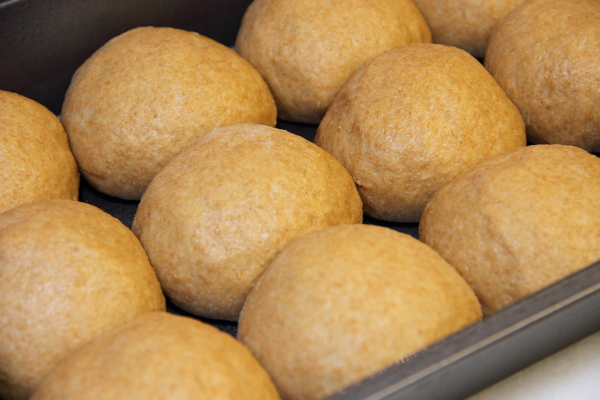
This is my version of Carol Fields lovely currant buns from her book 'Italy in Small Bites'.

The buns are especially delicious because of the way the lemon zest is infused into the milk, lots of zest and I used my homemade candied lemon peel and fresh unsoaked currants. 

In place of some sugar I used honey and also refrigerated the  shaped buns for an overnight ferment for fresh baked warm morning buns.  

I made some changes to adjust for the extra hydration because of the 3 eggs and yolk used in her recipe..but all in all they did turn out tender and delicious.  

I plan on using the 'lemon buttermilk soak' in my favorite Hot Cross Bun recipe for Easter.  It adds just the right touch of  lemon flavor.  

The buns are not overly sweet or tart...just delicious and tender!  


Zest of 1/2 Organic Lemon, Pith removed

3/4 cup - 170g Buttermilk

Six hours before you plan to bake these little sweet breads, cut the lemon zest in half and score the surface.  Place into the buttermilk, soak 6 hours, drain and reserve the milk.  Finely chop the zest.  

I used fresh fine grated zest from an organic lemon instead of chopping the soaked zest.


SPONGE

2 1/2 tsps.  I used the Gold OIADY for higher sugar content dough

1 TBsp Honey

Reserved Buttermilk

100 g APBF

Stir in a KA mixer the buttermilk, yeast, honey, flour.  Cover and rise until doubled, about 30-45 minutes.


DOUGH

1/2 cup plus 1 TBsp Sugar

3 eggs, room temperature

1 egg yolk, room temperature

About 3 cups minus 1 TBsp. (400 grams) APBF

3/4 tsp. sea salt

9 TBsp. unsalted butter, room temperature

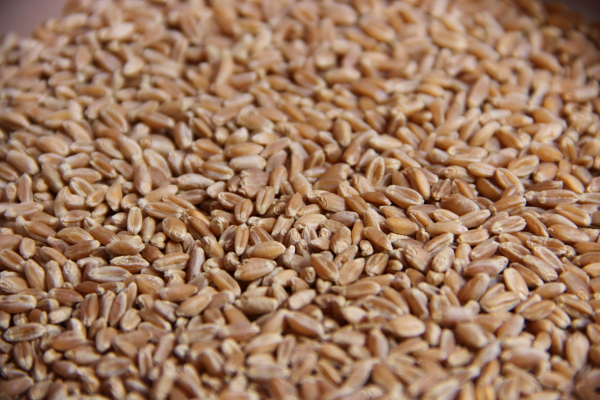
1 3/4 cups currants - I used a little less 

2 to 3 TBsp. APBF

1/4 cup Candied Lemon Peel


GLAZE

Egg yolk and milk or cream


Stir the sugar, eggs, egg yolk, and reserved lemon zest into the sponge.  Mix in the flour and the salt and stir until smooth, using the paddle of the electric mixer.  Beat in the butter, 2 TBsp at a time, and mix thoroughly until the dough is smooth and velvety.  Change to the dough hook and knead for 4 minutes.  The dough should be velvety, smooth, and soft.

First rise

Transfer the dough to a buttered bowl, cover well with plastic wrap, and let rise until doubled.  Thirty minutes before you plan to shape the dough you can soak your currants in tepid water.  


Filling and overnight proof

Drain the currants well, pat them dry, and toss them with the 2 - 3 TBsp. flour.  Flatten the dough on lightly floured work surface and spread the currants and candied lemon peel on the surface.  Gently roll up tucking in the sides.  Let it recuperate for about 5 minutes.  The dough into 12 to 14 pieces and shpae each into a ball.  Place into parchment lined buttered pans.  Let rise until puffy and half doubled.  

I covered with plastic bags and placed overnight into the refrigerator.

Preheat oven to 400F.  

When ready to bake.  Brush with egg yolk and milk glaze.  Bake about 18 to 22 minutes until well browned and golden.


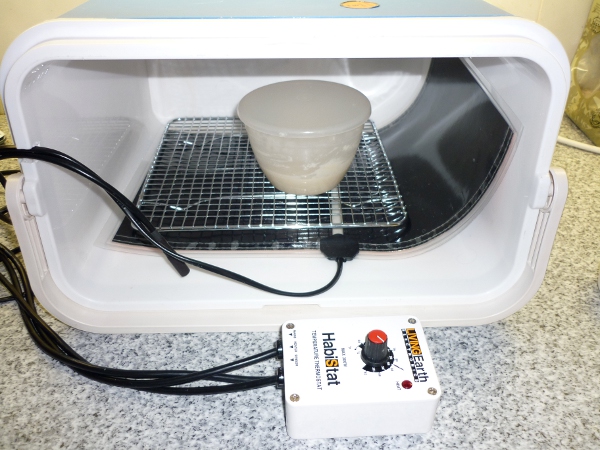
Another Use for my B&T Proofer..  Dry setting   - Speeded up making my candied lemon peels by 'One' day instead of 2 days!


I forgot to score my zest...but I give it a twist over the buttermilk.


I baked these the morning of my Birthday before leaving to celebrate with family.  What a beautiful day!


Wonderful topped with my homemade Lemon Curd


Sylvia


sam's picture
sam

Hello,

This time I decided to try out 100% whole wheat rolls, and added more butter + honey + milk than my previous white rolls.  The home-milled whole-wheat is pretty thirsty, so I increased hydration.  I estimated this around 78% hydration.  The dough was a little bit sticky, but easily manageable.   Overall, I am happy with the outcome, these are quite tasty w.w. sweet rolls.   :-)

Yields about 1200 grams of dough.

Milk poolish:

222g ww flour

308g milk

0.4g instant yeast

Final:

All Poolish

452g ww flour

135g eggs

101g butter

101g unfiltered honey

67g whole cane sugar

88g milk

30g instant yeast

13g salt

Procedure:

1) Make the poolish, ferment until ripe.

2) Cream the butter + sugar

3)  Mix everything except for salt+yeast, let rest/autolyse for 30 mins.

4)  Add salt+yeast, mix in thoroughly, then develop to near-full gluten development.

5)  Bulk ferment 1 - 1.5 hrs

6)  Shape, final ferment of 1 - 1.5 hrs

7)  Brush with standard eggwash (water+egg), bake at 350F for 30-40 mins.


Started with the hard red spring wheat berries..


Milled it on the finest setting..


The ripened poolish:


Get all the goodies ready!


The dough after mixing/development:


A diversion..  

Spring has arrived in my corner of the world, and while it's been raining a lot lately, today the sun peeked out for a couple hours this afternoon.  While the dough was fermenting, I checked out some of the new sprouts in the backyard.


After the ferment, I shaped the rolls, and had some leftover for a small loaf:

Here are the happy rolls, ready to bake!


The result.  Yum!

Tears off easily..


Happy baking!


(edited to correct milk weight for poolish)

yy's picture
yy

Thanks to Weekend Bakery's extremely helpful Croissant Making Log, I finally made a batch of croissants that I'm happy with (see link for formula and tips). I made a couple of changes to the Hamelman formula used in the Weekend Bakery log: I used 4 grams of SAF gold osmotolerant yeast instead of 11 g of regular instant yeast (11 g is a huge amount of yeast, which I don't think is necessary if you use a yeast that can stand up to the sugar content in the dough), and I added a teaspoon of barley malt syrup for flavor.  Last time I made croissants was about a year ago, and the attempt was not so successful. I feel like I learned a lot from comparing that bake to this one:

1. Last time: the dough was mixed for too long and got too developed. This made it impossible to roll out the layers. It was like wrestling with a rubber band. Not only did this make the process hard on the arms, it also resulted in thicker, doughier layers because the dough could not relax enough to be rolled out thinly. 

This time: I mixed the dough until uniform and gluten formation had barely begun. As Ciril Hitz says in Baking Artisan Bread, gluten development should happen in the course of being rolled out (stretched) during the lamination steps. There is no need to fully develop the gluten in the beginning. 

2. Last time: The butter layer shattered into several small pieces instead of spreading out uniformly, due to being too cold. A number of authors advise you to freeze the dough between lamination steps for about 20-30 minutes, arguing that this will make the butter and dough the right consistency to roll out. 

This time: I just used the fridge instead of the freezer. I used Kerrygold butter, which has fat content equivalent to typical European butters, so at 38 degrees, it is stiff yet pliable. I guess this depends on how cold your freezer is. Mine is kept at a frosty -2 Fahrenheit. 

3. Last time: Croissants were underproofed, so the butter leaked out very badly during baking.

This time: I proofed until the croissants were "jiggly" and very puffy. While there was still a tiny bit of butter meltage, it was not nearly as bad as last time.  

Here were the results from today:

The crust was so light and the crumb was so tender that they started shattering under the slight pressure of my fingers while being transferred to the cooling rack. The croissants are shatteringly crisp on the outside and moist and light on the inside. The crumb shreds into transparent sheets. I highly recommend the Weekend Bakery tutorial.

I've frozen half the batch, so it'll be interesting to see whether this affects the taste and texture. Happy Sunday, everyone!

T

ananda's picture
ananda

Seigle d’Auvergne


This is very much my own formula adaptation, but it takes its inspiration from Daniel Leader’s lovely book “Local Breads: Sourdough and Whole-grain Recipes from Europe’s Best Artisan Bakers”, see pp. 158 – 161.   Leader credits Armandio Pimenta, who has a bakery in Clermont-Ferrand, Auvergne, as the source for his formula.   My effort does not use the same refreshment regime, nor does it rely on hot water at the mixing stage.   Leader has a photograph of his loaf in the plates between pages 84 and 85 of my edition; the loaves I baked compare well, although I made 2 Miche, scaled at just over 1700g, where Leader’s recipe produces 1 loaf, slightly smaller at 1195g.

Here is the detail:

Rye Sour Refreshment

Day

Date

Sour [g]

Dark Rye [g]

Water [g]

TOTAL [g]

Thursday 22nd March

20:30

40

150

250

440

Friday 23rd March

18:30

440

300

500

1240


Final Dough

I made this on the Saturday morning, beginning the mixing at 06:00

Material/Stage

Formula [% of flour]

Recipe [grams]

1. Rye Sourdough


Bacheldre Organic Dark Rye Flour

22.5

450

Water

37.5

750

TOTAL

60

1200


2. Final Dough


Rye Sourdough [from 1.]

60

1200

Shipton Organic Light Rye [997]

50

1000

Marriage’s Organic Strong Flour

27.5

550

Salt

1.6

32

Water

35

700

TOTAL

174.1

3482


% pre-fermented flour

22.5

-

% overall hydration

72.5

-

% wholegrain flour

22.5

plus 50% @ 0.997 ash

FACTOR

20

-


Method:

  • Mix the sourdough, water and flours using a hook attachment, for 4 minutes on first speed, scraping down the bowl as needed.   Autolyse for half an hour.   Add the salt and mix 1 minute on first speed and 5 minutes on second speed, scraping down the bowl as required.   DDT 26°C.
  • Bulk ferment for 2½ hours.
  • Scale the paste using wet hands into 2 pieces and shape round.   Rest 15 minutes and prepare 2 bannetons dusted generously with dark rye flour.   Re-shape the dough pieces and place smooth-side up into the bannetons.
  •  Final proof 1 hour.
  • For baking, pre-heat the oven to 280°C for one hour.   Tip the loaf directly onto the hearth stone, apply steam and bake without the fan for 15 minutes at 250°C.   Drop the heat to 200°C, switch to convection and bake out for 50 minutes.
  • Cool on wires

This is the dough at the end of bulk proof:

 Finished Loaf, Crust and Crumb Shots:


We enjoyed one of these loaves with our dinner with friends last night.   The depth of flavour from the sourdough was intense; it was an accompaniment to avocado, served with the biggest prawns I have ever seen.   Munching on more of this bread with a salad for lunch today and I noted the sour flavour was much less pronounced, allowing more subtle flavours to come through; much improved to my taste.   The crumb is moist, but not overly so, and wonderfully easy to chew on.

The first loaf stood up tall in the oven, even though the formula uses over 72% rye flour.   I used Organic white bread flour at 11.6% protein, not High Gluten flour.   I should have delayed shaping the second loaf, as the long bake time meant this loaf was over-proved when it came to bake.   I’ve photographed the best-looking loaf, although the crumb shots come from the over-proved one.

We love this bread; such an eating treat for us for the rest of the week.   The Market beckons; this means I have plenty of baking to do this week.

All good wishes

Andy

Pages

Subscribe to Recent Blog Entries