The Fresh Loaf

A Community of Amateur Bakers and Artisan Bread Enthusiasts.

Recent Blog Entries

sweetbird's picture
sweetbird

It all started when Angelo put ricotta on the shopping list because he likes to have it on pasta sometimes and we didn't have any in the house. I was the one doing the shopping that day, a day or two prior to Easter, and I found the ricotta on sale, with the large tub marked at a lower price than the small tub. So the large tub went in my basket, and then my mind started dreaming about what I was going to do with all that lovely ricotta.

Cannolis turned out to be the answer. I married into an Italian family from the New York City area, and that automatically means that in my lifetime I've eaten a lot of the best cannolis in the world. Since we moved to the country north of the city, we haven't had easy access to all the special things that city people accept as their birthright -- the best bagels, the best pizza and the best cannolis (to name just a few). The cannolis up here are pale, lifeless, overly-sweetened imposters.

So . . . I consulted all my resources and came up with a recipe for shells and filling and made some cannolis on Easter day. I gave myself a mediocre grade that day, even though we both loved the shells and loved the idea of having homemade cannolis (and Angelo sweetly never gives my efforts anything less than flying colors...). But I knew I could do better, so the next day I did more research and picked up some mascarpone, and then I think I hit the jackpot, or at least close enough to make us very happy.

It turns out that regular ricotta is not what you are getting when you buy a cannoli from a high-end shop or restaurant. They're using a special type of ricotta called impastata. It's creamier but at the same time drier than what you find at most markets, and it's used for all sorts of Italian specialties, savory and sweet. I asked around and found out I could place a special order with a local cheese shop, but since I realized I was spinning away from the original idea of using up all the ricotta I had bought, I tried a different strategy. And I think it came out very well, so here's what I did. I drained some ricotta in a fine sieve in the refrigerator for about 8 hours, then beat it thoroughly with the whisk in my KitchenAid to approximate the creamy texture of the impastata, and once it was beaten into submission I added some mascarpone. We thought it was great.

SHELLS (recipe from Chef Anne Burrell, with slight changes):

1½ C. AP flour (I used King Arthur unbleached)
1 Tbs. sugar
½ tsp. ground cinnamon
Pinch of kosher salt
2 Tbs. cold butter, cut into pea-sized pieces
1 egg yolk
¼ C. marsala
¼ C. cold water (approx.)
Oil for deep frying

Pulse the flour, sugar, cinnamon & salt in the food processor to combine. Add butter & egg yolk and pulse until the mixture looks like grated cheese. Add the marsala and pulse to incorporate. Begin to add water in small amounts, pulsing between each addition, just until the dough forms a ball. You may not need all the water.

Knead for about 5 minutes, until silky and smooth. Form a flat disk and wrap in plastic wrap. Refrigerate at least 45 minutes.

Start heating your oil when you take the dough out after its resting period. It should reach 350°F - 375°F. Get your cooling rack ready for the finished shells.

Separate the dough into two pieces and put one piece back in the refrigerator, wrapped. Using a pasta roller (I used my Atlas), roll out the dough, starting at setting #1. I like to put it through a couple of times at that setting, folding it in between times, until it seems completely smooth. Use flour as needed to keep it from sticking on the rollers. When the dough comes out of the roller, handle it with your palms down (in other words, drape it over your knuckles) to avoid stretching it. Continue to roll it thinner and thinner until you have something no thicker than 1/8″. That should be about #5 on the dial (but next time I may try it one notch thinner, or roll it with a rolling pin before cutting into squares).


It can also be rolled by hand if you don’t have a pasta roller.

 Cut into 3″ squares. I used a pizza cutter for this.

Put a metal cannoli tube across the center diagonally and moisten the tips with water or egg white before rolling together. Press slightly on the tips to ensure a good seal. Drop into hot oil and fry for several minutes until well browned. You can fry several at once, depending on the size of your fryer. Push the shells under the oil from time to time to achieve even browning. You’ll notice that the shell stops sending out moisture toward the end of frying; that's a clue that it's ready to come out. Drain on rack. Sprinkle with confectioner's sugar.

 When cool enough to handle, remove the tube and use for the next batch. Since I only have four cannoli tubes, I needed a quicker turnaround, so I removed the hot tubes with rubberized pads and put them in the freezer for a minute to cool down.

Waiting to be filled:

FILLING (enough for about 4 cannolis):

About a cup of whole milk ricotta, drained at least 8 hrs.
          (or ricotta impastata, if available; no need to drain)
1 tsp. Madagascar Bourbon vanilla
1 Tbs. confectioner’s sugar
3 Tbs. mascarpone
Chocolate chips or shaved chocolate (optional)

Whip the well-drained ricotta by itself for about 5 minutes on fairly high speed with a whisk in the KitchenAid. Add the vanilla and confectioner’s sugar and whisk briefly to blend. Add the mascarpone and whisk another 2 - 3 minutes. Stop frequently to scrape the sides down into the bottom with a spatula, and occasionally remove the whisk and shake out the filling that is stuck in the middle. Taste and adjust flavor.

Add dark chocolate bits. (I used Guittard dark chocolate chips.) Hold filling in the refrigerator until ready to serve the cannolis, then pipe into the shells from both sides with a pastry bag or plain plastic bag with a corner cut off.

Above is my second-day filling and below is a photo of my first-day filling. I think you can see the difference in texture. It is lumpy. I hadn't beaten it; just folded the ingredients together with a spatula. And it is brownish because I followed a recipe that added cinnamon to the filling. I won't do that again, because I think the flavor contrast with the shell was lost. A great cannoli has a gorgeous, creamy whiteness to it, and it's perfectly balanced against the flavor and texture of the shell. Here's what the first (much less successful) filling looked like:

The amounts for the filling are approximations. I played around with the flavor and texture until I liked what I had, then I reconstructed it into a recipe. The end result is very lightly sweetened, since that's what we like, but you may prefer to have a bit more sweetening in both the shells and the filling. It's all personal preference at that point. I like using confectioner's sugar because its fine texture disappears in the filling.

There are many ways to flavor a cannoli, including orange or lemon rind, liqueur, pistachios, etc., so it's something you can play with to suit your and your family's palate. In fact, since you shouldn't fill the shells until the last minute (so they don't get soggy), you can mix up a batch of the basic filling and then let everyone create their own filling variation and pipe it into the shells. Kids would love that.

I decided to make cannoli shells with just the first half of the dough. That gave me about 10 - 12 shells, which seemed more than enough for us. With the second half, I rolled out the dough as before but cut it into rough rectangles and dropped it in the hot oil, then sprinkled with confectioner's sugar. I think these would make great appetizers. Hardly any sweetness; just crispy, airy deliciousness. We liked having a few with wine as we were putting dinner together.


One day I'll try it with homemade ricotta, which I love more than any ricotta I've ever tasted!

Happy baking to all,
Janie

Isand66's picture
Isand66

I love cherries and I love vanilla, so what better flavor combination to try to work into a bread recipe?  I have never incorporated a liquor into a bread dough before, so I'm not sure what to expect, but I do have to say it smelled fantastic mixing it up.

I started by taking my 65% hydration AP flour starter and building enough starter for 15 ounces of levain for the finished dough.  I wanted to incorporate some white rye into the starter to give it a little rye flavor so I added 22% white rye flour to the levain build along with AP flour and some water to make a 67% hydration starter.

The final dough including the starter has a hydration level of 66%.  I wanted to try to make this a moist and delicate crumb so I incorporated a large percentage of French Style low protein flour from KAF, along with a small percentage of white rye and durum flour.  After finishing the loaf in the oven and tasting it, I have decided that I added a little too much of the Cherry Marnier and vanilla so I have adjusted the amount in the recipe below.  This is a perfect bread for french toast or bread pudding or just as toast with some butter or cheese.

Starter Ingredients

7 ounces All Purpose Flour (I use KAF)

2 ounces White Rye Flour

6 ounces Water (90 degrees)

.75 ounces Starter, 65% Hydration (you can adjust the water to suit your current hydration level)

Final Dough

15 ounces Levain from above (75% Bakers Percentage)

12.6 ounces French Style Flour (80% Bakers Percentage)

3.4 ounces White Rye Flour (10% Bakers Percentage)

4 ounces Durum Semolina Flour (10% Bakers Percentage)

9.5 oz. water (90 degrees F.) (47.5% Bakers Percentage)

.5 ounce Pure Vanilla Extract (.03% Bakers Percentage)

3 ounces Cherry Marnie (15%)

2 1/2 Teaspoons, .63 ounces Sea Salt (3.2% Bakers Percentage)

Bakers % Final Dough

White Rye Flour 4 ounces

AP Flour 7 ounces

French Style 16 ounces

Durum 2 ounces

Total Flour  29 ounces   100%

Salt .63 ounces                  2.1%

All Liquids 19 ounces     66%

Directions

Using your stand mixer or by hand, mix the water with the starter to break up the starter.

Add the flours and vanilla extract and Cherry Marnier and mix on the lowest speed for 2 minutes.  Let rest for 15 minutes - 20  minutes to allow the gluten to develop.

Next, add the salt and mix for 4 minutes more on medium speed, adding more flour if necessary to produce a slightly sticky ball of dough.

Remove dough to your lightly floured work surface and need for 1 minute and form a ball.

Leave uncovered for 15 minutes.

Do a stretch and fold and form into a ball again and cover with a clean moist cloth or oiled plastic wrap.

Let the dough rest another 10-15 minutes and do a stretch and fold again.  Let it rest for an additional 15 minutes and do 1 more stretch and fold.   After this last stretch and fold cover the bowl again and let it rest at room temperature for 1.5 to 2 hours and then put it in your refrigerator overnight or up to 3 days.

When ready to bake the bread, take the bowl out of your refrigerator and let it rest at room temperature for 2 hours.  After 2 hours shape the dough as desired being careful not to handle the dough too roughly so you don't de-gas it.   Place it in your bowl, banneton or shape into baguettes.

Let it sit at room temperature for 2 hours covered with oiled plastic wrap or a wet cloth.

Pre-heat oven with baking stone (I use one on bottom and one on top shelf of my oven), to 500 degrees F.

Slash loaves as desired and place empty pan in bottom shelf of oven.

Pour 1 cup of very hot water into pan and place loaves into oven.

Lower oven to 450 Degrees and bake for 25 - 35 minutes until bread is golden brown and internal temperature reaches 200 degrees.

Let cool on cooling rack and enjoy!

The final dough had a nice open crumb and crispy crust.  The overall dough did not rise as much as I would have liked, but the oven spring was excellent.  Next time I think I would add some dried cherries and maybe some walnuts to kick it up a bit.

dabrownman's picture
dabrownman

The retarded loaf came out almost identical to the non retarded one.  It was perhaps a little more sour.  Tasting the non retarded one from yesterday, it is more sour today and about the same sour as the retarded one just out of the oven.  I would guess the retarded boule will be even more sour tomorrow too.  This bread is hard to make but worth it.  I never had a bread that tastes like it, the crust is dark and softens as it cools, the crumb is moist and open, for 40% whole grain bread.  It is one of the best breads I have ever had, much less baked.  it just looks great too with the dark crust and deep yellow crumb.  Here some pix's of the retarded version 5 of  Brachflachen Mehrere Vollkombrot.

Pre-shaped

Passes poke test

Slashed

Just out of the oven

Can you find the hairs?

Crumb and crust close up

Preparing for a

Nice lunch of grilled turkey franks on super-grain challah with cheese, pickled peppers and mustard, pickles, tomatoes,  apples and a home grown salad.

txfarmer's picture
txfarmer

Sending this to Yeastspotting.

Index for my blog entries

This organic fruit/veggie delivery service is really taking me to places I have never been -- in last week's case, it's beet! I roasted them in oven for 70min until tender. Peeled, cut some into chunks and put in salads. For the rest, I mashed and used the vividly red puree for this bread.

Bread Flour, 325g
WW Flour, 100g
Beet Puree, 220g
Starter(100%), 150g
Water, 190g
Salt, 10g

1. Mix everything autolyse for 20 to 60min,mix @ medium speed for 3-4 min until gluten starts to develope.
2. Bulk rise at room temp (~75F) for about 3hrs. S&F at 30, 60, 90, 120min.
4. Shape, put in basketes smooth side down, put in fridge over night.
5. Next morning take the dough out to finish proofing, about 60min for me. Score. Shockingly red, isn't it?

6. Bake at 450F with steam for 15min, lower to 430, bake for another 35min.

Finished bread is less red than the dough. I read that acidity would help keeping the red color, being a sourdough loaf, I thought that the PH value would be low enough, guess not...

I could tell that the sour beet puree (lots of it too) had a weakening effect on the dough, but the bread still ended up with good volume

Open moist crumb, with a subtle beet taste, great as a grilled cheese sandwich.

--------------------

Followed this recipe online to make red velvet cupcakes with the leftover beet puree.

Very happy with the deep red color both before and after baking, without food coloring!


In order to keep the color red, a lot of lemon juice was used in this formula (to keep PH low), which means the cake itself is noticably sour. That's why icing is necessary for this cake - to balance out the acidity. I don't think its taste is authentically "red velvet", but if you want a red cake with no artificial coloring, then it's fills the bill. It's egg free too.


dabrownman's picture
dabrownman

This is version 5 of my SD multi-grain challah called Brachflachen Mehrere Vollkombrot but wanted to make a special one this year - that non Jews would like - by Easter.  I added; whey water, a Yeast Water levain on top of the SD one, sunflower seeds,  white diastatic rye malt, malted barley, lentils, vital wheat gluten and various sprouted grains while cutting back on; the egg,  molasses and honey.  The crust came out lighter than usual but was still very dark and thick but soft after it cooled.  The crumb was more moist, more open, even with 40% whole grain and more interesting with the the sunflower seeds and the sprouted berries.  The taste is far superior and everything I would want in this bread.  It its a lot of work but you will be rewarded with a fine Holliday bread.  The method and formula follows the pix's.  I had an identical boule retarding in the fridge overnight, have now baked it off and those pictures will follow at the very end. I also added the 20 g of Pink Himalayan sea salt to the formula which was missing.  I do like using both starters.  SD for taste and YW is known for its spring and mpoist crumb by my experience.  These 40% whole grain breads with sprouts and seeds need all the help they can get and the YW seemed to help in spring and moistness.

Method

2 days before bake, take the berries and soak them in water for 5 hours.  Place a sheet of  wet paper towel on a tray and spread the seed out on top of it.  Cover with two more sheets of wet paper towel.  I just get the towels wet, squeeze out the water and unravel them to flat. Cover the whole shebang with plastic wrap and let sit until needed’

1 day before baking make the 2 starters.  There is 4 hours between each of the builds.  At the 12 hour mark, put both levains in fridge overnight for retardation of 8 hours

In the morning, take out the levains and put them on the counter for one hour as you autolyse the dough flours with the whey water and water (I used an equal part mix as usual) in your mixer bowl with the paddle on KA 1 then cover with plastic.

After an hour add the levains and mix again until they are incorporated and cover.  Let autolyse for one more hour.

Add the salt and all the mix-ins except the seeds, switch to dough hook and knead on KA 2 for 8 minutes.  Add in the seeds and the sprouts and mix until combined.  Transfer dough to a well oiled and plastic covered bowl.  Let rest 15 minutes.

 Do 10 S&F’s on a floured work surface, form into a ball and put back into a plastic covered oiled bowl.  Do 3 more S & F’s at 15 minute marks only do 4, 3 and 2 S&F’s.  Let dough develop in plastic covered oiled bowl for 1 hour.

Divide dough in half and pre-shape into boules.  Do final shaping 10 minutes later making sure the skin is stretched taut, dust top with 50/50 mix of AP and Rice flour and place top down in basket lined with a well floured towel, using the same dusting flour combination.  Place baskets in a tall kitchen trash can liner for 1 hour.  Place in fridge overnight to retard or, when dough has risen 70%, it is ready to bake when it passes the poke test.

Pre-heat the oven at 500 F on regular bake for 45 minutes with your steaming method and stone in place.  Invert baskets onto parchment paper on a peel, do a T-Rex or, my favorite, 3 Toed Chicken Slash or a beauty of your own and slide into oven on the parchment paper.  Turn down temperature to 450 F and steam for 15 minutes.  Remove steaming apparatus and parchment, turn oven to 425 F convection and bake for another 25 minutes or so turning the boule every 8 minutes 1/3rd of a turn.  When the bread has reached 205 F inside, turn off oven, keep door ajar and let boule crisp on the stone for another 12 minutes.  Then remove to a cooling rack until cool.

If retarding, take the bread out of fridge in the morning and leave in the plastic bag.   Immediately start your pre-heat of the oven and bake as above.  My retarded boule will be going in the oven shortly.  It rose beautifully in the fridge.

 This bread also bakes very well Tartine Method in a cold or hot Dutch Oven. 

Dabrownman's Multigrain SD YW Challah        
           
SD Starter         
 Build 1Build 2 Build 3Total Dough Flour  Multigrain Sprouts
SD Starter20  20 Rye35 Buckwheat15
Rye10 1020 WW35 WW15
WW10  10 Buckwheat35 Rye15
Buckwheat 10 10 Spelt35 Bulgar 
Dark Rye 10 10 Farro20 Barley 
WWW 10 10 Barley20 Spelt15
Bread Flour   0 6 Grain Cereal20 Water15
AP20301060 Millet20 Total Sprouts75
Water4060 100 Amranth20   
Total10012020240 Lentils20 Hydra. w/Sprouts72.18%
      Dark Rye20   
YW Starter    Semolina20 Scald 
 Build 1Build 2 Build 3Total Bulgar20 Buckwheat 
Yst Water30202070 Oats20 WW 
Rye   0 White WW20 Rye 
WW   0 Potato Flakes20 Bulgar 
Buckwheat   0 Ground Flax Seed20 Barley 
Dark Rye   0 Bread Flour280 Spelt 
WWW   0 AP280 Water 
Bread Flour   0 Dough Flour960 Total Scald0
AP30303090      
Water   0 50% Water/ Whey700 Hydra. w/Scald71.03%
Total605050160 Dough Hydration72.92%   
         Add - Ins 
Total Starters       Barley Malt50
      Total Flour1180 Molasses50
Flour220    Total Water880 Honey50
Water170    Total Hydration 74.58% Olive Oil50
Hydration77.27%       Egg50
       
Salt20
  Red Rye Malt 
         White Rye Malt10
         VW Gluten10
         Sunflower Seeds75
         Nuts0
         Total345
           
         Hydrat w/ Adds79.96%
         Total Weight

2,480

Salilah's picture
Salilah

Visiting family for Easter - so I baked a selection of breads:

Firstly, the Pugliese, based on David Snyder's recipe - I originally did this for us, but ran out of time to do another one for the family so this one was substituted

No crumb shot (for any of them, sorry!  didn't take the camera with me) - but the usual quite open crumb, light, tasty - I've posted before (I think) on this bread and it is well worth doing!

Secondly, the Cocoa with Walnut and Cranberries (I used cherries) from Lumos

Beautiful rich smell - lovely taste - not very even scoring as you can see, I didn't quite get this right, but it tasted nice!

Then, a double batch of SD Hot Cross Buns from last year's recipe from RossnRoller:

I did some seriously bad shaping here, and left them uncovered to rise for too long - they hardened off, and were quite solid...  I also did a fairly poor job of the pastry for the crosses, and it didn't go on very well.  Lots of room for improvement here - I shall be practising!  (Chris said "teacakes would be nice" - "what are teacakes?" - "well, they are hot cross buns without the crosses!").  They were a good flavour, but need to be a lot more fluffy and better shaped, and with improved crosses...

Lastly, the Colomba Pasquale, based on txfarmer's recipe:

Great fun - but again I need to improve my technique!  The dough didn't rise anywhere near enough - they tasted nice, but could have done with being a bit lighter and fluffier...  Also, I put too much almond essence in (half teaspoon), which was my mistake.  Also, I mixed the chopped nuts with the sugar glaze, then couldn't spread it - so put a dollop onto the top - which then shot straight through the dough to the bottom!!  I think more work on the mixing here, my panettone last year was a bit under-risen as well

And - for fun - the Colomba upside down to try to help it stay fluffy:

(Not in the recipe, but I did this last year with the panettone.  I did learn from the panettone to have the skewers a bit further into the bake - when I did this with teh Panettone, I had the skewers right at the base, and the Panettone fell out of the case onto its nose, which wasn't quite the best way to keep a rounded top!)

Half of the bake went to my brother- and sister-in-law and kids, who appreciated the box of breads; half went to Chris' mum, and we had the cocoa and pugliese for Sat lunch, and the Colomba and HXB for Sunday breakfast.  Overall appreciated, and I was pleased that they all came out!

Sali


hansjoakim's picture
hansjoakim

Today is the final day of Easter, and I thought I'd like to put up a couple of things that I've enjoyed puzzling with in the kitchen over the weekend.

 Worth waiting for, part 1

Pasta is one of those things that I love making during weekends. There's something about weighing up flour, heaping it up on the work surface and making  a little mound in the middle for some eggs and a dash of olive oil, that just feels right. Like bread, the basic ingredients are so simple, but the variations are virtually endless. A little over a year ago, I bought an Atlas 150 pasta machine that I'm happy to say has been in use on an almost weekly basis since then. Fresh pasta - delicious and fun to make – what's not to like?

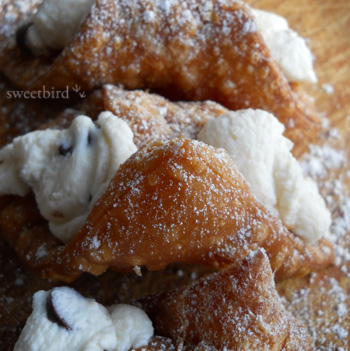
 I had my sister over for dinner on Saturday, and wanted to prepare a light pasta dish as our first course. This time I settled on some raviolis (perhaps tortellini or cappeletti is a more accurate name for the final shape of these?), filled with homemade ricotta and spinach.


I find that the main advantage of making one's own ricotta (apart from the satisfaction of making it from scratch, of course), is that the cheese has a much smoother mouthfeel than the otherwise coarse and crumbly industrial product. It keeps in the fridge, well covered, for up to 2 weeks, so it's worthwhile to make a fair batch while you're first at it.


Filling and shaping these rascals take time, so setting out making these on a busy week night is not something I would recommend! They're perfect for a lazy weekend afternoon, accompanied by good background music and a glass of crisp white wine.


There! An Italian grandmother would probably not fully approve... but hey, at least they look handmade... there's something to be said about the «rustic» quality of that though, right?


Anyways, both me and my sister enjoyed these as our first course – here accompanied by some greens, cherry tomatoes, more ricotta, a dash good olive oil and a grinding of pepper.

 Worth waiting for, part 2

I'm very, very fond of salted, dried cod (clipfish), and that's what I planned for our main course on Saturday. Spanish fishermen fishing cod at Newfoundland were the first to salt and dry their catch, and this was a method of conservation they started sometime during the 16th century. The practice of salting and drying cod was brought to Norway by the Dutch Jappe Ippes in the 1690s, and the method was further established in this country by some Scots in the early 1700s. Since then, particularly Kristiansund, a town on the Western coast of Norway, has been known for excellent salted, dried cod.

As the availability of fresh fish increased, Norwegians looked upon salted and dried cod as a «poor man's fish», and most of the conserved fish was (and is) exported to Spain, Portugal, France, Brazil and other Latin American countries. Export of salted, dried cod (and also un-salted, dried cod) is still a large industry, but thankfully, with the help of popular gourmet chefs, this product has been re-discovered by more and more Norwegians over the last decade. Now, a wide range of salted and dried cod products can be found in most well-stocked grocery stores; from the cheaper tail end pieces suited for casseroles, to highly expensive, gracefully aged loin pieces, comparable to some of the finest cured sausages.


For our dinner, I chose some mid-range loin cuts that are well suited for grilling, pan frying and baking. The cod needs to be reconstituted in several changes of cold, fresh water before they can be cooked; this re-hydrates the meat and extracts some of the salt from it. Soaking can take anything from half a day for the thinnest pieces to more than 4 days (and 4 – 5 changes of water) for the thicker, neck pieces from the fish. Ours took roughly 2.5 days and 3 changes of water to be ready.


We enjoyed the fish on a bed of Puy lentils and root vegetables, thin slices of salted pork belly and Nantais butter sauce (begin by simmering shallots and white wine in a sauce pan, as for a beurre blanc, add a dollop of crème fraîche after 5 mins, continue to simmer until slightly thickened, then beat in cubes of butter over low heat, whisking vigorously, taste for salt and pepper).

  Worth waiting for, part 3

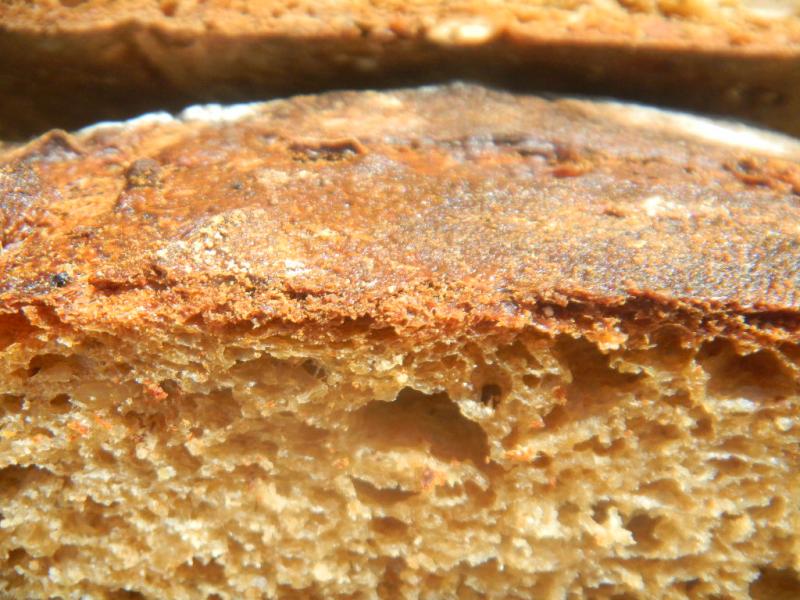
 Well, yes, there needs to be a loaf up here as well... Equally inspired by a Hamelman formula and David's wonderful walnut and raisin sourdough loaves that he told us about recently, I felt a craving for bread with walnuts in it. I came up with a formula rather similar to the one in "Bread" for a sourdough rye with walnuts, but with slightly less walnuts, some whole-wheat flour in there and a higher hydration.

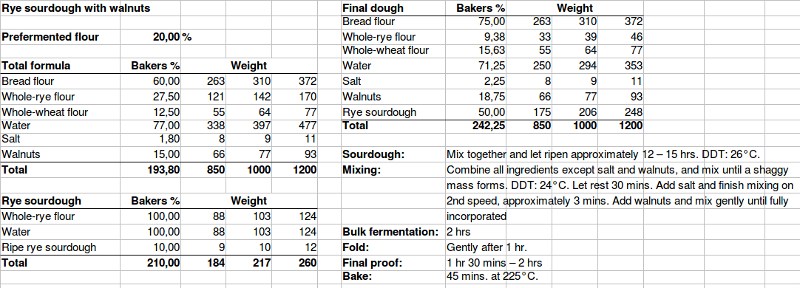
I wanted to focus on the flavour of a nicely ripened rye sourdough, the flour composition and the walnuts, so the recipe and formula itself is rather minimalistic and straight forward. It was the first time I tried it this morning, so it's not fully optimised yet, but I still feel it came out well-balanced hydration wise and in terms of bulk fermentation time and the final proof. It could hopefully serve as a decent baseline if anyone would like to bake a similar bread.

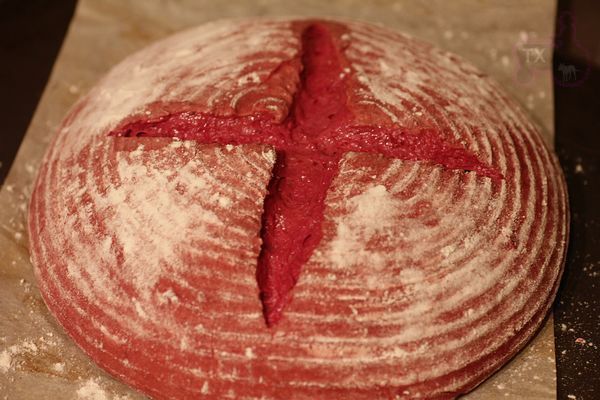
Below is a photo of the dough after bulk fermentation, just prior to pre-shaping. As the bulk fermentation was roughly 2 hours, I feel that a (very) gentle fold is required midway through. This strengthens the dough significantly, and makes it much more responsive and easier to shape afterwards.

If your time runs out, or if you're baking on a week night, you could probably retard it immediately after final shaping, but I think I would reduce the amount of pre-fermented flour somewhat if you're heading that route. I proofed and baked the loaf without any retardation; in that case, a final proof of approx. 1hr 45mins was right for me. It will definitely depend on your ambient temperature and the vigour of your sourdough, so start poking gently after some 70 - 80 mins.

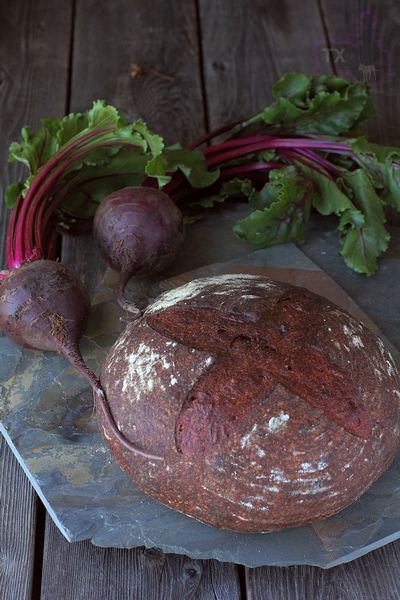
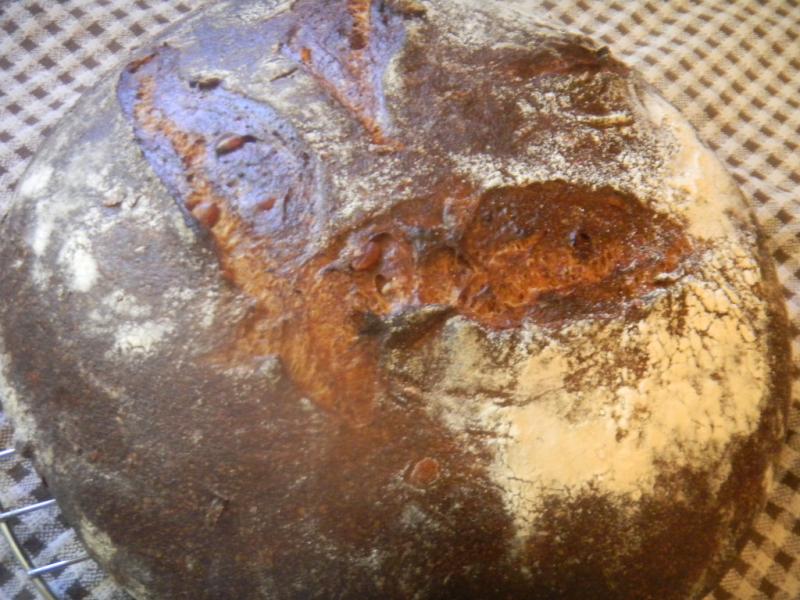
Here's a shot of the loaf, directly from the oven:

It had a nice, singing crust as it cooled down, and filled the kitchen with a most lovely smell. The singing crust and smell of the baked loaf is one nice perk of baking at home... And the crumb:

This will keep me happy the coming days, I expect!

I hope everyone enjoyed their Easter, and that you were able to spend it with friends, family and your loved ones. The days around Easter are always welcome as a respite from hectic weeks on either side of the celebration, and one can find a bit of peace and time for reflection.

I'm set for more time off in a few days, as I'll be taking my vacation early this year. I'm flying to Kiev on Friday, and I'll be spending three weeks travelling around in Ukraine, a country that has fascinated me for a long time with its rich culture and proud (but also, at times, tragic) history. I won't be freshloafin' much during those weeks, but I will make sure to sample Ukraine's range of baked goodies while I'm there. Hopefully, I'll have some photos to share in my next blog post. Until then, au revoir!

davidg618's picture
davidg618

Mid-February I wrote a blog entry http://www.thefreshloaf.com/node/27427/fine-tuning-process that included using  grill humidifying containers to generate steam. I've been using these for a couple months now, and can report I'm delighted with them.

These are sold by Amazon: Charcoal Companion CC4071 Moistly Grilled Grill Humidifier.

Although the manufacturer claims they are pre-conditioned, I've conditioned them further, and make certain I dry them immediately after removing them. They tend to rust slightly if not cared for. 

I place them on a rack in the top-most position in the oven. I  experimented with placing them on a bottom-most rack, but found it difficult--and less safe--removing them. The small rolled towel fragments at each end keep them from sloshing as all long and thin containers do, again a minor safety adjustment.

I fill them with preheated water, and place them on each side of the top-most rack about 10 minutes before loading loaves.  I've found they take a bit longer to produce steam, than a pan with more surface area. Nonetheless, once boiling they produce steam abundantly. I use them without their perforated covers. When the initial steamed baking time is completed I remove them, using oven gloves, immediately, and uncover the oven vent.  Then I place the oven into convection mode to finish the bake; the convection fan quickly vents the oven.

Prior, I created steam by putting a half-sheet pan, lined with wet towels, on the top-most rack. I got plenty of steam, but the pan blocked the radiant heat from the top heating coil. Consequently, I wasn't getting all the oven spring and bloom available. This method is the safest I've found to date, and as effective, or better, than any other method I've used previously.

David G

Pages

Subscribe to Recent Blog Entries