The Fresh Loaf

A Community of Amateur Bakers and Artisan Bread Enthusiasts.

Recent Blog Entries

dabrownman's picture
dabrownman

We haven’t made SD ciabatta in a long time and wanted to make one that included some YW in the levain, had some semolina, rye and WWW for flavor while using mostly AP and a little bread flour for the rest of the dry.  We added some VWG to up the gluten of this dough and improve its crumb.  We also took some of our standard pizza dough ingredients; the mix of herbs, garlic and sun dried tomato and added them with some chia seeds.

 The crust came out nicely browned and crunchy and softened as it cooled.  The crumb was open, soft,glossy and moist.  The herbs, garlic and sun dried tomatoes came though but were not over powering.  The SD tang was there in the background but it was subdued due to the YW and no retarding of the dough or starters to bring out the SD flavor.  We didn’t do two separate levains this time but mixed the YW right into the SD starter from the beginning.

 This might well be the best tasting ciabatta we have ever made – just delicious!


 It looks to be some fine sandwich bread for paninis by putting the crust of the bread on the inside and grilling the inside of the bread on the outside of the sandwich. Formula and Method follow.  Here is a nice beer can chicken sandwich with lettuce and Amish Swiss, chips, berries and some salad and a chocolate sandwich cookie. 

Method

Make the YW and SD levain in 3 stages each 4 hours apart for a total of 12 hours.  The levain will triple in volume

The next morning autolayse the flour with the water for 1 hour in the mixer bowl.  Add the levain and knead with dough hook on KA 8 for 8 minutes or until the dough releases from the bowl.  Add the salt and chia seeds and knead on KA 8 for 1 more minute.  Place in a well oiled plastic covered bowl for 15 minutes.  Do 4 S & F’s every 15 minutes in the bowl.  Add the herbs garlic and sun dried tomato and do 2 more S & F’s.  Let ferment and develop in a well oiled bowl until the dough at least doubles.  This will take about 3 hours

Turn out onto a well flowered counter, shape into (2) 8”x14” rectangles with an oiled dough scraper, dimple top with fingers, spray top with oil and cover with a dusting of flour and plastic.  Let rest 60 minutes.

After 60 minutes, preheat oven for 45 minutes at 500 F regular bake with steam and stone in place.  With 2 dough scrapers, transfer ciabatta to a floured parchment paper on a peel by flipping in over at the same time.  Reshape as necessary.  Slide onto stone and steam for 6 minutes.  Remove stream, turn loaves 180 degrees and bake another 6 minutes at 450 F convection this time.  When the internal temperature reaches 205 F it is done but not finished.

Turn off oven, leave door ajar and bread on the stone for another 8 minutes to crisp the ciabatta crust.  Move to a cooling rack to cool to room temperature.

Semolina, Rye and WWW Ciabatta w/ Chia Seeds, Herbs and Sundried Tomato      
       
Mixed Starter    Build 1    Build 2    Build 3     Total      % 
SD Starter2500253.69% 
Yeast Water30100408.00% 
AP55506016516.00% 
Water25354010016.00% 
Total Starter1359510033066.00% 
       
Starter      
Hydration74.65%     
Levain % of Total24.54%     
       
Dough Flour        %    
Rye255.00%    
Semolina20040.00%    
White WW255.00%    
Bread Flour8016.00%    
AP17034.00%    
Dough Flour500100.00%    
Salt102.00%    
Water500100.00%    
Dough Hydration100.00%     
       
       
Total Flour677.5     
Total Water632.5     
T. Dough Hydrat.93.36%     
       
Hydration w/ Adds92.67%     
Total Weight1,345     
       
Add - Ins        %    
VW Gluten51.00%    
Chia Seeds204.00%    
Total255.00%    
       
 Herbs and Veggies     
1 Clove Garlic      
1/2 T Garlic Chive      
1/2 T Rosemary      
1/2 T Sage      
1 T Sundried Tomato    


flux's picture
flux

I had a really rough start trying to get wild yeast to colonize on everything from a bag of NoName All Purpose to grinding some wheat berries into a rough flour with a spice blender; I think I've tried every starter recipe out there including a few from books.  I couldn't figure out what I was doing wrong so I sent off a SASE and cleaned the fridge of my other experiments when "Carl" arrived. Stuffed far in the back neither regions of my refrigerator was a ziplock of rye starter that was forgotten about, so I decided to try and revive that at the same time (I don't know what recipe I used, but its a very stiff starter, more like dough than batter) as Carl. I now have two starters and a kitchen that smells really nice on baking days. Flavour otoh still eludes me and will be working on how to bring out the tang.

I used the Alaskan sourdough recipe over on the Carl Griffith pages and divided the dough into three loaves (two boules and a loaf of cinnamon bread). I think I over proofed the loaves just a wee bit, but it's a bit hard for me to tell because I normally jump the gun and under-proof.

This time the loaves popped and crackled as they cooled on the rack.

The mouse holes are intentional. I haven't been deflating my dough after the initial mixing and have instead opted to use stretch and folds and a very gentle hand. I'm not sure what it is about this style of slowed down making/proofing/baking, but it makes for a wonderful grilled, or toasted, crumb.


I just wanted to thank everyone here who, without realizing it, has allowed me to pull loaves like these out of my oven. I've learnt a lot from this site.

And, if you think there's room for improvement let me know I'd appreciate the tips.

dabrownman's picture
dabrownman

home for the summer means 2 lunch sammys every day.  Something to look forward to!  One was semolina SD with brie, chicken and pepper jack grilled cheese with home made Dijon mustard.  Made another batch of mustard today but it tales 6 weeks to mature - not that it lasted that long :-(  The other sammy has two different SD and YW starters mixed in the same bread but each slice is a different variety.  It is served with our vapor aged white cheddar and pepper jack Mac and Cheese that is modestly flavored with Thai red curry paste. - Yummy!

\

MaximusTG's picture
MaximusTG

Today I baked the bread as described on this blog:

http://www.wildyeastblog.com/2007/07/08/my-new-favorite-sourdough/

I fed my starter yesterday evening, and it had more than doubled in volume this morning. After a quick trip to the local reform store, or "Ekoplaza" as this store is called, for some whole rye flour, I started the dough following the instructions. Made half of the recipe, opting to bake two 500 gram breads. 

Kneading and then S&F during bulk ferment went fine, so I then set up a couche from parchment paper. Shaped into two small batards and proofed for 2.5 hours. I had never really transferred bread from a couche to a peel, but I assumed I had to flip them on something and then put them on the peel, because they were supposed to proof seam-side up. This proved to be a bit of a problem because the dough had sticked to the sides of the couche. Guess I'll be getting me some cloth to use next time, I'm sure that would work better. You simply can't put flour on parchment paper, fold it so the paper is perpendicular to the table and expect it to stick ;). 

Eventually it did work out great though :) :

300,225300,225
300,225300,225

Edit:

Here are two photo's of the crumb. Didn't make them yesterday because the bread was still cooling. Thanks for the compliments!

300,225300,225


breadsong's picture
breadsong

Hello everyone,
Franko very kindly told me about a baking textbook that was available for sale online: On Baking
(authors Sarah Labensky, Priscilla Martel, Klaus Tenbergen and Eddie Van Damme).

Happily, I purchased the book, and once it arrived, the first thing I made was Turkish Pide Bread,
a round loaf with a pretty, diamond-patterned and sesame-coated crust:  

 
On the weekend, I saw this pineapple pattern on my friend’s tablecloth -
it reminded me of the Turkish bread’s crust:

Pineapple bread! I thought…and found a formula for Hawaiian Pineapple Sweet Bread in Advanced Bread and Pastry...
and Janie’s recent post about bakers from Mexico got me thinking about Mexican sweets and flavors.
 
Wanting to make this pineapple bread but being short of time, I made a sponge-based version of the ABAP formula, substituting a small amount of medium rye and whole wheat flour, and adding some fresh pineapple (diced, then caramelized with Mexican piloncillo sugar and unsalted butter, then flavored with small amounts of Mexican canela (cinnamon) and vanilla bean paste. This is how the pineapple turned out (yum!):


Here is the baked bread, kind of lumpy-looking but completely delicious: 
pineapple-brown sugar bread, or pan de piña y piloncillo :^)

To make the diamond pattern, I started by rolling with a thin dowel, but this dough was springy and the marks left by the dowel would not remain. I used a bench scraper to impress the diamond pattern on the dough, and went over the pattern a few times during proofing, and one last time, right before the bread went into the oven. 

The pineapple flavor completely infused throughout the crumb – loved how this tasted!
Here is the crumb:
(ice cream drizzled with some of the caramel sauce was a lovely accompaniment)

This is my adaptation of Mr. Suas' formula (1200 grams, to make 2 pineapple breads):


I enjoyed letting my oven 'travel around the world' for this bake :^)
(borrowing the phrase from this baker’s post)

With thanks to Mr. Suas for another fantastic formula – will have to try the levain version of his Hawaiian Pineapple Sweet Bread!

Happy baking everyone!
:^) breadsong

Submitted to Susan for YeastSpotting


rossnroller's picture
rossnroller

Not drawing as long a titular bow as you might think! These two master craftsmen have much in common.

Rubaud bakes only one variety of mixed-grain sourdough bread, endlessly repeating his formula and process (while tweaking according to changing seasonal conditions and grain variations). By all accounts his bread is magnificent - the home version I (and many others here) have made using local flours and his formula/process certainly is. Farine has provided a series of terrific blog posts on Rubaud. See here.

Jiro is an 85 year old sushi master whose modest stool-and-counter establishment in a Tokyo subway station, Sukiyabashi Jiro, has been awarded a 3 star rating by Michelin. No other sushi establishment has been honoured so.

(NB: I'm not a fan of elitist food Bibles like the Michelin Guide - or of western food critics who rock up to an Asian country and start making pronouncements on purveyors of the local cuisine - but that's another conversation. While the Michelin Guide has put Jiro on the global foodie map, he has long been acclaimed in his own country and is considered a national living treasure.)

Like Rubaud, Jiro uses only premium quality ingredients, and has no "secrets". He is a master because he has single-mindedly devoted his life to his craft. The attainment of excellence through narrow focus applies to both Rubaud and Jiro. In Japanese terminology, both are shokunin - craftsmen who have become masters through repetition of process over many years (although Jiro has carried this to extremes, having committed 70 of his 85 years to developing his sushi-making expertise!!).

I became aware of Jiro via a terrific film, Jiro Dreams Of Sushi. It's currently running on limited release in Australia, but may have been released a few weeks ago in the States. Hopefully, it is still showing. If so, HIGHLY recommend TFLers seek it out. While sushi and bread may seem worlds apart, the similarities I have alluded to between Jiro and Rubaud point to much common ground. And while you will surely be able to pick up this little gem of a doco on Blu-Ray/video not so long from now, the drool factor of beautifully composed close-ups of utterly delectable-looking sushi on the big screen will be compromised on home theatre systems, no matter how high end.

Anyone who loves great food will love this film. If you're into sushi, it's an absolute must-see.

If you want further details on Jiro and the movie, I have written an expansive review. See here.

Cheers all!
Ross

Isand66's picture
Isand66

I've been wanting to try my hand at making Phil's 100% Whole Wheat Desem bread since it sounded so simple but yet so good.  I had started preparing the Desem starter a while ago but had to abandon it when I went away for business.  I was not thrilled with the way it was turning out anyway so it wasn't a great loss.

I decided to try a different approach for building the starter from my 100% AP White Starter by doing a 3 stage build.  For the first build I used 50 grams of seed starter, 125 grams Bread Flour (KAF), 75 grams Organic Whole Wheat Flour and 200 grams of water.  I mixed this up and left it out at room temperature overnight for around 10 hours.  I then put it in the refrigerator until that evening when I proceeded to stage 2.  I added 142 grams of Whole Wheat, and 85.4 grams of Water.  I left this out again overnight and put it in the refrigerator until the next evening.

For the third and final build I added another 142 grams of Whole Wheat and 85 grams of water.  I left this out for one more evening and refrigerated it until that evening when I prepared the final dough.

I ended up making a lot more starter than I needed, but it was worth building it up to around 61% hydration as the starter was nice and fruity and ready to go to work!

Please see Phil's original recipe for the formula and his original procedures here http://www.thefreshloaf.com/node/27999/honest-bread-100-wholewheat-desem-bread-and-some-country-bread.  I decided to change his procedures by using my Bosche Mixer as follows:

After the flour autolyes for 1 hour I added the levain and mixed on speed #1 for 1 minute and #2 for 4 minutes.  I then did a stretch and fold, rested the dough uncovered for 10 minutes.  I then did another stretch and fold, covered the dough and let it rest for 10 minutes.  I did one more stretch and fold and put it in a lightly oiled bowl for 2 hours.  I then put it in the fridge overnight.

The next day I let the dough sit out at room temperature for 2 hours.  After 2 hours I formed it into loaves and put them in floured bannetons and let them rise covered for 2 hours.

I then baked on my oven stone with steam at 450 degrees until both loaves were golden brown and reached an internal temperature of 200 - 210 degrees F.

The dough lived up to all of its good press and had a nice slightly sour/sweet taste.  I have been eating it all week and it makes great toast!


dabrownman's picture
dabrownman

We were inspired by Varda’s recent Priests Hat  Altamura Style Bread Revisited here: http://www.thefreshloaf.com/node/28663/altamura-style-bread-revisited 


and thought we would convert it to our new, nearly normal, 3 day, multi-grain with sprouts and seeds process – no nuts this time.  We reduced the semolina and added some; rye, 6 grain cereal, white WW, AP and bread flour. 

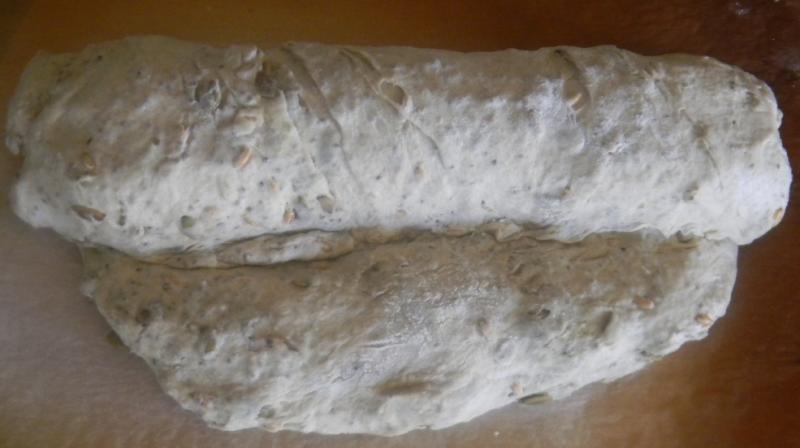
 I suppose we like the way the dough was shaped the most and what drew us to this take onAltamurastyle bread.  With our college age daughter home for the summer, she wanted to learn how to bake and cook so when she moves off into her apartment next year she won’t starve.  So she learned some French slap and folds and regular S& Fs on this loaf.   But didn’t make it out of bed early enough to do the unusual Altamura Priest’s Hat shaping.

 The dough rose well during the 20 hour retard period in the refrigerator and, after coming to room temperature the next morning, it nearly folded itself into the hat shape.  At about 2 ½ hours it was ready for the oven having passed the poke test.

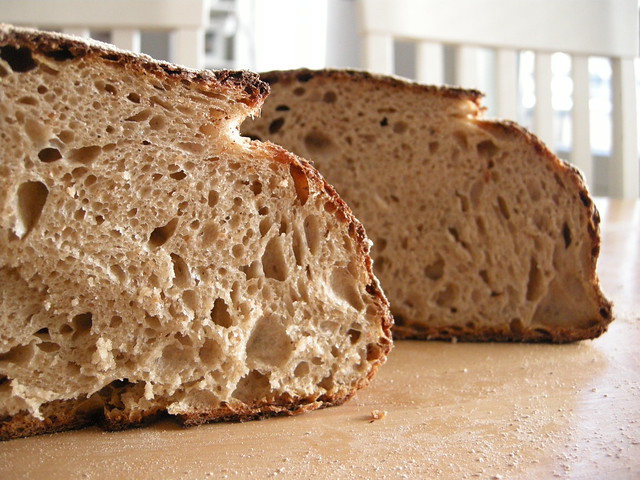
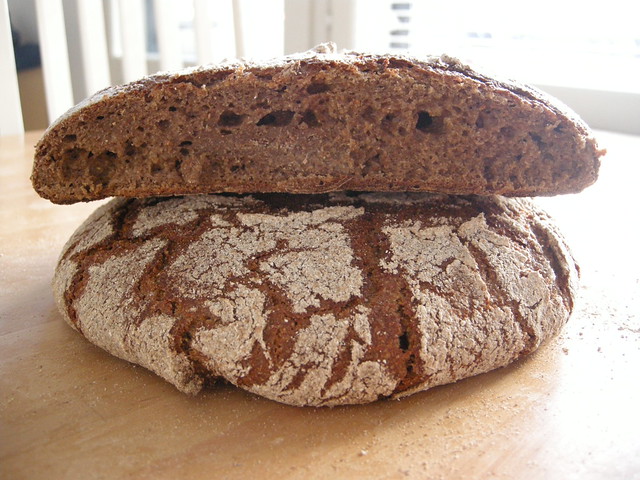
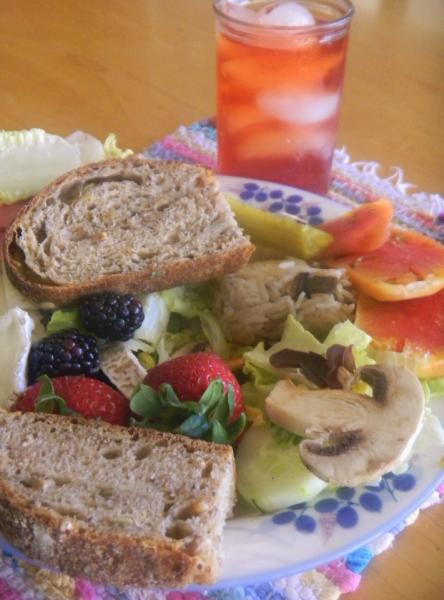
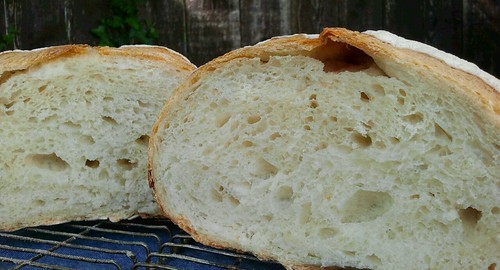
 The crust browned very nice and dark, the way we like it, the seeds and sprouts were popping out here and  there.  Best of all the crust was very tasty. The crumb was fairly open with all the whole grains, seeds, and sprouts but the taste and texture were just great.  We really like how this bread tastes.  The SD tang was deep and complex so the 3 day process worked.  Can’t wait to taste it tomorrow.  Formula and methods follow the lunch shot.

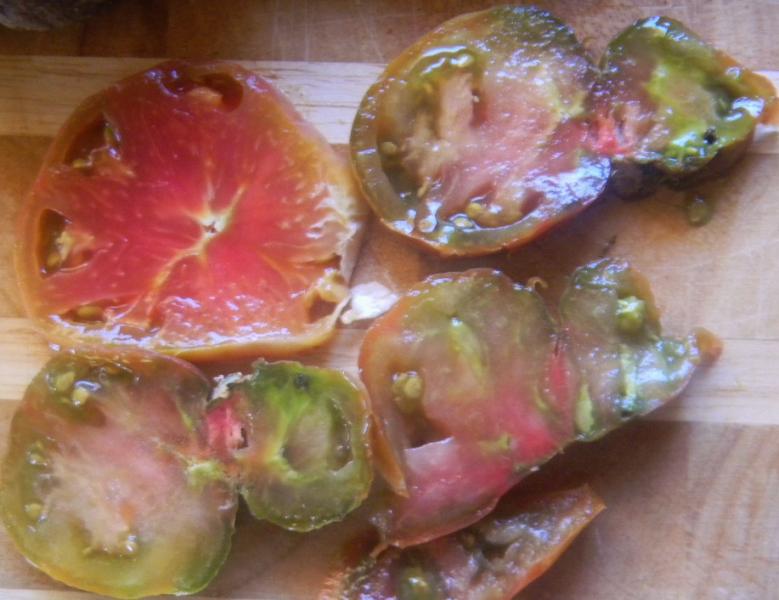
It took years of genetic engineering to get a home grown heirloom tomato color to match Green Rooibos, Honeybush, 4 Fruit Tea but even longer to get the same tonato to match the shape of Altamura 'Priest's Hat' Bread.

Semolina, Rye and WW Bread With Sprouts, Sunflour and Chia Seeds     
      
SD StarterBuild 1Build 2 Build 3Total%
SD Starter2000203.48%
Rye10100204.44%
Semolina0025255.56%
WWW1000102.22%
AP1515205011.11%
Water3535209020.00%
Total90706522550.00%
      
Starters %   
Flour12527.78%   
Water10022.22%   
Hydration80.00%0.00%   
Levain % of Total 19.98%   
      
Dough Flour %   
6 Grain Cereal5011.11%   
Semolina10022.22%   
White WW5011.11%   
Rye5011.11%   
Bread Flour10022.22%   
AP10022.22%   
Dough Flour450100.00%   
Salt92.00%   
Water33273.78%   
Dough Hydration73.78%    
      
Multigrain Sprouts %   
WW153.33%   
Rye153.33%   
Spelt153.33%   
Total Sprouts4510.00%   
      
Add - Ins     
Sunflower Seeds4510.00%   
Chia204.44%   
Total6514.44%   
      
Total Flour575    
Total Water432    
T. Dough Hydrat.75.13%    
      
Hydration w/ Adds75.13%    
Total Weight1,126    

Method

Start the sprouts by soaking the berries in water for 5 hours then spread them out on a damp paper towel, cover with another paper towel and then cover in plastic.  Set aside to sprout until needed – about 1 ½ days.

Start the SD levain build by following the 3 builds 3 hours apart and then refrigerate overnight.

Start the autolyse by combining the flour and water in the mixing bowl, cover with plastic and refrigerate for 24 hours.

Remove the levain and autolyse from the fridge and allow them to come to room temperature - about 90 minutes.

Mix with a dough hook, the levain and the autolyse in the mixing bowl on KA 2 for 4 minutes add salt and continue kneading for an additional 2 minutes .  Place in a well oiled bowl to rest for 15 minutes.  Do a few minutes of French slap and folds and let rest for 15 minutes, then do 4 S&F on 15 minute intervals.  Add the sprouts and seeds on the 3rd S&F and allow to rest for and ferment for 1-2 hours after the 4th.  Form into a boule and refrigerate overnight.

 Remove from refrigerator and allow dough to come to room temperature – about 90 minutes.  Flatten gently into a 8 x 18 rectangle and form into a priests hat by folding in half  from the short end and sealing the top edge.  Then fold up from the short end again but only go ¾ of the way up sealing the top and sides.  Allow to proof on parchment paper, on a peel, inside a trash bag until it passes the poke test about 90 minutes.

 Preheat oven to 500 F with steaming method and stone in place for 45 minutes.  Slide hat onto the stone and turn the oven temp down to 425 F after 4minutes.  Allow to steam for another 12 minutes.  Remove steam, turn down to oven to 425 convection this time, and allow bread to bake turning every 8 minutes, 120 degrees, until center reaches 205 F.  Turn off oven and leave on stone for 10 more minutes, with the door ajar, too allow skin to crisp up.  Move to wire rack to cool completely.


jarkkolaine's picture
jarkkolaine

For about two months, I had had my sourdough starter sitting on the kitchen counter covered with a kitchen towel. Last week, when I finally found time to look at it again, it looked like a dry cracker cookie. 

I had no idea if I could still restore the starter or not, but I decided to give it a try.

I added some water to dilute the dried starter. When most of the starter had turned into a milk-like fluid, I removed the remaining pieces of dry dough and added just enough flour to get it back to the normal consistency of my starter (at 100% hydration, 50/50 full grain and all purpose flour). I then left the starter on the kitchen counter and waited. The next morning, the starter was full of life!

Just look at this before and after photo:

After a couple of days of daily feeding cycles, I finally had the time to try to bake something with the starter.

--

About two weeks ago, I visited Viipurilainen kotileipomo, a family run bakery in Lahti, about 100 kilometers from Vantaa where I live to meet with the bakers and see how they work on their full-grain rye bread (among other things). The four baking brothers I met that night where some of the friendliest people I have ever met, and their rye "limppu" is delicious! So, inspired by seeing them at work, although I didn't ask for their recipe, I decided to try my luck with creating my own version of this Finnish tradition called "ruislimppu." 

At about the same time as I started reviving my old wheat starter, I created a 100% rye starter by mixing a handful of dark rye flour and some water. I didn't write down the exact measurements but it resulted in a rather wet and sticky dough to start with. I fed the starter daily, slowly increasing the mass of the dough, until it felt really sour and light. Ready for use. That was the night before the bake. Last week's Saturday. 

On that night, I made the rye "limppu" dough by mixing the starter with about 1.5 kilograms of rye flour and 1 kilograms of water. As I don't know the amount of flour and water in the starter, I can't give exact figures. I will try to be more exact the next time I make this bread... I didn't knead the dough at this point, just mixed the ingredients to a consistent mass. 

On Sunday morning, I mixed in the salt and did a very brief kneading for the dough. The dough was quite wet and it was practically impossible to knead, so I didn't spend much time on it. At the same time, I also prepared a batch of my favorite dough for two loaves of Basic Country Bread from Tartine Bread. 

I was baking for most of the day, and here are the results. I'm pretty happy with them: even the rye limppu tastes right. The rye loaves could be a bit lighter (it's definitely denser and flatter than the one from Viipurilainen kotileipomo), but that's not necessarily a requirement: most of the time they look just like this when you buy them from Finnish grocery stores: dense and dark, but full of flavor (especially with a thick layer of real, creamy butter on top!).

Basic Country Bread:


Rye Limppu:

Franko's picture
Franko


This is a Tarte Tatin made last weekend that I hadn't gotten around to posting till now. Tarte Tatin is a favourite of mine to make for it's delicious combination of baked apples and caramel, all sitting atop a base of buttery pastry. I've been making the tarte for many years, always using a shallow glass pie pan to bake it in. This time I decided to use an 8" cake pan to make it a bit higher to improve the overall appearance. Something else I altered from my usual method was to use an even richer caramel sauce for the coating rather than the simple sugar, water, and cream caramel sauce I've used in the past. The new sauce recipe is from Suas' "Advanced Bread & Pastry" which uses glucose, (I used corn syrup instead), sugar and water for the syrup, with the incorporation of butter and cream once the syrup has caramelized, a small change but with much better flavour and texture. The pastry used were some scraps of puff pastry I've had in the freezer for a few months. In fact it's having the scrap that quite often gives me the notion to make one of these in the first place as I can't think of a better way to use it up. If the scraps have been stacked together before freezing they should give adequate lift for this application. The apples and caramel tend to compact the pastry eventually anyway, so I've always thought using regular puff a bit wasteful for something like this, but no reason it couldn't be used. Once the sauce was made and had a chance to cool slightly it was poured into the pan and swirled around to coat the bottom and sides as evenly as possible, then thick slices of peeled Granny Smith apples were overlapped around the sides, interspersed with pieces of dried apricots to add some chew. The center of the pan was filled with more overlapping apple and apricot and a second layer was built on top of the first to fill the pan, pressing the apples down into the caramel. Out of personal preference I sprinkle some lightly toasted almond slices and cinnamon on top of the apples at this point for extra flavour and texture. The cold pastry was rolled out to slightly larger than the pan then draped over the apples, rolling the edge up all around and tucking it in around the sides. A steam vent was cut and the tart was baked at 350F/176C until the pastry was golden brown, then allowed to cool for 2 hours. After a 5-10 minute warming in a 200F/93C oven it was inverted onto a serving plate. If there is any residual sauce left on the plate it can be served with the tart immediately, or poured off and reserved to serve separately at a later time to keep the pastry from becoming soggy. Using the cake pan and the caramel sauce made a major improvement to the Tarte, resulting in a much better presentation and richer flavour compared to ones I've made previously.

Cheers,

Franko

Pages

Subscribe to Recent Blog Entries