We were inspired, even though the wrong time of year for laminated doughs with it being 8o F inside and 105 F outside in AZ, by txfarmer's croissants and Danish pastries.
We needed to change her recipe from yeast to sourdough and yeast water since I no longer stock any commercial yeast. I didn't expect my first attempt at laminated dough to be anywhere near txfarmer's and I was right. Freezing some of the croissants and Danish didn't help any either I suppose :-) But I did learn many important things about lamination which will help my assistant out later.
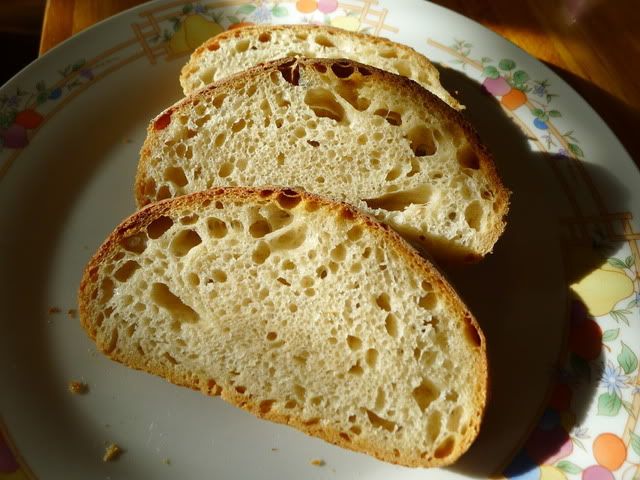
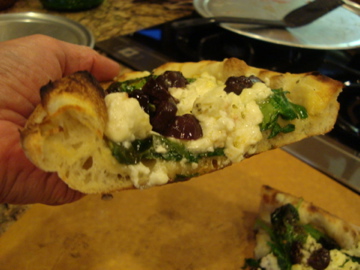
A very nice grilled; Amish Swiss and pepperjack cheese with grilled chicken sandwich made for lunch with this fine white sandwich bread. Love the chia seeds. The sweet potato and the pickled tomato, red onion and cucumber salad were also nice.
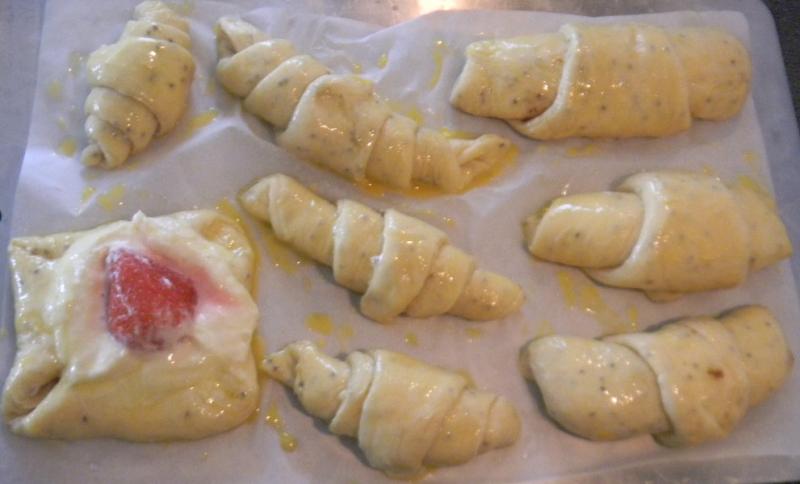
We made this enriched dough (can't believe it didn't have cream in it too) into 3 variations with various flavors; a non -laminated white sandwich bread (half of the dough split off before lamination), 3 kinds of Danish (blueberry, strawberry and dried apricot) and 2 kinds of croissants (plain and with a sweet home made mince meat filling made with beef shanks - those are the fat ones that didn't have 7 steps).
Used 27.5% of the total dough weight in roll-in butter (180 grams), txfarmer recommends 30% but we had a few more add ins than her recipe that upped the total weight. Txfarmer also said to hold the hydration down al little and I managed to somehow up it slightly,at least a couple of percent, if I calculated properly. We used dried apricots and they burned on the top and I should have reconstituted them in bourbon or water. We wanted to take them out of the oven at 25 minutes but by mistake took them out at 22 minutes and they could have used another 3 minutes in the oven. If you live in AZ it is best to do this in the wintertime.
My wife summed it up best. They don't look too good but they taste OK. I give the sandwich loaf a solid B and the rest a C only because it was a first attempt - my apprentice is worried she will soon be replaced since she said she was a lamination freak - well, at least the freak part was right:-)
The formula and method follows the pictures.
Method
Build the levain over 3 - 4 hour steps. I mixed the YW and the SD together from the beginning as is our usual now a days. Mine had more than doubled over 12 hours and then I refrigerated it overnight.
The nest morning, mix everything except the levain and the salt together in the mixing bowl and autolyse for 1 hour. Add the levain and the salt and mix on KA 2 for 4 minutes and KA 3 for 1 minute. Remove to an oiled bowl and rest for 15 minutes. Do (4) S &F’s every 15 minutes. At the 1 hour mark let the dough develop and ferment for 1 hour.
At this point I split off half the dough and formed it into a boule and let it ferment for another hour. Then it was formed into a loaf, placed into a Pyrex loaf pan and refrigerated for 4 hours. It doubled in the fridge. It was then removed and allowed to final proof for 3 hours. When it tripled in volume from when it initially went into the loaf pan, we slashed it and put it into a425 Fmini oven with steam for 10 minutes. The steam was removed and the temperature turned down to 375 F convection this time. The loaf was turned 180 degrees every 4 minutes 2 times. At this point the loaf was removed from the Pyrex and allowed to finish baking turning 2 more times at 5 minute each. When the loaf reached 205 F the loaf was allowed to stay in the off oven with the door ajar for 10 more minutes to crisp the crust.. It was then removed to a cooling rack.
The other half of the dough was used for lamination and I followed txfarmer’s method and procedure. I used180 gramsof roll-in butter for 645 g of dough (27.5%). The croissants and Danish were retarded overnight in a plastic bag in the fridge where the back half of them froze – no harm done though. In the morning, they came out of the fridge for final proof – this took about 2 ½ hours. Then they were placed in the 425 F oven for 22 minutes (should have been 25 minutes) rotated half way through and the temperature turned down to 375 F convection. When done they went onto a cooking rack from the parchment covered baking sheet.
Having recently tried Syd's version of a San Fran SD, I thought it was a good time to revisit DM Snyder's very different version. When I baked it a couple of months ago, my sense of taste had been annihilated by a shocker of a head cold, so was curious to try it again now that I'm back to salivating, savouring, gluttonous normality.
I don't have an electric mixer or bannetons, so I modified David's recipe accordingly, but otherwise sought to stay as true to his recipe/directions as possible. The starter and dough mix was the same, but of course my local flours differ from David's. And at a temperate 20.5-21C (approx 70F) my ambient temps are now lower than those he baked at. Last time, I had to drastically reduce his bulk and final proof times, as it was evident from the state of the dough that it was ready to rock. The finished bread confirmed this. In fact, it was slightly overproofed - some classic early signs of this are observable in these pics of that bread:
I thought the overproofing might be explained away by the still summerish ambient temps at that time.
As anticipated, on this occasion I was able to stick closer to the proof times David used, since my temps were now so much lower. ie: BP was 4 hours, FP before retardation 1 hour, retardation was 9 hours @ 5C/40F (fridge temp recently taken). However, I found that I had to completely cut out the post-retardation final proof period, as the shaped dough was clearly ready for the oven on removal from the fridge after its retardation. In fact, it was slightly over-ready - the baked loaf showed signs of overproofing!
I just sliced into some of the bread for lunch, and I must say, I was very impressed with the beautifully developed wheaten flavours - cool and almost creamy to the palate. As with the first bake, I like the textural quality of the crumb, too, which I can only describe as soft yet well structured. And the crust is crisp but not a jawbreaker, just how I like it. Very nice. Notably, though, NO hint of sourness! I don't mind at all, as I'm not a big fan of sour bread, but I do like a mild sour tang, and was expecting this of a SF style SD. I suppose my reduced final proof might have had something to do with the absence of sourness.
I'm still puzzled by the proofing. Even with Syd's SF SD, which he makes in the much higher ambient temps of his Taiwan kitchen, my proof times had to be reduced to avoid over-proofing. I am well aware that fermentation and proofing times should be determined according to the dough, not the clock, and this has long been my modus operandi. Still I wonder, though, why at my kitchen temp of 21C/70F, my fermentation and proof times inevitably need to be reduced from those specified in recipes where ambient temps are around 24C (or in Syd's case, considerably higher). Manic starter? Seems far-fetched. Flour qualities? Maybe...but wish I could get a definitive answer. Any other suggestions, folks?
Here are a couple of pics of today's bake of David's SF SD, which show unmistable signs of overproofing: limited spread of slashes, some tunnelling under the crust and bubbling on the outside, and crumb compression at the base of the loaf. I have to reiterate, however, that the eating qualities of this bread were fine indeed.
Cheers Ross
Does overproofing explain all this caving? Maybe not - I am thinking the mousehole centre-right might indicate a shaping issue...
Yesterday, with warmed weather and some time to fire up my oven. I made several pizza's for us and the neighbors.
The oven was a little cold. So a slow buildup from smaller fires to larger hotter ones where done through the day. I made use of the smaller firing for my favorite roasted peppers and Italian sausages.
I was so inspired to make a version of the Turkish Pide bread after viewing a site called 'The Pizza Goon.com' and even more inspired to after seeing breadsongs last post on 'Pide'. 'I apologize to breadsong'. I'm having trouble with my links.
'thepizzagoon.com' what a fun site to visit. I used his shaping and much inspiration for my Greek Pide. How fun and easy these are to make.
I choose one of my favorite pizza recipes from P.R. 'American Pie' and also posted on TFL by Floyd with included recipe. The only changes I made was to add a little more hydration. I thought the dough was well suited for the Greek Pide and it turned out I was very happy with the results.
Roasted Peppers in the WFO directly on top of the burning coals, makes for a very fast char that ends with a perfectly, not overcooked inside and a char that removes easily and leaves a lovely sweet smokey flavor...this works much better than setting them in a pan to roast in the WFO.
Roasted peppers and sausages in the beginning smaller firing to warm up my cold WFO.
Peppers in EVOO, garlic and sea salt ......
I shaped my pizza's large today. This one has been pulled onto my lightly flour 14" paddle. I will top it and into the wfo
that's now very hot and ready for pizza's.
My photo's are small. The best I could get to download today.
Pepperoni's just out of the oven
Underside of crust....... best I could get. Remember this is a one man bake, photo shoot..hubbies watching tv :)
This ones for 'thebrownman' Love, the Roobios Sangria!
About now the oven had cooled, a little, and I made a Greek style Pide. Quick and easy to make and oh so delicious..I had put my last two dough balls into the freezer and wish now I would have made some more. They keep nicely for enjoying later with a little warm up. These are great!
Piled on some spinach first, topped with feta, sliced kalamata olives and drizzled with EVOO. Forgot to add some seeds on the crust....next time! Though these are traditionally done in a WFO. They should bake up beautifully in a regular oven on a stone. What a wonderful replacement for a salad or appetizer or anytime.
Just shape your dough into a long oval, place ingredients, fold up sides, take ends, slice, twist together and roll. Place onto a lightly floured pizza paddle and into a hot oven. Also, you can form you Pide on parchment paper and bake for easier handling.
The fire was cooling down and baked the Greek Pide nicely.
Out of the WFO
Crumb turned out just as I hoped with a nice crisp crust on the bottom
Another thank you to thebrownman. I had thawed out some lovely frozen pie ready peaches, the last from last summer. I wanted dessert and by the end of the day was to tired to prepare a pie crust for the cooling oven... What a great idea, I saw thebrownman's post with his 'Crumble' Perfect and fast. Into the oven...I didn't make near enough crumble..to tired again..it was made with chopped pecans, cinnamon, brownsugar, rolled oats, canola oil...fast and easy..we enjoyed dessert :)
A lot to write about, I suppose, given I have not managed to post a blog entry for almost nine weeks, mainly because I have been so busy, and tied up with so many baking-related activities.
The March Farmers’ Market in Alnwick was a big success; the sun shone all day long, and my stall caught everybody’s attention as it was facing straight at the towns’ shoppers on entry to the Market Square. I sold out of bread in just over 2 hours.
Alison and I took the long drive to NW Scotland the next day after the Market, for a week’s holiday. The beautiful weather we had enjoyed for most of March was breaking, so our time in Sutherland brought snow, wind and sleet, as well as sunshine. Our holiday cottage had an old-fashioned stove with an endless supply of fuel to burn. The kitchen had some wonderful “le Creuset” pans, so I decided to experiment with the Dutch oven methods of baking oft mentioned on TFL.
I had taken my Rye Sourdough culture plus Bacheldre Organic Dark Rye and Marriage’s Organic Strong Wholemeal. I baked twice through the week, and made the same loaf each time, naming it “Rye and Wholewheat Holiday Bread”, with an “H” cut into the top. Here are the essential details:
Rye and Wholewheat Holiday Bread
Material/Stage
Formula [% of flour]
Recipe [grams]
1. Rye Sourdough
Stock
40
Bacheldre Organic Dark Rye Flour
30
150
Water
50
250
TOTAL
80
440
Returned to stock
40
2. Final Dough
Rye Sourdough [from 1]
80
400
Marriages Organic Strong Wholemeal
70
350
Salt
1.6
8
Water
35
175
TOTAL
186.6
933
% pre-fermented flour
30
-
% overall hydration
85
-
% wholegrain
100
-
FACTOR
-
5
Method:
Build the sourdough to the required quantity. I used 2 refreshments over 36 hours.
Mix sourdough with water and flour; cover and autolyse 50 minutes.
Add salt and develop by mixing by hand for 10 minutes.
Bulk proof for 2 hours; S&F after one hour
Pre-shape, then prepare a banneton. Final shape.
Final Proof for one hour.
Pre-heat Electric fan oven containing Le Creuset Roasting pot and lid for one hour to 240°C. Also set a pan of hot stones in the bottom of the oven prior to pre-heating.
Flour the base of the hot Le Creuset pot and tip the proved loaf gently into the pot. Flour the top if needed, then score an “H” for holiday into the top. Load the lidded pot to the oven and apply steam. Turn the heat to 200°C after 15 minutes. Take the lid off after another 15 minutes and bake out for another 10 – 15 minutes. Turn the oven off and leave the loaf inside for 10 minutes with the door wedged ajar.
Cool on wires.
What was special? This is a 100% wholegrain loaf, with 85% hydration. Our sandwiches, enjoyed out “in the hills” were joyful. Here is a brief reminder of an amazing part of the world which we both love so much.
I revised my Hot Cross Bun recipe, finally giving in and cutting down on the liquid content, which was excessive. Freshly ground spices; they are divine! Formula:
HOT CROSS/SPICY BUNS
Makes 36 buns @ 70g
Material
Formula [% of flour]
Recipe[grams]
1. FERMENT
Strong White Bread Flour
20
180
Caster Sugar
5
45
Fresh Yeast
8
72
Water @ 38°C
45
405
TOTAL
78
702
2. FINAL DOUGH
Ferment [from above]
78
702
Strong White Bread Flour
80
720
Salt
1
9
Milk Powder
8
72
Butter
15
135
Egg
15
135
Caster Sugar
15
135
Cinnamon
1
9
Nutmeg
1
9
Sultanas
33
297
Raisins
17
153
Mixed Peel
17
153
TOTAL
281
2529
3. CROSSING PASTE
White Flour
150
Shortening
35
Water
200
4. STOCK SYRUP
Caster Sugar
150
Water
150
FACTOR
9
Method:
Make the sponge [flying ferment]: Weigh out the water, making sure temperature is correct. Dissolve the yeast into the water. Add the flour and sugar, and whisk to a smooth batter. Cover and leave in a warm place for 45 minutes
Weigh the other ingredients: blend the flour with the other dry ingredients. Cut the butter into small pieces and rub roughly through the dry ingredients. Weigh the egg separately. Weigh the dried fruit separately.
Add the egg and dry ingredients to the risen sponge, and combine to form a soft and strong dough. Mix for 3 minutes on first speed and 8 minutes on second speed to develop, scraping down the bowl as necessary.
Rest the dough for 20 minutes, then use a metal cutter to cut through the dough and add the fruit.
Rest the dough for 40 minutes. Scale and divide into 70g pieces
Mould each dough piece round, and rest covered for 15 minutes. Prepare 3 baking sheets for the oven. Pre-heat the oven [180°C, or, 160°C for a fan oven]
Re-mould dough pieces and tray-up 4 x 3 on baking sheets lined with silicone paper [baking parchment]. Brush the tops of the dough pieces with beaten egg and cover.
Final proof in a warm environment for 1½ to 2 hours.
Pipe on crosses for HotXBuns.
Bake for 15 – 20 minutes
Glaze with sugar syrup immediately after baking
Cool on wires
The April Farmers’ Market was equally successful; I took record takings, and had one loaf left to give to my business adviser who I was able to meet up with after the market closed to discuss a potentially very exciting new business opportunity currently being explored.
Early in May we set out on a new Farmers’ Market adventure with a partnership with an old friend and business colleague who has built a fabulous wood-fired oven in his garden in Ryton, on the edge of the very lovely Tyne Valley. I have posted on this before, here: http://www.thefreshloaf.com/node/27794/development-day-work-nigel-13th-march-2012
My friend Nigel is making some White Levain breads and some Golden Linseed and Light Rye breads. I am making Moscow Rye and Gilchesters’ Miche, which I have posted on before…a number of times. We made just short of 100 loaves. Moving forward our aim is to make 150 loaves. Hexham is a lovely, historic town in the west of Northumberland, and trade at the Farmers’ Market is brisk…weather permitting!! We enjoyed sunshine and had sold out by lunchtime. Very good vibes!
Now I am building up stock ready for the next Alnwick Farmers’ Market on Friday. I’ve made Moscow Rye and some Black Pumpernickel breads in pans to keep the non-wheat people happy, as well as plenty of Gilchesters’ type breads. Today I spent some time perfecting a Pain de Campagne recipe using 2 leavens. I have posted similar before, but here are the details:
20th May 2012
Pain de Campagne with Rye Sourdough and Wheat Levain
Rye Sour Refreshment:
Day/date
Time
Sour [g]
Dark Rye [g]
Water [g]
TOTAL [g]
Temp °C
Sat 19 May
15:00
40
200
120
360
28°C
Wheat Levain Refreshment:
Day/Date
Time
Levain
Bread Flour
Water
Total
Temp °C
Sat 19 May
15:00
40
160
96
296
22°C
Sat 19 May
18:00
296
200
120
616
22°C
Material/Stage
Formula [% of flour]
Recipe [grams]
1a Wheat Levain
60% hydration
Marriage’s Organic Strong White Flour
22.5
360
Water
13.5
216
TOTAL
36
576
1b Rye Sourdough
167% hydration
Bacheldre Organic Dark Rye Flour
7.5
120
Water
12.5
200
TOTAL
20
320
2. Final Dough
Wheat Levain [from 1a]
36
576
Rye Sourdough [from 1b]
20
320
Marriage’s Organic Strong White Flour
50
800
Marriage’s Organic Strong Wholemeal
20
320
Salt
1.5
24
Water
43
688
TOTAL
170.5
2728
% pre-fermented flour
30
-
% overall hydration
69
-
% wholegrain flour
27.5
-
FACTOR
-
16
Method:
Prepare the levains as schedule. Make a cold “autolyse” with final dough flour and water plus the rye sourdough. Chill the autolyse and the wheat levain overnight.
Combine wheat levain and autolyse in the mixer on first speed for 5 minutes. Add the salt, mix 2 minutes on first and 3 minutes on second speed.
Bulk ferment for 2½ hours; S&F after 1 and 2 hours.
Scale and divide [2 @ 1400g]; mould round. Rest 15 minutes and prepare 2 large bannetons. Re-mould and set for final proof in bannetons.
Final proof 1½ hours. Pre-heat oven.
Tip onto peel, cut the top of the loaf and mist with water spray; set on stone in the oven. Apply steam. Set into oven at 280°C, no fan. Set heat to 250°C. Mist loaf after 10 minutes and top up steam if needed. After another 10 minutes, switch to convection and drop heat to 200°C for 20 minutes. Drop heat to 180°C and bake out a further 10 – 15 minutes.
And last week a local cookery writer came to visit and do a day of baking with me. Her enthusiasm was infectious, and I tested both the wood-fired oven and electric oven to the limit, making Seigle d’Auvergne, Gilchesters’ White loaves, Wholemeal Bloomers, Moscow Rye panned loaves and Spicy Buns [as a featured recipe]. Busy day! For more on Jane Lovett, see here: http://www.janelovett.com/
Honestly, there is a lot more than this going on just now, and it is making it impossible for me to post as much as I have done in the past. My apologies for that. Still, I promise to keep everyone up to speed on the Bread and Roses baking ventures, somehow or other.
Oh! Alison’s booked our holidays too: we are off to Paxos in August for 2 weeks. It’s the Powburn Show just before we go, and Alnwick Farmers’ Market shortly after we return! Then it’s the Food Festival in Alnwick in September and I have a Guest Speaker slot. Hopefully, I will have completed my Dissertation too and be looking forward to a trip to London to celebrate being awarded a Master’s Degree. That is sometime away, and a lot will happen in between times.
While part 1 of this week's blog entry explored the wonderful world of rye, part 2 is fully devoted to the good things that come from the duck. I don't use duck that often, but when I do, I like to buy a whole duck and book the whole weekend for fun in the kitchen. Even though it can be quite delicious roasted, I personally think it's better to work with the different parts of the duck separately. If you roast the whole bird, you know that when the breast pieces are perfectly cooked, the legs will be partly done and far from tender. Roasting the bird longer will make the legs more palatable, but the breasts will be dry... So why not break it down and cook each part on its own?
My plan for the weekend was to pan fry the duck breasts, make a stock from the bones, render duck fat from the skin and confit the duck legs. The legs are rubbed with coarse sea salt, some crushed pepper and cloves, as well as a little thyme and slices of garlic.
Leave the legs in the dry cure at least overnight, or up to 48 hours, and make sure you wash it off with cold running water before continuing with the confit. Just rubbing the salt off might leave you with overtly salty duck legs (a shame after so much work!!).
Marching onwards, render fat (for the confit) and cook stock with the bones.
A duck stock is a nice substitute for chicken stock, and is perfect in a risotto for your duck breasts. You could also braise the legs using the duck stock as a nice alternative to the confit method of preparing them. To extract as much flavour as possible, I like to roast the bones until well-browned, before adding to a pot with stock vegetables and topping up with cold water. Skim, skim, skim and let it simmer for a few hours, and then reduce it to the concentration you're after.
While the stock is simmering away, get some pasta going:
and if the stock still needs some time before it's done, this is a nice time to cook the breast pieces and enjoy them with pasta, some greens and a crisp white wine:
This left me rather exhausted, so I called it a day and came back fresh and relaxed the following day to get the legs going (literally). As mentioned, cleanse them under cold running water, pat well dry, and snuggle them tightly into a cooking vessel. The amount of fat needed to poach them tender is very dependent on your cooking vessel; this time, I only had two legs to confit, so I used an ovenproof baking dish for the job. Melt the fat and get it close to 100 dC, before pouring it over the legs and into the dish. Put the dish in a low oven (roughly 90 dC - 95 dC), and let it work its miracle for 4 - 6 hours, depending on how melting-and-falling-off-the-bone tender you like them.
Previously, I've tried to prepare the confit on the stovetop, but I found it very hard to keep a constant simmering temperature (I want somewhere between 85 dC and 90 dC for the duration of the cooking time), and the meat ended up tasting slightly "stringy". I think this can be due to cooking the legs at too high temperatures in the fat; a low oven and an instant read thermometer inserted into the cooking vessel is a much more convenient way, I think. After it's time was up, I left the legs to cool in the fat:
These would sit very well right where they are, but preferrably in the fridge, for weeks. Another use of the confit, is to make rillettes, probably my most favourite bread and baguette spread:
It's hard to make shredded and potted meat look delicious in a photography, but I hope you believe me when I say it tastes wonderful. Moist, spreadable and intensely duck flavoured. After all, this is pure duck; the leg meat is simply shredded and moistened with fat and the jelly from the confit cooking vessel. Kept air-tight, the rillettes can be stored for weeks. It also makes the most astonishing ravioli filling:
Phew! That was a long weekend, but it was also a ton of fun. I like to shift around and work in the kitchen, and putting all the bits from an animal to good use, feels rewarding. Stored (confit jelly, confit, and/or rillettes in the fridge, raviolis made up and frozen), this duck will keep me happy for a long time to come.
Some urgent matters (i.e. doctoring and trying to save a dying (possibly contaminated) sourdough starter) kept me away from blogging last weekend, so I'll try to make up the lost ground with a two parter this week. Due to the, ehm, subject matters, I think dividing this into two parts makes a whole lot of sense. (The starter made it through in the end (yay!), so I've put the stetoscope away for the time being...) First up: The bread bits.
Having the rye starter all pampered and fired up, I wanted to bake some filling rye breads this weekend. I particularly enjoy baking in the pans I brought back from Kharkiv; much as I like eating the free form rye breads that are shaped and proofed in bannetons, there's also a place close to my heart for the dense, often seeded rye breads that remain moist for more than a week.
When asking for chorny khlib in Ukraine, I was usually given rye bread that reminded me of the Borodinsky rye in Whitley's "Bread Matters". This is a rather straight forward rye, that's notable for being slightly sweetened and flavoured with crushed coriander. Coriander can be an acquired taste (well... come to think of it, I guess rye really is an acquired taste too...), and is rather dominant in terms of flavour, so this is not a bread I would enjoy eating day in and day out, but it's a particularly good companion to sharp blue cheeses.
As the taste of the coriander ryes from Ukraine is still fresh in my mind, I wanted to have a go at recreating it at home. I mixed up an 80% rye that was flavoured with a bit of honey (4.5% of the total flour weight) and crushed coriander (0.75% of the total flour weight). I think that whole rye berries, soaked overnight and then cooked al dente in the soaking water, add a lot of character to rye breads, and I tend to include at least a healthy sprinkling of them in my breads. For this one, the rye berries weighed in at roughly 15% of total flour weight. They'll plump up and add a lot of weight during cooking, so the weight is referring to unsoaked, uncooked berries. 30% of the flour came from a rye sourdough that had been fermenting overnight. The mixed dough was rather wet and loose, but easy to shape with wet hands. Baked off after roughly 2 hour proof:
I was very happy with the flavour of the bread. The crumb is quite light, as it's not a 100% rye, and the flavour of coriander was just right for me. I wouldn't go over 1% with the coriander, but then again, I am a bit...boring/conservative/cautious when it comes to spices in bread ;)
Another idea I've had for a rye bread, is for a free-for-all style muesli bread. So rather improvised and "what sounds good goes in", the mixing bowl turned into a bit of a mess:
Starring (clockwise from top-left corner): Diced apples, pumpkin seeds, some lemon peel, soaked raisins and dried apricots; toasted hazelnuts and walnuts; rye berries (soaked and cooked); rye sourdough. (Flour and salt underneath.) This was mixed together to a shaggy mass with a spatula, given a rest to properly hydrate the flour, and then mixed on 2nd speed for 3 mins. Panned and proofed just under 2 hours:
The bread had a lovely smell while baking, and a burst of fruity scents arose when I first sliced into it. Very moist and I'm sure it must be healthy. I'm a bit reluctant to be very sophisticated when it comes to toppings on slices of this muesli bread - either as is, or gently blanketed with butter is about as far as I go. That said, it's wonderful with most cheeses as well (both fresh and aged ones), but save the pickled herring and cornichons for another loaf.
In the rubble left after the duck cookery (stay tuned for part 2), I realised I had some odds and ends left in the fridge with nowhere in particular to go. This included some pastry cream, homemade ricotta, a dash of heavy cream, a couple of eggs and 3 limes. It all came together somehow, in a tart filling. The limes were used to make a lime cream (the lime equivalent of the lemon curd), which was folded into the pastry cream. This was combined with the ricotta and eggs. A nice buttery crust sounded like the way to go to "cut" the tanginess of the lime, so a pâte brisée (unsweetened, flaky and crisp tart base) was pre-baked, and filling poured in. Briefly baked to set the filling. To tell you the truth, it didn't turn out that bad, all considered... It was a bit tangy (just a touch too lime-y perhaps), but I ran out of pastry cream and ricotta that could mellow it out. Anyways, I'm not complaining.
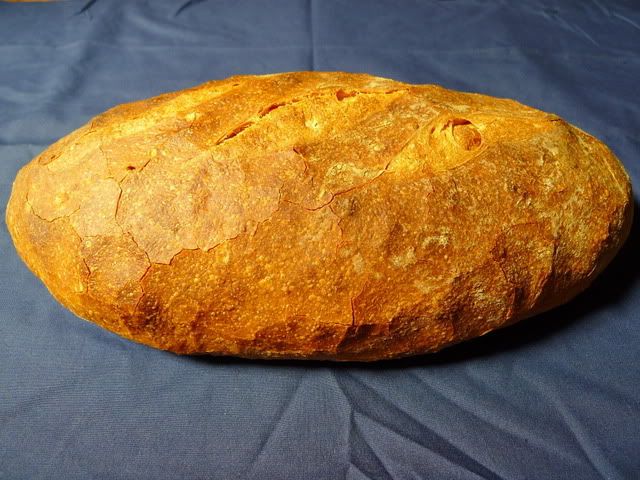
I had some leftover sweet potatoes from dinner the other night and after refreshing my starter I decided it was time to concoct something new and different.
I figured I would throw in some dried roasted garlic and what better than maple syrup to go with sweet potatoes. Naturally I had to be different and use some raspberry flavored maple syrup that we had picked up in Vermont a while ago. I love the nutty flavor spelt flour adds to bread along with roasted wheat germ and cracked wheat.
Including the water and syrup the total hydration for this dough is 73% and it definitely a wet style dough. If you are not comfortable working with wet dough you can certainly add some additional flour or decrease the amount of water a bit.
The final bread came out with a wonderful complex nutty flavor. You can taste the toasted garlic for sure, but the raspberry maple syrup is not noticeable at all. It has certainly added to the dark appearance of the bread, but the flavor is hard to notice. The sweet potatoes contribute to the rich flavor and dark color of the bread and were a great addition to the overall formula. The crust is nice and dark and crunchy with a moist and flavorful slightly chewy interior. I had a few slices with some cream cheese for breakfast a few minutes ago and it was very tasty. I'm sure this is going to make great toast and would be ideal for a steak sandwich.
Starter Ingredients
227 grams AP Flour
71 grams Starter (65% Hydration White Starter)
151.5 grams Water
Final Dough Ingredients
425 grams 65% Hydration Starter (All of Starter Above)
230 grams Bread Flour (I used KAF)
200 grams Spelt Flour (I used Bob's Red Mill)
70 grams Cracked Wheat
40 grams Roasted Wheat Germ
17 grams Dried Roasted Garlic (you can roast your own garlic and use that instead)
8 grams Raspberry Maple Syrup
160 grams Roasted Sweet Potatoes
400 grams Water (90 degrees F.)
18 grams Seas Salt or Table Salt
Directions
Starter
Prepare the starter the night before and let it sit at room temperature for at least 10 hours. After 10 hours it should be doubled or more in volume. Deflate the starter and put in your refrigerator for up to 2 days or use it immediately.
Final Dough
Take the starter out of the refrigerator and let it warm up for about 20-30 minutes. Break it up into 5-10 pieces and put it in your stand mixer or work bowl. Add the cracked wheat to the water and let it soften for about 5 minutes. Next add the water with the cracked wheat with the starter and mix on low for 30 seconds to break up the starter. Use a wooden spoon or rubber spatula to break up the starter. Now add all of the flours, sweet potatoes (mash them slightly before adding), maple syrup and roasted garlic. Mix on low for 2 minutes. Let the dough sit for 15 to 20 minutes.
Next sprinkle the salt over the dough and mix on medium for 4 minutes. The dough will still be fairly wet and loose at this point which is fine. Resist the temptation to add too much additional flour. If the dough is like soup then you should add some more flour until it starts to come together.
Remove the dough to your work surface and using a dough scraper stretch and fold the wet dough for a couple of minutes and form it into a ball. Let it sit uncovered for 15 minutes.
Do another stretch and fold several times and cover the dough with either a moist clean towel or a slightly oil sprayed piece of plastic wrap. Let it sit for another 15 to 20 minutes before you do another stretch and fold. The dough should start to feel more tacky than wet and sticky at this point. Let it rest again for 15 to 20 minutes and do one more stretch and fold. Form the dough into a ball again and place it in a slightly oiled container or bowl and cover it tightly. Let it sit at room temperature for 1.5 hours and then put it in your refrigerator for 24 hours or up to 3 days.
When ready to bake the bread, take it out of the refrigerator and let it sit at room temperature for 1 1/2 to 2 hours. Now shape the dough as desired on a floured work surface being careful not to handle the dough too roughly so you don't de-gas it
.
Place it in your bowl, banneton or shape into baguettes. I made 2 loaves with this recipe and shaped them into boules.
Let it sit at room temperature for 2 hours covered with oiled plastic wrap or a wet cloth.
Pre-heat oven with baking stone (I use one on bottom and one on top shelf of my oven), to 500 degrees F.
Slash loaves as desired and place empty pan in bottom shelf of oven.
Pour 1 cup of very hot water into pan and place loaves into oven.
Lower oven to 450 Degrees and bake for 25 - 35 minutes until bread is golden brown and internal temperature reaches 200 degrees. Leave the loaves in your oven with the door cracked for 5 minutes longer with the oven off. After 5 minutes remove them from the oven and place on your cooling rack. Try to resist the temptation to cut into the bread until they have cooled sufficiently.
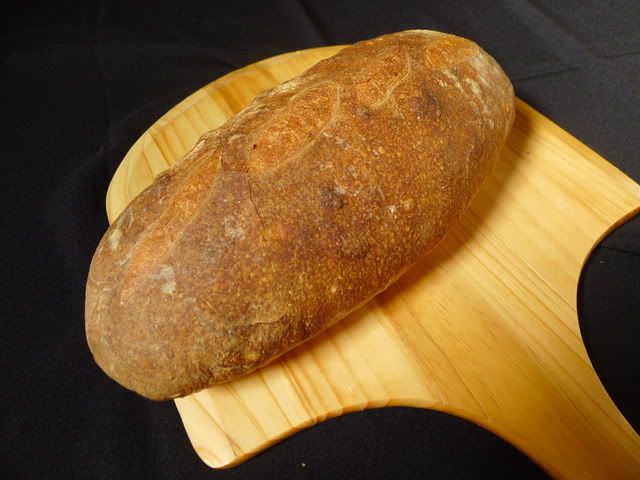
This was my second bake of Phil's (PiPs) Desem. His beautiful blog entry on this bread can be viewed here: Honest bread - 100% whole-wheat desem bread and some country bread. As with my first bake, I modified Phil's procedure somewhat, using CM fine ground organic whole wheat flour rather than fresh-ground white WW flour and machine mixing. While I baked directly on a stone last time, today I baked in Lodge 4 qt. Cast Iron Dutch ovens.
Desem crust close-up
The general appearence of the loaves was pretty much the same between the two baking methods. I understand that Phil is contending with the special challenges of a gas oven, but, for me, baking on the stone directly is easier than wrangling hot and heavy DO's.
Desem crumb profile
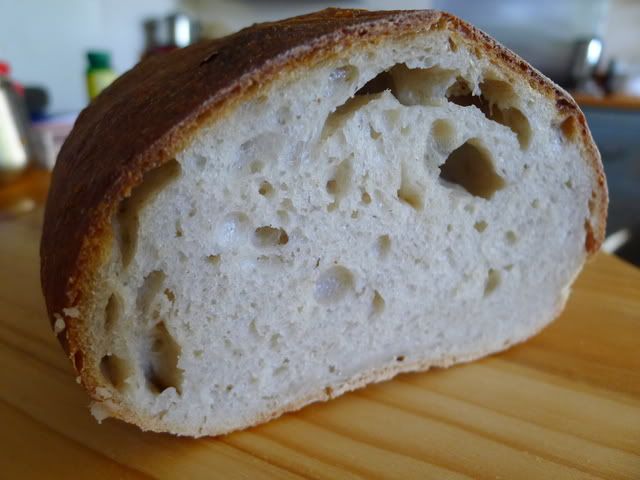
Desem crumb close-up
I cut the desem loaves 3-4 hours after baking. The crumb structure was very satisfactory, but it was somewhat gummy. Hansjoakim (see below) raised an excellent question: Would the desem benefit from a 24-36 hour rest before slicing, like a high-percentage rye does? I wonder.
The flavor of the desem, tasted when first sliced was very assertive - sweet whole wheat with a moderate sour tang. The sourness had decreased the next morning when I had it toasted for breakfast. It was very nice with butter and apricot jam.
I also baked a couple 1 kg loaves using the SFBI Miche formula. (See Miche from SFBI Artisan II - 2 kg) I altered the flour mix. The final dough was made using half KAF AP and half CM Organic Type-85 flour.
We had some of this bread with dinner. The crust was crunchy and the crumb was soft but chewy. The flavor was complex - sweet, wheaty and mildly sour. I have made this bread using the original SFBI formula, with all CM Type-85 flour and with the mix I used today. I'd be hard pressed to say which I prefer. They have all been delicious.