The Fresh Loaf

A Community of Amateur Bakers and Artisan Bread Enthusiasts.

Recent Blog Entries

codruta's picture
codruta

A while ago I made my first succesfull 100% rye bread (click to open the post). Since then I kept on baking, different sorts of bread, but never 100% rye again. Afraid of failure? NO. But I'm easily distracted and the list of must-try breads is getting longer and longer everyday and there are too many new formulas that I want to try, so I rarely decide to repeat a recipe. Or at least not very soon after I made it.

It was not the case with today's subject.

In march, Andy (Ananda) posted a formula for seigle d'auvergne. I then modified the formula and made the best 60% rye-40% einkorn ever. Time flew and I forgot about it, till I recently found the photos on my computer. Here is one photo with the crumb (you can see it was early in the spring, as I had some blue and white Hyacinth on the table):

I decided to make it again, using his formula as a starting point, but this time with a higher rye percentage. In 4 weeks, I baked it 4-5 times, with the following changes:

1'st: I replaced the white flour from his formula with einkorn flour and I added altus, rye flakes and caraway. I increased the water percent and I baked it on a tin.


2'nd: 100% rye bread, with dark rye flour instead of his white flour (also, altus, rye flakes and fennel seeds this time)


3'rd: I replaced the white flour for Malthouse Bread Flour from Doves Farm (no altus or rye flakes, but some caraway seeds cause I like the flavor)


You can see more photos on my flickr page, link HERE, or on my Romanian blog post, link HERE.

All the combinations mentioned above have as result some great breads. A friend from Bucharest who received for tasting a rye-malthouse loaf said that was the best rye bread he ever had. My sister in law from Paris got 2 loaves of rye-einkorn when she flew back home and she was very happy as long as they lasted :)

I finally can say that I'm not afraid of rye anymore. I wish I can go further and try pumpernickel or some dark russian breads, but the rye flours I find here are usually light or medium. When I'll find the proper flours, pumpernickel will be the first to try.


With this post I want to encourage everyone who, like me a while ago, is scared of rye paste to give a try to this formula. I find it to be very easy to work with and very friendly and rewarding. Andy, thank you for the inspiration and for being such a great friend and baker.


Codruta ♥

www.codrudepaine.ro


After 3 and half years of home baking, I decided that have to follow my passion and to go on on the bread path. Things are going in the right direction and I will soon share some exciting news with you.

ps. another rye bread I discovered on my computer few days ago is dated from april 2009. I'm glad to see that my skills improved :)

heavyhanded's picture
heavyhanded

So, here goes - I've finally got my very own kitchen ALL MINE ::evil laughter::!

My sister gave my mother Bernard Clayton's "New Complete Book of Breads" and my mother promptly said "I quit." and gave it to me, along with all her loaf pans, bread stones and nice big bowl for rising. I am now the family baker. Cool!

Follow along as I do wierd things to perfectly innocent dough!

Here is my second try at potato sandwich bread:


and here is the third:


I suspect I have over-proofed! The next time I make this recipe and I using half-again and going with 'poke it' instead of 'doubling in size', all thing I have heard from forum threads on this site.


<3M


sonia101's picture
sonia101

I finally have a sourdough starter again and this time I'm going to dehydrate some before I kill it again! LOL. I've tried google and can't seem to find any answers.....Do I dehydrate it after feeding it or when my starter is at it's peak? Any advice would be greatly appreciated :)


Growing up I used to watch my Aunty make this bread all the time, it was her specialty. I would sit in her kitchen in total amazement as she braided the bread. My Aunty now lives in a retirement village with no kitchen in her unit and mentioned that she really misses having a piece of Hefezopf with her coffee. Last weekend I baked her some and went for a visit, the bread brought a tear to her eyes! She got on her walking frame and showed the staff and her friends, I have never seen a person move so fast on a walking frame LOL! Listening to her tell her friends stories about the bread almost made me cry, but cry in a good way :)

Hefezopf Recipe
  • 500 grams plain flour
  • 1 packet (7grams) dry yeast
  • 90 grams softened butter
  • 1 packet vanilla sugar
  • 50 grams sugar
  • 90ml lukewarm milk
  • 150ml lukewarm cream
  • 1 egg
  • pinch of salt

  • Egg yolk and milk wash for glazing

Mix all ingredients into a smooth silky, soft dough. Set aside to rise for 40 minutes covered in a warm spot (till the dough has doubled in size). Divide dough into 3 pieces (for one big braid) or 9 pieces (for three smaller braids) Roll into long strips and braid. Allow braids to rest for 30 minutes in a warm post covered in plastic wrap and then brush with egg yolk/milk wash and sprinkle with course sugar and bake in oven on 180 degrees C for  20 mins (smaller loaves) 30 mins (larger loaves).

Cheers Sonia
Isand66's picture
Isand66

I am addicted to everything bread.  I guess there could be worse things to be addicted to.  I am constantly trying to push the limits and explore new avenues of bread baking so it was only a matter of time before I delved into the world of Wild Yeast Water.  My good friend DA Brownman has posted about his exploits using this technique on my favorite bread website, The Fresh Loaf.  His imaginative uses of this technique has finally convinced me to take the plunge so naturally the first recipe I had to try was one of his.

The idea behind Wild Yeast Water s similar to a standard sourdough starter but instead of developing flour and water and wild yeast into a starter you use water and fruit.  I followed his suggestion to use organic apples and raisins and after a week I had a nice lively Wild Yeast Water starter.

The recipe I followed was an interesting hamburger bun and cinnamon rolls recipe developed by DA where he used ramekins to let the buns rise and bake.  I changed a few things from his original recipe including building the Yeast Water levain in one step instead of 3 since my first attempt ended up in disaster when I miscalculated the amount of flour to add.  I also used European style flour from KAF instead of AP flour.

I decided to bake the hamburger buns free-form as rolls instead of in the ramekins which may have been a mistake.  I am not sure if I accidentally didn't measure the flour correctly, but the dough was extremely wet for a 58% hydration dough and was very difficult to handle and form into rolls.  Never the less, I forged ahead and before baking added some poppy seeds and toasted onions as toppings.  I also forgot to mention that I didn't have any dry milk so I left that out.

The final results were satisfactory for my first attempt using WYW.  The rolls were very tasty and had a nice sweet flavor from the WYW, honey and sugar.

Please visit DA's blog on TFL here :http://www.thefreshloaf.com/node/28622/yeast-water-hamburger-buns-cinnamon-roll-same-dough-kicker and give these a try for yourself.

Thanks again DA for your help and inspiration.

This post has been submitted to the Yeast Spotting Site here: http://www.wildyeastblog.com/category/yeastspotting/.

wally's picture
wally

Ok, I'm officially a lurker these days, reading and soaking in others' bread adventures but mostly too busy to contribute or respond.

But here I grant myself an exception because I've come across a sandwich bread which is worth sharing IMHO.

I spent last Mother's Day with Mom (extra points here!) outside of Clearwater, Florida.  We had a wonderful week together which included revelling in good food.  The high point of that was a visit to William Dean Chocolates, a home to artisan chocolates that makes calories melt away in insufficiency to the joy of truly great chocolate.

One day we had simple ham and turkey sandwiches on an onion rye bread Mom had found at the local supermarket.  The bread was wonderful!  Not too much onion and a smattering of poppy seed.  It made our sandwich and I decided to recreate it once I returned from vacation.

I've experimented with this recipe and tweaked it a couple times and I'm now happy with it and ready to offer it up to all comers.

It is, I think, a fabulous sandwich bread (unless you and onions aren't copasetic).

Here is the recipe:

I've made this with a small addition of yeast, as found above, and also as a wholly levain bread (without the IDY) retarded for about 21 hours.  The latter achieves a slightly more sour flavor than that which has the IDY and is baked the same day.  But both are delicious!

This produces two 1.5# loaves or one large 3# bâtard which is pictured.

The levain and sour are mixed and allowed to stand for 12-14 hours until ripe.  At the same time mix dried, chopped onions with beer - my favorite is a dark beer, Negro Modelo - and allow to stand overnight.  (I suspect that fresh onions, or caramelized onions would impart wonderful flavors as well, but I have a large jar of dried onions so I elected to use them and console myself with the need to rehydrate them in beer.  In any case, if using fresh onions, adjustsments - downward - of hydration will be necessary).

For the final dough, mix levains, rehydrated onions and water to disperse the levains, and then add the flours, salt and yeast (if not retarding).  I mix about 3 minutes on speed one and then crank up my Hamilton Beach to speed 3 for about 5 minutes.  You should aim for a moderate gluten development - not windowpane but partially there. 

Primary fermentation is about 2.5 hours, with folds at 50 minute intervals.  After that, divide, pre-shape and allow the dough to rest for 20 minutes, then shape into bâtards. Final proof is about 1 - 1.5 hours.  (If retarding, I proof for 1.5 hours and then refrigerate.  NOTE:  My downstairs refrigerator is old and holds a temp (whatever I attempt) of 40-42 degrees.  So, with respect to sourdough, that effectively shuts down fermentation.  If retarding in a hotter environment then you want to probably aim for a final proof of 80%-90% before retarding and then bake right out the retarder).

The bake for 1.5 # loaves with instant dry yeast is at 440° F for 35-40 minutes with steam for the first 15 minutes.  For fully levain bread I preheat the oven for 1 hour to 475°, during which I allow the refrigerated loaves to finish proofing.  In this case, I bake at 475° for 15 minutes, then reduce the temperature to 420° and bake for another 20-25 minutes (you may want to tent the bread during the last 15 minutes if the color becomes too dark).

The pics are of a 3# loaf I baked for a local restaurant, so baking times and temps were varied.  But the result is the same - an enjoyable sandwich bread. 

Add a little mustard, a little mayo and your favorite sandwich meats and you have sandwich satisfaction.

Larry aka Baker Bob

NOTE: Whoops!  Just noticed I fat fingered by bread flour percentage in the formula: It should read 79.46%, bringing the overall percentage to 178.62.  The rest of the figures are correct.  Apologies.


dabrownman's picture
dabrownman

Boule and crumb.

We are continuing to discover a better method of summer baking in the Cuisinart mini oven.  This time we tried Sylvia’s steaming method by using a 1 cup Pyrex measuring  cup half full of water with a dish rag rolled up inside and microwaving it before putting it onto the preheated 500 F mini oven.

 No stone was used.  We think this steaming method is a good as covering the boule with a stainless mixing bowl and that both would be better with a stone.

 Even though the loaf was not slashed, since we managed forget to do so, I though for sure it would split somewhere but it only cracked down one side.  There wasn’t much spring - about an inch.  It browned up nicely though.  We love the color that durum brings to bread inside and out and about 50% of this bread was durum with the other 50% whole grains of various varieties with wheat germ and the flax ground.  The whole grains overpowered the yellow color of the durum with barn on the inside though.  This bread is much more about being a hearty multi-grain variety.

 The only slightly unique addition to this bread was using Vietnamese 902 Green Jasmine Tea for the liquid.  I just love Vietnamese jasmine tea and used one that is especially fragrant with jasmine blossoms. 

Boule crumb

 The crust was nicely browned and chewy after coming out of the oven very crusty.  The crumb was very moist and light and tastes very sour. It made a fine sammy and it was delicious as toast or plain.   I have noticed that, if YW and SD starters are mixed from the beginning of the levain build, the bread is less sour.  The boule sprang more than the loaf and the crumb was a little more open.

Loaf crumb

 This bread didn’t have the usual sprouts and pumpkin or sunflower seeds (since I also forgot to put the pumpkin seeds in) we like so well, but it is a very hearty and satisfying bread to munch on – until it is gone!  Formula and method follow:

Method

 The YW and SD levains were built separately this time and used 3 builds.  The first 2 builds for each were 4 hours apart and the levains were refrigerated overnight at the 8 hour mark right after the 3rd build as each had already doubled. 

 All mixing was done by hand.  The flours, ground flax seeds, wheat germ, chia seeds, salt and green tea with the salt were autolysed for 1 hour before the levains were added the next morning.   After mixing the levains in completely the dough was allowed to rest for 20 minutes.

 4 sets of S&F’s were done every 15 minutes.  The first 2 were done on a floured surface the last 2 in a well oiled, bowl.  The dough was rested in a plastic covered oiled bowl between the S & F’s.  The dough was allowed to ferment and develop on the counter for 1 ½ hours before retarding in the refrigerator for 12 hours.

 The dough doubled in the refrigerator overnight. The next morning the dough was divided in half and half returned to the refrigerator since it would be baked one hour after the first half.  The other half was allowed to come to room temperature for 1 hour and then pre-shaped into a loaf rested 10 minutes and final shaped into a loaf and placed into a Pyrex loaf tin and allowed to proof.  The other half of the dough went through the same process but shaped into a boule and placed into a rice floured basket to proof.

 After an hour and half the loaf had doubled, passed the poke test and ready to bake .  Sylvia’s steaming method was used with a wash rag heated in a half full Pyrex 1 cup measure in the microwave and the placed in the back of a 500 F preheated Cuisinart Mini Oven.  No stone was used.  The loaf was not slashed but was steamed  for 12 minutes and then the steam removed and the temperature turned down to 425 F convection this time.

 The bread was then rotated every 5 minutes until if reached 205 F internal and then was removed to the cooling rack with no extra crisping in an off oven.  After the first 5 minutes of convection baking the loaf was removed from the Pyrex loaf pan and baked directly on the rack. 

 A similar process was used for the boule except it was slashed and steamed on parchment paper on the top cover of the broiling pan for the first 12 minutes and then baked at 425 F directly on the rack.  The loaf took about 30 minutes of total baking time and the boule 3 minutes less.

50% Whole Multi Grain Durum Atta with Wheat Germ, Flax and Chia Seeds     
      
Mixed StarterBuild 1Build 2 Build 3Total%
SD Starter25100354.50%
Yeast Water503008016.00%
Rye50350858.00%
AP02530555.00%
Durum Atta0030306.00%
WW50400909.00%
Water5060011022.00%
Total Starter2252006048597.00%
      
Starter     
Hydration74.77%    
Levain % of Total33.24%    
      
Dough Flour %   
Durum Atta30060.00%   
Oats255.00%   
Dark Rye255.00%   
White WW5010.00%   
Whole Barley255.00%   
Whole Bulgar255.00%   
Potato Flakes102.00%   
Ground Flax Seed102.00%   
Whole 6 Grain Cereal306.00%   
Dough Flour500100.00%   
Salt91.80%   
Green Tea 42585.00%   
Dough Hydration85.00%    
      
Total Flour777.5    
Green Tea - 425, Water - 207.5632.5    
T. Dough Hydration81.35%    
Whole Grain %53.05%    
      
Hydration w/ Adds80.32%    
Total Weight1,459    
      
Add - Ins %   
Wheat Germ102.00%   
VW Gluten102.00%   
 Chia 20204.00%   
Total408.00%   
Franko's picture
Franko

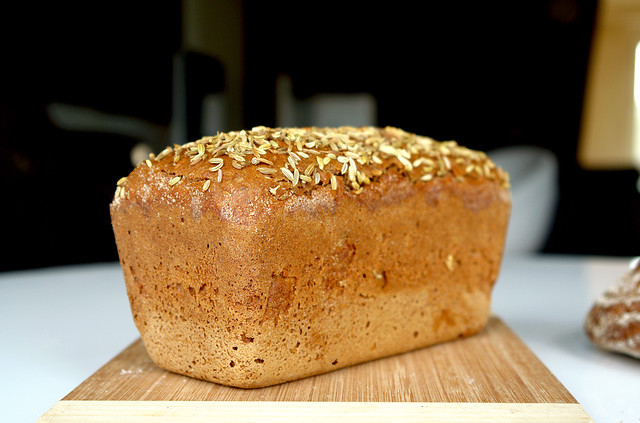
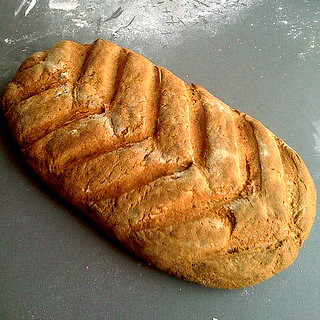
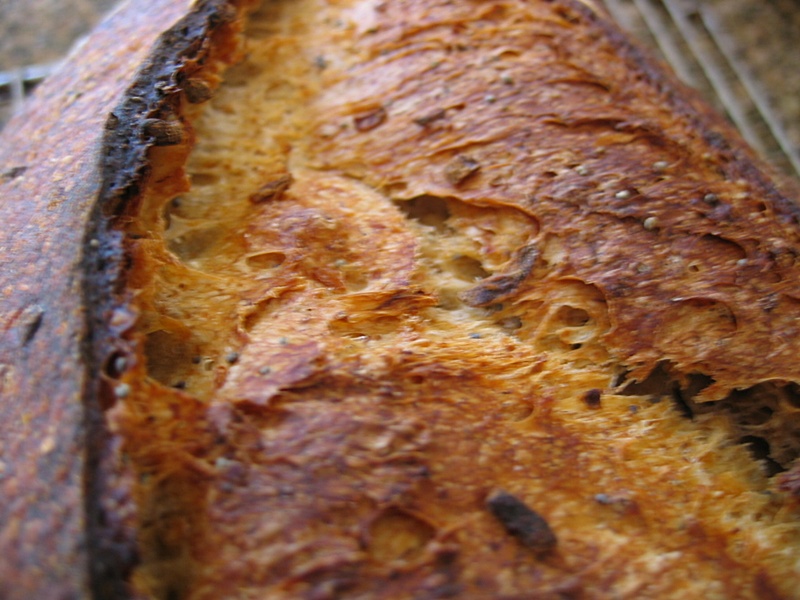
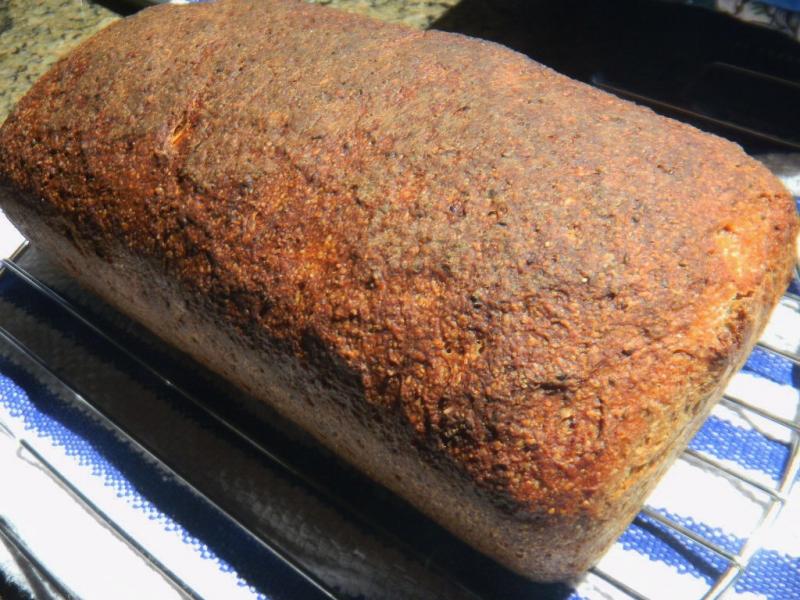
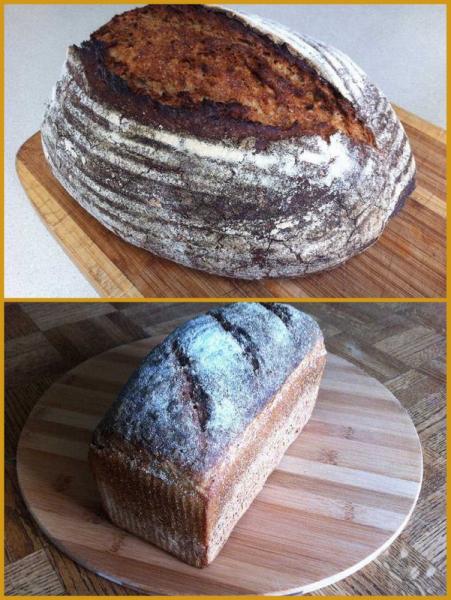
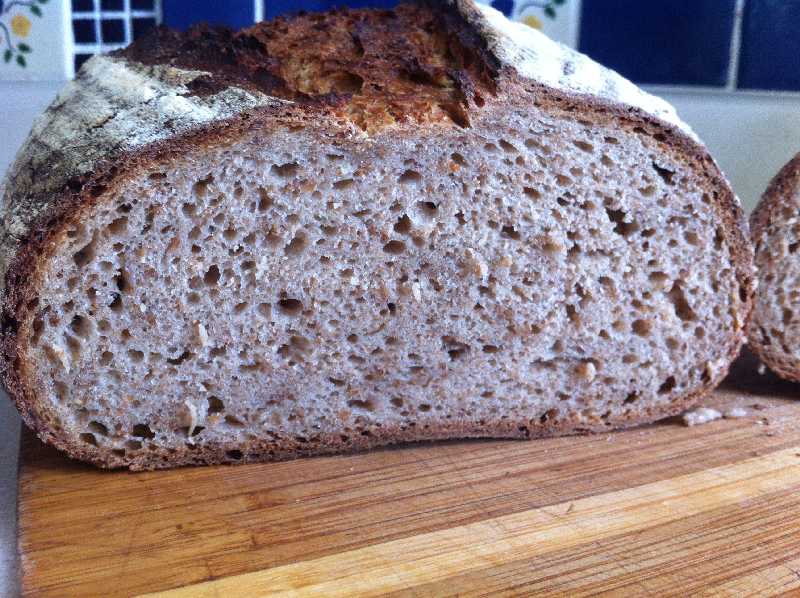
 Back In early May I posted on a 40% Rye http://www.thefreshloaf.com/node/28620/goo-good with a fermented soaker that I had to try and save because of miscalculating the hydration. The save was short lived unfortunately. After three days the crust became so tough from the extra flour added to the dough I couldn't eat it for fear of cracking a tooth. The formula has since been adjusted for hydration and two bakes of the bread have been done over the last few weeks with much better results than the original. The first loaf of the new mix worked out well, the dough consistency being what I expected, well hydrated but not to such an extent it was difficult to develop with a few stretch and folds. This time instead of baking it in a Pullman tin, the dough was shaped as a batard and placed in a brotform. The bread was to be part of a buffet table at my wife Marie's recent birthday party and I wanted it to look a little fancier than a regular tinned loaf. The loaf baked up nicely with a cracking crust, evenly open crumb, and well rounded flavour with a pleasant sour note from the soaker.

 One of our guests told me that she's usually not a fan of either rye bread or sourdoughs but that she enjoyed the flavour and texture of this bread more than any she'd had in the past. This was reassuring to hear and good to know that other people could enjoy it since to that point I'd been the only who'd tasted it. 

Last week we took a mini 3 day vacation out to the West Coast of Vancouver Island for a little R&R. On our way out to the coast we made a stop at Vancouver Island Grain and Milling, in the city of Port Alberni. VI Grain & Milling, a relatively new enterprise, came to my attention when Marie brought home one of their pamphlets from a local Farmer's Market. The proprietor, Wayne Smith runs the facility on his home and farm property located just a short drive from the main highway through town. At the moment the various organic grains he carries are kept in three, temperature and humidity controlled semi trailers situated near the front entrance of his property, with construction of a permanent storage facility getting under way this summer. One of the trailers has a small milling area equipped with four Nutrimills that he uses to produce retail size (2K) bags of flour for a number of health food stores here on the Island.

Wayne told me he doesn't anticipate installing a full size mill anytime soon as the investment cost and profit margin wouldn’t justify it at this point in the business, but that he'd be happy to mill whatever I needed on short notice. What a find! I asked him if he would mill up a slightly coarse rye flour for me while I was there, and a short time later Wayne presented me with 2 kilos of the best looking rye flour I think I've ever seen.

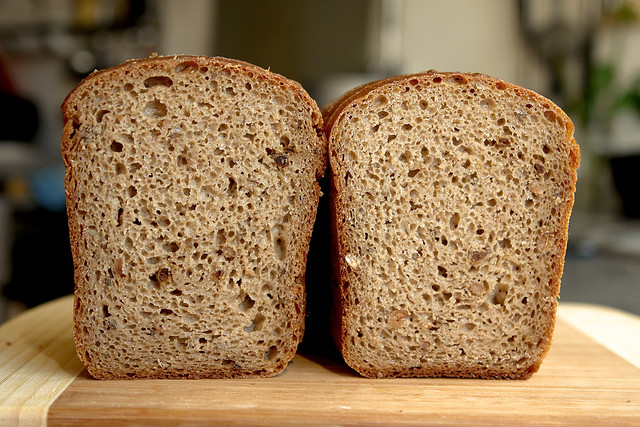
This is the flour I used in a second bake of the 40% rye. It preformed beautifully throughout the mixing, fermentation, shaping and baking, giving the bread an even better depth of flavour than the previous bake. The fermentation properties and flavour of fresh milled flour compared to pre-milled is so superior, I'm finally persuaded to invest in a flour mill for my home baking. Much as I'd prefer a stone mill similar to the type [Phil/Pips] uses, I've decided the size and cost of the impact type Nutrimill is a better fit for my storage and budget limitations right now. Once the existing stock of wheat and rye flour I already have has been used up I'll be looking forward to milling all my own flour with grains from Wayne Smith's VI Grain & Milling. 

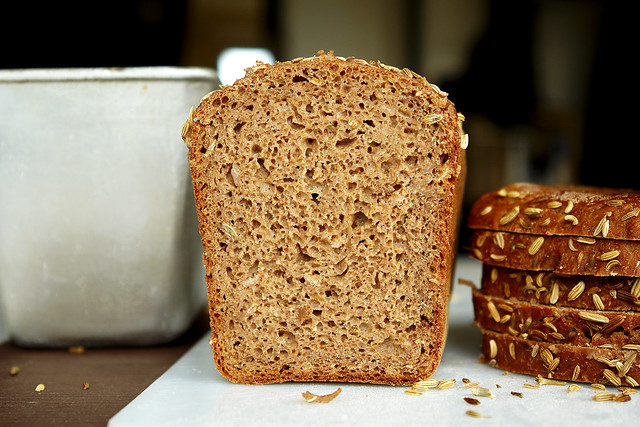
The second bake of the 40% Rye was slightly different in that the soaker was all cracked rye instead of 50/50 cracked rye and wheat, but other than that the rest of the formula remained the same as per the previous mix. Since I've started using a fermented soaker in some of my sourdoughs I've discovered how much easier it is to fine tune the level of sour in the  loaf, rather than having to rely entirely on the levain to contribute the bread's sour component. Cracked or whole grains ferment quite slowly compared to flour, allowing for greater control over the strength of the sour flavour than I feel I have with a typical 12-18 hour levain. With the soaked grains adding texture to the loaf along with added flavour, it's proven to me to be an effective technique for enhancing the overall quality of the finished loaf.

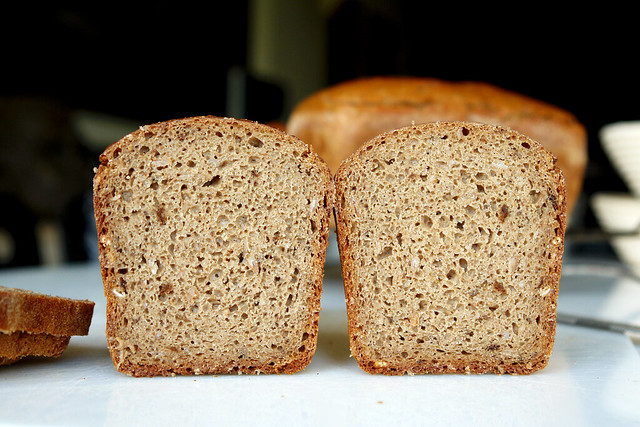
After pulling the loaf from the oven, de-panning, and wrapping in linen, it was left to cool for 48 hours. This was difficult! I was tempted to take a slice the day after baking but I'm glad I gave it one more day. The crumb, after 48 hours had set completely, allowing for clean even slices to be taken, minus the usual residue left on the knife when I slice a rye bread after only 24 hours.

40% Rye with Fermented Soaker


Procedure:

Levain

Mix all of the flour needed for the levan with mature 100% rye starter and water and ripen at 70F/21C for 14-18 hours.

Cracked Rye and Wheat Soaker

Pour the boiling water over the two cracked grains and salt and allow to cool to ambient temperature. Add the mature 100% rye starter, mix thoroughly and ferment at 70F/21C for anywhere from 3-5 days depending on the level of sour flavour desired. Note: The amount of water needed may need to be adjusted to achieve a slightly loose consistency. The soaker is not hydration nuetral and should contribute a small amount of hydration to the final mix.

Final Mix (by hand)

Combine all the flour and water to a shaggy mass, adjusting for hydration, and autolyse for 40-60 minutes. Add the levan and incorporate thoroughly, then add the salt and honey and mix until the dough is moderately developed. Finally add the fermented soaker and continue mixing until the soaker is evenly distibuted throughout the mix. Turn the dough onto the table and use the slap and fold method until the dough is smooth and cohesive but not fully developed. DDT is 78F/25C.

Bulk ferment the dough for 60-90minutes at 78F/25C. Bulk fermentation times will vary and the dough should be monitored closley to ensure it receives adequate fermentation time.

Intermediate

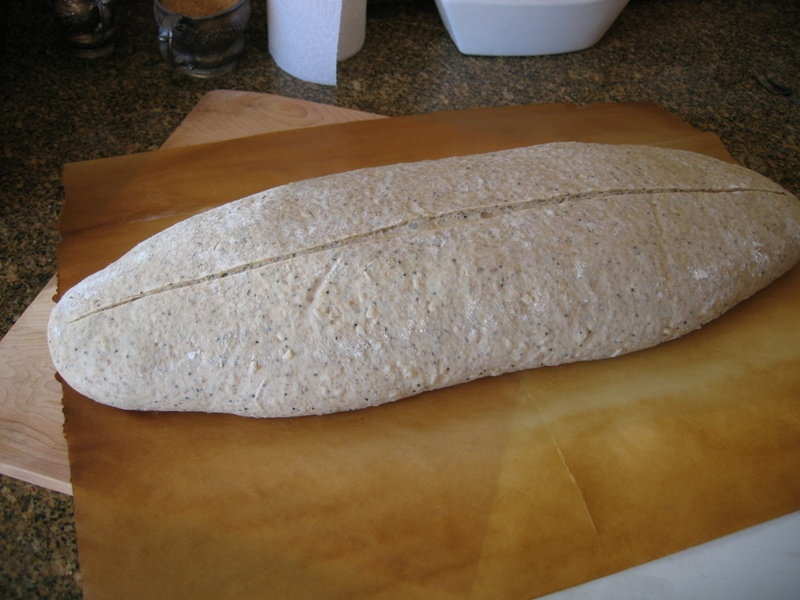
Turn the dough onto the table and give it a stretch and fold. Cover the dough and rest it for 30 minutes. Shape as desired.

Final Proof and Bake

After shaping, give the dough it's final rise in a covered 78F/25C slightly moist environment for 45-60 minutes. Again it should be closely monitored, as times will vary. When the dough is slightly springy to the touch remove it from final proof to the counter allowing the skin to dry if necessary before slashing. Slash as desired and bake in a 500F/260 oven, vents blocked, with steaming apparatus in place, for 15 minutes. Unblock the vent, remove the steaming apparatus and lower the temperature to 465F/240C, continuing the bake for an additionl 45-55 minutes (lowering the temperature if needed to 450F/232C) until the internal temperature reaches 210F/98.8 . Cool on a rack for 24-48 hours, wrapped in linen, before slicing.  


The flavour is noticeably better than the previous bake, which I credit to the fresh milled rye flour from V.I. Grain & Milling used in the mix and certainly one the best flours I've had the pleasure of working with.


Cheers,

Franko

Isand66's picture
Isand66

I wanted to try using one of my wife's bundt pans to shape a loaf, and see if I could get some nice intricate patterns.  Unfortunately I did not use enough dough to fill the pan adequately so I ended up with a nice ring loaf and not what I intended.

I was digging through my flour bin and found some Grapeseed flour that I purchased a while ago from KAF so I decided to add that to some European style flour, Barley, flour White Rye, and Whole Wheat.

I also found some raspberry maple syrup in my refrigerator that was yelling at me to use in a bread, so into the mix it went.  I don't think you really taste the raspberry flavor in the final bread at all, just a little sweetness and coloring from the syrup.

To use the bundt pan I made a boule out of little more than 1/2 of the dough and formed it into a boule.  I then poked a hole in the middle with my knife set's sharpening rod and placed the dough over the middle piece in the bundt pan.  I made sure to spray the bundt pan heavily with cooking/baking spray first.  As I said above it did not end up rising enough to fill the pan so I didn't get any of the nice intricate patterns in the bundt pan.  Next time hopefully I will learn my lesson.

The final bread had a nice chewy dark crust and an interesting semi sour flavor.

Ingredients

425 grams (65% Hydration Starter AP Flour)  Refreshed

200 grams European Style Flour (KAF) (You can use Bread Flour)

75 grams White Rye (KAF)

100 grams Organic Whole Wheat Flour (KAF)

75 grams  White Rye Flour (KAF)

100 grams Barley Flour (KAF)

35 grams Grapeseed Flour (KAF)

19 grams Raspberry Maple Syrup

18 grams Sea Salt (Table Salt is okay)

425 grams Luke warm water, 90 - 95 degrees Fahrenheit

Directions

Using your stand mixer or by hand, mix the water with the starter to break up the starter.

Add the flours and mix on the lowest speed for 2 minutes.  Let rest for 10 minutes.

Add the salt and maple syrup and mix for 4 minutes more on medium speed, adding more flour if necessary to produce a slightly sticky ball of dough.

Remove dough to your lightly floured work surface and do a stretch and fold and form into a ball.

Leave uncovered for 20 minutes.

Do a stretch and fold and form into a ball again and cover with a clean moist cloth or oiled plastic wrap.

Do at least 3 more additional stretch and folds letting the dough rest for 15-20 minutes each time. After the last stretch and fold, put the dough into a lightly oiled bowl that has enough room so the dough can double overnight.

Put in your refrigerator immediately for at least 12 hours or up to 3 days.

On the day you are ready to bake, take the dough out of the refrigerator and let it rest at room temperature for 2 hours.  After 2 hours shape the dough as desired being careful not to handle the dough too roughly so you don't de-gas it.

Place it in your bowl, banneton or shape into baguettes.

Let the formed loaves sit at room temperature for 2 hours covered with oiled plastic wrap or a wet cloth.

Pre-heat oven with baking stone (I use one on bottom and one on top shelf of my oven), to 500 degrees F.

Slash loaves as desired and place empty pan in bottom shelf of oven.

Pour 1 cup of very hot water into pan and place loaves into oven.

Lower oven to 450 Degrees and bake for 25 - 35 minutes until bread is golden brown and internal temperature reaches 200 degrees.

Let cool on cooling rack and enjoy!

This post has been submitted to the Yeast Spotting Site here: http://www.wildyeastblog.com/category/yeastspotting/.

baybakin's picture
baybakin

Oakland sourdough:

This is the basic sourdough that I keep around the house. Nearly every sourdough bread that I do is an edit on this basic recipe, which is sort of a combination of Daniel Leader's Pain de campagne and Chad Robertson's Country Bread.

Ingredients:

310g Sourdough Starter (130% hydration)
250g Water
440g Good quality unbleached AP/Bread Flour
60g Whole Grain Flour (I use whatever I have, WW/Rye/Spelt, etc)
12g salt (I use course grey sea salt)
(50g boiling water)

Method:

In a large bowl, mix sourdough with water and flours until a shaggy dough forms. Let autolysis.

Measure out salt into a small bowl, pour boiling water over the salt to dissolve it. let the salt water come to room temp.

After 45 mins mix the salt water into the dough. (I do this all by hand within the bowl, ala tartine)

S&F the dough a few more times over the course of the rising time (about 2-4 hours, depending on the temp of the house). At this time I either retard the dough in the fridge (on a weekday, so I can go to work), or proceed to pre-shape.

Pre-shape the dough into a round (If removing from fridge, let dough reach room temp before pre-shape).  Let pre-shaped dough bench rest for 15 mins, then shape into a round and place in a cast-iron dutch oven to rise.

30 mins before bread is proofed pre-heat oven to 500F.  Place lid on DO and put into pre-heated oven.  Bake for 20 mins covered.  Remove lid, turn down to 450F and bake for 15 mins.

Take bread out of DO (carefully) and let cool on a rack. Enjoy!


The pictured bread is cracked wheat/White Whole Wheat as the whole grain part.

breadforfun's picture
breadforfun

Greetings all.  After returning from a few weeks traveling (pleasure and business), I have been waking up my starter from a prolonged hybernation.  I was looking through some very old recipes for a straight dough bread to make in the meantime, and I found this recipe in an ancient archive.  In fact, I'm guessing it is one of the first (if not the first) yeasted bread I ever made oh so many years ago.  It is Cottage Cheese Onion Dill, and is very tasty and makes a nice sandwich loaf with its tight crumb.  It uses very little water with cottage cheese and an egg supplying most of the liquid.  Sometimes it is nice to have bread in only 3 hours. The recipe follows the photos.  Hope you enjoy it!

-Brad

Pages

Subscribe to Recent Blog Entries