The Fresh Loaf

A Community of Amateur Bakers and Artisan Bread Enthusiasts.

Recent Blog Entries

codruta's picture
codruta

Summer News.   My path in becoming a baker...

... goes through Powburn, Northumberland, England.


Hello, TFL friends. This is a delicate post for me to write, because it concerns a personal matter and because, as you probably know, I am not a native English speaker. However, I will do my best to communicate and make my story interesting.

It has been a long time since I have been so excited about what lies ahead, and I am happy to share with you my latest news.

A while ago, I mentioned that I was nursing an ambition to become a baker; a “real baker”! I want to run my own bakery. I want to bake good bread, offer it to nice people and make a living out of it. Without any money to begin a business, in the past year, all I did was dream, and hope that one day...? Well, that day has become closer than ever before. My dreams are no longer dreams; they have started to become real plans. I have two partners for moral and financial support. We have formed a Company and we are looking for premises to rent in my hometown of Timisoara and for baking equipment to buy. There is a long way to go, but things are moving at a good pace in the right direction.

I am a self-taught home baker. I have never been inside a commercial bakery. Yes, I am passionate, talented and smart (hope time will prove that :); but at the moment I lack the confidence, experience and knowledge found in a seasoned professional baker. I believe I am filled with sufficient determination and motivation that will allow me to plug these gaps and achieve all my dreams. Even if that means leaving behind my work as an Architect in order to fulfil these baking dreams!

A few weeks ago I started to look for the right place for me to work as an intern, a place where I would be able to learn, but also, a nice bakery, run by a nice artisan baker, willing to show patience, share knowledge and train a beginner. Luckily for me, I didn’t have to look for very long or very far. Andy (Ananda) has been my mentor and friend since my first day on TFL. I  wrote him a message and he generously agreed to help me.

So, what I am really excited about, as I mentioned earlier, is that I will be flying to Newcastle upon Tyne, and spending a whole week with Andy, at the beginning of August, in Powburn, England. He scheduled a special work programme so I can gain experience of working in a bakery and gain further knowledge which will help me to set up and run my own business. I will be doing my best to help him make the breads and other goods which he is planning to bake for Powburn Show, and in return, I will have the privilege to work and learn from a great baker and teacher. How is that for good news?

As you can imagine, I am very excited and happy about this arrangement and I am counting the days until this bread baking adventure begins. Who would have thought that my first trip to England would be an amazing baking experience, rather than a relaxing holiday? On the other hand, who would have thought that I would fall so much in love with bread that I would decide to change my career completely and take the bread path without a second thought?


I will leave Andy to add to my post later, with more details about his plans for our work together and I hope you will stay close for future notes.

Codruta

(www.codrudepaine.ro)

ps. My bread path won’t end in England, there will be a “part 2” coming soon, with other great news.

But for now, please be glad for me and wish me good luck!


ananda's picture
ananda


Given my flour delivery was put back a week, and the weather has done nothing except rain here in the UK, seemingly incessantly, and forever, my baking schedule has been somewhat interfered with.

So, here are a few loaves I've baked recently.   The Gilchesters' loaves were made today, and I will repeat again tomorrow as I dive into a dissertation on UK Organic Wheat, and prepare for a trip to Dunbar in Southern Scotland to introduce a training programme at a great local Bakery Co-operative


Borodinsky using the Auerman Process


Rye Sour build:

Day/Date

Time

Stock

D Rye

Water

TOTAL

Temp °C

Weds 13th June

20:00

40

300

500

840

30

Saturday 16th June

18:30

840

450

750

2040

30


Final Paste:

Material/Stage

Formula [% of flour]

Recipe [grams]

1a] Rye Sourdough


Bacheldre Organic Dark Rye Flour

30

750

Water

50

1250

TOTAL

80

2000


1b] “Scald”


Bacheldre Organic Dark Rye Flour

15

375

Red Rye Malt

5

125

Blackstrap Molasses

6

150

Crushed Coriander Seeds

1

25

Boiling Water

35

875

TOTAL

62

1550


2. “Sponge”


Rye Sourdough [from 1a]

80

2000

“Scald” [from 1b]

62

1550

TOTAL

142

3550


3. Final Paste


“Sponge” [from 2]

142

3550

Shipton Organic Light Rye Flour [997]

50

1250

Salt

1.2

30

TOTAL

193.2

4830


% pre-fermented flour

30 + 20 = 50

-

% overall hydration

85

-

% wholegrain flour

50 [+ 50 type997]

-

FACTOR

-

25


Method:

    • Build the sourdough as described above.   Make the “scald” as follows:   crush the coriander and add it to the red rye malt and dark rye flour.   Weigh the molasses into a pan, add water and bring to a rolling boil.   Tip this onto the flour mix, and add any extra boiling water if there is evaporation.   Stir well to ensure full gelatinisation.   Cover and cool.
    • Once sufficiently cool, add the scald to the sour to make the sponge.   Cover and leave to ferment for 4 hours @ 35°C.
    • For the final paste combine the sponge with remaining flour and the salt, mix with the paddle beater in an upright machine, 2 minutes on first speed and 2 minutes on second speed.   Scrape down the bowl to ensure thorough mixing.
    • Bulk proof for 2 hours with DDT at 28°C.
    • Scale and divide into 5.   Shape and drop into 5 Sandwich Pans, prepared with lining of shortening and coating of rye flour.   Smooth off and top with freshly crushed Coriander seeds, then apply lids.
    • Final proof for 2 hours at 28°C, then bake.
    • Pre-heat the oven to 280°C.   Load the pans, apply steam, after 10 minutes turn the oven down to 110°C, and move to Convection setting.   Keep a supply of steam in the oven and bake for 6 hours.
    • Cool on wires; wrap in linen and leave 24 hours before cutting into the bread.

 This is a video demonstrating how best to scale these loaves, and shape them for the pans.   In years gone by at Village Bakery, a team of 2 bakers would produce 2 x 150kg batches of this type of Rye paste and scale it off in this way.

http://www.youtube.com/watch?v=Xf36f0Fw0_E&feature=youtu.be

 Roasted Brazil Nut and Prune Bread

Material/Stage

Formula [% of flour]

Recipe [grams]

1. Biga


Carrs “Special CC” Flour

20

300

Water

12

180

Fresh Yeast

0.2

3

TOTAL

32.2

483


2. Final Dough


Biga [from 1]

32.2

483

Carrs “Special CC”Flour

55

825

Marriage’s Organic Strong Wholemeal

25

375

Butter

5

75

Salt

1.67

25

Fresh Yeast

1.33

20

Water

56

840

Soft Prunes

12.5

180

Brazil Nuts - toasted and chopped

12.5

180

TOTAL

200.2

3003


% pre-fermented flour

20

-

% overall hydration

68

-

% wholegrain flour

25

-

FACTOR

-

15


Method:

    • Prepare the Biga the night before.
    • Combine all the ingredients in the mixer except the fruit and nuts.   Mix on first speed until clear, scraping down as needed.   Mix for 6 minutes on second speed with the hook attachment.   Rest the dough for 20 minutes then add the fruit and nuts and mix to clear using a Scotch cutter.   DDT 28°C.
    • Bulk Ferment 1½ hours.
    • Scale and divide into 3 x 1kg pieces; mould round.   Rest 15 minutes then shape as bloomers.   Glaze with beaten egg.
    • Final proof 1½ hours.
    • Score the tops of the loaves with 4 diagonal cuts and bake in a pre-heated electric oven at 170°C with convection for 55 minutes.
    • Cool on wires.

Both the Borodinsky and the Toasted Brazil Nut and Prune Breads were lovely.   My apologies, the photographs don't really tell the best story.   It seems to be permanently dark in our house at the moment...and it was our longest day very recently too!!


 Gilchesters’ Miche

Makes 2 loaves @ 1350g

Levain build:

Day

Time

Stock Levain

White Flour

Water

Total

Temp °C

 Saturday 23rd June

21:30

40

400

240

680

18


Material/Stage

Formula [% of flour]

Recipe [grams]

1. Wheat Levain


Marriage’s Organic Strong White Flour

25

400

Water

15

240

TOTAL

40

640


2. Final Dough


Wheat Levain [from above]

40

640

Gilchesters’ Organic Farmhouse Flour

75

1200

Salt

1.6

24

Water

58

928

TOTAL

174.6

2792


% pre-fermented flour

25

-

% overall hydration

73

-

% wholegrain flour [approx 85% extraction]

75

-

FACTOR

-

16


Method:

    • Build leaven as schedule.
    • Mix Farmhouse flour and water for 3 minutes on first speed, then autolyse for 1 hour.   Add leaven to Autolyse and mix for 5 minutes on first speed.   Add the salt and mix a further 4 – 7 minutes on first speed.   Scrape down the bowl as necessary.   DDT 24°C.
    • Bulk proof 3 hours; S&F after 1 and 2 hours.
    • Scale, divide and mould round.   Rest 15 minutes, covered, and prepare the bannetons.   Re-mould dough pieces and place upside down in bannetons.
    • Final proof 2 – 3 hours.
    • Score top with an “A” and bake in a pre-heated electric oven at 250°C with steam for 10 minutes.   Switch to convection, drop the heat to 200°C and bake a further 30 minutes.   Drop the heat to 160°C and bake out 12 - 15 minutes.
    • Cool on wires.

Crumb shots!
DSCF3837DSCF3838DSCF3839

This all leaves me with a good bit of baking to do next week as the Alnwick Farmers' Market takes place on Friday.   After that, it's Hexham on Saturday week.

The Summer looks busy; Alnwick Farmers' Market end of July; Powburn Show early August, more on this soon; holiday on Paxos for 2 weeks; August Farmers' Market; Bank Holiday party for friend's 50th.   Then in September it's Alnwick Food Festival, where I'm doing a presentation and taking a stall along with my colleague Ann from Doughworks [ http://www.doughworks.co.uk/ ]

Happy Baking everybody!

Andy

joyfulbaker's picture
joyfulbaker

Finally, success.  I watched Mark Strausman on youtube: http://www.youtube.com/watch?v=mqJLExaX0yc and saw how he shapes the fully--and I mean fully to the point where the dough is blistering and nearly collapsing (thanks to Stan for that point)--proofed rolls and then baked them convection (450, 25 degress lower than conventional oven temp, preheated oven), two baking sheets (no stone), reversing the sheets midway.  I used a combination of the recipes in ITJB and Hamelman's Bread (except for the onions--I like them sauteed, no breadcrumbs, with a little poppy seed).  Here you have them:


Thanks to everyone who had suggestions, and you'll be happy to know that this was relatively "a piece of cake" (er--bialy).  

Joy

breaducation's picture
breaducation

Hi TFL. I'm a long time lurker on here. I've been baking bread for about 3 years now. First as a home baker and now professionally. I owe much of what I know to the fresh loaf(I've been using it as a resource almost the entire time I've baked!). I figure it's about time I contribute to the site.

I'm planning on posting about my home baked experiments  in the future but in the meantime I'll share what I think is the best way to learn about baking bread.

For my first proffessional baking job I was lucky enough to be given the opportunity to start a bread program at a local restaurant. I made essentially the same kind of bread everyday but I also made sure to experiment nearly every single time I made it. A little longer bulk one day, a slightly higher oven temperature the next, maybe try a new steaming method for a week. I tried everything I could think of to improve my bread. I learned more about bread doing this than any other experience I've had. Experimenting with one kind of bread over and over to see what effect small changes make on the end result is invaluable to a baker. I cannot think of a better way to learn.

To illustrate this point, here are my first loaves I baked at the restuarant:

And after one year of baking the same bread and experimenting everyday:

I'm not saying you have to go out and bake the same loaf for a year but do try baking the same formula a few times in a row. If you haven't already done this I'm positive you will learn something valuable from the experience.

BrickAndMortarBaker's picture
BrickAndMortarBaker

Hello fellow bakers,

The other day I was making some of my usual bread and decided to snap a couple pictures of the finished loaf (unfortunately with my terrible phone camera). I've gained so much from the blogs on the site I figured I should also add a recipe of my own into the vast bread vault.

First I made a starter using :

85 gr.  active wheat starter (fed night before)

85 gr  water

28 gr wheat flour

28 gr freshly milled coarse rye

28 gr freshly milled whole wheat

I then left this to ferment for about 6 hours.

When the starter was active enough I mixed together

700 grams water

900 grams white wheat flour

50 grams Rye flour

50 grams whole wheat

I then let this autolyse for 30 minutes before adding

25 grams salt

all of the active starter

I then kneaded for about 5 minutes and let proof in an oiled bowl for about 4-5 hours until doubled. After it had doubled I split the dough into two, shaped into batards and placed into bannetons and into the fridge for about 20 hours.

After the cold fermentation I pulled one loaf first, then the other 40 minutes later. I allowed to proof for 1 hour before loading into a preheated oven with stone and cast iron for steam. Baked for 15 minutes at 460 degrees farenheight with steam, then continued until golden brown, about 20-25 minutes.

Here are a crumb shot and the finished loaf.


Franko's picture
Franko

Earlier this week while rummaging around in our local cookware store looking for unfluted French tart rings I spotted this nifty looking 18" long baguette style brotform.

I've seen them online in the past, never paying them much attention for some reason, but knew as soon as I picked this one up for a closer inspection I wouldn't be leaving the store without it. The idea of a dark, crusty loaf full of mixed grains and seeds contrasting with the white pattern of the brotform immediately came to mind rather than using it for a typical white baguette. While I continued my search for the tart rings I started considering possible recipe sources to use for the loaf I had in mind, thinking I'd likely find what I was looking for in Jan Hedh's “Swedish Breads & Pastries” or possibly Dan Lepard's “The Handmade Loaf“. After finally locating the one and only straight sided tart ring in the entire store, I drove home with the new purchases and immediately started going through my baking books looking for the type of bread I'd envisioned. Dan Lepard has a good looking formula for a Sunflower bread in his book that I almost went with, but it called for a levain and I'd already decided that I wanted to use a yeasted preferment of some kind for this loaf. As is often the case I found what I was looking for in Jeffrey Hamelman's “ Bread”. The two recipes I drew inspiration from were the Five Grain Bread with Pate Fermentee and his Sunflower Seed Bread with Pate Fermentee, on pages 129 and 131 of the book. Between the two, I opted for the higher percentage of pate fermentee he uses in the Five Grain Bread, swapped out the malt syrup used in his Sunflower Seed Bread for honey, and used an 80/10/10 combination of white AP flour, whole dark rye, and barley flour for the final mix.

 The percentages used in the initial formula came fairly close to giving me a workable mix, but needed a few adjustments for hydration, reflected in the formula below. The mix should be fairly slack, but not so much that developing it over the stretch and fold sessions becomes a matter of having to scrape it off the counter after the first S&F. The bread isn't as crusty as I'd hoped for, likely due to the higher percentage of honey used in the final mix, but I can live with that given the slightly sweet flavour and soft chewy texture of the crumb. For the next bake of this bread I'd like to include some of the   black currants we dehydrated last year in the mix to add a note of tart to the flavour profile. I'm sure this bread would lend itself to savoury additions such as cheese, fresh herbs or roasted onions as well. Formula and procedure included below. 

Best Wishes.

Franko

Procedure for Multi Grain Baguette with Seeds and Pate Fermentee 

  • Mix all ingredients for pate fermentee and let sit in a covered bowl for 14-16 hours @ 70F

  • Mix all ingredients for the multi grain soaker at same time as pate fermentee and leave in covered container at room temperature. 

  • Final dough:

    Mix the flours and pate fermentee with the water, adjusting for hydration if needed. Autolyse for 40 minutes. 

  • After autolyse is complete add the salt and instant yeast and mix till the dough is slightly developed. Add the grain soaker and honey and develop by either doing stretch and folds in the bowl or slap and folds on the counter until a slight windowpane can be achieved. The dough should be slightly sticky and moderately developed. 

  • Bulk ferment at 76F/24C for 90 minutes giving a full stretch and fold every 30 minutes.

  • After the last S&F round the dough to medium tight ball, cover and allow 15 -20 minutes for the dough to relax before shaping. 

  • Shape as a baguette or batard, and place seam side up in a floured brotform. 

  • Preheat the oven and baking stone to 485F/251C for 45-60 minutes prior to baking. 

  • Final rise of 45-50 minutes at 74F/23C covered with plastic sheet. 

  • Tip the loaf on to the underside of a parchment covered 18 ”/45cm long sheet pan or a peel if shaped as a batard. Score as desired, and slide loaf onto the preheated stone, with steam system in place and oven vents blocked. 

  • Bake at 485F/251C for 10 minutes, unblock the oven vents, remove the steam system and lower the heat to 465F/240C. 

  • Bake at 465F/240C for 10 minutes, rotating the loaf periodically for even colouring. Bake a further 10-15 minutes at 455F/235C or until the internal temperature is 210F/98.8C 

  • Turn the oven off, prop the door open slightly and leave the loaf in the oven for 20 minutes to cool gradually. 

  • Wrap the loaf in linen and place on a wire rack for 4-5 hours before slicing. 

  • NOTES: The bake times are based on a 680 gram loaf. Longer bake times will be needed for larger loaves. For transferring the loaf to the oven I recommend using parchment paper to avoid any likely sticking. The dough is soft and difficult to handle in a baguette shape. After the first 10 minutes of baking the parchment can be removed easily from beneath the loaf.

    Link to full sheet [HERE]


Litebrite's picture
Litebrite

This is a version of Vermont bread from http://homecookingadventure.com/recipes/easy-sourdough-bread-vermont-bread that I have baked probably 8 times now to get a feel for my starter strength and how a properly proofed loaf should respond.  I am happy to say that each attempt has produced better results than the previous one.  In this week's bake, I substituted chapati flour for the whole rye portion of the formula.  I love the color and the flavor that durum wheat imparts to bread.  To get better hydration of the chapati flour, I increased the autolyse period to several hours, which seemed to make the dough less prone to tearing (I have had this issue with breads containing any portion of chapati flour in the past). 

breadsong's picture
breadsong

Hello everyone,

This month, Elle and the Bread Baking Babes are baking MC-Farine’s cute and charming Morning Cuddle Breads,
as ‘Summer Twists’.

MC, on her always-so-interesting blog!, recently featured a beautiful Barley Bread - in her post she recalls the sucre d’orge (barley candy) she had as a youngster. 
I was curious so looked up barley sugar candy online (noting its pretty golden color), and read on Wikipedia “Barley sugar was often made into small spiral sticks, and the name is… sometimes used for…twisted legs and spindles in furniture…”.
                          (So that’s where ‘Barley Twist’ furniture got its name!).

MC‘s Barley Bread post motivated me to make these breads as ‘Barley Twists’ … using a bit of barley malt extract , and some of the *lovely* Fairhaven organic whole barley flour MC gave to me (*many thanks!*), in place of oats. 
The barley flour was scalded, to help retain moisture and hopefully add a bit of extra sweetness.
For fruit, I added golden raisins, their color reminding me of the golden color of the sucre d’orge :^)

                  Barley Twists        
                                           Cinnamon Cuddles

Two breads were shaped as ‘Barley Twists’, egg washed, and sprinkled with barley flakes prior to baking.

The other two breads were shaped in a ‘C’ shape, for ‘Cinnamon Cuddles’ (the raisins in this bread seemed to call out for some cinnamon! ). I added some cinnamon to the egg wash, sprinkled cinnamon sugar along the edges of the twists, where the strands joined, and for a bit of extra golden color, sprinkled some turbinado sugar on top, prior to baking:
 cinnamon egg-wash :^)
                                   just before baking

                                                                 crumb

The bread has a soft and moist crumb, nice sweetness from the golden raisins, and the bread itself having a lovely complex flavor that I don’t quite know how to describe!, but this is a wonderful breakfast bread.

Thanks to MC for the lovely ideas in her posts, and thanks to Elle, too, for featuring this bread this month!
Here is the formula I worked out, inspired by these ladies' efforts :^)


Happy baking everyone,
:^) breadsong

Submitted to YeastSpotting :^)


Isand66's picture
Isand66

For someone who doesn't like to drink coffee, I must say I love adding it to my bread.  It adds a subtle flavor to the overall product that is very pleasing and smells good to boot.

I recently bought some Red Wheat Berries and Farro on my latest trip to Whole Foods so I wanted to make a soaker using these ingredients and see what happens.  I also added some oat bran to the soaker as well.

I used some White Rye Flour, Pumpernickel, Sprouted Wheat Flour and French Style (low protein flour good for baguettes) and of course some Mudslide flavored coffee as the liquid.

In order to make the soaker I used a cup of hot water and mixed it with the ingredients and let sit at room temperature for 24 hours.  Since the Red Wheat and Farro are very hard, I should have used boiling water or actually boil it on the stove in water for a longer period to make it tender.  My soak in hot water did not end up making the soaker ingredients tender enough so they ended up a little chewier in the final bread than I would have preferred.

For the starter, I refreshed my standard AP white starter the night before and used most of it in this bake.  I have also included the ingredients to make the exact amount of starter needed from your seed starter.  Mine is kept at 65% hydration so adjust yours accordingly.

Soaker

50 grams Farro

30 grams Red Wheat Berries

30 grams Oat Bran

240 grams Boiling Water

Mix boiling water in a bowl with other ingredients and let sit covered at room temperature for 24 hours.

Starter

71 grams Seed (Mine is 65% AP Flour Starter)

227 grams AP Flour

151 grams Water (85 - 90 degrees F.)

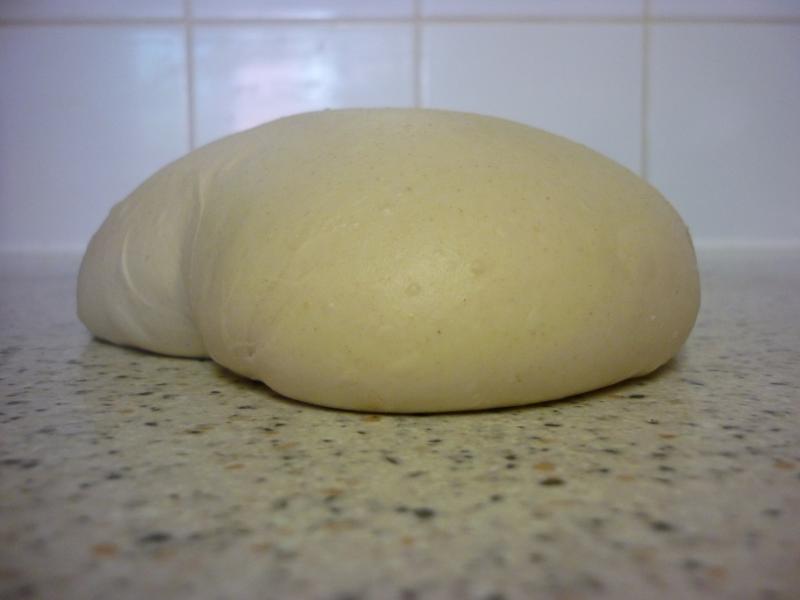
Mix seed with water to break up for a few seconds and then mix in flour until the starter form a smooth dough consistency.  Put it in a lightly oiled bowl and loosely cover and leave at room temperature for at least 10 hours.  The starter should double in volume.  Put the starter in the refrigerator for up to 1-2 days or use it immediately.

Main Dough

Ingredients

425 grams Starter from above (all of the starter)

180 grams French Style Flour

150 grams Sprouted Wheat Flour

200 grams White Rye Flour

100 grams Pumpernickel Flour

370 grams Mudslide Coffee (90 degrees F.)

14 grams Sea Salt (or table salt)

Procedure

I mixed  the flours together with all the coffee except for 50 grams and let them autolyes for 30 minutes.    After an hour  I added the levain and the soaker and the rest of the coffee with the salt and mixed on speed #1 for 1 minute and #2 for 4 minutes.  I then did a stretch and fold, rested the dough uncovered for 10 minutes.  I then did another stretch and fold, covered the dough and let it rest for 10 minutes.  I did one more stretch and fold and put it in a lightly oiled bowl for 2 hours.  I then put it in the fridge overnight.

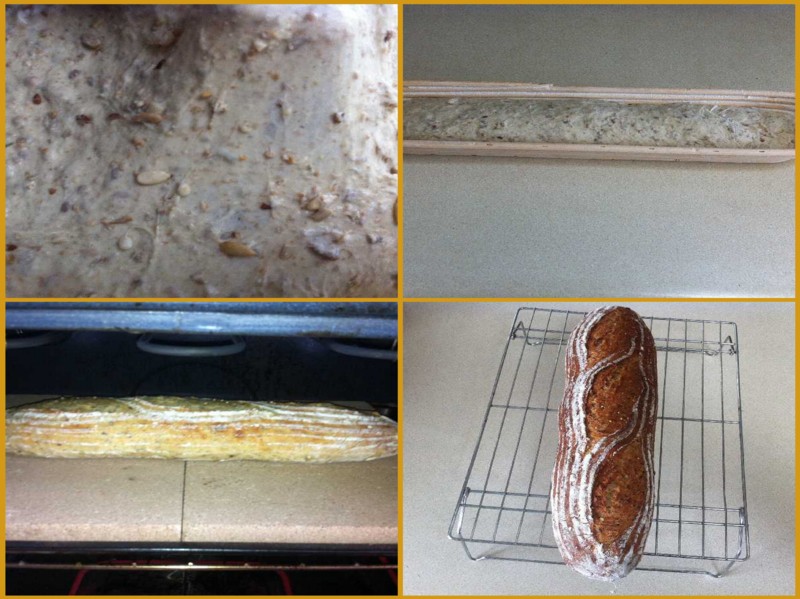
The next day I let the dough sit out at room temperature for 1.5 hours.  After 1.5 hours I formed it into loaves and put them in floured bannetons and let them rise covered for 2 hours.  Score the loaves as desired and prepare your oven for baking with steam.

I then baked on my oven stone with steam at 450 degrees until both loaves were golden brown and reached an internal temperature of 200 - 210 degrees F.

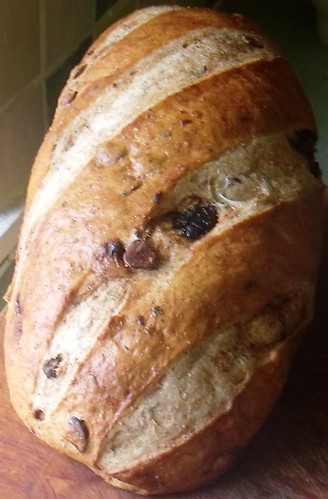
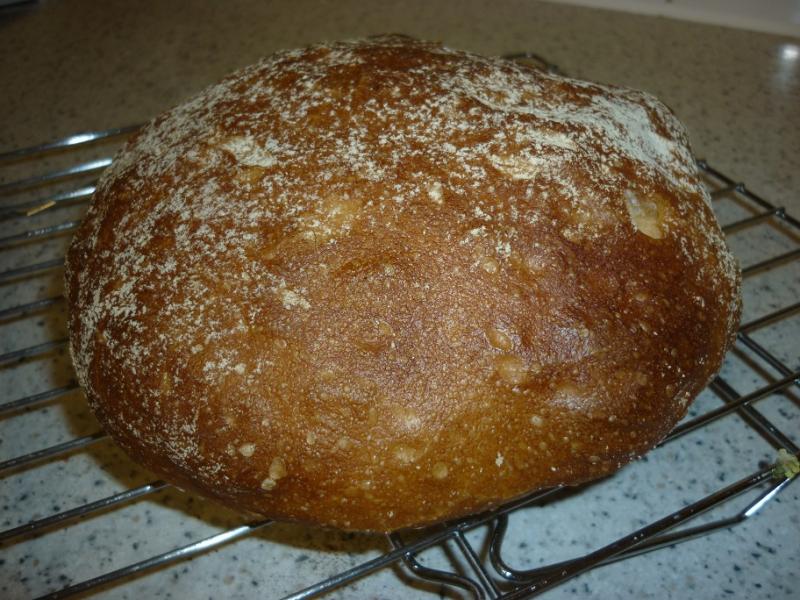
I got a nice bloom with my scoring, actually more than I expected.  One loaf I tried a curved scoring pattern which came out pretty nice.

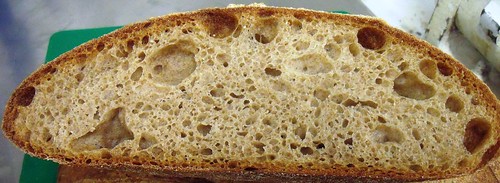
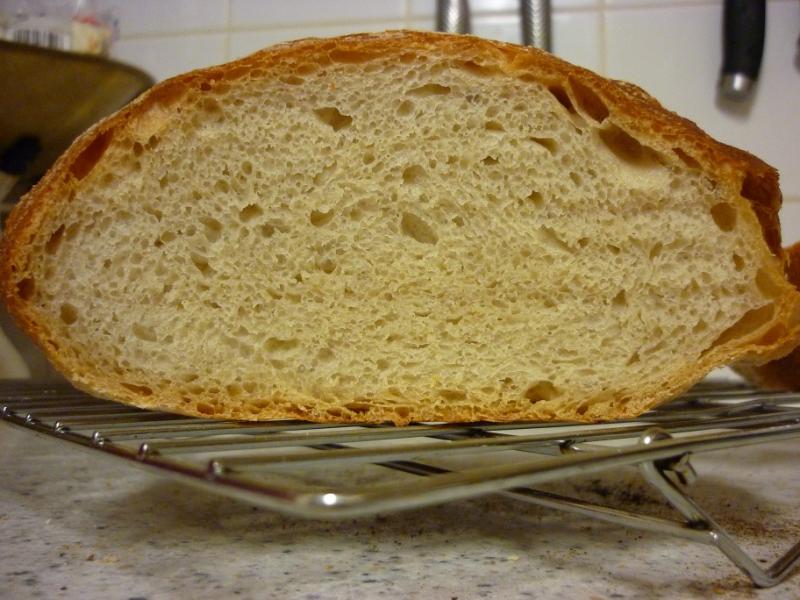
The final bread came out like I had hoped with a nice crust and open moist crumb.  You can taste the coffee influences for sure as well as the multi-grain ingredients.


mwilson's picture
mwilson

This requires a lot of kneading to create a dough with strength. It starts out as a liquid soup. 40 mins kneading by hand. A messy job!

Recipe:

  • 200g white spelt
  • 200g water
  • 2g yeast
  • 4g salt

Mixed dough:
 

Baked:
 
The final dough was easily 4 times the size mixed dough and baked with a little spring. Slightly over-proofed consequently blew some bubbles at the side.

Crumb:

A fine even crumb due to the required intensive mix and the poor gluten properties of spelt.

I challenge anyone to mimic this recipe. I'm sure you will struggle!

Michael

Over and out.

Pages

Subscribe to Recent Blog Entries