The Fresh Loaf

A Community of Amateur Bakers and Artisan Bread Enthusiasts.

Recent Blog Entries

Floydm's picture
Floydm

Hi everyone,

I am long overdue to make a post here about our transition to living in Canada and everything that has been going on with me, but not tonight.  Tonight I did, however, register for the Kneading Conference West in mid-September in Mount Vernon, Washington.  Any other TFLers going?  I'd love to meet up with anyone else attending.  

-Floyd

breadsong's picture
breadsong

Hello everyone,
These basil buns are my adaptation of Jan Hedh’s Risotto Bread, from his book, Artisan Breads.

I loved Mr. Hedh’s idea of including fresh basil in a prefermented dough.  Our season for fresh basil is here! –
I was curious to try making these rolls, to see how they would taste.
                                      

The aroma of basil held very nicely after baking and the basil flavor is definitely there! There is a nice sweetness from the durum, along with tanginess and richness from the yogurt and parmigiano cheese. The crumb is very soft and moist  from the yogurt and risotto, but the risotto is not visible in the crumb after the bake.

I tried stencilling the tops with a basil leaf, and also tried applying a basil leaf with an egg white/water wash, wanting to see how a whole, tender basil leaf would hold up to baking. The leaf lost its bright green color during the bake, but the leaf didn’t brown like I feared it might.

one of the rolls, before baking

                                                             a stencilled roll

crumb (golden from the durum, nice and soft!)

The adapted formula (I wanted to call these rolls 'Pane Risotto con Basilico' in honor of their Italian flavorings :^)   ):

....this was how much basil I used (leaves are pictured on a dinner plate)


 ...the dough after all the ingredients were mixed together


                       One last shot :^)

Thank you, Mr. Hedh, for these lovely, fragrant, delicious little rolls!

Happy baking everyone,
:^) breadsong

Submitted to Susan's YeastSpotting


thedutchbaker's picture
thedutchbaker

Hello TFL members,

This last couple of days i am on a quest, I try to get more information about bolted flour and what it is or how to use it.

I read an article in " Edible" magazine about the flour the miller and the baker but not much info why or how to use it.


Thanks

Hans Krijnen


Franko's picture
Franko

The photo above is of historic [Watson's Mill] located on the banks of the Rideau River in Manotick Ontario, just a few kilometers south of Ottawa. The history of this 1860's heritage mill goes into greater detail in this [Wikipedia] entry for anyone who may be interested. My wife and I had a chance to visit the mill in late June while we were back in Ontario for a few days of sightseeing and to attend our niece's wedding. I'd done a little research in the weeks prior to our trip and discovered that Ontario has a good number of old mills that have been preserved over the years,Watson's Mill being one of the few (or only one) that still produces flour. We'd driven down from Ottawa that Wednesday morning having spent the day before on a fascinating tour of our national capital's historical sites and museums. We arrived at the mill about 30 minutes before it was due to open so put the time to good use exploring the area and taking a few exterior shots of the mill and it's lovely surroundings on this sunny, blue sky, perfect summer morning.

 The mill offers the option of a guided tour, or if you prefer you can just browse around on your own. We decided to do our own thing since every section of the mill has information boards posted explaining how the different stages of the milling process take place and the machinery employed. We started out on the lowest level where the river runs under the mill to power the turbines that run the mill are located, then worked our way up floor by floor to see how the grain progresses through the mill using a belt and gear driven conveyor system.The grain travels up and down several times over 3 floors with various parts of the process taking place at each stage. [ Here is a link] that explains the process in better detail than I'm willing to get into here but the illustration doesn't come close to describing the elaborate set up of all the various milling components and how they function together as one large machine. I would loved to have seen the mill while it was running to get a better sense of this, but production is limited to one day a week (Sunday) during tourist season.

The last stop on our mill tour was the gift shop to pick up a couple of bags of the freshly milled flour to take home for myself and a friend.

They had an open bag of the flour available that one could reach in and sample the texture of before purchasing, which of course I did. The flour is milled from Ontario Red Fife wheat, a much softer variety than the prairie grown Red Fife that I'm familiar with and has a very silky feel to it, reminding me more of a whole wheat pastry flour than a bread flour. Just around the time I started asking questions of the lady behind the counter regarding the flour, one of the millers happened to stop by for a break from his morning run and was quickly directed over to me. He told me that they typically will sift off 30% of the bran and re-mill it back into the batch, which along with the softer nature of the grain would account for it's fine texture. He went on to assure me that the flour does make very good bread and hoped I enjoyed working with it. Much as I would have liked to have stayed and chatted with him a while longer, we had to be on our way as we still had a long drive ahead of us to get to our destination of Port Hope on the shores of Lake Ontario where the wedding was to take place. 

When we arrived back home from Ontario and had unpacked and settled in I began looking through some of my books for a recipe to use the Watson's Mill flour in, deciding to try Dan Leader's Poilane inspired Whole Wheat Sourdough from “Local Breads” that uses an 80% ratio of whole wheat in the formula. The first mix didn't produce the kind of results I was after mainly because of my impatience in wanting to get some bread made that I could have for sandwiches that week. The levain I'd made using the Watson's was extremely lively but the dough hadn't been developed sufficiently, nor had the bulk ferment been long enough for a full and even fermentation.

The loaf made the following week was better developed and fermented, with a mild sour flavour and slightly sweet background to it, that if I hadn't known better would have guessed contained some honey or sugar in the mix. Generally, I thought the loaf was OK but somehow it wasn't hitting any high notes for me either.

By the time I was ready to mix a third loaf using the Watson's flour the appeal of a high ratio whole wheat bread had paled and instead I chose to make a basic country loaf vaguely similar to Chad Robertson's Tartine bread. Starting with an all white flour 100% levain fermented for 8 hours, it was then converted to a stiff 50% levain for an additional 8 hours before adding it to a mix of 83/17 percent White AP to WW flour. 

This produced a bread that fell right into my preferred flavour range with the kind of medium sour tang I love, complimented by the same hint of sweetness noted in the previous loaf. The contrast of handling and flavour characteristics between the Ontario grown Red Fife and Saskatchewan RF is significant in my opinion. The soft Ontario flour requires a much more aggressive approach when it comes to developing a high WW ratio dough during the initial kneading, with several stretch and folds needed throughout the first 90 minutes of bulk fermentation, while the prairie grown RF might need only one or two . In terms of flavour and fermentation the Ontario grown grain has a milder, sweeter profile to it than it's spicier, more herbal flavoured prairie cousin. Both flours ferment readily, producing very active and healthy leavens in short order, but lend distinctively different flavour nuances to the finished loaf. For the relatively small amount of Watson's Mill flour I have left remaining,this recipe or similar low ratio WW flour formulae...perhaps some scones as well, will be how it's used in order to stretch it out as much as possible, our next visit to Ontario a few years away.  Recipe for the Basic Country loaf [HERE] and Procedure is [HERE]

Best Wishes,

Franko

dabrownman's picture
dabrownman

There is nothing we like better than sandwiches when it comes to bread.  It has been nearly month since we did a parade so here goes:

Naan made on the grill

The Chacon wiith Mushroom and Brie Soup with some home made croutons.

A brand new Breadman for a $1 on 'Dollar Thursdays' at Goodwill.  Nice gift for a physically challenged friend.

How did that Chocolate Cake get between those Mocha Brownie Ice Cream Sandwiches?  I'm pretty sure that is illegal!

Monsoon Sunset

Mango is the most eaten fruit in the world - I would have guessed apples.

DaBialotta with a nice (triple 2) 2 mushroom, 2 pepper, 2 cheese egg white omlete.  We love 2's around here.

It's nice that sometimes a good lunch is followed later by a fine sunset.

jarkkolaine's picture
jarkkolaine

After making my first yeast water bread, I discarded most of the yeast water, leaving about two table spoons, added a big handful of raisins and a table spoon of honey, and then filled the jar about two thirds with water. I’m not sure if this is how it’s usually done, but it worked very well: In a couple of days, the mixture had developed a very fruity and inviting smell with lots of bubbles.

I wanted to drink the liquid but resisted and started a new bread dough instead.

Following the lead of Ian and others, this time it was time to mix in some of my sourdough starter to play with the taste a bit. I was hoping to make a boule quite similar to the one I had made the first time (and usually love to make), but because of some mistakes in calculating the proportions of water and flour (I forgot to account for the water in the starter!), ended up with Ciabatta—which was actually good, as we were just about to leave on a two day trip to Tallinn, and Ciabatta makes delicious picnic sandwiches…

Anyhow, here’s the recipe. 

First build of YW starter: (evening)

  • 60 g Yeast water
  • 60 g White flour

Second build of YW starter: (about 8-10 hours after previous step, I forgot to time everything properly…)

  • All of the starter from previous step
  • 200 g Yeast water
  • 200 g White flour

Final dough: (About 4 hours later, in the afternoon)

  • 400 g YW starter (which at this point looked a lot like a regular poolish starter)
  • 100 g Sourdough starter (100% hydration, refreshed the night before)
  • 750 g Fine, rather white spelt flour
  • 700 g Water
  • 20 g Salt

The dough was quite wet, so I gave it an autolyse (it was only about 15 minutes, as I was itching to get my hands in the dough) and worked it for 20 minutes on the table.

After that, the dough rested for 4 stretch and folds at 30 minute intervals. Then I cut pieces of the dough and let them rest on a heavily floured couche for about an hour or so as the oven heated up. I baked the breads on a baking stone for 35 minutes.

...And here’s what came out from the oven:

I am very happy with the resulting flavor:  I can’t say I taste any of the fruit anymore, but it’s a little sweet, not really sour at all. And the boys liked it (filled with some salami, cheese, boiled eggs and cucumber):

Let’s see what happens next time, as the yeast is now feasting on some fresh fruit… (And looks and smells more and more like a drink! I might have to start making cider or something, soon ;))

MickiColl's picture
MickiColl

For a very long time I have been searching for a recipe for graham flour bread.  I have found one and it is excellent ..( thank you Mr Google) 

it is a James Beard recipe .. how can we go wrong ? here it is

Graham Bread

Adapted for 2 loaves from Beard On Bread

  • 3 1/2 tsp instant yeast1
  • 2 tbsp sugar2
  • 12 oz warm water (between 100° and 115° F)
  • 8 oz evaporated milk
  • 1 1/2 oz butter, melted
  • 1 1/2 tbsp salt
  • 2 cups graham flour3
  • 3 - 4 cups all-purpose flour

In a large mixing bowl, combine graham flour, salt, sugar and yeast. Pour the water, milk and butter on top. Beat well and add in all-purpose flour a cup at a time until it comes together into a firm dough.

Turn the dough out onto a floured board and knead for 10 minutes until it is smooth and elastic. Or, use a stand mixer fitted with a dough hook to do the kneading - it will take slightly less time and much less effort.

Form the dough into a ball and place into a lightly oiled bowl. Cover lightly with a clean towel and let it rise in a warm place until doubled (about 1 hour or two). Punch down the dough and cut in half.

Grease two 9x5x3" loaf pans4 well. Shape the dough pieces into loaves and arrange in the tins. Cover them back up with the towel and let them rise again until doubled (another hour or so). Slash the tops.

Bake in a preheated oven at 425° F for 10 minutes then reduce the heat to 350° F. Bake for 30 - 35 minutes. (The loaves will sound hollow when done or you can check their temperature - they should be at 190°F.) Let cool in the pans for 5 minutes, then turn out onto racks to cool completely. Slice and serve.

Notes:

  1. Instant yeast does not need to be proofed. It's wonderful stuff. If you use active dry, you will need to proof it in the warm water with the sugar for 5 minutes before continuing with the recipe. Also, use 4 tsp of active dry.
  2. Or honey, which is what I wished I had done and will do differently next time.
  3. Whole wheat can be substituted for graham, which is coarser because the different parts of the wheat are ground separately then remixed. You can make it yourself, according to Wikipediaby mixing all purpose flour with wheat bran and wheat germ. For this recipe, you would need to mix 170 g all-purpose (about 1 1/3 cups) with 30 g wheat bran (about 1/2 cup) and 5 g (3 tsp) wheat germ. Graham flour is very coarsely textured.
  4. This dough is firm enough, according to Beard, that you can just make free-form loaves if you don't have or don't feel like using loaf pans.

A recipe from http://kitchenmouse.rozentali.com/2010/05/graham-bread/

Posted by Cori Rozentāle onMay 3, 2010.


dmsnyder's picture
dmsnyder

Miche, Pointe-à-Callière

I haven't made this one in a while. It is still a favorite. I made it with Central Milling's "Type 85 Organic, unmalted" flour. I retarded the firm levain overnight, but the bread was baked on the same day the final dough was mixed.

Episodic supervision and taste testing were provided by granddaughter, Naomi.

Miche, Pointe-a-Calliere, crumb

Tasting notes

Crunchy-chewy crust. Chewy crumb. Sweet, nutty, wheaty flavors with moderate sourdough tang, tasted 18 hours after baking. Naomi, who doesn't eat the crust on bakery bread, 1. Asked for a second slice. 2. Finished both slices to the last crumb and said the crust was her favorite part. 

David

Happy baker/grandfather

Isand66's picture
Isand66

I had a new brand of store bought guacamole in the refrigerator just calling for me to use it in a bread.  I made bread before with fresh avocados and I've been meaning to try it again with a higher percentage of avocados this time.

The pre-made guacamole had some tomatoes, peppers, cilantro and onions which ended up adding a nice kick to this bread.

I also added some left over mashed potatoes as well as greek yogurt and I used Durum flour as well.  The idea was to create a moist, soft bread with a sour undertone and I think I achieved this.

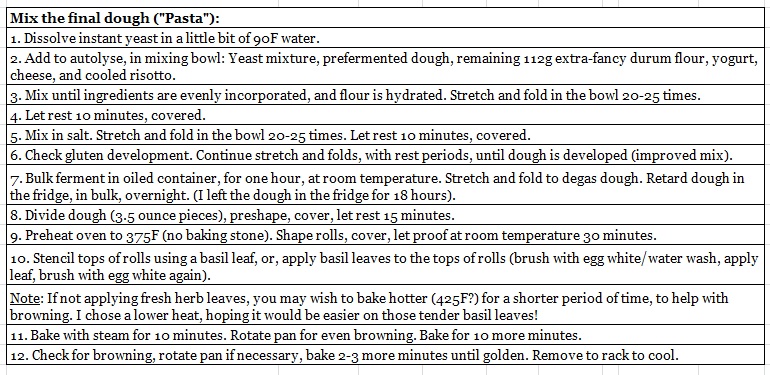
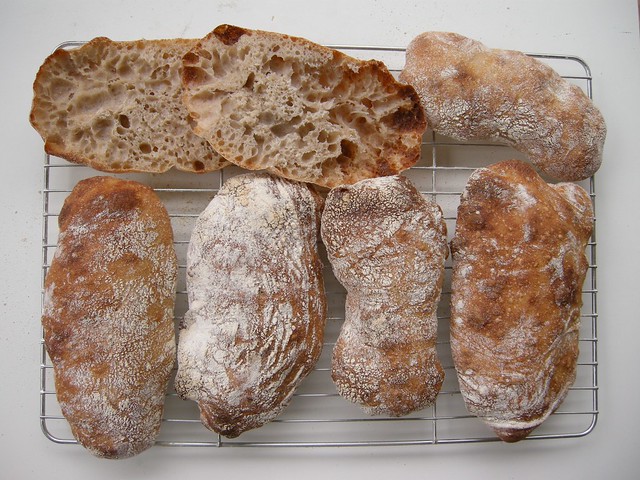
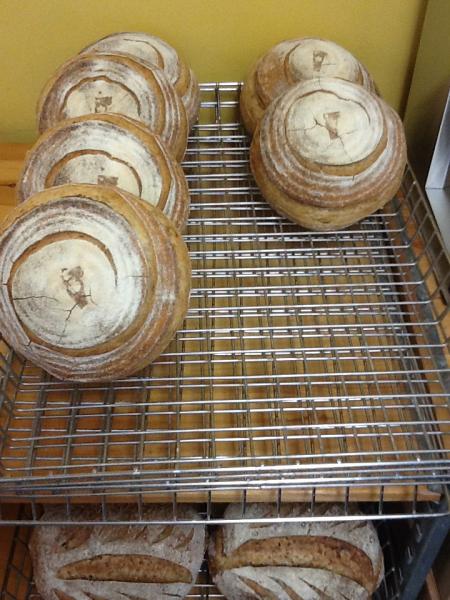
The crumb was nice and moist and open with a buttery yellow/green texture.  The addition of the guacamole and yogurt made this a very wet dough even though by the strict definition of hydration it really wasn't it.  This would have made great Ciabbata bread but I decided to stick with traditional Boules.  The second one I made stuck to the cloth liner since I guess I didn't add enough rice flour so it ended up a little flatter than the first loaf.

If you decide to make this and are intimidated by wet dough feel free to increase the flour percentage or cut back on the water.

Starter

71 grams Seed (Mine is 65% AP Flour Starter)

227 grams AP Flour

151 grams Water (85 - 90 degrees F.)

Mix seed with water to break up for a few seconds and then mix in flour until the starter form a smooth dough consistency.  Put it in a lightly oiled bowl and loosely cover and leave at room temperature for at least 10 hours.  The starter should double in volume.  Put the starter in the refrigerator for up to 1-2 days or use it immediately.

Main Dough

Ingredients

385 grams Starter from above (you may have a little left over from above)

315 grams European Style Flour (KAF...you can substitute bread or AP flour or a combination of the two)

251 grams Durum Flour (make sure not to use Fancy Semolina as it is too gritty)

122 grams Mashed Potatoes

308 grams Guacamole

73 grams Greek Style Plain Yogurt

335 grams Water (85 - 90 degrees F.)

16 grams Sea Salt (or table salt)

Procedure

Mix the starter with all the water except for 50 grams just to break it up.  Next mix in the flours for 1 minute on low in your mixer or by hand and let them autolyes for 15 minutes up to an hour.    Next add the salt, guacamole and yogurt.  Mix on low for 1 minute and then add the remainder of your water unless you feel the dough is already too hydrated.  Mix on low-speed or by hand for 4 minutes.  Remove the dough from your mixing bowl to your work surface.  The dough will be very sticky so you may want to use a bench scraper to help you do 4-5 stretch and folds.  Leave the dough uncovered for 10 minutes on your work surface or put it in a slightly oiled bows.  After 10 minutes either on your work surface or in your bowl do another stretch and fold, cover the dough and let it rest for 10 minutes.  Repeat this S & F procedure one more time and let it rest another 10 minutes.  Do one last S & F  and put the dough in a lightly oiled bowl for 2 hours.  If you don't feel the dough has developed enough feel free to do some additional stretch and folds while the dough is in the bowl and then put it in the fridge overnight.

The next day when I returned from work I removed the dough from the refrigerator and  I let the dough sit out at room temperature for 1.5 hours.  I then formed it into loaves and put them in floured bannetons and let them rise covered for 2 hours.

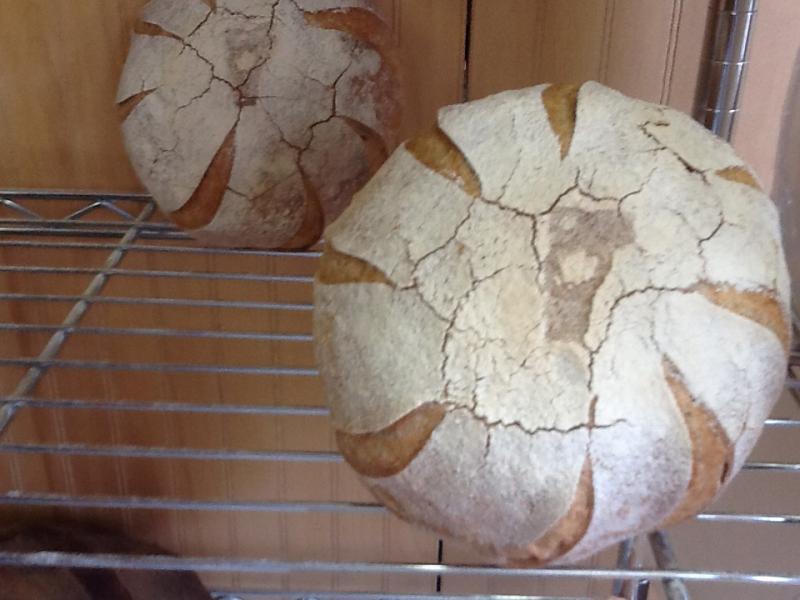
Score the loaves as desired and prepare your oven for baking with steam.

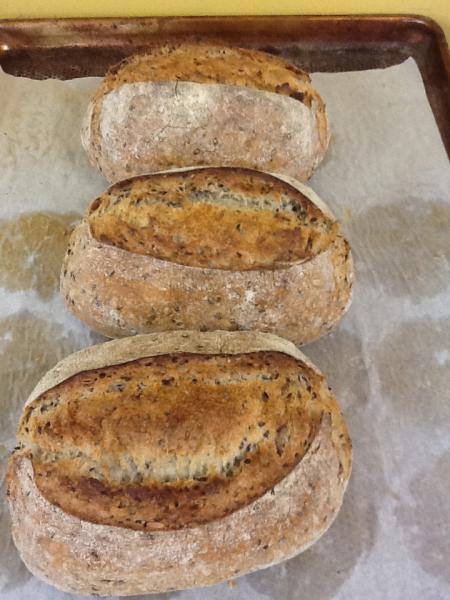
I then baked on my oven stone with steam at 450 degrees until both loaves were golden brown and reached an internal temperature of 205 - 210 degrees F.  I left them in the oven for 15 minutes with the heat turned off and the door open a crack to get the crust a little harder.

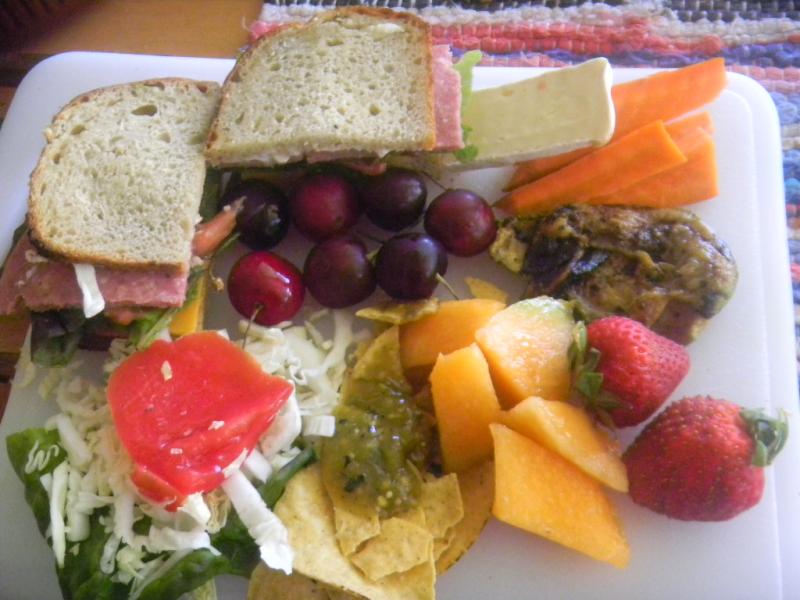
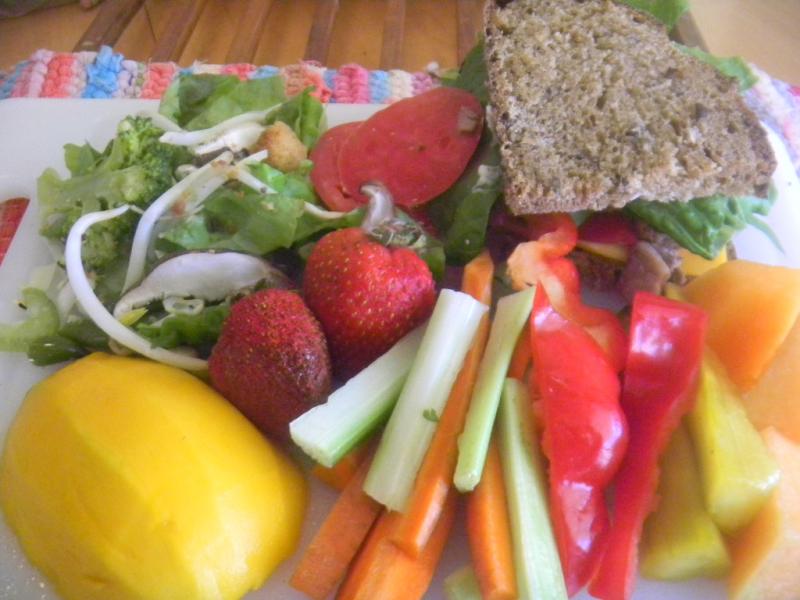
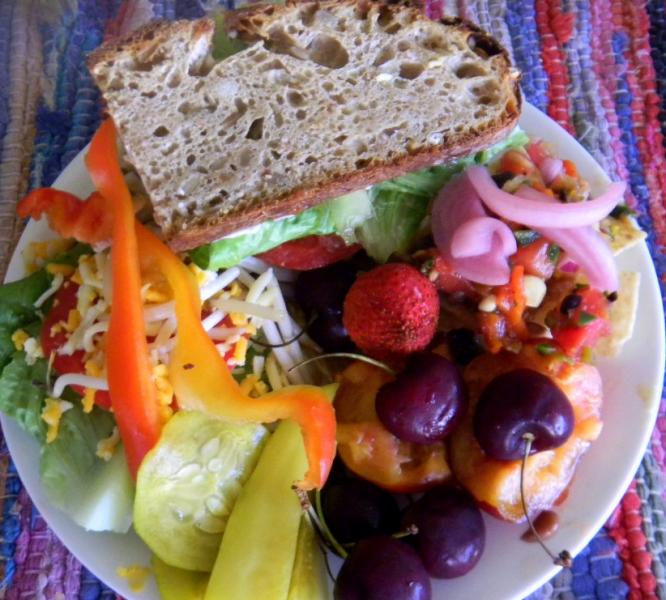
The end result was a nice golden-yellow crumb with a hint of green.  The crust was nice and crispy and the bread was moist and flavorful.

This bread has been submitted to Yeast Spotting here at http://www.wildyeastblog.com/

Cosmo Waiting for the Bread to Bake
thedutchbaker's picture
thedutchbaker

Hello TFL,

while i am here on my computer, like to show of some pics of a little detail on the VT sourdough i hope you like it


On the bottom you see some Mult grain sourdough from the Bread book with a little personal touch.

This is version of a 5 seed bread from the bread book ( just seeds, Flax, sesame,poppy, sunflower, and pumpkin)

This is a WW VT sourdough that i created after i read some blogs from Farine or i was on here website.

This bread is made with All-pur, rye, WW, and Spelt.

Hans Krijnen

Pages

Subscribe to Recent Blog Entries