The Fresh Loaf

A Community of Amateur Bakers and Artisan Bread Enthusiasts.

Recent Blog Entries

Our Crumb's picture
Our Crumb

Ok, maybe French Toast.  But I heard this reference to Elizabeth David's easy-peasy Summer Pudding recipe by Linda Wertheimer on NPR a while back and thought this has to be a sign:  A use for one formula in my Summer 2012 Tour de Hamelman that I would otherwise have been hard pressed to find, and a smashing crop of raspberries just pouring off our vines this year (plus some market-sourced blueberries).  Pain de Mie would have sufficed, but Chef Jeff's Toast Bread's slightly elevated richness seemed more appropriate.  As a straight dough, its ease of prep fits with the no-frills simplicity of Elizabeth David's recipe, offered here in the Oxford Times.


Can't go too far wrong with a desert consisting of nothing more than bread, fresh fruit and sugar.  With a scoop of vanilla ice cream or frozen yogurt, this is one utterly satisfying seasonal pleasure.

Cheers,

Tom

loydb's picture
loydb

I just ran across http://www.localgrain.org/csa, and have signed up for a share. I'm excited to try out some of the heirloom wheats. More info in December when I pick it up.


mwilson's picture
mwilson

Whenever I make bread my main goal is volume. Admittedly this isn't the most rewarding feature of bread but I am a technical junkie and love taking things to the limit. Not to mention, I love super-light bread.

This loaf is somewhat akin to the improved loaf I made a few months ago but uses acidity from sourdough to boost volume. Milk and diastatic malt are used to soften the crumb.


Ingredients:
320g Very strong Allinson flour (High gluten)
200g Water
200g Skimmed milk
153g 00 flour
~77g Italian sourdough (~45% hydration)
55g Wholemeal flour
22g White spelt
22g Red malt
10g Salt
6g Diastatic malt
2g Instant yeast

Method:
Mixed dry to wet. Fermented 3-4hrs @ ~30C until tripled. Kneaded by hand until satisfied, 5-10 mins á la Bertinet.

Rounded and left to rest for 20-30 mins at which point it was significantly swollen.

Shaped tightly and placed in the tin.

Proved for 45mins-1hr. Baked with steam, oven off for first 8 of a total 45mins.

Crumb:


dmsnyder's picture
dmsnyder

These photos were e-mailed to me and Glenn. My younger son, Joel - father of Naomi and Sasha, made Montreal bagels from the formula in ITJB this weekend. He must have had excellent shaping instruction from his daughters. They look better than most of mine.

David


dabrownman's picture
dabrownman

Never give up!

It has been a while since we last made a white bread that didn’t have some outlandish concoction of ingredients to make it healthier than your average slimy white slice.  So we toned this one down as it is meant for the wife’s daily bag lunch.


She is more traditional in her love of Oroweat Whole Wheat Bread to contain her sandwich fillings but we also wanted a bread that we could be sure to deliver some real whole grain goodness, wheat taste, extra light sourdough flavor, not too sweet, a soft, moist, yellowish, open crumb and a nice dark brown chewy crust once the bread cooled.

We hoped that our whole grain combination yeast water and sourdough starter in conjunction with soft white wheat (home ground), durum atta and WWW and the semolina, wheat germ, malts, bread and AP flour in the dough would provide what we were looking to get bread wise at the end of the day.


A little honey would supply a hint of sweetness and the whole soft white wheat berry soaker would supply some extra crumb texture and bite that we like so much.  We also used some yogurt whey water, from earlier Greek yogurt making this week, for part of the liquid trying to enhance the sour taste.  All together it is a simple white bread easily prepared that is fun to; make, bake, admire and devour.  

\

This was the original move from bamboo couche to the floured basket - not horrible so far.  Then 4 hours later in the fridge the whole time..... and the oven wasn't even preheated .......

This is a fine everyday eater and we got what we mostly desired along with a great wheat taste.  We were surprised how balanced the taste was between wheat and sour. We loved it crumb color too.   It is delicious bread that is perfect for everyday lunch sandwiches of all kinds.

We also got to use our bamboo double barrel batard couche that has been unloved for some time but we only used one barrel for this1,126 gloaf that is 35% whole grains, 74% hydration and where the levain is 30% of the total weight except……..

That is not what happened!

Well, that was the way it was supposed to be.  After shaping and loading the bread in the bamboo couche, it proved to be too small, so I switched it too a larger batard shaped woven basket lined with a rice flour coated towel and chucked it into the plastic bag and right into the fridge after reshaping for the 18 hr retard.  There was no proofing on the counter.
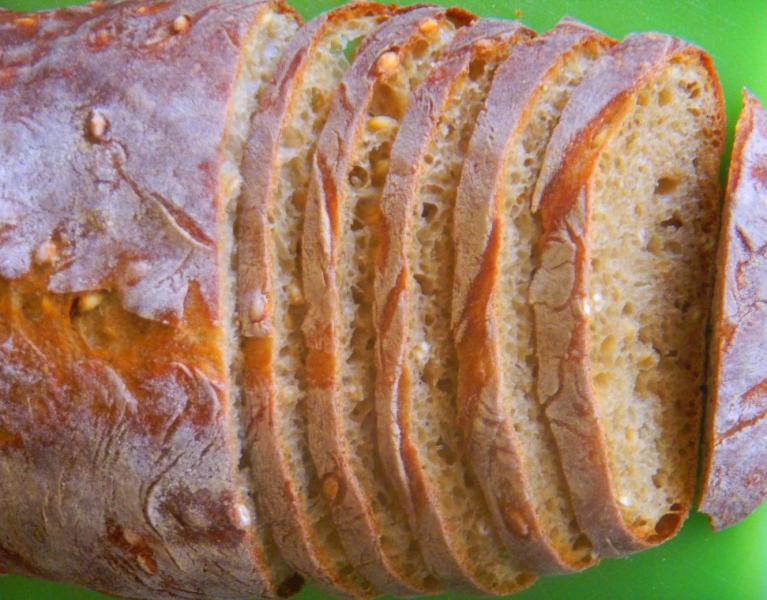
When I checked it in 4 hrs, right before bed time, this thing had exploded out of the basket like the Nile in full Spring Flood!  It might have been over proofed – a heck of a lot!  Immediately we fired up big old Betsy since this blob wasn’t going into the mini and got 2 of Sylvia’s steaming pans going for the 40 minute warm up.

When pre heat was over the dough was really loose and still spreading.  I overturned it onto parchment and a peel and scored it, why I don’t know since it was already spreading like a ciabatta and scoring only made it worse.  By the time I got it into the oven, throwing another 1/2 cup of water in the bottom of the oven as the door slammed, it was only 1” high and a full 10”wide.

It sprang great to almost 3” high before settling back to 2 ½” in height.  It was late by the time it cooled and was wrapped.  I’m guessing the yogurt water, inconjunction with the honey and the (2) malts enzyme action had something to do with making this dough look like a meth crazed, whack job on steroids.  Never had a dough go berserk while in the fridge for retarding after shaping before.  I didn’t have a clue anything was wrong until I checked on it at the 4 hr mark.  The method that follows is the one that should have been.

I got a fairly nice badly scored ciabatta out of what was supposed to be a sandwich loaf.  Next time this is going into a loaf pan from the get go and watched carefully.

The ribs would have almost fit this bread perfectly if the loaf had been split length wise like a ciaabatta :-) The ribs turned out sort of normal  - before the bread fiasco thoiugh.

A nice brie and Colby jack grilled cheese sandwich using this bread with left over potato salad and BBQ baked beans, 1/2 ea of the 3 P's - pear, peach and plumb each stuffed with blue berries, 1/2 banana, black grapes, another 1/2 pear with brie and Colby jack , cantaloupe chunks with carrot pieces and a nice little salad with yellow and red papper topped with tomato and feta.  A decent lunch for a decent sandwich bread.

The Method

Making this bread is pretty straight forward compared to our insane kitchen sink recent bakes.  First you build the combo YW and SD levain using (2 ) 3 hour builds, mixing in the 3rd build  WWW flour and then immediately refrigerating it.

Then you make the soft white wheat soaker and let it sit out for 4 hours before refrigerating it overnight.  No scalding or microwaving required if you have the time and patience for it to soak a long while.

I also ground up the soft white wheat berries from the freezer and added the rest of the flours, home made malts, and salt to the ground flour in a bowl.  The water and yogurt whey was added, mixed in well and allowed to autolyse on the counter for 2 hours before being refrigerated over night.

The next day, the now nearly doubled in volume levain and the autolyse were removed from the fridge and allowed to come to room temperature – about 2 hours.  The two were mixed together in the mixing bowl with a dough hook on KA 2 for 4 minutes and KA 3 for 2 minutes until it pulled away from the sides.

The dough was then allowed to rest for 20 minutes in an oiled bow lbefore (3) sets of S&F’s were done 15 minutes apart.  The soaker was drained and dried with a paper towel and incorporated on the 2nd S& F.  After the 3rd S&F, the seeds were well distributed and incorporated nicely.  The dough rested in an oiled bowl between S & F’s.  The dough was then formed into a ball and allowed to ferment and develop for 60 minutes on the counter in the same oiled bowl.

It was then pre-shaped and final shaped into a batard, and placed into the parchment lined, bamboo couche seam side up.  The couche was then wrapped in a tall kitchen trash bag, allowed to proof for 330 minutes before being refrigerated overnight while the bartard doubled in volume.

The next morning the mini oven (MO) was preheated to500 F, and 2 of Sylvia’s steaming Pyrex cups, half full of water with a rolled up hand towel inside, were heated to boiling in the microwave.  The batard was removed from the fridge and the trash can liner, turned over by rolling on the underlying parchment, poorly slashed and placed onto the top vented mini broiler pan with the 2 steaming cups.

The baking apparatus was placed into the MO and allowed to steam for 12 minutes with the temperature being turned down to450 Fafter 4 minutes.  At the 12 minute mark the steam was removed and the temperature was turned down to425 F(convection this time) and allowed to bake another 20 minutes.  The batard was rotated every 5 minutes until the internal temperature in the center of the loaf reached205 F.

The MO was turned off, the door positioned ajar and the loaf left inside for 10 minutes to crisp the skin.  The bread was then moved to a cooling rack.

Formula follows the pix’s as usual.

35% Whole Grain YW & SD Semolina, Durum Atta White Bread with Soaker


Mixed Starter

Build 1

Build 2

 Build 3

Total

%

Multi-grain SD Starter **

20

0

0

20

3.27%

Yeast Water

75

0

0

75

18.03%

Durum Atta

40

35


75

18.03%

WWW

0

0

35

35

8.41%

Whole Soft White Wheat

75

0

0

75

18.03%

Water

20

35

0

55

13.22%

Total Starter

230

70

35

335

80.53%

** 10 g each Rye Sour & Desem


Starter


Hydration

71.79%


Levain % of Total

29.75%


Dough Flour


%


Non – Diastatic Red  Malt

3

0.72%


Wheat Germ

10

2.40%


Semolina

100

24.04%


AP

200

48.08%


Diastatic White Malt

3

0.72%


Bread Flour

100

24.04%


Dough Flour

416

100.00%


Salt

8

1.92%


Y. Whey Water -155, Water -152

307

73.80%


Dough Hydration

73.80%


Total Flour

611


Water

447


T. Dough Hydration

73.16%


Whole Grain %

34.53%


Hydration w/ Adds

73.98%


Total Weight

1,126


Soaker


%


Soft White Wheat

50

12.02%


Add ins


%


Honey

10

2.40%


Mebake's picture
Mebake

I’ve always wanted to try Laurel’s Whole wheat buns, and last weekend I had the chance to try one. I’ve chosen the feather Puff recipe, which is an enriched 100% whole wheat bread from the book: (Laurel's Kitchen bread book: a guide to whole grain breadmaking). The recipe calls for  eggs, honey, butter, cottage cheese, and good deal of kneading (15 minutes kneading at least), and makes for wonderfully light buns (for whole wheat, that is!).I had no cottage cheese, and decided to do without it altogether.

The author does promise outrageous lightness of the bread when kneaded properly, and boy was she right!

Shaped Buns:

Fairly light buns!

Even, smooth texture:

A close look:

The crust is soft, and full of flavor, and the crumb is light, soft, yet dry. The eggs have contributed to the dryness of the crumb. The sesame seeds add a nutty flavor to the buns, and the bread has some pronounced sweet under tones, due to the Honey.

Although the recipe is a straight dough, with no preferment, it is an excellent healthy, and all purpose bread that is good with any food.

Khalid

jarkkolaine's picture
jarkkolaine

This spring, in the preparation for the most recent issue of my online magazine, Bread, I sowed a handful of wheat seeds in a small metal tub on my balcony. As a fun experiment for the whole family (dad, mostly) to see if it’s possible to grow wheat on your balcony. It was. The wheat grew well, and throughout the summer, I watched the grass grow, make grains, and finally turn golden. 

Last week, it was finally harvest time!

My field was very small so I didn’t get nearly enough wheat for making flour for even a small loaf, not even for a small bun (I suppose had I ground the wheat berries it would have lead to something like two to three table spoons). But even if making flour was out of question, I wanted to use the wheat in some way. 

This summer, I have been mostly experimenting with yeast water and sandwich bread, but for this loaf, I knew I had to go back to my true love, sourdough.

After manually picking the wheat berries from the spikes, I put them in fresh tap water to soak overnight. At the same time, I also took my starter out of the refrigerator and refreshed it with my regular 100 grams of whole wheat flour and 100 grams of bread flour. As we ended up spending the whole Saturday in Helsinki, I refreshed the starter again in the morning and left to wait for my return.

In Helsinki, we visited a local food event, Herkkujen Suomi, which presented real food from small producers all over the country. I got to meet Teppo from Viipurilainen kotileipomo again and the owner of their (and mine) mill of choice, Vääksyn mylly, Kari Savola for the first time. And look at what we found at a museum stand!

I need to get one of these…

And Here's Teppo sharing samples of their bread:


When we came back in the evening, everything was ready for bread making. The wheat was very soft and the soaking water had turned somewhat yellow, so I decided to use the liquid for bread making too. I mixed 500 grams of bread flour from Vääksyn mylly, some 50 grams of very coarse rye flour (from Vääksyn mylly as well) and a total of 400 grams of water (including the water used for soaking the wheat) and left for a one-hour autolyse.

After the autolyse, I mixed in my wheat berries, worked the dough on the table for about five minutes and left for another half hour. Then, I came back to the dough, added 11 grams of salt and kneaded for a further 5 minutes. 

It was rather cool outside already, about 8-10 degrees Celsius, so I let the dough rise on the balcony. In the morning, I preshaped and then shaped the dough into one boule which I baked a couple of hours later using my Tartine Bread inspired cast iron pan + clay pot ”cooker”.


The bread is delicious, and some grains that have baked on the surface of the bread bring a very nice addition of a roasted nut like aroma. With this bread, I feel the grains got a treating worthy of the attention that went into growing them. 

Now, as the weather gets cool, then cold, I will be spending the winter thinking of where to go from here. My balcony isn’t getting any bigger, but maybe I could sacrifice some other crops in favor of cultivating some more wheat… Or I could try rye next?

ph_kosel's picture
ph_kosel

I had a hand at making spice rolls using the recipe in Peter Reinhart's book "Crust and Crumb"

Ingredients (per Reinhart)

454 grams un-bleached all purpose flour

1/4 cup granulated sugar

1 Tablespoon instant yeast (see below)

1/2 teaspoon salt

1/4 teaspoon baking soda

1/4 cup butter

8 ounces (227g) buttermilk at room temperature (see below)

1/2 teaspoon ground allspice

1/2 teaspoon ground ginger

2 cups raisins


Procedure

Mix all ingredients except the raisins into a dough, then knead in the raisins.  Form into two-ounce balls and let rise about 90 minutes.  Bake 20 minutes at 350F.


Results

I found that the dough seemed too dry to come together well so I added another slosh of buttermilk, maybe a tablespoon or two.  I weighed two cups of loose raisins and measured 270g; this seems a bit excessive and 200g might be more reasonable.  I popped the rolls in the oven at 350F with steam and set the timer for 20 minutes; after checking at 20 minutes I gave them another 2 minutes or so to brown up a bit.

The recipe made 18 2-ounce rolls.  I think next time I'll make the rolls larger, maybe 12 rolls per batch. 

The taste is OK:  nice sweetness, moderately spicy and rather yeasty.  I've that found recently that similar coffeecake recipes that called for similarly large yeast percentages also tasted yeasty to me.  I'm not sure if this is due to the initial yeast added or possibly to yeast propagation fed by the sugar. I may reduce yeast by half  in my next batch, to something comparable to typical bread recipes.

I found the texture a bit dry and dense.  The Reinhart recipe calls for surprisingly little liquid, and the results reflect this.

Overall, an interesting bake but something I think perhaps I can improve on - bigger, moister, less yeasty rolls, would be nice, and perhaps some cinnamon and a pinch of cardamom.


Isand66's picture
Isand66

I recently returned from my 3rd trip to China for work this year and the first bread I attempted to make was this one.  I think I must have been suffering from a bad case of jet lag since I ended up with a puddle of cherry cheese which resembled a flat bread.  I like to work with wet dough but I went overboard on this attempt and didn't take the extra cherry juice from the cut up cherries into consideration.

I am happy to say that my second attempt of this bread was much more successful as I ended up with something that actually resembles a bread rather than a pancake.  I still can't find my wife's cherry pitter so I had to de-pit the cherries by hand which is a messy job to say the least.

I used a nice Havarti style cheese in this bake which melts nicely and compliments the cherries very well.  I used fresh cherries since they are still in season and reasonably priced.  I pureed 218 grams of cherries and cut the balance of 134 grams into pieces.  I used my mini Cuisinart to puree the cherries but you can use a blender or stick blender as well.

I used my standard white flour AP SD starter which I keep at 65% hydration and I added some Oat Flour to give it a little bit of nutty flavor.  I think the next time I make this bread I would add some walnuts or pecans to make it even better.

The final dough came out terrific with a nice moist open crumb with cheese and cherries oozing from its pores.  It smelled amazing with the flavors of cherries and cheese while it was baking and it took all my self-control not to tear into it until the next morning.

Procedure

Starter

71 grams Seed (Mine is 65% AP Flour Starter)

227 grams AP Flour

151 grams Water (85 - 90 degrees F.)

Mix seed with water to break up for a few seconds and then mix in flour until the starter form a smooth dough consistency.  Put it in a lightly oiled bowl and loosely cover and leave at room temperature for at least 10 hours.  The starter should double in volume.  Put the starter in the refrigerator for up to 1-2 days or use it immediately.

Main Dough

Ingredients

425 grams Starter from above

340 grams Bread Flour (King Arthur Flour)

161 grams Oat Flour (King Arthur Flour)

63 grams European Style Flour (KAF--you can substitute bread flour or a little whole wheat)

218 grams Cherry Puree

134 grams Pitted Cherries Cut Up into Small Pieces

200 grams Havarti Cheese or Similar Style Soft Cheese

220 grams Water (85 - 90 degrees F.)  (Note: the Cherry Puree Counts as the Balance of the Liquid)

16 grams Sea Salt (or table salt)

Procedure

Weigh the cherries and remove the pits either with your hands, knife or if you are lucky a cherry pitter.  Puree the 218 grams per above in your food processor or blender and set aside. Cut the remainder of the cherries into small pieces and set aside in a strainer to drain.

Cut the cheese into small cubes and set  aside.

Mix the starter with all the water except for 20 grams just to break it up along with the pureed cherries.  Next mix in the flours for 1 minute on low in your mixer or by hand and let them autolyes for 30 minutes up to an hour.    Next add the salt and then add the remainder of your water unless you feel the dough is already too hydrated.  Mix on low-speed or by hand for 4 minutes.  Remove the dough from your mixing bowl to your work surface.

The dough will be very sticky so you may want to use a bench scraper to help you do 4-5 stretch and folds.  Leave the dough uncovered for 10 minutes on your work surface or put it in a slightly oiled bowl.  After 10 minutes either on your work surface or in your bowl do another stretch and fold, cover the dough and let it rest for 10 minutes.  Repeat this S & F procedure one more time and let it rest another 10 minutes.  Do one last S & F  and flatten the dough out into a rectangle.  Add the cherry pieces and the cheese pieces and fold up the dough onto itself.  (Note: I goofed up and did this step after the first stretch and fold which made it very difficult to do additional ones.)

Let the dough sit in your bowl for another 1.5 to 2 hours depending on the temperature of your room ( my house is usually at about 70-72 degrees F.).  Next put the dough into your refrigerator overnight up to 24 hours or longer if necessary.  I usually only wait about 24 hours but you can do 36 hours if necessary.

The next day when ready to bake, remove the dough from the refrigerator and  let the dough sit out at room temperature for 1.5 hours - 2 hours until it starts to come to room temperature and is growing slightly. You can now remove the dough from your bowl or dough bucket and form into your desired shapes.  Be careful not to handle the dough to  roughly or you will end up degassing the nice gas trapped in the dough.  Place formed loaves in floured baskets (I use rice flour to make sure they don't stick which works every time).

 Let the dough rise at room temperature for around 2 hours until they pass the poke test.  (When the dough is poked your finger should leave a small indent that springs back very slowly.)

Score the loaves as desired and prepare your oven for baking with steam.

I then baked on my oven stone with steam at 450 degrees until both loaves are golden brown and reached an internal temperature of 205 - 210 degrees F.

Let the finished bread rest on a wire rack until cool and try to resist the temptation to cut into them until thoroughly cooled.

Please feel free to visit my other blog at www.mookielovesbread.wordpress.com for all my bread recipes.

arlo's picture
arlo

Holy crap! What a year so far!

So did I go to Madison to be a pastry chef? Or did I stay in Michigan and start bread baking at one the nations best bakeries?


...


Well, I ended up staying in Michigan and striking out on my own for the first time in a very long time! With support of my once-fiance, and her still standing by myside in a sense, I made the move realitively easily and haven't looked back on it yet. So if you are reading this dear, thanks again for always listening to me and still being so kind of a person to me! Hope our birds are well!

-

What am I doing at Zingermans? Well, I am doing the 3:45 a.m. mixing, and french baking currently. Along with scaling, shaping and blah blah blah. But my primary focus is the 2nd shift mixing at 3:45 a.m. and the french at the moment. 3:45 a.m.? Yea, it is like sleeping in for me :) But there really isn't a second of down time at all- on any given day. Which I have come to enjoy truthfully. My 8+ hours are filled with dough. It keeps my mind off everything else in life. There is constant practice of shaping, scoring, baking, mixing and scaling. I am certainly thankful to have this position.

So here is some pics of some baguettes I mixed, scaled, pre-shaped, shaped, scored and baked!

Enjoy!


 Pay no mind to the recycling bag or messy counter top...

Take care!

Arlo


Pages

Subscribe to Recent Blog Entries