The Fresh Loaf

A Community of Amateur Bakers and Artisan Bread Enthusiasts.

Recent Blog Entries

dabrownman's picture
dabrownman

Typo after typo,  My left fnger doesn't know what my right finger is doing.  This is way worse than dyslexia, which I had but sold to Lebanese rug trader and a lot more painful too.

With plenty of rye, WW and semolina bread in the freezer we baked off another as close to white bread as we ever make for the bread winners daily lunches.   My wife prefers Oroweat whole wheat bread but we are slowly winning her over to SD bread in the 25%-35 % whole grain range.


This one was 25% home ground whole grain bread with spelt, rye and WW ground from berries.   The remainder of the flours used for the bread were grocery bought bread flour and AP milled by KAF.


The bread baked up nicely browned with small to medium blisters.  The crust came out crisp but went soft and chewy as it cooled.  The bloom and spring were OK but nothing special.   The crumb was moderately open, soft, chewy and slightly glossy.  This bread had a bolder SD tang right after being cooled and we assume it will get better tomorrow. 


If you like David Snyder’s Pugliesi Capriosso and San Joaquin or Pierre Nury’s Rustic Light Rye you will like this bread.  For a nearly white bread it sure is tasty.  Just delicious.


The formula follows the pictures.

Method

The levain starter was equal amounts of rye sour, desem and spelt (a new one that we will soon convert to Kamut) and built up over (2) 3 hour and (1) 2 hour build.

The levain was refrigerated overnight after nit had doubled along with the autolysed flours which included the entire formula less the levain.  There were no sprouts, scald, soaker or add ins with the exception of the red and white home made malts, some ground flax seed and a tiny bit of honey.

The next day the autolyse and the levain were removed from the fridge and sat on the counter for 1 hour to warm.  The two were combined in the KA mixing bowl and kneaded with the dough hook for 8 minutes on KA2.  The dough pulled away from the sides at the 7 minute mark.  It came together easily for the 75% hydration dough.

It was rested in an oiled plastic tub, sized for a 836 g loaf, for 20 minutes before (4) sets of S& F’s were performed all in the tub.  The first set was 25 stretches with a ¼ turn each time.  The next set was 5 stretches less all the way down to the last one of 10 for a total of 70 stretches.

After the last S&F the dough was rested for 60 minutes before being pre-shaped and then shaped into a boule and placed into a rice floured basket seam side up.  The basket was sized to allow the dough to double when it reached the top.

Sandwixh on the left made with last bakes Semolina Bread - good but not great like this bake.

The boule was them placed into a plastic trash can liner, the end closed with a rubber band.  The tented and basketed boule was placed in the refrigerator for a 12 hour retard.

Makes a great grilled hot dog bun! cantaloupe, cherries, black grapes, chips and pico de gillo. 1/2 ea plum and peach, 3 kinds of pickles and some Mexican beans - a typical but still a nice lunch to feature this  fine bread.

After 12 hours the mini oven was preheated to 500 F and (2) of Sylvia’s steaming cups with dish rage rolled up were micro waved until boiling.  The dough was covered with parchment and then the bottom of the mini’s supplied broiler pan.  The whole stack was overturned and the basket removed.

It was quickly slashed ¼” deep with a single sided razor blade, the steaming cups placed in the corner and the whole apparatus loaded into the mini oven’s bottom rack for 15 minutes of steam as the oven was turned down to 450 F.   When the steaming cups were removed at the 15 minute mark the oven was turned down to 400 F convection this time.

The boule was rotated every 5 minutes for the next 20 minutes when the boule was tested for temperature.   It was at 208 F and deemed done.   The mini oven was turned off and the bread allowed to sit in it with the door ajar for another 10 minutes to further crisp the skin.  It was then removed to a cooking rack.


Multi grain SD Starter - 25% Whole Grain Sourdough Boule     
      
Mixed StarterBuild 1Build 2 Build 3Total%
Multi-grain SD Starter **4500459.54%
AP025255014.12%
Dark Rye1500154.24%
WW1500154.24%
Spelt1500154.24%
Water452507019.77%
Total Starter135502521059.32%
** 15 g each Rye Sour, Desem & Spelt SD Starters   
      
Starter     
Hydration78.72%    
Levain % of Total25.12%    
      
Dough Flour      %   
Non - Diastatic Red  Malt20.56%   
Wheat Germ102.82%   
Dark Rye102.82%   
Spelt 102.82%   
Ground Flax Seed102.82%   
WW102.82%   
AP20056.50%   
Diastatic White Malt20.56%   
Bread Flour10028.25%   
Dough Flour354100.00%   
      
Salt71.98%   
Water 26073.45%   
Dough Hydration73.45%    
      
Total Flour471.5    
Water352.5    
T. Dough Hydration74.76%    
Whole Grain %25.77%    
      
Hydration w/ Adds75.29%    
Total Weight836    
      
Honey51.41%   


SylviaH's picture
SylviaH

I just love those crunchy, flaky, best for coating fried things Panko bread crumbs :)

Making homemade Panko Bread Crumbs.  Fun easy and fast.

Recipes are posted all over the web.  But I've never actually seen one here.  So here goes.

Pre-heat your oven to 300F

The secret weapon.......The Food Processor Shredder Disk : )  little did I know :/

Assemble your food processor with the largest sized shredder blade

Panko is usually made with a very shreddable, soft fluffy type plain white bread.  I like my sourdough stale leftover bread of coarse

Simply remove all the crust

Process the bread in your food processor with your largest shredder disk

Place the crumbs onto a cookie sheet.  

Bake in a pre-heated 300F oven for aproximately 6 minutes..till dry and crispy.   Do not brown

Done, just about..........unless of coarse you want some of those delicious seasoned bread crumbs.  My favorite are Italian.  Add whatever seasoning you like..toss.   

Place into storage bags and freeze for later if you like.


Store bought or homemade breading???  Answer at the bottom on the photo.

storebought Italian Panko...made this eggplant parmesan yesterday with the last of my Italian style panko.  Now I'm a day older and wiser...where have I been.  

Sylvia


mwilson's picture
mwilson

I couldn't resist making my favourite Panettone again!

As I wrote previously my regular Italian sourdough has been dried up and stored away in the fridge so that I could focus on making rustic sourdough breads. I created a new, wet 100% hydration starter but the temptation to convert it into a new Italian starter was too strong. And after bringing it to maturity I couldn't resist making Panettone again!

So here we have one of my favourites courtesy of master pastry chef Igino Massari. Entitled “The Best Panettone” this is one very soft, very sweet and very moist cake!

I made dough for a 500g mould but the smallest ones I have in stock are 750g capacity. Consequently the resulting shape isn't as proud as the Milanese style. I didn't glaze it and instead cut ears…


Paper removed.


Cross-section.


Finally, I now have a better understanding of how best to mix the second dough. I have achieved the best crumb so far. I like those open pockets!

First dough: (26C for 12hrs)

  • 30g Lievito Naturale
  • 120g '00' Flour
  • 45g Water
  • 38g Sugar
  • 30g Egg Yolks
  • 43g Butter

Second dough: (28C until tripled ~8hrs)

  • 30g '00' Flour
  • 39g Egg Yolks
  • 30g Sugar
  • 7.5g Honey
  • 46g Butter
  • 21g Water
  • 2.4g Salt
  • .3g Aroma Panettone
  • .3g Vanilla
  • 60g Sultanas
  • 45g Candied Orange
  • 15g Candied Citron

Total Ingredients:

Flour100
Water45
Sugar40
Honey4
Yolks41
Butter53
Fruit70
Salt1.4
Flavourings.6
 355%
 
Floydm's picture
Floydm

I've always admired immigrants, folks who, for love or opportunity, pull up their roots and start over.  This summer we've been going through what has to be the easiest immigration process possible -- same language, same geographic region, very similar culture, no questions of about citizenship or difficulty finding employment -- and still... it has been a tremendous amount of work.  I can't even imagine how much work it must be when the obstacles are larger or the circumstances less fortunate.  My respect and admiration for anyone who has gone through it has been redoubled.

Now we are here in Vancouver, largely settled in.  As of today my kids and I are on the Provincial health plan.  My wife's papers have been approved too, so she is legitimately residing with us and no longer "visiting."   All has gone as well as one could possible wish for and we are loving it here.

And I'm finally finding a little time to bake.  Well, only once, so far, but it is a start.

Baking in a new kitchen is always a challenge.  As is using a new oven that isn't mine with a glass door.  No more tossing ice cubes in willy nilly and not worrying about the damage I do.  But I brought my baking stone and picked up an aluminum roasting pan to invert over it to create a little steam, so we'll see how it goes.

I spotted this flour blend at the grocery store and decided to give it a try. 

I was extremely imprecise on this one, just trying to get back in the saddle rather take accurate measure.  My formula was roughly:

Poolish

1 cup AP flour

1 pinch instant yeast

1 cup water

I left that out covered on the counter overnight and then mixed it into

2 cups Robin Hood bread blend 

1 cup AP flour

1 cup water

2 teaspoons Kosher salt

1 teaspoon instant yeast

Mixed with my standmixer for 5 minutes, let rise on the counter top for an hour, folded and put in the refrigerator for 6 hours.

About an hour before baking, I removed it from the fridge, divided it, and shaped a couple of loaves.  I rolled them in sesame seeds before placing them on a pan since I forgot to pick up parchment paper and the last thing I wanted was to have them stick to the pan and ruin everything.

They rose for about an hour, then were baked at 465 for 10 minutes with the aluminum cover, then 425 for another 15 minutes after I removed the lid.

I can't say they were the best loaves I've ever made, but I certain consider them a success and a great starting point!

-Floyd

dmsnyder's picture
dmsnyder

Scoring hearth loaves made with high hydration doughs is a challenge. Expressions of frustration with this in TFL postings are not rare. Much good advice regarding how to accomplish nice scoring of wet, sticky dough has been offered, but it is scattered. So, I thought I would share my own advice on this subject in one place.

These two bâtards are San Joaquin Sourdoughs. (For the formula and procedures, please see San Joaquin Sourdough: Update. Today's bake was different only in that I used just 100 g of 100% hydration starter.) The effective hydration of this dough is 74.5%. It is a sticky dough and a good test of one's shaping and scoring abilities. Yet, as you can see, it is possible to get nicely shaped loaves from this dough with cuts that bloom nicely and form impressive ears.


The key points in achieving this are the following:

A Key Point

  1. Gluten must be well-developed by mixing and fermentation. Good dough “strength” is important for crumb structure, but also for successful shaping. It is even more critical in wet doughs, because these tend to spread out and form flat loaves if their shape is not supported by a good, strong sheath of gluten.

  2. Pre-shaping and shaping can add to dough strength through additional stretching of the dough in the process of forming the loaves. A wet dough like this needs to be tightly shaped. This is a challenge, because it also has to be handled gently. Rough handling will result in excessive de-gassing and a dense loaf. It will also tend to make the dough stick to your hands more. When it sticks, it tears and makes weak spots in the loaf surface which are likely to burst during oven spring. The goal is to form the tight gluten sheath by stretching the dough and sealing the seams while avoiding downward pressure on the dough pieces being shaped. “An iron hand in a velvet glove.” Dough sticking to your hands can be decreased by lightly flouring your hands, wetting them or oiling them. However, the most helpful trick is to touch the dough lightly and as briefly as possible each time.

  3. The loaves need to have lateral support during proofing. This is to prevent them from spreading out. Support can be provided by a banneton (proofing basket) or on baker's linen or parchment, where folds in the couche material, sometimes reinforced with rolled up towels or the like under the material, provide the support. (I suppose the “ultimate support” is provided by a loaf pan.)

  4. The ideal material to support proofing loaves is absorbent. Baker's linen, cloth-lined bannetons and floured, coiled cane brotformen all absorb some moisture from the surface of the loaves in contact with them. This makes that surface a bit less sticky and easier to score without the cut edges sticking to the blade excessively. (I do not want the loaf surface so dry it forms a “skin.”) I like to proof loaves with the surface I am going to score on the absorbent material. This means baguettes and bâtards are proofed smooth side down (seam side up). Note that baking parchment is not absorbent, so, while advantageous for other reasons, it is not ideal for this purpose.

  5. Loaves should not be over-proofed. A greatly over-proofed loaf may actually collapse and deflate when scored. Short of that, it will still have less oven spring and bloom. This is a relatively greater problem with high-hydration doughs which are more delicate to start with. I find the “poke test” as reliable as any other criterion for when a loaf is ready to bake. However, it is not quite as reliable with very wet doughs. Neither is the degree of dough expansion. You just have to learn through experience with each formula when it is perfectly proofed.

  6. Loaves should be scored immediately after transferring to a peel and immediately before loading in the oven. Letting high-hydration doughs sit too long on the peel is asking them to spread out, especially if they have been scored ,which disrupts the supportive gluten sheath.

  7. The wetter the dough, the shallower the cuts. This is not as critical for boules, but, for long loaves like baguettes and bâtards, if you want good bloom, and especially if you want good ear formation, The cuts need to be very shallow (about 1/4 inch deep) and at an acute angle (30-45 degrees). A deeper cut creates a heavy flap that will collapse of its own weight and seal over, rather than lifting up to form an ear as the cut blooms open. The cuts made on the loaves pictured here were barely perceptible on the unbaked loaf surface. Resist the temptation to re-cut!

  8. Minimize dough sticking to the blade and getting dragged, forming a ragged cut. The cuts need to be made swiftly and smoothly, without hesitation. A thin, extremely sharp blade is best. Some find serrated blades work well for them. I find a razor blade on a bendable metal handle works best for me. The cuts are made with the forward end of the blade only, not the whole length. Some find oiling or wetting the blade lessens sticking. I have not found this necessary.

  9. Humidify the oven with steam during the first part of the bake. This delays firming up of the crust which would restrict the loaf from expanding (oven spring) and the cuts from opening (bloom).

Most of these points apply to scoring in general. I have indicated where there are differences or special considerations applying to high-hydration doughs.

Finally, a mini-glossary:

Scoring refers to the cuts made on the surface of the loaf prior to baking. The primary purpose of scoring is to create an artificial weak spot and direct expansion of the loaf to it so the loaf doesn't burst at some random point. Secondarily, the scoring pattern influences the final shape of the loaf. And lastly, the pattern of cuts can be decorative and, if unique, can serve as a “signature” for the baker.

Oven spring is the expansion of the loaf when exposed to oven heat.

Bloom refers to the opening up of the scoring cuts during oven spring. The French term for this is grigne.


Ear, when pertaining to bread, is a flap of crust that separates from the surface during oven spring and bloom.

For additional information regarding scoring and a more basic introduction to this topic, please see The Scoring Tutorial Also, excellent examples of shaping and scoring can be found in videos on youtube.com, particularly those made by Ciril Hitz, and on the King Arthur Flour web site. I have not found any that address the peculiar challenges presented by higher-hydration doughs, however.

Happy baking!

David

SylviaH's picture
SylviaH

Yesterday I picked up some nice pickling cucumbers.  Since mine were a total flop trying to grow them in my tiny garden space...it's just gotten to shady with my pepper tree.  I'd rather have the shade and stick to the farmer's markets..we have so many.  I don't know why I even attempt to grow anything with all the locally available produce.  Well, I really do know why..it's fun to grow things.  Even my tomatoes were a flop this year...but not the tomato worms..yikes..I cringe at those things and will pick them off sqirmming more than they do.  

I also picked up some other nice organic veggies.  Among them were a nice butternut squash for the fresh ravioli.  I have been wanting to make it with my fresh supply of Caputo Italian 00 flour.

This recipe makes a lot of pasta.  Just for the fresh Ravioli for two.  I use 2 Organic Eggs, 200g C Tipo 00 flour, about a teaspoon of E.V.O.O and a pinch of salt.  

I mix it all in my food processor, until I get a nice texture that comes together in a ball and is not sticky..comes away from my fingers nicely.  I use extra flour while kneading the dough and making the pasta on my Artisan King Arthur (oops edit) thats a Kitchen Aide Mixer using, my pasta roller attachment.

Fresh Pasta Made With Italian Caputo Tipo 00 Flour

6 Organic Eggs

600 G Caputo Tipo 00 Flour

pinch of salt to taste

1 TBsp. Extra Virgin Olive Oil

For the Butternut Squash Filling and Cream Sauce.  

I used Fabio Vivani.com recipe.  He has a video making it.  He is so fun and entertaining to watch with many wonderful recipes.  I only changed the cookies that were added and made 1/2 a recipe.  I used some wonderful Italian Lady Fingers from Italy I picked up a Sprouts.  They are dry crispy with a slight sweetness...just delicious.

Dinner was delicious.   Light, Butternut Squash Raviolies, perfect for a hot summer day.


It's hard to get a photo before things get eaten


Easy Dill Pickles-  Great for just making a few jars at a time as your pickling cucumbers ripen.

I like Cold Packed pickles and peppers.  They are the firmest

Wash, slice, pack pickling cucumbers into Sterilized jars.  Use approved canning jars and rims with new seals for safe processing.

In a pot add 3 cups water, 2 cups 5% white vinegar/ or you can use apple cider vinegar, 1/8 cup pickling salt more or less to taste.  More is your making a lot of jars.  Bring to boil..turn down heat and keep hot until ready to ladle into jars.

I added a couple peeled garlics, lots of  fresh dill..I didn't have it so used dried.  Some pepper corns, a small amount of dried red pepper, pinch or two,  mustard seeds to each jar according to your taste...about a teaspoon per jar.  Fill to 1/2 head space with vinegar mixture. 

Remove bands and lids from hot water and skew into place.

Process in a hot water bath for 15 minutes.  

Remove and let sit several hours until cooled and you'll hear a 'pop' they've sealed..or press cooled top and if it pops..it didn't seal..just refrigerate and eat after allowing at least 2 weeks to full flavor.  Store 'sealed' jars in a cool place for at least 2 weeks for full flavor to develope.  Refrigerate before eating..they always taste better that way.


Sylvia


Isand66's picture
Isand66

I just returned from a couple of days vacation visiting Newport Rhode Island.  We had a great time visiting the shops, historic mansions and sailing the harbor.

I wanted to make some rolls/buns that we could use for hamburgers for today's lunch and I didn't have time to refresh my starters so I used some instant yeast for the first time in a long time.

Since these were going to be used for hamburger buns I wanted to make sure to use enough fat in the recipe to make sure they were nice and soft.  I also wanted to try using some polenta in this recipe after reading about several other bakers trying it with great results.  I decided to also use potatoes to give it some extra softness and for extra flavor I left them nice and chunky with the skin on.

I used an overnight retardation of the dough to build extra flavor as well.  The end result was one of the best rolls I have made to date.  They were nice and soft and moist inside and out and tasted good enough to eat by themselves.  I am sure the polenta, potato combo along with the heavy cream I used contributed to the nice soft and moist crumb and crust.  Next time I will try these with Wild Yeast Water instead to see how that impacts the crumb

.

Ingredients

550 grams Bread Flour (King Arthur Flour)

100 grams Whole Spelt Flour (Bob's Red Mill)

150 grams Whole Egg (3 large eggs slightly beaten)

1 Egg Beaten with Water for the Egg Wash

180 grams Polenta (cooked, and cooled)

160 grams Mashed Potatoes with Skins (I boiled a few potatoes and saved the water for the dough)

50 grams Extra Virgin Olive Oil

127 grams Potato Water at 85 - 90 degrees F.

142 grams Heavy Cream at 85 - 90 degrees F.

7 grams Instant Yeast

14 grams Seas Salt or Table Salt

40 grams Honey

Directions

Polenta

Prepare the polenta according to your recipe.  I followed the simple directions on the package and only made half the recipe which still was 4 times the amount I needed.  I added some grated Parmigiano Reggiano and butter at the end and also threw in some toasted dried onions for extra flavor.  Left overs will be grilled later this weekend with some olive oil and more cheese on top.

Final Dough

Mix flours with yeast to combine.  Next add remainder of the ingredients keeping about 30 grams of water back.  Mix on low-speed or by hand for 1 minute and let the dough rest for 5-10 minutes to absorb the flour.

Add the balance of the water if needed and mix for another 4 minutes.  The dough should come together and be scraping the side of the mixing bowl and be nice and fairly smooth but still tacky.

Remove the dough to your work surface and knead by hand for 1 minute.  Do about 3-4 stretch and folds and put in a well oiled bowl or container with a cover.  Put it in your refrigerator immediately.

You can keep it in your refrigerator for about 24 to 36 hours.  I ended up baking it in the morning so it was only in my refrigerator for around 14 -15 hours.   The dough should double while in the refrigerator.

When ready to bake the rolls or bread, take it out of the refrigerator and immediately weigh out your pieces or loaves and shape as desired.  I made simple round rolls and let them rise for 1 hour on a cookie sheet with parchment paper.

After 45 minutes turn your oven up to 350 degrees F. and prepare your rolls as desired.  I beat 1 whole egg mixed with a little water and put an egg wash on each roll.  I also added some toasted onions to some and some dried cheese mix on some as well.  At the 1 hour or so mark pop them in the oven with steam and turn once after about 15 minutes.  These should take about 25 minutes to cook thoroughly.

Let them cool on wire rack for at least half an hour before digging in if you can wait that long.

Please feel free to visit my other blog at www.mookielovesbread.wordpress.com for more recipes.

Below are some photos of my Summer Cottage at New Port :) as well as some other interesting sites.

The Breakers....owned originally by Cornelius Vanderbilt II
The Breakers
Animal Topiary Gardens
More Animal Topiary Gardens
Jacky Kennedy's Childhood Summer House
Playhouse for Jacky Kennedy when Child. Note: I think it is bigger than my current house!
Oldest Tavern in USA originally built in 1642.

Rosalie's picture
Rosalie

I'd tried the sourdough route before and had to quit.  The main reason, I think, is because I keep my thermostat at 60 degrees Fahrenheit, and I had a hard time creating a proper environment for the starter and the bread dough.  Brod and Taylor to the rescue!  I didn't have to rig up a styrofoam ice chest with an electric light bulb.  I just had to order the box that you can set at any temperature between 70 and 120 (1 degree increments).

It was no problem creating a starter.  It had been no problem the last time, either.  I think I used rye to get started last time.  But this time it was 100% whole wheat, start to finish.  I used Mike Avery's instructions in his book and on his web site sourdoughhome.com as my main source of information.  He recommends getting started with whole wheat.  But when it comes to maintenance, that's a different story.  He indicates that refined flour works better for that.  But I don't buy refined flour any more, not with my NutriMill and my little granary downstairs.

So the problem became finding a source of whole wheat sourdough info.  The theory is that whole wheat was the main flour used in the 19th century by the sourdoughs.  I don't know if that's true, but still refined flours are a recent invention, compared to sourdough-type starters, which are centuries old.

My first try at baking bread with the starter was an adaptation of Mike Avery's basic (white flour) sourdough recipe.  Edible.  It's always edible.  But otherwise not very good.  Then I looked through my own books and found Breadtime by Susan Jane Cheney.  You can't tell except by examining the recipes, but it's all whole grain.  I don't think there's a refined grain in the book.  And there's a section on sourdoughs.  So that was the recipe I used.

It took some persistence, including some fancy timing-manipulation (I had to refrigerate the dough at one point).  But in the end I had a loaf that actually rose in the oven, the big test, in my opinion, of success.  It's not holey, like some of the other loaves I was eyeballing on this site today, but they're not whole wheat either.  Sticking close to the recipe this first time, I came out with two large loaves, each of which I cut in half; I held one half out and froze the other three.  I'm currently working on the second of the four pieces, and I swear it gets better with each slice.

Still, the loaf was rather dense.  Breadtime has a variation on the basic sourdough that includes 1/4 teaspoon active dry yeast.  Unless I'm under the gun, I'm going to avoid this form of cheating (which I call sourdough-flavored bread).  (I also have lots of gluten flour, which I may try just to use it up.)  The starter is very young, and presumably the it will become stronger with practice.

Rosalie

txfarmer's picture
txfarmer

Sending this to Yeastspotting.

Click here for my blog index.

 By now, you all know that I never get bored with 36 hour sourdough baguettes, just keep making and eating them -- with a bit of variation each time

1) Rye sourdough, with dried lavender. Lavender adds a subtle herby fragrance to flavor profile.


AP Flour, 425g
ice water, 315g
dried lavender, 1TBSP
salt, 10g
rye starter (100%) 150g

-Mix flour, dried lavender, icewater, and autolyse for 12 hours.
-Mix in salt, starte, then follow the basic 36 hour sourdough baguette formula here.


2)Rye sourdough, with caraway seeds. Such a classic combo, can't believe I just got to it now.

AP Flour, 425g
ice water, 315g
caraway seeds, 15g
salt, 10g
rye starter (100%) 150g

-Mix flour, caraway seeds, icewater, and autolyse for 12 hours.
-Mix in salt, starte, then follow the basic 36 hour sourdough baguette formula here.

3)Rye sourdough, with millet for extra crunch and nutrition.


AP Flour, 425g
ice water, 315g
millet, 50g
salt, 10g
rye starter (100%) 150g

- soak millet in enought water overnight, drain
- Mix flour, drained millet, icewater, and autolyse for 12 hours.
- Mix in salt, starte, then follow the basic 36 hour sourdough baguette formula here.

4) White starter, 20% spelt flour. Extra earthy flavor from spelt.


AP Flour, 325g
spelt flour, 100g
ice water, 315g
salt, 10g
white starter (100%) 150g

- Mix ap, spelt, icewater, and autolyse for 12 hours.
- Mix in salt, starte, then follow the basic 36 hour sourdough baguette formula here.


dabrownman's picture
dabrownman

After the fiasco of the previous bake still haunting, we decided to give this formula another go to see if we could figure out what caused the explosive proofing in fridge during the last bake.


We decided to cut back on the YW from 75 g to 50 g added 10 g multi-grain SD starter.  But the biggest change was to cut back on the yogurt whey to 46 g from 155 g in the previous bake.


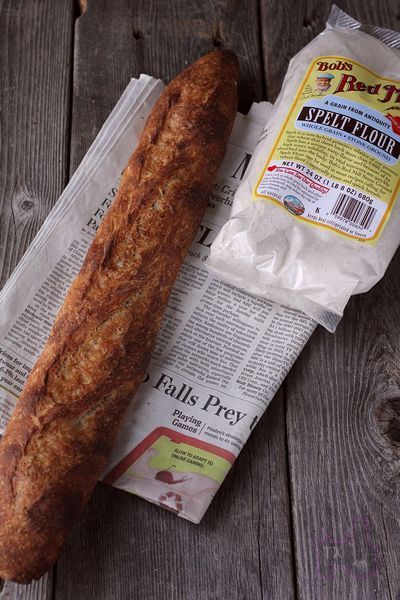
We also omitted the soft white wheat soaker and added some whole grain spelt, rye and WW to the levain flour.  We cut back form 3g to 2g for the malts and reduced the honey from 10 g to 8 g.   The idea was to try to keep this dough in check so that it can get through a 12 hour proofing retard in the refrigerator overnight without expanding out of the proofing basket.


We also switched to a larger basket just in case the dough wasn't muzzled enough with these changes.

The process and method was same as before and you can find it here:

http://www.thefreshloaf.com/node/29954/35-whole-grain-yw-sd-semolina-durum-atta-white-bread-soaker

With the exception of not having a soaker to add during the S & F’s, all appeared to be the same as before including putting the shaped dough into the fridge for retard.  I did turn the temperature of the refrigerator down to 36 F from 38 F.


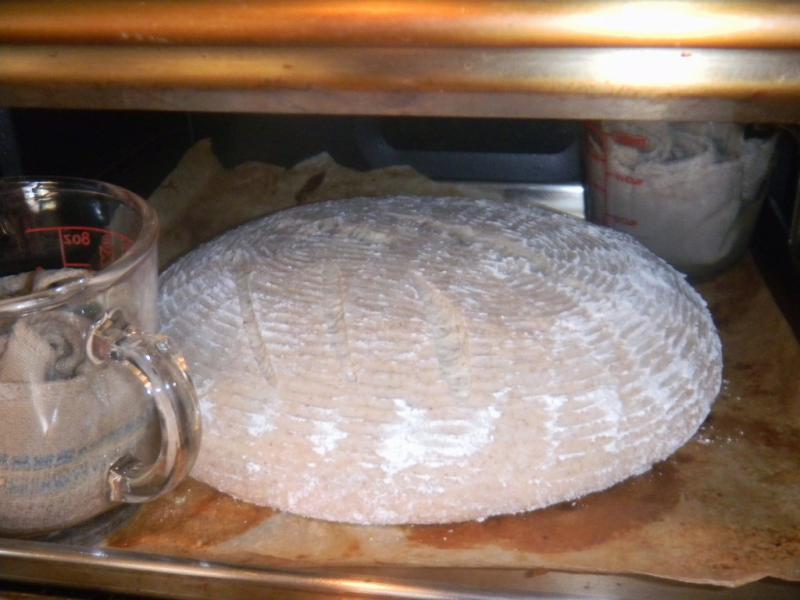
Another over proofing - by a wide margin....................................Another deflating disaster when it stuck to the basket.

At 6:45 the next morning the dough had doubled nicely and was ready for the oven.  We fired  up the mini oven to500 Fand got Sylvia’s Mini Steam ready, (2) Pyrex cups with a dish rag half full of water placed into a microwave until they boil.  We were waiting for the mini to beep that it was ready and was watching Isaac, on the weather channel………..when all the plans of furry baking apprentices everywhere changed in an instant. 

I heard a small crash and my wife began calling; ‘come here quick’. So we did - slowly -  to show a bit of hysterical calmness usually associated with manic depression resulting from a freezer.

My poor wife, who had to witness this calamity first hand, was trying to get the water bottles out of the fridge for her work cooler, when she said something odd happened.   The basket of beautifully risen dough,  covered in trash can liner, just jumped right off of the top shelf of the fridge, did a flip with a half twist in mid air and landed upside down  and cockeyed on the tile kitchen floor. 


Needless to say, all was lost, the bread was ruined – a classic ‘Death by Deflation’ if there ever was one that turned into a #2 before you could shake a stick at it.  Thank goodness the plastic wrapper stayed intact saving my apprentice another difficult clean up licking the floor. 

Not wanting to give up after the last bake’s fiasco that this new fiasco was supposed to fix and  realizing that I am under no obligation to supply her with room and board, my apprentice a sprang into action to try and save the day and this ugly mass of doggone, dead dough.

She mixed 50 g each of durum atta and bread flour and added 100 g of AP flour and 5 g of VWG to it.  She dumped 150 g of water and mixed it up furiously by paw to make a paste while totally forgetting to add additional salt - I mean, she’s only an apprentice for heaven’s sake. 

She then spread out the original deflated dough into a rough12”square about an inch thick and spread this new flour and water mix over it.  She then used stretch and folds to enclose the new mix and started kneading until everything was well incorporated and the dough began to feel like it was back to its well developed gluten self.  The two paws poked into the dough sprang back quickly to confirm her properly kneaded thoughts.

A nice chicken and Colby jack cheese sandwich, lettuce and tomato - poblano on top, with a salad that has brie and red and yellow peppers crowning, black grapes, canteloupe slice, 3 kinds of pickles, 2 kinds of plumbs and my favorite mango,.

It was then placed into the basket seam side up again, encapsulated in the saving plastic trash can liner and allowed to proof for another 90 minutes on the counter.  Then back into the fridge it went where it could take another high dive onto the floor to commit Hare Kari again if it wished.

Will this deceptive dough dispel and disregard the dreaded and despicable’ Death by Deflation’ discipline and decide, in total delirium, to become bread this time?  ‘Don’t dare declare!!!’ she spat, pointing a paw at me, as my apprentice growled menacingly and stomped off for her morning nap.   Now we await the devil dough coming out of the fridge again and pray this curse doesn't come in threes.  Until later.........

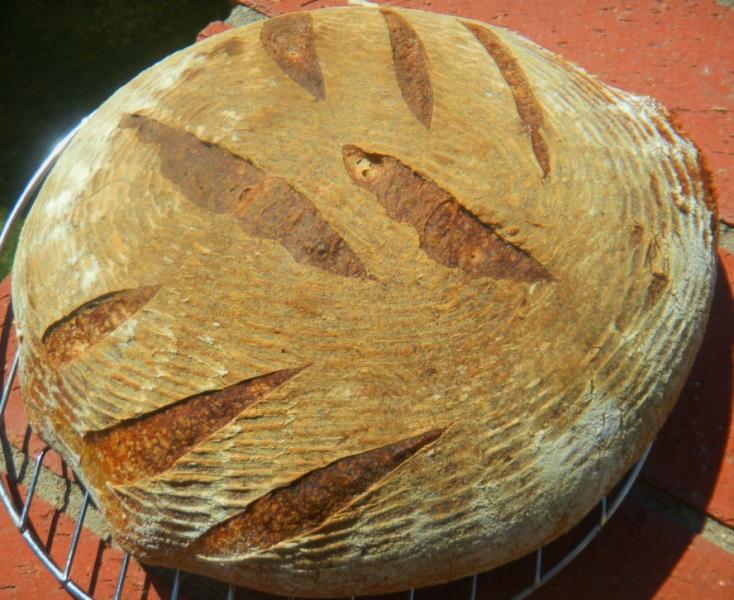
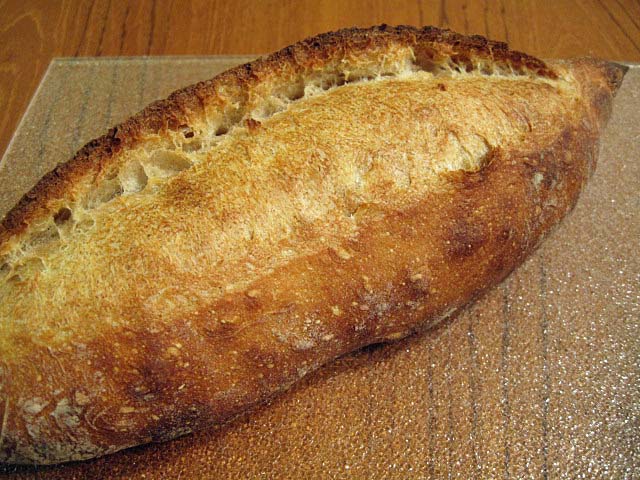
Well, well, well, the devil dough decided to over proof again by tripling in the fridge and then stick itself to the basket and deflate inappropriately as we tried to coax it out of its sticky home.  Just a couple of more and more disasters in a long line of disasters for this and the last bake.  Just gave up, slashed it wickedly and tossed it in the belly of Big Betsy.

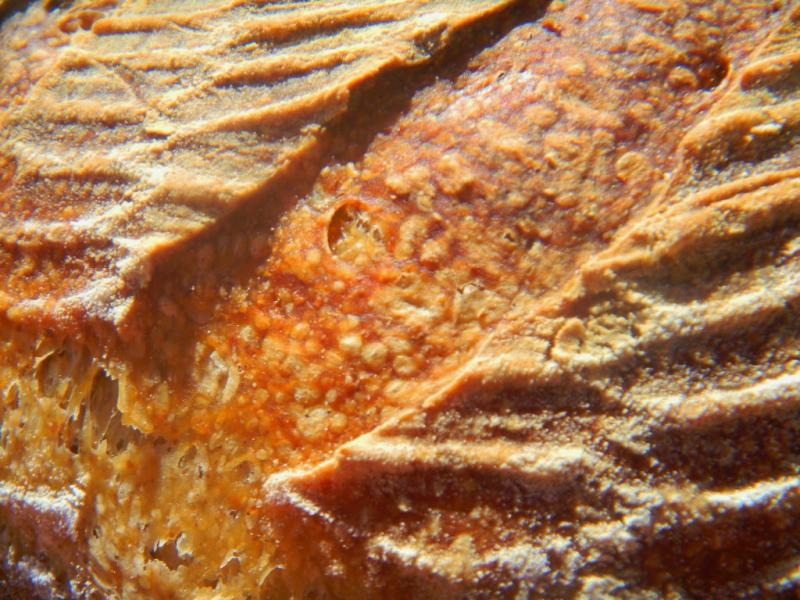
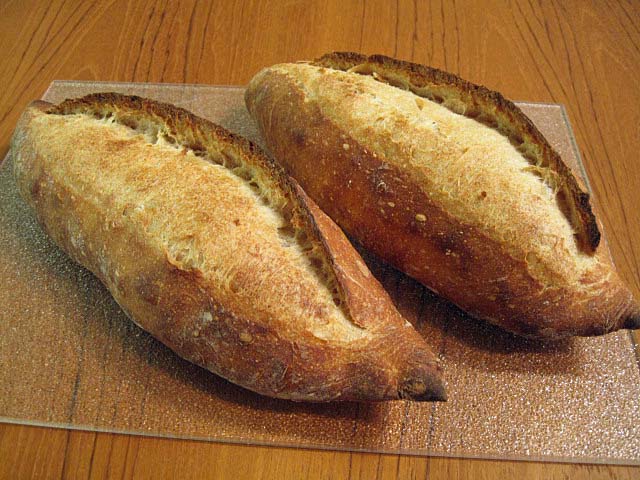
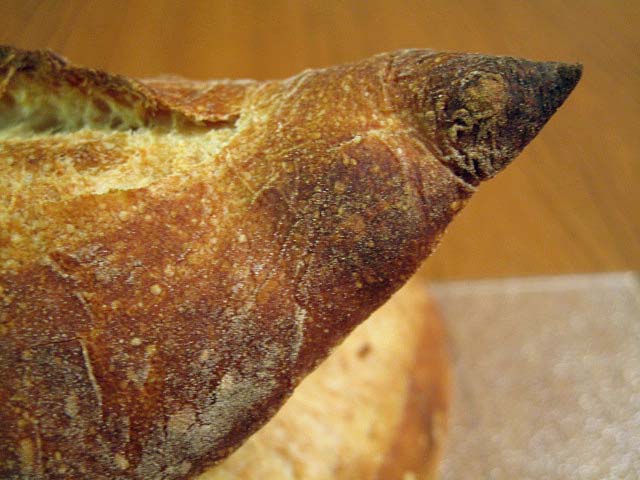
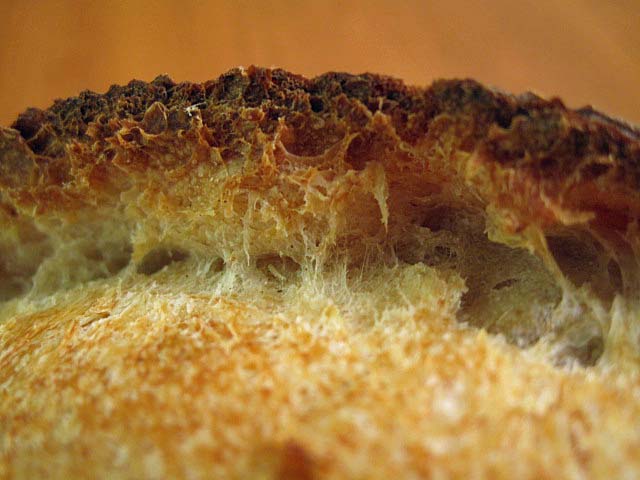
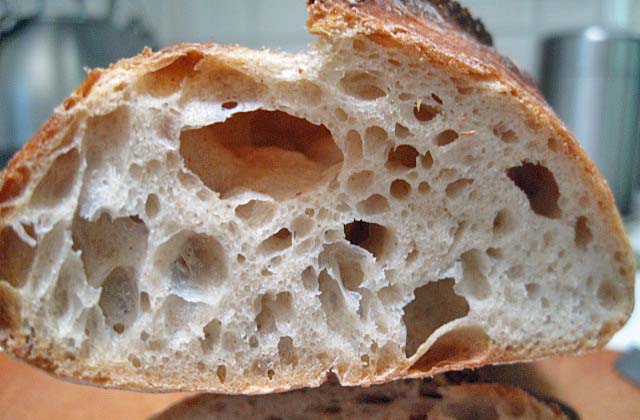
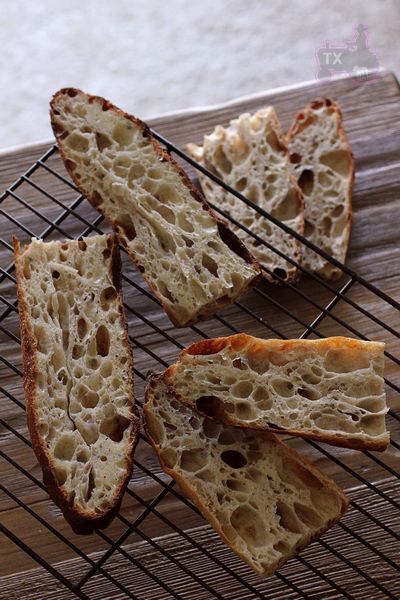
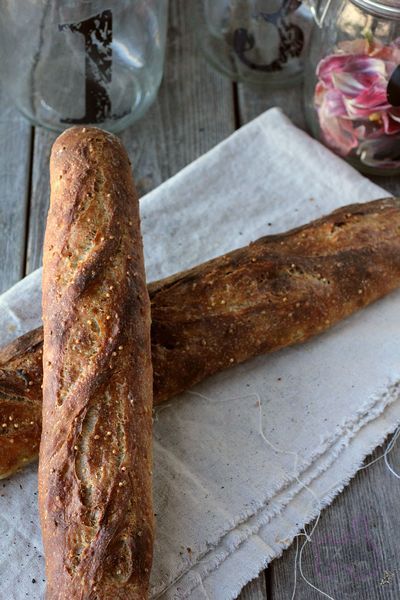
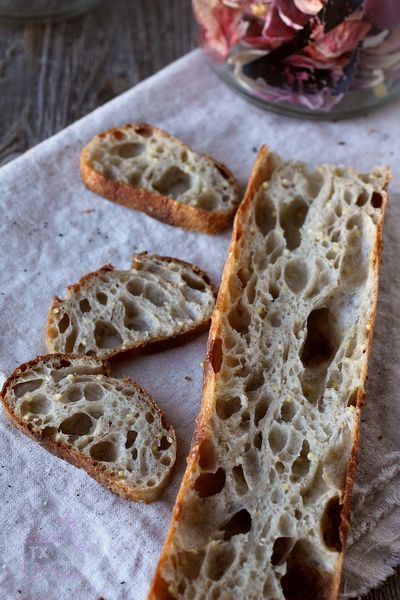
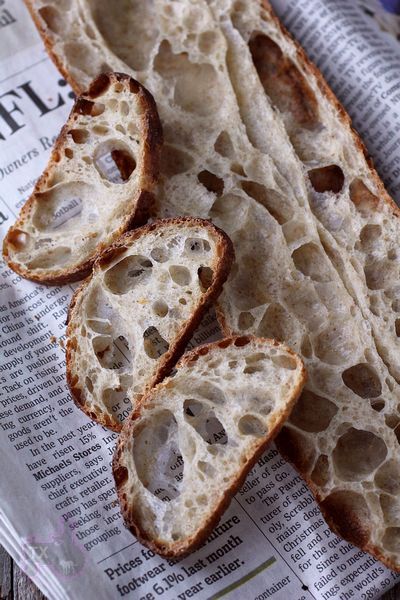
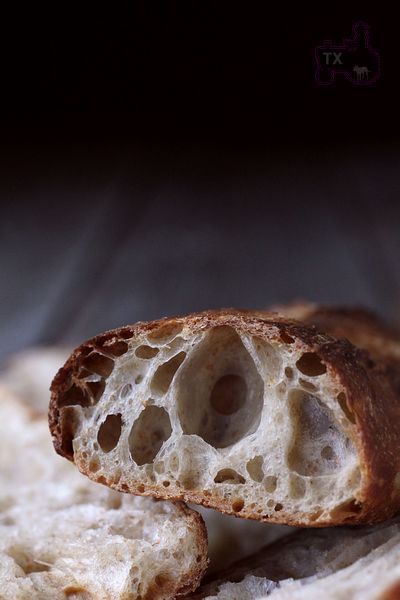
It baked up pretty and golden, sprang back some if still ma lot flatter than it would have been had it not stuck to the basket.  It also smells tremendous.  We will have to wait for the crumb which suffered the most.  Fingers crossed.

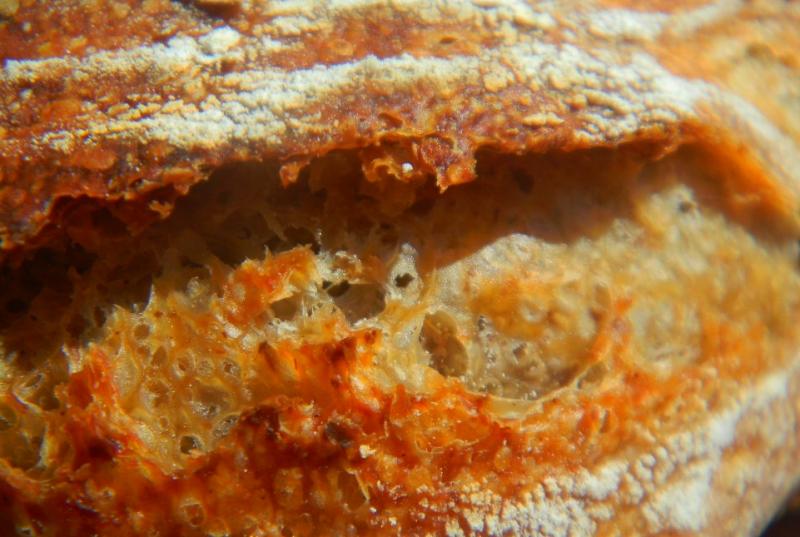
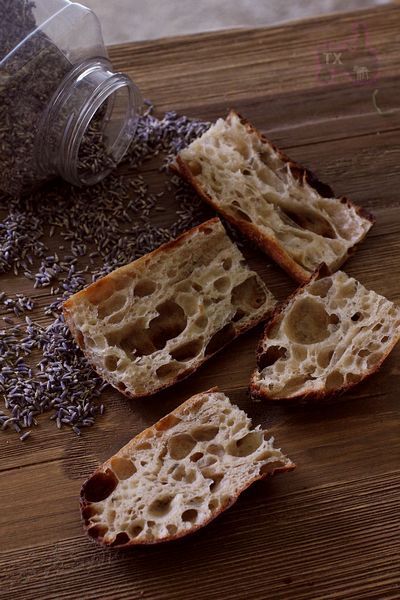
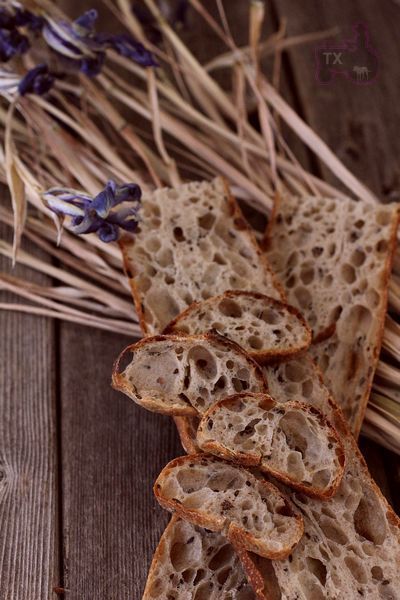
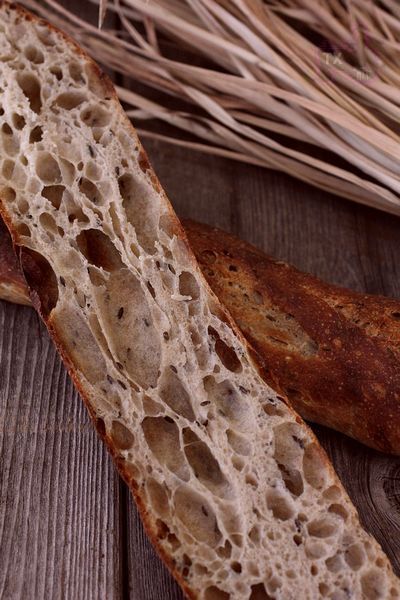
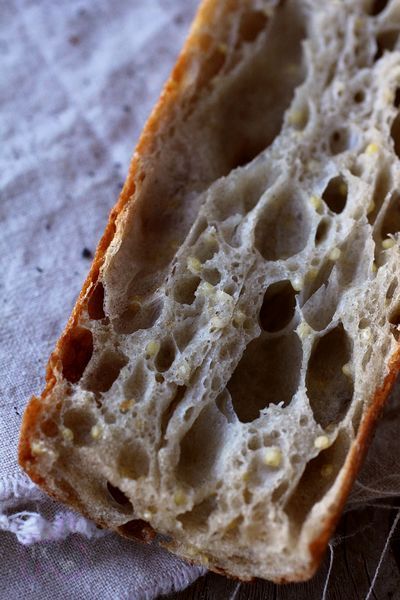
The crumb came out much like the last one that was also stricken by mooshing (a bakery term that means mashed horribly).  More open then we thought it would be, beautifully yellow, airy and moist with no big holes like it should have had.  Since it has no seeds or soak my wife will love this for her sandwich bread.  It is more deeply flavored due to the whole spelt, rye and wheat berries we ground up for the dough flour.  A nice bread no matter how hard we tried to mess it up. 

30% Whole Grain YW & SD Semolina, Durum Atta with Germ, Malts & Honey    
     
Mixed StarterBuild 1Build 2Total        %
Multi-grain SD Starter **30030      3.70%
Whole Spelt010101.70%
Whole Soft White Wheat050507.96%
Whole Rye010101.59%
Wheat Germ0881.27%
Whole Wheat010101.59%
WWW300304.78%
Durum Atta500507.96%
Water32669815.61%
Total Starter14215429647.13%
** 10 g each Rye Sour, Desem & Multi-Grain  
     
Starter    
Hydration89.07%   
Levain % of Total24.37%   
     
Dough Flour        %  
Non - Diastatic Red  Malt2       0.32%  
Semolina124      19.75%  
AP300      47.77%  
Diastatic White Malt2       0.32%  
Bread Flour150      23.89%  
Dough Flour628     100.00%  
     
Salt8       1.27%  
Yogurt Whey - 46, Water - 219425      67.68%  
Dough Hydration67.68%   
     
Total Flour811   
Water588   
T. Dough Hydration72.50%   
Whole Grain %29.22%   
     
Hydration w/ Adds72.55%   
Total Weight1,420   
     
Add ins          %  
Honey8         1.27%  
VW Gluten50.80%  
Total132.07%  

Pages

Subscribe to Recent Blog Entries