The Fresh Loaf

A Community of Amateur Bakers and Artisan Bread Enthusiasts.

Recent Blog Entries

Wandering Bread's picture
Wandering Bread

I've been busy baking this week, but haven't quite caught up on posting about it. So you get them all at once.

First, I played with spelt for the first time with a Sourdough Spelt Country Loaf. It truned out very tasty and had more structure than I thought it would.


Next up I made some Sourdough Bread Bowls with Chicken Corn Chowder. There is just something so satisfying about eating soup in a breadbowl. 


And finally I tried David Snyder's San Joaquin Sourdough. I'm still not in the same universe as David as far as my skills, but following his intructions exactly gave me some really beautiful, tasty bread. I highly reccommend trying it out if you haven't yet.


Read more about all three at Wandering Bread

-Ryan

breadsong's picture
breadsong

Hello everyone,
I caught an episode of "Mexico: One Plate at a Time", on TV - hosted by Chef Rick Bayless.
Fresh flour tortillas were the subject - very quickly made, using a food processor.
The recipe is available online at rickbayless.com  -
(I used the ingredients posted online, and the method demonstrated on TV, to make these tortillas). 

                         Here's one cooking...


Fresh flour tortillas...0h-so-delicious! They puffed up nicely while cooking:
   

                  This one ballooned just like a pita!:


My adaptation of the recipe and method:

I wouldn't hesitate to make these flour tortillas again - they were fabulous; enjoyed freshly-cooked, a delight!
Thank you, Mr. Bayless!

Happy baking everyone,
:^) breadsong

Mebake's picture
Mebake

Dear TFL'ers

I'm on an obligatory pause from baking, as i've underwent a spinal fusion Surgery in my lower back. Can't bake nothing now, nor bend forward... It is a dead pause for 3 months at least!  I'm bound to this dreadful back brace, so the only bread related activity i'll do is watch TFL, and learn more, take it easy, and enjoy some time in some personal reflection (remembering how vulnerable we are as humans, and that without God's mercy and grace, we are helpless).

In the meantime, my dried starters are now dormant in my freezer, and i'm looking forward to the day when i'm ready to fire them up again :)

My thoughts and wishes to you all, especially those of you experiencing tough times.

Khalid


varda's picture
varda

I have been doing multiple bakes with home-milled sifted flour and it's nothing if not a learning experience.    My initial attempt at tempering was a fiasco.   All I could think of when I heard the word tempering was that somehow the wheat berries must be heated to very high temperatures to strengthen them.   Only a few seconds of thought though, is all it takes to realize that that is ridiculous.   But I was still surprised to learn that tempering when it comes to wheat means letting it absorb enough water to achieve a small measure of malting, and reach a desirable level of moisture.   

Easier said than done.   I tried heating a sample of berries at low temperature for several hours to see what their moisture content was.   See the strategy described by Michael here.  Then I added the requisite amount of water to the berries I intended to bake with and stored in a closed container for 2 days while the berries absorbed the moisture, shaking the container whenever I passed by.    I knew that I needed to be careful not to use overly moist berries in my Komo mill.    Fortunately the owners manual gives a handy rule of thumb.   Smash a berry with a spoon on the counter.   If it cracks with a nice snap, it's dry enough.   If it just kind of smashes, it's too wet.   Unfortunately after it seemed that the berries were dry, they smashed.   I had to dry them out for a whole day to get them to crack again.    When they got back into a crackable state, they had lost all the water weight that I'd put into them.   Furthermore the bread I made with these tempered and redried berries was flavorless.   

So presumably my berries are moist enough as it is, and don't need water added.   This still leaves the question of whether I'll get good enough bran separation during milling without going through the tempering step.    But for now at least I've put tempering on hold.  

For my next few bakes, I tried a milling and sifting approach as follows.   Mill berries coarsely.   Sift.   (I used a roughly #24 strainer - that is 24 holes per inch.)   Remill what is caught by the sifter at medium coarse, and sift again.   Remill the leavings again at medium fine and sift again.   Remill the leavings again at fine and sift again.   Stop.   The flour and bran in the picture above resulted from this approach.   While the bread I baked with this approach was a lot tastier than the one with the mis-tempered flour, I still felt that a lot was left to be desired.   

Today, I went out and got more sifting ammunition.   A roughly #30 strainer, and a roughly #40 splatter screen.    I also changed my approach to milling and sifting.    In addition to remilling the leavings and resifting, I decided to progressively sift the flour.     So I milled the berries at medium, then sifted in the #24 strainer and set aside the leavings.    Then sifted the flour in the #30 strainer and set aside the leavings.   Then sifted the flour in the #40 strainer and mixed all the leavings from the three sifts together and remilled at medium.   Then went through the 3 siftings again of the remilled material and added to the flour.  

The flour I got from this process was lighter and silkier than the other approach.    The bad news is that I started with 350g of berries and got only 170g of flour, a less than 50% extraction rate.    That meant that to get a full bake, I had to add a lot of other flour, which I did.     So the flour from the Upinngil wheat berries ended up at a quarter of total flour.    To throw yet another wild card into the bake, I hadn't prepared starter in advance, but I had some leftover rye starter from a bake a few days ago in the refrigerator, and I decided to use as is.   However, not knowing how potent it was I threw in some instant yeast.   

Of course any bread I got out of this was just in the interests of science (aka hacking around with milling and sifting.)   And here is what I got.   Mild and pleasant, but just another step along the way toward something or other.  


Final

Starter

Total

Percent


Whole Rye


146

146

23%


Sifted Upinngil

171


171

26%


KA Bread Flour

329


329

51%


Water

352

119

471

73%


Salt

14


14

2.2%


Yeast

8


8

1.2%


Starter

265


1139


Grind 350g hard red wheat berries at medium


Sift in #24 sifter.   Sift resulting flour in #30 sifter.


Sift resulting flour in #40 sifter.


Regrind all the leavings at medium.


Redo the three part sift.   This left me with 170g silky


golden brown flour. 


Mix all ingredients in mixer.   When all ingredients incorporated mix at speed 2 for 20 minutes. 


BF 1.5 hours until dough is double.  


Cut and preshape.   Rest 15 minutes.


Shape into batards.  Proof 1 hour.   Coat with bran/semolina mix.

Slash and bake at 450 F with steam for 20 minutes, without for 25 minutes


Addendum:   Andy's recent post about bolted wheat flour from an operating watermill, led me straight to google to look up bolting.   Well bolting is sifting, but it has an interesting history as I found in this article -  http://www.angelfire.com/journal/millbuilder/boulting.html   There is a lot of interesting stuff in this article but one of the things that struck me is that much of sifting has been done with cloth rather than a wire mesh.    Which leads me to wonder if that would be a good strategy for the home miller.   Would a nylon or silk stocking work?    Has anyone tried it?   

dabrownman's picture
dabrownman

After the difficult and tedious Not So Stollen bake earlier in the week, we decide to continue our Thanksgiving bake list with something much simpler, less stressful even if not as enjoyable.
  

After seeing Toady Tom’s fantastic large miche bake and the excellent crust he managed to put on it, we decided to do a large loaf too only using the chacon shape we love to make since it too can produce a beautiful crust if it naturally splits where we would like as it springs and blooms in the oven heat.


We also wanted to try out a toasted wheat germ, soft white wheat extract and oat bran component similar to Toad’s to see what it tasted and looked like in the chacon.  All but 10g went into the dark side.


Instead of using our recent 1  starter and 24 hour counter levain development we went back to our roughly 20% seed levain for the SD starter required for this bake.   One levain was Rye Desem combo SD for the heartier darker portion of the loaf that has 2all of the whole grains listed for the starter. 


The other levain was a YW one that was fed with cake meal, another new ingredient for bread making for us.  Many folks use this ground matzo altus for their lemon, poppy seed walnut cakes or possibly a chiffon cake of any number of possible flavors.  We decided to try it out in the whiter portion of this bread only to see what it tasted like and how it performed in two different kinds of bread.
  

The instant coffee and the cocoa were only used in the dark portion to, you guessed it, make it darker than the light colored portion.  We also used some yogurt whey water for some of the liquid in both portions with 2/3rds of it going into the dark side.  The sprouts were also split between the two sides in the same proportion as the whey water - 2/3rds to the dark. 


In order to finish the breakout, the white portion ended up being 500 g with 100 g of the AP and bread flour and 80 g of the whole grains in the bread flour and 10g of the toasted bits.  Total flour and toasted stuff was 290 g and the liquid was 210 g (42 g whey) for a little over 72.4% hydration not counting any of the 1/3 of the sprout total that went into it.


With the malts, oats, and potato flakes on in the dark side the hydration of it was 82%.

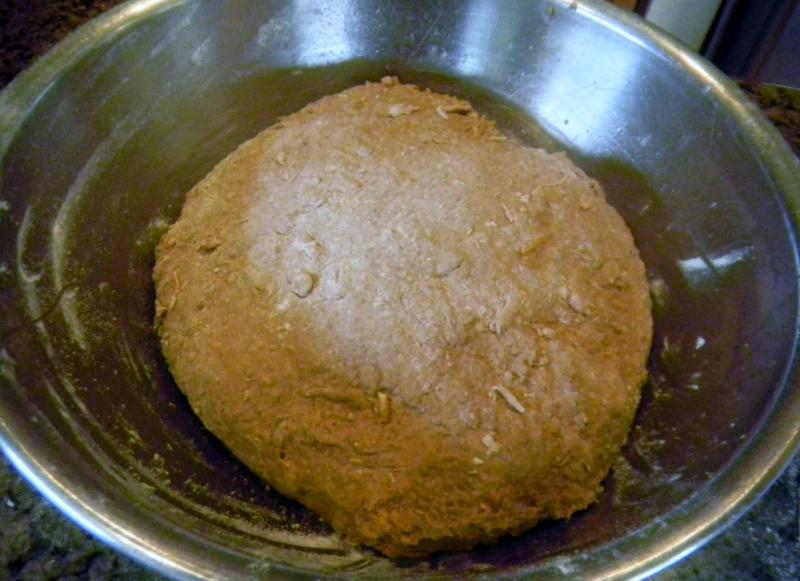
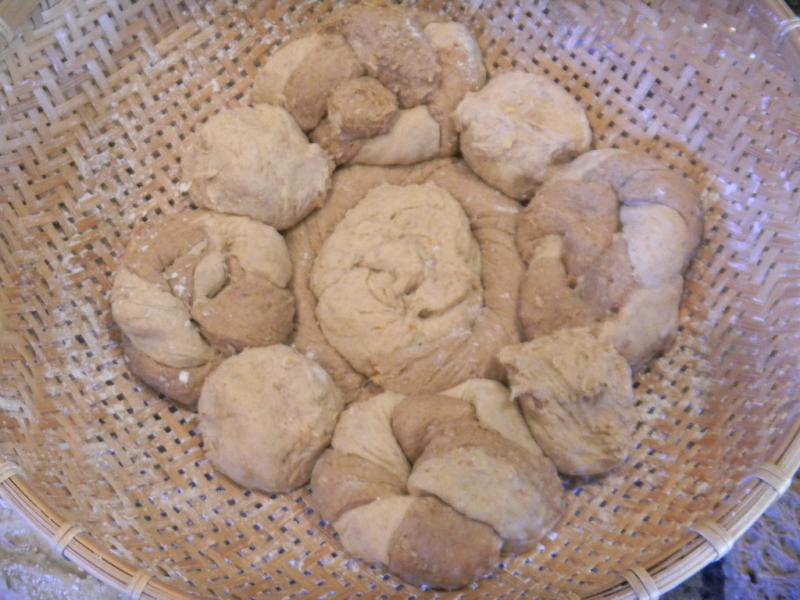
The fun part was putting together the largest chacon we have ever made.  The center knotted roll is made from the light side and the side going down into the basket is sprinkled with rice flour.  It was surrounded by a twisted rope from the dark side.   The 4 other knotted rolls, on the cardinal direction points, were made from equal portions of dark and light that were ropes twisted together to make one rope.  The 4 little balls between the 4 twisted knotted rolls were from the light side.  Remember to rice flour anything that will touch the basket so it doesn't stick - and don't rice flour anything else so it sticks together.
 

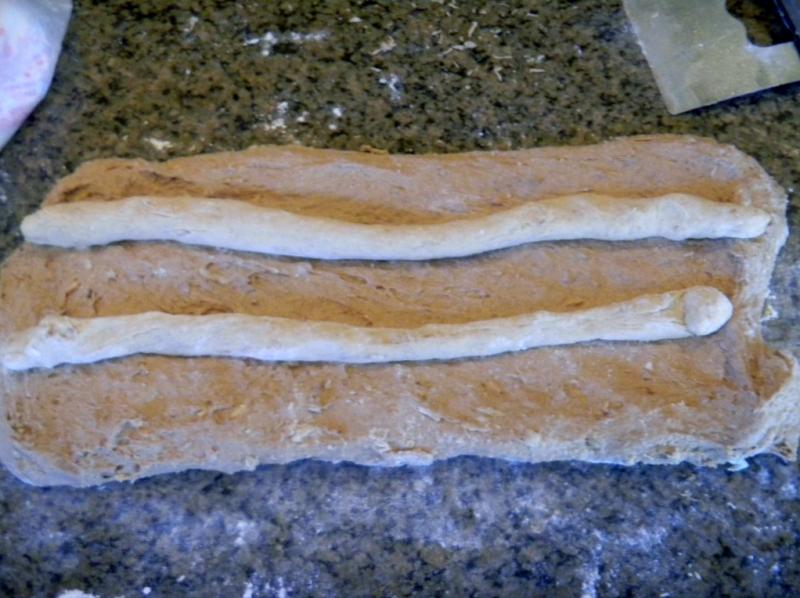
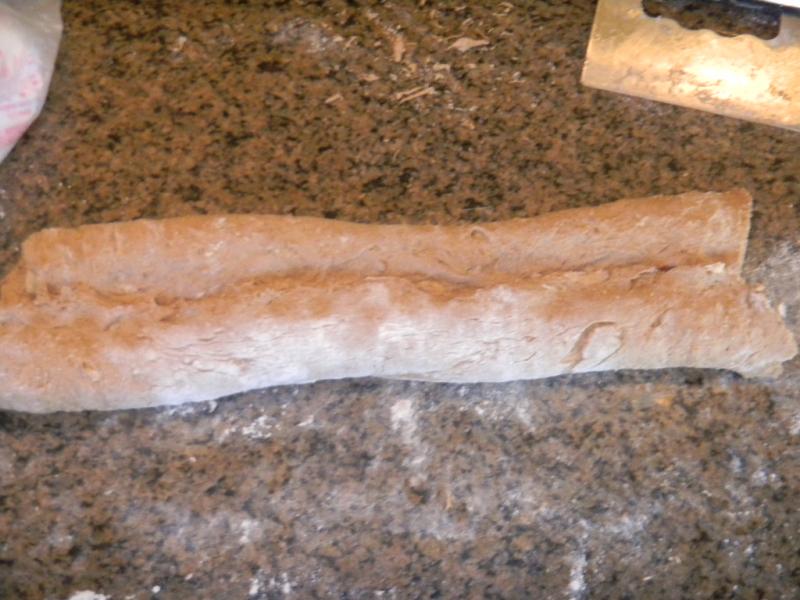
What was left over was two light ropes that were placed on the spread out remaining dark side.  The long sides of the dark were folded over the light ropes to encapsulate them making a long rectangle.  The shot sides of the rectangle were folded over to the middle making a near square where the corners were folded into the center making a circle that was quickly shaped as a boule.


This boule was pressed out gently into a large bialy with the center indentation equal in size to the circle of knotted rolls, ropes and balls already in the basket.  The large bialy was floured around the edge that would contact the basket with rice flour and flipped over so the indentation covered the knotted rolls and the assembly was basically flat on top when finished. 

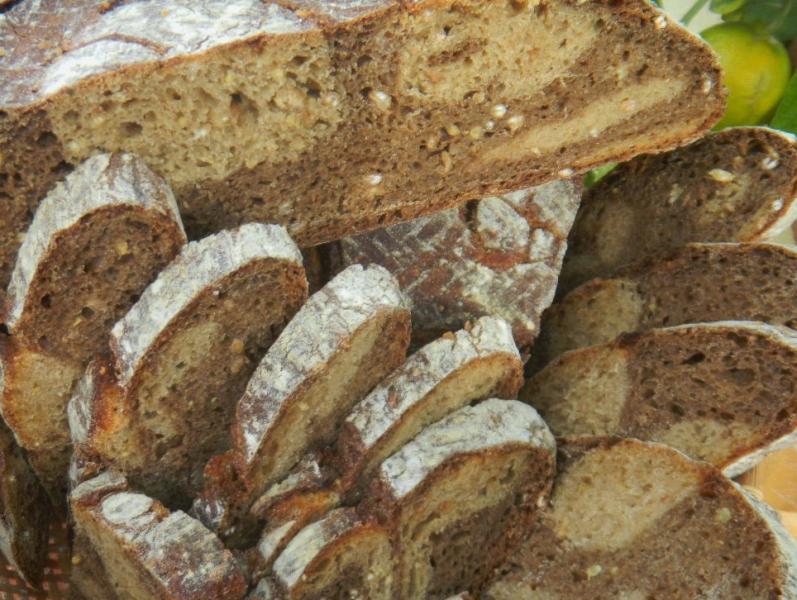
We hope this assembly will make a very pleasing marbled look when the chacon is cut.  Otherwise it was a waste of time and effort…something every baker is well used to if they have been baking more than a couple of minutes with an apprentice that is nearly all paws, bark and ankle bite.

The levains were formed by mixing, letting them double over about 4 hours or so and then chucking them in the fridge for 24 hours to build the labs while suppressing the yeast.   The flours and toasted bits were autolysed with the liquids and the salt for 2 hours as the levains came back to room temperature a day later.

Once the autolye and the levain were combined for each, the gluten was developed with 15 minutes of French slap and folds.  Then 4 sets of S&F’s wee done fpor each where the sprouts were incorporated on the 3rd set.  The dough’s were allowed to develop for 1 ½ hours on the counter before being retarded in a36 F fridge for 15 hours.


They were allowed to warm up for 1 ½ hours before being formed into the chacon and the allowed to proof at room temperature for 2 hours before firing up old Betsy and her16”round stone,  to preheat at 500 F for 20 minutes before 2 of Sylvia’s steaming pans were added.

After 45 minute of total pre-heat the chacon was un-molded easily from the basket using parchment and peel.  It slid into the oven off the peel when a 1/2 C of water was thrown into the bottom of the oven for extra initial steam and the door closed.  The temperature was turned down to 450 F the steaming was done at the 20 minute mark when the pans were removed and the temperature turned down to 425 F, convection this time.

In another 20 minutes the bread was exactly 205 F in the middle and beautifully and evenly brown from rotating it 90 degrees on the stone every 5 minutes after the steam came out.  At the 40 minute total mark, we turned off the heat and left the oven door ajar as the chacon continued to crisp on the stone for another 10 minuets before removal to the cooling rack.

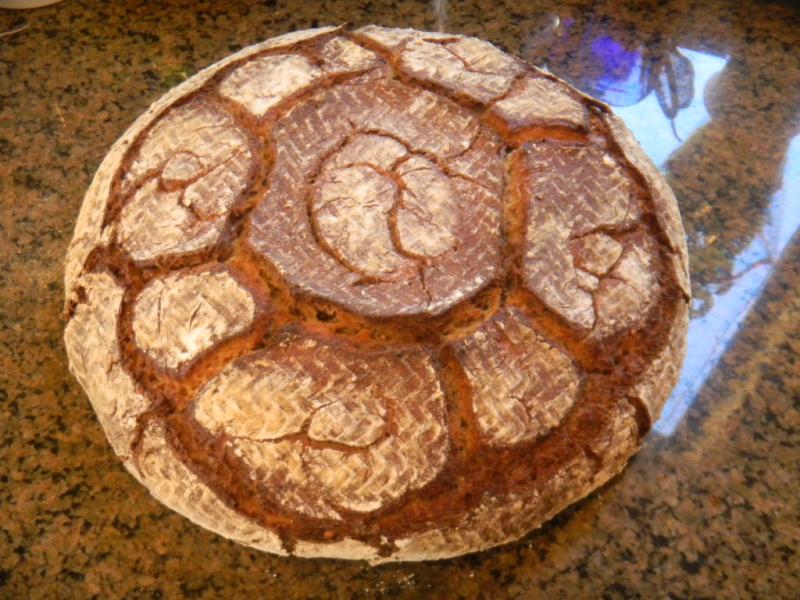
The chacon didn't spring all that much and might have been a little over proofed but it did bloom and crack as expected.  It is a very pretty large chacon and we can’t wait for it to cool down and rest for awhile before we cut it ....   and see if anything interesting happened inside.

Now that it is cut..... the light and dark did learn to play well together.  We are pleased that it is so pretty on the inside and fitting for such a gorgeous outside.   The crumb is fairly open for so many add ins and whole grains.  The dark is tangy sour while the white is a little sweet, maybe sue to the Cake meal, has no tang and is a little moister as YW tends to impart in crumbs everywhere.  A very nice combination of two tastes.  The toasted bits tend to come through more on the dark side and the millet crunch is prevalent throughout.  This bread will have to to to the top of the chacon list and into the top 15 of our all time top 5 favorites.  I'm glad we made a big one.

Formula

Combo Starter

Build 1

%

SD Desem & Rye Sour

30

3.01%

Bulgar

20

2.56%

Dark Rye

20

2.56%

Kamut

20

2.56%

Buckwheat

20

2.56%

Spelt

20

2.56%

Whole Wheat

20

2.56%

Yeast Water

60

7.69%

Ground Flax

20

2.56%

Cake Meal

80

10.26%

Water

140

17.95%

Total Starter

450

39.74%


Starter Totals


Hydration

97.25%


Levain % of Total

17.88%


Dough Flour


%

Whole Spelt

25

3.21%

Dark Rye

25

3.21%

Whole Wheat

25

3.21%

Whole Kamut

25

3.21%

Bulgar

25

3.21%

Buckwheat

25

3.21%

Cake Meal

50

3.21%

Oats

20

2.56%

Instant Potato Flakes

20

2.56%

Bread Flour

245

31.41%

AP

245

31.41%

Dough Flour

730

93.59%


Whey 125 and Water

610

78.21%

Dough Hydration

83.56%


Total Flour

998


Total Water & Whey Water

822


T. Dough Hydration

82.36%


Whole Grain %

43.19%


Hydration w/ Adds

78.94%


Total Weight

2,517


Add - Ins


%

Red Multi-grain Malt

3

0.38%

Barley Malt

20

2.56%

White Multi-grain Malt

3

0.38%

Total

26

3.33%


Multigrain Sprouts


%

WW

25

3.21%

Rye

25

3.21%

Quinoa

25

3.21%

Buckwheat

25

3.21%

Millet

25

3.21%

Bulgar

25

3.21%

Spelt

25

3.21%

Total Sprouts

175

22.44%


Toasted Bits


%

Toasted Germ, Oat Bran & Extraction

50

6.41%

  10 g each of instant coffee and cocoa went into the dark side only.

Skibum's picture
Skibum

I have been for the last couple of weeks using a nearly pure rye sourdough starter and have baked nothing but the New York Deli recipe from P. Reinhart's BBA.  I love the addition of the fried onions.  So far I have added the onions to the final dough and at some pont I will try adding them to the starter to see if it makes a difference.  For my last bake, I reduced the fried onion and added garlic to cook lightly, but not brown.  With the heat off, I added the caraway seed and fresh rosemary.

This bread has a really nice subtle garlic, onion and rosemary flavour and just screams out for a large pile of corned beef or pastrami lathered with both hot and grainy mustard.  Darn, that could have been an apres ski dinner, but the deli is closed . . .

I had incredible oven spring from this loaf.  Next bake I will also include a post proof, pre-bake photo.  I have now had 3 consecutive success's baking with my rye sourdough and will share what has worked very well for me.  Pre bake I refresh the mother rye starter as follows:

25 g seed

50 g light rye flour

40 g water

This is mixed well in a measured container and left to at least double.  This has taken anywhere from 4 to 28 hours depending on when the mother starter was last refreshed -- I do it weekly now.  After the initial build had doubled or more, I went to a second build:

115 g first build

60 g light rye flour

60 g strong bread flour

96 g water

The second build has consistently doubled or more in about an hour.  For this bake I had to put it in the fridge after a half hour as it was a ski day.  Six hours later, I removed the second build from the fridge and it had nearly overflowed the container.  Time to get baking!

NY Deli Rye w/ garlic and rosemary

151 g second starter, (it is hard to hit 150 perfectly and decided not to be anal about things.  bread is so forgiving in that way!)

50 g light rye flour

151 g bread flour

30 g greek yogurt, full fat

30 g whole milk

100 g water

1 Tbs brown sugar

1 tsp caraway seeds, pounded in a mortar and pestle, they didn't reduce much

90 g finely chopped onion, fried, weighed before cooking

20 g coarsly chopped garlic, fried, weighed before cooking

1-11/2 tsp fresh minced rosemary, less than 1 g, my scale only weighs to full grams, not fractions and I should have spent the extra 5 bucks . . .

1 Tbs canola oil for frying the savourys

1/2 Tbs EVOO for the main dough mix

11/4 tsp salt

I have been adding the salt in the final couple of S&F's of late, thanks to reading Carol Field's The Italian Baker.  So mix well, rest for 5, mix well again, rest 10, then 4 S&F's with 10 rest.  After a 1 hour bulk rise this dough had more than doubled.  This starter works faster than commercial yeast!  Pre-shaped, rested 5 then shaped a loaf.  After 30 minutes it was oven on to my 500F max, then another 30 minutes proof.  Scored and baked with steam for 20 turning and removing the steam pan at the half.

This was a fun bake I was able to fit around my schedule and am enjoying the whole sourdough leavening process.  The sourdough preferments add great flavour, I find the final dough develops strength quickly and the finished bread keeps surprising well on the kitchen counter.

BakeON!  Brian

dabrownman's picture
dabrownman

This So Not Stollen is based on a modification to a real Dresden Christmas Stollen recipe that was posted by nellapower here:  Refer to it for most of the method with a few exceptions below.

http://www.thefreshloaf.com/node/25407/dresden-christmas-stollen


I just figured that if you replaced the commercial yeast with SD it would be SD Stollen and if you replaced some of the white flour with other grains..... it would be SD Multi-grain Stollen?  But others might not think so.


I'd be surprised there isn't a SD multi-grain stollen out there somewhere since just about everything in the bread world has already been done by some baker like nellapower already. But it might be called something else like Sourdough Multi-grain Dried Fruit Bread.


Of course that is not all my apprentice did to this recipe either. She is diabolical with her changes and modifications – and can’t be stopped when she gets rolling along.  She wasn't sure SD alone could lift this lump of multi-grain properly so...... instead of the commercial yeast in the recipe we threw in some YW into the SD levain to give it an uplifting boost.


We used a 24 hour 1% starter counter top levian build with all of the whole grains (30%) in the levain. I think long slow levain builds with whole grains enhance the flavor and sour of the bread.  We used home ground spelt, rye, kamut and some farina for fun.  We made our own citrus peels by taking off the skin only with a XOX veggie peeler and boiled them 3 times before drying them and coating them in home made vanilla sugar.


We upped the alcohol some by adding some home made limoncello and arancello to enhance the orange and lemon peel and also used the traditional dark rum and amaretto too - in total about 50% more proportionally so...... no water was required in the fruit soak.  The fruit soaked up all the hooch but it was still wet.


She decided to cut back some of the dried fruits a little and added walnuts and pistachios in their place for a little crunch.  She also added a large amount of YW marinated apple and cherry pieces used to feed the YW (that we had frozen previously) to get closer to the original recipe fruit amounts.  We found them hanging out in the freezer door doing nothing but talking up precious Holiday freezer space – so in they went..


To cut some of the fat, not that it reduces it much with all the butter and lard in this recipe, we replaced some of the cream with Mexican Media Creama.   We really like the flavor of it in flans and thought it would work well here too.  She decided to replace some of the white sugar with dark brown sugar hoping it would pair better with the dark rum which is still made from molasses if you buy the good stuff - but this dark rum wasn't good enough for that.


We added some nutmeg to the spice list too thinking a little more spice would go well with the extra liquors.  We forgot to add the ground almonds to the fruit to sop of some of its wetness and put it into the dough flour by mistake.  So, we added 125 g or bench flour when we added the fruits to keep the overall hydration closer to the original.  We ended up using  50 g more hooch than we should have according to the recipe.

We were basically cutting this recipe in half and the kneading would have been easier with half a lump but, also we changed the methods slightly by cutting in all the fat into the flours before adding the 2 creams.  The creams were supposed to be part of the levains but, with theYW in the levain, we used water there instead.

This made the kneading easy since we could do 15 minutes of slap and folds before adding in the fruits and nuts and the 125 g of bench flour.  The dough tightened itself back up as we folded the add ins into the dough.  This method is much closer to short crust pasty and stollen is much closer to short crust pasty than it is to bread if you ask me.

We retarded the bulk dough in the fridge overnight after allowing it to proof on the counter for 2 hours.  We shaped the dough right after coming out of the fridge and allowed it to proof for 8 more hours on the counter before baking.

We made the dough into 2 boules because they needed to fit in the round tin my apprentice found in the garage.  My apprentice thinks she is related no only to Emperess Ying but also to Rin Tin Tin.  So finding one was easier for her than it would have been for me.

These Not So Stollen will be wrapped in cotton cloth and placed for 6 weeks in a beautiful blue holiday tin with silver snowflakes.  It held last year’s Holiday Topsy’s Pop Corn from KCMO and Lucy saved it for a reason like this..  The outside temperatures at night have finally gone into the 40’s and the daytime temps are in the mid 70’s so we hope that will do for the stollen siesta.

We baked it for 1 ½ hours at 350 F and turned off the oven when the stolen hot 203 F.  We didn’t know what temperature it was supposed to be in the inside and we had to cover the Not So Stollen at the 50 minute mark so it wouldn’t get too brown.  They spread rather than sprang but they will still fit in the tin, yea!!  This Not SO Stollen looks and smells terrific and not being able to eat it for 6 weeks…… should be illegal !!

Once again, we are getting pretty far away from the nellapower’s original recipe for this Modified Dresden Christmas Stollen even though they are still quite similar in concept except for these minor changes :-)  I do plan on storing it for 6 weeks wrapped in cotton like a stollen, even though thsi probably isnlt one.  The Not So Stollen is the perfect name for this different, if not unusual attempt to make a stollen of some 3rd kind.

Thanks to nellapower for posting her original recipe and her help in our making something close to it conceptually.

 Formula 

Combo Starter

Build 1

%

SD Desem & Rye Sour

2

0.26%

Dark Rye

30

6.00%

AP

20

4.00%

Farina

30

6.00%

Spelt

30

6.00%

Whole Wheat

30

6.00%

Yeast Water

8

1.60%

Water

110

22.00%

Total Starter

260

50.40%


Starter Totals


Hydration

84.14%


Levain % of Total

10.85%


Dough Flour


%

Soft White Wheat

215

43.00%

AP

285

57.00%

Dough Flour

500

100.00%


Media Creama 225 & Cream

232

46.40%

Dough Hydration

46.40%


Total Flour

766.2


Total Water, Crema, Cream

350.8


T. Dough Hydration

45.78%


Whole Grain %

25.45%


Hydration w/ Adds

52.04%


Total Weight

2,396


Add - Ins


%

Lemon Peel

35

4.00%

Orange Peel

85

14.00%

Pistachios

50

10.00%

Walnuts

50

10.00%

Butter

250

50.00%

Ground Almonds

100

20.00%

Sugar 50, D. Brown Sugar 25

75

15.00%

Red Multi-grain Malt

2

0.40%

White Multi-grain Malt

2

0.40%

YW Apple and Cherries

150

30.00%

Prunes

50

10.00%

Cranberry

50

10.00%

Apricot

50

10.00%

Raisins & Sultanas

100

20.00%

Total

1019

203.80%


1/2  tsp Cinnamon


1/2 tsp Cardamon


1/2 tsp Nutmeg


1/2 tsp Mace


Dark Rum - 50g


Amaretto - 50 g


Limoncello - 25 g


Arancello - 25 g


Bench AP Flour -125 g


( B. Flour included in Total Flour and for Hydration Total)


ananda's picture
ananda

New Breads from Old Favourite Flours

Our next-door neighbours recently took a daytrip to my old stomping ground across the North Pennines in Cumbria.   They very kindly sent a text message to me wondering if I might want any flour, as they ended up at the Watermill at Little Salkeld: http://organicmill.co.uk/http://organicmill.co.uk/

In the late 1980s and early 1990s when I baked at the Red Herring Workers’ Co-operative, we used flour from the Watermill, exclusively; organically grown wheat, usually biodynamic Demeter standard, grown in the North of England, and stone-milled using water power…unique!

My choices of flour?

The Miller’s Magic is a flour which was introduced shortly after the mill began to produce Unbleached White Flour using a traditional bolting method.   The last and finest of the sieves produces what are known as the “Middlings”, extracted from the outer portion of the endosperm of the wheat grain.   Maslin flour is a blend of rye flour with “middlings”, which produces flour which is a little grey, reasonably finely ground, and somewhat stronger than might be expected.   And this is a by-product, remember!

My Hexham venture with Nigel; http://www.thefreshloaf.com/node/27794/development-day-work-nigel-13th-march-2012  includes a loaf made with Golden Linseed and Light Rye Flour.   I decided to use the Miller’s Magic flour to produce a similar type of loaf, using a wheat levain and a cold soaker with the flaxseed blond.

A few customers ask for Spelt Bread.   I like to use Spelt, and made a lot of it at the Village Bakery in the late 1990s; it was marketed as “Hadrian Bread”, named after the Roman Emperor in charge at the time the Romans occupied Britain, when Spelt was the most common wheat crop.   Even more appropriately, Hadrian’s Wall lies only a few miles from this North Pennine bakery.   My main problem with spelt is that it costs a lot of money.   This is because it is difficult to mill, as the outer husk is attached to the grain, and, because yield is very poor when compared to more modern wheat varieties.   This did not put me off asking for Biodynamic Spelt Flour.   And I made a variation of the Hadrian Bread too.   It uses my regular wheat leaven, plus a “Raisin Must”.   Honey seems to be a ubiquitous “sweetener” found in Spelt breads.   This alternative is a hot soaker of raisins which is blitzed to a fine purée to add to the final dough.

Both formulae are given below, along with a few photographs.

I am now looking forward to offering tastings of these loaves to local people as part of the next stage of the business development plan.

I made a couple of old favourites to justify firing up the brick oven
The Millers’ Magic: Maslin Flour and a Golden Linseed Soaker

Wheat Levain build

Day/Date

Time

Stock

Flour

Water

TOTAL

Temp °C

Tuesday 13 November

10:00

40

200

120

360

21

Tuesday 13 November

17:00

360

500

300

1160

21

Tuesday 13 November

22:00

1160

1100

660

2920

18


Final Paste

Material/Stage

Formula

[% of flour]

Recipe [grams]

1a. White Leaven-refreshed


Marriage’s Organic Strong White Flour

30

630

Water

18

378

TOTAL

48

1008


1b. Cold Soaker


Organic Golden Linseeds

10

210

Water

30

630

TOTAL

40

840


2. Final Dough


Leaven from 1a

48

1008

Soaker from 1b

40

840

Watermill Organic Maslin Flour

70

1470

Salt

2

42

Water

25 - 30

525 - 630

TOTAL

185 – 190

3885 - 3990


% pre-fermented flour

30


% hydration

73 - 78


FACTOR

-

21


Method:

    • Build the leaven as schedule and prepare soaker the night before.
    • Combine all the ingredients in the mixer using a hook attachment.   Mix 10 - 15 minutes on first speed, scraping down the bowl as required.   DDT 26°C.
    • Bulk ferment 2½ - 3 hours
    • Scale, divide and pre-shape.   Rest covered 15 minutes; prepare bannetons.
    • Final shape; final proof 1½ - 2 hours.
    • Score top and bake in wood-fired oven
    • Cool on wires

Dinkel Bread with Levain

Material/Stage

Formula

[% of flour]

Recipe [grams]

1a. White Leaven-refreshed


Marriage’s Organic Strong White Flour

30

630

Water

18

378

TOTAL

48

1008


1b. “Raisin Must”


Californian Raisins

8

168

Hot Water

8

168

TOTAL

16

336


2. Final Dough


Leaven from 1a

48

1008

“Raisin Must” from 1b

16

336

Watermill Organic Wholemeal Spelt

70

1470

Salt

1.8

38

Water

40

840

TOTAL

175.8

3692


% pre-fermented flour

30


% hydration

66


FACTOR

-

21


Method:

    • Prepare the leaven as schedule.   Soak the raisins in the hot water overnight.
    • Blitz the raisins and water to a must.   Combine all the ingredients with the leaven and must in a mixing bowl with a hook attachment.   Mix on first speed for 15 minutes, scraping down the bowl as required.   DDT 27°C.

    • Bulk proof 2 hours
    • Scale, divide and mould
    • Final proof 1 - 2 hours
    • Score the tops and bake in wood-fired ovens
    • Cool on wires

 Campagne with Rye Sourdough and Wheat Levain


Material/Stage

Formula

[% of flour]

Recipe [grams]

1a Wheat Levain

60% hydration


Marriage’s Organic Strong White Flour

25

400

Water

15

240

TOTAL

40

640


1b Rye Sourdough

167% hydration


Bacheldre Organic Dark Rye Flour

3

48

Water

5

80

TOTAL

8

128


2. Final Dough


Wheat Levain [from 1a]

40

640

Rye Sourdough [from 1b]

8

128

Marriage’s Organic Strong White Flour

50

800

Marriage’s Organic Strong Wholemeal

22

352

Salt

1.5

24

Water

49

784

TOTAL

170.5

2728


% pre-fermented flour

28

-

% overall hydration

69

-

% wholegrain flour

25

-

FACTOR

-

16


Method:

    • Prepare the levains as schedule.   Make an “autolyse” with final dough flour and water plus the rye sourdough
    • Combine wheat levain and autolyse in the mixer on first speed for 5 minutes.   Add the salt, mix 2 minutes on first and 3 minutes on second speed.
    • Bulk ferment for 2½ hours; S&F after 1 and 2 hours.
    • Scale and divide; mould round.   Rest 15 minutes and prepare large bannetons.   Re-mould and set for final proof in bannetons.
    • Final proof 1½ hours.   Pre-heat oven.
    • Tip onto peel, Bake in wood-fired oven
    • Cool on wires.

Moscow Rye Bread


Rye Sour Refreshment

Day/date

Time

Sour [g]

Flour [g]

Water [g]

TOTAL [g]

Temp °C

Monday 12 November

19:00

40

300

500

840

30

Tuesday 13 November

13:00

840

720

1200

2660

29


Final Paste

Material/Stage

Formula [% of flour]

Recipe [grams]

1a] Rye Sourdough


Bacheldre Organic Dark Rye Flour

30

930

Water

50

1550

TOTAL

80

2480


1b] “Scald”


Bacheldre Organic Dark Rye Flour

13

403

Red Rye Malt

7

217

Blackstrap Molasses

1

31

Caraway Seeds

0.1

3

Boiling Water

35

1085

TOTAL

56.1

1739


2. “Sponge”


Rye Sourdough [from 1a]

80

2480

“Scald” [from 1b]

56.1

1739

TOTAL

136.1

4219


3. Final Paste


“Sponge” [from 2]

136.1

4219

Shipton Mill Organic Light Rye Flour

50

1550

Salt

1.2

37

TOTAL

187.3

5806


% pre-fermented flour

30 + 20 = 50

-

% overall hydration

85

-

% wholegrain flour

50 + 50[997]

-

FACTOR

-

31


Method:

  • Build the sourdough as described above.   Make the “scald” as follows:   combine the caraway and the red rye malt and dark rye flour.   Weigh the molasses into a pan, add water and bring to a rolling boil.   Tip this onto the flour mix, and add any extra boiling water if there is evaporation.   Stir well to ensure full gelatinisation.   Cover and cool.
  • Once sufficiently cool, add the scald to the sour to make the sponge.   Cover and leave to ferment for 4 hours.
  • For the final paste combine the sponge with remaining flour and the salt, mix with the paddle beater in an upright machine, 2 minutes on first speed and 2 minutes on second speed.   Scrape down the bowl to ensure thorough mixing.
  • Bulk proof for 1 hour with DDT at 28°C.
  • Scale and divide, shape and place in bread pans prepared with lining of shortening and coating of rye flour.   Smooth off the top and attach lids.
  • Final proof for 1 hour at 28°C, then bake.
  • Bake in the dead wood-fired oven.
  • Cool on wires; wrap in linen and leave 24 hours before cutting into the bread.


Ok, I’m off to make a croissant dough to retard overnight, plus rolling out the butter, and, an overnight biga for some bread rolls.   I need another delivery of wood…very soon!

Happy Baking everyone!

Andy

jarkkolaine's picture
jarkkolaine

In the beginning of the fall, I took my boys with me on a small trip to Vääksyn mylly, a small mill at about 150 kilometers from where I live. It's the mill of choice of Viipurilainen kotileipomo, the family run bakery I visited earlier this year (and featured in issue 2 of my magazine, Bread), and the owner of the mill is my friend on Facebook. 

The mill has a strong feel of old days. This is how buying flour must have been like in the past, I thought: friendly people asking you what kind of flour you had in mind, seeing where the flour comes from as you enter the shop. And apparently I'm not the only one impressed by what they do: when I said I had come from Helsinki, the mill's staff told me that it's not that far compared to some other customers. One customer had just visited from Lapland and brought big bags of flour with her. 

I bought 5 kilos of rye flour, 10 kg bread flour, some oats and "uutispuurojauho", a very coarse rye flour meant for porridge making and returned home eager to try the flours. 

I started by trying to make my regular white sourdough bread using the bread flour from the mill, and noticed that there was something very different about how the dough behaved. I knew the flour is strong in protein, but this was much stronger than I had expected. I worked the dough for a long time, until I got tired and gave up. Without a machine, making a dough with nothing but this flour seemed impossible. I think Dan Wing or Alan Scott talked about this in Bread Builders, saying that strong flour is not very good for sourdough bread... What surprised me however was that even a long autolyse didn't seem to help. 

After experimenting with different ratios of this bread flour and some organic white flour I had used before, I found a combination that works very well. Using just 200 grams of bread flour from Vääksy, 100 grams of coarse rye flour from the same mill, and 800 grams of the organic flour, I was able to create bread I really liked: 

At times, I was ready to give up, but I guess now I understand better than ever that if all flour is not created equal, and what is good for something (making dough with a mixer in this case) is not good for something else (mixing a dough by hand).

But at the same time, I'm still not quite sure about this: I had previously bought some of this same flour from a small local food shop near the mill and made bread with it quite succesfully, replacing only a small part of the flour with spelt... There could be differences in batches, or maybe some other factor in the environment or even my starter was affecting the results? 

--

The next step in my flour experiments came by surprise when I visited Eat & Joy Maatilatori, a local food market at the heart of Helsinki and found their flour mills! At the back of the store, I found a small room with about 10 different flour mills meant for home use. Next to the mills they have big bags of grains, a scale, and a note saying "feel free to use the mills to grind your own flour." I had found heaven!

So far, I have visited the shop twice, as it's always a bit of work to take my kids and go flour shopping in Helsinki. Last week, I bought some rye flour and full grain wheat from the shop. Here's the bread that came out of that visit. 50% of the flour used in the bread is stone ground wheat flour I milled myself at the shop and the remaining 50% regular organic white flour. It's quite dense but tastes delicious with a rather strong wheat flavor (it's amazing how much darker and more flavorful this bread is compared to bread I've made from regular, store bought full grain flour before).


I should really be experimenting with heat and oven improvements, but my head is bubbling with ideas for more flour experiments... Maybe next, I'll mill some more flour and try sifting it to a higher extraction level, or maybe I'll mix in some of the strong bread flour from Vääksyn mylly...

Pages

Subscribe to Recent Blog Entries