The Fresh Loaf

A Community of Amateur Bakers and Artisan Bread Enthusiasts.

Recent Blog Entries

gary.turner's picture
gary.turner

I was browsing through Fannie Farmer's  The Boston School of Cooking Cookbook, 1918, and ran across a recipe for Boston brown bread. It is a steam cooked bread from a batter. A search through the Fresh Loaf found several posts on this bread, mostly from Maggie Glezer's book, made with a fairly stiff dough.

Farmer's recipe calls for 1 cup each of rye meal, corn meal and Graham flour,  ¾ cup molasses, 1 tsp salt, ¾ tbsp soda and 1¾ cup milk or water (or 2 cups sour milk).

I converted to weights as follows:

  • 130g rolled rye (like oatmeal, but from rye)
  • 130g cornmeal
  • 150g whole wheat flour
  • 11g baking soda
  • 6g salt
  • 240g molasses (I was a little short so made up the difference with blackstrap molasses)
  • 400g milk
I whisked the dry ingredients together, added the milk and molasses and mixed well. The batter was poured into a buttered melon mold, the lid was secured and it was put on a trivet in a stock pot. I poured boiling water around the mold to halfway up, covered the pot and set the stove-top's burner to simmer.

From the crumb pic, you can see that the bread fell before completely setting up. I think this was due to my bumping the pot about an hour into the steaming. After 3½ hours, I turned the burner off and allowed the whole thing to cool enough that I could lift the mold from the water bath; then turned it out to cool on the rack.

That was Monday evening. Tuesday morning I cut a slice. The taste was of sweet cornbread with a strong rye kick. Using the rolled rye adds a texture that complements the density of the bread. I might try using all blackstrap molasses next time, as the corn and rye pretty much cover the molasses flavor — and I like molasses.

Each day, the flavor and mouth feel have improved. By today, Thursday, the flavors have melded much like leftover stew and the bread still has moisture with no sign of staling. Opening the bread box brings a wonderful corn+rye aroma into the kitchen. Heated and spread with butter, you have breakfast Nirvana.


The molded bread. Notice the melon mold in the rear.

My mom would yell at me for running through the kitchen while a cake was in the oven; now I grok in fullness why.

Floydm's picture
Floydm

Earlier this week on a rainy day working from home, I fed my starter with 50% dark rye flour and 50% bread flour.  The next morning I made a dough with 10 ounces starter, 11 ounces water, 16 ounces of bread flour, and a teaspoon or two of salt.  All measurements are approximate: this wasn't something I tended to carefully, just a "background process" that I had running while doing other things.

That was a much larger proportion of ripe starter to fresh flour than I usually bake with but, boy, let me tell you, did this  dough ever pop.  I folded it two or three times during the day, shaped it in the afternoon, and an hour later baked it in the pot I got with the Average Joe Bread Kit.  465 preheat, 425 bake, 25 minutes covered and another 30 minutes or so uncovered.

It came out great.  One of the best rising loaves I've ever made, and incredibly thin, crackly crust.   The only real flaw was that I overdid it with the flour on the outside while it was rising, but that's easy enough to brush off.  

* * *

Hey! If any of you are Tumblr users, we started a blog for The Fresh Loaf there.  Follow us!  It'll mostly just point recipes and posts here, though we'll also recirculate good baking posts we find on Tumblr.


greedybread's picture
greedybread

My all time favourite..Pandoro!!! Merry Xmas….

This has to be my favourite of favourites if that makes sense.

Of course, I was very greedy and made this mid year when I was on my xmas bread mid winter binge…

But fear not, I will be making again next week, i just wanted to share now:)

Golden and gorgeous!!


What is Luscious, Golden and yummy?

ha ha many, many things!! BUT nothing is as luscious as the PANDORO…..

From the Veneto region, it is the regions equivalent of the Panattone.

I had some mini ones from the supermarket in Lucca and Venice but I knew they would not be like a homemade one.

The Italian supermarkets, sell huge boxes which have Pandoro in them but I still think, can’t beat homemade……

So without further ado………………….

What are we aiming for?????

Pandoro……….

I did not have a Pandoro tin though, so I used a brioche mould and a panettone mould.

I think they looked great but it was the crumb and crust that blew me away!!

See this is a deceptive bread, as it looks pretty plain………..

Ahhhh but there in lies the beauty of it.

Pandoro Kiwi style

Be warned, this does take a while, it’s an all day process.

Not an all day standing round but you start in the morning, and it will be ready at night…

Lets get yeasty beasty!!

I am VERY EXCITED about this one!!

Wait till you taste it!!

What do you need?

Patience, my friends, patience……………….

This is done in 3 stages.

Stage 1 : Pre-ferment

5 teaspoons of dried yeast

1/2 cup of warm water

1 large egg

2 tbsp sugar

3/4 cup of Strong bread flour.

pre ferment Pandoro

Mix yeast into warm water along with sugar and mix until dissolved.

Sit until creamy and frothy, about 10 minutes.

Add in egg and flour and mix till smooth.

Cover tightly with gladwrap and sit for 30 minutes .

First dough stage

Stage 2: 1st Dough stage:

3 cups of strong bakers flour

3 cups of cake flour

1 tsp dried yeast

1 tbsp warm water

1/4 cup sugar

2 eggs

60g butter

First stage dough after rising

Mix the yeast into the warm water and allow to sit for 10 minutes until creamy.

Mix flours together and put aside 2 and 1/2 cups of the flour for this dough.

Add yeast, flour, sugar and eggs into the pre ferment, combining well.

Add the butter and make sure this is blended in well.

Cover with gladwrap again and allow to rise for 45-60 minutes.

2nd dough, ready to rise

Stage 3: Second dough:

4 large eggs

2 egg yolks

1 cup sugar

flour left from prior (3 and 1/2 cups)

1 tsp salt

2 tsps Vanilla

1 tbsp lemon zest

1/2 cup od candied citron

300g butter at RT

extra half cup flour

After 2nd rise

Add the eggs, yolks, sugar, lemon zest, vanilla and flour to the first dough and mix well.

Gradually add the butter, 25g at a time, blending well.

Toss the candied citron in flour and put in the dough, combine well.

Change to the dough hook and mix for 8 minutes on low-speed, gradually adding in extra flour in needed.

Dough, will be soft, very buttery and sticky.

Place dough in lightly oiled bowl and wrap with a towel.

Allow to rise until doubled, usually about 2-4 hours, dependant on the temperature.

After 2nd rising and shaping…

Turn out dough on lightly floured area with your hands well floured.

Lightly shape dough into a ball and place in moulds.

NB: Moulds must be very very well oiled!!

Dough should take up 2/3rds of mould.

Place moulds on a tray and cover with a tea towel and rise until almost at the top of the mould, usually 2-4 hours again.

30 minutes before this is ready, preheat oven to 200 celsius.

Ready for baking…

Place pandoro in the oven and bake for 30 minutes.

Turn down the heat to 170 celsius and bake for a further 20-25 minutes.

Allow to cool and then remove carefully from moulds.

Fabulousness…………

Pandoro in the panettone mould:)

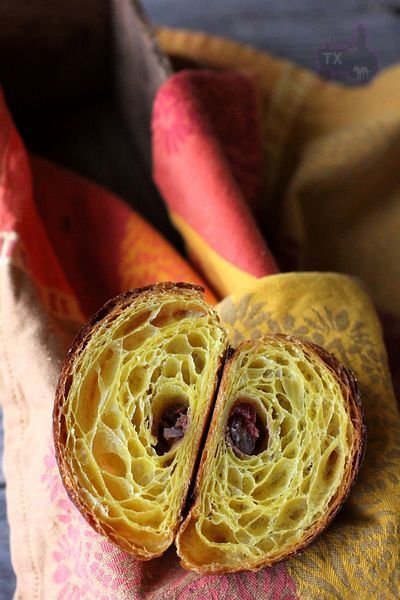
When this is cool, slice a wedge, and ENJOY, ENJOY, ENJOY!!

Absolutely divine!!

It is so light, yet rich but not overly…………

It is less buttery in taste than brioche but tastier………..

It is just heavenly!!

I like this better than Panettone

I can only dream of how gorgeous it would be at Xmas with rum flavoured mascarpone in between slices, like a xmas tree!!

LOVE IT!!!

Well worth the effort involved and it makes 3 good sized pandoro.
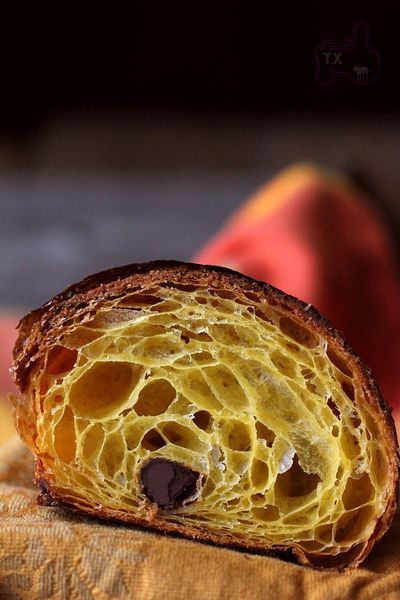
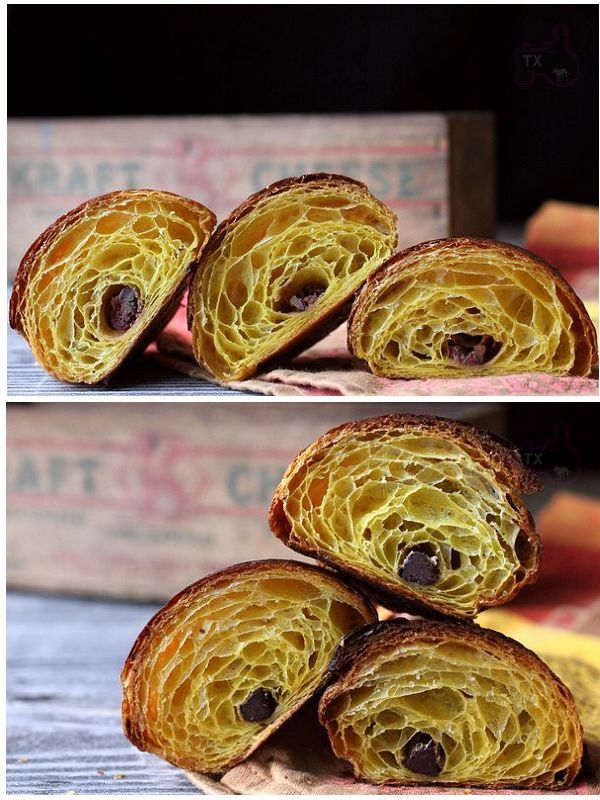
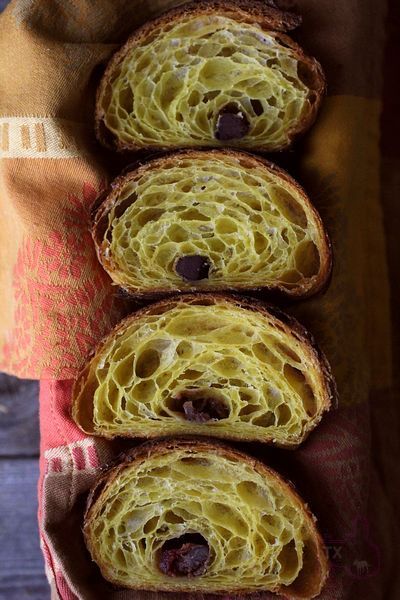
Look at the crumb!!

Gorgeousness, in all its glory!!

Can you handle it???

Recipe adapted from the wonderful Carol Field’s ” Italian Baker”, 2 Ed, 2011.


breadsong's picture
breadsong

Happy holidays everyone!

This is a take on Guro’s lovely Caucasian Bread – a Christmas version, colored red, with sun-dried tomato pesto
for the filling :^)

There was a lovely round-up of Roses in this post (so many pretty breads featured!, which got me thinking about savory fillings and flavors for this bread).


Here's the recipe for the sun-dried tomato pesto (makes more than you will need for the rose bread):
Place in food processor and process until you have a smooth paste:
1 cup sun-dried tomatoes (preserved in oil, but drained)
2 cloves garlic, crushed
1/4 cup sliced almonds
2 Tablespoons chopped parsley
1/8 to 1/4 cup grated asiago or parmesan cheese

Add 1 Tablespoon olive oil, 1/2 teaspoon kosher salt, 3 drops Tabasco sauce, and 1/2 cup real mayonnaise.
Process again until smooth. Adjust salt to taste. Transfer to bowl, cover and refrigerate until ready to use.
The recipe called for a bit more olive oil, but I held back, not wanting to make the pesto too thin (concerned it might run out during proofing and baking).

This is my interpretation of Guro's formula. I kept hydration to 63% as I liked how that worked when making
Julia's rose bread, and reduced the yeast as I was going for a longer, overnight fermentation.
I used half of the dough to make the rose, and saved the other half to make something else.

Flour counter; roll dough to 15"x20".
Cover dough with 190g of sun-dried tomato pesto, leaving a clean border (about 1/4").

Roll up from long side;  brush flour off of dough as you roll

Cut in half lengthwise (used a serrated knife).   
Fold open to expose the layers. Pick up one piece and lay over the second piece, forming an 'X' shape, keeping the cut sides facing up.

Twist the pieces to form one long rope  
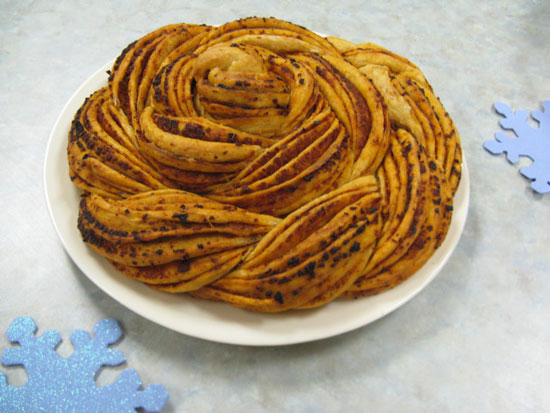
Coil the rope to form the rose

Proof for about one hour. Some of the olive oil might leak out during proofing

Bake at 350F for 25-30 minutes, or until 195F internal temperature is reached, turning loaf for even browning or covering with foil to prevent overbrowning, if needed.

 a colorful, flavorful crumb! :^)


Thank you, Guro! This was a fun and very delicious bread to make. It had the aroma of a really good pizza,
while it was cooling.
I was regretting not having any fresh oregano to add to either the dough, or the pesto!
Something to look forward to, for next time, although the bread had wonderful flavor as is.

Happy baking everyone!
:^) breadsong

Submitted to YeastSpotting :^)


bakingbadly's picture
bakingbadly

How long ago was it?...

Oh, yes, I remember. I remember it well. Three months ago I happened upon Khalid's (mebake) multigrain struan on TFL---a bread loaf heavily enriched with grains and seeds, topped with a luscious field of poppy seeds. Tantalized by the thought of crafting such a fine loaf myself, I dove ahead, not knowing that I'd fail despite using the best ingredients that I could afford, despite my patience and greatest effort.

The crust, pale and feeble. The crumb, dense and damp. And the flavour, vile rancidity.

Deeply disheartened by my failed attempt, self-doubt plundered my body of motivation throughout the course of a week, bringing me to the brink of cease and desist. In other words, I wanted to quit baking. 


So, why didn't I quit baking? Well, on that bleak day, my heart became enlivened, resuscitated by a bolt of insight. My failed loaf incited so much distraught because of one reason: I was passionate about bread.

During the subsequent months, I progressively honed my bread baking skills by experimenting with sourdough starters, higher hydration dough, kneading, folding and shaping techniques, as well as steaming and baking methods---all learnt to one day confront and slay the recipe that nearly slaughtered my baking spirit.

With great honour, I now present to you my second attempt at Peter Reinhart's whole wheat multigrain struan. 


My second attempt deviated from the first attempt in many ways. Most notably, I substituted the biga with a whole wheat sourdough starter, retarded the bulk fermentation via refrigeration, and implemented the "Dutch oven method". Technically speaking, it was thick metal pot, not a Dutch oven.


In equal parts, this particular struan was packed---really packed---with pearl barley, buckwheat, quinoa, flax seeds, white sesame seeds, and sunflower seeds. 


See? I wasn't kidding---it's packed! I admit, this wasn't intentional. In all likelihood, my darn-ol'-wonky mechanical kitchen scale displayed false readings. But hey, no harm done. As they say: more grain, less plain. (Okay, I just made up that phrase on spot.) 

The flavour: Cooled for nearly twenty hours, the tender yet firm crumb bursted with nuttiness in my mouth, followed by subtle notes of butteriness and bitterness (likely caused by the uncooked quinoa and buckwheat), finishing with a progressively sharp but mild tang. Approximately nine hours later, just after work, the flavours of the struan coalesced into a smooth symphony of taste notes. It was truly wonderful, minus my immediate craving for butter. 

Final comments:

Thank you Khalid for inspiring me to bake whole wheat / whole grain breads. Thank you Karin for helping me troubleshoot my failed struan. Thank you Mini Oven for your posts on how to create and maintain a sourdough starter. And lastly, thank you to the members of TFL who've taken their time to share their knowledge, wisdom, and passion with us. It is immensly appreciated.

:) Have a happy baking,

Zita 

P.S. Please feel free to critique my loaf. It will only lead to improvement---and who doesn't want that?

bobkay1022's picture
bobkay1022

Finally 2 ? nice 1 lb. Sour Dough loaves. Lot of thanks to Mike Avery  

http://www.sourdoughhome.com/ 

 Nice crispy chewy crust and a moist rich tasting crumb. Definitely a keeper this time. The birds will have to go without.


txfarmer's picture
txfarmer

Sending this toYeastspotting.
Click here for my blog index.

Holiday season is pumpkin season. Pumpkin in dishes, in pies, in cakes, in breads, and in croissants!

Pumpkin Croissant with Sourdough Starter
Note: for details and tips on making croissants, please see this post & this post.
Note: this recipe makes about 12 large danishes.

-levain
starter (100%), 35g
water, 59g
bread flour, 105g

1. mix and leave at room temp for 12 hours.

-final dough
bread flour, 422g
sugar, 68g
salt, 10g
instant yeast, 7g
butter, 21g, softened
pumpkin puree, 200g
water, 120g
levain, all
roll-in butter, 287g

1. Mix everything but the rolling butter, knead until medium gluten developement. Then follow the steps here.

Tried out two fillings. The ones at bottom were filled with dark chocolate, a safe bet that never disappoints; the top ones had a caramelized cranberry walnut filling, how very seasonal! Chocolate ones were easier to roll than the soft/mushy cranberry filling, that's why the bottom ones had more turns and appeared to be fuller/taller.

Both had pretty open crumb though. Love the golden hue.

Makes great holiday gifts

Franko's picture
Franko

Tom/toad.de.b recently posted  *here* about a new organic sprouted whole wheat flour he'd run across in his local market that is produced by One Degree Organic Foods. I was delighted to learn that One Degree OF is located here in British Columbia Canada, not far from Vancouver in the city of Abbotsford. One of our local supermarkets carries two of their products, the Organic Sprouted Whole Wheat flour that Tom featured in his post, and an Organic Sprouted Spelt Flour milled from grain grown in Lumby, located in the Southern Interior of B.C.

A rare treat indeed to have a locally grown grain to use and since I haven't baked with spelt in over a year the decision was an easy one to make. When I think of spelt breads, particularly100% ones as these loaves are, the nutty flavour of the grain is what first comes to mind, and not far behind that is the fragile nature of the dough due to it's lower protein content. What spelt flour lacks in gluten strength, aptly described by http://www.thefreshloaf.com/user/nicodvb as wheat's “poorer cousin” is more than made up for by its earthy, well rounded flavour that compliments a wide variety of toppings and accompaniments. Toasted almonds and dates were included in this mix along with honey and a touch of apple-cider vinegar. Increasing the dough's acidity just a little goes a long way toward strengthening a dough made from spelt or durum flour, both of which typically have low or poor quality gluten content. Although the One Degree flour shows a protein content of 13.3%, how much of that is gluten based isn't clear. If this mix had included a sour leaven of some kind I wouldn't have bothered with the vinegar but since I was using a spelt pate fermentee as the preferment I decided to hedge my bets by including it. Between the preferment, vinegar, or the flour itself I'm not certain which contributed more to the overall strength of the dough but it resulted in a mix that showed very little of the tearing so common with high ratio spelt doughs.

The loaves took on a rich brown colour during baking and I detected a whiff of the cider vinegar as it baked off but no evidence of it upon tasting. The primary flavours are those of the grain and the toasted almonds accented by a touch of sweet from the dates and honey. The crumb is fairly soft and moist with a very nice texture compared to other 100% Spelt breads I've made. Overall I'm quite happy with the final results of this bake and the performance of One Degree Organics Sprouted Spelt Flour.

Best Wishes,

Franko

Procedure: 

Other than the six hours it took for the pate fermentee to dome, indicating it was ready for final mixing, this is a relatively quick bread to make.

DDT 76-78F/24-25C 

  • No autolyse needed, just dump all the ingredients except the fruit and nuts in the bowl and mix by hand until the dough comes together. Knead for a few minutes (less than 5) until the dough begins to build strength and becomes smooth. If the dough begins to tear stop kneading and let it rest for 5 minutes before resuming.

  • Cover the dough and rest it for 15 minutes, then press it out to a disk and cover with the fruit and nuts. Fold the dough over and slowly work the fruit/nut mixture into the dough until evenly dispersed. The dough has 2-3 stretch and folds during bulk fermentation so any clumps of fruit or nuts tend to even out by the time it's completed BF.

  • This dough had 70 minutes BF time at 76F/24C with a stretch & fold at 20 and 40 minutes. After bulk was complete the dough was rounded lightly and rested for 15 minutes before scaling at 740 grams per loaf, then shaped and put for a final rise of 60-70 minutes. 

  • Preheat the oven and stone to 465F/240C. Watch the final proof very carefully during the last 20 minutes as an all spelt dough can over-proof quite quickly. When the dough has a little less than doubled remove it from the proofing environment and let it air dry for a few minutes before slashing.

  • With preferred steam system in place and oven vent blocked, slash the loaves as desired and place in the oven. Lower the temperature to 440F/226C and bake for 10 minutes, remove steam system, vent the oven and bake with convection on for a further10 minutes. Lower the temperature to 430F/221C and bake for a final 15 minutes, rotating the loaves if necessary for even colouring.

  • Check the loaves to ensure full baking either by tapping the bottom for a hollow sound or use a thermometer looking for an internal temperature of 206-210F/96-98C. Cover and cool on a rack for 6 hours before slicing.

Link to working spreadsheet *here*

winstonsmith's picture
winstonsmith

A couple months ago I was using my KA Pro 6 of a dozen or so years of age when it finally stripped a gear. I ordered parts and repaired it, but as I thought about it I realized that it no longer suited my needs. I expect it will last another decade or more, but it will be reserved for light loads.

The bagel formula I have been using is from Jeff Hamelman and I like it quite a lot. This time I decided to try the BBA, or at least a somewhat modified version. That makes a bakers dozen, which would have been too much for the KA since I use HG flour. Fortunately, I have a new Bosch Universal! I decided to double the recipe and see how the new machine worked.

I want to say right now that this post is not about a KA vs. whatever. The KA is a fine machine for many purposes, but it was never intended to make 26 large bagels worth of high gluten dough at once. Consequently any comparison between the two is irrelevant. Use what you have within its limits and if you move beyond it do so and remember the good things you've made rather than bemoan what you could not do. My 2 cents. 

Onward!

I followed the BBA formula as I've said, creating the sponge in the mixing bowl. Once it sufficiently proofed I added part of the flour to collapse the sponge. I've read that getting dough into the center column could be a problem so I incorporated the ingredients in two batches, mixing half the flour in for a few moments then in with the rest. In doing so I had no problems later.

One concern was that I wasn't sure just how long I should mix the ingredients. This was an untried formula in an unfamiliar machine. I decided that I would let it knead for 5 minutes and try to windowpane test it every minute thereafter. I found that 8 minutes provided sufficient time. I could have gone a little longer, but I don't like to over-oxidize. 

Please forgive the low quality cell phone pics. 

Here's the Beast with its first "victim" 


This may not look like much, but it's roughly 7 lbs of high gluten bagel dough which ultimately made 26 bagels of about 4&1/4 ounces each. That would have been impossible before, but the Bosch acted like it didn't care at all. 


I went back and forth on Hamelman or Reinhart and ultimately the latter won simply because I wanted to try it. That said I didn't depart entirely from my old ways and  follow everything to the letter. 

What follows is my standard work practice for bagels. 

I use an apartment sized fridge for retarding dough and I pre-cut sheets of parchment to fit the shelves. I then spray them lightly with Pam and rub it into the paper. I then  cut the number of portions from the dough ball which will fit onto the sheet and roll them into ropes and form the bagel. Onto the sheet they go and into the fridge after covering with plastic wrap. Once that's all done I let them sit for about 15 hours until the next morning.

I preset the oven to go off an hour before I woke set to 500F. The bottom two racks have rectangular stones and the top one has a large aluminum flat sheet. 

When I get up I take another set of parchment sheets sized to fit the stone and spray as before to avoid sticking.  I don a pair of surgical gloves and add three teaspoonfuls of lye to three quarts of cold water in a stainless pan. Note cold water. The reason the reason for that is lye will react strongly with water, and if the water is hot it could go everywhere, including yourself. Cold is definately the safe way to go.

There's a thread explaining the use of lye with bagels. Coincidentally it turns out the fellow who does this shares my profession and we both grew up in Philly. Small world, eh?

Once the water gets up to a boil I put 4 bagels in and flip them over at about 30 seconds for a total of a minute them remove them. One side of the bagel is flatter than the other and what I do is put whatever topping I want on the more curved surface and have that side down on the parchment. I then carefully take the hot sheet out of the oven and quickly slide parchment and all onto it. The reason being is that I want both sides to bake a bit, but not completely set. The hot sheet holds enough heat to start the process without burning the toppings and the flat side being exposed to the open oven has a chance to rise and round itself. I then use tongs and slide the parchment and bagels onto another flat sheet, close the oven and quickly flip them over. Back into the oven onto one of the stones. I'll repeat the process of boiling and topping on another parchment paper and repeat, then put that onto the other stone. Total baking time is about 22 minutes at 500F. With the oven opening and closing I doubt the oven stays quite that hot for the second batch so I may give another minute or two if needed. 26 bagels required three batches on the size stones I have and here's the results, minus several. 


I took some with me to work that morning and they were well received. They were nice and chewey with a light crunch when bitten into. I will have to try Hamelman again with the Bosch to compare the results between it and the Pro 6. There was better development of gluten this time, but there are too many variables to know why.

As far as the machine itself, I'm thrilled with it. I would have to do this in three or four batches and the time involved would have been prohibitive. I believe I could have done perhaps three dozen, but this is about the perfect quantity. 

cookingbyheart's picture
cookingbyheart

Vishwani Agrawal teaches his daughter, Chitra, to make traditional North Indian flatbread known as chapati or roti.

http://vimeo.com/30384978

It was a treat to spend the day with Chitra and her dad while we shot this piece and learned from a master. Chitra’s father, Vishwani, shares his method of making chapati, also known as roti, a flat bread most commonly prepared in northern India. Vishwani grew up in Allahabad, one of India’s oldest cities, where he learned to prepare chapatis by watching his mother and then as time went on, by refining his own technique. On the shoot, Vishwani told us about leaving home for college, which is when he first began making chapati. Later, when he met his wife, Prathima, he continued to make chapati. Prathima is from south India, where rice is more commonly served as a staple. To this day, Vishwani remains the primary chapati-maker of the house. And since Vishwani and Prathima make chapatis weekly, they’ve become masters. It seems like making any kind of bread dough takes some experimentation to get it right.

When I asked Vishwani about the importance of passing down the tradition, I was excited by his response. He pointed out that traditions are not a one way street. They aren’t blindly passed on and can’t be forced onto the next generation, but rather they are actively accepted, practiced and kept alive by the younger generation. It’s refreshing to hear a different perspective and to consider that we are not just vessels but we are active participants in creating new traditions and keeping old traditions alive. Vishwani can teach what he knows, but it’s up to Chitra to keep it going, if she so chooses. As he tells Chitra, he teaches procedure, technique is what you figure out on your own.

Vishwani and Prathima reside in Alabama, where they both work in the Computer and Electrical Engineering Department at Auburn University.
Chapati

Ingredients (makes 6 rotis)
1 cup of flour
~1/2 cup lukewarm water
extra flour for rolling

Method
Sift the flour into a bowl and slowly add water while kneading until you get to a dough that is soft, smooth and pliable. The longer you knead the dough the better but 5 minutes of heavy kneading will do.

Take the dough ball and cover with a damp cloth for a minimum of 30 minutes (you can also make the dough and put in your fridge for making another day).

Divide the dough into 6 dough balls or loee and roll them in flour.

Flatten each each dough ball with your palm and roll out to a 6 inch diameter, using extra flour so it does not stick.

Heat an iron skillet on medium heat. When it is hot (water drops should sizzle immediately), place roti on.

Let it cook and when you start to see bubbles form in many places, flip it over and cook until the other side does the same.

Over a medium flame, with flat tongs or chimta place the roti until it blows up or browns on both sides. (If you are cooking on an electric stove, you can press the roti in different places with a cloth to make it blow up a bit right on the skillet)

With the tongs, hit the roti against a surface to shake off any excess flour.

Butter one side with ghee and place in an airtight container lined with paper towel.

Music: Boss City by Wes Montgomery; Evelyn by Dabrye; Pacific Theme by Broken Social Scene; Cause=Time by Broken Social Scene; Little Chin by Tommy Guererro

Vishwani and Chitra, thank you for sharing. Franny & John, Thank you for letting us take over your apt for the day! Sintalentos, thank you for your musical consultation. Michael Legume, thanks for the audio equip. Paul, you’re the best.

Pages

Subscribe to Recent Blog Entries