Been a long time since I blogged properly about the bread I baked. I was baking at least a couple of times a week during those absent days, as I’d always done, but haven’t got around to blogging about it, for one reason or another. But today, I finally decided to gently and timidly ease myself back into my old bread-blogging routine, starting it with my recent (like, yesterday…:p) baguette.
It’s one of the most popular baguette recipes among TFL members, and I have tried it a couple of times before, but for some reason it never became my ‘regular,’ maybe because I usually prefer using only dried yeast for baguette because it produces lighter texture and also because I’d become so comfortable with ‘Hamelinet poolish baguette’ formula, I didn’t feel strong enough ‘urge’ to try out other baguette recipe. Lazy and uninspired, I know….
But last Friday, I was preparing to make Daniel Leader’s Light Rye for the first time; scaling down the original recipe to suit our consumption and started feeding the sourdough…..and realized the recipe produced excess sourdough, about 50g more than the main dough production would need, in the scaled down amount. Thought of adding it to the main dough anyway at first, then a light bulb came up and remembered Fromartz’s baguette used small amount of sourdough! :D Checked the recipe, re-calculated the amount of sourdough needed (his sourdough is 100% hydration and mine is 70 – 75%) for the scaled down ingredients. (my usual batch for baguettes is 300 – 350g total flour)…… Ha! I’d need exactly 50% sourdough! So that’s what I made. :)
I more or less followed the original recipe, but, as you may well know, my ‘more or less’ can often be ‘hardly.’ :p Following is the basic outline of the recipes with a list of changes I made.
Ingredients (for 3 mini baguettes, about 35 – 37cm length. So technically, it’s NOT baguette, but anyway….)
295 g Strong white flour – I used 150g Waitrose Leckford Estate Strong Flour + 145g Heritage Wholesome White Flour*
5g wholemeal strong flour
50g sourdough (mine is about 75% hydration)
0.8g (scant 1/4 tsp) dried yeast – much small amount than the original recipe, so that I can incorporate long, cold retard overnight. (Don’t kick me, Ars!!! :p) ---- ETA:Strike that. Clearly forgotten Fromarts does long retard in the fridge, too, but with larger amount of yeast. But I did get sufficient fermentation with this amount after 16-17 hrs. (See below)
210g water
*Note - This is the flour I bought from Syd’s stall (Aston’s Organic Bakery) at Real Bread Festival a few months ago. It’s a blend of flour milled from traditional English heritage wheat varieties. Have no idea what varieties are used (not stated on the bag except for saying it consists of 150 varieties), but as the name suggests, it contains a little amount of bran and wheat germ. Maybe it’s a sort of equivalent of French T65 flour. (my wild guess….) Its protein level is scary low at 10.1% but it seems to have good quality gluten and makes lovely dough with silky touch but with nice strength.
Changes I made
1) Fromartz’s method ‘autolyse’ for 5 – 10 minutes after mixing all the ingredients ⇒ I extended it to 30 minutes. (it was a very cold day. The temperature in the kitchen was about 17-18C)
2) Instead of French-folding for 5 minutes before proceeding to 3 x letter-folding, as in the original recipe, I S & F 3 times in a bowl every 30 minutes. (I’d probably do it every 20 min if it’s warmer)
3) After 3 x S & F, letter-fold for 1 – 2 times to strengthen the dough, if necessary.
4) Leave at room temperature for 1 hr or so until the dough increases in the volume by 25% or so.
5) Put it in the fridge and retard for 16 – 18 hrs.
6) After 16, 17 hrs in the fridge, the dough looked fully fermented with a few large air bubbles on the top, so I divided it into 3, very roughly shaped and left for 20 – 30 min to return it to room temperature. (I would’ve done the other way round = returning to room temperature, then divide), if it hadn’t been so fully fermented during the cold retard)
7) Pre-shape into rectangular, as the original recipe (but smaller, obviously) and rest for 15 min.
8) Shape into baguette and proof for 1 hr or so.
9) Bake on very hot baking stone with steam for 10 min at 240C, then without steam for another 10 min with fan.
...and the obligatory crumb shots. Sorry for weird colour. Night light….
The rest of the crumb shots to black & white...
Verdict: I think this turned out to be better than my earlier trials with this recipe (with similar changes) some time ago. Can I praise myself for having improved in the art of bread-making or should I just thank to the heritage flour and the dedicated farmers behind it? :p I liked the taste, probably slightly more robust than my usual poolish baguette, and the texture was definitely chewy-er, too. It’s a good baguette, for sure. Do I like it better than poolish baguette? Not sure, difficult to say. Probably both have their own place, depending upon your mood and what you eat with it. Last night we had pot-au-feu to warm ourselves up in the freezing temperature with heavy snow in England, so slightly gutsier baguette like this was, I have to say, ideal companion to the meal. :)
I got this idea from another post on TFL but can't seem to find it again - props to whoever you are.
Anyway, the idea is that since you can't use the DO method with a baguette, you use a covered steam tray which can accomodate a 3 loaf baguette form.
I used a basic lean dough formula (100% bread flour) and standard forming routine. The oven was pre-heated to 500F with the uncovered pan on top the stone. I place the loaded baguette form in the pan, added 6 oz of water, and covered it. 10 minutes later lowered the oven temp to 450F, rotated the covered pan 180 deg. The last 10 minutes the loaves were left to finish uncovered.
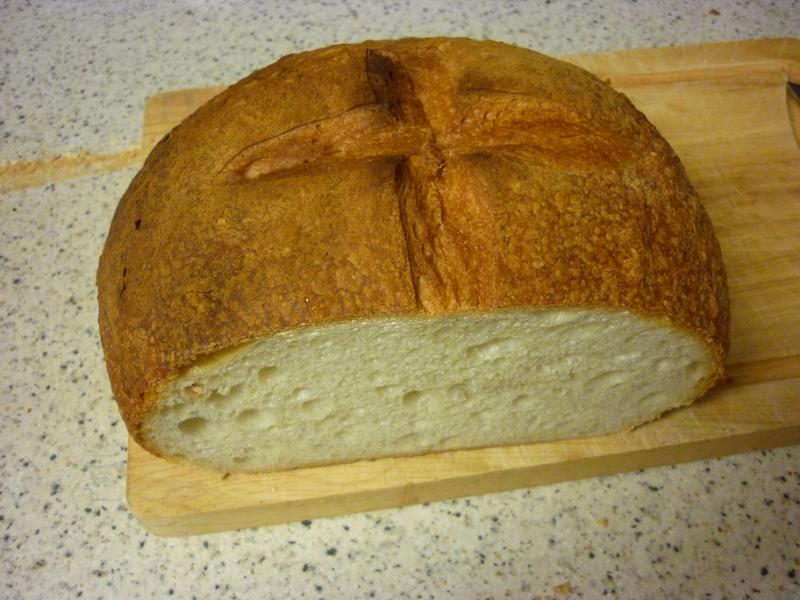
I gave two away to the nieghbors since I've been eating WAY too much bread - the last one was for breakfast:
Looks good, tastes good. The crumb was tight due ( I imagine ) to using 100% bread flour and perhaps some overworking and impatience on my part during the rise. ;-)
Lately I've been fascinated by the baking properties of the material that is left after milling wheat berries and screening out the fine flour and (some of) the bran. One thing that has daunted me for awhile was what to call it. At first I tried the term middlings, but that made me uncomfortable because of the squishiness of the term. I have found in my readings at least 4 different uses for the word middlings, some similar to each other, and some not. Bah. I used this material several times as hot cereal, and it distinctly rang a bell from my childhood and beyond both because of flavor and texture - Cream of Wheat! I loved cream of wheat when I was a child, and strangely, as an adult I was hooked on it if and only if I was pregnant. Who can understand these mysteries. So look up Cream of Wheat and what do you find - Farina. Farina seems to be defined quite a bit more consistently than middlings, and describes my mystery substance quite well. So farina it is.
I have baked several times with farina (plus other flours) and have been very happy with what it adds to the mix. Now I find myself milling just so I can get the farina, and the heck with the high-ex flour - that's just a byproduct.
The next thing I tried with it was using it as the flour in starter. I had a "desem" starter that I had begun with a dab of rye starter, but had never been happy with the results. But I had a bit of it tucked away in the refrigerator
So I built that up with farina, and got it ready for use. I fermented it in an outer room which is colder than the rest of the house at between 62 and 65F. The second morning it had grown and cracked and as I was planning to be out most of the day I put it into the refrigerator. If there is one thing I've learned about whole grain starters, which I extrapolate to farina starters, it is that they can over-ripen when you turn your back on them, and then your bake is doomed no matter what you do.
Here is what the starter looked like when I removed it from the refrigerator after around 7 hours and cut it in half.
At the same time, being piqued by A.P.'s suggestion of a long autolyse, I did an autolyse for that 7 hour period as well. Finally I put all ingredients together, and mixed and fermented, and then retarded overnight only because time had run out for a bake yesterday. This morning after proofing until the dough softened, I baked it and this is what I got after cooling:
Flavor is excellent - mild and creamy. I somewhat dislike the squatter shape of overnight retarded loaves but that's a quibble.
Skip this section if you are bored to death with milling and sifting.
I have developed a more streamlined milling and sifting process which I believe gives me as good results as the more elaborate one I was using previously. First I got a sifter holder so I could sit down and sift instead of standing and hurting my back (ok, you younger folks might not need this.) I wanted something where I could see what was coming out during sifting, so this is my set-up:
Yes, you're right, that's a plant stand. It works great. I place the sifter on top, sit down, and rub my hand through it and I can see the flour flowing down into the bowl.
My milling and sifting log and notes:
1/13/2013
Berries
1000
Golden
665
67%
Farina
272
27%
Bran
40
4%
Loss
23
2%
Mill berries fine
Sift in 55
When streams get very light
sift leavings in 30
This separates off bran
Had to remill leavings at fine during this
process
Resift results in 55
This was as simple and effective
as other methods I've used
No appreciable difference between
this strategy and milling coarse first
I used plant stand with wooden bowl
and thick plastic on the floor
This was my lowest loss yet
Here is formula and method:
1/18/2013
10:00 AM
9:00 PM
2:00 PM
Starter
Seed
30
KAWW
1
1
1%
Farina
17
50
100
167
99%
Water
11
30
60
101
60%
270
9.1
Final
Starter
Total
Percent
KAWW
1
1
0%
Farina
142
142
24%
KABF
225
225
38%
KAAP
225
225
38%
Water
340
86
426
72%
Salt
12
12
2.0%
Starter
230
24%
1020
Starter Factor
0.85
Ferment starter at 62-65 degrees starting on 1/18
Refrigerate starter at 9 am on 1/19 as don't want to get overripe
Mix flour and water at 9:15 for autolyse
Mix all at 3:45 in mixer for 8 minutes to blend, and 4 more minutes
to strengthen. Dough comes out very stiff and windowpanes
Lumos did a lovely cocoa sourdough with cranberries, walnuts and orange peels for Codruta from the fresh loaf. www.thefreshloaf.com/node/25490/xxi
visited Tokyo recently in December 2012. there, they have lovely ingredients for all sorts of cooking. especially at the tsukiji fresh market. bought some good green tea powder and black beans.
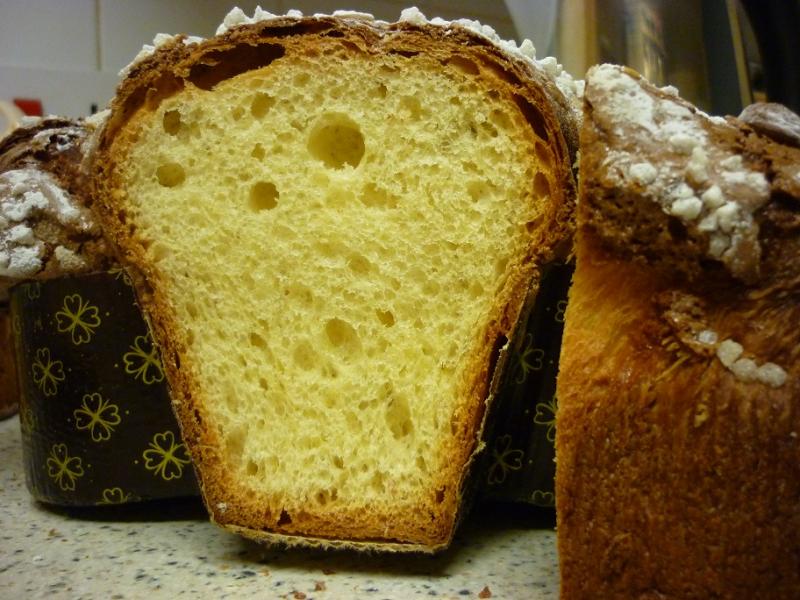
after looking at the recipe for the cocoa sourdough, i had a thought of replacing the cocoa powder for the green tea powder. and added the black beans instead of the cranberries. yuzu peels instead of orange peels...
this is how it turned out.. beautiful bitter flovor from the tea and sweetness from the black beans quite similer to chestnuts. aromatic yuzu... yum
Today I was on a mission. To defeat this fear of developing and shaping rye dough. I learn best through video and photos and I have found that there are not nearly as many video tutorials for rye breads as there are for white breads. I used a 40% formula and followed all that I have learned on this site as much as possible. My last week's attempt came up short with little rise/oven spring. This time, a combination of longer bulk ferment and proof times, along with an amazing organic medium rye flour from a local mill, produced loaves that I am finally happy with. Not to mention Dumbo sized ears that I have never achieved before. Flavour is lightly rye, with a definite sour tang.
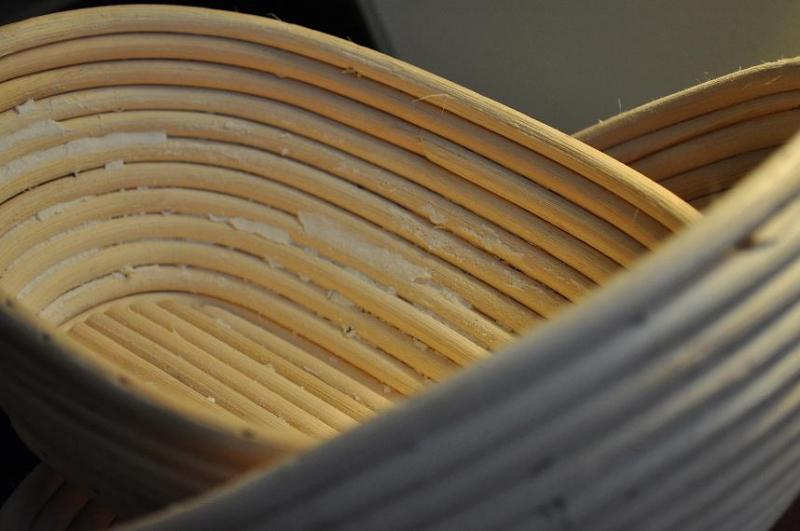
Shaping was done in air with wet hands, and proofed in brotforms for almost 2 hours at 78 degrees.
Crumb shot a day later. Any suggestions/comments on the crumb from the rye experts out there?
For a few weeks now I have been maintaining my typical Italian style sourdough, experimenting, trying to increase the pH level at it's maturity. I've managed to go from 4.1 - 4.6. Depending on which schooling of Italian sourdough you follow, methods and guidelines vary slightly. But according to one source optimum pH at maturity is 4.5 but can vary between 4.3-4.8.
Lately I have taken to the method of keeping this sourdough in cold water over the tied in cloth method. But I still use both to keep the acidity under control.
“Scoring” is the word used to describe the cuts made in a loaf of bread before it is baked. Some breads are not scored. For example many loaves baked in pans are not. However, almost all free-formed “hearth breads” are scored.
When is scoring done?
Scoring is generally performed just prior to loading the loaves in the oven. French rye breads (pains de siegle) are sometimes scored right after shaping, before proofing.
Why are breads scored?
Intentionally creating a weak spot on the surface of the loaf prevents the loaf from bursting at weak spots created during shaping.
The type of scoring performed controls the direction in which the bread will expand during “oven spring.”
The pattern of cuts made, the angle at which they are made and the depth of the cuts influences the rate of expansion and the formation of an “ear” - a raised flap of crust at the edge of a cut.
The pattern of cuts can create a pleasing visual pattern on the surface of the loaf. While there are some very traditional patterns, for example for baguettes, the baker can use the scoring pattern to identify the type of bread or to create an unique pattern that identifies the loaf as coming from his or her oven.
The effects of scoring on loaf shape are discussed in more detail below.
What do you use to score bread?
The blade used to score bread is often referred to as a lame (pronounced “lahm.”) This is simply a French word with means “blade.” Breads may be scored with straight or curved razor blades, either held in the hand or mounted on a handle. Scoring may be performed with other sharp, straight blades, even with a straight razor. Some bakers prefer serrated blades.
For some types of scoring, a straight blade is preferred. Straight bladed knives are preferred for cuts made with the blade held perpendicular to the loaf's surface. This sort of cut is generally used for round loaves (“boules”). For other types of scoring, a curved blade works better. Curved lames are generally used for long breads like baguettes which are scored with cuts parallel to the long axis of the loaf.
Video on Choosing a Blade: http://youtu.be/vF7eFluzHXc
How are the cuts made?
The scoring stroke should be firm, rapid, smooth and decisive. For the beginner, it may help to take “practice swings” or to visualize the movements and totally focus one's attention before making the cuts. Understanding the functions of scoring and the effects of the variables described can help, but there is no substitute for experience. In this respect, scoring bread is no different from an athletic skill or any other art or craft. (Tourist: “Please, sir, can you tell me how to get to Carnegie Hall?” New Yorker: “Practice, practice, practice.”)
The cuts should generally be 1/4 to 1/2 inch deep. A wet, sticky dough requires a more shallow cut than one would make in a dryer dough.
Scoring a boule (round loaf)
The angle the blade of the knife makes with the surface of the loaf is important in determining how the cut will open up. If you want the cuts to spread equally from the cut and to open quickly, as is traditional with round loaves (boules), the knife should be held vertically – at 90 degrees to the surface of the loaf.
Video on Scoring a Boule: http://youtu.be/gnL7mvR9wFg
Besides the “tic-tac-toe” pattern, boules can be scored with diamond patterns, simple crosses or much more elaborate and creative patterns.
Miche scored with a diamond pattern
Scoring a long loaf (bâtard)
If you want the cuts to spread more slowly and create an “ear,” as is generally desired with long loaves (baguettes and bâtards), the knife blade should be held at a shallow angle with the surface of the loaf, at about 20-30 degrees or so. Many find using a curved blade helps make this type of cut. The blade is held with the concave surface facing up (away from the loaf). A flap of dough is created that will lift up to create an “ear” as the loaf expands and, by lifting gradually, slows the expansion of the loaf. This prolongs the time during which new areas of dough are exposed to the direct heat of the oven and results in greater overall expansion – a larger “bloom.”
Video on Scoring a Bâtard: http://youtu.be/UC5HLCWAyMo
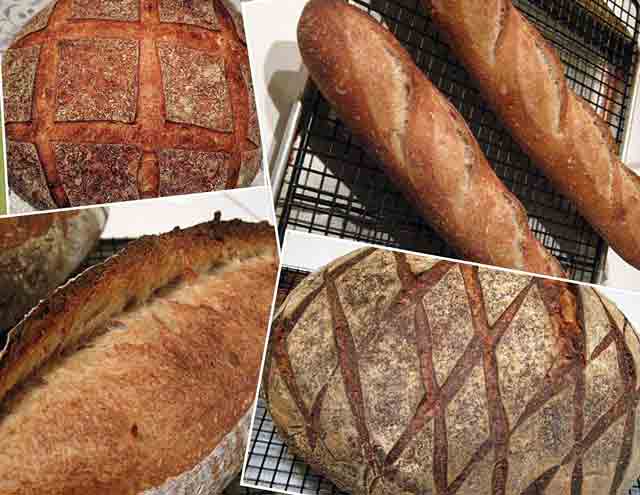
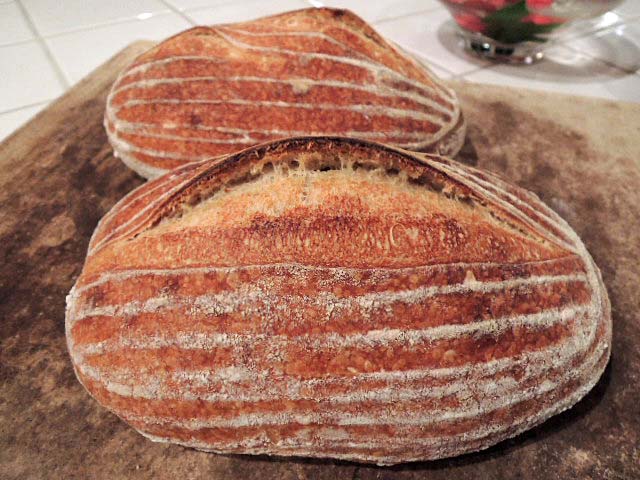
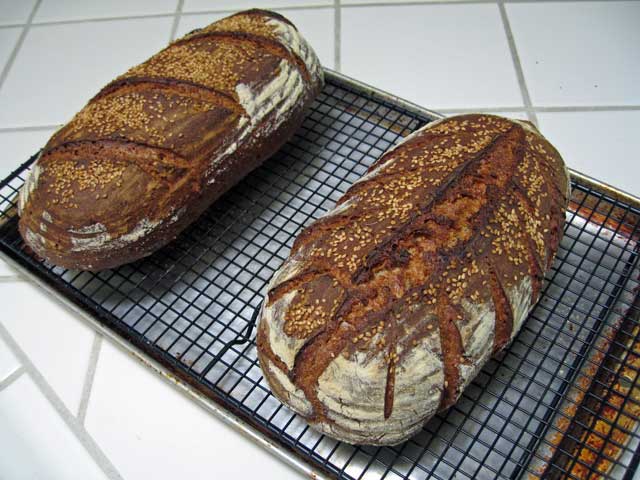
Bâtards
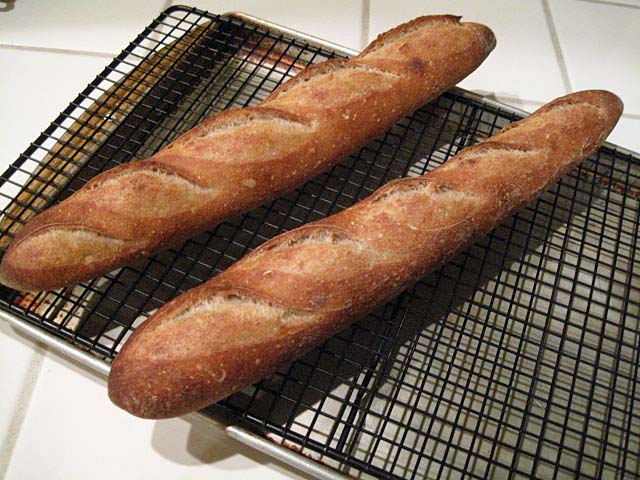
Baguettes
The effect of scoring on loaf shape
Michael Suas, in his book "Advanced Bread & Pastry," provides some information about how scoring patterns influence loaf shape. Scoring is not just to make a visually pretty design on the top of a loaf. It is also how the baker controls the direction in which the loaf expands. This impacts the shape of the loaf cross section (rounder or more oval), the height of the loaf and, for a boule, whether it stays round or ends up more oblong.
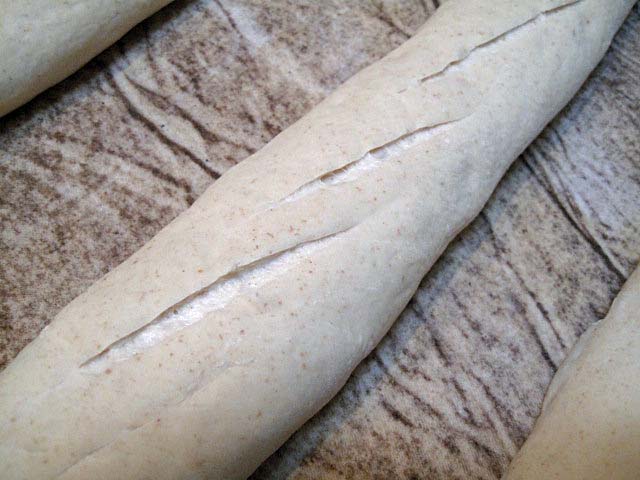
According to Suas, long loaves like bâtards and baguettes are traditionally scored parallel to their long axis. This may be a single long cut or multiple cuts that are almost parallel and overlap somewhat (for ¼ to 1/3 of their length, generally). This pattern promotes sideways expansion of the loaf, resulting in an oval cross section when the loaf is sliced.
Baguette showing overlapping cuts, almost parallel to the long axis of the loaf
For breads with high-rye content which have lower gluten and less oven spring, the traditional objective is to encourage a higher rise in the oven spring resulting in a rounder cross section. This is achieved by "sausage" or "chevron" cuts.
"Sausage cut" on the left. "Chevron cut" on the right.
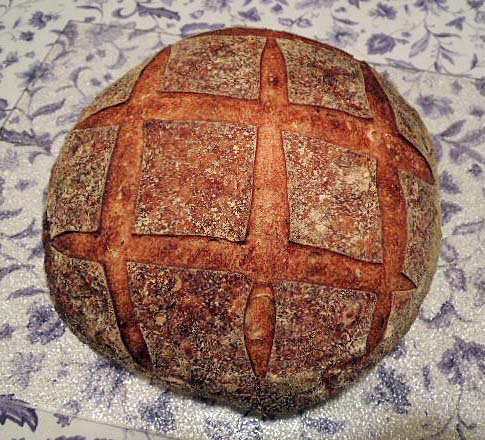
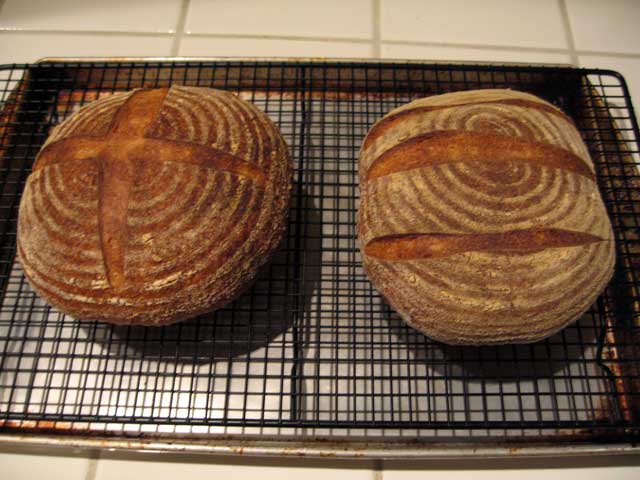
Boules are scored in a variety of patterns with differing effects on how the loaf expands. The common "tic-tac-toe" pattern and a simple cross will direct the expansion upward. More complex patterns like diamonds result in a relatively flatter loaf.
One of most interesting effects is that scoring a boule with multiple parallel cuts encourages expansion at a right angle to the cuts. This results in an oblong loaf shape.
Two boules scored differently. Note the effects of the scoring pattern on the final shape of the baked loaves.
What's the point of an ear? Controlled bloom!
This topic is not about the auricular anatomy of elves (or Vulcans). It's about scoring breads.
Scoring loaves creates a visually pleasing pattern, and it helps control the expansion of the loaf as it bakes.
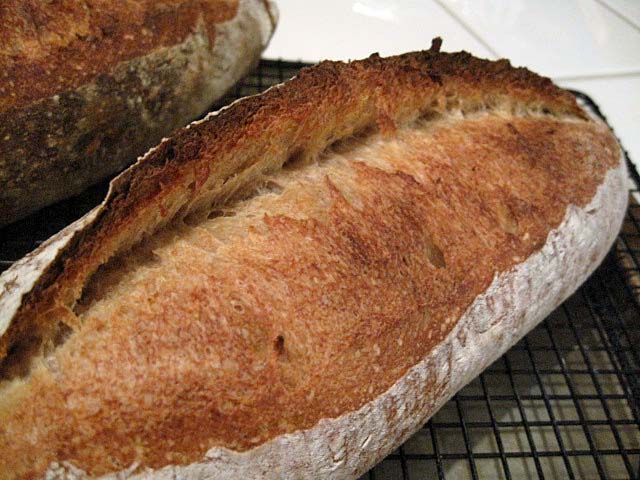
What Suas called "the classic cut" is parallel to the long axis of a baguette or a bâtard. The cut is made with the blade at a shallow angle to the surface of the loaf. The cut should be shallow - about 1/4 inch deep. Paradoxically, this shallow cut results in the flap lifting better than a deeper cut would, thus forming a nice "ear." Hamelman (pg. 80) points out that "a deep cut will simply collapse from its own weight."
The angle of the blade is important. "If the angle is not achieved and the cut is done with the blade vertical to the loaf, the two sides of the dough will spread very quickly during oven spring and expose an enormous surface area to the heat. The crust will begin to form too soon - sometimes before the end of oven spring - penalizing the development of the bread. If the cut is properly horizontal, the sides of the loaf will spread slower. The layer of dough created by the incision will partially and temporarily protect the surface from the heat and encourage a better oven spring and development." (Suas, pg. 116.)
These photos illustrate nice "ears," but they also show that the bloom occurred slowly, as it should. Notice that the color of the crust in the opening has 3 distinct degrees of browning, decreasing from right to left. The darker part on the right obviously opened first and was exposed to the direct heat of the oven for longer. If the bloom occurred too rapidly, it would have a more even coloration.
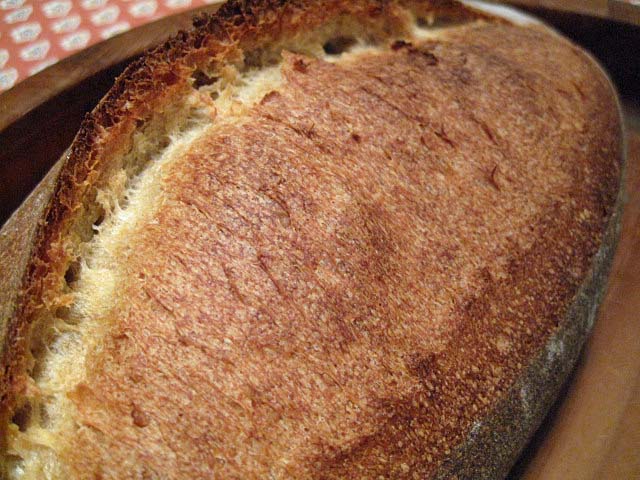
In summary, in order to achieve an optimal bloom in baguettes and bâtards, one must attend to 3 variables when scoring them:
The cuts should be almost parallel to the long axis of the loaf.
The blade should be held at about a 30 degree angle to the surface of the loaf.
The depth of the cut should be shallow - about 1/4 inch.
Variable shading of the bloomed crust confirms that the desired slow but prolonged opening of the cut during oven spring occurred.
A final word
This tutorial focused on the mechanics of scoring, but the other steps in bread making impact the behavior of the cuts you make and the final appearance of your loaves. In fact, every single step, from your choice of ingredients and their proportions – your formula – to how you steam your oven plays a role in how your cuts will open. Your best looking loaves will result from a series of choices that are mutually dependent, where how you score a loaf takes into account the other choices you have made about the formula, mixing, fermentation, shaping, proofing and baking.
Pound, pound, pound 'til the wheat berries were ground. Bounded by a creed to heed to the flavours of the grain, I pained and maimed my fingers, arms, and shoulders.
After nearly an hour of mortar-ing and pestle-ing, the seeds bled a fine sand of flour, blotched with bits and grits of bran and germ. And what did my efforts amount to? Just twenty-eight grams (or one ounce) of freshly ground flour.
And that's why grain mills exist.
Based on Peter Reinhart's "Transitional Country Hearth Bread" recipe from his book Whole Grain Breads, the above loaf contained a set of firsts:
My first time shaping a dough into a batard
My first time incorporating freshly ground flour into dough (albeit only 3% of total flour weight)
My first time converting my former rye starter to a white starter
My first time boldly baking a loaf until lightly charred
Look at those blisters, like bubbles in boiling water. Some of you may find this mesmerising. Others may think my loaf had succumbed to an illness---bread pox maybe?
Hoping that two parallel ears would form, I scored two cuts along the length of the dough. As you can see, it didn't turn out as expected. Perhaps my incisions weren't deep enough. Or perhaps my slashes weren't properly angled. Or perhaps both.
Well, that ain't right...
I was aiming for a slightly open crumb but what I got, it seems, was a tunneling effect. Was this the result of poor shaping or gluten degradation? I don't know, really. Moreover, the bottom crust was thin and pale brown. Evidentally, my baking stones (i.e., unglazed clay tiles) weren't hot enough.
The flavour profile:
After being cooled for more than twelve hours, the loaf had permeated my room with a deep, complex, and wheaty aroma. After sinking my teeth into the flesh of the bread---pleasantly chewy and slightly moist---I became grossly bewildered; my taste buds registered subtle sweetness and mild nuttiness. How was this possible, I pondered. This bread wasn't contaminated with sugar or nuts. Was it the freshly ground flour? Yes, it had to be!
As I chewed, savoury toastiness and a tinge of bitterness progressively unveiled itself, likely caused by the scorched crust. But wait, where was the tang? Reflecting on my past actions, I faulted my overfed starter and one hour bulk fermentation for the lack of piquancy.
All in all, it was a good loaf. Just a lil' more practice and I can perk up the flavours a notch or two.
:) Thanks for reading my post. Have a happy baking and wish you all the best,
Zita
P.S. Please feel free to input your tips and suggestions. It'd be much appreciated. Thank you in advance!
In keeping with my practice and hopeful improvement, I baked some more of David Snyder's SF Sourdough(using the 4th iteration of the formula). Today, I got some great oven spring on the batard even with my awful scoring -
Here's the bread after its bake with steam in the oven -