The Fresh Loaf

A Community of Amateur Bakers and Artisan Bread Enthusiasts.

Recent Blog Entries

peauters's picture
peauters

I've been lurking for a while, reading and digesting and I've been struck by how awesome the community is here and so I decided to start chronicling my new bread adventures.

My current bakes over the last couple of weeks have been:

  • The loaf from lesson one - this went down well with the missus, warm with butter.
  • Zolablues Cinnamon Rolls - These were amazing. Shared with a few friends. Didn't last 2 days!
  • Pretzels - These were ok, I definitely need to work on them
  • A couple of batches of Poolosh Baggettes from BBA, but shaped into smaller rolls. - These have been my lunch for the last couple of weeks. Awesome!
The current plan is to bake bread for my lunch, so I can enjoy some tasty rolls instead of dull shop board sandwiches!
I've started a couple of sourdough starters, which seem to be stumbling a bit. But hopefully they'll pick up soon so I can start one some sourdough rolls!
Anyway, Hi all! Hopefully I'll have some pictures in my next post.


txfarmer's picture
txfarmer

Sending this to Yeastspotting.

Click here for my blog index.

First, it's the ciabatta made with my usual 36 hour baguette dough (with higher hydration to be about 81%).

AP Flour, 425g
ice water, 330g
salt, 10g
white starter (100%) 150g


1. Mix flour and water into a lump of mass, cover and put in fridge for 12 hours. (let's say Thurs morning, takes <5 min)
2. Add starter and salt to the dough, use hand to mix until roughly evenly distributed. Note that the 100% starter here has two purpose: it's levaining power to raise the bread, AND it's extra water acts as the "2nd hydration" step.
3. Bulk rise at room temp (70 to 75F) for 2-3 hours until it grows about 1/3 in volume, S&F every half hour until enough strength has been developed. Put in fridge.
4. About 24 hours later, take out dough, if it has not doubled or nearly doubled, give it more time to rise at room temp. I usually have to give it about 1 to 2 hours, depending on temperature, which means the dough can probably be stored in the fridge for even longer than 24 hours.Do make sure it has a sufficient bulk rise, so the dough is strong enough; but don't let it go too long, the dough will be so bubbly that the shaping would be difficult - this is where you need to experiment with timing a lot.
5. Divide into 4 portions (which means these were 200g-ish ciabatta rolls), put on oiled parchment paper to proof. The beauty of ciabatta is that little shaping is required, however, I find that it still helps with crumb to lightly fold the edges over to make them into squares.

6. Proof until very puffy and expanded (about 1.5 hrs for me), take each one and flip over onto another parchment.

7. Bake each @460 for 18 min, the first 8 with steam.

Cut them horizontally, and they were perfect for juicy fillings

Cut it vertically, they were great for dipping into olive oil

Second one was made with this recipe: http://www.wildyeastblog.com/2007/08/27/overnight-ciabatta/

These are bigger than the 36 hour sourdough ones

dylemma's picture
dylemma

KAF Sir Galahad (AP) 95%

Fresh Milled Rye Flour 5%

Hydration 77%

Levain (25% of the flour is Whole Wheat, 100% hydration) 25%

Salt 2%

Using the "Tartine" method, I refreshed a mature starter with 90 degrees F water, and inocculated it 20%.  After 2.5 hours mixed the levain, 85 degrees F water and flours.  Autolyse for 30 minutes, then added the salt. The dough temperature ended up at 81 degrees F.   Two stretch and folds each hour for the first 2 hours, let sit until 25-30% rise.  Pre-shaped and benched for 30 minutes.  Shaped, placed in baskets and counter proofed for 1.5 hours. Then onto a 39 degree F retard for 17 hours.

The crust was thick and chewy, the crumb was soft and slightly sour.  Why only 5% rye you might ask, because my kids are always on the look out for "brown bread" and won't touch it.  So I figured I will slowly increase the amount as time goes by.    

-Derek

trailrunner's picture
trailrunner

My husband and I grew up in New Orleans. It is a tradition to use up the rich fat foods on this day, the day before Lent begins. Buttermilk pancakes were the order of the morning. We have a vintage griddle from early in our marriage...42 years this past Friday. Husband made his wonderful buttermilk pancakes. I sliced the berries and my best friend had sent me 2 jars of his homemade maple syrup from his trees in Wisconsin. What a great way to start the day and to savor our rich lives. c

punkchef77's picture
punkchef77

Isand66's picture
Isand66

  Stranded in my house for another day since Nemo swamped Long Island with 20 -30 inches of snow I needed some more bread to eat. I decided to make some nice soft and tasty rolls that will be great for sandwiches and/or snacking.

I had some left-over starter from my last Cherry Sourdough Bread so I decided to combine that with some of my AP starter along with some cream cheese, milk, butter, maple syrup for some sweetness and assorted flours.

I have to say the rolls came out great and I already ate 2 before dinner! I need to build up my strength for an early AM drive to the train station to trek into the city. Normally this would not be a big deal, but I'm afraid it may take me longer to drive to the station than the actual train ride to Manhattan.

I used multiple toppings including toasted onions, cheese powder and poppy seeds but these rolls will work with just about any topping you desire.

Directions

The night before refresh your starter and if you have some oat flour make an additional starter using 50% oat flour to bread or AP flour. The oat flour starter was kept at 100% hydration while my AP starter was at 65%.

You need to have a total amount of starter at 375 grams.

Main Dough Ingredients

200 grams AP Starter at 65% hydration

175 grams Oat Flour Starter at 100% hydration

300 grams Sir Lancelot High protein Style Flour (you can substitute bread flour if necessary)

112 grams Durum Flour (KAF)

100 grams White Rye Flour (KAF)

102 grams Cream Cheese softened

50 grams Unsalted Butter (cut into pieces and softened)

16 grams Seas Salt or Table Salt

30 grams Maple Syrup or Honey

353 grams Milk (I used 2% but you can use which ever you prefer) at room temperature

Procedure

Mix the flours, maple syrup and 300 grams of the milk together in your mixer or by hand until it just starts to come together, maybe about 1 minute. Let it rest in your work bowl covered for 20-30 minutes. Next add the salt, butter, starters and cream cheese and mix on low for a minute. Add the rest of the milk unless the dough is way too wet. Note that the dough should be rather moist so don't be afraid to add the rest of the milk. Mix on low-speed for another 3 minutes. Remove the dough from your bowl and place it in a lightly oiled bowl and do several stretch and folds. Let it rest covered for 10-15 minutes and then do another stretch and fold. Let it rest another 10-15 minutes and do one additional stretch and fold. After a total of 2 hours place your covered bowl in the refrigerator and let it rest for 12 to 24 hours.

When you are ready to bake remove the bowl from the refrigerator and let it set out at room temperature still covered for 1.5 to 2 hours. Remove the dough and divide into around 10-12 pieces depending on the size of your rolls and form them as desired. Place them on a parchment lined sheet pan and let them rest.

Cover them with a moist tea towel or sprayed plastic wrap for 1.5 to 2 hours. Around 45 minutes before ready to bake, pre-heat your oven to 500 degrees F. and prepare it for steam. I have a heavy-duty baking pan on the bottom rack of my oven with 1 baking stone on above the pan and one on the top shelf. I pour 1 cup of boiling water in the pan right after I place the dough in the oven.

Before putting the rolls into the oven, apply an egg wash and your favorite toppings.

Place the pan with the rolls in the oven, add the boiling water or which ever method of steam you prefer and lower the temperature to 450 degrees. Bake for 20-30 minutes until the rolls are nice and brown.

Take them out and let them cool on a bakers rack for at least an hour before eating.

dabrownman's picture
dabrownman

I joined in on The 3 Twisted Sister’s GMA bake this week to do a Valentine Rose.  The premise was to do Vienna bread dough and make it into a Valentine Rose somehow.  The GMA’s posted their fine examples yesterday so this was a tough act, all 3 of them, to follow.  But, we had the last of our left over panettone to use up and on our side.


There were all kinds of new things for us on this bake.  We have never made a Vienna bread before and was sort of taken back by the sugar, egg, fat and milk in most of the recipes on the Internet.  It was sort of Challah like when it came right down to it.  There are some recipes out there without all of these enrichments but if you can use them all – why not?


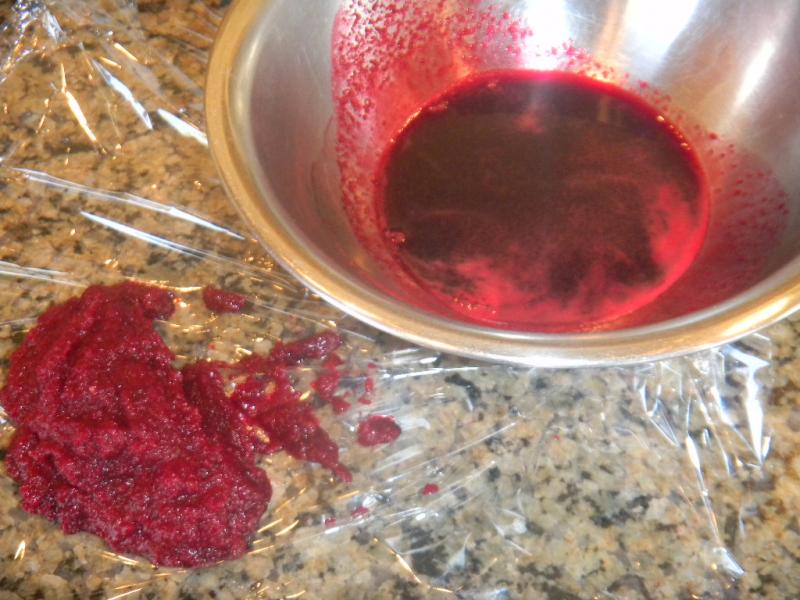
We wanted to put our own twisted outlook into this bread so we decided to take it pink and savory only to change our mind later, after the savory was in, to take it sweet too.  The pink came from slicing ¼ of a beet and putting it into the mini chopper with 50 g of water and having the mini chopper do its best to liquefy it.  After straining, we were left with some really beet red juice and some red beet pulp.


We mixed the beet juice with the water for the dough and it ended up making a pretty as pink dough.  The beet pulp we sautéed with some beet greens and a clove of garlic to use for the filling in the rose roll-up thinking savory was the way to go and the red and green filling would be nice in this bread.


Then at the last minute Red Velvet Cake into my apprentices brain somehow and she thought that the dough was more sweet than savory and some cocoa powder and sugar added to the filling would make it taste more red velvety.  She also thought that some chocolate chips would also be a good addition to the filling since she and most ladies know roses and chocolates are the bare minimum for Valentines day.


I went ahead with Lucy’s recommendations wondering how the savory beet greens, beet pulp and garlic would jive with the chocolate and sugar.  We added a mix of whole grains, to the leavain only.  It was our usual rye, spelt, Kamut and whole wheat  and got the whole grains up to nearly 20%.


While the last feeding of the levain was ongoing, we autolysed the rest of the ingredients sans filling for 3 hours.  Once the autolyse and the levain came together we did 10 minutes of French slap and folds and then let the dough rest for 20 minutes before performing 3 sets of French folds on 20 minute intervals. 


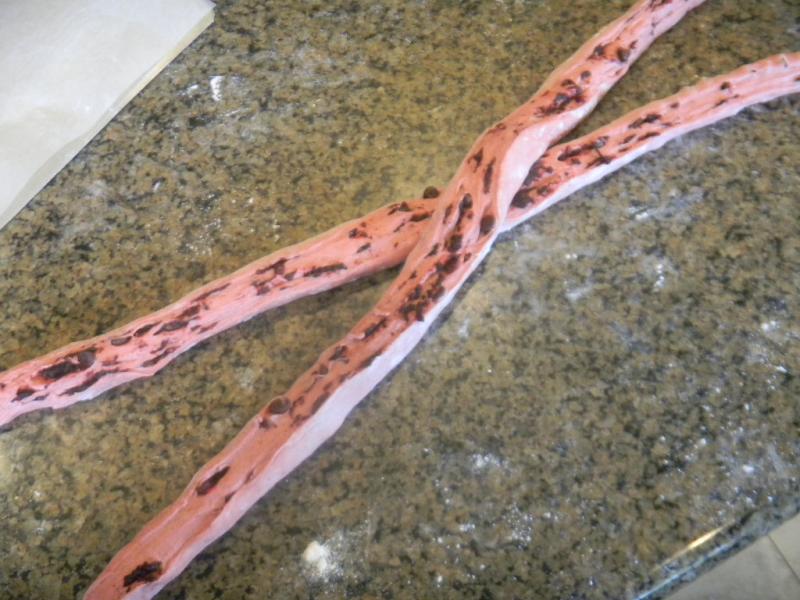
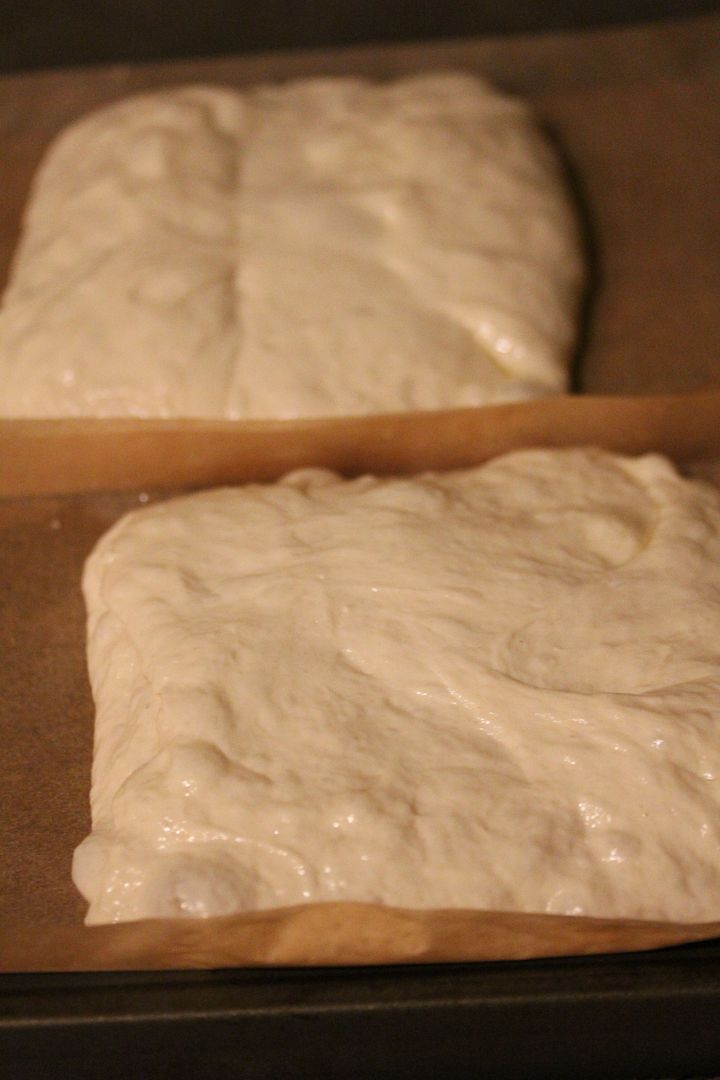
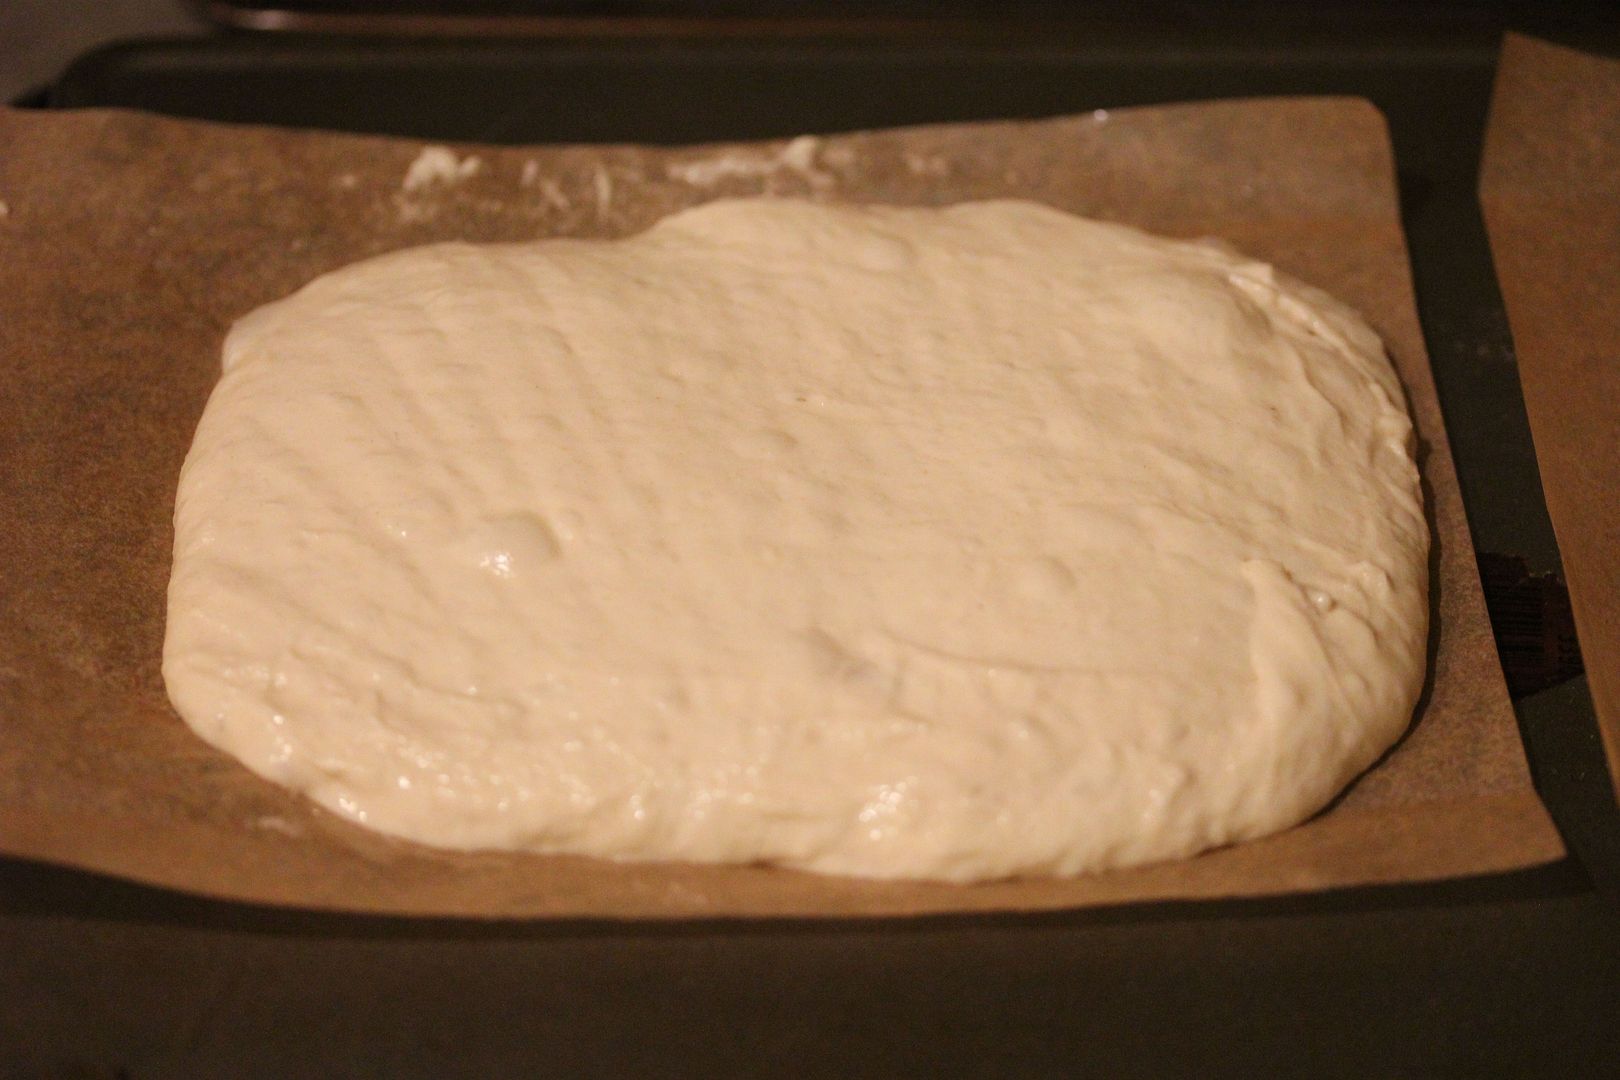
After the last fold we allowed the dough to rest 10 minutes before dividing it in two and rolling each out to 10” x 18” rectangle.  We brush each with melted butter first then sprinkled on the beet green and pulp, sugar and cocoa mix followed by the chocolate chips.


We then rolled it up from the wide end, pinching the seams and ending up with a rope 18” long.  After finishing the 2nd rope, we split each with a paring knife down the middle ending up with 4 rope halves.


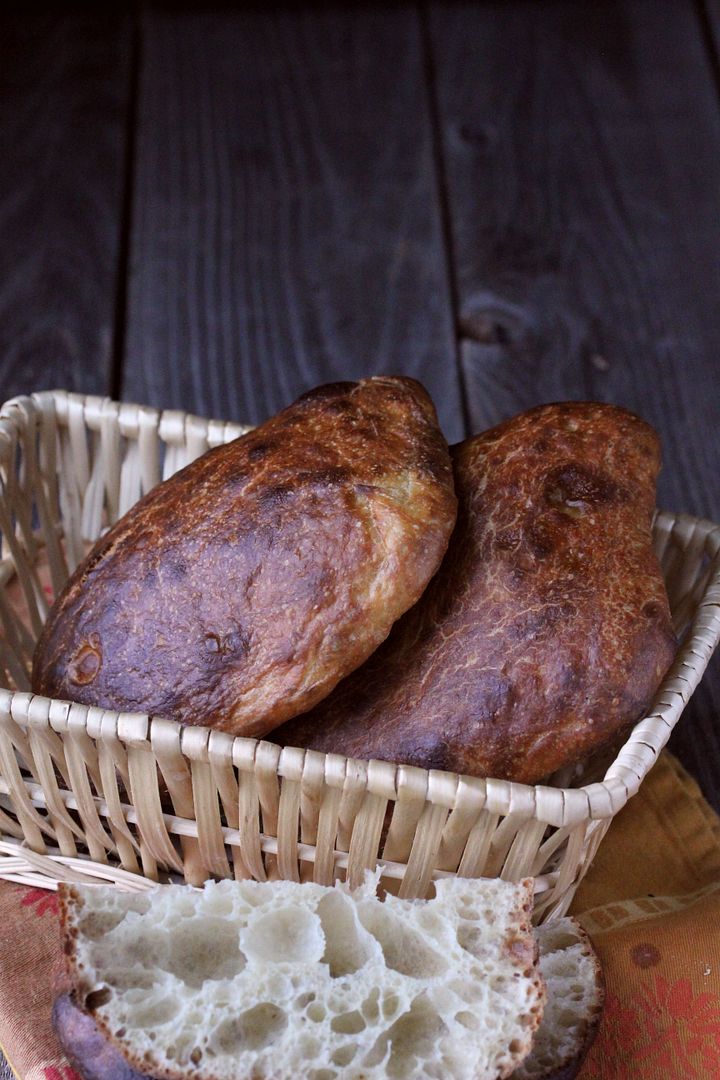
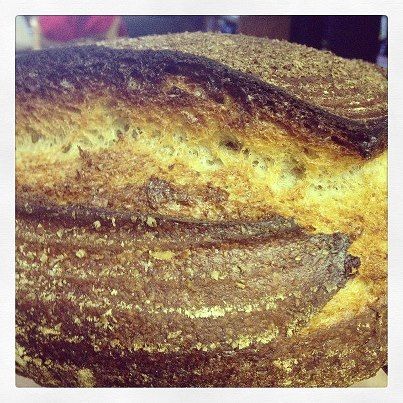
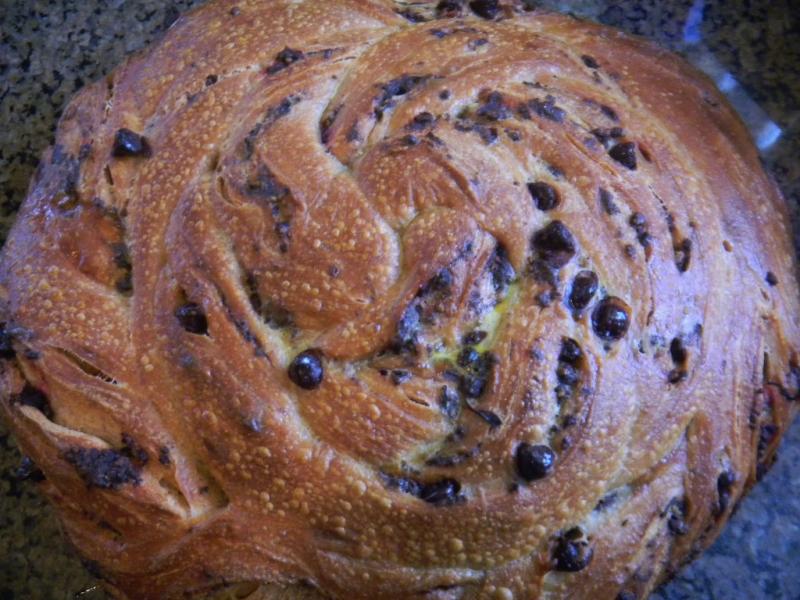
Two of the rope halves were crossed in the middle and then braided each direction making sure to keep the cut side up.  Once the other 2 half ropes were braided together, each of the 2 braided ropes were placed on a baking sheet covered in parchment by coiling each in a snail shape, one following the other, again trying to keep the cut sides up.  The result was one fairly big pink rose.


We let it proof on the counter for 90 minutes in a plastic trash can liner before refrigerating it for a 12 hour retard.  The next morning the rose was allowed to warm up and final proof for 4 hours before being brushed with an egg wash and going into the 425 F baking stone for 10 minutes of steam.  We used a combo Sylvia’s steaming pans and David’s 12” Iron skillet with lava rocks for the steam.


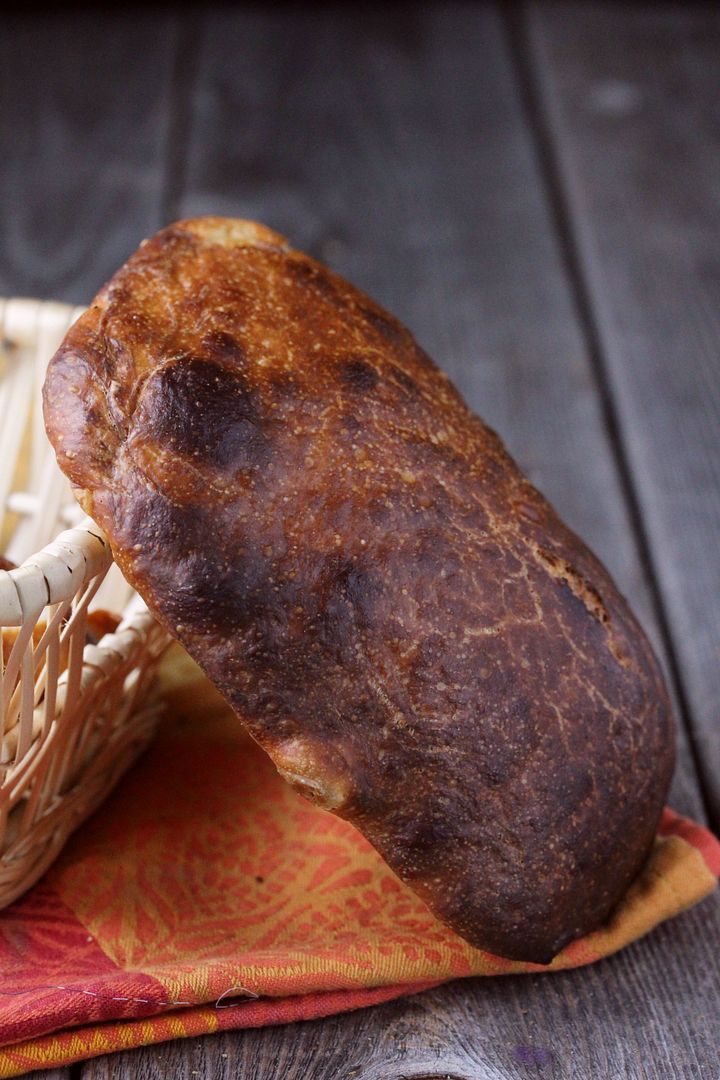
The rose had expanded nicely while doing its final proof but it also sprang very well in the oven too.  After 12 minutes the steam was removed and oven turned down to 350 F, convection this time.  The bread was turned on the stone every 8 minutes to ensure even baking.  The rose reached 205 F and we turned off the oven with the door ajar to allow the crust to further crisp on the stone for 8 more minutes.


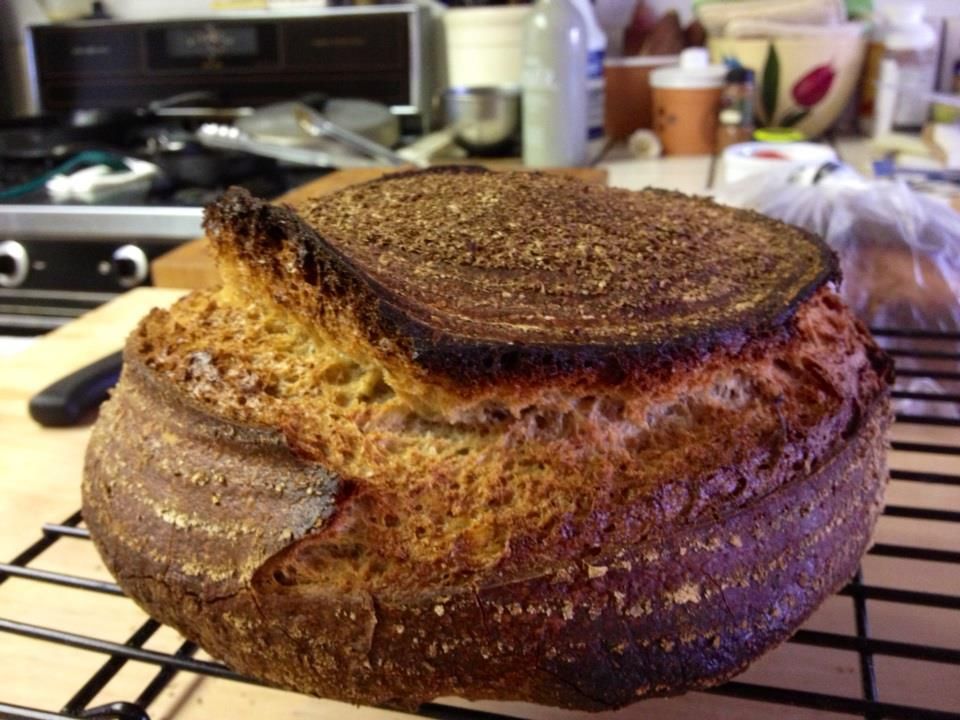
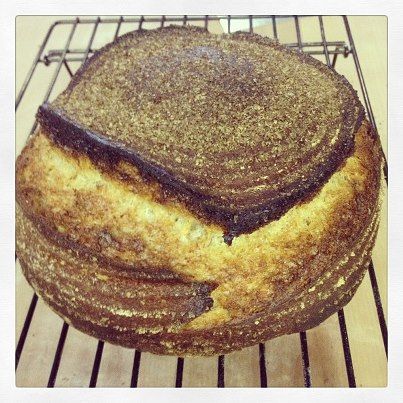
The rose was removed from the oven to the cooling rack.  Total baking time was 30 minutes – 12 minutes of steam and 18 minutes without plus 8 minutes resting on the stone for 38 minutes total.  The rose browned nicely due to the egg wash.  It is nice looking rose where we hope the pink survived under the crust but, we will not know for a couple of hours.

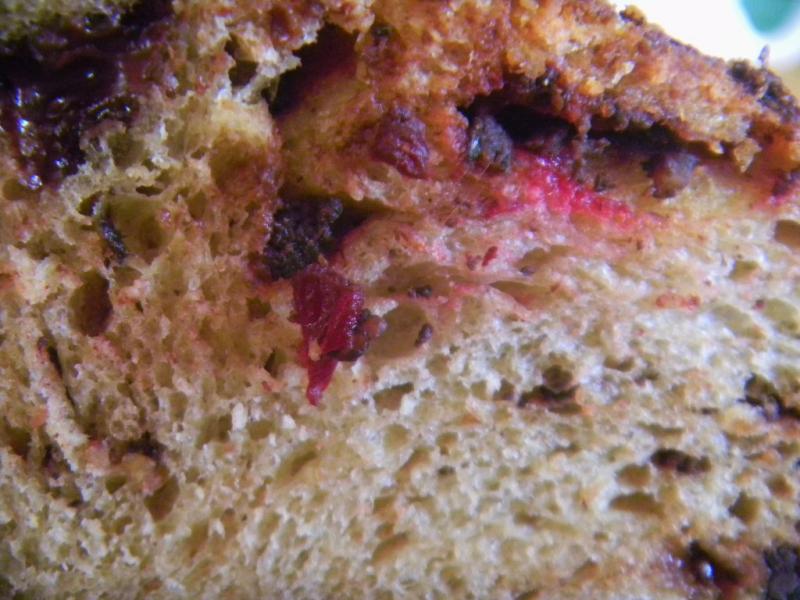
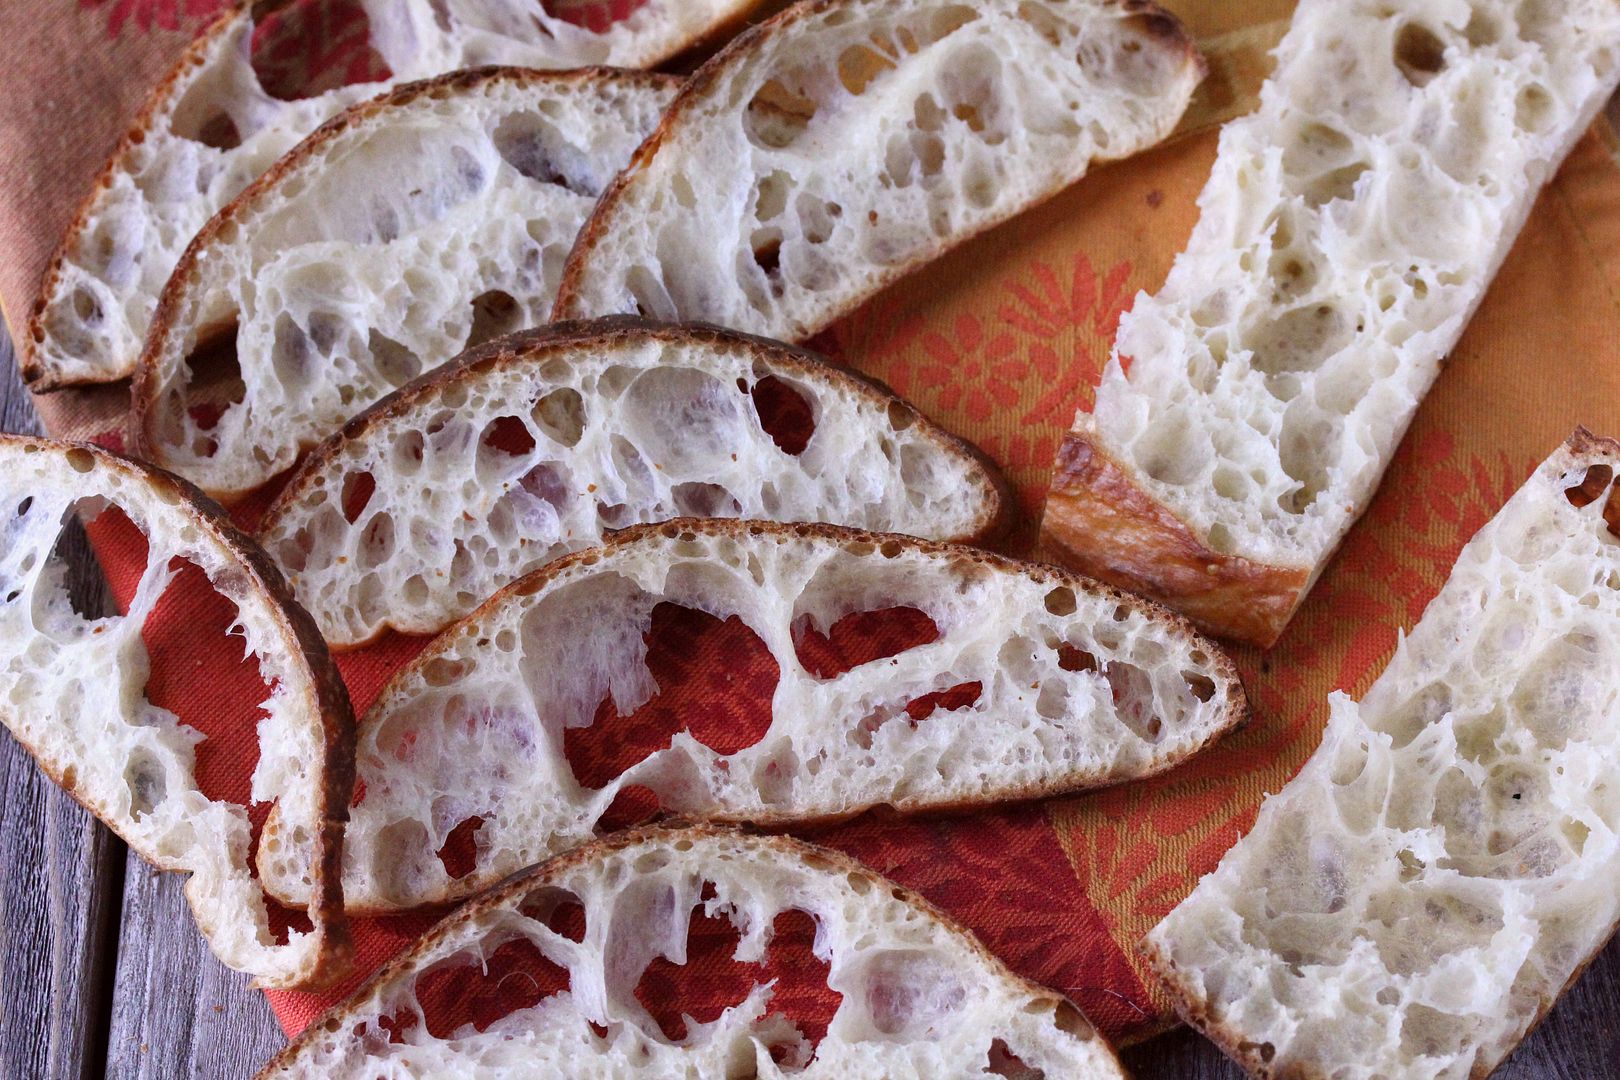
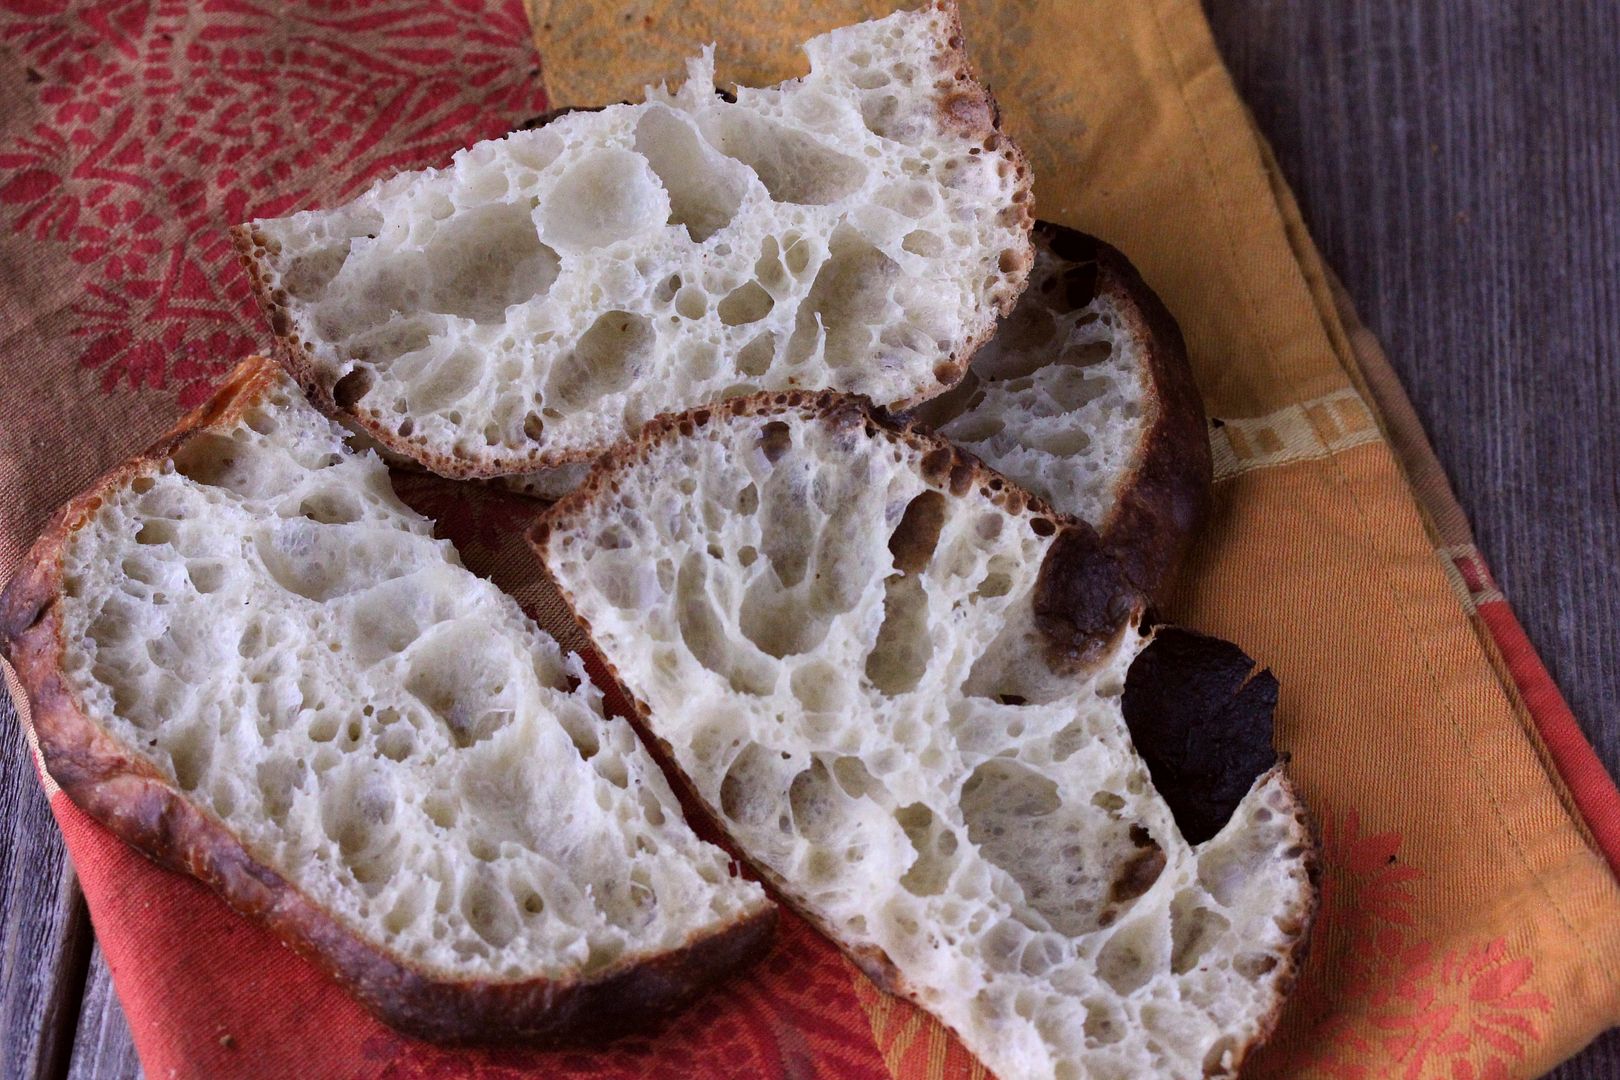
This bread turned out to be shocking 3 ways.  One, the pink dough went away with just some red where the beet pulp and leaf saute was incorporated - I was robbed!  Two, you can't taste any beet either - not a trace - nor the garlic either.  Three, this bread tastes wonderful as a sweet chocolate bread. So if you want the pink to stay, put in some red food coloring :-)

The crumb is so soft, moderately glossy and fairly open.  Where the yellow tinge in the crumb came from is strange since it is  coming from a definite pink.  I guess the egg and butter finally won out ?  I love the taste of this bread but I also want tomake a straighten up Vienna bread without the goodies added in.  It also has to be a fantastic bread on the sweet side.

Formula

Starter Build

Build 1

Build 2

Build 3

Total

%

WWW & AP SD Starter

13

0

0

13

1.82%

Kamut

6

6

12

24

3.37%

Spelt

6

6

12

24

3.37%

Dark Rye

6

6

12

24

3.37%

Whole Wheat

6

6

12

24

3.37%

Water

24

24

48

96

13.47%

Total

61

48

96

205

28.77%


SD Starter Totoals


%


Flour

102.5

14.39%


Water

102.5

14.39%


Starter Hydration

100.00%


Levain % of Total

15.89%


Dough Flour


%


Red Malt

10

1.40%


Bread Flour

300

42.11%


AP

300

42.11%


Total Dough Flour

610

85.61%


Salt

10

1.40%


Beet Infused Water

320

44.91%


Dough Hydration w/o starter

52.46%


Add - Ins


%


Sugar

40

5.61%


Egg

50

7.02%


NF Dry Milk powder

15

2.11%


Butter

40

5.61%


Total

145

20.35%


Total Flour w/ Starter

712.5


Beet Infused Water 320 & Water

422.5


Hydration w/ Starter & Adds

65.68%


Total Weight

1,510


% Whole Grain

19.30%


Chocolate Chips

100


Beet, Almond & Cocoa Filling

120


Filling is sauted beet leaves, 2 tsp ea cocoa & sugar


35 g of almond meal & left over beet juice pulp


Mebake's picture
Mebake

It has been a while since i have posted any thread, baked any bread, or joined in any conversation with the TFL community. 3 months have elapsed since the day i had my spine fused, and i now feel good, and have recuperated enough to be able to bake bread again.The bread shown is one of my favorites: Hamleman's Whole Wheat Multigrain.

As far as pain, it is mild, yet tolerable. I have removed the brace now, so i can bend easily.

It is worth mentioning that i had kept my BDS (aka Baking deprivation syndrome) at bay by engaging in yet another addiction (like i need one). I have sketched away for days and weeks, and sought to increase my skills at drawing/digital art, and have been pleased with the results. Anyway, enough about me, and here is the bread:

With soaked millet/buckwheat/roasted sunflower seeds/Flaxseeds, and wholewheat freshly milled at home, this bread is mindblowing! Superior to any multigrain bread i have tasted.

I'm glad to be back!

Khalid

linder's picture
linder

A month ago, the three gmas baked a great looking lemon anise seed tea loaf from Dan Leader's book 'Bread Alone'.  Having lots of lemons and being a lover of all things anise (including anisette), I decided to bake a loaf for us to have with tea in the evenings.  I up'ed the lemon flavor by adding a teaspoon of limoncello to the lemon and simple syrup glaze.  Haven't cut into it yet, but it makes a very big loaf of tea bread.  It is baked in a 9 x 5 inch loaf pan and rises in the oven to fill the loaf pan to the very top.  In baking this, however, I did find the 30-40 minute baking time quite optimistic, mine wasn't done until an hour had passed in the 350F oven. 


Wingnut's picture
Wingnut

Messing around..........

Good Crumb, nice sweet nutty flavor with just a hint of sour.

Cheers,

Wingnut

Pages

Subscribe to Recent Blog Entries