The Fresh Loaf

A Community of Amateur Bakers and Artisan Bread Enthusiasts.

Recent Blog Entries

Mebake's picture
Mebake

Yesterday, i was meaning to bake Hansjoakim's (a TFL member) Pain au levain with Rye sour, but changed my plans at the last moment. I stared at the Ripe Rye sour sitting in the bowl and thought of possible alternatives to my intitial recipe. I wanted a 100% wholegrain bread so I browsed through the bread books i have and found that most recipes needed a soaker of some kind, which i had none. I decided to improvise and bake some bread with my whole wheat and whole rye flours. I weighed the sour and calculated the required flour and water to arrive at a medium loose consistency dough at 75% hydration. It is 22% fermented flour, all of which is whole Rye flour.

Ingedients:

Starter:

412 grams Rye sour (200g water, 200g Whole Rye flour, 12g rye starter)

Dough:

700 grams Whole Wheat flour (finely ground)

480 grams water

Starter above

1.5 Table spoon salt

Total Dough weight: 1605 grams 

I mixed all the ingredients incuding salt using my mixer, made a dough of medium softness, rested it for 5 minutes, and finished mixing it at speed 2. The dough was rounded and left to ferment for 2 hours. The dough fermented very slowly, if at all, and on hour 3 i lost all hope and knew that it would be an unpleasently sour bread had i left it to ferment more. I have learned yesterday that a rye sour will not do quite well with wholewheat flour, as opposed to white wheat flour (as is the case with Hans' recipe - which contains some rye flour in the final dough too).

I decided to add instant yeast, and i'm glad that i did. I spread the dough to a rectangle and dissolved 3 tsp of IDY in water and poured it on top of the dough, i then kneaded the yeast in until it diappeared.  The bread rose in 1.5 hours, shaped and fermented for 1.5 hours in my bread pan.

The bread's crumb is medium soft, and the crumb is soft and slightly moist. the flavor is very good, with a nice sour tang with each bite. The Rye sour really came through

A really good save, and a lovely wholesome result.

Khalid


dmsnyder's picture
dmsnyder

Somehow, I had overlooked the formula for Whole Wheat Multi-grain bread in Hamelman's Bread. Thanks to Khalid (Mebake) for calling it to my attention! When he named it his favorite bread, I knew I had to try it.

This is a 50% whole wheat bread made with a liquid levain and added instant yeast. It has a soaker of mixed grains and seeds. I found I had to add about 15 g of water to the dough during mixing to achieve a medium consistancy. 

The dough weighed a bit over 2 kg. My wife has been wanting some soft, whole wheat rolls for sandwiches. I thought this formula might make rolls she would like, so I made four 3.5 oz rolls in addition to two 840 g bâtards.

I baked the rolls first at 480 dF for 12 minutes and cut one for sampling. It had a sweet, wheaty flavor. The crust softened with cooling. The crumb was firm and chewy. My wife judged it suitable for its intended purpose. 

The bâtards were baked at 460 dF for 15 minutes. At that point, the crust was already getting dark. I lowered the oven temperature to 415 dF and baked for another 23 minutes.

The bâtard crust was somewhat crunchy. The crumb was more open and more tender than that of the rolls.

The flavor of the bâtard was more complex than that of the roll. It has no perceptible sourness and a slightly sweet, wheaty flavor like the roll. It is indeed a delcious whole wheat bread and one I will definitely make again. I expect it to make wonderful toast and sandwiches.

Thanks again, Khalid!

David

kiki's picture
kiki

I baked W-chocolate campagne for valentine.

Cocoa campagne  with lots of big chunk of bitter chocolate, cranberry and orange peel.


I love the combination of chocolate and fruit....the multiplication  enrich the chocolate flavor!


best,

kiki

varda's picture
varda

Last week, I had to go out during a bake, and didn't expect to get back in time for shaping.   Usually I would have placed the dough in the refrigerator to suspend operations during my absence, but in the spirit of experimentation, I decided to leave it on the counter in a 70degF kitchen.    When I got back the dough was very soft and bubbly, and I was afraid overfermented, so I shaped (not that easy given how full of gas it was) and proofed but cut the proof short (45 minutes) as I was worried about losing the whole bake.    Long story a little shorter, I underproofed it significantly and got an exploding loaf.    But an exploding loaf with a boatload of flavor.    Today I decided to retrace these steps, but with a normal proof.   I observed two differences between today's loaf and last week's.    One is today's loaf expanded normally in the oven, and two, the crumb isn't nearly as open.   Same rich flavor though.  

And now, the real reason I wanted to post:

I love this bowl.   It was a poor unwanted reject at the Kohl's housewares sale.   It has a crack in the bottom.    I never grabbed anything off the shelf so fast.    Perfect.   Just perfect.

But back to bread.

Formula and method:


1st feed

2nd feed

Mix


2/15/2013


4:15 PM

10:00 PM

9:30 AM


Seed

41


KAAP

23

75

96

194

95%

Whole Rye

1

5

4

10

5%

Water

17

55

68

140

68%


344

8.4

2/16/2013

Final

Starter

Total

Percent


KAAP

200

141

341

57%


Whole Rye


8

8

1%


Golden*

250


250

42%


Water

300

101

401

67%


Salt

12


12

2.0%


Starter

250


0.73


1012


Autolyse flour and water for 45 minutes


Add salt and starter and mix until smooth and supple

(Speed 1 around 10 minutes)


BF 45 minutes


S&F


BF 3 hours


Shape into boule and place in bowl


Proof until soft but still a bit springy


Bake at 450F with steam for 20 minutes


without for 22


 * See this post for description

hanseata's picture
hanseata

10/7/18 This post has been updated to include a sourdough starter here

Facebook friend and co-baker David Wolfe asked me to help him understand some terms in a German recipe. Google translate (always good for a laugh!) is not too fluent in professional German baking lingo.

The formula, published by a German bakers' association, Bäko Gruppe Nord, seemed quite intriguing, combining rye meal and cracked wheat with mustard and cheese. The amounts, of course, were calculated for a commercial bakery (19 kg/43 lb), as were the instructions.

My curiosity was wakened, especially after I saw David's appetizing photos in his blog "Hearth Baked Tunes" so I downsized the formula for two small loaves.

The original recipe requires 16% of the white flour as preferment, all the remaining flour, including the coarse grinds, is worked into the final dough. The breads are baked "bei Brötchentemperatur" ("at roll temperature") - leaving hapless hobby bakers clueless as to what that might be.

But I don't donate for nothing to Wikipedia, a quick research at the German site showed me the light: the breads were to be baked at 465ºF/240ºC.

Since I'm a friend of long fermentation (also from a physician's point of view,) I re-wrote the procedure from using just a small amount of preferment,  to preferment plus soaker for the coarse ground rye and wheat, as well as an overnight bulk fermentation.

I can honestly say I never noticed a difference between adding the salt with all the other ingredients, or adding it later to the almost finished dough, as the recipe stated. Peter Reinhart (my guru) mixes everything together at the same time, and I do, too.

For the cheese you can choose between Gouda or Tilsiter. I don't care for stinky cheeses, so I went for the Dutch. Though the recipe didn't specify what kind, I was sure that middle aged cheese (18-month) would work better, as I use it for gratins. Young Gouda is too mild, and really old Gouda unnecessary expensive.

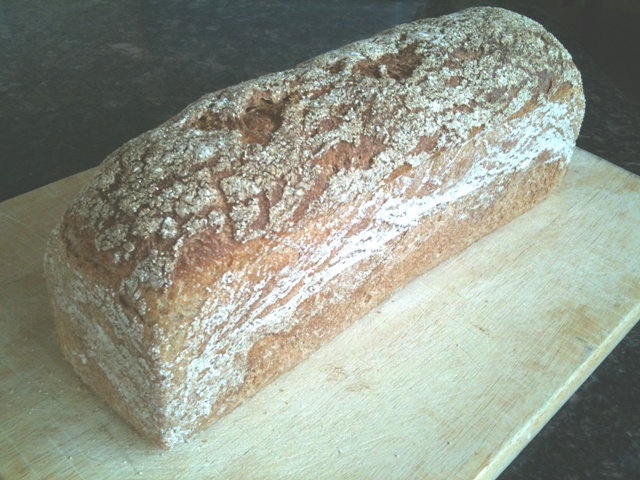
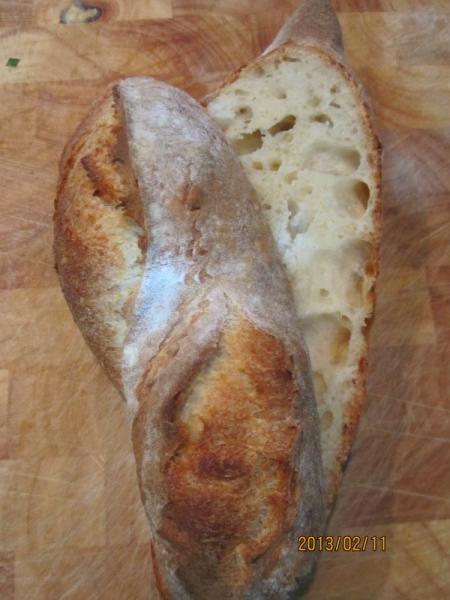
I was very pleased with the result, a beautiful red golden bread, covered with seeds, with a pleasant spiciness, but not too much. It tasted great with cold cuts, and was a wonderful surprise when toasted: a bread with in-built grilled cheese!

The crumb has a nice yellow color from the mustard


SENFBROT - MUSTARD BREAD  (2 small loaves)

 Preferment

140 g/5 oz bread flour

  84 g/3 oz water

    1 g/ 1/4 tsp. instant yeast

    2 g/0.12 oz salt


Soaker

104 g/3.7 oz wheat meal, coarse

  70 g/2.5 oz rye meal

130 g/4.4 oz water

    3 g/0.12 oz salt


Final Dough

all preferment

all soaker

556 g/19.6 oz bread flour

  15 g/0.5 oz instant yeast

  16 g/0.6 oz salt

408 g/14.3 oz water

  66 g/2.3 oz mustard

122 g/4.3 oz middle aged Gouda (18 month old), coarsely grated or cut in chunks

 mustard for brushing

sunflower or pumpkin seed for topping (I used pumpkin seed)


After shaping the loaves are brushed with mustard - I used a medium-hot one from Düsseldorf

DAY 1:

In the morning, mix preferment and soaker. Leave at room temperature until using.

In the evening, mix all final dough ingredients at low speed (or by hand) for 1 - 2 minutes, until all flour is hydrated. Let rest for 5 minutes, then knead at medium-low speed (or by hand) for 6 minutes, adjusting with a little more water or flour, if necessary (but beware: dough should be somewhat sticky, clearing only sides of bowl, but stick to bottom!)

Transfer dough to a lightly oiled work surface. With oiled hands, stretch and pat it into a square, first fold top and bottom in thirds, like a business letter, then do the same from both sides.

Gather dough into a ball, place seam side down into a lightly oiled bowl, cover, and let it rest for 10 minutes.

Repeat S & F 3 times, at 10 minute intervals. After last fold, place dough in lightly oiled container with lid and refrigerate overnight. (I divide the dough at this point already in halves, and refrigerate them in two containers.)


DAY 2:

Remove dough from fridge 2 hours before using.

Preheat oven to 465ºF/240ºC, including baking stone and steam pan. Place seeds for topping on a plate.

Shape dough into 2 boules, brush them with mustard, and then roll them in sunflower or pumpkin seeds.

Place breads, seam side down, on parchment lined baking sheet, and proof, until they have grown 1 1/2 times their original size.

Bake for 15 minutes, steaming with 1 cup of boiling water. Remove steam pan, and rotate breads 180 degrees.

Reduce temperature to 210ºC/410ºF,  and continue baking for another 25 minutes, or until breads are a deep reddish brown, sound hollow when thumped at the bottom, and register at least 200ºF/93ºC.

Let breads cool on a wire rack.


After brushing the loaves with mustard, they are rolled in pumpkin seeds.

Submitted to YeastSpotting

pmccool's picture
pmccool

Today was, well, not your ordinary Saturday.

Instead, the morning was spent in the company of 9 beginning bakers, ages 5-9 (and their adult "assistants").  Off-hand, I'd estimate more of the bakers were closer to the age 5 end of scale.  There were three dad/daughter combos, a couple of grandmothers with grandson or granddaughter, and the rest were mom and child.  All in all, some really nice kids.  We baked two different breads; one a cheese and onion scone (some opted not to use the onions) and the other a Cape Seed Loaf.  

One of the things we talked about was the importance of bubbles, and how those make the difference between a risen bread and a flatbread.  We talked about how sometimes we make bubbles in bread using a reaction between baking powder or baking soda and some kind of acid (a la the scones), and how we let growing plants (yeast) make the bubbles for us (as in the Cape Seed Loaf).  And we covered a lot of other territory, too.  Like, "What do you do when you make a mistake?"  Luckily, I had a real-life mistake to point to: someone, probably the assistant I have yet to hire, had forgotten to include the onions in the scones that were baked for demonstration and snacking purposes.  That gave us the chance to talk about how mistakes can often be corrected or, if they can't, that they usually taste good anyway.  And it gave a good segue to talk about mise en place.  Lots and lots of teachable moments.

After I demonstrated the scones, including the kind of textures that they should be looking for, the chef/assistant teams took their places at their work stations.  The kids had fun cutting the butter into the dry ingredients for the scones.  Some also plunged hands-first into mixing in the buttermilk/egg mixture with nary a thought of "Ooh!  Icky!"  And no, that wasn't just the boys.  One young chef said she would prefer not to cut up the dough into scones, so we baked hers as a bannock.  Once we bundled all of the scones into the ovens, we took a breather to talk about what we had just done and to answer some questions.  Someone asked about oven temperatures and their effects.  Once again, we drew on a real life example (not a mistake!) to show how the scones that were baked on the bottom shelf of the oven were darker than the scones baked on the middle and top shelves of the oven, indicating that that specific oven was hotter at the lower level than it was in the upper levels. 

From that, we moved to a demonstration of the Cape Seed Loaf, which is simplicity in itself.  Though yeasted, it is a batter bread.  All one has to do is mix everything together, scrape it into a greased baking pan, let it rise 20-30 minutes, then bake it.  Because of time restraints, the young chefs needed to bake the bread at home.  Two who weren't able to do so simply mixed all of the dry ingredients together and bagged them for later final mixing and baking.  For the others, we made sure to mix the batter with ice water to slow the yeast growth, which, I hope, gave them time enough to get home to bake the bread before it over-proofed.

It was a very busy, active morning.  I'm interested to see if the hockey game we will go to with friends this evening will be as stimulating.

Paul

jgmathis23's picture
jgmathis23

Here's something probably a thousand people on this site have figured out before me, but just in case someone hasn't thought of this yet:

The problem: A 12 inch diameter dutch oven.  Handles boules quite nicely.  Still, you don't always want the boule shape.  The maximum size for a batard would be 12 inches of course.  Unless you don't mind a circular batard, which allows you (pi X diameter)  or 3.14 X 12 inches = 37.7 inches for your batard length, or at least external circumference.  Now that's a substantial batard.

I kept it simple and used 1,000 gm of KA bread flour, 68% hydration, 2.2% salt, and 0.08% (0.8 gm) instant yeast with overnight bulk fermentation.  This follows Ken Forkish's formula for "weeknight white bread" on page 91 of "Flour, Water, Salt, Yeast".  I divided the dough in two, formed two normal batards, then kind of bent them together, making sure the outside diameter stayed at about 11 inches, to insure an easy drop into the super hot dutch oven.  

I painted a little extra virgin olive oil on the top to try and prevent "skin" formation while the thing proofed for 90 minutes uncovered.  Baked at 475 degrees with lid on for 25 minutes and then 380 degrees with lid off for 30 minutes.

Here are the results:


Won't know how the crumb looks until friends come over for dinner tonight.  I took care to bake until bottom was at the verge of having a few dark brown to black areas in order to make sure the crumb wasn't too doughy.  I have a good feeling about it though.  My friends will eat anything, especially if an adequate supply of lager and Malbec is at hand.  My wife made a very nice beef borguignon (spelling?) for the main event.


Best to all,


Jim

mcs's picture
mcs

Latest Update!
Next Tuesday I pick up my completed concession trailer and get busy!  I can't wait.  That means that in exactly two weeks (March 2, 2013) I'll be making the Sinclair's Bakery debut at the Bozeman Winter Farmers' Market!  I won't be bringing the trailer since it's an indoor venue, but instead will be baking in the trailer here at my place, then transporting the breads and pastries to Bozeman, just like a regular market. 

Here's a couple pictures of the work in progress.  Here's a Facebook link for more photos and a flickr link in case you don't do Facebook (same photos). 

I'll post more photos next week when I get the trailer, and then some more when I get the graphics on the trailer.

-Mark
http://SinclairsBakery.com

edit:  At the bottom is a photo of the trailer that I picked up yesterday,  2/19/13.  There are more photos at the links above.

link to a previous post about the project


greedybread's picture
greedybread

Are you ready for Urenika??......Purple Rewena....

Made with the Urenika potatoes from La Cigale last week

ready...

Hmmmm..Are you thinking???

I took my rewena recipe and used a different potato.

I am going to try it with a variety of the potatoes.

I have been meaning to for a while but never seemed to get round to it.

purple mash....

The bread tastes wonderful...

BUT...

I was so wrapped up in the starter, I didn't really taste the potato alone.

Tomorrow...off to get some from the markets again:)

Very very similar to the original recipe, but slightly more tangy and of course purpley looking:)

Day one brew....
Day three and ready to use
Ready to rise...
Ready to shape..
 ready for 2nd rising
Stencilled....
ready...
Dig in...
lovely...
Gorgeous crust
Up close
Puss Puss says tasty

ENJOY, ENJOY, ENJOY!!

Rewena Recipe

http://greedybread.wordpress.com/?s=urenika

Dror50's picture
Dror50

First success!

I was finally able to produce baguettes that I am happy about.

(didn’t have the nerves to post here until I had something to show off )

Thanks to txfarmer , I flowed the formula he posted under

Straight Method Baguette - a good starter baguette to practice on 

(with title alteration on the flour parts)


This is my version, and what I did: 

Straight Dough Baguette
Note: makes 3 baguettes

400g bread flour

100g AP flour

375g water
salt, 10g
instant yeast, 2g


Mix everything together. No need for kneading. 

Bulk ferment for three hours, flood three times at 45, 90 and 135min. 

(these are an in-bowl-starch-and-fold )

After three hours pre-shape into 3 small boules. rest for 25 minutes.

Shape into Baguettes and proof at room temp for 40 minutes.

Bake at 460F(240C) for 25 min, with steam for the first couple of minutes.

Turn off oven, crack the door open, and keep baguettes inside for about 5 minutes. 

Take out and cool completely before attempting to eat. 

Note that I preheated my stone at 500F (260C) for an hour to make sure the oven is hot enough, only reduce the temp to 460F when the dough is loaded. 


Thats it! 

here are some photos 


Pages

Subscribe to Recent Blog Entries