The Fresh Loaf

A Community of Amateur Bakers and Artisan Bread Enthusiasts.

Recent Blog Entries

Aminax's picture
Aminax

My love for bread, cooking in general, and gardening centers around one, important person in my life. I am fully willing to admit that, at least when it comes to Mamo (my maternal grandmother), my memory may be a tad biased. With that said, if I were to describe Mamo (pronounced "ma'am-moe"), I would certainly include the words intelligent, beautiful, capable, and even superhero. She sewed, gardened, baked, cooked, and cleaned in her spare time. She worked as a secretary for an incredibly successful real estate broker in my hometown of Arlington, TX. I realize that the title 'secretary' has negative connotations for some, but Mamo was very good at and proud of the work she did. Her boss suffered from Parkinson's Disease, and I got the impression that she took on more and more of the responsibilities of keeping his business running as he succumbed to the inevitable symptoms of the ailment. She even earned and held her own real estate license. Although now, as an adult, I wish I had paid more attention to her, and spent more time with her and learning from her;  she died suddenly while I was in my snotty, too-cool-for-family, adolescent stage.

Her kitchen was simply a haven. The wallpaper had a pattern that included pussywillows, and the counters were a sunny yellow. I tasted many "firsts" at the small, glass-top table at the kitchen's center; including two of my favorite foods of all time: crab legs & pickled okra. Many casual dinners, board games, holiday meals, conversations, and other memories took place at that table. Hunger overcame me anytime I stepped foot onto that vinyl floor.

Whether it was a gift related to Christmas or her birthday, or "just because" I don't recall, but I clearly remember her getting a bread machine, and the excitement and enthusiasm she expressed while learning to use it. It caused some frustrations in the beginning, if I remember correctly, but she never gave up. The baked goods that came out of that machine were delicious, and I probably had more than my fair share of "tastings".

To date and not counting quick breads, I can count the number of loaves I have baked on one hand. The very first attempt resulted in a very dense white bread. I cannot overstate how dense those first, two loaves were. As I type this I am on the verge of laughing because I was under the impression that if I had to cram all the flour the recipe suggested into the dough. I also didn't have the slightest clue about kneading or getting air into the dough, etc. A more detailed account of my first attempt may be good enough material to warrant its own blog entry. For now, I will simply say it was clumsy and messy.

Some hobbies remain just that: activities done in our free time for pleasure. Now and then, we try a new activity on which we are instantly hooked. Each session with this "hobby" is an attempt to improve our skills or broaden what we know. We find ourselves wishing we had more time to devote to this activity; perhaps we even daydream of ways to do so. We're never quite sure when exactly the hobby became a passion (or maybe even an obsession). This is what bread has become for me.

greedybread's picture
greedybread

Si, si, si per favore!!  I have to say these little beauties (in general) are gorgeous and so easy to make .

The ones in Venezia are sublime, especially the ones with the pastry creme in them.

Heavenly.

I have seen other variations throughout Italy but i didn't take much notice at the time:(  They were selling something similar at night in Siena at the odd stall around the city.

Not at Palio time, in winter.......

So this my Frittelle friends, is what we are aiming for!!

Assorted Frittelle mmmmmm

Lets get Yeasty!!

Fritelle dough

Ingredients:

  • 4 cups of flour, I used strong bread
  • 1/2 cup of castor sugar
  • ½ tsp salt
  • 2 eggs
  • 1 & 3/4 cup milk
  • 2 Tbsp dried yeast
  • 6-8 cups oil  for frying err preferably NOT fat.
  • 1  jar Nutella err, not quite as large as this one in my photo!!
  • 2 tsp cinnamon for garnishing
  • 1 cup castor sugar for garnishing
  • A big Beasty!!

Method:

  • In a bowl warm half the milk, add in the sugar to warmed milk until dissolved
  •  Stir in the yeast.
  • Leave in warm place until creamy/frothy.
  • Place all dry ingredients in a bowl, flour and salt.
  •  Stir the eggs and half of the milk together and add it to the flour mixture a little at a time.
  •  Add the yeasty mixture to the flour mixture and stir until all the ingredients are combined.
  •  The dough will be wet and sticky. Don't be alarmed!!
  • Cover the bowl with a tea towel and let rise for about 5 hours when it should have doubled in size.
Pour that Oil in!!

On the matter of oil, my husband and I have often debated getting a mini fryer. He says no, we would put on 5-10 kgs in a VERY short time and sadly i think it is true but then when i make something like this, doughnuts, beignets or deep-fried ice cream balls, then we have this huge pot of oil (which i will filter) which will be on the stove for a while until its used. When I cook, i like to use olive oil but sadly the cost of filling a pot with olive oil would make the cost of the frittelle astronomical! The kids use the oil and make chips a few times (but that for them is LABOUR intensive) and i will slowly chip away at it but i do wonder, " mini fryer"? Would be easier and i could just pop it in the cupboard. Hmmm, more pondering maybe?

Hmmm wondering???

Back to the dough:

  • Prepare the sugar and cinnamon mix on a large plate.
  • When the dough is ready, stir it again. It should be sticky. If it's not, add a little more milk.
  • In a heavy pot for frying, heat the oil . I don't have a thermometer but i usually test the heat by putting a wee piece of raw food in it. My granddad used to spit in the oil!!
  •  Spoon the dough batter into the oil. I used a tablespoon but the original recipe used an ice cream scoop. Not plastic obviously!!
  • Fry until the frittelle are cooked through, about 5 minutes. I like to turn them over with tongs. They brown pretty quickly. Don't overcrowd your pot as they will take longer to cook .
  • Remove the frittelle with a slotted spoon and place on a plate covered with paper towels to drain.
  •  Once drained, quickly roll them in the sugar.
  • Poke a hole in the frittelle and fill a pastry bag fitted with a tip with Nutella and pipe Nutella into each frittelle.
  • Best eaten when warm.
  • Don't forget the most important thing!! Enjoy, enjoy and enjoy!!
yummmm
Almost all gone
filled with Nutella

P.S : You can easily insert other delights into these, white chocolate, milk chocolate, jam, pastry creme, cream, moro bars err perhaps not cream,  the list is endless........But things that hold shape and have some heat resistant are probably better. My son seemed to think jelly lollies would be nice!! I don't think so............You could,  if you were really adventurous, make it a savoury recipe but that we will look at another day :)

Frittelle how i love thee!!

Recipe adapted from Luscious Lucca Blog @ i love Lucca tours  

http://greedybread.wordpress.com/2012/05/31/back-to-the-yeasty-beasty-frittelle-anyone/

GSnyde's picture
GSnyde


This is a variation on Hamelman’s Cheese Bread, using Cheddar and Jarslberg instead of Parmasen, and sprinkling Sesame Seeds on the loaves.  It all started because the fridge was full of cheese.  And I love cheese breads.  I have made the Cheese Board’s Onion-Curry Cheese Bread  (http://www.thefreshloaf.com/node/22549/some-spice-breads-%E2%80%93-one-sweet-and-one-savory) many times.  But I wanted to try something new.  So I flipped through several baking books, and found Hamelman’s Cheese Bread to be a good starting point.

I used a very active starter, left over from the Tartine Basic Country Bread, as the seed culture, and made the stiff levain per Hamelman’s formula.  The final dough was also from the Hamelman formula, but I substituted the surplus cheeses (sharp Cheddar and Jarlsberg) for the Parmesan in Hamelman’s formula.  And I topped the proofed loaves with a light egg wash and sesame seeds just before scoring and baking.

I recommend using parchment under the loaves to keep the mess off your baking stone.

Here’s the formula and procedure.

Overall Formula

Ingredient

Weight (oz)

Bakers’ %

AP Flour

32

100

Water  (75 F)

19.2

  60

Olive Oil

  1.6

    5

Salt

    .5

 1.5

Instant Yeast

    .1 (1 tsp)

 1

Cheese

  6.4

  20

Sesame Seeds

To taste


Egg wash (1 egg and 1 Tbsp water)


Stiff Levain Build

Ingredient

Weight (oz)

Bakers’ %

AP Flour

  5.8

100

Water (75 F)

  3.5

  60

Mature culture (stiff)

  1.2

  20


Final Dough

Ingredient

Weight (oz)

AP Flour

26.2

Water (80 F)

15.7

Olive Oil

  1.6

Salt

    .5

Yeast

    .1

Levain

  9.3

Cheese (1/2 Cheddar and ½ Jarslberg), half grated and half in ½ inch cubes

  6.4


Procedure

1.  Make the levain about 12 hours before mixing the dough.  Cover and let ripen at room temperature.

2.  Mix all final dough ingredients, except the cheese, at low speed for 3 minutes, then at medium speed for 3 minutes, to moderate gluten formation.  The dough should be quite stiff.  Add cheese and mix on low speed just until incorporated.

3.  Scrape the dough onto a board, round up into a ball and place in a lightly oiled bowl.  Cover the bowl and let ferment about 2 ½ hours, with folds at 50 minutes and 100 minutes.

4.  Divide into two or three loaves, pre-shape into rounds and let rest, covered, for 15-20 minutes.

5.  Shape into boules or batards and proof about 1 ½ to 2 hours at room temperature.

6.  Pre-heat oven to 500 F, with stone in place and steaming apparatus of choice (I used cast-iron skillet with lava rocks, plus Sylvia’s steamy towels).

7.   When proofing complete, move loaves to parchment covered peel.  Brush loaves lightly with egg wash, and sprinkle with sesame seeds.   Then score the loaves , slide the parchment paper onto the oven stone, and steam the oven.

8.  As soon as the loaves are in the oven, reduce heat to 450 F.  Bake with steam for 18 minutes, remove steam apparatus, reduce heat to 400 F, and bake another 16-18 minutes (too internal temperature of 206-207 F). 

9.  Cool on rack.

This bread is amazing when almost, but not quite, cooled.  And it makes nice toast.  The combination of cheese and sesame is really good!

Enjoy.

Glenn

BobS's picture
BobS

We had a can of pumpkin puree kicking around. I'm tired of the usual pumpkin quick bread and wanted something lighter.  Some time ago our paper had a braided yeast-raised pumpkin bread, originally from King Arthur. I started there and somehow ended up here:

Sorry, no crumb shot; the good light was gone by the time I sliced it.

I'm going to try another spin, this time with a preferment to punch it up a bit; then I think this one will be done.

linder's picture
linder

We have a big pot of borscht to eat and wanted some hearty rye bread to go with it, so last night I mixed up the soaker and wild yeast starter for Rye Sandwich Meteil.  I had read on TFL that the bread had come out quite sweet for some, so I used only half the sweeting called for in the formula.  The bread 'rose' more sideways than anything else, but is still very tasty. 

I'm also wondering if some of the lack of rise was not letting it proof long enough (45 min instead of the full 60).  In any event - here is the loaf.  Any comments on how to achieve a better rise upwards are appreciated.  (Maybe I really do need to add some vital gluten?)Thanks.


jacobsonjf's picture
jacobsonjf

Locked up indoors while mending from some winter crud, Saturday night I took my recently refreshed liquid levain and made two preferments. One whole wheat and one whole spelt. Sunday morning I added them to some water, then added bread flour, salt, and yeast. Fermented, stretch fold, ferment, shape, proof, bake. Seems no matter what I do, the sharp edges of the spelt bran never soften. Energy bread,s surface I make using spelt, feels like 220 grit sandpaper. I fined nothing wrong with it, but find spelt is the only whole grain flour wwhere I experience  rougher the texture.

dabrownman's picture
dabrownman

Varda caught the the original Pope's Hat was really a Priest's Hat and then we found out it wasn't and Priest's Hat either so we got a chance to fix that, inserting Priest's for Pope's and also fixing that to remove the Priest's Hat entirely and our spelling and grammer errors too.  Hope this clears up the confusion in a confusing way.

We were making a stiffer levain Italian style and decided to revisit another Italian bread – Altamura style like David Snyder did here

Pane tipo di Altamura from "Local Breads"


 This bread is also one where the whole multi-grains were going to be in the levain.  We also decided to go more Italian style with a stiff levain - 51%.  Since the whole grains  only amounted to 35% or so and not too much rye or spelt,  we thought a good 30 hour retard would really bring out the whole grain flavor and the sour too.


First off you simmer the soaker seeds for 3 minutes and then let them soak for 24 hours.  We would normally use the excess water at the end of the soak for the dough liquid but forgot to this time - so we saved it for the next bake.  Remember to rum a paper towel or two through the well drained soaker seeds to get rid of as much excess liquid as you can, otherwise, the dough will bee wetter than it already will be.


Nothing like a big picture of the reject :-)

The levain was made over (3) 4 hour builds and an additional 10 second one at the end.   20 g of the water in build 3 was added and mixed it at the 12 hour mark.  The levain was very stiff at 51% before this addition and so the normal doubling we look for went out the window.   We got 50% and that is normal for this levain type.


The rest of the ingredients, less the soaker seeds, were autolysed for 1 hour before mixing with the levain.   Then 10 minutes of French slap and folds followed.  After a 15 minute rest 2 sets of S&F’s followed on 15 minute intervals.  Then the soaker seeds were added and 2 minutes of slap and folds were used to rebuild the gluten structure and incorporate the seeds.


The dough was then allowed to develop on the counter for an hour in a well oiled covered bowl where the plastic was oiled too.  The dough was then retarded for 30 hours in the fridge at 38 F.  It easily doubled in volume while in the fridge. 


After removing from the fridge and letting it warm on the counter for 2 hours we took out first shot at shaping a Pane tipo di Altamura.  This turned out to be the pre-shape since it ended up looking like 2 ugly stuck together baguettes. Plus it wouldn't  fit on the mini ovens 12” square broiler pan. 


So we took another shot at the shape a few minutes later and it came out a lot better - but not at all like it should have if we were writing home about it.  But, it now fit on the top of the broiler pan too – a really good thing.  It then went into a trash can liner for final proof and was placed on a heating pad set to low with some kitchen towels on top of the pad.


After and hour it had popped itself open at the seam so we tried to fix that by re-sealing and we were almost half way successful. Another hour and it had puffed itself up well enough to bake.  Into the 450 F preheated mini oven it went after throwing a ¼ of water in the bottom of the broiler pan and heating one of Sylvia’s steaming cups for the vented top where the bread would bake. 


After 12 minutes of steam the Pane tipo di Altamura had sprung nicely so we removed the steam and turned down the oven to 400 F, convection this time.   We continued bake for 10 minutes rotating the bread 180 degress every 5 minutes.


This my new apprentice.  As I was hiking in Sabino Canyon in Tucson yesterday , this Roadrunner followed me on the trail for about 1/4 of a mile.  I didn't want to scare it off but as I took a few step he would take a few too.   Next thing you know he was walking with me as I hiked along. 

They are expertly camouflaged and if they don't want you to see them - you won't.  I already miss my new hiking buddy :-(

Then we turned the bread over on its top and continued to bake for 8 more minutes to brown the bottom when the bread reached 205 F in the thickest part.  The bread had baked a total of 30 minutes.  The crust was nicely browned and crispy but no huge bubbles which is the norm for baking this way in the mini.   The crumb went chewy and soft as it cooled.

The crumb turned out very soft and moist with chewy bits of soaker seeds - just liked we hoped.  The surprising thing about this bread is that it tastes great.  The grain flavors and sour are front and center.   It has to be one for best tasting crusts and crumbs we have ever managed and my new apprentice would have approved as much as old one did. 

Formula

Starter Build

Build 1

Build 2

Build 3

Total

%

SD Starter

22

0

0

22

4.80%

Oat

3

5

3

11

3.24%

Buckwheat

3

5

3

11

2.40%

Quinqoa

3

5

3

11

2.40%

Amranth

3

5

3

11

2.40%

Kamut

3

5

3

11

2.40%

Spelt

3

5

3

11

2.40%

Dark Rye

3

5

3

11

2.40%

Whole Wheat

3

5

3

11

2.40%

Millet

3

5

3

11

2.40%

Farro

3

5

3

11

2.40%

Water

30

2

22

54

11.79%

Total

82

52

52

186

40.61%


SD Starter Totals


%


Flour

88

19.21%


Water

65

14.19%


Starter Hydration

73.86%


Levain % of Total

20.09%


Dough Flour


%


Red Malt

3

0.66%


Toadies

4

0.87%


Vital Wheat Gluten

10

2.18%


White Malt

3

0.66%


AP

350

76.42%


Total Dough Flour

370

80.79%


Salt

8

1.75%


Water

275

60.04%


Dough Hydration w/o starter

74.32%


Multigrain Scald & Soak

0

%


Buckwheat

20

4.37%


Rye

20

4.37%


WW

20

4.37%


Kamut

20

4.37%


Spelt

20

4.37%


Farro

20

4.37%


Total Scld & Soak

120

26.20%


Total Flour w/ Starter

458


Water

340


Hydration w/ Starter & Adds

74.24%


Total Weight

926


% Whole Grain

36.24%


7ardys's picture
7ardys

I began baking bread in 2009 after being laid off from my job.  It was not a life long desire to bake bread.  In fact, I hadn't even spent much time in the kitchen at that point.  But somehow, I became enthralled with bread baking.  Might I even say, passionate about bread baking.  And because I suddenly had lots of time on my hands, I practiced almost daily.  Not necessarily baking every day, but reading about, or buying supplies for, or tending a starter for baking.    I credit Peter Reinhart's book, Whole Grain Breads with capturing my interest and leading me on to read other bread baking books as well.  For some reason, I kept track of each bread recipe that I made, along with my comments about what I learned, what went well, what didn't.  And I learned many "do not ______" next time.  It's been a fascinating thing -- this study of bread making.  And I am still such a novice. 

Along with being a novice bread baker, I may be even more of a novice internet user.  (Where have I been hiding, huh?)  I only discovered this site today!  A couple of weeks ago, I started a blog of my own about my breads which I call "Ardys 'n Bread".  That's my first name--"Ardys".  I've always felt it was an unfortunate name and probably spent the first 35 years or so, of my life, encouraging the use of nicknames.  Well, at last, my name seems to have come into its' own.   My blog site is http://ardrichards.wordpress.com.  I have been thoroughly enjoying writing about bread, and I've realized that my real goal with the blog is to reach out to other people who might be interested in making bread for the first time, and offering some guidance and practical information on the subject.  Little did I know that I should have been posting my blog with The Fresh Loaf.  Although I have to say, the work of the bakers that I have seen on this site inidicates that they are so far beyond me in experience , that I would have little to offer to this group.  

I am, however, glad to have found this site, and thank you all for welcoming me into the fold of bread bakers. 

P.S.  If you come across anyone by the name of "Ardys" (female name, Scandinavian) under the age of 60, I'd appreciate you letting me know that there is another one of us out there.  I have an aunt with my name, and many times people have remarked after meeting me, "I once knew someone by that name.  She was in her 80's."  I, myself, have never actually met another person with my name (aside from my aunt, and there was a neighbor lady named "Ardis" who died when I was a child).   I believe the name is a revision of the Norwegian name "Hjordis".  (should be a / through the O)  Are there any more of us out there?

Ardys 'n Bread

4akitchenblog's picture
4akitchenblog

Hi all,

I am new here and this is my first post on The Fresh Loaf!

Today I would like to share my first attempt at baking Sourdough Boule with Japanese Clay Pot.

Japanese Clay Pot (a.k.a. Donabe) is a symbol of comfort food for Japanese people.

(Oh, by the way, I am Japanese :-))

Family members or friends come together around the table and share a meal out of one pot, so that you can build a sense of closeness, warmness...

I live in Santa Monica, California and my all family members live in Japan...Therefore, I felt all warm inside when I happened to find this Donabe.

"I want to bake BREAD with this clay pot!"

This idea just popped in my head :-)


The best part of using a clay pot (of course, a cast-iron pan, too) is you don't need to create the steam in your oven.

Because a closed clay pot trap all of the moisture from the dough, and that creates STEAM you need to get a perfect crust!

It's like a "masonry oven" inside your oven, if you will.


Ok, let's bake Donabe-bread!

This is a Sourdough Boule made with 36 hours fermentation.

————————————

Sourdough Boule

Makes 1 small loaf

Submitting this post to YeastSpotting

————————————

Recipe

225 g Bread flour

162 g water

4 g Salt

67.5 g 60% Firm sourdough starter

————————————

Formula

266.3 g Bread Flour (100%)

188.3 g Water (70%)

4.8 g Salt (1.8% )

————————————

Directions

1. Making the preferment dough --- In a mixing bowl, combine Bread Flour, Water and Sourdough seed starter / culture. 

    Let it preferment at room temperature for 12 hours.

2. Meanwhile, mix flour and water, cover it with plastic and Autolyse for for 12 hours.

3. Next day, mix starter into the dough and slap & fold for 1 minute.

4. Add salt and slap & fold for 1 minute or until the dough becomes a rough ball.

5. Let it rest for  30 minutes.

6. 1 set Stretch & Fold (1 set = right over left, left over right, bottom over top, top over bottom)

7. Let it rest for  30 minutes.

8. 1 set Stretch & Fold

9. Let it rest for  30 minutes.

10. 1 set Stretch & Fold

11. At a cooler place, let it rise until the dough just starts showing the yeast activity, about a third in size.

12. Put it in the fridge for 18-24 hours.

13. Pull it out of the fridge and leave it out for 1 hour.

14. Pre-shape the dough and let it rest for 15 minutes.

15. Shape into Boule and place into a mixing bowl lined with well-floured tea towel, seam-side up.

❉ Since I didn't have a round banneton, I used a mixing bowl lined with a tea towel and it just worked very well!

16. Final fermentation for 60 - 90 minutes.

17. 1 hour before you plan to bake, place your Donabe / Closed clay pot (must be completely DRY) on the middle shelf in the oven and preheat to 500°F.


18. Flip the bowl over so that the dough sits on the middle of a parchment paper.

19. Score the top of the Boule using a lame or a sharp, serrated knife.

20. Very very carefully open the lid (it's HOT!) and put the bread in the preheated Donabe, replace the lid and slip it back into the oven.

21. Turn the heat down to 480°F and bake the bread for 30 minutes with lid.

22. Turn the heat down to 450°F and bake for 10-15 minutes without lid.

23. Once the boule is nicely brown, turn the heat off and remove the boule from the Donabe and place directly on a rack in the oven for another 5-10 minutes.

24. Let them cool onto a rack.

Here is my first Donabe-Bread!

It turned out super nice! I got an amazing crust and silky-fluffy-holey crumb.

To be honest, I was quite surprised by this result. 

Even though I knew this "closed clay pot (La Cloche)" method through this post on a website BREAD IN FIVE,

I was not sure if I could get the same result with this Japanese Donabe or not...

No baking stone? No steam? Really?!
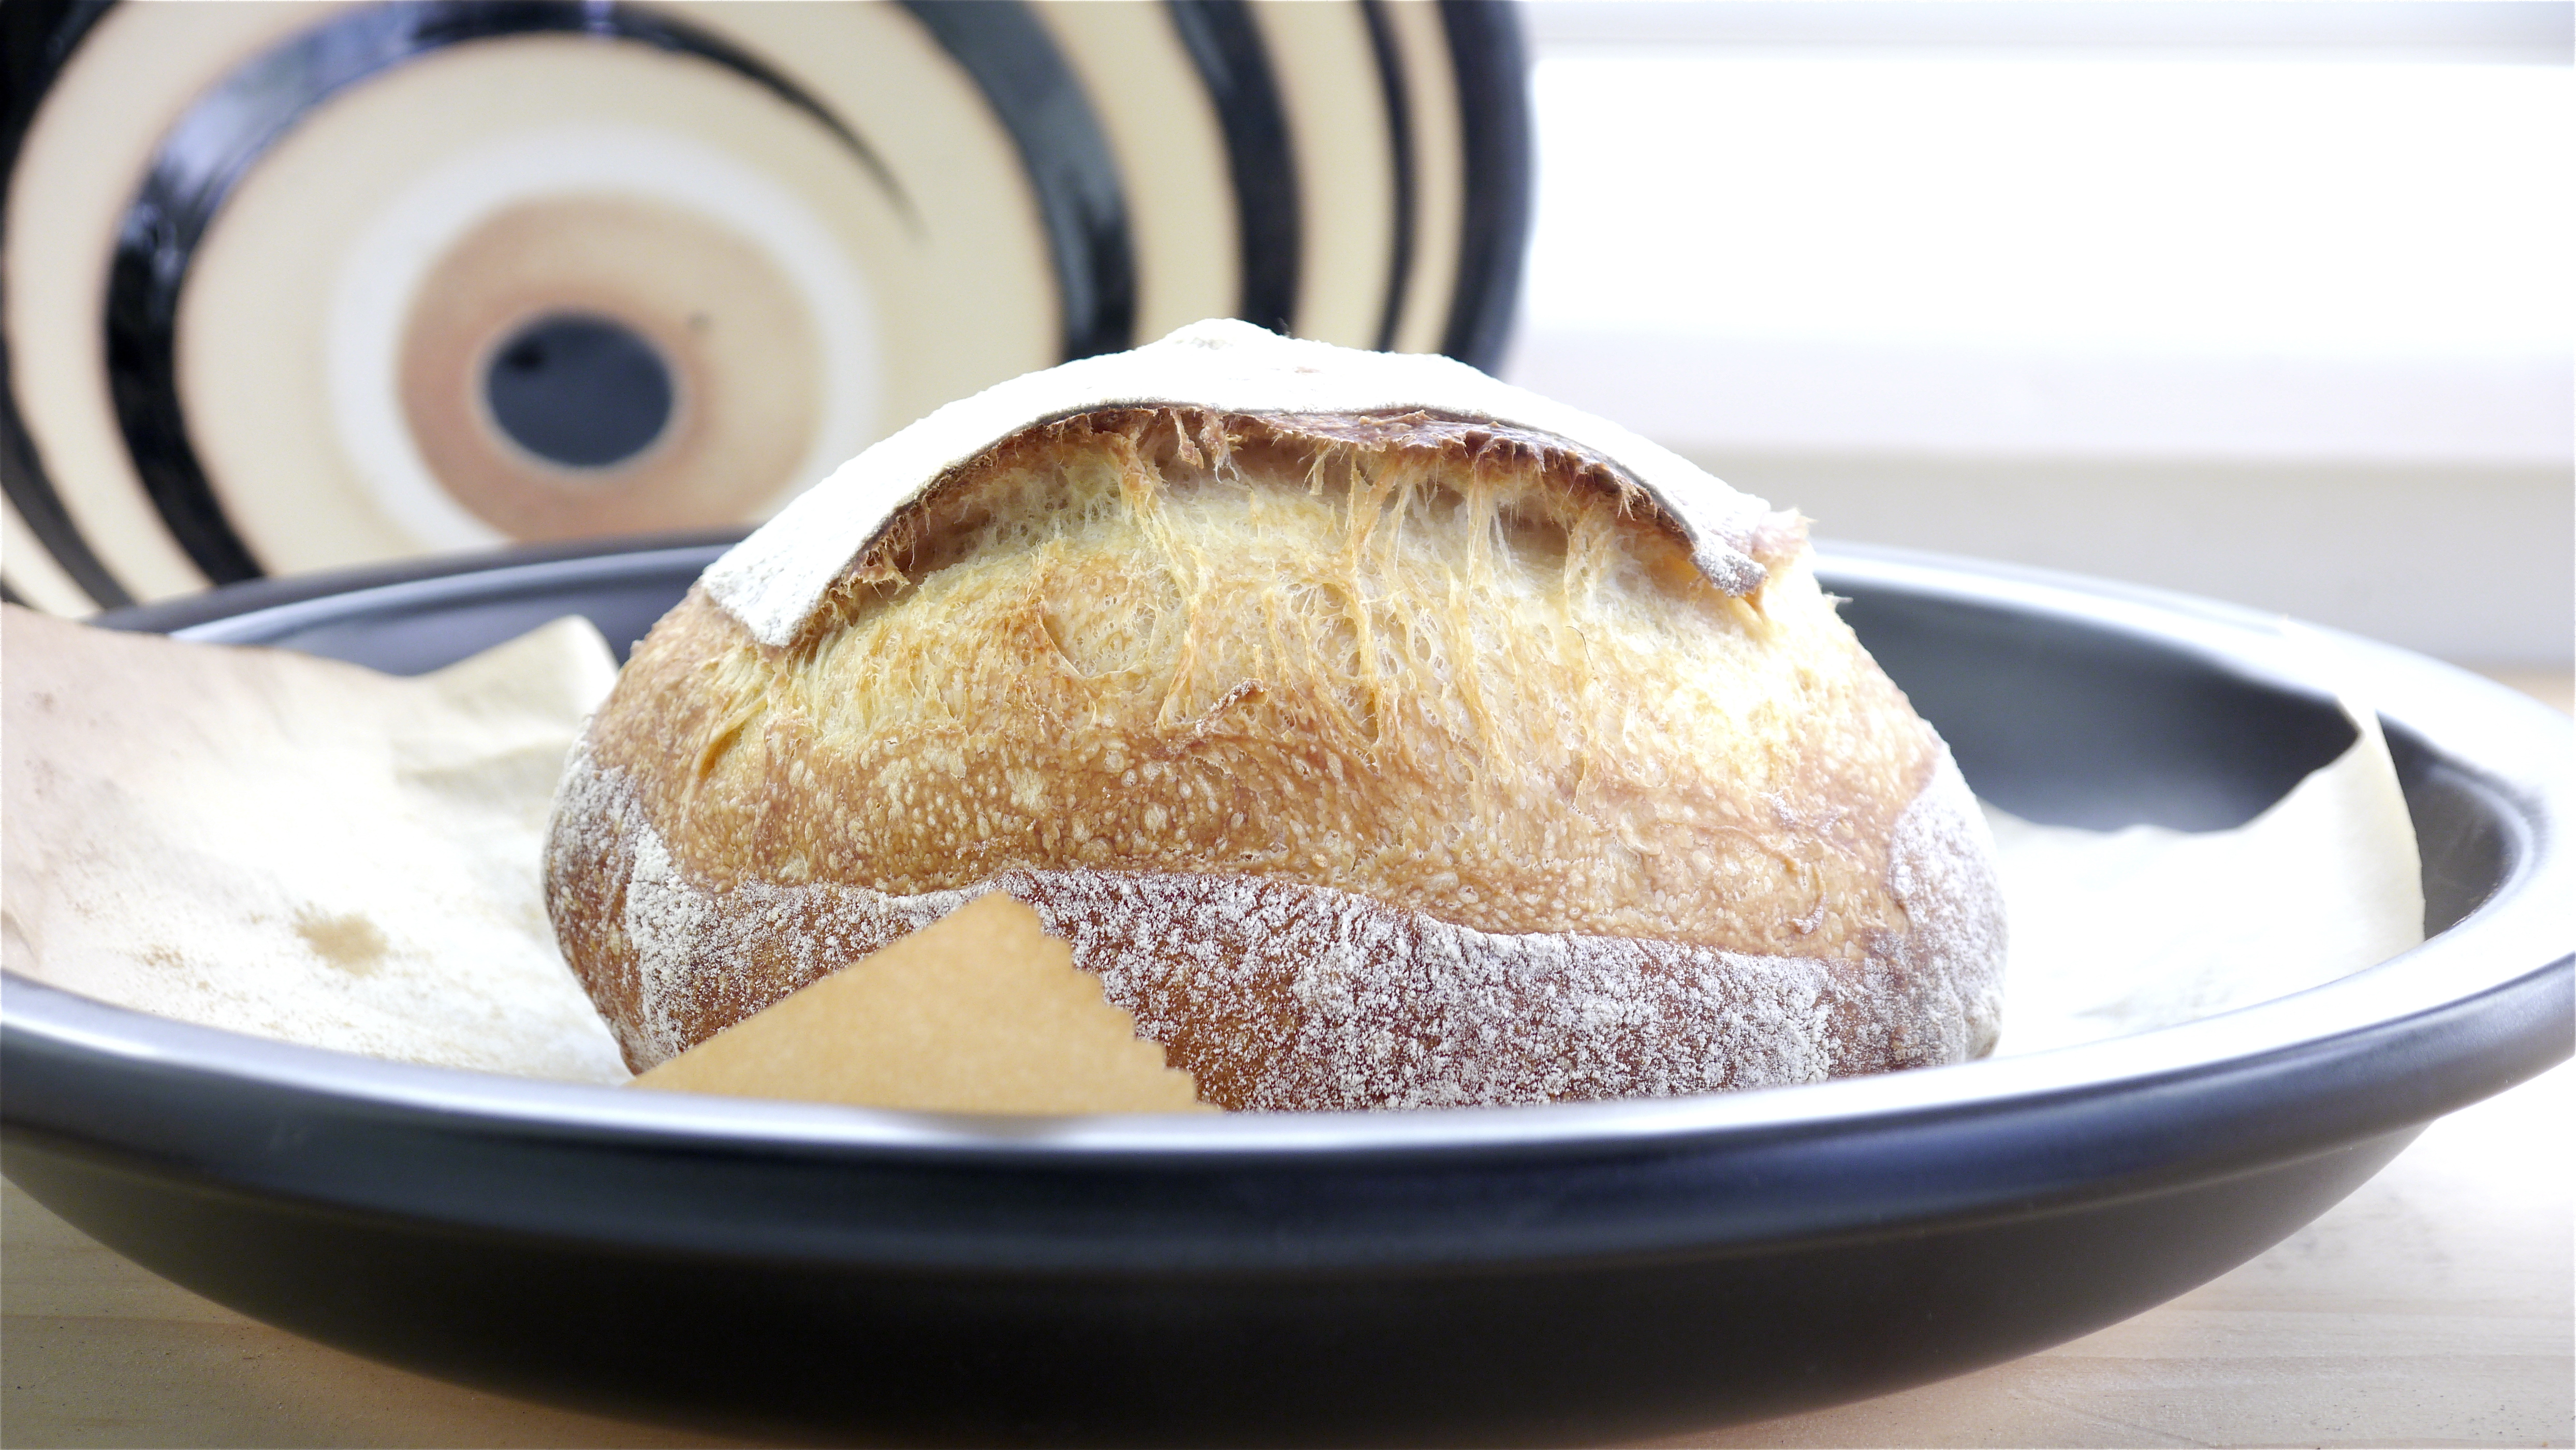
Yes, it really works! Donabe-bread is a new comfort food for me!

Yuko


Raluca's picture
Raluca

I am back today, to tell you all about one of our favourite breads these days: Pain au Levain. I’ve baked this bread using one of Codruta‘s recipes and we loved it!

Time schedule:

Day 1: Make the preferment, leave for 8-12 hours at room temperature to mature. I don’t know exactly what the temperature in my kitchen is over night…I guess not above 21C.  I usually leave my preferment for around 12 hours until it’s nice and bubbly and has not sunk. You can test if it’s ready by putting a spoon of it in a bowl of water, if it floats it’s ready, otherwise it needs more time. This time I only left it for 11 hours.

Day 2: Make the bread

      • Mix the preferment with the water and flour.
      • Leave to rest for 45mins (autolyse) – The initial recipe calls for only 30mins, but I just couldn’t attend to it due to having some other stuff to do, so I’ve left it for 45minutes.
      • Add the salt and mix for 1 minute on speed 1 and another 3 minutes on speed 3.
      • Leave to rest for 50mins
      • Perform 1st stretch and fold
      • Leave to rest for 50mins
      • Perform 2nd stretch and fold
      • At this point we had to leave the house so I’ve put the dough in the fridge for 3 hours. The recipe called for another 50mins rest  and then the shaping, but I couldn’t do that. If you are at home, by all means don’t put it in the fridge just give it another 50mins rest after the 2nd stretch and fold and then pre-shape it.
      • I took the dough out of the fridge after the 3 hours, performed another stretch-fold and left it for another hour to come to room temperature. Skip this if you have done this the proper way with 3 – 50 mins rest sessions and 2 stretch and folds.
      • I shaped my bread in a batard shape and left it to proof in a floured banneton closed in a plastic bag for 2 hours 30 minutes.
      • Bake at 250C for 5 minutes then reduce the heat to 220C for another 35 minutes then bake for another 5 minutes with the oven door ajar. If you have a bigger oven you can try to bake it the proper way: 45 minutes in total at 230C with the last 5 minutes with the oven door open. 

Sourdough culture: I use a 100% hydration sourdough culture: 90% whole wheat, 10% dark rye.

Recipe for 1 loaf (aprox. 69% hydration)

Flour: For this loaf I used very strong Canadian white flour (that has 15% protein) and organic dark rye flour from Shipton Mill.

Ingredients for the preferment

Make it 12 hours before you want to start on your bread. The overall hydration of your preferment (including the water and flour in the sourdough culture is aprox. 60%). 

IngredientQuantityBaker’s %
Strong white flour53gr93%
Organic dark rye flour4gr7%
Water31gr54%
Sourdough culture14gr

24%

Method for the preferment

Dissolve the starter in the water. Add the flour and mix until well combined. Cover tightly with cling film and leave it to rest at room temperature for about 8-12 hours or as I said above: until it’s bubbly and floats. As I said I’ve left mine for 11 hours for this particular bread.

Ingredients for the bread

IngredientQuantityBaker’s %
Preferment102gr29%
Strong white flour333gr95%
Organic dark rye flour17gr5%
Water240gr69%
Salt8gr2%

Final baker’s percentage (including preferment)

IngredientQuantityBaker’s %
Flour407gr100%
Water271gr66.58%
Sourdough culture14gr3.47%
Salt8gr1.96%

Method for the bread

I dissolved the preferment in about 2/3 of the water and then added it to the flour. Mix and add the rest of the water until you have quite a weird and not smooth mass of wet flour coming together. Do NOT add the salt at this point.

I covered the bowl and left to rest for 45 minutes for the autolyse. As I said the original recipe calls for only 30minutes of autolyse..but I couldn’t get to it until after 45minutes. Still works.

When the 45 minutes were up I added the salt. I used the Kitchen Aid with the hook attachment this time: 1 minute on speed 1 and another 3 on speed 2. If you want to knead it by hand do it for about 10 minutes or so.

Transfer the dough to a clean greased bowl (I used an oil spray to grease the bowl), cover it with cling film and leave it to rest for 50 minutes. 

When the 50 minutes are up you are ready for your first stretch and fold.

I did my stretch and folds directly in the bowl, but you can either tip the dough onto a lightly floured surface or you can initially place your dough in a large rectangular container so you can do them directly in there.

Now cover the bowl again and leave to rest for another 50 minutes. Do another stretch and fold (the last one) and again leave to rest for 50 minutes. I couldn’t do that, as we had to go out so I’ve put my dough in the fridge for 3 hours. When we returned I took it out, performed another stretch and fold and left it to come to room temperature for another hour.

After this final rest you need to shape your bread. I shaped this one as a batard, not a great one, but getting there. I moved my shaped loaf in a floured banneton, placed it in a plastic bag that I closed tightly and left it to proof for 2 hrs and 30 minutes.

You will need your oven to reach 230C so start pre-heating sometime after the proofing period has started, depending on your oven.

To bake the bread I use a 3cm thick granite baking stone, that needs at least 1h20 minutes in a 250C oven to heat up properly.

So, after the 2hrs and 30 minutes of proofing, I tipped my bread on a baking sheet scored it with one good score and another 3 rubbish ones, but hey I am learning and put it in the oven. 

I also keep in the oven one of the trays, while it is pre-heating, so it gets hot hot. Then, immediately after transferring the bread on the stone, I add a cup of hot water to the tray below to create some steam and shut the door quickly.

You will need to bake this bread for 45 minutes at 230C. To get a nice crust open the oven door 5 minutes before the baking time is up, to release some of the steam. In my case as the oven is very small I baked it for 5 minutes at 250C then reduced the temperature to 220C for the next 35 minutes and kept it with the oven door opened for another 5 minutes.

Resulting bread:

This is now one of our favourite breads. It had a nice crust with a bit of crunch and the crumb was sweet and with a very nice chewy texture.

Pages

Subscribe to Recent Blog Entries