The Fresh Loaf

A Community of Amateur Bakers and Artisan Bread Enthusiasts.

Recent Blog Entries

smasty's picture
smasty

I'm sure other people have reviewed this, but I'm so pleased with this product I had to create a post.  I cultivated my own sourdough starter about 4 years ago.  I don't know if it's because I'm in suburban Denver (6000 ft) or what, but I could NEVER coax any flavor out of my breads.  2, 3 day retards, maybe a little...definitely nothing like california breads. In fact, I could really not tell the difference between my SD breads and straight breads.  Even poolish were better.  I tried once adding citric acid to my bread, great flavor, but wrecked gluten a bit.

I was thumbing through the KAF catalog recently and came across the "Sourdough Flavor"...decided it was worth a try.  I made Peter Reinhardt's straight dough baguettes using 1/2 the recommended amount of KAF Sourdough Flavor (yeah, they try to oversell I think).  Holy cow...I was blown away!  Flavor was amazing, texture was spot on, color was a beautiful golden brown (my SD's always came out more of a grayish-brown).  I love it so much I decided I was sick of caring for my starter and tossed it (a little sniff, since it was a living thing). 

Love the stuff!    

dabrownman's picture
dabrownman

With Memorial Day neigh, we needed some hot dog buns for some sausages and brats we will start the weekend off with tonight for dinner.   Who better to come up with a recipe for them than none other than our resident Hot Dog and my German baking Apprentice - Lucy!


She got in the mood doing slap and folds for the Japanese Black Rice bread earlier today while singing her favorite Japanese cowboy song -  ‘Yippee Oh Kiyae, I am a Japanese Hot Dog, Bun Making Sandman.’  Yes, it is even truer that she got into this song more doggedly while doing the slap and folds for these buns.  She is incorrigible.


 In any event, we made a poolish and YW levain over 12 hours.   After a short 1 hour autolyse, we mixed it all together, did the singing, slapping and folding over 10 minutes and then let the dough rest for 15 minutes before doing the first of 3 sets of S& F’s in the bowl.


After a 30 minute rest we shaped the dough into 5 tight little logs a spiral bun and a Franz Joseph roll just in case a hamburger happened onto the gill with the Hot Dogs over the weekend.   After proofing for an hour and a half on parchment paper laid out over a plastic cutting board substituting for a peel, we thought they looked fairly proofed.


The oven was already hot from the Japanese Black Rice bread so all we had to do was reconstitute the lava rock and CI skillet steam and get to baking.  The rolls, after egg washing, went in at 400 F for 2 minutes and then 6 minutes at 375 F before removing the steam.  We then turned the oven down to 350 F convection this time and baked the rolls for an additional 12 minutes while rotating them on the stone every 5 minutes,


After a total of 20 minutes, the rolls looked nice and brown so out they came to a cooling rack.  We brushed some milk on them to make sure that they crust would be soft as possible.   They puffed up beautifully in the oven and the Toadies really come through in the smell department.  Lucy can’t wait to eat these buns with a nice variety of sausages for dinner.  Will post a crumb shot then.


The nuns were very good and they worked out well even if a little on the large side - just more room for pickled, onions, cucumber and Hatch chilis.

Happy Memorial Weekend!

Love the left over toasted buns much better when steamed for lunch the next day!

Formula

YW & Poolish

Build 1

Build 2

 Build 3

Total

%

Yeast Water

85

0

0

85

17.00%

Pinch of yeast

0

0

0

0

0.00%

AP

130

50

50

230

46.00%

Water

50

50

0

100

20.00%

Total

265

100

50

415

83.00%


YW & Poolish


%


Flour

230

46.00%


Water

185

37.00%


Hydration

80.43%


Levain % of Total

0

42.26%


Dough Flour


%


AP

270

54.00%


Dough Flour

270

54.00%


Salt

9

1.80%


Water

81

16.20%


Dough Hydration

30.00%


Total Flour

500

100.00%


Water

266


T. Dough Hydration

53.20%


Whole Grain %

2.60%


Hydration w/ Adds

65.57%


Total Weight

982


Add - Ins


%


Egg

47

9.40%


Butter

42

8.40%


Non Fat Dry Milk Powder

25

5.00%


Cream Cheese

50

10.00%


White Rye Malt

3

0.60%


Toadies

10

2.00%


Honey

20

4.00%


VW Gluten

5

1.00%


Total

207

41.40%


dabrownman's picture
dabrownman

After Evon’s post of her bread with Japanese Black Rice in it, we knew it had to get to the top pf the bake list like Hanseata’s Wild Rice bread did when it appeared.  We had run across some of this rice a couple of months ago at Sprouts and had cooked it for dinner.  We knew it would end up in bread eventually and Evon’s post was the impetus.


The question was what kind of bread to put it in?  My apprentice went back and looked at our take of the Karin’s wonderful Wild Rice Bread and quickly knew that we would do something similar to it, perhaps not as dark or complicated.


Since I started medicating my apprentice with Sylvia’s Dog Bones, she isn’t as determined or anal as usual - even though she has taken to licking the glow in the dark, black light intensified picture we have of Elvis performing in Las Vagas.   Here was that bake:

http://www.thefreshloaf.com/node/28806/hanseata%E2%80%99s-wild-rice-sd-w-yeast-water-multi-seeds-prunes-beer-and-sprouts

Here is Karin’s original post :

http://www.thefreshloaf.com/node/24092/wild-rice-sourdough-bread-ended-cold-war

Here is Evon’s inspirational bake, if a little dark, : Sprouted Organic Wild Black Rice SD Bread


It isn’t often we have a new bread ingredient like Japanese Wild Rice but Evon’s bread also had edamame in it – a second ingredient we have never seen used in bread before.  And as luck would have it, we had 3 kinds of edamame in the pantry and freezer.  We had fresh shelled edamame in the freezer. Wasabi dried edamame (my favorite after a few beers) and regular dried edamame.


You can tell we eat it a lot around here since it is my daughter’s favorite veggie.  We decided to be our normal conservative self when it comes to baking, as opposed to my apprentice’s solution for cleaning tile grout or magnesium rims on fine, if old, motorcycles.  So, we went with the non Wasabi dried edamame even though the black rice is Japanese.  You just can’t make apprentice’s think after leading them to water.


We sprouted the black rice and thought we had killed it when we forgot it was soaking and let it go for 8 hours before draining and putting them between damp paper towels.   But the rice loved it and after 2 days had sprouted well.  My apprentice was especially thrilled since this was her first time sprouting any kind of rice.


We did the standard (3) 4 hour levain build by putting all of the whole multi-grains in the levain.  Since it was white flour in the dough, we autolysed it for 1 hour only with the VWG, Toadies, red and white malts.  Once the levain and autolyse came together we did 10 minutes of slap and folds.

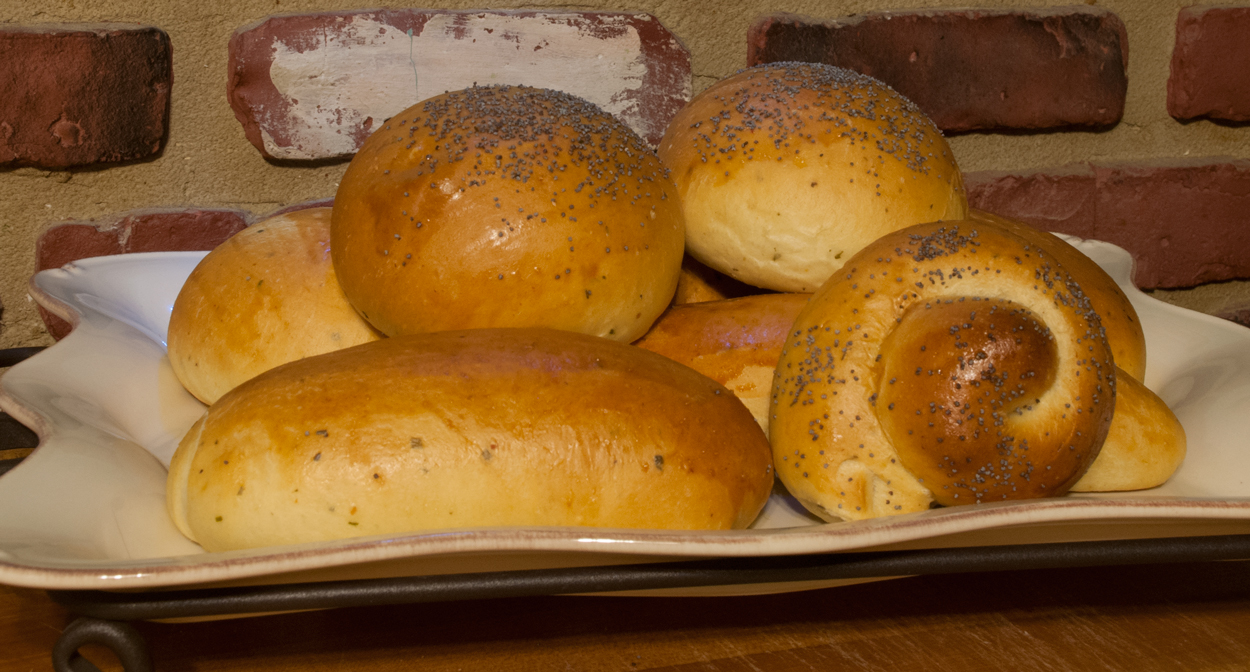
My apprentice sang one of her favorite tunes while doing the S& F’s - an Oriental cowboy song called - ‘Yippee Oh Kiyae, I am a Japanese Hot Dog, Bun Making Sandman.’  I reminded her that we wouldn’t be making hot dog buns till later in the day but she was in the groove and just wouldn’t be stopped with her being a hot dog and Japanese rice in the mix.  I’m guessing it won’t be the last time I hear this odd tune today.


After a 15 minute rest we did 3 sets of S& F’s on 15 minute intervals and added the edamame, black rice sprouts, ground non aromatic and aromatic seed variety and prunes on the first set.  By the 3rd set they were well distributed.  After another 15 minute rest, we divided the dough in half, shaped each and placed them into rice floured baskets and then into used plastic trash can liners.


After a 30 minute rest on the counter the baskets were placed into the fridge for an 18 hour retard.  By the next morning they had risen well in the fridge.  They came out of the cold for one hours to warm up before we fired up Big Old Betsy with Sylvia’s and David’s Patented Steaming Combo.


It took 45 minutes for the oven to get to 500 F including the 20 minutes for the top and bottom stones to get to that temperature lagging 20 minute behind.  We really cut back on the rice flour this time and worried that the dough would stick to the baskets but they came out no worries after a rap on the parchment covered peel.  A quick slash and into the oven they went.


After 2 minutes of steam at 500 F we turned the oven down to 465 F for a further 10 minutes of steam.  After removing the steam, we turned the oven down to 450 F, convection this time and let the bread finish baking to 205 F on the inside while rotating the bread ever 5 minute on the stone.  Total baking time was 27 minutes with 15 of it without steam.


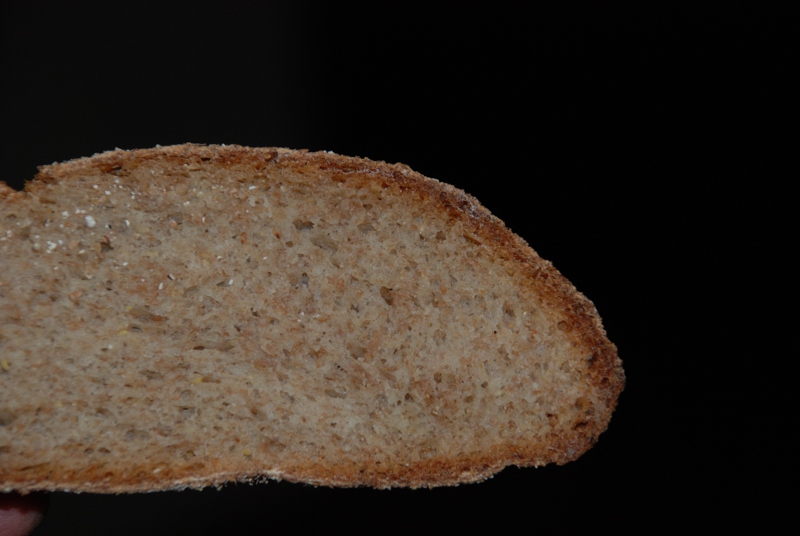
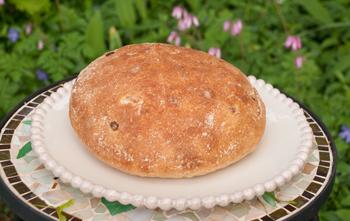
It browned up, bloomed out had a few blisters and an ear where we tried to get one.  I like the color of this bread and the pattern that the baskets put on them.  They smell like they will be tasty if not delicious.  Have to wait for the crumb shot till after lunch .

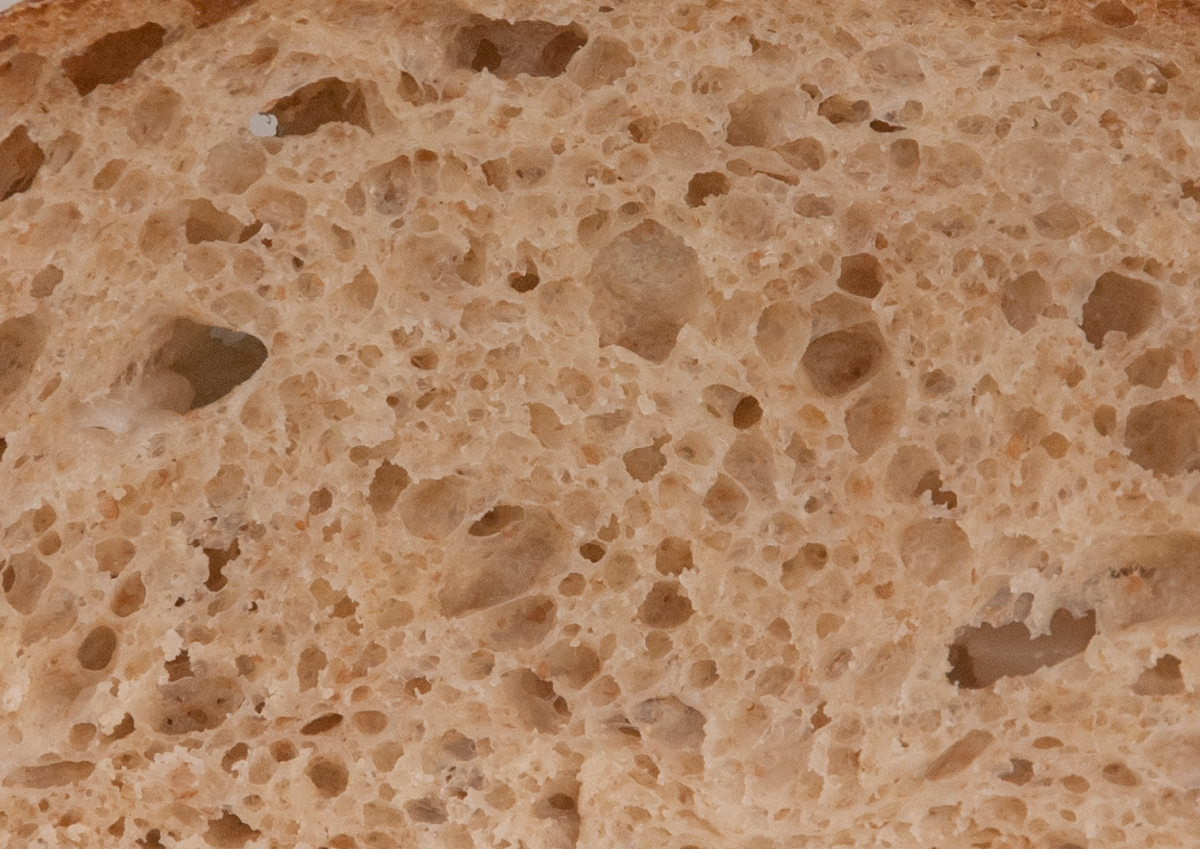
The crumb is soft, light, open and moist.  The taste is totally unique and unlike Hanseata's Wild Rice bread.   We really like this bread.  the dried edamame will be a routine bread ingrediant from now on - we love the mouth feel and taste of them in thsi bread very much.   We love rhe contrasting ncolors and textures of teh crumb - very appealing!  It is another fine bread of late and a shout out goes to Evon for her inspiration and fine post of her bread.  One more crumb picture for Lucy!
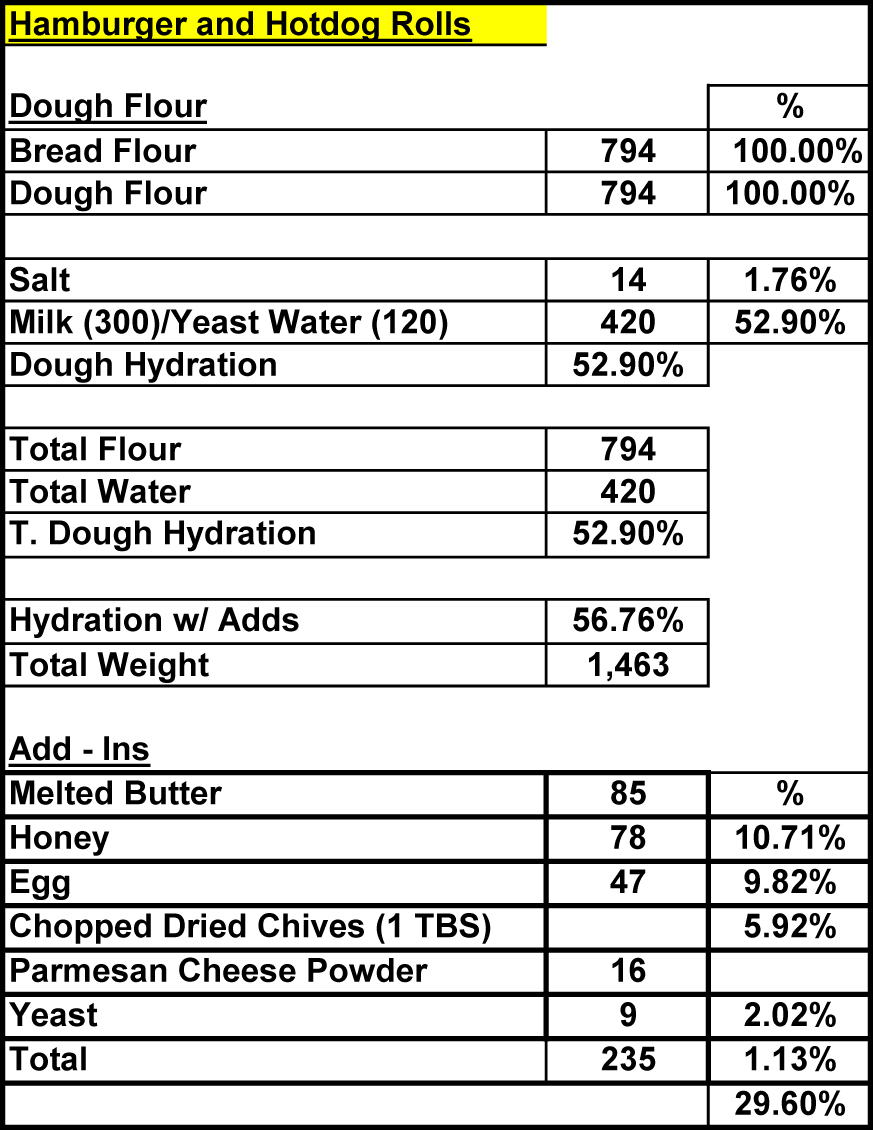
Formula

Whole Wheat and Rye Levain

Build 1

Build 2

 Build 3

Total

%

WW and Rye Sour Starter

20

0

0

20

3.17%

Whole Wheat

15

15

15

45

7.14%

Spelt

0

15

15

30

4.76%

Rye

15

15

15

45

7.14%

Water

30

45

20

95

15.08%

Total

80

90

65

235

37.30%


Levain Totals


%


Flour

130

20.63%


Water

105

16.67%


Hydration

80.77%


Levain % of Total

16.79%


Dough Flour


%


AP

500

79.37%


Dough Flour

500

79.37%


Salt

11

1.75%


Water

382

60.63%


Dough Hydration

76.40%


Total Flour

630.0

100.00%


Water

487


T. Dough Hydration

77.30%


Whole Grain %

25.08%


Hydration w/ Adds

72.90%


Total Weight

1,400


Add - Ins


%


Toadies

20

3.17%


Prunes

72

11.43%


Red Rye Malt

4

0.63%


White Rye Malt

4

0.63%


Dried Edamame

35

5.56%


Ground Sesame & Flax Seeds

12

1.90%


Poppy Seeds

3

0.48%


Anise, Coriander, Caraway & Fennel

12

1.90%


VW Gluten

10

1.59%


Total

172

27.30%


Sprouts


%


Japanese Back Rice

100

15.87%


Total Sprouts

100

15.87%


Weight for Japanese Black Rice is the dry weight.


Juergen Krauss's picture
Juergen Krauss

At the moment I am pursuing two totally different themes in my baking: Gluten Free bread and bread for a school summer fair themed "Treasure Island".

This blog post is intended as a journal for my thoughts and ideas, nothing is final yet.

The photo above is my take on "Pease Bread", the 18th century wheat-free alternative. See below.

Let's start with Gluten Free (GF) bread:

After my initial success with a Buckwheat-Millet Sourdough I am aiming to understand more indepth how GF flours behave. I will be using Psyllium husks as a gelling agent, avoiding all processed ingredients like gums etc.

My plan is:

  1. To determine the optimum amount of Psyllium needed for several GF flours. I will use a 60:40 flour:starch mix and instant yeast for these experiments. I will aim to adjust hydration in a way that makes the doughs feel similar. 
  2. To determine the fermentability of the individual flours Plus Psyllium  using Raisin Yeast Water, Rye Sourdough and Yeast.
  3. To develop a reliable GF Starter
  4. To work on flour combinations and taste

This is a lot of work, but i am really excited to do this.

My spreadsheet (work in progress) is here:

https://docs.google.com/spreadsheet/ccc?key=0AkcYHhPxccKtdG5aRV96RVY3TUkzdWM1R0tWcndmaXc&usp=sharing

/*  UPDATE */

Posted some photos of step 1 above: http://www.thefreshloaf.com/node/33651/some-gf-experiments

/* ************ */

Having spoken to several people with food allergies it is clear to me that it might be necessary to design a bread for an individual person and their specific sensitivities. 

A big Thank You to Gluten Free Gourmand and Laura T. for your inspirations:

http://www.thefreshloaf.com/node/32708/glutenfree-sourdough-progress

"Treasure Island" baking:

My son kindly volunteered me to have a bread stall at their school's summer fair. 

This fair is meant to be organised by the children, and the theme is "Treasure Island". 

It took me a few days to figure out what I could do within this frame of reference, and the pieces are starting to come together.

I looked into 18th century baking, and Andy (ananda) generously pointed me to an article about the history of flour usage in Britain.

I will have a group of children do most of the work on the day before the fair, using the school kitchen.

And this is what I intend to bake with them:

  1. Ships Biskets (Hardtack): the staple food of the sailors; this will be more for curiosity. Wholegrain Wheat flour 100%, Water 50%, Salt 2%, Mix until evenly hydrated, rest for 1 hour or so, shape flat palm-size biscuits 4oz each, dock, bake until completely dry, but not brown (I have to figure that one out). 4 of these was a sailor's daily ration.
  2. Pease Bread (see the picture at the top): The staple food of the very poor, or in times of bad wheat harvests.This is my take, quite tasty: Ground Haricot Beans: 30%, Ground Pearl Barley: 30%, Oatmeal 30%, Water 80%, Salt 2%, Rye Sour (100% HL) 20%. DT 28C. Bulk fermentation 2 hours, proof in basket 1 hour, long bake in falling oven.
  3. Maslin Bread: This would have been the staple bread of the lower classes in south England. My take on this: Wholegrain Rye: 50%, High Extraction Wheat: 50%, Water 75%, Salt 2% Rye Sour 20%. DT 28C. Bulk fermentation 2 hours, proof in basket 1 hour. Bake in falling oven starting hot.
  4. Manchet Bread: This is what the Squire, Doctor and Captain would have eaten. There are several historical recipes about, this is my first take. Everybody loved it: Stoneground White Strong flour: 100%, Water 54%, Salt 2%, Instant Yeast 0.7%. Mix, knead and beat the living daylights out of it with a rolling pin, until very silky. Get those carotenoids oxidized. They want WHITE bread!  Proof 2 hours. Shape into batard. Proof 40 minutes. Bake at 210C.

I will try out some other recipes for Manchet, and I intend to use ale barm - this afternoon I will pick up some from the brewery.

Here is a picture of Manchet and Maslin breads:

And here is a crumb shot of Maslin, Manchet and Pease Breads:

I am off to my kitchen now...

Cheers,

Juergen

varda's picture
varda

It was late.   I had three breads to prepare for.   This meant two starters, two soakers and a biga.   My eyes drooped.   I was almost done - once I made the second soaker, and then the biga, I could go to sleep.   Yet something was wrong and I didn't know what.   I looked down.   Instead of holding a bag of whole wheat flour, I was holding a bag of whole rye flour.  And I had already made the biga and the soaker for whole wheat sandwich bread with rye instead of wheat.   No rest for the weary.   I placed the mistaken soaker and biga in sealed tubs in the back of the refrigerator, and made the biga and soaker again - this time with wheat.    

What a difference a day makes.   My three breads prepared, I thought, hmmm.   Wonder what I could do with that rye soaker and biga?   I had extra starter.   That's always a good place to start.   But isn't it the case that wheat doesn't raise rye?   That's what I have believed for the last three years.   And yet.... extra starter, misbegotten biga and soaker.     I pulled the rye soaker and biga out of the refrigerator.   They both had taken on the texture of cement during their overnight stay.  Not very promising.    I'd probably be throwing good flour after bad.   But really, what did I have to lose?

So I mixed up the soaker, biga, starter, added some extra bread flour, salt and water for good luck, and had a dough of some sort, not sure what.   Then went through sort of half rye, half wheat bread steps, as I wasn't really sure what I had.    Then baked it.   It came out of the oven looking surprisingly pleasant.   As it cooled, I finally sat down to write down the formula of what I had in front of me.    More rye than wheat, percentages reasonable given that I did all the computations in my head at the counter.   And not enough rye that I had to wait until next day to cut.   All it needed was to cool down. 

I cut.   Hmmm.  

Really not that bad looking.  I tasted. 

Pleasant, mild, rye bread, without the sour tang that comes from leavening with rye sour.   A bread that many people might enjoy.   A bread that I would like to make again.  But on purpose next time.

Weird.

Formula and method:

Mistake Bread


5/23/2013


     Final

       Starter

       Soaker

          Biga

          Total

        BP

KAAP

105

60


165

44%

Rye


106

106

211

56%

Water

88

40


79

207

55%

Milk


92


92

24%

Salt

5


2


7

1.8%

Yeast


1

1

0.3%

Starter

100


Soaker

199


Biga

186


Total Flour

376


Total Dough

683


Hydration

80%


Scald milk


Make biga and soaker night before and refrigerate


After 15 hours mix all.


Dough is pasty but relatively firm


BF 1.5 hours


Shape into boule


Proof 1.5 hours


Bake at 450 with steam for 40 minutes


kenlklaser's picture
kenlklaser

I always meant to try Reinhart's Pain à l'Ancienne, and today was the big day.  This was an easy formula and process.

I used a hydration of 70%, whereas Reinhart recommends a value somewhere in the range 70-88%. I diverged slightly from his instructions in a couple of places. 

I use a pressure cooker to pump steam into a gas oven through a copper pipe which I installed in my oven, which is different from Reinhart's pan with a cup of hot water added when the dough is loaded. I did two batches in succession, I ended up steaming both bakes for the first 10 minutes, and stopped the steam for the final 8 minutes of 18 minutes total bake time.  He said they'd begin browning by 8-10 minutes, but with the pressure-cooker steam applied, they hadn't yet browned at 10 minutes when I turned the steam off.

It took about 3 hours for the yeast to wake up from its refrigerated slumber at a room temp of 75 °F, the dough temperature was just hitting 62 °F. When the gas:dough ratio reached 0.2 just a short time later, I shaped the logs and placed them to proof.  I only had enough room on the baking tile to bake three at once in the way I planned it, so I did two batches in succession.  The first one was baked when the gas:dough ratio was 0.7:

The second batch was by necessity 30 minutes later and the gas:dough ratio was 1.0 (a doubling):


I preferred the shape of the batch baked at a 0.7 gas:dough ratio, but believe it's not yet an optimal value.  The 1.0 dough expansion baked flatter, more like a wetter ciabatta.  Both had a reasonably open crumb.

Isand66's picture
Isand66

RollcloseupIt's Memorial Day this weekend believe it or not.  Doesn't feel like it's almost June, but it is certainly time to grill some hot dogs and hamburgers.  I hate using store-bought rolls since I know I can make ones myself that are far superior.

My wife insists that the only rolls worthy of using for hamburgers and hot dogs must be light white bread rolls.    I have been real busy at work so it's been difficult to find time to bake as much as I would like so a quick yeasted roll recipe would have to do.  With that in mind I adapted a recipe from Peter Reinhart's Artisan Breads Every Dayand added a few twists.

I decided to add some parmesan cheese powder and some dried chives just to make it a little interesting.

I used the overnight retardation method which helps build some extra flavor.

I must say that overall these came out nice and flavorful and were perfect for our hamburger and hot dog dinner the other day.

Hamburger-and-Hotdog-Rolls

RolllsGroup

Directions

Mix flours with yeast to combine.  Next add remainder of the ingredients keeping about 30 grams of milk back.  Mix on low-speed or by hand for 1 minute and let the dough rest for 5-10 minutes to absorb the flour.

Add the balance of the water if needed and mix for another 4 minutes.  The dough should come together and be scraping the side of the mixing bowl and be nice and fairly smooth but still tacky.

Remove the dough to your work surface and knead by hand for 1 minute.  Do about 3-4 stretch and folds and put in a well oiled bowl or container with a cover.  Put it in your refrigerator immediately.

You can keep it in your refrigerator for about 24 to 36 hours.  I ended up baking it in the morning so it was only in my refrigerator for around 14 -15 hours.   The dough should double while in the refrigerator.

When ready to bake the rolls or bread, take it out of the refrigerator and immediately weigh out your pieces or loaves and shape as desired.  I made simple round rolls and some hot dog buns.  I think it is time for me to buy a hot dog pan since I can't seem to get the size right and ended up with gigantic size hot dog rolls.  Next, let them rise for 1 hour on a cookie sheet with parchment paper.

After 45 minutes turn your oven up to 350 degrees F. and prepare your rolls as desired.  I beat 1 whole egg mixed with a little water and put an egg wash on each roll.  At the 1 hour or so mark pop them in the oven with steam and turn once after about 15 minutes.  These should take about 25 minutes to cook thoroughly.

Let them cool on wire rack for at least half an hour before digging in if you can wait that long.

Crumb-Shot

Isand66's picture
Isand66

 Ever since I baked my first "Pillow Bread" last month I've been wanting to try baking this again with some modifications.  I wanted to use a 24 hour bulk retardation instead of baking it on the same day and I wanted to add some onions as well.

I also decided to use some of my apple yeast water in the levain and in the final dough but not as a rising agent.  Instead I  just to add some extra flavor and soften the crumb.

I also changed up the flour combination a bit using some Spelt flour in place of some of the Kamut flour and also in the levain.

I used a chopped onion and mixed it in with the sour dough levain build along with some Yeast Water which ended up adding a nice subtle sweet onion flavor to the final bread.

I cut the amount of yeast in the final dough slightly to compensate for the bulk retardation.

The final bread turned out excellent with a nice open crumb and crisp crust.  While the crumb is not as open as the last bake it actually is better suited to using for a nice sandwich or to dip in olive oil.  I like the flavor profile very much and the addition of the spelt and onion as well as the overnight bulk retardation really makes this one a winner.

Pugliese-withOnions

Levain Directions

Mix all the levain ingredients including the chopped onions together for about 1 minute and cover with plastic wrap.  Let it sit at room temperature for 6-10 hours or until the starter has doubled.  I let it sit overnight and used it in the final dough in the morning.

You can use it in the main dough immediately or refrigerate for up to 1 day before using.

 Main Dough Procedure

Mix the levain with the water and add the flours, and yeast and mix for about 1 minute.  Let the dough rest for about 20 minutes or longer.  Next add the salt and mix in your mixer for 2 minutes on low, and 2 minutes on medium .  This differs from the original procedure which required you to mix for over 6 minutes increasing the speed all the way up to high.  I'm not sure if maybe that may have helped pump some more air into the dough so next time I may go back to that procedure and see the difference.

Take the dough out and place it in a clean oiled bowl and leave uncovered for 10 minutes.  After 10 minutes do a stretch and fold and cover the bowl.  Let it rest for another 10 minutes and do an additional stretch and fold and immediately place back in the bowl, cover it and place in the refrigerator for 12 to 24 hours.

When you are ready to bake, take it out of the refrigerator and shape it gently into a boule and proof in a well floured basket or bowl and cover with a moist towel or plastic wrap and let it rest for 2 hour or so.  The dough will only rise about 25 to 30% since it already has risen in the refrigerator.

In the mean time pre-heat your oven to 500 degrees F. and prepare it for steam.  I have a heavy-duty baking pan on the bottom rack of my oven with 1 baking stone on above the pan and one on the top shelf.  I pour 1 cup of boiling water in the pan right after I place the dough in the oven.

PillowBreadRisen

This bread does not need to be scored so when ready to bake, place it on  parchment paper on your peel and then add 1 cup of boiling water to your steam pan or follow your own steam procedure.

After 1 minute lower the temperature to 450 degrees.  Bake for 35-50 minutes until the crust is nice and brown and the internal temperature of the bread is 205 degrees.

Take the bread out of the oven when done and let it cool on a bakers rack before for at least 2 hours before eating.

This post has been submitted to the Yeast Spotting Site here: http://www.wildyeastblog.com/category/yeastspotting/.

CrumbPillow

GroupPillow2CrumbCloseup

 
arifainchtein's picture
arifainchtein

Hello,

I am a software developer slowly becoming a farmer. My project is described in www.chilhuacle.com and www.gingeros.org.  I am reaching a point where I need to build a small bakery to produce sourdoughs as well as other yeasted breads. ( I finally have the teleras I grew up eating in Mexico City down to perfect).  My idea at first is to supplement my CSA boxes with bread.  I am not growing the grain myself, but source it from a neighbour who grows it biodynamically.

My current very high level design includes a small building for the actual preparation, a wood fired breadoven and a dryer/smoker  (this is for another side of the operation but is logical to have it there because of the proximity to the wood storage area).

I have a couple of books for the oven, and have googled about the smoker.  The bakery is where I thought this forum could be a great place to ask for help. Because of the site, money and other council planning reguations, I am thinking  a 3.2m x 2m (ie 10 feet by 7 feet more or less) enough for a a 2 meter long  table and  a milling machine, a kitchen aid type machine that could mix  dough for 9 1.2kg loafs and a proofing cabinets.

I would love any suggestions for anything anybody thinks i should and should not do. All my ip is open source and will eventually end up formatted and uploaded to the above sites.

Thanks

Juergen Krauss's picture
Juergen Krauss

I shouldn't be baking when I am too tired, especially not something new:

I did only enough turns for croissants, getting 32 layers. Butter everywhere!

The next try was much better, with 256 layers:

But this time I think the problem is the oven. Fan only, and the door seems to loose a lot of heat.

I rotated the baking sheet every 10 minutes during the bake.

Cheers,

Juergen


Pages

Subscribe to Recent Blog Entries