The Fresh Loaf

A Community of Amateur Bakers and Artisan Bread Enthusiasts.

Recent Blog Entries

Szanter5339's picture
Szanter5339


Szanter5339's picture
Szanter5339


http://szanter.blogspot.hu/


Szanter5339's picture
Szanter5339


Kovászos kenyér, Olaszul is.

520 ml víz

1000 g liszt BL55  (fehér liszt)

2 kávéskanál Fruktóz (lehet cukor is)

2 evőkanál olaj vagy, 4 evőkanál vaj.

6 kávés kanál só

+  300 g érett kovás


Kovász készítés:

  1. 3 evőkanál teljes őrlésű búzaliszt vagy rozsliszt vagy tönkölyliszt  3 evőkanál víz (kb. 40°C-os) A vizet a liszttel elkeverjük és letakarva, meleg helyen (kb. 20-22 °C-on), 1-2 napot állni hagyjuk.


2. 3 evőkanál teljes őrlésű liszt  3 evőkanál víz (kb. 40°C-os Mindezt az 1. lépcsőben elkészített masszához keverjük, amely már kellemes, savanykás szagot áraszt. Ismét letakarjuk, és 20°C-on 1 napot állni hagyjuk.


3.  10 dkg teljes őrlésű búzaliszt vagy rozsliszt 1 dl víz (kb. 40°C-os) Az előzőekkel összekeverjük, és letakarva, 20°C-on ismét egy napig állni hagyjuk.

Kovászos kenyér.


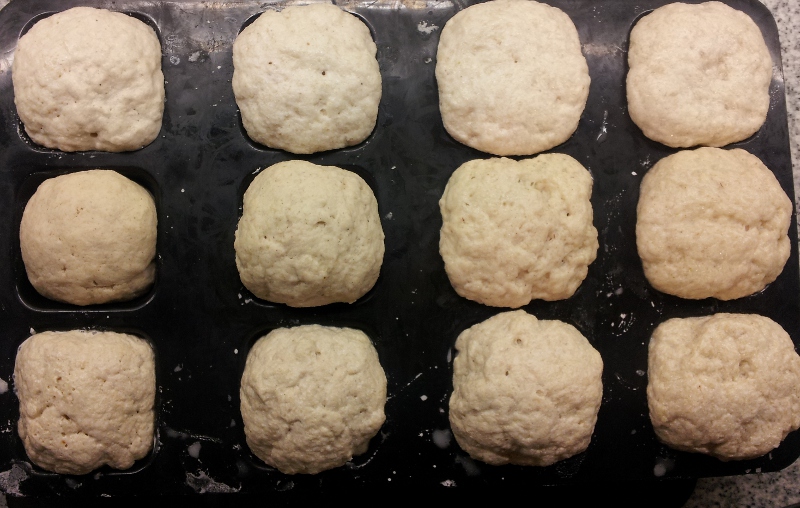
A kenyér hozzávalóit tálba teszem. Kevés vizet meghagyok, és ha szükséges, akkor pótolom.

Inkább keményebb tésztát dagasztok, rugalmas nem ragadós. Akkor jó, mikor nem ragad a kezemhez és a tálhoz sem.

Deszkára teszem és laza mozdulatokkal még dagasztom egy kicsit.

Sütő edénybe teszem.

Ezzel elkezdődik a hosszú kelesztési idő. 20-22 fokos melegben legalább 3-4 óra szükséges.

Ha hűvösebb a konyha, akkor a kelesztési idő megemelkedik.

Olvastam róla, hogy nem kell attól félni, hogy túl kel, mert a kovászos kenyér nem tud túlkelni. Viszont minél tovább áll, annál savanykásabb ízt érünk el végeredményként.

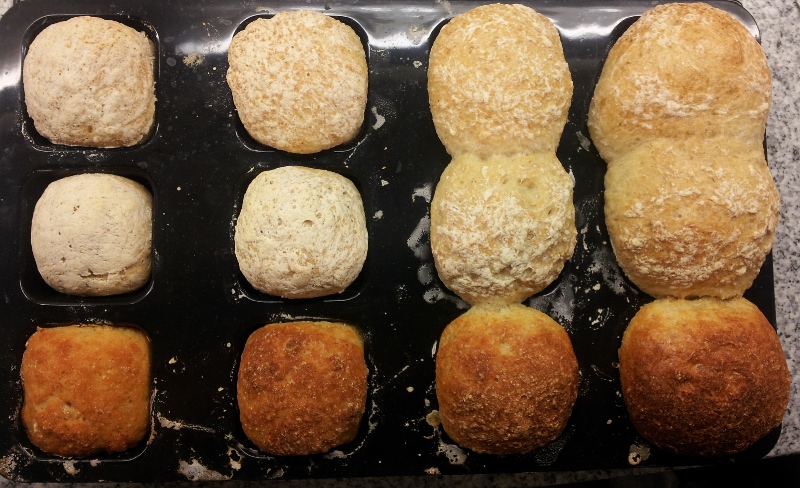
Felfűtöm a sütőt, 230 fokosra és a sütés végéig így hagyom. Gáztűzhelyben sütve, szinte a maximumra állítva.

 Bevágom a tészta oldalát és beborítom egy szintén sütőpapírral bélelt edénnyel. Lehet a sütőedényünk, jénai, cserépedény, egyszerű tál, lábas. Lényeg, hogy legyen teteje!

Beteszem a forró sütőbe a sütőedényt és sütöm 40 percig, majd leveszem a tetőt és tovább sütöm jó erős arany barnára.

Mikor kiveszem a sütőből, rácsra teszem, kicsit lespriccelem vízzel.

Sütés után, nagyon kemény a kenyérhéj, de nem kell megijedni, mert lassan átalakul a kihűlési folyamatban. Egy óra múlva, gyönyörű cserepes, ropogós, és lágy kenyeret kapunk.


Megjegyzésem:


 A dagasztás után már nem szabad lisztnek érnie, mert csak akkor lesz szép sima, fényes a kenyér teteje.

Az a tapasztalatom, jó erősen meg kell sütni, akkor lesz cserepes a kenyerünk.


Ha nem akarsz érett kovásszal sütni, akkor el lehet készíteni 10-12 órás kovásszal is!


A 10- 12 órás kovász receptje.

1,5 dl langyos víz

15 dkg BL80 liszt

1 dkg élesztő


Pane con „Pasta Madre”

 Ingredienti:       520 ml acqua

1000 g farina bianca BL55  

2 cucchiaini di Fruktóz (o zucchero normale)

2 cucchiaio di olio

6 cucchiaini di sale

+  300 g pasta madre

 Preparazione della „Pasta Madre”:

 Mescolare 3 cucchiai di farina integrale di frumento (o d segale o di farro) con 3 cucchiai di acqua tiepida (cca 40°C) coprire e lasciare riposare 1-2 giorni in un posto caldo (20-22 °C).

  1. Aggiungere  ulteriore 3 cucchiai di farina integrale 3 cucchiai di acqua (kb. 40°C) all’impasto che nel frattempo comincia ad avere un profumo acido piacevole.  Coprire di nuovo e lasciare riposare 1 giorno in un posto caldo (20°C).
  2. Aggiungere 1 etto di farina integrale di frumento o di segale ed 1 dl di acqua (cca 40°C) all’impasto, coprire e lasciare riposare 1 giorno in un posto caldo (20°C).

 Preparazione pane con „Pasta Madre”

Mettere ingredienti in una ciotola, lasciando a parte una piccola quantitá dell’acqua, poi aggingere se necessario.

Preparare un impasto abbastanza duro, flessibile. Va bene se non si attaca né alla ciotola né alla mano.

Mettere sulla tavola d’impasto e lavorare ancore per un po.

Mettere nel tegame da forno.

Con questo inizia il periodo lungo di lievitazione. Alla temperatura di 20-22 centigradi ci vogliono almeno 3-4 ore.

Se la cucina e piú fredda, il tempo si allunga.

Non é de temere di una lievitezione eccessiva, questo non accade mai con il pane con la „Pasta Madre”. Piú lungo tempo si lascia lievitarsi, piú acido sará il sapore del pane.

Riscaldare il forno a 230 °C, lasciare a questo livello durante la cottura. Nel forno di gas regolare quasi al massimo.

Fare un taglio sul lato dell’impasto e coprire con il coperchio (o con un altro tegame) imbottito di carta da forno.

Il tegame puó essere vario, vetro, terracotta, ecc., importante di avere il coperchio.

Mettere nel forno preriscaldato e lasciare cuocere 40 minuti.

Togliere il coperchio e continuare finché non avrá un bel colore dorato.

Togliere dal forno, mettere su una griglia, spruzzare con un po di acqua.

Il pane appena fatto ha una crosta molto dura, ma non c’é da preoccupare, diventa meglio raffreddando. Tra un ora il pane sará morbido con la crosta croccante.

 Consigli utili:

Per ottenere un pane con la parte superiore liscio e lucido, l’impasto non deve essere toccato dalla farina.

Tenere il pane in forno tutto il tempo necessario, piú lungo il tempo nel forno, piú croccante la crosta diventa.

Se uno non vuole occuparsi della preparazione della „Pasta Madre”, si puó fare anche con la cosidetta pasta madre di 10-12 ore

Ricetta di Pasta Madre di 10- 12 ore

Ingredienti:                   1,5 dl acqua tiepida

                                   1,5 etti di farina BL80

1 etto di lievito di birra


Szanter5339's picture
Szanter5339

              Fénykép


              Fénykép


              Fénykép


              Fénykép


Szanter5339's picture
Szanter5339


SylviaH's picture
SylviaH

Oh, Strawberries!  They are abound now and will be gone soon.

I was thrilled that a local 3 generation family owned farm with organic, pesticide free,  picked daily, fruits and veggies, have opened a second stand down the road from me.  They have another stand near by but this one is super convenient for me.  Now I have three to pick from all within less than 15 minutes drive and, that's not counting the 2 farmer's market's.  

I feel so spoiled after moving from the desert.  There was one ranch that was picked over and trampled before anything was ready at least by the time I arrived.  It made me so sad to see had people abused all the brothers hard work.  Thank goodness Whole Foods arrived.  

I've made a few batches for sending to some of my family and, extra for Mike..who loves  my strawberry jam, strawberry shortcake and anything else strawberry.  

I made some strawberry shortcake cookies.  It's an old Martha Stewart recipe that I've tweaked with sour cream instead of heavy cream.  Basically, I think it's just like a scone.  I think I would like scones made with these fresh strawberries even more than the cookies.  But these are different and very enjoyable.    

I also baked a Pain Au Levain with whole wheat ala Jeffrey Hamelman's 'Bread'.  Mike loves a bit of toast with the SJ.  


Strawberry Jam on Pain Au Levain w/ whole wheat - Jeffrey Hamelman's 'Bread'


Strawberry Shortcake Cookies -  These cookies remind me of a scone, they are not mild in sweetness and, the strawberries really come through in flavor.  

I've posted the recipe below.  They should be eaten right away or refrigerated for a short time.  They won't last long.

 Martha Stewart's strawberry desserts

Strawberry - Shortcake Cookies

A handy portable version of a classic dessert.

12 ounces strawberries, hulled and cut into 1/4 in diced pieces (2 cups)

1 teaspoon - fresh lemon juice

1/2 cup plus 1 tablespoon granulated sugar

2 cups all purpose flour

2 teaspoons baking powder

1/2 teaspoon salt

3 ounces (6 TBsp. cold unsalted butter cut into small cubes

2/3 cup of heavy cream -  I didn't have any cream so I used sour cream

Some sparkle sugar crystals to sprinkle on top of cookies before baking.

1.  Preheat oven 375F - I use convection setting for best results.

Combine strawberries, lemon juice and a Tablespoon of granulated sugar.  Whisk together flour, baking powder, salt,

and remaining 7 Tablespoons granulated sugar in a large bowl.  Cut in the butter with a pastry cutter, or rub in with

your fingers, until mixture resembles coarse crumbs.  Stir in cream until dough starts to come together, then stir in

strawberry mixture.

2.  Using a 1 1/2 - inch ice cream scoop or a tablespoon, drop dough onto baking sheets lined with parchment,

spacing evenly apart.  sprinkly with sanding sugar, and bake until golden brown, 24 to 25 minutes apx.  

Transfer to a wire rack, and let cool.  Cookies are best served immediately, but can be stored in an airtight container

at room temperature for up to 1 day. 


Have a Berry Happy Day!

Sylvia


golgi70's picture
golgi70

So I've stuck with it into week two (lets see about week 10).  To prep for this market I have to be prepared as i work M-F and that means after work Friday is the likely time I'll be bulk fermenting/shaping/retarding.  Followed by waking up early to bake the loaves and get down to the market in time.   

This week I chose to use one of my trade items from last week.  Local dried figs. I write up a recipe and it continues to be manipulated right until I finally make the dough.  Then I put together a rough guideline and let the dough lead.  I'll post recipe and tommorrow after all is said and done some pictures and I'll update the recipe with some notes. 


Figgy Sour                           

108 grams HP
36 g Rye
144 g H20
32 g Mature White Starter 
--------------------------------
ferment 8 hours

Dough
48   g Dried Figs (chopped roughly)
80 g Hot water
------------------------------------
Soak figs warm water when you make the levain.

------------------------------------
96 g  Kamut
552 g HP
91  g   Yogurt  (scale when you make the levain and let come to room temp)
215 g H20
1/2 tsp fennel seed (soak in final dough water while figs are soaking)
16 g Sea Salt
----------------------------------
DDT 76deg

When levain is ready
1) Drain Figs and add liquid to final dough liquid.  Mix in the yogurt
2) Add Flours and mix until shaggy dough is formed (autolyse 1 hour) 
3) Add levain and blend in, Add salt and continue mixing
4) Mix on low speed for a few minutes until dough begins to develop. (I have a 4 speed mixer and use speed 2) Once slighly developed
Add  figs and mix in slowly.
When pulled away from bowl turn up to speed 3 for 30 seconds to mix and mash some of the figs just a bit.
5) Bulk ferment 3-4 hours with 4 s+f at 30 minutes intervals. (4 hours with 4 s + f)
6) Divide and shape into bannetons. Proof 1-2 hours at room temp and retard.
7) Bake with steam at 460 for 15 vent for 25

Updates tommorrow when all is said and done.  Currently shaped and waiting to be retarded. 


Juergen Krauss's picture
Juergen Krauss

Warning - this contains lots of photos

I outlined the experiments I wanted to undertake with regards to GF baking  in a previous post and here is a brief personal log of the first steps.

I baked gluten free breads with a mix of tapioca flour, potato flour and five other flours using instant yeast as rising agent and psyllium husk as gelling agent.

The psyllium husks have been soaked with 20g water per g Psyllium.

For each of the "main" flours (making up 60% of the total flour, the rest are the starches) the amount of psyllium has been varied and hydration has been adjusted to give the doughs a similar feel as far as possible.

The details of the bakes are in a google sheet here:

https://docs.google.com/spreadsheet/ccc?key=0AkcYHhPxccKtdG5aRV96RVY3TUkzdWM1R0tWcndmaXc&usp=sharing

The sorghum was a flour from TRS, the millet was a GF certified flour from Infinity Foods and the others were freshly milled.

The breads were baked at 210C for about 40 minutes.

Now to the results:

Quinoa gets the best marks in terms of color, Sorghum in terms of handling, consistency and crumb. Rice bread was surprisingly light and tasty.

The amount of psyllium has a great influence on the handling qualities of the dough, there is a fine line between yielding a pliable and a dough that feels more like jelly.

Because Psyllium attracts so much water the amount of Psyllium also hugely determines the final hydratiuon of the dough.

1. Buckwheat:

With 2% Psyllium / 90% Hydration and 4%Psyllium / 110% Hydration the crumb was pleasant and the taste strong but not overpowering. Above 110% Hydration the taste became watery.

The batch after "shaping":

After baking (the same labels apply):

And here the crumb:

2. A batch with brown rice, sorghum and quinoa, after shaping:

After proofing (the same labels apply):

After baking:

And here the crumb:


3. Millet

This was the first of the batches, and I might have overproofed a bit.

The shaped batch:

After proofing

After baking

And here the crumb:

The 4% Psyllium Millet loaf is agreeable. I might repeat this with less hydration, although I must say that for me millet is the clear looser in terms of texture, taste and handling.


michelebike's picture
michelebike

            
 Levain


35 gr Starter

140 gr di H20

140 gr Semola  di Grano Duro Rimacinata

Left at Room  temperature 22 ° for 10 H 


Final Dough


350 + 50  gr di H20

4 gr of Malt

560 gr di Semola di grano Duro Rimacinata

13 gr Salt


Method


-         when levain is ready

-         take the 350gr H20 and mix the malt

-         mix water and levain together with a mixer and rest for 15 min

-         add the salt and the 5o gr of  water and rest  for 40 min

-         1 ½  H bulk fermentation every 30 min S & F

-         20 min of rest after the last S & F

-         Preshape  and bench rest  15 min

-         shape and bannetton for 20 min and than in fridge 4 ° for 20 H

-         1 H at room temperature in the same time preheat the oven

-          scoring and baking at :

-         15 min with steam at 250°

 -        30 min NO steam  at 250 °

-      15 min at 200 with the oven  door slightly open


For one loaf


http://freebakery.blogspot.it/

Pages

Subscribe to Recent Blog Entries