The Fresh Loaf

A Community of Amateur Bakers and Artisan Bread Enthusiasts.

Recent Blog Entries

foolishpoolish's picture
foolishpoolish

[DELETED BY AUTHOR]

pmccool's picture
pmccool

What follows is a case study of "Its beautiful!  Let's change it!"

When we moved into our present house in August 2007, one of the things that we especially liked about it was the large, open kitchen with lots of cabinet space and room to maneuver.  No more tripping over each other, as in the cramped kitchen of the previous house; no more trying to find a place to set something down that wasn't already occupied by something else.  It was pretty typical of houses that were built in this area in the mid-1990's; lots of honey-oak cabinetry, formica counter tops, ceramic tile backsplashes, etc. 

We have, over the years, been collecting ideas of things we would like to have in our kitchen.  There was the "If money was no object" list and there was the "Get real!" list.  One of the things that we fell in love with a few years ago was soapstone for counter tops.  I don't recall where or how we first became aware of it, but I do remember that after seeing it used (and still usable) in a Shaker village built in the mid-1800s we figured that durability wasn't going to be a problem.  I'll spare you the rationalization / sales pitch as to why we chose it over other options.  Let's just say we like it.  In looking at the somewhat worn Formica counter tops that were in the house, we decided that this might just be the time and place to take the plunge. 

Once the decision about counter tops was made, several other things followed in rapid progression.  For instance, to take out the existing countertops, the existing backsplash had to be removed.  Besides, white ceramic tile wouldn't have complement the new soapstone counters.  To get all of the backsplash out, the existing microwave oven had to be pulled.  Said microwave not only functioned poorly, it's vent fan recirculated cooking odors back into the house instead of venting outdoors.  Oh, and the dinged up, surface-mounted porcelain sink?  That had to go.  While they're messing with the plumbing anyway, let's get a new disposal, too.  To quote the King of Siam: "Et cetera, et cetera, et cetera."

So, by choosing new counter tops, we got:

- new counter tops (natch)

- new backsplash

- new microwave, vented outdoors

- new undermount sink

- new faucet

- new disposal

- new switches and outlets (to coordinate with new backsplash)

- new pulls for the drawers and cabinets

- new under-cabinet lights

Talk about unforeseen consequences!

The steam-injection oven remains on the "If money were no object" list.  We decided that we could live with the existing white refrigerator, even though all of the other appliances are black.

The first thing to go was the backsplash and counter tops.  Not having a place to set things down for a couple of weeks was an adjustment we never quite got used to:
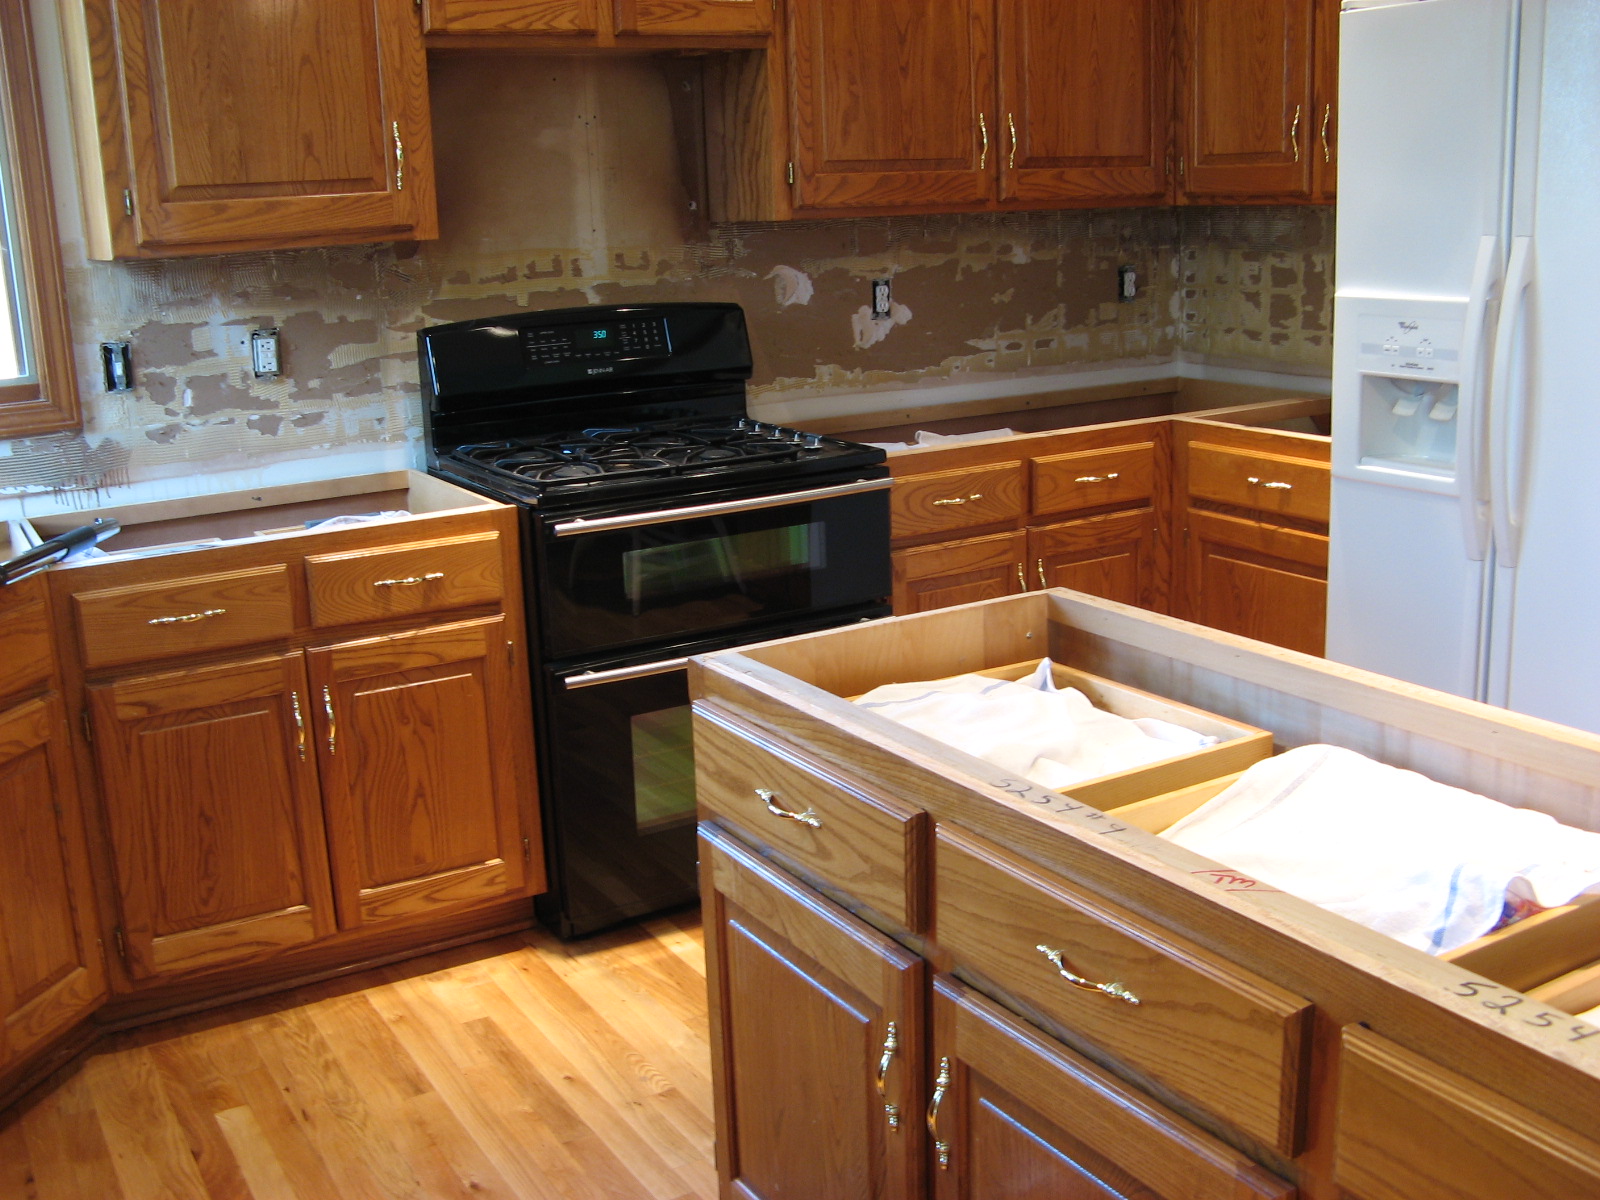
Tear out

The day after the wrecking crew tore out the backsplash and counters, another individual came to take the final measurements and make the templates that the stone fabricator would need to cut the raw slabs into the finished pieces for the counter tops.

A crew came back to install the wiring for the puck lights underneath the upper cabinets while the stone fabricator was doing his thing.  Under-cabinet lighting wasn't something that had been on either list but after seeing how much darker the slate tiles were going to be, compared to the previous white ceramic tiles, we decided that it would be a good thing to have. 

And then came the day that the new counters arrived:

They're here!

The installer in the above picture is finishing a seam between two sections of counter top.  Note that he has already installed the under-mount sink.

The final step for installing the counter tops was the application of a coat of mineral oil.  When soapstone is oiled, it darkens dramatically.  Since the stone isn't porous, I'm not sure exactly why it works.  The closest approximation I can think of is the difference between dry pavement and wet pavement, particularly when driving at night, in the sense that the oil fills in microscopic irregularities on the stone's surface in much the same way that rain fills in the irregularities of the pavement's surface, making it look much darker.  Or maybe I'm the one that's all wet.  Anyway, oiling is not required.  It does nothing for the stone, other than change its appearance.  My wife thinks that she will probably not oil our counters with any frequency, if at all.  She prefers the "dry" look.  Here's a picture that shows part of the stone oiled and part of it dry:
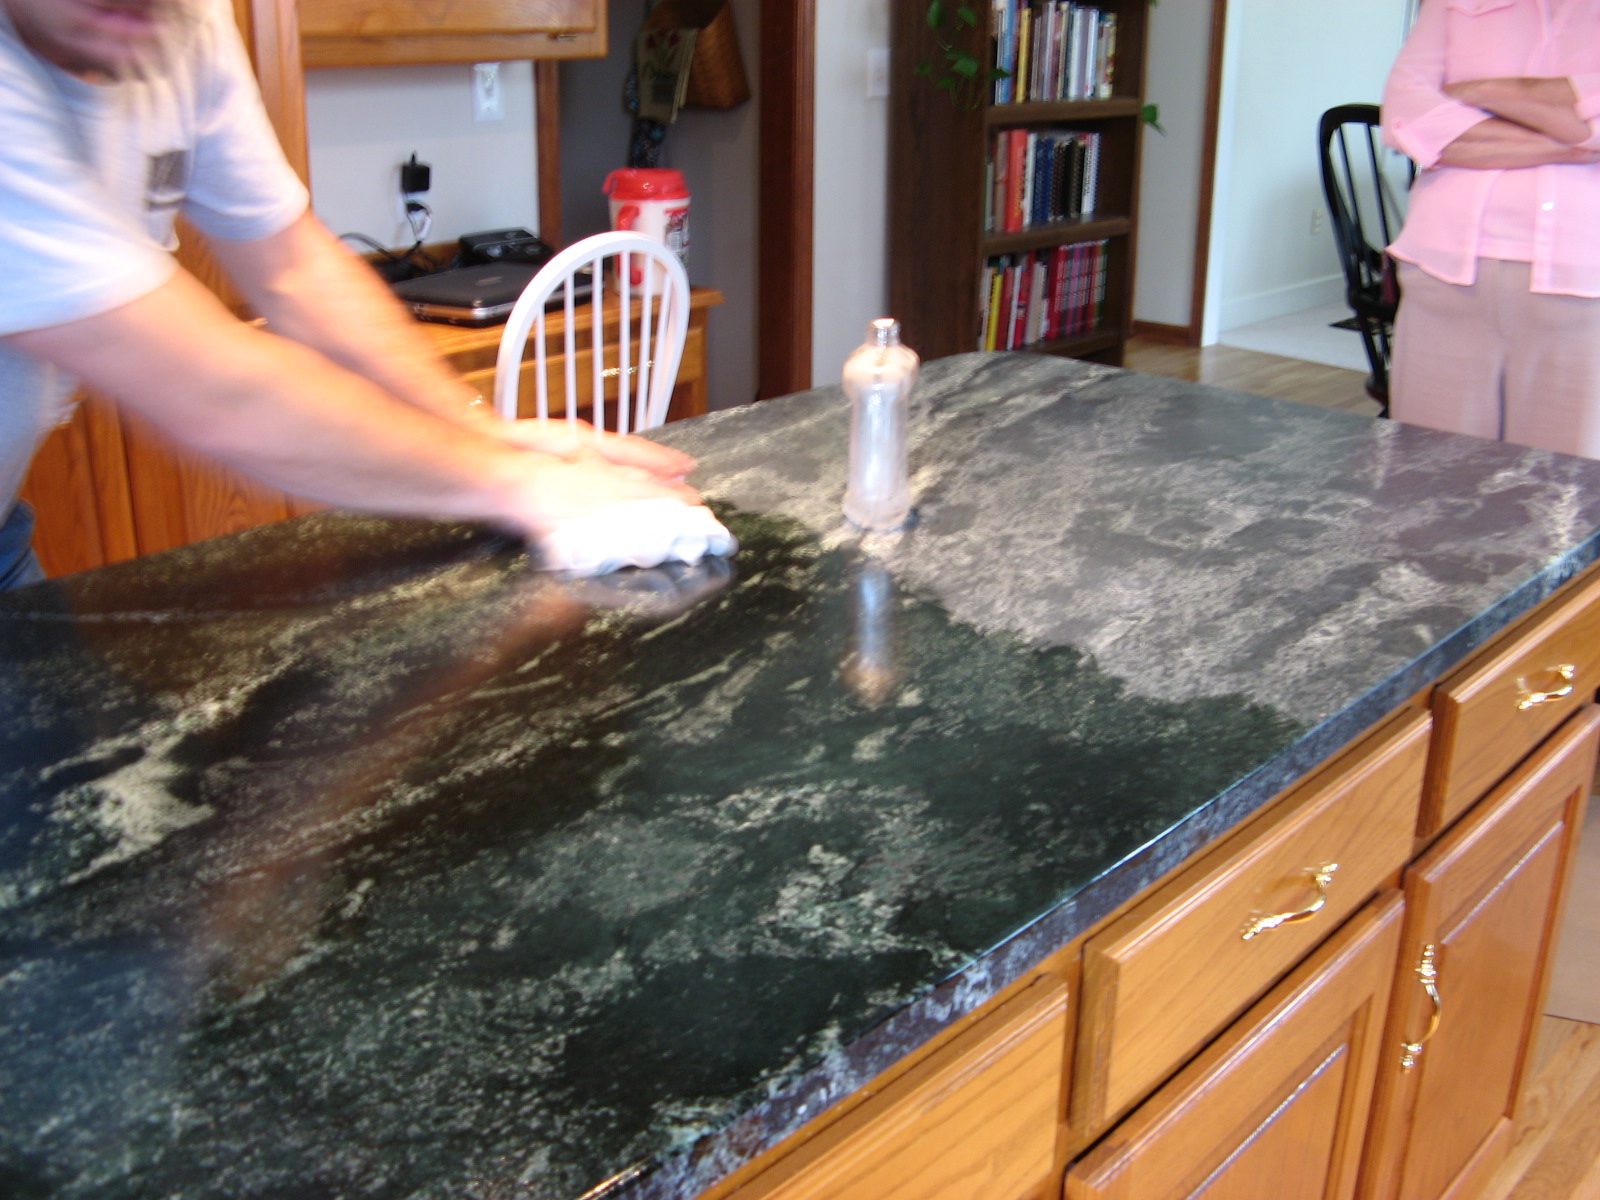
Oiled vs. dry stone

Over the next couple of days, the slate tile backsplash was installed, grouted and sealed.  You can also see two of the puck lights under the upper cabinets, along with the new faucet at the sink and the new pulls on the cabinets and drawers in this shot:
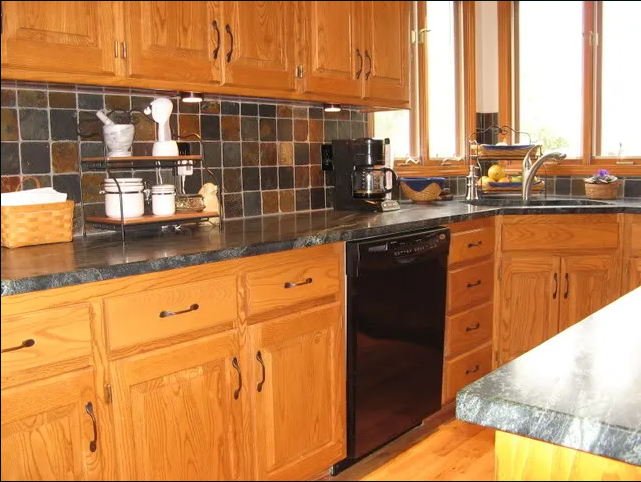
Slate backsplash

And a couple of more shots showing the finished work:
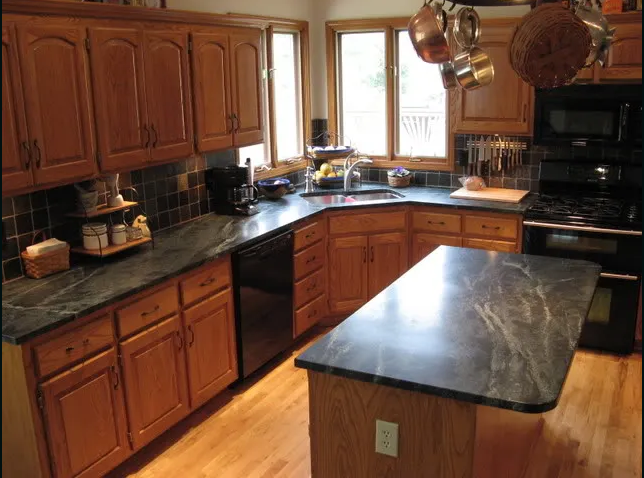
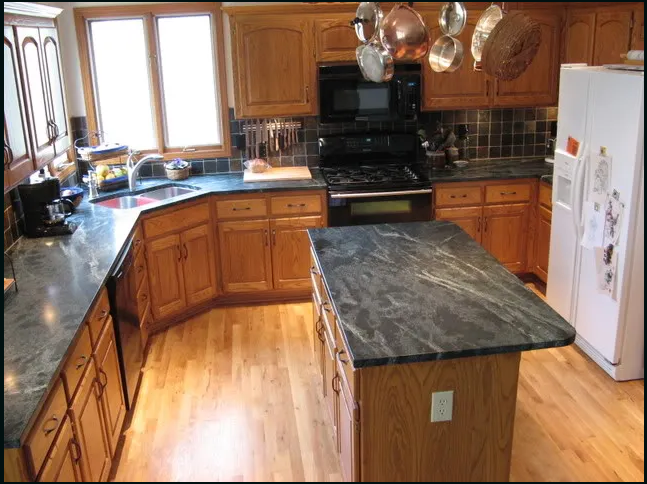
Finished!

Finished!

We had dithered about whether or not we should refinish the cabinets, eventually defaulting to a wait and see approach.  Now that everything is in, we are content to keep them as they are.

We are very satisfied with how things have turned out, even though some of the et ceteras drove the price up higher than my informal initial estimate.  We expect to be using, and liking, this kitchen for a long, long time.

Bottom line?  "It's beautiful!  Don't change a thing!"

Janedo's picture
Janedo

What makes a great baguette? Well, first of all, what's a baguette? It's a post-war, "we're sick of tough pain au levain, we want what the American's have", loaf of very light, white bread. It's made with yeast, very white flour that is very often, believe it or not, a mix of French soft and American hard wheat. Most French bakeries "cheat" and use white flour with stuff in it like ascorbic acid which produces an even light loaf. The baguette "tradition" is the no-cheat version, made with only flour, water, yeast and salt, no additives.

I'm not a huge fan of the baguette but it definitely has its uses. It makes great sandwiches, it sops up sauce very nicely and when it is very, very fresh, still warm out of the oven, it is quite heavenly!

But it's darn hard to find a really good one these days and no bakeries around where I live make a decent one.

It isn't that hard to make a baguette-style bread. There are loads of recipes, either straight method, on a poolish or even a sourdough version. But the question some of us have been asking is, How do you get those that really light, airy, big holed crumb? Is it the flour? The preferement? The fermentation? The kneading? The proofing? The baking? All of the above?

I have no clue really. I have ideas, suspicions. So, the only thing to do it TRY!

For my first test I simply took the recipe for Baguette Tradition from the web site of the INBP, L'Institut National de la Boulangerie Pâtisserie. I thought I'd try their very straight method before doing some of my own experiments.

Well, I was actually impressed with the results. They don't LOOK that beautiful, but they were very tasty and very light. They look sort of heavy but when you pick one up, it is much lighter than you imagine. The crumb is light and melt-in-your-mouthish. The crust is crackly.

I used organic T55, tap water, Guérande salt and yeast.

Here's the recipe:

Poolish: 150g T55 flour, 150g water, 2 pinches yeast - 15 hr ferment

Dough: poolish, 300g T55 flour, 140g water, 8g salt, 1tsp yeast

The recipe called for fresh yeast and since I forgot to take it out of the freezer, I guessed on the regular yeast.

There is no autolyse. 10 min on first speed, 3 min on second (that's what the recipe says!)

30 min rise, fold, 30 min. Mise en couche oblong shape. 30 min rest, form 3 baguettes, proof 1 hr.

Incisions then 20 min bake with a medium steam at 250°C.

Baguette N°1

Baguette N°1 crumb

So, I let the baguettes proof until I found they were nicely risen and I could see the air pockets under the "skin". I sliced quite deeply, but at baking they didn't get that much spring which I found strange. I followed the instructions and baked at 250°C but wondered if a lower temp wouldn't have been better.

I think the basic recipe is definitely a good one and I'm going to try again changing the variables to see what I can get out of it. Longer/shorter proofing, longer mixing (I read in a French site that baguettes need "agressive kneeding) Any suggestions are welcome! 


pmccool's picture
pmccool

I had occasion to try several new things last weekend: Rose Levy Berenbaum's recipe for "Levy's" Real Jewish Rye Bread, one of my recently acquired bannetons from SFBI, and the Pampered Chef equivalent of a La Cloche (which has been sitting around unused for years).  This also marked the second time that I have made bread on the new soapstone countertops that were recently installed.

The recipe comes from RLB's "The Bread Bible".  The bread contains 3.3 oz of rye flour, vs. 8.5 oz of bread flour, so it is scarcely any more sticky than a wheat dough would be.  And with 2 tablespoons of caraway seeds, rye isn't the dominant flavor.  The bread begins with a yeasted sponge, which is allowed to ferment 1-4 hours.  It eventually bubbles through a flour layer that is placed on top of the sponge:

Fermented sponge 

Once the sponge has fermented, the flour mixture, oil and salt are stirred in.  The dough is then kneaded and left to ferment under an overturned bowl for a 20-minute rest:

Resting dough

After the dough has rested, it is kneaded again and then allowed to rise until it is doubled.  At that point, it is given a letter fold, then returned to the bowl until it doubles again.  After the second rise, the dough is flattened slightly and then shaped into a ball and allowed to rise until it has doubled.  Ms. Levy recommends that the final rise after shaping occur in a covered bowl.  I opted to use a fabric-lined banneton, dusted with rice flour, covering the exposed surface with plastic wrap to keep it from drying.

Ms. Levy suggests baking either on a baking sheet with steam, or in a cloche.  In both cases, she recommends having a baking stone in the oven as it preheats, then setting either the baking sheet or the (also preheated) cloche on the baking stone.  It seemed like overkill, but I followed the instructions as given, using the cloche.  The risen loaf was tipped out onto parchment paper, slashed, then placed in the cloche and covered.  I'll need to practice the technique a bit.  I was a bit gun-shy about burning myself on either the cloche base or its lid, so I wasn't as gentle with placing the loaf as I should have been.  It deflated slightly but recovered most of the loss with oven spring.

Based on the directions, I pulled the cover from the cloche about 10 minutes before the estimated completion of the baking time, expecting that it would finish browning during those last few minutes.  Instead, I saw that the loaf was already well-browned.  So, I stuck a thermometer in it, which quickly registered 210F.  At that point I declared it done and placed it on the rack to cool.  Here's how it looked:

Cooling rye bread

And a shot of the crumb, taken the next morning:

Crumb of Levy's rye

More of the color comes from the malt syrup in the recipe than from the whole rye flour that I used.  The crumb is firm and moist, the crust thin and chewy.  It makes a mean ham and Swiss sandwich. While I like caraway in a rye bread, the amount in this bread is more than I would use for my tastes.  Next time I make it, I will either cut back on the caraway, or substitute fennel or dill, which will be more to my liking. 

Thank you, RLB.  This is good stuff!

Paul

dmsnyder's picture
dmsnyder

SF SD Pain de Compagne

SF SD Pain de Compagne

SF SD Pain de Compagne crumb

SF SD Pain de Compagne crumb

This came out of the oven this evening in time to cool ... almost cool ... for our obligatory bedtime snack.

It is basically the same bread as that described in my last blog entry except that I built the dough directly from the starter rather than elaborating an "intermediate starter," and I made it with slightly higher hydration. As a result, it did not have the first clear flour, and it had proportionately more whole wheat and rye in the starter. This was a sticky dough that I avoided over-kneading. It fermented for 3.5 hours with one folding at 90 minutes. I shaped a single boule of about 830 grams. It was retarded in the refrigerator for 18 hours.

The boule was proofed in a linen-lined banneton and baked on a stone, covered with a stainless steel bowl for the first 15 minutes of a 40 minute bake. It was left in the turned off oven with the door ajar for another 10 minutes.

The crust was really crisp after 90 minutes of cooling. The crumb is tender but chewy, how I like it. The taste is medium sour with clear notes of whole wheat and rye which I expect to be more subtle by the morning.

My next project is to use the same dough at a lower hydration to make sourdough baguettes.

David

holds99's picture
holds99

These are pictures of the process beginning after mixing.  I made Jeffrey Hammelman’s Light Rye Bread from his book BREAD, A Baker’s Book of Techniques and Recipes (page 197)albeit a slightly modified version.  I would have to say that this recipe is wonderful and very easy to make.  His recipe ingredients consist of 2 parts.  (1) SOURDOUGH, (2) FINAL DOUGH.  He makes what I would call a sponge, which he calls “Sourdough” as the first step in his recipe.  This takes 14-16 hours to ferment.  Then he mixes the SOURDOUGH with the FINAL DOUGH ingredients.  That’s it! The 5 basic steps of the process consists of:

SOURDOUGH:  (sponge/levain)

MIXING: 7-10 minutes

BULK FERMENTATION: 1 hour

DIVIDING AND SHAPING: 5-10 minutes

FINAL FERMENTATION: 50-60 minutes at 78-80 deg. F

BAKING: 35-40 minutes

I made a couple of minor changes to his recipe:

For his SOURDOUGH (sponge) he calls for Medium Rye Flour.  Instead I used K.A. First Clear Flour.  I did this because K.A. says it works well with sourdough starters.  After 16 hours I had a terrific sponge.

In his FINAL DOUGH, He does use some yeast (1 ½ tsp.)  For the flour I incorporated  4.8 ounces of medium rye flour (called for in the sponge) with the high gluten flour.  I used K.A. Bread Flour with Arrowhead Mills rye flour and added 1 tablespoon of vital wheat gluten.

Caraway Seeds:  He calls for 2 ½ tablespoons.  I recently purchased a bottle of McCormack which smelled very fresh and pungent.  At first I thought maybe they were a bit too strong.  But after my second bite I think they’re fine.  My wife really likes this bread very, very much and she’s a very tough critic.  Anyway, there you have it, and here are the photos.


 Mixed Dough Photo No. 1

Jeffery Hamelman's Light Rye Bread: Mixed Dough Photo No. 1


 Folding Photo No. 2

Jeffery Hamelman's Light Rye Bread: Folding Photo No. 2

 Folding - Photo No. 3

Jeffery Hamelman's Light Rye Bread: Folding - Photo No. 3

 Bulk Fermentation - Photo No. 4

Jeffery Hamelman's Light Rye Bread: Bulk Fermentation - Photo No. 4

 Ready for Final Fermentation - Photo No. 5

Jeffery Hamelman's Light Rye Bread: Ready for Final Fermentation - Photo No. 5

 Final Fermentation Complete - Photo No. 6

Jeffery Hamelman's Light Rye Bread: Final Fermentation Complete - Photo No. 6

 Ready for scoring - Photo No. 7

Jeffery Hamelman's Light Rye Bread: Ready for scoring - Photo No. 7

 Scoring complete - Photo No. 8

Jeffery Hamelman's Light Rye Bread: Scoring complete - Photo No. 8

 Light Rye Loaves - Photo No. 9

Jeffery Hamelman's Light Rye Bread: Light Rye Loaves - Photo No. 9

 Light Rye Crumb Photo No. 10

Jeffery Hamelman's Light Rye Bread: Light Rye Crumb Photo No. 10

Rosalie's picture
Rosalie

I have a variety of grains in my arsenal, and I thought it was time I tried something other than the usual.  I settled on spelt and found bwraith's post on Marcel's Grandmother's Spelt Bread (http://www.thefreshloaf.com/node/2828/marcels-grandmothers-spelt-bread).

There were a few obstacles.  First was the uncertainty whether the 1/2 cup water used to dissolve the yeast came out of the 500 grams in the ingredient list.  I proceeded assuming it did, but the resulting dough was too dry, so I added it back in.  Then there was the question about rises.  Apparently the only rising is of the loafed bread in the heating oven.  Then there was the fact that I make mini-loaves (I got eight mini loaves out of this one-loaf recipe).  Finally, there's my own klutziness when it comes to matters of art and grace.

I pretty much followed the ingredient list.  I used double caraway seeds because I neither like nor have anise seeds.  But instead of going directly from mixer to loaf pans I went through my traditional bulk rise after a bit of kneading (which apparently was also not required).  I rolled the formed loaves in the sunflower seeds rather than just having them stick to the sides of the pans.  Finally, I was afraid to try the cold oven approach.  As it was, one hour in a pre-heated oven was more than enough.

The dough had a wonderful feel.  It reminded me of Play Dough.  But in the end, the bread did not rise particulary much.  Maybe that's okay.  I looked at Bill's picture, and it's about the same density.  Remember, I got eight mini-loaves out of the recipe - I shouldn't expect much height.

Bottom line is that I couldn't stop eating it.  One mini-loaf (177 grams before baking and before sunflower seeds) is in my stomach.  The taste is different.  I believe some of that is attributable to the nutritional yeast, but despite that it's wonderful.

If I define success in baking bread by how willing I am to eat the final product, then failure is extremely rare.  It may not be tall and light, but it's always good!

Rosalie

Janedo's picture
Janedo

I don't really know what to call this bread. It is mostly based on the method of Nury's Light Rye. I made that one a couple of times and found it very good, but I wanted a bread with more rye and that had nice big holes but was a bit higher, blown up. I decided to modify the ingredients a bit and then go for a dough that was just slightly more compact. Not a normal bread dough that forms a ball, but not as hydrated. I also proofed it in a banneton for a couple of hours straight out of the fridge. These modifications produced this bread here:

Rye bread

Rye crumbRye crumb

The recipe goes like this (it can be halved. I just like making more of the long recipes):

I made a firm starter with 3/4 white and 1/4 rye (no WW like the Nury's) in order to have at least 200g the next day (I never measure, I admit)

Then, in my mixing bowl 800ml water, 200g T110 rye (medium whole?) and 750g T65 (bread flour?). 30 minute autolyse.  Then 4 tsp good sea salt, 200g starter and mixing. I don't mix until windowpane. Just until it really starts to look nice, but not overly. Now here is the thing... the dough should be well hydrated, but NOT as much as a ciabatta or the Nury's light. It won't form a real ball. In the mixer most of the dough will be ballish but it won't disconnect from the paddle. It still sticks. So flour should be added/or not to produce this.

Put it in an oiled bowl, rest one hour, fold, rest an hour, fold, rise another 2 hours, then in the fridge over night. 

The next day, pull the dough out, mise en couche even though it's cold. After 15 min, form the dough in two bannetons, or more (I once did two small and one big, whatever). Cover and let rise about 2,5 -3 hours depending on the temp. The dough is cold so it needs to come to room temp and then rise a bit so this time is needed.

The trick is, I think, to limit the handling of the dough. It forms lots of bubbles that should stay. So, no kneeding after it comes out of the fridge.

Preheat at 230°C, steam the oven lots, in goes the bread. Turn the oven down to 210°C and the baking depends on the size. 

The whole family is nutty over this bread, even the little ones (2 and 3 yrs).

The first time I made it I wasn't sure weather to score it. The dough is hard to score. It looked like this:

unscored rye

And the one I baked today didn't get folds and didn't have any room temp rise because I had to go out yesterday. It went straight in to the fridge over night (almost 24h). It had HUGE holes. Go figure!

Jane 

holds99's picture
holds99

These are ciabatta loaves I made using Rose Levy's Bread Bible recipe.  She doesn't call for "stretch and fold" in her recipe but I did 3 very gentle stretch and folds during proofing, then divided the dough into 4 equal pieces and it seemed to give the loaves better rise and crumb.  The dough is very wet so I very lightly floured the work surface and top of the dough when doing "stretch and fold" (be careful with the amount of flour used to dust the dough or it will leave tell tale lines embedded in the interior of final loaf).  I very lightly dusted with flour before each of the 3 "stretch and fold" procedures (at 30 minute intervals).  Some folks use water on the counter and water on their hands but I found this dough to be so wet that if you use water you destroy some of the air bubbles that is so important for the light airy texture you're trying to achieve.  Anyway, after final proofing I divided and shaped them (her recipe is for 1 loaf, I made 4 loaves) for final proofing on parchment lined baking pans placed, coveded with a large clear rectangular plastic storage bin that accomodates two baking pans containing the 4 loaves.  I think the "stretch and fold" technique helped produce a better, more open crumb in the ciabatta loaves and gave them better oven spring.


Ciabatta Loaves No 1Ciabatta Loaves No 1


Ciabatta Loaves No 2Ciabatta Loaves No 2

I had mentioned previously, in a response to a question re: getting the ciabatta loaves off the work surface and onto a parchment lined pan or baking stone, that I made a bread board using a legal size clip board with the clip hardware removed.  My wife purchased a pair of panty hose for the project and here's a photo of the front side of the bread board with the panty hose stretched over the surface.  It works well with wet dough, as the dough doesn't stick to the nylon.  I moved the loaves from the work surface onto the nylon covered bread board and then onto parchment lined bread pans for final proofing.  This photo below (Bread Board No 1) is the work side of the board, where the loaf is placed on the board.  It is hard to see but the board is covered with the nylon hose.  If you wanted to make a longer bread board (and have an oven that will accomodate longer loaves) you could use thin plywood cut to the size you need and sanded to take of the rough edges after cutting the shape.


Bread Board No 1Bread Board No 1


The photo below is the back side of the bread board, with the nylon hose tightly pulled across the front side of the board and tied on the back side.  You could, if you wish, tape the back side with packing tape.  I didn't bother and it works fine.  I also use the board for baguettes (up to 18 inches long) and batards, when removing them from the couche and placing them onto parchment lined pans.  During the final 10 minutes of baking they can be removed from the parchment line baking pan(s) and placed directly on the baking stone to finish out the baking phase, if one wishes to use the stone as the preferred method.  After use I let the board dry completely at room temperature, dust off the excess flour and store it in a plastic bag for the next use.

Bread Board No 2Bread Board No 2

Pages

Subscribe to Recent Blog Entries