The Fresh Loaf

A Community of Amateur Bakers and Artisan Bread Enthusiasts.

Recent Blog Entries

Yippee's picture
Yippee

I guess all the hard work and sleepless nights, even the dark circles under my eyes, are well worth it:

http://www.flickr.com/photos/33569048@N05/sets/72157617903700219/

SulaBlue's picture
SulaBlue

Having built up a starter to bake a double batch of rosemary sourdough loaves, I had quite a bit still left over. Not that this wasn't planned - only the use for it changed. Having gotten up late on Sunday and everyone having different plans, the idea of sourdough pancakes went out the window and I was left to ponder what to do. I opened Nancy Silverton's "Breads from the La Brea Bakery" and it instantly flopped to the picture of a pretzel being made. I instantly knew what I was going to make.

I forgot the 2 teaspoons of salt in the dough itself, but I like the way it turned out, so I'm going to omit it here. Silverton also called for barley malt syrup, which I don't have and replaced with agave nectar. Silverton has instructions to cut the dough into 18 3-ounce portions, but this seems to be incorrect. I only got 12, which is mathematically correct as 20+9+6=35/3=11.6.

These turned out so nicely that I'll be submitting them to Wild Yeast's Yeastspotting

Sourdough Hard Pretzels

2 day Recipe

Adapted from Nancy Silverton's "Breads from the La Brea Bakery"

Makes 12 crisp pretzels

Day 1

6 oz cool water, ~70F

9 oz white starter, 100% hydration

20 oz unbleached white bread flour

1 T agave nectar


  1. Place liquid ingredients into the bowl of a stand mixer fitted with a dough hook. Mix just to combine so that flour is easier to incorporate and then add flour. Once flour is incorporated knead until dough is smooth and firm, about 8 minutes. This is a VERY firm dough, and may be rough on your mixer - keep a close eye on it and STOP if you hear or smell signs of distress.
  2. Divide the dough into 3 oz sections and tuck them into rough balls. Lay on a parchment-covered sheet pan and allow to rest, lightly covered, for 45 mins.
  3. Remove one ball of dough from the covered pan and, using your hands, roll it into an 18-20 inch snake, keeping the dough as even as possible. (Silverton likes hers with thick and thin portions, but I prefer evenness.) Use the method of your choice to form into a the traditional pretzel shape. As you work the dough you will notice it is very dry and forms a skin. It may actually be hard to roll due to wanting to slide from lack of tackiness. Air bubbles inside the dough snake are normal and probably won't roll out. The thinner you get your rope, the crunchier your pretzels will be.
  4. Place formed pretzels back onto the parchment covered baking sheet, slide the baking sheet into a plastic bag and refrigerate for 24 hours.
Day 2 1/4C Egg Beaters Kosher Salt
  1. Preheat oven to 400F
  2. When oven is hot remove first tray from refrigerator. Brush the tops of the pretzels with egg substitute (Or beaten egg) and then sprinkle with kosher salt.
  3. Bake IMMEDIATELY so that salt does not have time to dissolve - about 20-25 minutes. Pretzels will puff and turn golden brown and crispy.
  4. Move pretzels to a cooling rack and then bake the second pan. 
If you have a big enough oven, or one that is more reliable than mine, you can probably bake both pans at once. They bake so quickly I just didn't see the problem with baking in two batches. You should probably go ahead and have your mustard on hand - you'll barely be able to wait until these are cool enough to eat.


dmsnyder's picture
dmsnyder

Today, I baked a couple boules of Susan's "Ultimate Sourdough," a batch of Anis Bouabsa baguettes with sesame, sunflower and poppy seeds and a Polish Cottage Rye.

I've blogged about Susan's sourdoughs before. What else is there to say? I love both her "Original" and "Ultimate" sourdoughs. I can't say I prefer one over the other. The one I baked today was from Susan's recipe, but I left out the olive oil ... I think. At the moment, I can't recall whether I forgot it or not. Hmmmm ....

The seeded Bouabsa Baguettes were made at my wife's request. I've been making different breads with mixed-seed soakers recently. My wife has enjoyed them, but has told me she likes the seeds on the outside more than on the inside. Being it's Mother's Day, it seemed a good time to make something special for her.

I followed the Bouabsa formula about which I've blogged several times before. This uses Bouabsa's technique but adds 100 gms of active sourdough starter. I also substituted 10% white whole wheat flour and 5% whole rye flour. The remaining 85% was Giusto's Baker's Choice. I mixed the seeds (30 gms sunflower, 30 gms sesame and 15 gms poppy) and rolled the shaped baguettes in the mix, spread on a sheet pan, before proofing on a linen couche.

They turned out well, with a nice crunchy crust, open crumb and very tasty flavor. 

The Polish Cottage Rye is one of my favorite breads from Leader's "Local Breads." I have made it using First Clear flour with results like the photo in Leader's book. The last couple of times, I have followed the recipe and used bread flour for the wheat flour. The crumb has been very open and nothing like that pictured in "Local Breads." Using bread flour, it makes a very slack dough that requires extensive, intense mixing to develop the gluten sufficiently to allow one to form a boule that holds its shape. Leader's mixing instructions should be followed and yield good results. Both versions have been delicious. 

I made this bread today with bread flour. It just came out of the oven and "sang" at the top of its lungs. 


David

SulaBlue's picture
SulaBlue

Today was just one of those days. That kind of day when any little thing that could go wrong does. But at the end of it, somehow, despite everything, I got some of the most gorgeous loaves I've ever gotten.

It started with the dog. Usually she wakes us up around 6:30 am. I told my husband to take my preferment out of the refrigerator when he took her out, and then I would wake up later and bake. Well, for once, the dog decided to sleep in and didn't get him up until almost 8 - which is when I planned to be up to bake! This put me behind from the very beginning. Add to that the stress that these were loaves being made for people who had requested them, and even offered money for them, and I was feeling a bit out of sorts.

You know, I should take that back. It started with the starter. Yesterday I had my starter out and it was going at a roiling bubble. After its second feed of the day it shoved the loosely-settled lid of its container off and proceeded to ooze out of the container and onto the counter. My mother, who is visiting, scooped everything up and put it in a bigger container. I was worried about possible contamination as, with guests in the house, a husband and a dog you just never know how perfectly sterile your countertop is. Ah well! It's for reasons just such as this that I keep a small portion of my starter back in the fridge and feed up to what I need on the counter when baking!

So, rather than doing the two loaves the recipe called for I'd decided to do a double batch. I put my cut-up preferment into the bowl of my new KitchenAid Pro 600 and then, for some inexplicable reason, added the flour before the water. I have always mixed my starter with water, then added flour as it is easier to get everything incorporated. I made sure to double everything - except the water! I almost forgot the salt, but then looked over and saw the salt in my mis en place and noticed the bowl, so in it went. At first things were OK, and then the KitchenAid began to protest. The bowl bucked and the mixer became sluggish. Uh-oh! I tried to reset, but it just wasn't working, so I turned it all out and started to knead by hand. After only a few moments of this I realized what I had done.

Let me tell you, there's just nothing like trying to add that much water into a dough at that late stage, by hand! I stretched the dough out as far as I could, sort of like a pizza with a lip, then added a bit of water and rolled it up. Lather, rinse, repeat. The dough became slick and a huge mess, but eventually I got it to a consistency where I was able to toss it back into the KitchenAid to finish up the kneading. As if this wasn't enough I had the pour guard on and bumped it when I was putting in my rosemary and knocked it into the bowl while the dough hook was going. There was a pop as the hook hit it, but thankfully nothing broke.

Thankfully I got a new dough bucket yesterday and I was able to mark where my dough was and easily saw when it had doubled. It doubled in closer to 2 hours than 3 or 4! I suppose in part due to the warmer temperature in the house, but the dough probably got warm with all that nonsense, and the starter was insanely active. Dough was removed and divided up into 4 slightly larger than 1-pound loaves and set to proof on parchment-paper lined pans. I'd like to say that from here on out it was smooth going - but that'd be a bald-faced lie!

Despite spraying my dough with spray oil the saran wrap stuck to the dough. Thankfully I was able to get it free without deflating my dough, though it was very dicy for a bit. Into the oven it went where, after about 8 minutes, I was reminded why I no longer use Reynold's parchment paper. I opened my oven to rotate my loaves - cue the fire alarm! Ugh. The parchment wasn't even that brown! Despite having to run around to the living room while flapping a towel like a maniac, I couldn't help but be giddy with glee as I could already tell that my loaves were springing like mad. I believe I can say that, without a doubt, these Little Loaves That Could are some of the most gorgeous sourdough loaves I've made. I even scored them, because hey, what could have went wrong THERE, right? I was worried that they might be tough and chewy despite looking so perfectly gorgeous, but the crumb is soft and feathery with just that perfect hint of chew! I even got HOLES!


alliezk's picture
alliezk

With a trip to disney and AP testing going on, there has been unfortunately no time in my life to bake, or at least to share my baking adventures. But some good things have come from this brief break:

1. I decided on a college! (I will be a freshman at Princeton University next fall) My tentative plan is to major in chemistry or chemical engineering and then do graduate study in Food Science (my cop out rather than going to culinary school)

2. I experimented with pizza. I tried the recipe from the latest issue of Martha Stewart and was very pleased with the results, ignoring my own mistakes of way over-proofing. I made a Shrip, pesto and asiago pizza that my friends devoured, and an eggplant and goat cheese that I loved. As an aside, an interesting fact I came across: New Jersey produced 1/3 of the worlds eggplants. Our south jersey garden state reputation is perhaps well deserved.

3. I started my scone experiments. My friend challeged me to make perfect blueberry scones, which are her favorite baked good. This morning I made a Mother's day brunch with Dried Cranberry, Walnut and Chocolate Chip scones (no blueberries in the house), popovers (Which are a family favorite with lemon juice and honey), rosemary scrambled eggs, sausage, bacon and a berry salad.

4. I also started my, as of yet, fruitless job search. I have been working as a lifeguard for the past few years, but would really like to work as a waitress this year. Obviously my dream would be to work as a baker or a cook, but there are not an abundance of those jobs for nonexperienced 19 year olds. Hopefully if I can get work as a waitress in a local restaurant, the general experience of restaurant life will be a good one.

Post graduation I will have much more time to experiment, and I am really looking forward to that. Also, considering that now my phone camera and actual camera are broken, I may give up and invest in a new one for next year.

Happy Baking!

xaipete's picture
xaipete

I wanted to try one of Dan's breads for Mother's Day and thought his Double Raisin Bread with Toasted Walnuts sounded delightful!

Dan gives several options for making it: as a straight dough, as a pain au levain, and as a pain au levain with a little added yeast. I chose to make the bread without the addition of any yeast.

Early yesterday morning I created a liquid levain from my stiff levain on the thought that it would take about 12 hours to fully ripen. At 8 hours I could see that it was just starting to recede, so I went into to action thinking I would have enough time to complete the bread before going to bed. (Just to clarify, I had planned to make the liquid levain in the AM and refresh it in the PM for use today, but when I saw it was proceeding faster than I expected, I just went for it.)

Results: I didn't get any oven spring but I think that was because I let them proof too long in the pans and I didn't have the oven hot enough (see below). The crumb is slightly wet, but pretty open. The flavor is quite delicious. This is the best raisin walnut bread I've ever had. I especially like it because it doesn't have a sugary or cinnamon flavor to it, just the pure pain au levain taste mixed with the natural sweetness of the raisins and nutty walnut flavor. I would definitely make this bread again. It is a real winner.

I'm hoping Dan will critique my method below. Dan's book, like Suas', is a big jump for me. But I figure if I don't try to learn to use this type of book, that I will never make real progress, and I really want to understand what I am doing so I will be able to develop my own recipes some day. I have given a detailed description below of how I understood Dan's method. Dan: you won't hurt my feelings so please don't hold back on any comments! Many of us will benefit from what ever you have to say.
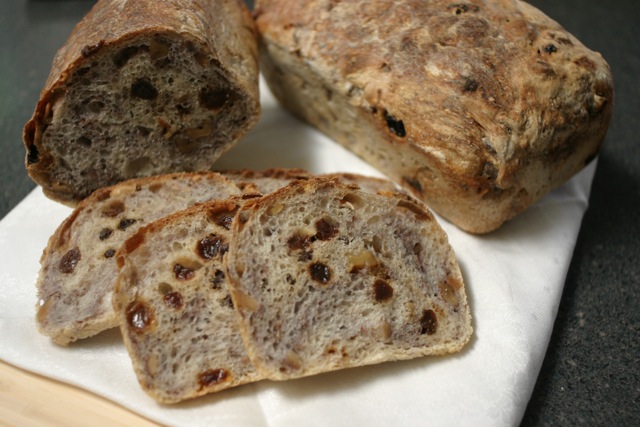
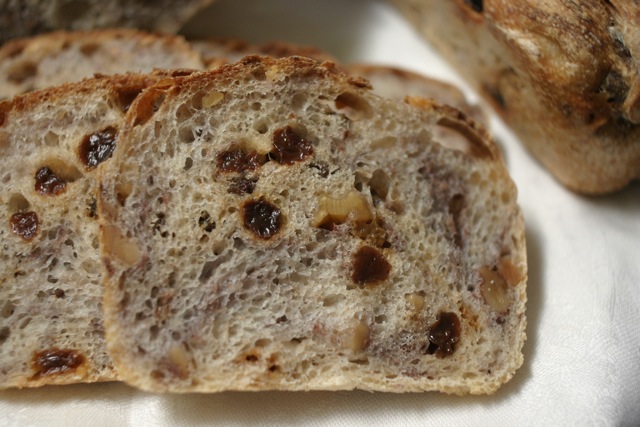
dan dimuzio double raisin bread with toasted walnuts

dan dimuzio double raisin bread with toasted walnuts

From: Bread Baking: An Artisan's Perspective

Liquid levain:

133 g bread flour

133 g water

67 g ripe levain (I used about 60 g of my stiff levain and added a little more water to get to the total of 333 g)


Final dough:

467 g bread flour (I used KA bread flour)

67 g whole wheat flour (I used some I had ground about 30 hours before)

347 g water

13 g salt

167 g dark raisins (I pumped the raisins with warm water, but drained them before incorporating)

167 g golden raisins

167 g toasted walnut halves

266g of the liquid levain at the peak of ripeness


My interpretation of Dan's method:

1. Mix the levain and the water together with the paddle attachment on speed 1 until the levain is well incorporated, about 1 minute.

2. Add the bread and whole wheat flours, and the salt. Mix with the paddle attachment on speed 1 until everything is combined, about 1 minute.

3. Let dough hydrate with mixer off, about 5 minutes.

4. Resume mixing with dough hook on speed 2 until dough reaches improved mix stage (window pane forms but breaks when stretched), about 5 minutes. I had to add a small amount of additional flour, approximately 1/4 cup, to get the dough to sit right on my dough hook.

5. Reduce to speed 1 and add in the nuts being careful not to break them up too much.

6. Fold in the raisins with a kidney shaped bowl scraper. Dan warned me to be careful not to cut the raisins because they are high in calcium propinate, which is a yeast retardant.

7. Place the dough into an oiled bowl, cover and let bulk ferment at room temperature for 30 minutes.

8. Do one stretch and fold, return to covered bowl, and continue to bulk ferment until dough doubles. (Although the dough was a little sticky after one stretch and fold, it seemed to have good strength so I only did one. I thought bulk fermentation would take about 3 hours--my kitchen was about 74º--but it took more like 5 1/2 hours).

9. Preshape the dough into two balls and let rest under plastic for 30 minutes. (The dough was difficult to preshape because it was loose/wet/a little sticky--not sure what the remedy was here, but I floured my hands and the board in an attempt to make it easier to shape.)

10. Shape into two loaves and place in 4 1/2 x 8 1/2 inch oiled bread pans. Cover with plastic and let proof until about 1 1/2 times. (It was now 10:30 PM and I didn't achieve very good surface tension.)

11. Bake in a preheated 375º oven for 55 minutes. (I think the oven should have been hotter because the loaves didn't brown as much as I thought they should. Also, I didn't get any oven spring, but that was probably my fault because I think I let them almost double in the pan--of course in my defense I had gone to bed. I got up at 2 AM to turn the oven on and again at 3:15 AM to put them in. By that time they were doming the pans and were probably more like double.)

--Pamela

SylviaH's picture
SylviaH

Something a little sweet for my daughter!  She loves brownies/chocolate. These small brownies are full of chocolate and sprinkled with a little expresso powder.

Terrible lighting for the photo..these really are  very dark chocolate.


M for Mandy!

More for the kids ;-D

Happy Mother's Day to all you Mom's,

Sylvia


xaipete's picture
xaipete

I've been on a buckwheat kick lately and wanted to try Michel Suas' Buckwheat Pear Bread. Suas' book, Advanced Bread and Pastry, poses some problems for me in that its recipes all assume the baker knows what he or she is doing. While I generally know what I'm doing, I don't always remember to do what I know.

I made the levain yesterday, soaked the pears in riesling wine for an hour this morning, and then completed dough. The recipe didn't specify whether to dice the dried pears, but fortunately I was able to find some information about it on the SFBI site and figured out they were suppose to be diced. Still, I didn't know whether the weight of the pears was before or after soaking. I used the before soaking weight, and that was probably a mistake. The final dough was pretty sticky, and although not unmanageable, I think I would have been better off if the dough had been a bit firmer. Another thing that the formula doesn't tell you is how to assemble the final dough. After I had dumped everything in the mixer bowl, I thought, "I should have mixed the water with the levain before putting in the rest of the ingredients." That was a good thought but unfortunately I thought it a little too late. Anyway, I mixed everything up as best I could, but had trouble getting the pears and walnuts incorporated during the final minute of mixing and had to work them in by hand; the final dough was pretty sticky. The dough took about 2 hours to double. I shaped it into 3 rounds and let them rest 30 minutes, then formed them into loaves for my mini pans. I wasn't interested in making my loaves into the recommended pear shape--I'm way too utilitarian for that. I let my loaves proof for 1 hour and then baked them with steam at 400º for 35 minutes.

The crumb is a slightly spongy and a little wetter than I think it is suppose to be. Perhaps I under- or over-mixed the dough. You can see darker and lighter parts in the crumb; I think that is probably owing to my failure to incorporate the levain and water at the beginning. The pear taste is very prominent but not overwhelming; the buckwheat taste is very subtle. If nothing else, these little loaves will make great toast.

buckwheat pear bread

Levain:

39 g buckwheat flour

138 g bread flour

174 g water

1/8 t yeast

1/8 t salt


Final Dough:

280 g bread flour

135 g water

11 g salt

3 1/2 g yeast

39 g toasted walnuts

92 g dried, diced pears reconstituted for 1 hour in white wine


My interpretation of how to put this bread together:

Make the levain 12 hours beforehand. Mix the levain with the water for the final dough, add in the remaining ingredients except the nuts and pears, and knead on speed 2 until you achieve improved mix (window pane forms but breaks when stretched). Add the pears and walnuts on speed 1 after the dough has been developed.

Let ferment at room temperature until double, about 2 hours. Preshape into 3 pieces and let rest for 30 minutes. Form into mini-loaves and let proof for about 1 hour. Bake in a 400º oven with steam for about 35 minutes.

--Pamela

Susan's picture
Susan

High-Gluten Spring Wheat flour is what I use for all my sourdoughs, Shannon, and using it tends to make a stretchier, chewier loaf, which is what I want.  H-G flour is a step higher in protein than bread flour.  Don't know if you are making sourdough, but if so, here's a simple recipe:

50g starter

210g water

300g High-Gluten Flour

6g salt

Mix the starter and water in a small plastic tub,* add flour and salt, mix until rough.  Cover and let sit 10 minutes.   Using a wooden spoon, fold the dough from bottom to top around the tub.  Cover and let rise until the dough has doubled in volume.  At this point, turn it out on your oil-sprayed counter and envelope-fold it.  Fold it two or three times, letting it relax between foldings.  Each time you fold, it will become easier to handle and will hold its shape better.  Now, shape the dough and leave it to rise either on the counter with parchment underneath or in a banneton (or linen-lined colander or bowl).  When you can poke your floured finger into the dough and the imprint stays, it's time to bake.  Pre-heat the oven to 500F, then turn it down to 460F after you load the bread.  There are several options for steaming bread.  My fav is covering the bread for the first 20 minutes with a stainless-steel bowl.  Total time in the oven will be about 30 minutes.  Let the bread brown as much as it can without burning.  Don't cut the loaf until it has cooled. 

*If you use a small tub (such as a 2-lb yogurt tub, which is what I often use), the dough will half-fill it, and when it doubles, the tub will be full!  Cool, eh?

Remember to have fun.

Susan from San Diego

The below loaf has 25g rye flour substituted for 25g of the HG flour:

xaipete's picture
xaipete

I've been lucky enough to travel to Paris a few times. One of the new foods I experienced there was buckwheat crepes or galettes. The little bistro I ate them in was just across the bridge from Notre Dame. These crepes were served flat with an egg and ham in the middle of them. You just break the egg on top of the cooked crepe with the heat on low and cook until the white is set and the yolk is very warm. (Quail eggs would be especially delicious here.) When you bite into the crepe, the egg yolk gets absorbed by the crepe. These were fun to make although I had to add some milk to the recipe this morning to loosen it up (it really thickened overnight). I found the recipe in the LA Times. I'm going to fill some of them with creamed spinach as a side dish for tonight's dinner.
buckwheat crepes
buckwheat crepes

1 cup buckwheat flour

1 cup all-purpose flour

4 large eggs

1 cup milk

1/2 teaspoon sea salt

4 tablespoons butter, melted Softened butter for the pan

1. In the jar of a blender, blend the flour, eggs, milk, salt and melted butter with three-fourths cup water at high speed until smooth, about 2 minutes, scraping down the sides midway with a spatula. Strain the batter through a fine-mesh sieve.

2. Cover and let rest, refrigerated, for at least an hour, or overnight.

3. Heat a crepe pan or nonstick sauté pan over medium heat until a sprinkle of water sizzles when you throw it on the pan. With a paper towel, spread butter over the pan, being sure to wipe most of it off.

4. Using a bowl or a measuring cup with a spout, pour enough batter to just cover the pan (for a crepe pan, a little less than one-fourth cup), immediately swirling the batter around until it covers the whole surface. The batter may be thicker than basic crepes once it has been resting and may need to be thinned a little; if so, add up to one-fourth cup water and stir until blended. It will have a different consistency than sweet crepes (more like honey than pancake batter) and will cook slightly differently, forming bubbles and lacier edges. Adjust the heat, if necessary, to medium-low. As with pancakes, the first one or two galettes are usually experiments.

5. When the edges of the galette begin to turn golden and move away from the pan, about 3 minutes, lift the edge nearest to you using a spatula (an offset spatula works best). Flip the galette over. Cook the second side of the galette only long enough for it to set, less than a minute. Remove from the pan and start a stack of galettes, using wax paper to layer between each galette as you cook more. Add more butter when needed with a paper towel.

Each of 24 galettes: 71 calories; 3 grams protein; 8 grams carbohydrates; 1 gram fiber; 3 grams fat; 2 grams saturated fat; 41 mg. cholesterol; 65 mg. sodium.

Pages

Subscribe to Recent Blog Entries