The Fresh Loaf

A Community of Amateur Bakers and Artisan Bread Enthusiasts.

Recent Blog Entries

dmsnyder's picture
dmsnyder


This bread is based on the Italian Bread formula in Peter Reinhart's “Bread Baker's Apprentice.” I substituted a biga naturale (sourdough starter) for the biga made with instant yeast in Reinhart's formula. I still added the instant yeast to the final dough to provide more predictable fermentation and proofing times.

Reinhart recommends this formula for hoagie rolls. I divided the dough to make 4 rolls scaled to 4 ounces each and shaped the remainder of the dough into one large bâtard.

I also employed the “stretch and knead in the bowl” technique during bulk fermentation, even though I used a KitchenAid mixer for mixing beforehand.


Intermediate starter (Biga naturale)

Active starter

3 oz.

Water

9 oz.

KAF Bread flour

12 oz.


Final Dough

Biga naturale (Note: save the remaining 6 oz. for another bread.)

18 oz.

KAF Bread flour

11.25 oz.

Salt

0.41 oz. (1-2/3 tsp)

Sugar

0.5 oz. (1 T)

Instant yeast

0.11 oz (1 tsp)

Diastatic barley malt powder

0.17 oz. (1 tsp)

Olive oil

0.5 oz (1 T)

Water at 80F

7 oz (¾ cup)

Sesame seeds for coating.

Semolina to dust the parchment paper.


Mix and ferment the biga.

Mix the biga naturale the evening before baking. Dissolve the starter in the water in a medium sized bowl, then add the flour and mix thoroughly to hydrate the flour and distribute the starter. Cover the bowl tightly and allow to ferment for 3-6 hours, until it doubles in volume. Refrigerate overnight.

The next day, remove the biga from the refrigerator and allow it to warm up for an hour or so. Alternately, mix the biga late at night and ferment at room temperature overnight.


Mix the dough

Mix the flour, salt, sugar, yeast and malt powder in a large bowl or the bowl of your mixer. Add the biga in pieces, olive oil and ¾ cups of tepid water and mix thoroughly. Adjust the dough consistency by adding small amounts of water or flour as necessary. The dough should be very slack at this point.

I mixed the dough with the dough hook in the KA mixer for 10 minutes then transferred it to an 8 cup/2 liter glass pitcher that had been lightly oiled.


Fermentation

I stretched and folded the dough in the pitcher with a rubber spatula then covered it tightly. I repeated the stretch and fold again 20 and 40 minutes later. I then left the dough to ferment until it was double the original volume (45-60 minutes more).


Divide and form

Divide into 2 pieces and pre-form as logs. Allow the dough to rest 5 minutes or more, then form into bâtards. To make rolls, divide into 4 ounce pieces and pre-shape into rounds, then shape into torpedos. If desired, spray or brush the loaves with water and sprinkle with sesame seeds.

Prepare a couche – either a floured piece of baker's linen or parchment paper sprinkled with semolina.

Pre-heat the oven to 500F with a baking stone on the middle shelf. Make preparations for steaming the oven.

Place the loaves in the couche, cover with plastic or a towel and allow to proof until 1-1/2 times their original size (about 40 minutes).


Baking

Score the loaves and transfer them to the baking stone. Bake with steam, using your favorite method. After loading the loaves and steaming, turn the over down to 450F and bake until done (about 20 minutes for a bâtard, 15 mnutes for rolls.). If you want a thicker crust, use a lower temperature and bake for longer.


Cooling

Allow to cool before slicing, if you can.

Sourdough Italian Roll

Sourdough Italian Roll crumb

We had a couple of the rolls for lunch. They were very nice. The crust is chewy, not crunchy, and the crumb is also chewy. This is not your fluffy, cottony roll that seems standard in most sub shops and, unfortunately, most Italian delis.

I am pretty sure this is the roll I would choose for a meatball sandwich, oozing mozzarella and dripping marinara sauce. I don't think this roll would be the usual soggy mess after the first 20 seconds. However, in the interest of Science, I will volunteer to test this hypothesis. Of course, if additional volunteers were to pool their data with mine, we can be more confident of our conclusions.

David

Submitted to Yeast Spotting on Susan FNP's marvelous Wild Yeast blog


sharonk's picture
sharonk

I see a lot of sourdough starter recipes that call for commercial or dried yeast. For those of us who chose not to use yeast it is possible to create a starter without it. Before the invention of commercial yeast all sourdough starters and breads relied on the natural yeast in the air for leavening. I’ve made many successful wheat and rye starters with just flour and water. They fermented easily and made wonderful breads. After I learned I was gluten (and dairy) intolerant I tried to make gluten free starters using the same technique I had grown accustomed to for the wheat and rye breads: a 7 day sourdough starter. With gluten free flours 7 days did not work well. The starter turned a moldy shade of bluish green. I experimented, searched the webs and learned that gluten free sourdough needs to be fed 2-3 times a day unlike wheat/rye starter which can be fed as little as once a day.

I was able to create a brown rice starter in about 4-5 days using only brown rice flour and water but it smelled almost spoiled and the bread was unpleasantly sour. (one wonders why I would go forward and bake something that smelled almost spoiled, but I was determined to follow through so I could learn all the ins and outs of this) Someone suggested that I try a small amount of Water Kefir, a non-dairy fermented drink, to give the starter a boost. This made all the difference for me because it cut the fermenting time down to 3-4 days and never moldered. I have come to greatly depend on this success-every-time starter.

Fermented drinks are an important part of my diet. They have helped me repopulate my digestive system with probiotics and enzymes enabling me to fully recover from health challenges. Water Kefir culture is a colony of bacteria and yeast that, when fed sugar, creates lactobacillus into the liquid which then becomes available to us in the form of a drink. It can also be used to soak grains and beans before cooking. It then boosts the predigestion process that happens when grains and beans are soaked. It does the same for the flour in the starter making the finished bread more digestible. It also speeds the fermentation process.

Kombucha Tea is another fermented drink I make at home, that can be used to boost a starter, although I find the fermentation time to be slower than with the water kefir. For people able to eat dairy products, Milk Kefir or active Yoghurt could be used to boost a gluten free starter. Just add 2 tablespoons of any of these fermented products to your starter when first mixing it up. I save a bit of this starter to start the next batch and store it in the refrigerator. If I haven’t used it after 2 weeks I take it out, let it come to room temperature, feed it with rice flour and water, let it sit (and ferment) for 4 hours and store it back in the fridge. Creating a new starter with this bit of previously fermented starter cuts the fermentation time from 4 days to about 2 days!

I make a quart of water kefir at a time and use it to soak grains and beans before cooking. I also drink it in small amounts as a digestive aid before meals. It becomes effervescent and is very refreshing. I bought my first batch of water kefir culture for under $30 including shipping. With care these can last indefinitely and as they add probiotics into my diet I save money as I no longer need to buy bottles of probiotics.

Here are very succinct directions for making Water Kefir:

Nearly fill a wide mouth quart jar with water.

Add 2 tablespoons sugar, stirring to dissolve, 20 raisins and a slice of lemon or lime.

Add the contents of your bottle of water kefir grains into the quart jar.

Cover with a paper towel or cloth and secure with a rubber band. 

When raisins float to the top, scoop them and the lemon slice out and discard.

Ferment the water kefir for 6 more hours on the counter with the paper towel.

Then store in fridge and use as needed.

When you have used the liquid down to about an inch in the jar start a new batch in a new jar and pour the water kefir grains plus the liquid their in right into the new jar, cover and ferment.

You can order water kefir culture (as well as kombucha and kefir culture)  at www.culturesforhealth.com. They send dehydratedwater kefir grains with instructions for rehydrations.


Shiao-Ping's picture
Shiao-Ping

I am a sucker for vivid colors.  Last year when I was in Japan on my self-guided pastry eating tour, I discovered a brioche bread with  bright red candy almonds at Susumu Koyama's gorgeous pastry shop in Santien, two hours southwest of Kyoto.  It's hard to believe EVERY morning people from all over the country queue up in front of Patissier es Koyama in this small city, waiting for it to open its door, much like that in front of Pierre Herme's patissier in Paris.  At the time I did not know these little red cruchy candies are "pink pralines" (or "pralines roses" in French originating from Lyon) which are made of almonds and sugar.   

Yesterday I was sitting on my balcony reading when I saw this picture in "Eric Kayser's New French Recipes":  

Brioche with Pink Pralines (page 117 of "Eric Kayser's New French Recipes")

It brings back memories. The color is so beautiful it makes me want to make it, but I have no pink pralines so I have to improvise.  Before I could think of what to do, I thought I'd just first refresh my starter.  Kayser's recipe uses commercial yeast but what's the point of following it - that may just be too easy.    I thought of making my own pink pralines but that would mean I'll have to use red food coloring, which I am reluctant to do.  In the end I settled with a punnet of fresh raspberries for the coloring effect.  

Towards yesterday evening when my starter almost tripped, I mixed the bioche dough.  I did not know how my starter would perform with all the butter and eggs in the dough but I just wanted to try.  I don't have a brioche tin so I used what I have.  Years of making souffle tells me that I need to line the sides of the tin with double parchment paper just in case it expands out of it.  I left it at room temperature for a couple of hours then put it into the fridge for retarding overnight.  This morning I took it out of the fridge and it had barely increased in volume.  I let it stand in my balcony to proof for 4 hours.  This is what it looked like when it doubled in volume, half way through proofing :  


            sourdough brioche dough 

 I turned on my oven to 200C.  Then, when it rose a further 50% in volume, I prepared my egg wash as below:  


                                                                               egg wash  

I brushed it on the top of the dough, placed it in the oven, and immediately lowered the temp to 170C.  There was a good oven spring; the dough expanded a further 50% within the first 4 - 5 mins of baking.  It baked for 35 mins in total and this is the result:  

Sourdough Brioche with Raspberries  


                                                        The crumb

I can't say I am happy with the outcome.  The flavor is good; the curmb is moist but it is not open enough.  The mouth feel is not light enough as a result.  Perhaps my choice of tin does not allow the dough to expand as easily as a proper brioche tin (which opens out very widely).   Well, I shall see to it next time.   

With a slice of this plus cream and homemade raspberry jam, I toast to Monsieur Eric Kayser with my Oolong tea on my sunny balcony!  


                           Winter morning on my balcony

 Shiao-Ping

TeaIV's picture
TeaIV

I decided to try out my new SD starter and see if it's healthy and working and all. I'm pretty sure it's in good shape. I added it to the ciabbatas I made for a friend of mine, and it made the crumb and taste really extraordinary. Not only that, but I think I've finally mastered the steam technique. this bread had the ultimate crackly crust. it literally cracked when I cut it in half. This is definitely one of the better breads I've made.

P.S. you can see the starter in the background, it's in the container with the red lid :) .


TeaIV

gothicgirl's picture
gothicgirl

Posted on EvilShenanigans.com on 6/12/09

I have been on something of a pizza kick lately, and not those commercially prepared pies with flavorless cheese and mushy veggies.

DSCF2897

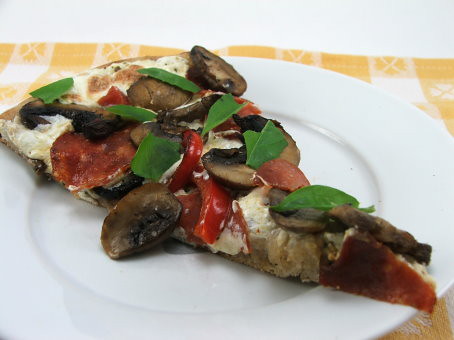
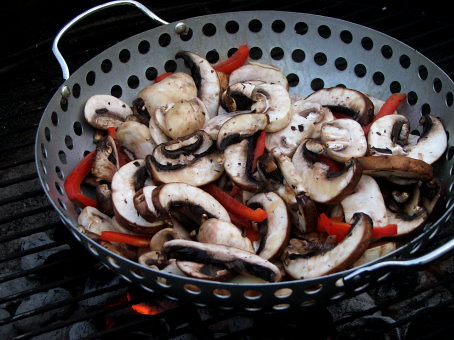
I can directly pin-point when this all started.  It began at the Mushroom Council lunch when Chef Kent Rathburn made us a grilled mushroom pizza.  I knew in that moment that I would be making a pizza with grilled mushrooms.  This is the result.

DSCF2890

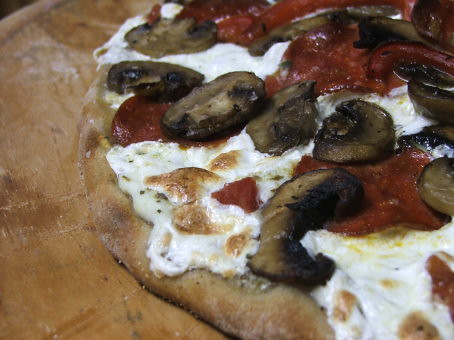
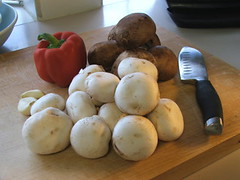
I used mushrooms that were available at the grocery store, portobello and white button, and added some red pepper for extra flavor.  I will say this, grilling mushrooms is an easy way to add a soft smoky flavor and meaty texture to a pizza, and it may be the only way I do it from now on!

DSCF2880

I decided that instead of sauce I would just put diced tomato on my pizza, and along with some lovely fresh mozzarella cheese I would add some creamy ricotta.  Of course, I added some pepperoni.  It is my favorite topping.  I'm not ashamed to admit it either.

DSCF2896 

The crust is homemade, and I decided almost at the last minute to add about 1/4 cup of my sourdough starter to it.  The starter added a nice tangy bite to the crust, which has a crisp exterior and a soft interior.  If you do not have any starter do not fear.  It is entirely optional, and the crust is still beautiful with out it.

Grilled Mushroom and Ricotta Pizza on Sourdough Wheat Crust   Serves 4-6

Sourdough Wheat Crust:
1 cup water heated to 95F
2 teaspoon active dry yeast
1/4 cup sourdough starter, optional
1 teaspoon sugar
1 tablespoon honey
1 cup whole wheat flour
1 1/2 cups white bread flour
1 tablespoon olive oil, plus more for the bowl
1 teaspoon salt

Grilled Mushrooms and Peppers:
1 pound portobello mushrooms, stemmed and sliced
1 pound white button mushrooms, sliced
1 red bell pepper, sliced into strips
2 cloves garlic
1/4 cup olive oil
1 teaspoon kosher salt
Fresh ground pepper

Other Toppings:
Ricotta cheese
Fresh Mozzarella Cheese
Diced tomatoes
Pepperoni
Fresh oregano, minced
Fresh Basil

DSCF2839

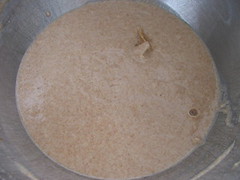
Prepare a sponge by combining the water, yeast, starter, sugar, honey, and what flour in a bowl.  Stir to combine and allow to sit covered, at room temperature, for ten minutes.  The sponge may not be terribly foamy or bubbly.

DSCF2840

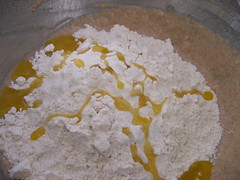
To the sponge add the remaining ingredients and mix with the dough hook on low speed for 3 minutes. Adjust the hydration as needed (the dough should be tacky but not cling too much to your fingers).  Increase the speed to medium and mix for 8 minutes.   Remove the dough from the bowl and form it into a ball on a lightly floured surface.

DSCF2842

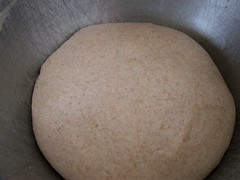
Transfer to a bowl coated with olive oil, turn once to coat, and proof for two hours, covered, at room temperature.  After the initial proof, degas the dough and store, covered well, in the refrigerator for 24 hours, or up to three days. 

 DSCF2877

Pull the dough an hour before you are ready to bake it.  While the dough warms up prepare your toppings and heat your oven to 500F with a pizza stone on the bottom rack, if you have one.  

DSCF2879

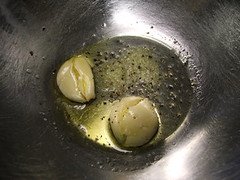
With the flat of a knife crush two large garlic cloves.  Mix them with the olive oil, salt, and pepper.  Add the sliced mushrooms and bell pepper strips and allow sit five minutes.

DSCF2882

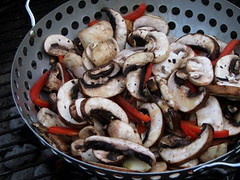
Transfer to a perforated grill pan and cook, over a very hot grill, until starting to soften, about five to ten minutes.  Transfer to a bowl to cool slightly.

DSCF2872DSCF2875

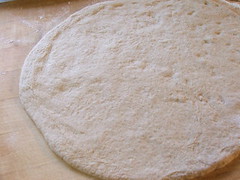
Divide the dough into two large or four small balls and, using your hands, stretch it into a thin circle.  

DSCF2883

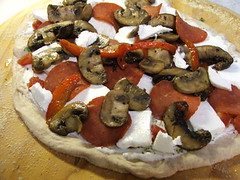
Transfer the dough to a pizza peel that has been dusted generously with corn meal.  Top the pizza with a thin layer of ricotta, diced tomatoes, oregano, mozzarella, pepperoni, and the grilled mushrooms and peppers.

DSCF2891 

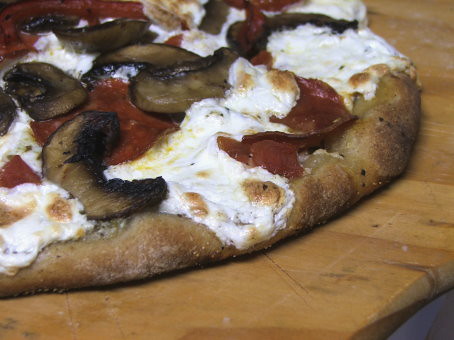
Cook the pizza for 10 to 15 minutes, or until the crust is crisp and brown and the cheese has melted and begun to brown as well.

DSCF2899 

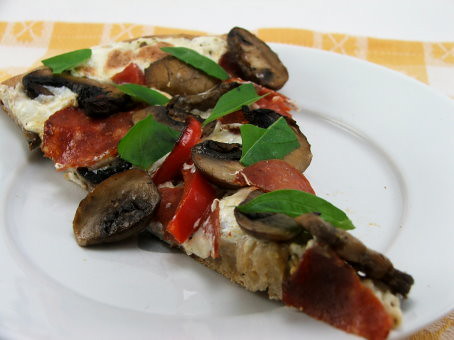
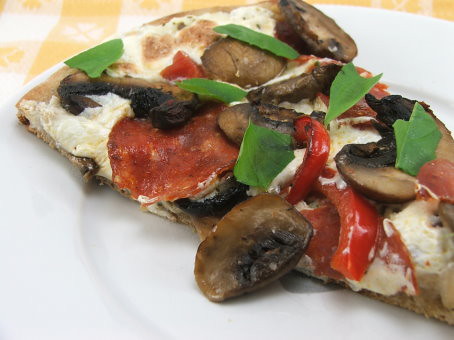
Allow the pizza to rest for five minutes before slicing.  Top with torn fresh basil.

DSCF2898

Enjoy!

ArtisanGeek's picture
ArtisanGeek

I'm sure 99% of you are familiar with Nancy Silverton, her books, and her bakery, La Brea.  Through a lot of hard work and innovation, La Brea has been able to mass produce artisan loaves of every description. The machinery handles the dough in such a way to produce bread that has a hand-shaped look and artisan taste. The loaves are par-baked, flash frozen, and distributed throughout the country. One of their breads that really appeals to me is the Petite Baguette. These, like their other breads, are available in grocery store deli bakeries and warehouse clubs. I get mine from BJ's in a package of four. Looking over the ingredients, there's basically nothing here but flour, water, salt, yeast,  and the cornmeal used to dust the bottom. Because there are no dough conditioners or preservatives, you have to eat them or freeze them right away. These are definitely NOT the soft, mushy crap that pass for French bread in most in-store bakeries. The crumb is semi-open and the crust is what is to be expected of a good artisan loaf. Just how crispy the crust is depends on how the store baked the frozen loaves. Most stores don't bake them very long so the crust doesn't get really crisp. Why do they do this? To appeal to the majority of Americans who like their bread very soft. (They grew up on Wonder Bread and don't know any better). Unlike us bread snobs, they think anything slightly hard is stale. They also have a tendency to wrap them before they are completely cool and the resulting moisture softens the crust. I usually give mine a few minutes in a hot oven to give the crust a good crisp

La Brea Petite Baguette

These also have a very good taste; not like bland, white mush like many mechanically produced breads.

A Single Petite Loaf

Stay tuned for more reviews. All reviews can also be viewed on my blog, The Bread Portal.

Bixmeister's picture
Bixmeister

Besides bread making, one of my other hobbies/interests is homebrewing.  I have brewed for over 15 years now.  I am an all-grain brewer which means I brew with grains rather than extract.  I am also an AHA beer judge at certified level.  You need to pass a test for this.  I am a member of a very fine beer club, QUAFF which put San Diego on the map beerwise by winning the National Homebrew Club of The Year award 6 years consecutively and several California titles.  You may ask yourself why am I telling you this when this is a bread oriented forum.

The answer is because I promised to bake bread for the National Homebrew Conference being held in Oakland, CA this year.  I promised four Ciabattas.  What I baked was 4 Ciabattas plus a bonus bread, my first attempt at a 6 strand braided Italian bread:


4 CIABATTAS


MY FIRST 6 STRAND BRAIDED ITALIAN BREAD


Comments and Suggestions Welcome

Jw's picture
Jw

I took a break while on a businesstrip to Berne, Switzerland, and found a breadmarket! I was sort of a promotion, all different booths. It was a promotion activity of http://www.swissbaker.ch. Looks like the Swiss bakers community. Just a few impressions:

Roses decoration, looks nice! Pictures quality is from my phone...

Lots of figures. I guess you can eat this as well, but kind of hard to take along to work...

Steinhauer brot, Macenbread? looks from a realy fire based oven.

Cow bread?

I took a few more pictures. Will post them on request. What a shame I could not take anything along home...and what a great break from work.

Cheers,
Jw.


ArtisanGeek's picture
ArtisanGeek

Well, I had a birthday party to go to (pool-side at my Brother-In-Law's house) and I wanted to do something a little different than the standard birthday cake...so I decided to make a giant chocolate chip sandwich cookie. It's about 12 inches in diameter and contains about a pound each of semi-sweet chocolate chips and white chocolate chips. At the end of the mix, I fold in about 4 ounces of walnuts. The cream filling consists of powdered sugar, egg white, shortening, and vanilla. The cookie dough is from a recipe you can find on any Toll-House chocolate chip bag. Its baked a little on the soft side so it slices like a cake. This one didn't last long after this photo was taken....it was devoured in short order!

Giant Chocolate Chip Sandwich Cookie

ArtisanGeek's picture
ArtisanGeek

This is the second of my reviews on artisan breads available at my local Whole Foods Market. Actually, I visit three locations in my area (Raleigh/Durham, NC) and they are all the same because the are all baked in the same "bakehouse" which distributes them to all of the area stores. As many of you commented in my previous post, nothing quite compares to what you can produce at home....however, there are good bakeries out there and some of this retail stuff is pretty good.

The Whole Food Organic Farm bread is another loaf I really like. Like the Ciabatta, it has the classic crackling crust. This one uses a sourdough preferment that becomes apparent when you take the first bite.; not too tart, but just enough tang where you can taste it.  It contains white and whole wheat flour. Uncut, it will keep for three or four days in a paper bag. If the humidity is high and the crust gets a little soft, about ten minutes in the oven at 425 will revive it. This bread isn't my all time favorite as far as retail breads are concerned, but its definitely on my "pretty dog-gone good" list:

Whole Foods Market Organic Farm Bread

Organic Farm Bread Crumb

Stay tuned for more reviews....My posts can also be viewed on my blog, The Bread Portal.

Pages

Subscribe to Recent Blog Entries