The Fresh Loaf

A Community of Amateur Bakers and Artisan Bread Enthusiasts.

Recent Blog Entries

Nomadcruiser53's picture
Nomadcruiser53

A quick entry today because I didn't do much. The raisin bread is wonderful and filled the house with that "to die for" smell, but I can't take much credit for it. I had a mound of dough left over from the sticky buns yesterday so I figured I'd just stretch and fold some raisins into it and let er rip. It sat and proofed for another hour and into the oven for 40 mins at 350. I think the neighbors could smell it from the street cuz it's going fast. I just made myself a "moscow mule" and browsed BBA for SD tips. I have a firm starter getting ready for a basic white SD tomorrow. I need bread for work sandwiches. Anyway, here are the raisin bread shots.

A nice crumb and tasty treat with fresh coffee. Dave


xaipete's picture
xaipete

I tried making the grilled pizza margharita featured last week on WildYeast over the weekend. The recipe makes two pizzas so I grilled one Friday night and the second, Saturday for lunch.

Friday night's pizza was about a 10" round. I had difficulty getting our gas BBQ to heat evenly (it has three elements running front to back but the backs of all three are hotter than the fronts). Consequently, it cooked too fast, got too brown on the back side, and was slightly underdone in the middle (didn't cook all the way through).

To remedy the problem I decided to make Saturday's pizza into a rectangle and lower the heat so it would cook all the way through. My second attempt was much more successful: nothing got burned and the pizza dough was cooked all the way through.

Grilled pizza is definitely different than its oven baked cousin. It was thicker and the crust had a nice crunch, but the flavor of the mozzarella just seemed a little blah on the grill. Would I make it again? Yes, but with a stronger topping, e.g., sausage and firmer, perhaps marinated mozzarella or pesto and shrimp. It was nice not to have to preheat the oven for an hour on a day when the temperature was nearly 100ºF here!

--Pamela

Just Loafin's picture
Just Loafin

-- Recipe revised on July 7, 2009 | Shaping technique revised on July 7, 2009 --

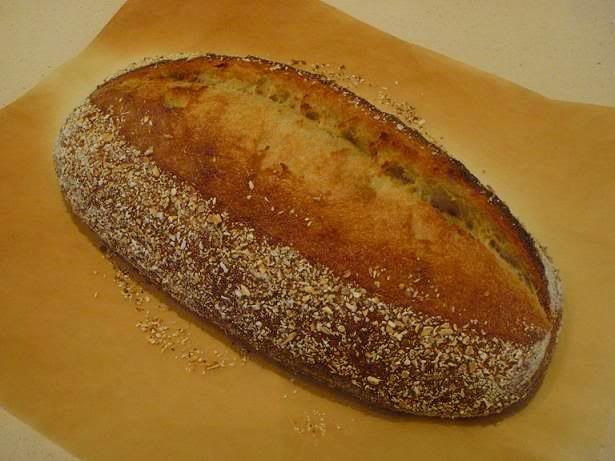
I have been developing this recipe for about 4 months now, and it has become one of those breads that's always around the kitchen. I use to make it solely for hearty dinners like stews, roasts, etc. I started off making one dinner sized submarine style loaf and freezing the rest. That worked great, but then I started making clover dinner rolls, and those were great too. This last time, I was rushed, so I just made one large hybrid boule/batard and hoped for the best. It turned out well for the roast we had that night, and lived on the next day in the form of morning toast and afternoon tuna sandwiches. The nuttines of the Whole Wheat really compliments tuna for some reason... very good stuff! Anyways, using only honey and molasses for the sweeteners keeps this bread pretty honest, and allows for the bread flavor to remain dominant.

 - Keith

-- Recipe revised on Jul 7, 2009

-- Edited on Jun 29, 2009 to include recipe

Recipe for Honey-Molasses Whole Wheat Bread (a work in progress!)

Disclaimer: As of right now, I do not use any machines in processing my bread dough. I use a combination of autolyse, frisage (see Technique Notes below recipe), classic stretch and fold, Bertinet stretch and fold, and good old fashioned kneading to get to the proofing stage. Which combinations I use depends on the recipe and time constraints. I will try to define gluten development as light, medium, or heavy so that those of you who do use machines can use your own due diligence and experience with your particular machine.

For this particular loaf, time was of the essence (dinner), so I needed to get from mix to bulk fermentation as fast as possible. To that extent, I used some Bertinet folding for quick gluten strengthening, then some regular kneading before rounding into bulk fermentation. The rest of it, up to baking, was pretty standard fare.

RECIPE INGREDIENTS (Baker's percentages provided)


Ingredient Final Dough
  % Grams
Whole Wheat Flour 57.71% 160.42g
All Purpose Flour 42.29% 117.58g
Water (110° F) 67% 186.26g
Salt 1% 2.78g
Butter (unsalted, softened) 9.3% 25.85g
Honey 13.89% 38.61g
Molasses 6.9% 19.18g
Active Dry Yeast 1.15% 3.2g
Totals 199.24% 553.88g


Notes: This recipe was revised to reduce hydration. After experimenting over the last week with several loaves, I found what I feel is the best starting point for the intial hydration in relation to the type of shape for the end product. You will still need some bench flour during the final kneading, but probably less than 1/4 cup. Please keep in mind that this dough has honey, as well as molasses in it, therefore it will be sticky. Judging when the dough is perfect takes a few times working with it. For me, this 'sweet spot' during the final knead is, it does not stick to my work surface (but I am working with it quickly.. if left to sit more than about 5 seconds, it -will- stick). It will slightly stick to my hands, but I keep them lightly floured.

If you are unfamiliar with scaling recipes using baker's numbers, please just ask and I'd be happy to scale for any amount of dough you need. ~550g of final dough was a perfect size for this particular loaf.

Ok, so onto -

TECHNIQUE

[Added Jul 7, 2009 - Summer is here, and it is over 80° F in my kitchen and work area. I have therefore dropped my target liquid temperature from 110° F to 90° F. My bulk fermentation has dropped from 90 mins to 60 mins, and final proofing dropped from 40 mins to 20 mins. These temperatures and times are using Active Dry Yeast.]

Add flours and salt to a mixing bowl, whisk briskly. Combine water, honey and molasses to micro-safe container and heat in micro to about 120° F. Add butter to liquids. Whisk, and once it has melted in, water mixture should have dropped to about 110° or so (exact temp not real critical here - +/- 5° is fine). Add yeast and allow to work about 5 mins, or if you have used instant yeast, add that to flour instead and skip this step. Make a slight well in flour bowl and add water mixture to the well. Begin incorporating flour into water mixture by stirring from inside the well towards the wall of the mixing bowl. Do as best you can until you cannot mix further. Dump onto work area (no extra flour at this time). Perform Frisage (see note below). Put back into mixing bowl and let autolyse (rest) for about 30 minutes (20 mins during summer heat). After autolyse, return to work surface and begin Bertinet folding. Do this type of folding for about 10-15 minutes. Use windowpane test to check for medium to heavy gluten development. If you use this dough in some sort of a pan, less gluten is necessary. If you intend to make a freeform loaf (as is pictured), lean toward the heavy end. If you are doing this by hand like me, it is very difficult to overwork dough. Once you have a well-developed dough that is also smooth, round it (watch the very end of the Bertinet video) and return to a lightly oiled (I used veg oil, but canola or olive should be fine) bowl for bulk fermenting. Bulk fermenting should take 1 hour to 90 minutes, depending on temperature. Use a floured-finger poke test if you're unsure. Lightly turn back out onto work surface, this time with some bench flour on it (I also use Wondra for my bench work). Shape however you want.

Expert dough handlers: This next section is to walk novice shapers through the process of creating internal dough pressure and external dough tightening. You can skip all of it, and I'll just say, this shape is initially a boule, super-tightened, and then rolled on its side to elongate. The end shape is a batard middle section with a bull nose on each end. The middle section, after final proofing, should be a decent sandwich loaf width.

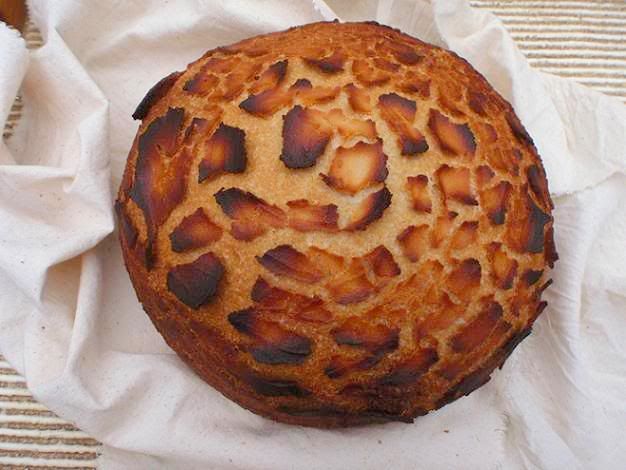
[Updated shaping technique added July 7, 2009 - For this loaf, I used my fingers to press out a rectangle, with the long edge running top to bottom. Use firm finger pressure to degas while flattening. Roll edge furthest from you towards you, overlapping the dough by about 1/2" to 1". Press down firmly all along the inside of this overlap, building tension on the outside skin. This technique is commonly used for making French loaves, and you are doing two things: building up inside dough pressure while degassing. Continue rolling towards you and pressing each seam. You will do this 7 or 8 times before reaching the edge nearest you. Lightly pinch together final seam along bottom. You should now have a nice French loaf type log. Fold left side 1/3 of the log over the middle, from left to right. Fold right side 1/3 over onto the left side, creating a 3 layer log. Flip upside down, and flatten firmly (but do not smash it). Pick up entire dough ball, and start tucking all of the bottom edge down and force into underside middle. We are now forming a quick and dirty boule. Move the dough ball around in a circle in your hands as you continue tucking under. Watch the surface area on top as the skin tightens. We already tightened once while rolling up the log, we are super-tightening it now. Once you have a nice tight boule, pinch together bottom seam area where all the edge dough gathered. It is -important- to thoroughly seal this seam, or the boule tension will release slightly. Set boule on the work surface, seam side down. It should sit up nice and tight. Very lightly dust your work surface. Now roll the boule back and forth (away from you, then back towards you) over the seam area. Do this fairly quickly, and apply slight pressure to the middle section. Your goal is to elongate the boule a bit, almost to the shape of a large batard. How much you do this last step actually determines the final loaf shape. Doing very little pressure here results on a very fat loaf which more resembles a boule. Using quite a bit of pressure and elongating it farther results in the shape pictured above, which is more of a sandwich loaf with a bull nose. The bull nose is the result of the intial boule shape. You have built up massive internal pressure, and now a super tight outside skin. Effectively, you have created a nice little hand grenade! This is going to maximize your oven spring, and provide for the nice bloom in the middle section. Handle carefully from here on out...]

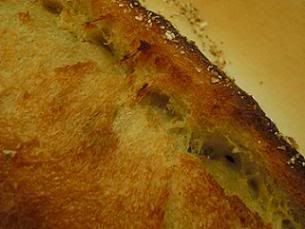
Transfer to parchment paper or baking sheet for final proof, seam side down (I use an Airbake cookie sheet, which bypasses the need for using parchment paper and provides me with a perfect bottom crust). Final proof is about 25-40 minutes, so begin preheating the oven to 350° F now, or even a bit earlier if yours needs more time. Again use a poke test if you need to determine when the final proof is ready to load into the oven. Lean towards a slight underproof if you like good oven spring. On the loaf pictured, the timing was just about perfect. The batard rose nicely in the heat, but didn't literally explode out the top. I spritzed the proofed loaf with a fine spray of plain water and slashed. The slash was a straight line lengthwise, with a slight angle on the blade. Drizzle about 1 Tbsp melted butter down the slash. This is optional. I omitted the melted butter on two loaves, and ended up with a nice smooth grigne on top. The melted butter loaves keep the slash area very moist and allows for the ear and bloom in the middle (if you like that rustic look).

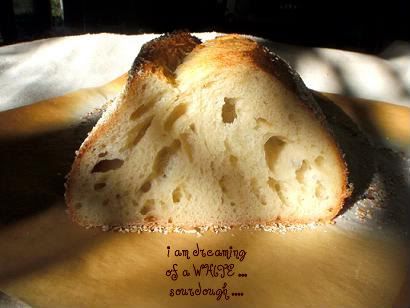
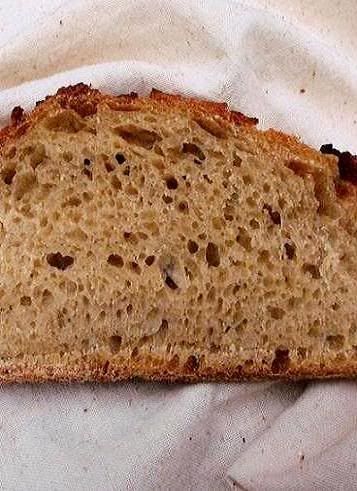
Bake for about 40-50 minutes, or until a digital thermometer reads 205° F or more (insert on underside, and make sure probe goes to middle of the loaf). When finished baking, turn off oven and let the loaf stay on the slightly pulled out rack to dry (about 5-10 minutes). Retire loaf to an actual cooling rack. You can slice into it within about 15-20 mins or so if, like us, you need it immediately. As with most breads, this loaf cuts best once completely cool (90-120 mins).

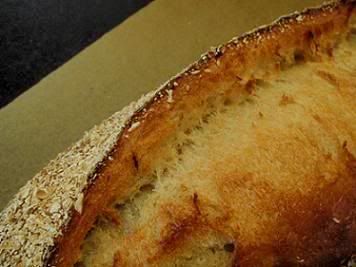
I would rate this recipe as Easy to Moderately difficult, the moderate part due to handling a sticky dough with honey and molasses. Anyone with some baking experience should be able to get reasonable results without much hassle. The honey and molasses content also creates a very nice dark golden brown crust without the need for any type of wash. You can experiment with any seeds or additional grains (like oats) for crust toppings. I've done the oats for a very nice result.

Techinique Notes:

Video of Richard Bertinet performing his stretching technique to develop gluten without the aid of a machine:

http://www.gourmet.com/magazine/video/2008/03/bertinet_sweetdough

Frisage:

Frisage is a french term for massaging the dough on the work surface in order to crush and hydrate any dry bits of flour after the intial mix. This, in effect, does by hand what a mixer would do. Although it looks messy, it really isn't that bad, and only takes about 2 minutes to do an entire load of dough. I have found that by doing this, and then following it with an autolyse period, leaves me with a dough that already has a light gluten formation. This makes for less kneading for the next phase. A video demonstrating this is available at the PBS Julia Child video library, where her guest chef is Danielle Forestier. The technique is performed several minutes into the video, right after she is finished combining the flour and water. The difference between what she does and what I do prior to the frisage is, she creates the well in the flour right on the work surface, where I use a mixing bowl. I do not have enough work surface space for that big of a mess! hehe Anyways, video link is HERE.

Nomadcruiser53's picture
Nomadcruiser53

         Hi. Here is a short introduction. I'm one of the newer Dave's on TFL. I'm 56, Canadian  and getting ready to retire. I spent my early years in open pit mining and oil field construction work. I spent a couple cold and interesting years in mine construction in the high Arctic. The last 16 years have been spent operating in the pulping and steam side of newsprint production. Now we're waiting for our house to sell in a slowing Alberta economy so we can move to our second home on Vancouver Island. My baking for now only happens on days off work so it's sporatic at best. Once retired, I'm hoping to settle into home renovations, time in the kitchen and recreational fishing. It's now time to start a blog so I can keep my bread and baking attempts in some sort of order. The bread machine used to be my home baking tool of choice, but since finding TFL I am discovering the joy of handmade loaves. I tend to have more failures than successes, but when the successes come I sure injoy them. Even the failures seem to get eaten at my house. Between my wife, 24 year old son and company, food doesn't last too long around here. I also have a 29 year old married daughter and 4 year old granddaughter living Regina so they don't get to enjoy the fruits of our kitchen as often, but we see them when we can.

         Today was a lazy day, but I did manage SD waffles and sticky buns. Both recipes came from the KA site.

These are a couple of left over waffles and they sat for awhile before I took a pic. Great with butter, syrup and a side of good old Canadian back bacon.

The sticky buns are wonderful and soft. I do think I pulled them out of the oven 10 mins early though. They were smelling more than done, but I was wrong. Next time I will wait.

Dave.

Shiao-Ping's picture
Shiao-Ping

I needed to revive my grape starter (I dried it using the method here) to make sure that it is still alive and happy.  And indeed it is.  I dried it a month and a half ago because it was getting too strong and active and I couldn't keep up with it.  It took me 4 days to bring it back from its sleep and on the 5th day (yesterday) I mixed up a batch of dough.

This is the sourdough that came out of my oven this morning:    

My daily sourdough with grape starter  


                         The crumb           

My formula:  

150 g grape starter @100% hydration (my original grape starter was fed with 1/2 wholemeal and 1/2 rye meal before it was dried; but for this bake I used only white flour to revive it)  

320 g unbleached white flour

12 g organic honey

22 g olive oil

170 g water

8 g salt

oat bran for dusting  

(final dough weight 680 g and dough hydration 70.6%)  


After 3 hours of first fermentation yesterday during which time 3 stretch & folds were performed, it went into the refrigerator of 8 hours cold retardation, then it was shaped and stayed out at cool room temp (15 C/59 F) for another 8 hours before it was baked at 230C/450F this morning at 7.   

This is the first time that I've ever got a meaningful "grigne" in my sourdough.  The oven spring I got this time was phenomenal.  The dough expanded nearly double in the oven - first the whole dough raised up to nearly double its height, then the centre line along where the score was made further raised up to 2 + 1/2 times its original height.   


                    grigne                                                                                     


I was trying to think back what I'd done to deserve this oven spring.  It appears to me from the very beginning when the flour was mixed with the starter, the choice of flour and the hydration that was used for the particular flour, the way it was mixed, right down to its fermentation, and how the fermented dough was handled, everything has contributed to this.  I know many users at TFL in the past have commented that bread making is a continuous process and that every link in this circle matters.  This is the first time that I am cognisant of this process and witnessed its pleasing result when done properly.  

Well, let's not get carried away.  White flour is easier to achieve a holely crumb, right.


                                                                                 i am dreaming of a WHITE ... sourdough ....

 Shiao-Ping

dmsnyder's picture
dmsnyder

Hamelman's 5-grain Soudough made with rye sour is currently one of my favorite bread. The formula calls for high-gluten flour, but I have not had any for a while. I now have some KAF Sir Lancelot flour, and this is the first bread in which I used it. 

I followed the formula for ingredients exactly, as I had before. Using Sir Lancelot flour, the gluten developed a little more slowly. I think I could have given the dough another couple minutes mixing in the Bosch. I did a stretch and fold before bulk fermenting, but it could have used either more initial mixing or another stretch and fold.

The crumb was quite chewy. I'll be interested in seeing if this bread seems too "tough" when toasted.

BTW, you might notice in the first photo that the boule on the right has a duller (less reflective) crust. This was the first loaf loaded onto my baking stone, and I steamed the oven after the third loaf was loaded - maybe 45 - 60 seconds later. Even a few seconds baking without steam at the start has a pretty dramatic effect.

David

lammie10's picture
lammie10

This is my first post ever! I am a graduate student who has a love for bread. I grew up in Hong Kong, and my favorite food as a child included 豬仔包 and 雞尾包 ("little pig roll" and cocktail bun). I have since immigrated to the US. As I grew older, my tastes have changed. I discovered the sourdough from Panera. Later, I would become acquainted with the wonderful spice that is cinnamon, which introduced me to cinnamon swirl and cinnamon raisin breads. When I visited the New York Chinatown, I became a fanatic for the raisin buns. Then, more recently, I fell in love with challah. I also enjoy eating the bread from my local food co-op, which gets its bread from Springmill Bread.

My baking adventures truly began when I wanted raisin buns but they were nowhere to be found within driving distance in the US. I began baking raisin bread as an undergrad, on occassion venturing into the naan. My dad is a wonderful chef, and sometimes, we would make "man tou" or "veggie buns" at home (I'm lacto-ovo vegetarian). Lately, I have been trying to perfect the challah. I think I'm doing okay. Today, I am baking my first loaf of sourdough... which explains why I have been browsing this site obsessively. Hopefully all turns out well!

Some pictures of my previous baking adventures:

First loaf - Raisin bread  no knead cinnamon raisin

Shiao-Ping's picture
Shiao-Ping

My formula for the dough:  

220 g organic stonegournd wholemeal starter @75% hydration 

400 g organic stoneground wholemeal flour (protein 14%+)

25 g water

270 g fat free butter milk

9 g salt   

(final dough weight 924 g and dough hydration 74% ) 

formula for the semi-liquid dough for brushing on the dough please see here.  (I would however increase water to 50 grams from 44 grams for future renditions.)


Mottled 100% Wholemeal Sourdough  


                                                                                            The crumb  

(1) The edges of the mottled surface were burned.   Because of the size I had to bake it quite long and the mottled surface cannot take high heat for a very long duration.  Next time I would lower the heat as soon as the dough is loaded.   (But, if the dough size is only half and baking time is shortened, the high heat for the whole duration is still the way to go to produce the golden brown crust.)  

(2) The mottled crust is nice and crispy, the best shape for it however is not a boule.  (I know now.)  The benefit is best felt in a baguette style or thin long bread such that you slice it length-ways.

(3) 74% dough hydration using butter milk is different from 74% hydration using water. The hydration would have been fine had it been water that I used given the high protein level in the wholemeal flour.   This sourdough turns out to be quite dry (ie, under hydrated) as the crumb is somewhat dense.   

(4)100% wholemeal flour gives a strong bitter note to the taste that my family doesn't care for.  Don't do it again.  


Shiao-Ping  

GabrielLeung1's picture
GabrielLeung1

http://chausiubao.deviantart.com/art/CaP-2-127364147

Further improvements on my white bread included three changes.

1.) Salt-less autolyse period

2.) Decreased amount of preferment

3.) Decreased hydration

Because an autolyse is meant to increase extensibility, salt would be a bad addition, this would counter the decrease in extensibility of a drier dough. However, I should be able to score these loaves because they are drier.

---------------------------------------------------------------------------

Purpose: To improve on a sandwich loaf with good crumb and flavor.

---------------------------------------------------------------------------

Formula:

 100%   Bread Flour        (13.5 oz)

 66%     Water               (9.0 oz)

 0.8%    Instant Yeast     (0.11 oz)

 1.33%  Salt                   (0.18 oz)

----------------------------------------------------------------------------

Method:

Day 1-preferment

 6.750 oz Bread Flour

 9.000 oz Water

 0.055 oz Instant Yeast

All the water is combined with half the flour and half the yeast and fermented for an hour, then retarded overnight in a refrigerator.

----------------------------------------

Day 2-main dough

 6.7500 oz Bread Flour

 0.0550 oz Instant Yeast

 0.1800 oz Salt

 15.805 oz Preferment

Autolyse- Combined the preferment with the flour and autolyse for 20 minutes.

Knead in the yeast and salt, and developed

Bulk Fermentation- 45 minutes at room temperature

Folded the dough

Secondary Fermentation- 45 minutes at room temperature

Divided the dough into two pieces, shaped them into batards.

Final Proof- 60 minutes

- Preheated oven to 450F after 30 minutes

- Scored loavves, filled slashes with sesame oil before the loaves went into the oven.

--------------------------------------------------------------------------

Thoughts:

- The fermentation was too quick. I can easily cut the yeast to stretch out the fermentation.

- If I quarter the amount of yeast, the fermentation should take 3 hours, a more reasonable time.

- It wasn't as difficult to knead in ingredients after the gluten was developed as I had thought.

- It was possible to score the loaves, 66% hydration is a good number, but it can still go higher I feel.

- Sesame oil is a good addition in terms of fragrance and flavor. It isn't too powerful.

- I need to work on the volume.

Next:

- I must shape the loaves to maximize surface tension

- Slashing the sides may improve volume

- less yeast, or several folds to slow down the yeast

- experiment with increased hydration, return to 70%.


GabrielLeung1's picture
GabrielLeung1

http://chausiubao.deviantart.com/art/CaP-1-127362078

A good white bread was made yesterday. This was my attempt to bring together all the techniques I've been learning about from books and this site.

--------------------------------------------------------

Formula:

 100%  Bread Flour

 70%    Water

 1.33% Salt

 0.8%   Instant Yeast

---------------------------------------------------------

Method:

Day 1-preferment

 9.0000 oz Bread Flour

 9.5000 oz Water

 0.0275 oz Instant Yeast

All the water was combined with an equal weight of the flour and a quarter of the yeast to be used here. This mixture was fermented for one hour, then retarded overnight in a refrigerator.

----------------------------

Day 2-primary dough

 4.50000 oz Bread Flour

 0.18000 oz Salt

 0.08250 oz Yeast

 18.5275 oz Preferment

The preferment was warmed up at room temperature for 90 minutes. The flour, salt, and yeast were then added and kneaded in.

Autolysed for 20 minutes.

Fermented for two hours, the fermenting dough was folded half way through. 

Shaped into a round boule, and proofed for 60 minutes.

Baked at 450 F with steam until it reached 200 F within, and was golden brown on top (probably around 25 minutes).

------------------------------------------------------------

Thoughts:

-----------------------------

Strategy-

Here I combined the preferment, autolyse, secondary fermentation, folds, and final proof to maximize gluten formation and flavor. The autolyse and folds should have enhanced the gluten development, while the preferment and secondary fermentation should have enhanced flavor. The final proof was 60 minutes long to achieve maximum volume.

-----------------------------

Next Time-

*I can probably still push the maximum flavor by scalding the flour in addition to retarding a preferment overnight.

*I can also increase the openness of the crumb by increasing hydration.

Oddities- scoring loaves is essential to maximum opening of the crumb, yet its difficult with high hydration doughs.

Pages

Subscribe to Recent Blog Entries