The Fresh Loaf

A Community of Amateur Bakers and Artisan Bread Enthusiasts.

Recent Blog Entries

sharonk's picture
sharonk

I tried one of my newest gluten free recipes and came up with a very tasty bread. It had a nice crumb, a nice rise and a nice crust. When I travel I always bring my own bread. I was getting ready to travel to a family event. I sliced up one loaf and packed it in my suitcase. To be sure I would have enough bread I also took the loaf I had previously sliced and frozen the week before. When I got to my hotel room I unpacked the still slightly frozen bread, leaving it to thaw in the open air. Meanwhile, I happily ate the fresh slices as I moved through the weekend’s events. I had forgotten about the thawing slices in the open air until I began packing and saw them. Being unsure they were still good but unwilling to dump them, I repacked them and brought them home. When I got home I toasted up a piece and Wow! it was still fantastic! There were a few pieces left so I wrapped them in a cloth and set them on the counter to see how many more days they would still taste good. They were still excellent even 2-3 days later. So this was a previously frozen bread that had thawed in the stuffy air of a hotel room, inadvertently left in that same stuffy air for 3 days, repacked and traveled a total of 700 miles. The bread just would not get stale, old, or gross!


For a gluten free bread to be treated this way and still taste so good is very, very unusual. Most people who must eat gluten free bread, whether they bake their own or buy it fresh, eat it fresh for one day and put the rest in the freezer because it dries out so quickly. My gluten free sourdough bread stays fresh on the counter for 5 days wrapped in a cloth, sitting in an open plastic container. It keeps 10 days in the fridge if it hasn’t been eaten up by then. It also freezes, thaws and toasts up beautifully. I have always been proud of the long shelf life of this palatable bread.


The packed, frozen, thawed, repacked, retoasted loaf that was inadvertently ignored in the hotel room was an experimental loaf. I used one of my standard recipes and added 2 tablespoons of chia seed gel to it. Recently I baked another loaf using this same recipe, with chia added, and tested the limits of its shelf life. It lasted 10 days! stored on the counter, in a cloth, in an open plastic container. By day 8 it lost a little of its bounce but gained a great crispiness in the toaster.


Chia seed is a wonderful addition to baked products. Adding 2 tablespoons of chia seed gel to baking products will extend the freshness and shelf life. The chia seeds attract moisture which is retained in the baking product.


To make chia seed gel, take 2 tablespoons of chia seed and mix it into 8 ounces of water.


Stir with a whisk or fork every 5-10 minutes for a half hour.


It is suggested to let the chia seed gel sit for 12 hours before using.


It keeps for 2 weeks in the fridge.

davidg618's picture
davidg618

I'd planned to do yet another bake of classic baguettes ala Hitz' formula, but after seeing and reading Pamela's blog entry a week ago, and after comparing Dan's formula with what I've been doing--they are very similar except for the liquid levain--I gave into my temptation and made the DiMuzio formula. The only change I made was to scale the formula to 1000g final dough weight (four 250g small baguettes) which isn't really a change, merely a diminuation. The DiMuzio formula calls for instant yeast, in addition to the liquid levain. I considered not using it, ultimately deciding to be faithful to the formula.

I prepared the liquid levain from my starter cache, using the 3-Build process I've made my own, over a nineteen hour interval. I mixed all ingredients together in my stand mixer for five minutes--bread hook, on lowest speed--then 3 minutes on second lowest speed, rested the dough 30 minutes, did a stretch & fold, and started to chill the dough for overnight retarded bulk fermation. I did two more S&F at 45 minute intervals before I was satisfied with the dough's development. Left to ferment overnight in the fridge, approximately 12 hours. Next morning, I divided the dough, and returned half to the refrigerator. I let the dough rest for thirty minutes. It didn't reach room temperature, but it had doubled in volume so I divided it again in two,  preshaped, rested 20 minutes, shaped, and proofed for an hour. Baked for 10 minutes, with steam, at 480*F, cleared the steam as much as possible, dropped the temperature to 450°F and baked further to 208°F internal temperature. I had decided to do the bake in two two-loaf batches. The one time I baked four baguettes simultaneously, despite the convection oven, I experienced uneven baking among the loaves.

Meanwhile, I'd removed the remaining dough from the refrigerator.

I was pleased, with the first batch's oven-spring, but one of the two loaves had a minor blowout. I'm still not confident my shaping and slashing is what it should be, and the visual results of the first two loaves didn't boast my confidence even an iota. I prepared and baked the second two loaves like the first batch with two planned changes--and one mistake. Planned: I allowed the shaped loaves to proof 15 minutes longer, and I slashed approximately 1/4 of an inch deeper than the first batch. Unplanned: In a senior moment, I forgot to lower the temperature to 450°F after the first ten minutes.  I think this only effected the crust thickness and color. The second two loaves are on the right in the picture below. I removed the loaves, like the first two, at 208°F internal temperature.

The crumb is all I could ask for, and the flavor, in my perspective, not surprisingly, is better than the poolish initiated baguettes I've been baking. Let me hasten to add, I love their flavor as well, but the sourdough levain adds complexity absent in the classic baguettes. I especially like the crust's nutty flavor bursts, and the chewier crumb. Furthermore, the flavor is only mildly sour.

So, I'll claim a conditioned success: Taste: A, Visual: C. Procedures: C+; I got a lot of them right, but not all of them. I've watched shaping and slashing video's and read shaping and slashing instructions ad nauseum, but my hands haven't yet developed the muscle memory to be able to do it rightly, without thinking about it. More practice, practice, practice. At least I've got lots of mouths that love to eat my bread, regardless of how it looks. I did, however, see one neighbor close her eyes while chewing a mouthful. I had assumed it was a gesture of ecstasy, and felt flattered, but maybe, that wasn't the real reason!


Yippee's picture
Yippee

I must confess this loaf is a mistake, but it is also the best sandwich loaf I've made so far.  It's fluffy, springy, and moist and 'pillowy' to touch; and it's wholesome - made with 100% white whole wheat.  Basically it has everything I've dreamed for in a sandwich loaf. 

It's an old formula adapted from a friend's home recipe, which originally calls for 64% hydration.  However, I did experiment with something new this time: the double hydration mixing technique, in which part of the liquid called for is reserved and added to the dough gradually in small increments after gluten has well developed initially through kneading.  

As I converted the original recipe into a formula using water roux starter, I forgot to account for the liquid component in the starter and accidentally added more liquid than I should.  This pushed the hydration of the dough up to 79%.  If I had not applied the double hydration technique, I may not have been able to incorporate all the liquid into the dough without ruining it.

This loaf turned out surprisingly good, since I did not realize in the first place my alteration to the formula. Now it has been four days, it still shows no signs of drying.  It springs right back when I bite into it and it still tastes very good without toasting.

This unexpected outcome has made me wonder if we up the hydration of our dough to the highest point it can withstand, will this produce a more fluffy loaf with extended shelf life?  Or other factors may kick in to interfere? Well, this question is too complex for a beginner to figure out.  Maybe you have the answer to it?

Here's my 'mistake':

http://www.flickr.com/photos/33569048@N05/sets/72157620566684609/

090709 follow up:

I tried 70% hydration, still moist afte 3 days, but starting to show some signs of drying.

will experiment with 75% hydration next.    


100% WWW Yin and Yang Banana Toast      
           
           
Water Roux Starter          
           
any amount is fine as long as   bread flour (or whole wheat flour to make 100% WW)   50 g
the 1:5 ratio is followed   water    250 g
           
    Whisk both until well mixed      
    Heat it up on stove, keep stirring       
    until temperature reaches 65 C or 149 F      
    (Yippee uses the microwave, about 4 minutes, stir halfway.)       
    (Final product should leave a trail when stirred.)      
    Put a plastic wrap directly on top to prevent forming a 'skin'.      
    Must be cooled to at least room temperature before use.      
    Refrigerate up to 3 days.        
    Do not use if turns grey.      
           
           
Makes 1 twin loaf (530g)           
           
A.   whole wheat flour =           229 g
    sugar  =             30 g
    salt =            1.5 g
    yeast =               5 g
    vital wheat gluten =             15 g
B.   whole eggs and  milk combined =           132 g
    but weigh separately so you can hold back part of the milk      
     (eg. 20-30g) to add later       
    water roux starter =             72 g
    mashed ripe banana =             30 g
C.   unsalted butter =             15 g
D.   black and white sesame seeds, each on a plate = as much as needed
           
Knead: 1 Combine A. and B. knead until a ball is formed.  This time the dough      
    should be on the dry side, since part of the liquid is withheld      
  2 Add C as kneading continues      
  3 Then add the remaining milk reserved earlier in small increments, wait       
    until the previous addition is fully incorporated before adding again.      
    If your dough seems unwilling to take in more liquid, stop adding.       
           
1st Fermentation:   About 40 minutes at 28 C or 82.4 F      
           
Divide:    265g x 2 for the twin loaf      
           
Relax:   15 minutes at room temperature      
           
Shape:   twin loaf:      
    Deflate      
    Roll into an oval      
    With the long side facing you:      
    Fold 1/3 from top to bottom, press to seal      
    Fold 1/3 from bottom to top, press to seal      
    Turn seam side down      
    Roll and elongate the dough to about 30cm or 12 "       
    Upside down and roll into a cylindrical shape      
    Wet a napkin, put on a plate, roll the formed loaves on the wet napkin      
    Roll the moist loaves on the plates of sesame seeds      
    Seam side down, into the loaf pan      
           
Final Proof:   About 40 minutes at 38 C or 100.4 F      
           
Bake:   350 F, 35-40 minutes      
    (Yippee applies whole egg wash before baking)      

This will be submitted to Wild Yeast Yeastspotting! 

Shiao-Ping's picture
Shiao-Ping

I confess this came as an accident.   When I was scanning Michel Suas' Advanced Bread & Pastry, his Caramelized Hazelnut Squares (page 248) caught my attention.   I sometimes make for my kids Hazelnut Praline Semi-Freddo; nothing pleases my boy more than that Italian ice cream.   Suas' formula to me is like incorporating a secrete ingredient in a delicious ice cream into a bread.  I was however not sure about having to prepare 2 sponge preferments plus 2 levains just to make this "Squares."  

Then, came MC's posting of her beautiful Blueberry Bread with Spelt Starter a couple of days ago, I found myself the reason of embarking on an experiment.  


                                                   caramelized hazelnuts (or hazelnut praline)  

I started my project after dinner last night around 7:30.  Instead of fresh blueberries that MC used for her bread, I thought if I used frozen ones perhaps there would be less of a chance of squashing them during mixing - bad plan.  There was more juice/water that came out of the frozen berries (than the fresh ones) that my dough was literally drenched in liquid and I had to use tissue to soak up some of the liquid.  What was supposed to be a 69% hydration turned out to be at least 85%.  Hence, the rustic "Squares!" - there was no way of any shaping of any kind!  If it were possible, I wasn't up to it.  It was a scary sticky mess:


                    the sticky dough mess                                                      the "shaped" dough

I ended up putting the mess on a piece of parchment paper and stapled the edges of the paper to try and hold the dough in.  The dough was in that position sitting on my counter-top from 9:30 last night to 11:30 this morning when it was loaded onto the oven (14 hours proofing!).     

My formula  

230 g starter at 75% hydration

150 g spelt flour

220 g white flour

40 g honey

206 g water

110 g caramelized hazelnuts*

140 g frozen blueberries

9 g salt

Flaked & slivered almonds for dusting  

*  Suas' caramelized hazelnut formula:

80 g hazelnuts (lightly roasted)

27 g sugar

10 g water

10 g butter  

*Add sugar and water to a sauce pan, cook until the mixture reaches 116 C/240 F, then add roasted hazelnuts, stirring constantly; when the sugar/water has started to caramelize, add butter to slow down the browning.  Move the sauce pan away from heat when the desired coloration has reached.   Note:  I used Suas' formula for the caramelized hazelnuts just to try it out but I have since found that it is just as easy without using the butter.  Simply heat the sugar/water mixture to 130 C/266 F or until it has browned, then add hazelnuts, stir for a few seconds, then take the sauce pan away from heat to cool down.  Half way through cooling down, spread the nuts apart so they don't stick together.  

It's a bit tricky to bake this sourdough as the flaked and slivered almonds that I used for dusting brown very quickly in high heat.  The dough was baked in 230 C/446 F for 10 minutes, then 200 C/390 F for 10 minutes, and 170 C/340 F for 30 minutes.  This is what came out of my oven at mid-day today:  


        Caramelized Hazelnut & Blueberry Sourdough  


                                    The crumb  

This sourdough is no "rustique" at all.  It is my kind of hog heaven!  The crumb is delicious - soft, moist and very flavorsome.  I am a happy Vegemite today.     


                                                                               my kind of hog heaven!


                    simply delicious!


Shiao-Ping

Dragonbones's picture
Dragonbones

I've decided to blog my baking and look forward to sharing recipes and getting advice from y'all.

For the past 15 years here in Taiwan, I had made far too many doorstops and hockey pucks instead of edible bread, until a couple months ago I decided to invest in a few good books on baking (I got PR's BBA (Peter Reinhart's The Bread Baker's Apprentice), RLB's BB (Rose Levy Beranbaum's Bread Bible), and NS's BLB (Nancy Silverton's Breads from the La Brea Tarpits), and also found this wonderful forum. It's helped immensely -- thank you all!

I've learned not to work so much flour into the dough (wetter is better!), and have also learned to weigh, not scoop and pack (!) flour. Equally importantly, I've learned to let it rise and proof by volume and not by the clock. I've started doing lots of pre-ferments, using sourdoughs as well as commercial yeast, and using pâte fermentée. Finally, I've gotten a hotter oven and started using steam.

My first big success was my Fifteen-grain Torpedo, based on the Tyrolean Ten-Grain Torpedo in RLB's BB p. 394. I changed the flour to 日清特高筋麵粉 extra-high gluten flour (sorry, but the brands here aren't generally in Roman script -- I'll sometimes post the original Mandarin because there's at least one other forum member here in Taiwan who might want to know the brand name or the product name in Mandarin; you can just ignore it if you don't read Chinese). I also added vital wheat gluten (小麥蛋白). The very high gluten content gave this loaf incredible shape-retention during its rise.


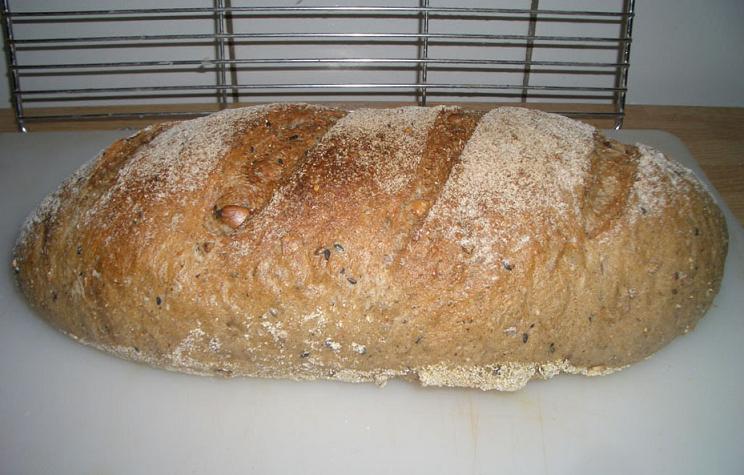
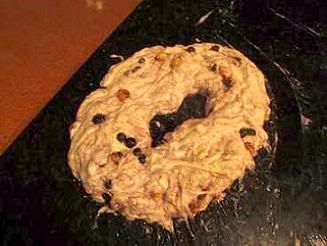
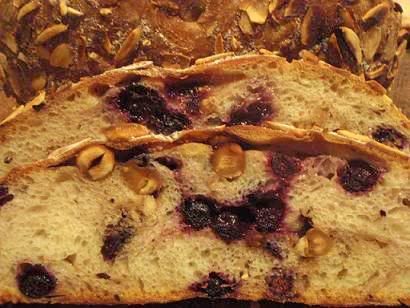
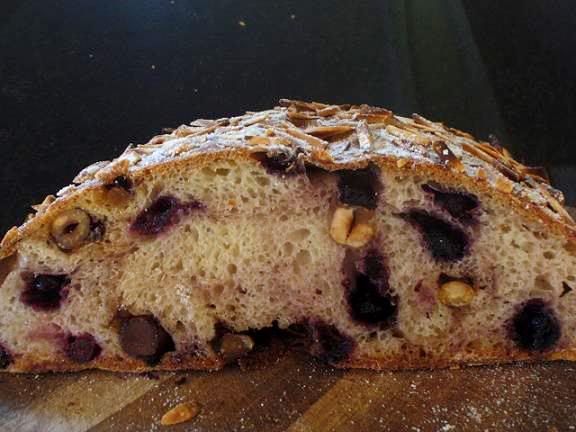
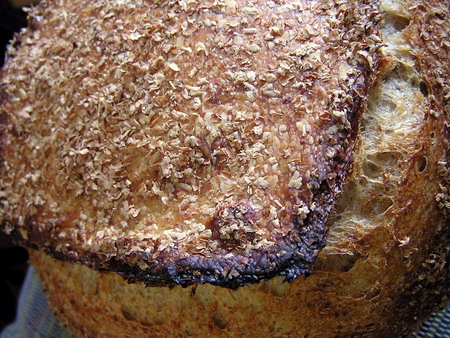
Dragonbones Fifteen-Grain Bread

This was baked in my old oven, which I got rid of a couple weeks ago. It didn't get hot enough (only 400F max, sometimes 365F), especially the lower element, so the bottom crust in the above pic could obviously be improved upon.

 DAY ONE:

Make sponge.   

  • ¼ tsp instant yeast
  • ½ TBSP malt syrup
  • ¾ cup + optional 1-2 TBSP water, RT

Should be DRY, to make up for the very wet mixture of grains and seeds to be added later. Let hydrate an hour, then add 100g (about 2/3 c) extra-high-gluten flour (日清特高筋麵粉 brand).  Original recipe called for bread flour (throughout). 

Make flour mixture (dry mix). In a separate bowl, mix these:

  • 200 g (about 1.25c plus ½ TBSP) extra-high-gluten flour
  • ¾ tsp instant yeast
  • 4 tsp (12 g) vital wheat gluten (小麥蛋白))

Whisk these 3 items together, dry. Spoon onto the sponge to cover it completely. Cover this with plastic, ferment 4 hours at RT, then overnight in the fridge.  This will form the 'dough' on day two.

Soak grains and seeds: Mix the following (or your own creative mixture of seeds and grains) in a small bowl, then add ½ c minus 1 TBSP HOT water, stirring well. Cover tightly, soak overnight at RT.

RLB's Original: ten-grain cereal mix, ½ c plus 2 TBSP, or 100 g

My version - equal amounts of the following, mixed into a larger bag (then measured out ½ cup of the mix, saving the rest for a subsequent batch):

  1. buckwheat flour, fine
  2. pumpkin seeds, toasted
  3. sunflower seeds, toasted
  4. cornmeal
  5. whole oats (chopped in my spice grinder) then toasted
  6. pearl barley; briefly chopped in spice grinder then toasted
  7. barley tea (=roasted unhulled barley), cracked (in my spice grinder)
  8. whole millet, toasted
  9. sesame, white
  10. sesame, black
  11. rye crumbs
  12. caraway
  13. spelt flour
  14. wheat germ and wheat bran
  15. zaliang 雜糧 (multi-grain) powder

 DAY TWO:

Mix the dough on low (KA2) 1 min., then medium (#4) SEVEN mins; will be dryish. Rest 20 mins (do not skip). Add salt (1.25 tsp) and presoaked seed mixture including liquid.

Knead another 3-5 mins until well incorporated; should be slightly sticky. Adjust with flour or water; will weigh 680 g (24 oz). Taste to check whether salt was added.  Due to errors on my first attempt (failure to realize sponge should be so dry, leading to adding too much water), I kneaded longer, working in flour, for about 15 minutes before dough was smooth; it was a very firm dough, resilient, slightly tacky.

Put in greased, flat-bottomed bowl; turn once. Push down to make top level, and mark this and the double level. Cover tightly. Let rise RT til double. Dough becomes more slack, workable.

Oil spatula. Scrape onto floured counter, press into rectangle.  Letterfold, turn, repeat; return to oiled bowl, turn, cover, let rise until doubled again, 45-60 mins.  

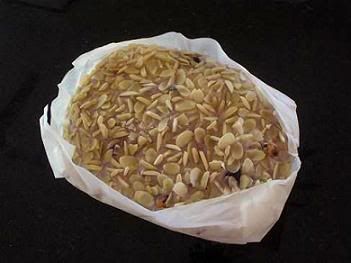
Shape and final rise:  Turn onto lightly floured counter, press into a rectangle. Shape into a torpedo-shaped loaf or bâtard. Spray parchment with oil then dust heavily with cornmeal. Set parchment on a peel or the back of a cookie pan;  set torpedo atop this, and cover with a large container, proofing box, or loosely with oiled plastic wrap. Let rise until doubled. Meanwhile preheat oven to its maximum, with stone on lowest shelf, and cast iron pan on oven floor.

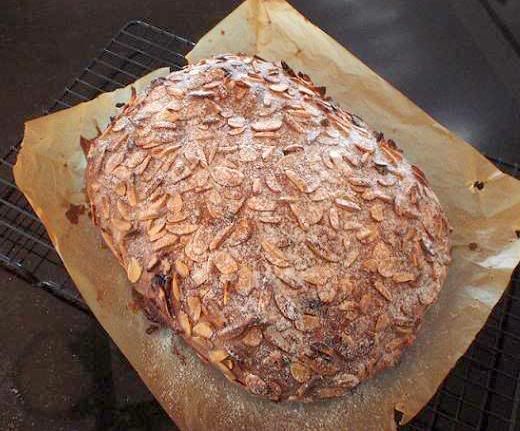
Dust with light or medium rye flour and score.  Prepare a cup of boiling water. Open the oven, slide the dough with its parchment sheet onto oven stone directly, and pour water onto cast iron pan underneath. Shut door quickly. After 30 seconds, spray water and shut door. Repeat once more.  I didn't lower the oven temp because my old oven maxed out at a wimpy temperature. A hotter oven might need to be turned down at this point, especially the top element.  Bake 20-30 mins, turning once, or until golden brown; internal temp should be about 208°F.  Cool completely on rack before cutting.   

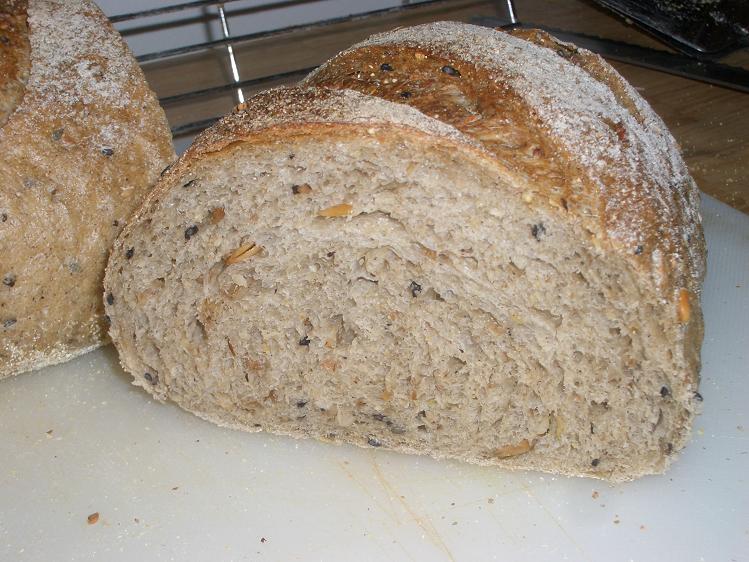
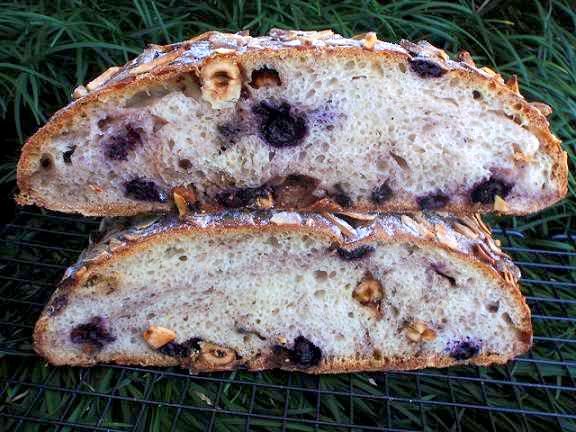
RESULT: Excellent! Chewy, full of grain, nice crust, nice flavor. Maintained shape, rose more than expected during final rise (had to orient diagonally on parchment to fit in oven!). Cuts opened well, looked great!  Cornmeal on bottom contributed nice texture too.   

My first real bread success! (This was about 6 weeks ago, I guess).  I'll be trying it again with a hotter stone this time for a better bottom crust, now that I have a new oven.


TeaIV's picture
TeaIV

I call this bread the Super-Soaker because I soaked every type of flour I had for a long time (a day and a half, with about a day in the fridge). the taste was superb, as was the crumb.

By the way, how's my new granite ;)?
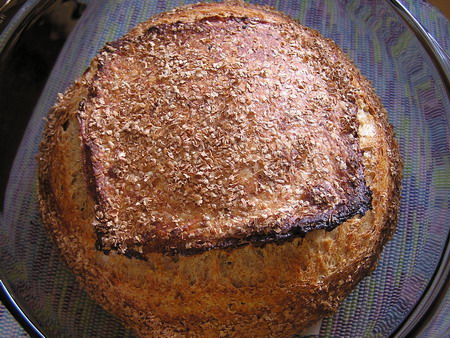
 

I added about a tsp. of sugar to the soaker. at first, it tasted like cream of wheat. after the day and a half that it was soaking for, there was some apparent hooch on top, and it had a very good, distinguished taste. I also did a cold proof.


the second picture isn't much of a looker, but oh well.


comments and suggestions would be welcome,

TeaIV

jleung's picture
jleung

Goodness, it's been a while. I've finally raised a sourdough starter, Bud (sorry, I couldn't resist heh heh), and baked my very first loaf of sourdough!

I followed SusanFNP's Norwich Sourdough as closely as possible.

Norwich Sourdough

For the blister-inclined:

)

Crumb shot:


Now I can finally start making my way through all of the sourdough loaves that I've bookmarked from TFL! It's so exciting to be able to explore a whole new field of bread baking. I had been slowly settling into a pattern of baking several of my favourite breads, but I love how every once in a while, you try something new and it really makes you stop and think, "Wow!"

Got to love baking bread. ^_^

Full post here; I had posted it last week but still wanted to share it here, seeing as The Fresh Loaf is where I've been able to learn so much from everyone. Thank you!

xaipete's picture
xaipete

When I was cleaning out my pantries a couple of weekends ago, I discovered a number of bags of various specialty flours. One of the bags was Bob's Red Mill Durum Wheat Semolina Flour. I was looking around today for a way to use this flour and found a recipe on the King Arthur site for 100% semolina bread. I adapted my bread from the recipe found in Judith and Evan Jones' "The Book of Bread".
http://www.kingarthurflour.com/recipes/semolina-bread-recipe
It is a moist bread with a nice even crumb and a mild taste of semolina. Very easy to make, I'm sure it would be well accepted by children because of its slight cake-like texture. It's kind of like corn bread with out tasting like corn (sounds strange, I know, but that's the way it strikes me). I think this bread would make great stuffing for turkeys and pork chops (see my comments below).

It did make great toast and go well with bacon, lettuce & tomato.

9 g instant yeast

340 g water

28 g soft butter (olive oil would work fine too) 28 g nonfat dry milk 8 g salt 600 g Durum wheat semolina flour (I used Bob's Red Mill Durum Wheat Semolina Flour)
Place all ingredients in bowl of mixer and mix with the paddle for a minute to incorporate all ingredients. Switch to dough hook. Knead on speed 2 for 4 minutes--dough should clean to bowl and pass the window pane test.
Place dough in an oiled 2 qt. container, cover and let rise until nearly triple, about 1 1/2 hours.
Deflate dough and divide into two 18 ounce pieces, for 8 1/2 x 4 inch loaf pans, or four 9 ounce pieces for mini loaf pans. Roll each piece of dough into a rectangle and then roll up tightly, cigar-style.
Place loaves in oiled bread pans, cover with oiled plastic wrap, and let rise until nearly double, about 1 hour.
Bake in center of preheated 350º oven until bread is a light golden brown and internal temperature reaches 190ºF, about 30 minutes. Turn loaves out onto a rack and let cool.
Would I make it again? Probably not. It is a little boring for my tastes, but I'm sure it will make great toast for breakfast. But it serves a two-fold purpose: I needed to use up this sack of semolina and I'm out of bread (my SD starter won't be ready to go until tomorrow.)


Nomadcruiser53's picture
Nomadcruiser53

I started my firm starter last night. This morning I prepared the dough. I did my first autolyse ( I didn't have a clue what that was before TFL). The boules shaped up ok this afternoon. I think they over proofed a little because I had some deflation when I scored the loaves. Using steam was something I wanted to do so I preheated the oven with my cast iron skillet inside along with my stone. In went the boule onto the stone followed  by a cup of boiling water into the skillet. I made use of the parchment tip this time (see, I'm not that slow of a learner). I pulled the parchment out after the first 10 minutes. Here's the results of the day.

It's just a simple all white SD, but I'm happy with the outcome.

The crust is thin and a little chewy with some crackle to it. The crumb is soft and slighly chewy with a very nice SD tang on the palette. Not much oven spring or gringe, so I still have lot's to strive for. Dave

SylviaH's picture
SylviaH

I wanted to have another go at this delicious loaf 'my new love Scali', this time I used a natural biga, mixed the dough, put it into a lightly oiled container and fermented it overnight.  I removed it from the refrigerator and let it warm for about an hour and then shaped one braided loaf...brushed it with one egg white mixed with one cup of water and spread on the sesame seeds heavily and baked it under my enameled turkey pan lid...giving the lid and oven a few spritz of water just before covering the loaf.  I don't know if I'm going to slice this loaf or freeze it..but I have a feeling the crumb is very nice and the flavor with be too and the crust is great on this bread, browning to a lovely mahogany!

This Scali Braided Loaf is a fairly simple and fun bread to make..use your favorite way of mixing.  The recipe is on http://www.kingarthurflour.com

We couldn't wait to cut into it!

Sylvia


Pages

Subscribe to Recent Blog Entries