The Fresh Loaf

A Community of Amateur Bakers and Artisan Bread Enthusiasts.

Recent Blog Entries

dmsnyder's picture
dmsnyder

This bread is a rye with 66 percent rye flour and the remainder high-gluten flour. A rye sour is elaborated using whole rye. The sour is 80% hydration, which ends up being a very thick paste, due to how much water the whole rye absorbs. This is fermented for 14-16 hours and is then mixed with Medium rye flour, high-gluten flour, more water, salt and instant yeast.

The resulting dough is very loose. Hamelman says to mix it (in a professional spiral mixer) for only 3 minutes at first speed and 2 minutes on second speed. He says you should have "a bit of gluten strength, but ... not much." I aimed for "a bit" of gluten development but had to mix for 16 minutes in my KitchenAid. The dough was extremely sticky and still rough and pasty. It had enough elasticity after fermenting to form into loaves, using more flour dusting on the bench and my hands than is necessary with lower-percentage rye doughs.

Fermentation was only 45 minutes and proofing was 50 minutes. Proofing is tricky with this type of rye. Under-proofing contributes to excessive oven spring and blow-outs. Over-proofing leads to the loaf collapsing when it is scored or when it is loaded into the oven. I think I hit it about right. <whew!>

I wasn't sure about scoring a bread like this. I considered not scoring at all or making rounds and docking them. In the end, I decided to make oval loaves and score one in the "sausage" cut and the other in the "chevron" cut.

Hamelman prescribes a 24 hour rest after baking before slicing. I wrapped the loaves in linen and left them on the counter overnight.

When sliced, this rye has a fairly thick, chewy (but not hard) crust. The crumb is fairly dense and quite moist. It is tender to chew. The aroma is assertively rye, as is the flavor with a mild sourdough tang.

The taste is good when eaten plain. It is strong enough to come through when eaten with a slice of aged gruyère cheese. Just as a light rye seems to call for corned beef, this rye calls for stronger cheeses and fatty fish such as herring or salmon. I wish I could get some smoked sable. 

David

dmsnyder's picture
dmsnyder


I made a couple of sourdough boules today. I'm quite happy with them. I used a slightly different formula, but the exciting thing to me was the effect of a modification of my oven steaming method I've been meaning to try for some time.


Ingredients

Amount

Baker's percentage

High-gluten flour

450 gms

90

Whole rye flour

50 gms

10

Water

362 gms

72

Salt

10 gms

2

Levain (1:3:4 - S:W:F)

100 gms

20

Total

972 gms


194


I used KAF Sir Lancelot flour and Bob's Red Mill “Dark Rye” flour.

Procedures

  1. Mix the flours and water to a shaggy mass. Cover and let rest for 20-60 minutes.

  2. Add the salt and levain and mix to moderate gluten development.

  3. Transfer to the bench and do a couple of folds, then transfer the dough to an oiled bowl and cover it. Note the volume the dough will achieve when doubled.

  4. After 45 minutes, do another stretch and fold, then allow the dough to double in volume.

  5. Divide the dough into two equal pieces and pre-shape into rounds. Let the pieces rest, covered, for 10-20 minutes.

  6. Shape each piece into a boule and transfer to well-floured bannetons, seam side up. Place each in a food-grade plastic bag, seal the openings.

  7. Allow to proof for 30-60 minutes (less in a warmer environment), then refrigerate for 8-14 hours.

  8. Remove the loaves from the refrigerator 2-4 hours before baking (depending on how risen they are and how warm the room is). Allow to warm up and expand to 1.5 times the loaves original volume.

  9. 45-60 minutes before baking, pre-heat the oven to 500F with a baking stone on the middle shelf and a cast iron skillet filled with lava rocks on the bottom shelf. (I suggest moving the stone ove to within one inch of the oven wall on your non-dominant side. Place the skillet next to the wall on your dominant side.)

  10. When the loaves are ready to bake, pour 1/3 cup of boiling water over the lava rocks and close the oven door fast. (Strongly suggest holding the kettle wearing an oven mitt!)

  11. Transfer the loaves to a peel or to parchment paper on a peel, and load them onto your baking stone.

  12. Immediately pour ½ cup of boiling water over the lava stones and quickly close the oven door.

  13. Turn the oven temperature down to 460F and set a timer for 10 minutes.

  14. After 10 minutes, remove the skillet. Reset the timer for 20 minutes.

  15. The loaves are done when nicely colored, thumping their bottoms gives a “hollow” sound and their internal temperature is at least 205F.

  16. When the loaves are done, turn off the oven but leave the loaves in the oven with the door ajar for 7-10 minutes to dry the crust.

  17. Cool thoroughly (2 hours) before slicing and serving.

The crust was remarkably shiny when it came out of the oven. This effect, due to starch that is gelatinized early in the bake, I have only achieved before with breads baked under a stainless steel bowl for the first half of the bake. I also got quite satisfactory oven spring and bloom in these loaves which I had feared were a bit over-proofed.

It is evident that using the skillet with lava rocks for both pre- and post-loading steaming is superior to either a) pre-steaming by throwing ice cubes in a hot metal loaf pan or b) compensating for insufficient pre-loading steam by over-steaming post-loading. Some methods of steaming, when used to excess, actually interfere with the cuts opening and produce pale-colored loaves.

The bread I tasted has a delightfully crunchy crust and a chewy crumb with what I would regard as medium-strong sourness – just how I like it best.

As far as I'm concerned, this experiment was a success.

David

Submitted to Yeast Spotting


SylviaH's picture
SylviaH

Banana-Nut Bread!  Fast, easy and didn't heat up the kitchen to much and I just happen to have 5  extra-large perfectly overipe  black speckled bananas and fresh Pecans from our local Bates Nut Farm!

This is a lovely tasting recipe 'not to dry not to moist' and slices beautifully from Williams-Sonoma Bread.   I doubled the recipe and it works out just right for two nice large 9X5 loafs.

Sylvia


Salome's picture
Salome

Isn't one of the best things to sit down with friends for a simple dinner? Last night we had two kinds of bread, butter, lots of cheese and a swiss style müsli, the Birchermüsli. I was so satisfied. And the others seemed to enjoy it as well. It always makes me so happy and proud when other people enjoy my baking and I think I'm very lucky that I've got such friends and family members who are willing to try new things. Howwould I be able to bake otherwise?!

After the Buckwheat Apple Sourdough I felt that autumn had come. Even though I'm very much a summer person, I decided to make the best out of it and bake some more seasonal breads. I made an old favorite again, the Potato-Nut Bread from Southern Tyrol and created a formula for a Pumpkin-amaranth bread. I shared the recipe for the Potato-Nut Bread a few monts ago on here and David has baked the Potato-Nut Bread a couple weeks ago and had very nice results.

The Potato-Nut-Bread is a very rustic loaf. The crust looks every time very wild and I always get a nice crunch when baking this bread. It has a good keeping quality due to the potatoes, which also make the inside very soft and tender. (If there weren't any crunchy nuts ;) .) This time, I even achieved somewhat of an oven spring, which I've found hard to achieve in the past. But probably I was just not doing it right, this is one of the recipes I started my sourdough baking with. From all the times that I've baked this bread, this time it was the most successful time! Yeyy! I might could have let it proof somewhat longer after the shaping though.  Don't be shy with the coriander - I think, two teaspoons is the perfect amount. (In the original recipe it's even two tablespoons, but then it's very overpowering.)

The pumpkin-Amaranth bread . . . is yellow! Sadly, I couldn't notice any pumpkin flavor. But the color is great, I think I'll bake with pumpkin again. maybe I won't blend it completely and leave some chunks the next time. The toasted amaranth provided a very tasty note! I was frustrated though because I forgot to roll the shaped batard in amaranth. Imagine how nice this crust would have been! Why am I so oblivious. . . I wasn't 100 %satisfied with the crust, it softened during the cooling. The bread was very light and pillowy.

Potato-Nut Bread from Southern Tyrol

Ingredients

Liquid levain

  • 80 g whole rye flour
  • 100 g water
  • 20 g mature starter

Final dough

  • All of the liquid levain
  • 400 g potatoes, peeled
  • 500 g bread flour
  • 250 ml water
  • 11 g salt
  • 2 tsp ground coriander
  • 100 g walnuts
  • 100 g hazelnuts
  1. Prepare the liquid levain the night before you bake.
  2. On the next day, cook the potatoes with just a little bit of water. Drain the excess water and let the potatoes cool somewhat. Mash the potatoes.
  3. chopp the walnuts and the hazelnuts roughly and toast the nuts until fragrant but not burned. Rub the peels of the hazelnuts off.
  4. Mix the liquid levain with the water, the potato mash and the flour to a shaggy mass. Let it autolyse for about 30 minutes.
  5. Add the coriander and salt and mix them into the dough. Knead in your mixer for at least 10 minutes. The dough is very sticky, don’t add any additional flour though! It does not clean off the sides completely.
  6. Transfer the dough to a floured board and, with well-floured hands, stretch it into a 14 inch square. Distribute the nuts over the dough, roll it up and knead for a couple minutes to get the nuts evenly distributed in the dough.
  7. Gather the dough into a ball and place it in a large, lightly oiled bowl. Cover the bowl.
  8. Ferment the dough until it has doubled and is puffy, with stretch and folds every 40 minutes. I folded the dough three times, it fermented somewhat longer than two hours.
  9. Transfer the dough to a well-floured bench. Divide it into two till three equal pieces. Pre-shape into logs. Dust with flour and cover with plasti-crap. Let the dough rest for 10-20 minutes.
  10. Form the pieces into bâtards and place them on lightly floured parchment paper. Dust again with flour and cover with plasti-crap.
  11. Proof the loaves until they are about 1.5 times their original size.
  12. 45-60 minutes before baking, place a baking stone in the oven and make preparations for your oven steaming method of choice. Pre-heat the oven to 430F.
  13. Bake with steam for 10 minutes, then in a dry oven for another 20 minutes. If the loaves seem to be getting dark too fast turn the oven down 10-20 degrees.
  14. Bake until the internal temperature is 205F. Remove the loaves to a cooling rack.
  15. Cool completely before slicing.

@ David, I copied and adapted your write down of this formula. Is that okay? I made some things differently than you. For instance I used a whole rye sourdough and I cut down on the hazelnuts. In my opinion, a total of 200 g is enough. The bread is still very rich on nuts.

The second bread, the Pumpkin-Amaranth Bread, I made up myself. I found a bag of organic Amaranth the other day in a shop and couldn't resist. On the same day, I prepared a roasted pumpkin salad and thought, that I could use pumpkin in an other way than just always seeds. I cooked some pumpkin pieces with a tiny amount of water and purreed it and stored it in the fridge until today.

Pumpkin-Amaranth Bread

Ingredients

Preferment

  • 100 g bread flour
  • 1/10 tsp instant yeast
  • 57 ml water

Soaker

  • 70 g amaranth, toasted until fragrant
  • 80 g hot water

Final dough

  • All of the preferment, in chunks
  • soaker
  • 240 g pumpkin, cooked and pureed, cooled
  • 250 g bread flour
  • 65 g water
  • 50 g amaranth flour
  • 4 g instant yeast
  • 9 g salt
  • optional: amaranth for a crust coating
  1. Mix the ingredients for the preferment the night before you bake.
  2. At the same time, toast the amaranth grains until they are fragrant.
  3. The next day, pour 80 ml hot water over the amaranth, let it cool of somewhat.
  4. Mix all of the preferment, the pumpkin puree, the bread flour and the water and let this shaggy mass autolyse for 30 minutes.
  5. Add the salt and the instant yeast and knead in a machine until the gluten is developed. Then incorporate the soaked amaranth (some hand work is probably needed).
  6. Let the dough ferment until doubled in size, with two folds every half hour
  7. Divide the batch into two equal pieces and preshape. Let them rest for about 10 minutes, then shape into batards. you might want to roll the loaves in amaranth grains to achieve an interesting crust.
  8. Let them proof for about an hour, until they seem to be ready to go into the oven.
  9. Slash and bake in the preheated oven (430°) on a baking stone with steam for about 30- 40 minutes

Salome (Happy not just because of her breads, but also because she passed the acceptance test for her school's Proficiency English course (aiming at the Cambridge Proficiency Certificate). Probably as well because I get to use my English here all the time. Thank you folks and keep correcting me!)

alliezk's picture
alliezk

Baking hiatus until my situation is more solid at my new home - glorious Princeton University.


I hope to be back soon!

Til then - Happy Baking!


jleung's picture
jleung

Back in July, a "Swiss sourdough youngster" introduced herself and was kind enough to share her recipes for some fantastic breads. I was particularly excited about the zopf because I had never made it before, and it was just the kind of bread I was craving. Salome explains that this is her mother's version of the traditional Swiss Sunday bread; it is not sweetened so will pair well with many things. I had it plain, and with blackberry jam (my first batch of freezer jam!), and honey, and butter, and cheese... not all at the same time :) but all of these variations were delicious.

Original post here:

http://www.thefreshloaf.com/node/12781/swiss-sourdough-youngster-introducing-herself#comment-75348

My notes:

- I used 100g KA whole wheat flour and 900g KA all-purpose flour
- I couldn't find Quark and substituted it with homemade whole milk yogurt
- The recipe calls for 40g fresh yeast; I used 20g of active dry based on a conversion factor of 0.5. It didn't taste "yeasty" to me but I think I will reduce the amount of yeast and let it ferment for longer next time.
- I used honey instead of glucose.
- My oven and half sheet pan are small and I was concerned the two large loaves would burn at the edges if I baked them at 400F, so I baked them at 350F for slightly longer (40-45min.) instead.

Here are the loaves!

Thanks, Salome, for sharing this recipe with us. I enjoyed making it very much!

davidg618's picture
davidg618

We enjoy sandwich breads--soft crust, close crumb--a buttermilk white straight dough, the dough for three loaves made in our bread machine and oven baked,  or a whole wheat variation has been our mainstay for six or seven years. My favorite is the whole wheat version. Recently, I've made a sourdough variation a couple of times, with enjoyable results. It was natural I'd turn to this favorite for my first go at making pain de mie--Pullman bread. This is a poolish started version. The final dough contains 25% whole wheat, and is firm (60% hydration). As expected, the crumb is close and soft, and the crust slight. The bread has a sweeter flavor than the straight dough version. I suspect this come from the poolish which makes up 25% of the final dough weight.

I think I overfilled the bread-pan slightly. There is a slight compression of the crumb just inside the crust (although that could also be due the way I fit the dough log into the pan). Jeffery Hamelman, in Bread, recommends 2.25 lbs. of dough for a 13"x4"x4" Pullman bread pan. My dough weighed four ounces more. Next time I'll follow his guidance to the fraction of an ounce.

the crumb.

On the last day of class at King Arthur we baked Fougasse and pizza in the center's magnificent Le Panyol wood-fired oven. Here's a picture of our classes' youngest member, Michael who attended with his mother, loading his pizza into the oven, and another of my Fougasse. At 650°F it only takes a few minutes to bake, and because the fire was still burning in the rear of the oven we had to keep turning our breads frequently. It was fun, but it also made me appreciate my home's modern convection oven.

This bread was delicious when eaten immediately warm, but the next day it was rock hard, good for croutons or bread crumbs, but not much more.

smasty's picture
smasty

Before I say anything, let me say thanks for the generous advice I've received!

I did it!  This was my 3rd attempt, and it's pretty close to perfect.  My culture was 16 days old, yesterday.  I began my pre-ferment at 7:00 pm yesterday, then at 7:00 am this morning I built the dough.  I could never figure out why Hamelman continually suggests "tasting for salt to be sure it wasn't forgotten."  I always wondered why someone could forget the salt.  Well, twice now I've almost forgotten it, since it is added after the autolyse.  My dough still took 6.5 hours to less-than-double, I gave it two folds during that time.  I proofed the loaves for about 1 1/4 hours, crossed my fingers and popped them in the oven.  I bought a probe thermometer yesterday....wowza...what a difference that makes, too.  I started the loaves at 460 degrees, after 10 minutes I lowered the temp to 435 (due to browning).  I now know that I've been pulling my loaves at about 160-170 degrees (internal temp)...way too low!  I had to lower the temp to 400 to keep the crust from overbrowning, and finally pulled them out when internal temp hit 200.  So, I started at 7:00 am and have bread at 4:30 pm (great bread!).  The crumb color is hard to discern in the pic since I didn't use a flash, but it's a great color.  I've learned so much by failing multiple times and asking for help.  Though I know I have much more to learn.  Thanks again for the great advice, encouragement and support! Now...just gotta hunt down a good bottle of wine!

hansjoakim's picture
hansjoakim

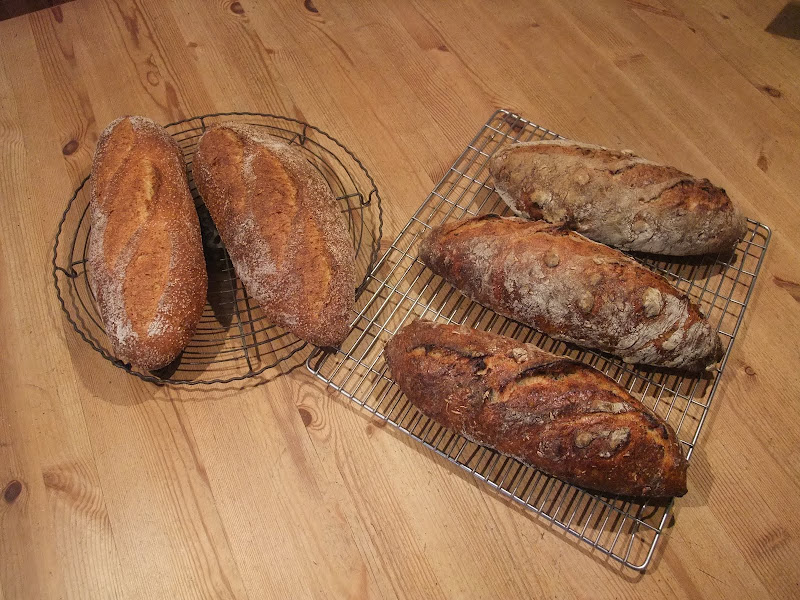
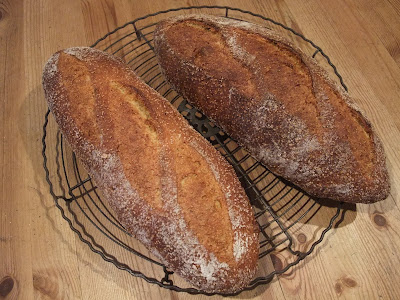
The pain au levain with whole-wheat from "Bread" that I blogged about a few weeks ago, is quickly becoming one of my favourite levain breads. Here's one that I baked yesterday afternoon:

Pain au Levain

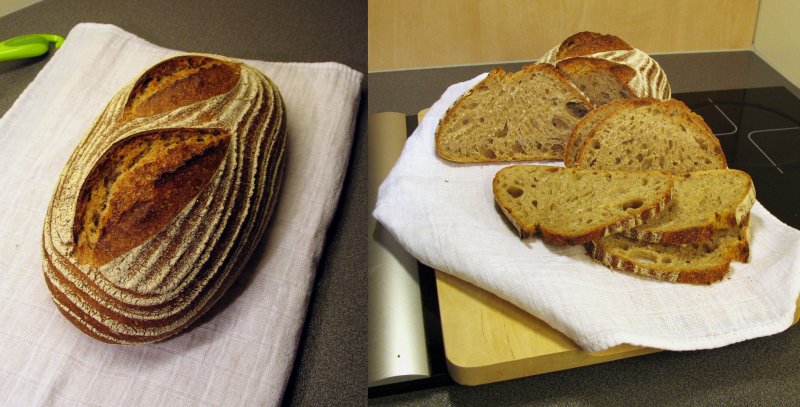
I'm always amazed by the fact that these levain breads only contain three ingredients: Flour, water and salt. It's fascinating how three so simple ingredients come together and, given enough time, produce delicious loaves. This loaf has a subtle and mild taste, and I usually eat it plain in order to fully enjoy the flavour.

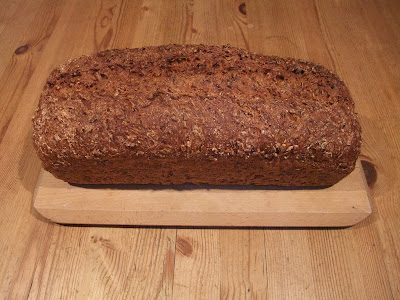
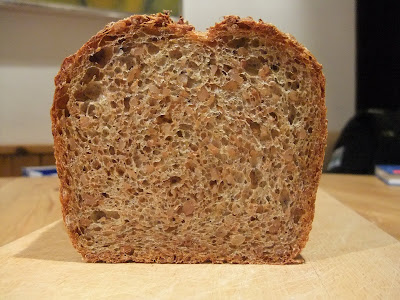
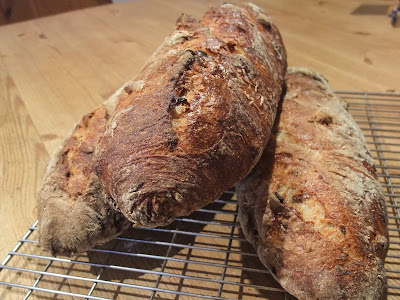
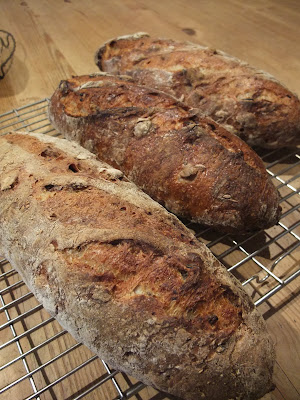
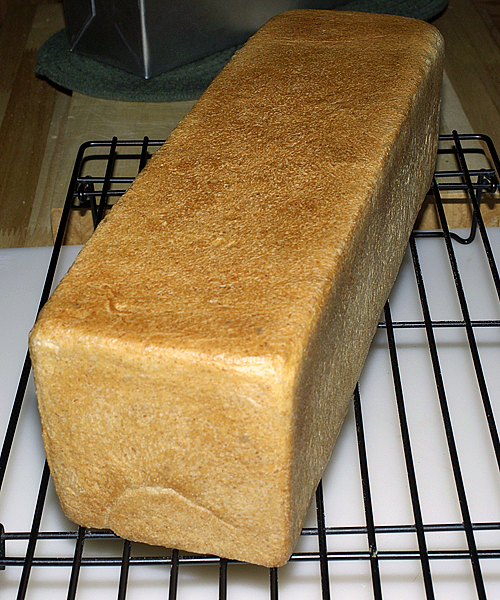
In my last post, I wrote about a new rye starter that I made. The initial motivation to get a new one going, was to see whether there would be any significant difference in flavour compared to the stiff, white starter that I've had for about a year. The rye starter is incredibly active, and I've been keeping it on a 1:10:10 (starter:flour:water) diet, with feedings spaced roughly 12 hours apart. The resulting loaves taste pretty much like those leavened with the white starter, so I guess one of them will eventually be cut loose... We'll see. Anyways, below is a multigrain sourdough that I baked with the rye starter (no commercial yeast):

Multigrain Levain

It's approx. 20% whole-rye (all from starter), 10% buckwheat and the rest bread flour. Multigrain soaker contains the usual suspects (i.e. flaxseeds, quinoa seeds, oat bran, rye chops, sunflower seeds). I gave the dough a 2 hr. bulk followed by proof overnight in the fridge.

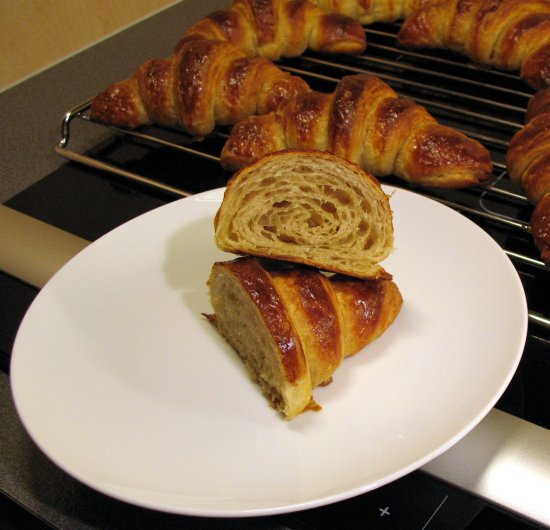
I also baked some croissants over the weekend:

Croissants

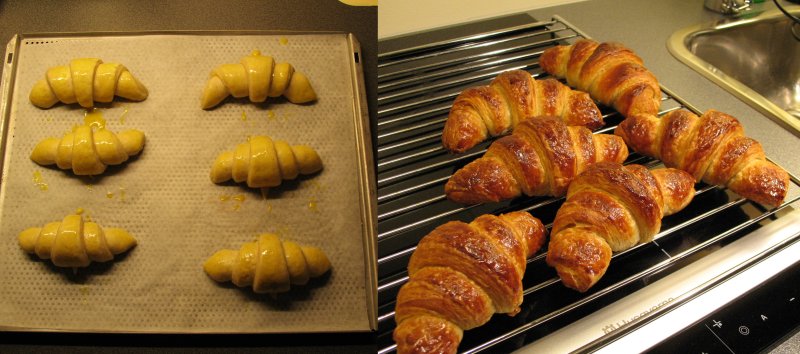
It's been a long time since I had a go at these, and I've definitely felt the cravings for buttery, flaky croissants for a while. I used the straight dough version from Suas' ABAP, and let the dough ferment 45 mins. at room tempertaure before I degassed and retarded the dough in the fridge overnight. Lamination (three single folds) the following morning, and makeup and final proof the following afternoon. A nice evening snack and splendid petit dejeuner the next morning :) They turned out alright, but rolling and shaping still need practice.

Croissants_crumb


Finally, a humble carrot cake:

Carrot cake

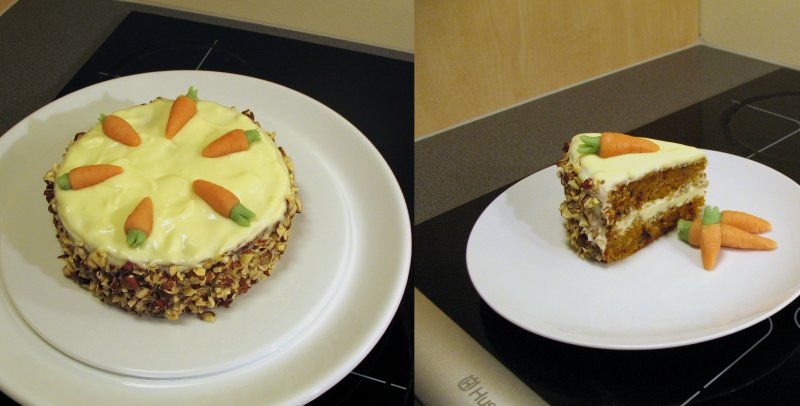
A very moist, soft carrot sponge and cream cheese filling made this an enjoyable dessert! Three pretty large, shredded carrots went into the sponge batter (baked in a 15 cm cake ring), but I think even more could go in there to give it a stronger flavour of carrots. The most enjoyable bit was actually making small, cute marzipan carrots :)

Salome's picture
Salome

100 % sprouted grains? 'Sounds great and interesting', I said to myself and printed the Recipe of Reinhart's Whole Grain Breads a couple weeks ago. This weekend I gave it a try.

I sprouted my grains as indicated. They all had cute little white tails and were pleasant to chew. I would have better kept them as a addition to my breakfast cereals instead of trying to make them into a bread.

"grind the grains into a pulp as fine as possible. If the grains warm up to much, let them rest for ten minutes and continue when cooled. A meat grinder works even better" - That's what Reinhart wrote. I should have been an english native to know what exactly a food processor is. I tried everything, and everything failed.

my kenwood mixer . . .

the mixer which normally fixes everything, the legendary bamix . . . mühle The bamix addon grinder . . .

even the kenwood grater . . .

and last but not least, in desperation, I tried it with a passevite.

I fought about an hour, ended up with my bamix. All the other things blocked because of this doughy/grainy mass. My bamix just got very hot, so I decided to call it for good, even though there were still some whole grains. I added yeast, honey, salt, water and Vital Wheat Gluten, then fermentation, shaping, proofing, baking, cooling, slicing.

The result of this struggle? My bamix is somewhat weird. The exchangeable blades are very hard to remove and to put on again. (I hope my mom won't find out.) I washed kitchen equipment for about an hour. And I've got a bread which is jar-muscle-excercise. It is light, but the grains . . . Flavorwise, it's just bread. seriously, I had much better whole grain breads. I don't notice an exciting difference trough the sprouting and because of the considerable amount of yeast added, no other interesting flavors emerged. Even my family noticed a "lack" in flavor compared to other breads I bake.

You wan't to see pictures?I know the bread looks decent, but before you try it: Think about what gear you've got.

Salome

Pages

Subscribe to Recent Blog Entries