The Fresh Loaf

A Community of Amateur Bakers and Artisan Bread Enthusiasts.

Recent Blog Entries

koloatree's picture
koloatree

just some pics from yesterdays bake. next time, i will do the second proof longer, increase hydration slightly, and reread scoring tutorial. not sure why the other side didnt get spring. maybe i didnt score deep enough? 


higher hydration


Kuret's picture
Kuret

Seeing as rye breads are all over this place nowdays I decided to share some loaves I have baked the last weeks. First up is the 80% rye with soaker from Bread. This bread is really great! I made two of these 850g breads and they lasted a week each, with some saved in the freezer for the next time I make the Horst bandel black pumpernickel.

This is how one of the loaves looked when ready for cutting. A little overfoured I have to admit..


I am really fond of the cracks that appear when you make properly proofed rye breads. When I cut the loaves open I found a much more open crumb than what I am used to when handling this kind of high percentage rye, to me the crumb looks more like a 60% rye than an 80%. This combined with a robust rye flavor made for great open face sandwiches with cream cheese and chives. Who whould say no to that?

           80% rye crumb

I also baked some "american pumpernickel", I do not really know what classifies a bread as pumpernickel though. This loaf is a 40%rye made with finely ground rye flour with some ground up caraway and fennel added, the color is homemade caramel coloring. The tomato is a tomato..


dmsnyder's picture
dmsnyder


Today's sourdough bread is a continuation of the experiment from last week with my modified steaming method of pouring hot water over pre-heated lava rocks in a cast iron skillet both before and after loading the loaves in the oven.

I had two new goals: In addition to trying to replicate last weeks good results, I wanted to increase the sourness of the bread and I wanted to see if I could get a “crackly” crust.

In the interest of increased sourness, I elaborated a firmer levain than what I customarily use. I fed the levain two days before mixing the dough, fermented it overnight and then refrigerated it for 18 hours. I also doubled the percentage of the levain in the formula.

I have read that lower protein flour will produce a more crackly crust, while higher protein flour produces a more crunchy, harder crust. Therefore, I used AP flour (11.7% protein) rather than the high-gluten flour (14.2% protein) I had used last week.

Since I was using a lower protein flour, I reduced the hydration of the dough to 70%. Note that the effective hydration is even a bit lower, since the levain was less hydrated also. I used the same procedures as last week except I baked the loaves slightly longer, since they were slightly larger (because of the additional levain).


Ingredients

Amount

Baker's percentage

Giusto's Baker's Choice flour

450 gms

90

Whole rye flour

50 gms

10

Water

350 gms

70

Salt

10 gms

2

Levain (50% hydration)

200 gms

40

Total

972 gms

212

Procedures

  1. Mix the flours and water to a shaggy mass. Cover and let rest for 20-60 minutes.

  2. Add the salt and levain and mix to moderate gluten development.

  3. Transfer to the bench and do a couple of folds, then transfer the dough to an oiled bowl and cover it. Note the volume the dough will achieve when doubled.

  4. After 45 minutes, do another stretch and fold, then allow the dough to double in volume.

  5. Divide the dough into two equal pieces and pre-shape into rounds. Let the pieces rest, covered, for 10-20 minutes.

  6. Shape each piece into a boule and transfer to well-floured bannetons, seam side up. Place each in a food-grade plastic bag, seal the openings.

  7. Allow to proof for 30-60 minutes (less in a warmer environment), then refrigerate for 8-14 hours.

  8. Remove the loaves from the refrigerator 2-4 hours before baking (depending on how risen they are and how warm the room is). Allow to warm up and expand to 1.5 times the loaves original volume.

  9. 45-60 minutes before baking, pre-heat the oven to 500F with a baking stone on the middle shelf and a cast iron skillet filled with lava rocks on the bottom shelf. (I suggest moving the stone ove to within one inch of the oven wall on your non-dominant side. Place the skillet next to the wall on your dominant side.)

  10. When the loaves are ready to bake, pour 1/3 cup of boiling water over the lava rocks and close the oven door fast. (Strongly suggest holding the kettle wearing an oven mitt!)

  11. Transfer the loaves to a peel or to parchment paper on a peel, and load them onto your baking stone.

  12. Immediately pour ½ cup of boiling water over the lava stones and quickly close the oven door.

  13. Turn the oven temperature down to 460F and set a timer for 12 minutes.

  14. After 12 minutes, remove the skillet. Reset the timer for 20 minutes.

  15. The loaves are done when nicely colored, thumping their bottoms gives a “hollow” sound and their internal temperature is at least 205F.

  16. When the loaves are done, turn off the oven but leave the loaves in the oven with the door ajar for 7-10 minutes to dry the crust.

  17. Cool thoroughly (2 hours) before slicing and serving.

Comments:

I autolysed the flours and water for about 30 minutes. I then added the levain and salt and mixed with the paddle in my KitchenAid for about 2 minutes. As I was switching to the dough hook, I was surprised how much gluten development had already occurred. I mixed with dough with the dough hook at Speed 2 for just a couple minutes more and already had moderate gluten development.

To what could I attribute this? The only possibilities were the increased percentage of levain and the different flour. My hypothesis is it was mostly the flour. We hear that higher-gluten flours require more mixing to develop the gluten. I was using a lower gluten flour than usual for this type of bread.

The dough consistency (Thank you, MC for this useful distinction from the SFBI!) was almost identical to that of last week's dough, so my guesstimated hydration adjustment seemed spot on.

These boules were proofed for a bit over an hour before they were refrigerated. The next morning, they sat at room temperature for about 2 hours before baking. When I transferred them to the peel, they spread some. This could be because of the lower gluten flour effects, slight over-proofing or a combination of factors.

The loaves had reasonable but not great oven spring, and they had less bloom than the previous bake. This suggests they were probably over-proofed a bit. I baked them for 22 minutes at 460F. They then sat in the turned off oven for 7 minutes to dry the crust.

The crust was not as shiny as the last ones, but by no means “dull.” They were singing already when I took them out of the oven. It seemed to me, that the “tune” was higher pitched than the song my boules generally sing. Could this be because of the lower gluten flour? Thinner crust? And … Woohoo! Cracks began to appear in the crust as the bread cooled!

The crust has a crunchy bite. As can be seen from the crumb shot, below, it is relatively thick. I think that, to get a thin  crackly crust like a classic baguette, one must have a shorter bake at a lower temperature.

The crumb appearance was typical for my sourdoughs of this type. However, it was chewier than I expected. Very nice. The flavor was indeed more sour than last week's sourdough, as expected. I would still categorize it as mild to moderate sourness. It is not as sour as the "San Francisco Sourdough" in Reinhart's "Crust and Crumb," which uses an extremely firm levain in even higher proportions.


Conclusions:

  • Increased sour flavor with firmer levain and increased levain percentage: As expected, this loaf was more sour but not dramatically so. To get a super-sour flavor, the techniques used must be pushed further.
  • Crackled crust with lower protein flour: Today's bake seems to support this hypothesis. Is this effect desirable? That's a matter of taste, but, for me, it's at least nice to know how to get the effect when I want it.
  • The benefits of the double steaming technique: Today's results were certainly satisfactory, but they also demonstrate that steaming is just one among several variables that contribute to oven spring and bloom.


David

Submitted to Yeast Spotting


Muffin Man's picture
Muffin Man

   A of years ago, I was browsing in Barnes and Noble, looking for nothing in particular, when I came upon Daniel Leader's "Bread alone".  It looked interesting as it was more than just a collection of recipes.  I bought it and was hooked by bread.  I read and consumed the book and, since there sere as yet no other books by him, I expanded my horizons to include, again in no particular order, Maggie Glezer, Peter Reinhart (I'm eagerly awaiting his newest), Nancy silverton, Jeffrey Hammelman, Carol Field, Beth Hensperger, Joe Ortiz, Laurel Robertson, Ruth Levy Barenbaum, and the good folks at King Arthur.  I have learned from each and enjoyed their different perspectives and approaches.  To thhink that simple wheat, yeast, and water could produce so many different and delightful flavors - it bogglesd the mind.  I have learned to make a variety of tasty breads and have a side business going at work supplying muffins to my coworkers.  Since their support aids and abets y hobby, I charge, basically, only my costs.  A very gracious friend, a retired graphic artist made me the caricature which I use on all of my recipes and as a part of my signature block  I felt I had arrived when my wife ceded the pantry to me and got me a small freezer in which I may keep flours not yet used and various berries for my muffins.  On a recent visit from our daughter, i realized how focused (my wife says obsessed) I have become when she took our grandkids into the kitchen and rearranged grandpa's pantry.  i love them anyway and rearranged things back the way they should be.  I feel that I could come into the kitchen and make biscuits without turning on a light - yeah, I'm that organized.  But only with my baking... the rest of my life is as disorganized as anyone else.  Thank you for reading.  In the immortal words fo the Governor of California: I'll be back.

Shiao-Ping's picture
Shiao-Ping

Very soon it will be Celtic New Year (see my Van Morrison post).   It doesn't mean anything to me except that here in Australia spring is in full swing, spring is the season for new growth and that's what you get after New Year .  Here in Brisbane Hong Kong Orchid trees are towards the end of their flowering season; when their flowers have all fallen, Jacaranda will be in full bloom.  I put on my joggers, went around my neighborhood and took these photos of Hong Kong Orchid trees:


Yesterday while I was watering my husband's baby avocado tree in the backyard, in amongst Polly our dog's droppings, I saw little bell shaped purple flowers; I lifted my head and was surprised to see one of our jacarandas is showing the new season's color.  Very soon my one and only surviving rose bush will be blooming, and when all the jacaranda flowers have fallen, roses will be in full bloom.

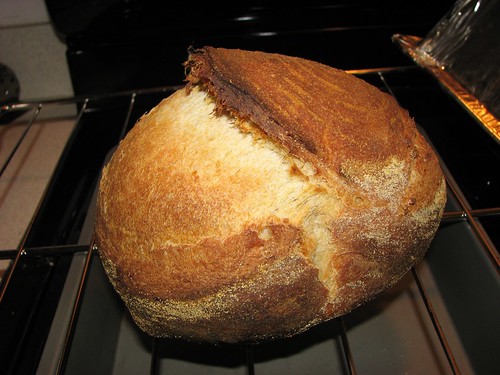
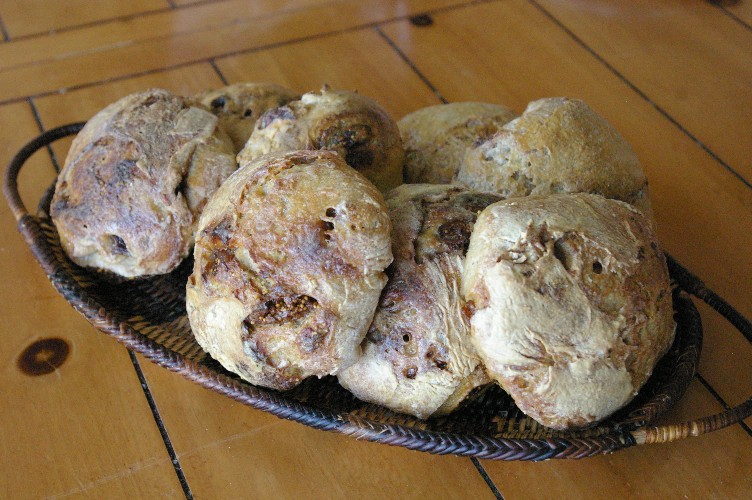
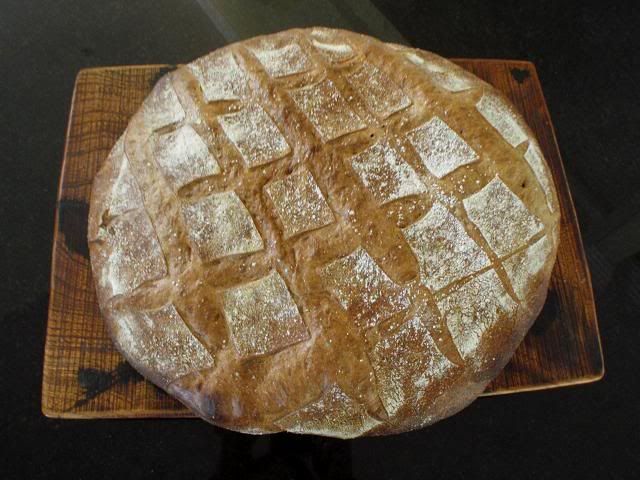
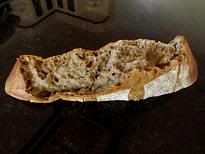
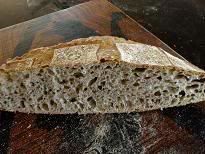
I'd like to celebrate spring by this Ancient Grains Sourdough (anticlimax?).  Safa, our instructor at Artisan I, SFBI, once told us he made a 7 x 7 sourdough, which has 7% Teff flour and 7% spelt flour.  He calls it 7 x 7 because it is easier to remember.  He said a small percentage of Teff flour gives a pleasing sweetness to the bread.  Teff is the smallest grain in the world and compared to other grains, it has a much larger percentage of bran and germ.  My idea of this Ancient Grains Sourdough indirectly came from him.  I added buckwheat flour which I bought from Ferry Building in San Francisco last month, together wiith Teff flour.  The whole grain buckwheat is ground into flour with little black specks that come from the ground seed hull.  This is how traditional buckwheat flour has been made for hundreds of years.  All three grains are considered "ancient grains."  

I noticed the dough seemed to be quite "volatile" as there were a lot of bubbles happening at very early stage of the fermentation.  There must be more enzymes in the dough because of the bran and germ from the whole grain ancient flours than just plain white flour.  I ended up doing more stretch & folds with this dough to try and slow down the enzymatic activity.   And here is my Ancient Grains Sourdough (Sourdough 7 x 7 x 7):


Formula for My Ancient Grains Sourdough

For a description of Chad Robertson's method as decribed in Daniel wing and Alan Scott's The Bread builder, please see  my previous post.

Two nights before bake day - first stage of levain build-up

  • 62 g starter @ 75% hydration
  • 124 g bread flour (i.e. two times starter amount for me; I do not know what ratio Chad Robertson uses.)
  • 94 g water

Mix and ferment for 6 - 8 hours at 18C / 65 F (depending on your room temperature, you may need shorter or longer fermentation time for your starter to mature)

The morning before bake day - second (and final) stage of levain expansion

  • 280 g starter @ 75% hydration (all from above)
  • 280 g bread flour (I use one time starter amount in flour but I do not know what amount Chad Robertson uses)
  • 210 g water

Mix and ferment for two hours only.

Formula for final dough

  • 770 g starter (all from above)
  • 770 g bread flour
  • 54 g spelt whole meal flour (7% of bread flour)
  • 54 g whole grain buckwheat flour (7% of bread flour)
  • 54 g whole grain Teff flour (7% of bread flour)
  • 630g water
  • 25 g salt
  • Extra rice flour and bread flour mixture for dusting

Total dough weight 2.35 kg and total dough hydration 70%

  1. In a big bowl, first put in water then put in the starter. Break up the starter thoroughly in the water with your hands.
  2. Add all ingredients and stir with a wooden spoon to combine for 1 - 2 minutes.  (Take down the time when this is done; this will be your start time for calculating the 4 hour bulk fermentation.  Starting from this time, your dough is fermenting. The preferred room temperature is 18 - 21C / 65 - 70F. You may need to adjust your dough temperature by using cooler or warmer water.)
  3. Autolyse 20 - 30 minutes
  4. Start the first set of stretch and folds in the bowl by grabbing the edge of the dough with one hand and fold to the centre onto itself (10 - 20 times) while rotating the bowl with the other hand as you go. The hand folding serves as mixing. As you stretch and fold, try not to tear the dough; only stretch as far as it can go.
  5. After 30 minutes, do the second set of stretch and folds. You will see that this dough is very easy to work with and the fermentation seems to be under way quite nicely as there will be some bubbles already forming in the dough. At the end of the folds, the dough will feel silky and smooth and almost leave the side of the mixing bowl. (The dough appears to be quite "volatile." Because of the activity that seems to be taking place inside the dough, I made a mental note to come back to it for the next set of stretch and folds very soon.)
  6. When you fold, be mindful that the bottom of the dough is the right side of the dough; and the right side of the dough always remains at the bottom in the bowl.   *See note below.
  7. After another 30 minutes, do the third set of stretch and folds. You will see that the dough is very active in that there seems to be a lot of fermentation already going on as the dough feels quite bubbly and has expanded quite a lot by the time you do the third S & F's. (So right there and then you know that more stretch & folds will be necessary to slow down their activity.)
  8. After another 30 minutes, repeat the stretch & folds. 
  9. After another 60 minutes, do the fifth set of stretch & folds.
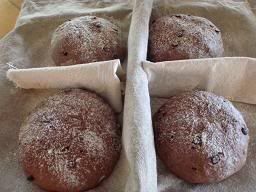
  10. After another 30 minutes (that will be the end of the 4 hour bulk fermentation and the start of the 2 hour proofing), pre-shape the dough to a very tight ball as follows: First sprinkle some flour on your work bench and some flour at the edge of the dough (ie, in between where the dough meets the bowl); scrape the dough out onto the bench, trying as much as you can to land the right side of the dough (which is at the bottom) onto the floured bench. Gather the sides of the dough to the centre, flip the whole thing over (so now the right side is on the top) and pre-shape to a tight ball. You will see that the dough is very wobbly and after 10 minutes resting on the bench, it will have completely spread out. I decided to do another pre-shape. I flipped it over, gather the sides to the centre, flipped it over again, then shaped it tight again.
  11. Dust your linen-lined basket or banneton with a mixture of bread and rice flours.
  12. After another 10 minutes resting, shape the dough and place it into your basket for proofing. Cover.
  13. My room temperature is 18 - 21C / 65 - 70F; if your room temperature is cooler or warmer than that, adjust your proofing time accordingly.
  14. At the end of the 2 hour proofing, place the dough into the refrigerator for retarding (minimum for 8 hours; I retarded mine for 16 hours).

* Note on the right side of the dough:  Since I started doing what I thought was Chad Robertson's sourdough procedure by hand, I recalled an incident during my Artisan III class.  My team had  members who worked in commercial bakeries and one day, towards the end of our first speed mixing for a dough, a team member switched the spiral mixer to the reverse gear to try to pick up some dough stuck on the side of the wall.  Our instructor saw it and told us never to do that; he said that you can do reverse gear only at the beginning of the mixing process when the ingredients are still being incorporated.  The reasoning is:  once the gluten structure has started to form in a certain direction, it is not advisable to do anything to alter or disrupt that direction.   Therefore, my thinking is when I am hand-mixing and folding the dough, I want to keep that "direction" in tact.

Bake Day

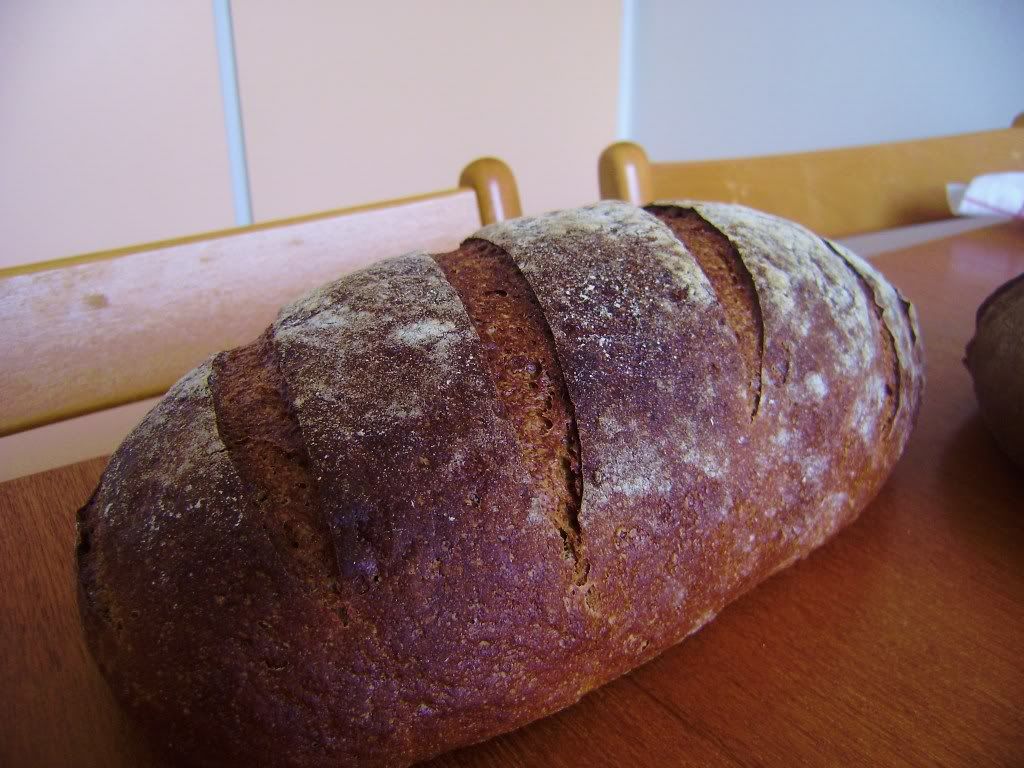
  1. Bake the boules cold (ie, straight out of the refrigerator). Just before baking, sift flour on the dough and score it or stencil it any way you like. Once the dough is loaded onto the baking stone, steam the oven with 1 cup of boiling hot water.
  2. Bake at 220C / 430F for 30 minutes, then turn the oven down to 200C /390F (or higher if you wish for a darker crust) and bake for another 25 - 30 minutes.
  3. Cool completely before slicing.


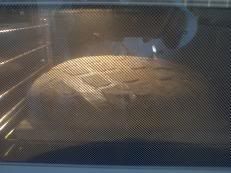
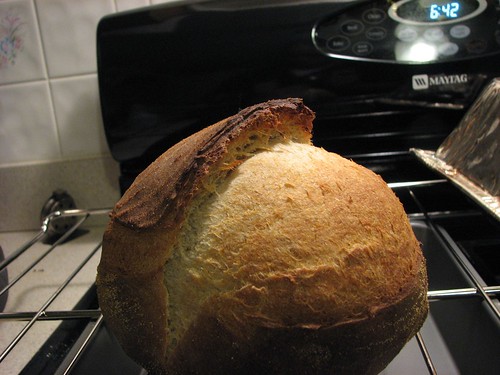
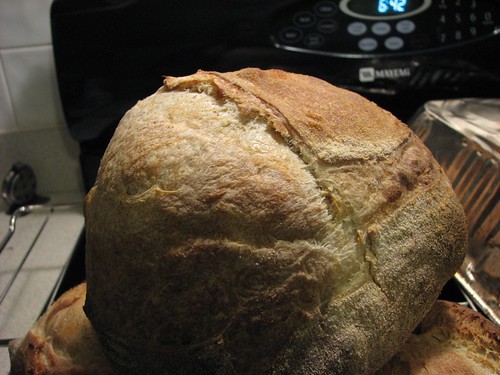
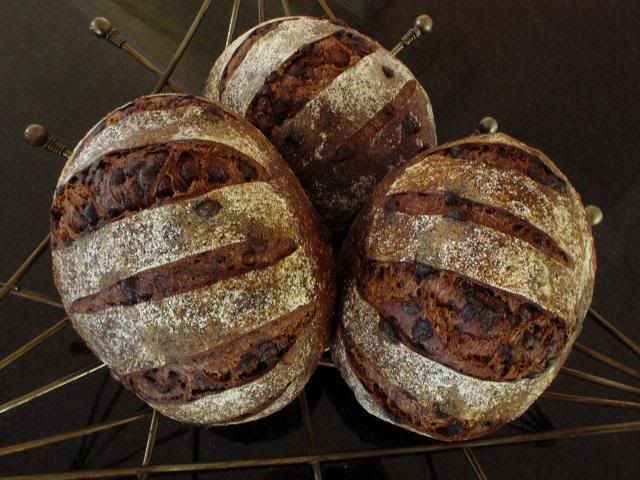
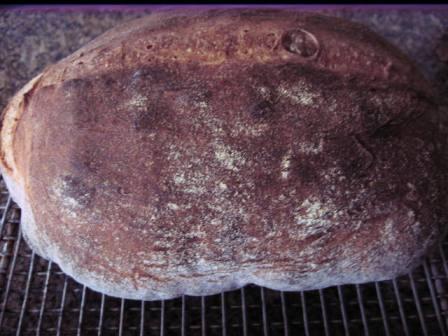
       The dough spreads out enormously and fills my whole baking stone (measuring 34 cm x 34 cm)

       with a little bit hanging out on the side of the stone.

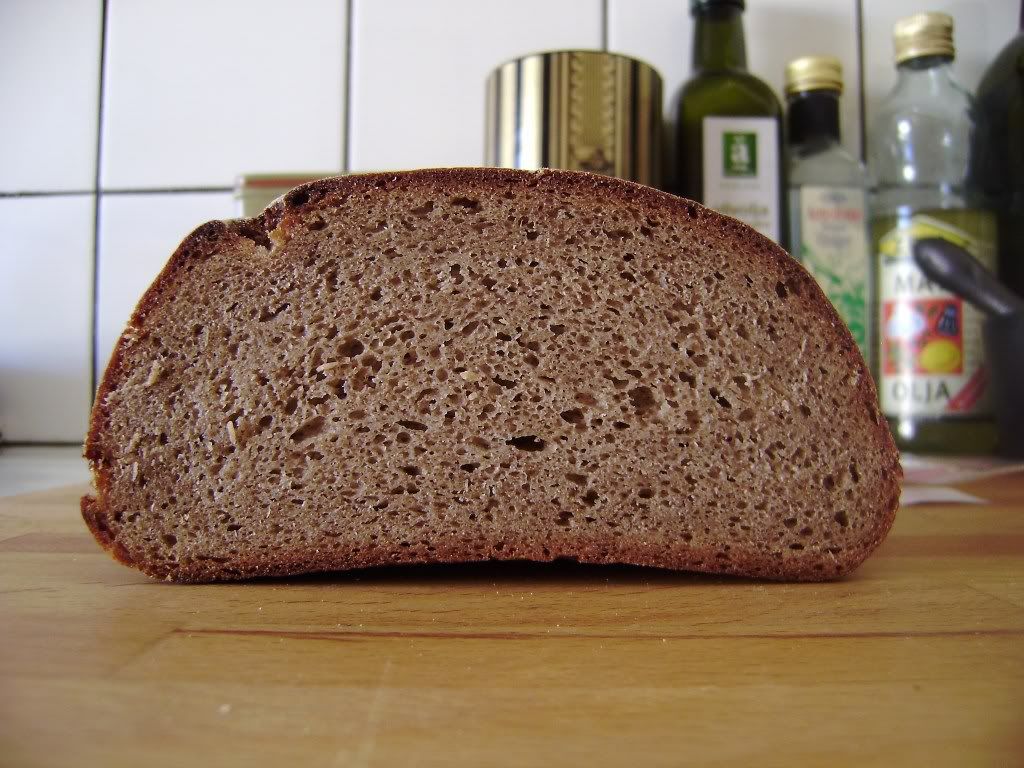
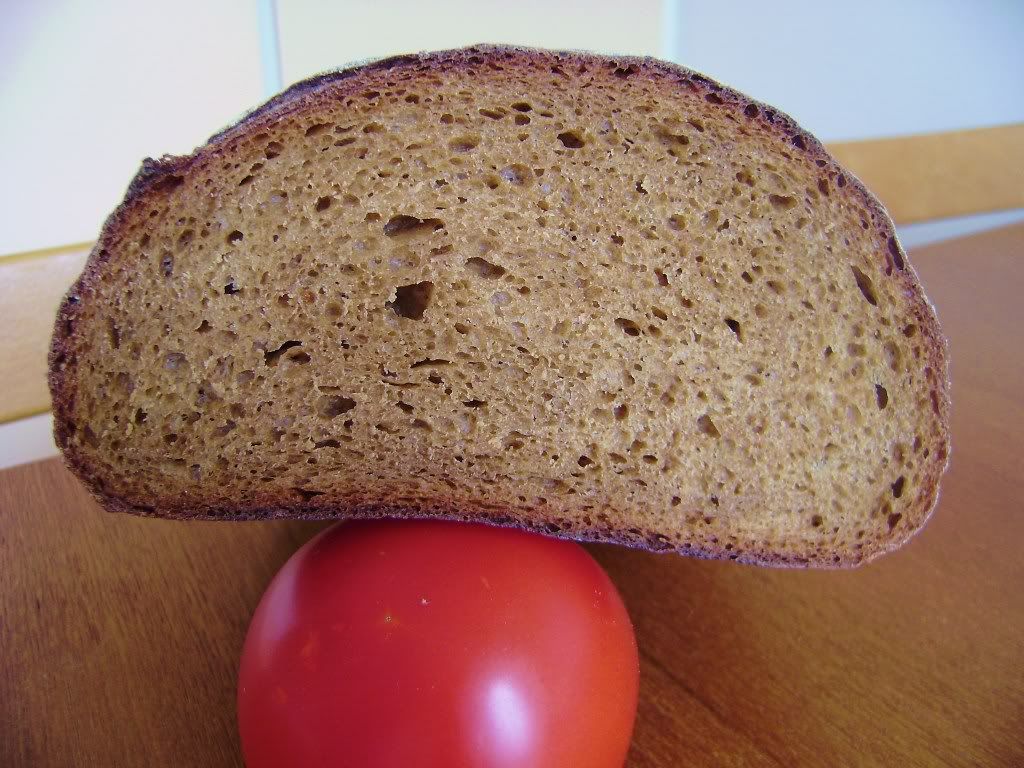
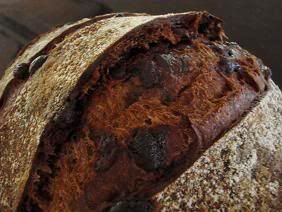
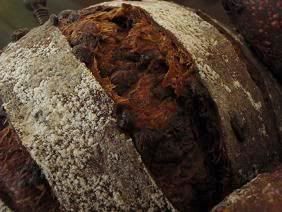
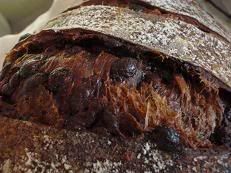
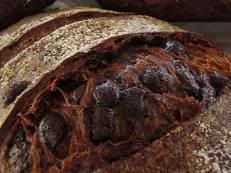
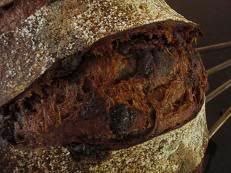
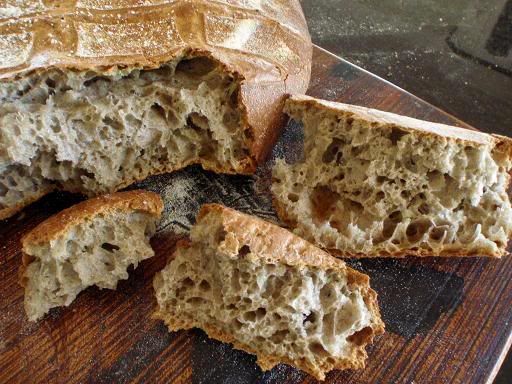
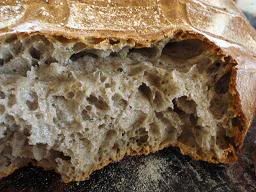
This is an unusual sourdough.  It is quite sour (medium strength sourness) even though I used the same starter as for my other Chad Robertson sourdough.  I can only surmise that it is because of the ancient whole grain flours that I used here.  The enzymes in the flours must have sped up the fermentation process quite a lot such that the dough was far more fermented than that other sourdough I made, hence more sourness.  The sourness is more of an acidic, rather than lactic, acidity.  


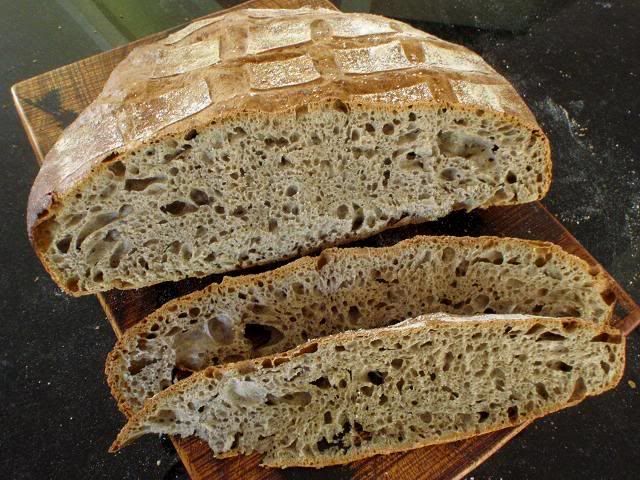
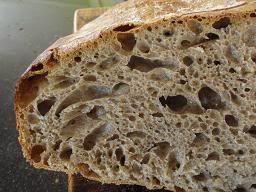
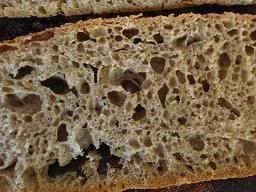
The texture is very different from that other sourdough, too.  The texture of sourdough made from white bread flour is normally tender, whereas this one is quite "robust," as if the crumb has "strength" when you bite into it and is quite chewy.  The comparison is a bit like the difference between red wine made with shiraz (syrah) grapes (very "robust") and other red wine made with merlot or cabernet sauvignon (more "mellow").  It is very moist just the same. 

I couldn't taste the sweetness that Safa mentioned of Teff flour but it has a very interesting nutty flavor.  

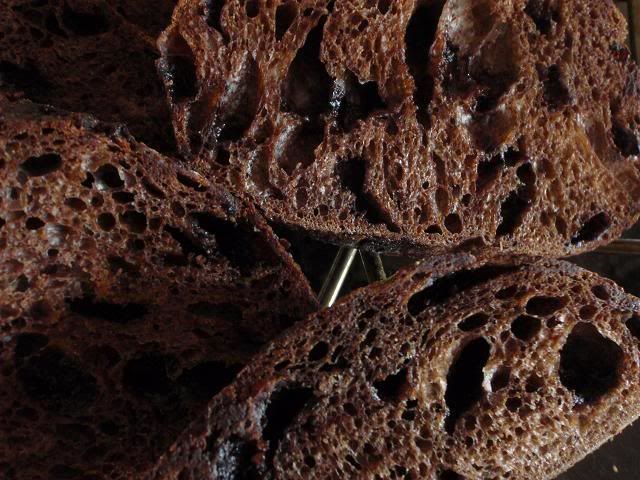
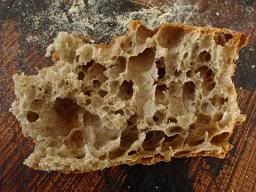
The crumb is very open, as open as what I can hope for.  As the dough had a lot of enzymatic activity during fermentation and spread out enormously (not keeping its shape), I wonder if cutting down the hydration to say 67% would make it more manageable and at the same time not hurt its open structure.

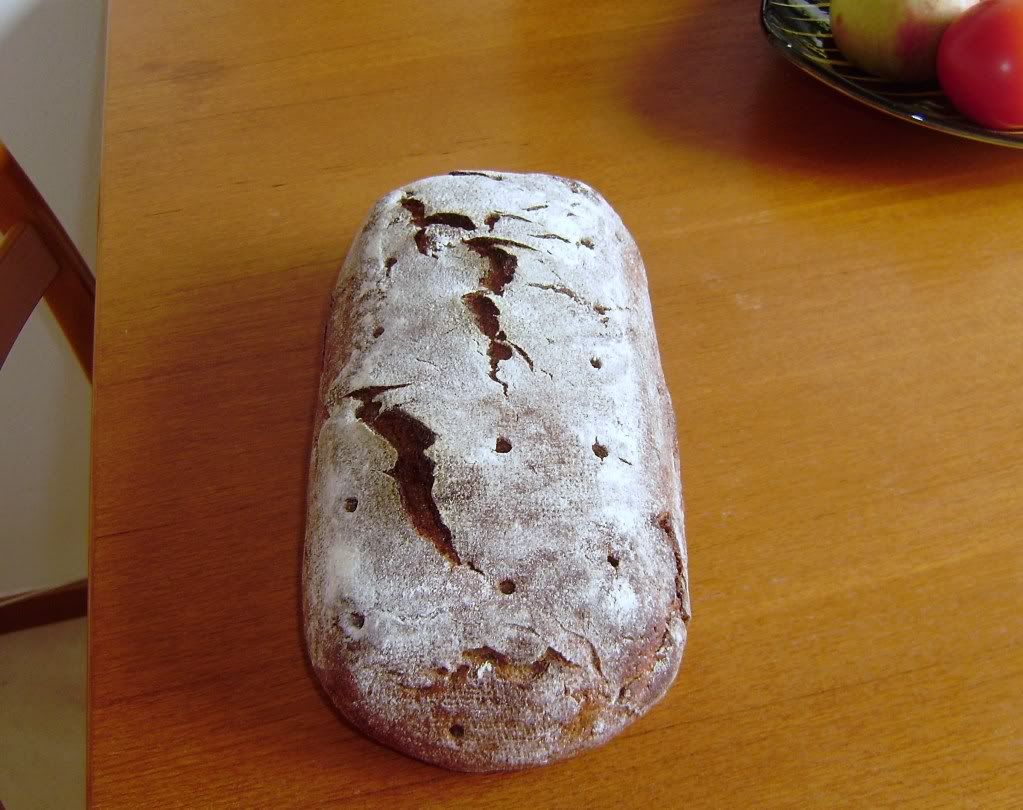
Chinese collects stones or rocks which show formations of nature.  My uncle Chang has a rock which looks like a mountain.


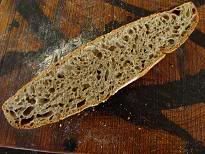
         My bread mountain                                 Bread mountain -other view 1                 Bread mountain - other view 2


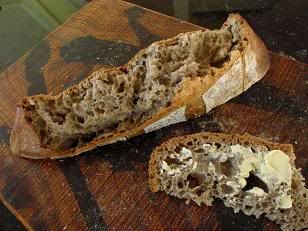
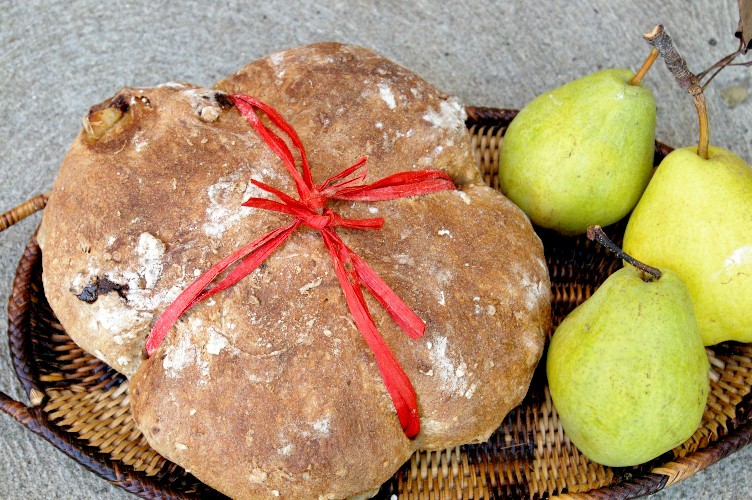
                                                                 This ancient grains sourdough is delicious.

Shiao-Ping

dmsnyder's picture
dmsnyder


Last week, hansjoakim's blog included a gorgeous rye bread that he referred to as his “favorite 70% rye.” I asked him for his formula, and he generously provided it. I baked “hansjoakim's favorite 70% rye” today.

I grew up eating rye bread, but it was what is commonly called “Jewish Light Rye” or “Jewish Sour Rye.” We just called it “rye bread.” I had no exposure to breads made with whole rye flour or those made with a preponderance of rye flour. I was aware that there were countries where rye breads had a long history and an important place in the culture – Russia, Poland, Germany, Switzerland, Austria, and the Scandinavian countries. But I had no experience with these breads. It was only when I started baking rye bread myself and started reading bread baking books – notably Hamelman's “Bread” and Leader's “Local Breads” - that I began to appreciate the rich diversity of rye breads and the technical differences between making great mostly-wheat flour sourdoughs and great mostly-rye flour breads. I'm also just starting to get a sense of the cultural differences in taste that determine “what is great rye bread” to some one who grew up eating these rye breads.

So, being endlessly curious about culture and values, including the aesthetics of food, how could I not want to see what hansjoakim, a man with quite evident refined aesthetic sensibilities, judged to be his “favorite 70% rye?”

The following formula is that provided by hansjoakim. The procedures are also his but with additional details. Any errors introduced by my extrapolations are, obviously, mine.


Total formula

Amount

Baker's percentage

Medium rye flour

436 gms

70

All purpose flour

187 gms

30

Water

467 gms

75

Salt

11 gms

1.8


Rye sour final build

Amount

Baker's percentage

Medium rye flour

218 gms

100

Water

218 gms

100

Ripe rye sour

11 gms

5


Final dough

Amount

Baker's percentage

Medium rye flour

218 gms

54

All purpose flour

187 gms

46

Water

249 gms

61.5

Salt

11 gms

2.7

Rye sour (all of the above)

447 gms

110

Note: 35% of the total flour is from the rye sour.

Procedures:

  1. The day before baking, mix the final rye sour build. This should ferment at room temperature for 14-16 hours, so figure backwards from when you want to mix the the dough. For example, I wanted to mix the dough at around 2 pm today, so I mixed the final rye sour build at 8 pm yesterday evening. In fact, I started the process two days ago by activating my white rye sour by feeding it, fermenting it 8 hours and refrigerating it for a day.

  2. I used a KitchenAid stand mixer, but these procedures could be done by “hand.” Mix all the ingredients in the final dough in a large bowl. If using a stand mixer, mix for 3 minutes with the paddle at Speed 1. Switch to the dough hook and mix for 2-3 minutes more at Speed 2. The dough at this point is a thick paste with little strength (gluten development providing extensibility and elasticity). Optionally, after mixing, you can knead briefly on a floured board with well-floured hands.

  3. Transfer the dough to an oiled bowl, cover it tightly, and ferment for 1 hour.

  4. Transfer the dough to a floured board and pre-shape it into a single round. Cover with plasti-crap or a damp kitchen towel and rest for 5 minutes.

  5. Shape the dough into a boule and transfer to a well-floured brotform or banneton.

  6. Cover the boule with plasti-crap or a damp towel and proof for two hours. (My loaf was fully proofed in 1 hr and 45 min.)

  7. One hour before baking, pre-heat the oven to 250C/480F with a baking stone and your steaming method of choice in place.

  8. When ready to bake the bread, pre-steam the oven. Then transfer the boule to a peel. Score or dock it. (hansjoakim proofed his boule seam-side down and did not score or dock it, resulting in a lovely chaotic pattern of cracks on the loaf surface. I proofed my boule seam-side up and docked it using a bamboo chop stick.) Transfer the boule to the baking stone. Steam the oven.

  9. After 10 minutes, remove your source of steam from the oven.

  10. After 15 minutes, turn the oven down to 225C/440F.

  11. Bake another 45 minutes. Monitor the loaf color, and, if it is darkening too quickly, turn the oven temperature down further. It would be well within the rye baking tradition to do this planfully in steps, ending up as low as 205C/400F for the last 10-15 minutes.

  12. The loaf is done when the crust feels firm, it gives a “hollow sound” when the bottom is thumped and the internal temperature is 205F or greater.

  13. When the loaf is done, turn off the oven, but leave the loaf in it with the door ajar for an additional 10 minutes.

  14. Transfer the loaf to a cooling rack and cool thoroughly before slicing. It will be best to leave it 24 hours, loosely wrapped in linen, before slicing.

Comments:

I baked this loaf at 460f convection-bake for 15 minutes, then 440F bake for 30 minutes, then 400F bake for 10 minutes. I believe I should have turned down the temperature from 440F sooner.

I got less oven spring than hansjoakim. I believe this is due to over-proofing. In hindsight, I should have baked 15-30 minutes sooner. I suspect my kitchen environment was near 80F which accelerated the proofing.

The bread smells lovely while cooling – a characteristic, earthy rye aroma.

The profile of the cut loaf was better than I had expected, although I didn't get the oven spring hansjoakim did.

hansjoakim's Favorite 70% Rye crumb

The crust was substantial and crunchy-chewy. The crumb was tender. This bread is very similar to the Detmolder 70% Rye from Hamelman I made a few weeks ago. It has a very nice hearty rye flavor with a touch of sweetness and a touch of sour when tasted about 20 hours after baking. I expect the flavor to evolve over the next several days.

Because hansjoakim's procedures are so straightforward and the bread is quick to make, I would recommend it to anyone, but especially those wanting to make a high percentage rye bread but not ready to tackle the time and temperature rigors of the Detmolder 3-stage method.

This is a wonderful rye bread! Thanks, hansjoakim!

David


Shiao-Ping's picture
Shiao-Ping

Chad Roberson's Tartine Bakery doesn't do chocolate sourdough (if they do, I haven't had the fortune of tasting it).  We did Pane Cioccolata (chocolate bread) at Artisan III, SFBI, and it was very good.  Everybody loved it but at the time I was thinking to myself if I were to make it at home I would make some changes for the following reasons: 

First of all, I feel really uneasy about "double hydration" method, which is supposed to be good whenever you have any "add-ins" for your dough, be it dried fruits, nuts, seeds or soakers, or in this case, chocolate chips.  The procedure is: you mix your dough with only 80 - 85%% of the recipe water in the first and 2nd speed as usual until a slightly stronger than normal gluten development has achieved, then turn the mixer back to first speed, slowly incorporate the reserved water and finish off on 2nd speed, then, add the seeds and nuts (or whatever add-ins you have) in the first speed initially for incorporation, and finish off, again, in 2nd speed.  The reasoning for this method is it is easier to develop dough strength with a stiffer dough than a wet dough and so the purpose is to build up the strength before you incorporate any add-ins.  Because of the longer mixing time, the temperature of water you use with this method is lower than for other doughs. 

I remember we mixed the dough for nearly 20 minutes in the spiral mixer.  I am not confident that I could do such a long mixing time with the mixer I have at home.  I always feel "traumatized," looking at the dried fruits or nuts being beaten up and chopped up while they try to be mixed in to the dough after the latter's gluten structure has already been formed; it really takes time to break the gluten bond.

Secondly, after the dough was bulk fermented, it was scored then proofed. One other type of bread where we scored first then proofed was rye bread.  It was said that because of the delicate gluten structure in both of these cases, if you were to score after the dough is proofed, you may destroy the gases that were produced.  While this makes sense to me, I don't care for the look when it's baked.

Thirdly, the Pane Cioccolata formula we used at Artisan III has only 20% levain (in baker's percentages) and therefore it also has a small percentage of dry instant yeast (DIY).  If I increase levain to 100% I wouldn't have to have DIY!  Also, chocolate chips used were only 12% of total flour, I know my son would just LOVE more chocolate chips. 

So here is my Chocolate Sourdough inspired by Chad Robertson's method all by hand (timeline as described in Daniel Wing and Alan Scott's The Bread Builder) in my previous post.


Formula for My Chocolate Sourdough 

Two nights before bake day - first stage of levain build-up

  • 61 g starter @ 75% hydration
  • 121 g bread flour (i.e. two times starter amount for me; I do not know what ratio Chad Robertson uses.)
  • 91 g water

Mix and ferment for 6 - 8 hours at 18C / 65 F (depending on your room temperature, you may need shorter or longer fermentation time for your starter to mature)

The morning before bake day - second (and final) stage of levain expansion

  • 273 g starter @ 75% hydration (all from above)
  • 273 g bread flour (I use one time starter amount in flour but I do not know what amount Chad Robertson uses)
  • 204 g water

Mix and ferment for two hours only

Formula for final dough

  • 750 g starter (all from above)
  • 650 g bread flour
  • 100 g cocoa powder (8.5% of total flours*verses 5% in SFBI recipe)
  • 86 g honey (7% of total flours verses 15% in SFBI recipe)
  • 250 g chocolate chips (21% of total flour verses 12.6% in SBFI recipe)
  • 433 g water (note: with every 12 g extra water, your total dough hydration will increase by 1%. If you wish, you can increase up to 5% more hydration. See step 10 below.)
  • 1 to 2 vanilla pods (optional but really worth it)
  • 20 g salt

Total dough weight 2.3 kg and total dough hydration 73%

*Total flour calculation takes into account the flour in starter. 

  1. In a big bowl, first put in water then put in the starter.  Break up the starter thoroughly in the water with your hands.
  2. Then put in honey; scrape the seeds from the vanilla pods and put it in, and stir to combine
  3. Put in all the remaining ingredients except choc. chips
  4. Stir with a wooden spoon to combine for 1 - 2 minutes. (Take down the time when this is done, this will be your start time.  Starting from this time, your dough is fermenting.  From this start time to the time when the dough is divided and shaped, it will be 4 hours; i.e., bulk fermentation is 4 hours.  The preferred room temperature is 18 - 21C / 65 - 70F.  You may need to adjust your dough temperature by using cooler or warmer water.)
  5. Autolyse 20 - 30 minutes
  6. Sprinkle half of the choc. chips on a work surface (spreading about 30 cm by 30 cm) and stretch or pad the sticky dough thinly to cover the choc. chips.  Then sprinkle the other half of choc. chips over it; press the choc. chips into the dough so they stick.
  7. Gather the dough from the edges to the centre and place the choc. chip dough back into the mixing bowl.
  8. Start the first set of stretch and folds in the bowl by pinching the edges of the dough and fold onto itself to the centre (10 - 20 times).  Rotate the bowl as you go.  As the dough is quite stiff, you may need both hands for the folding.  The hand folding serves as mixing.  I used my left hand to press down the centre, so my right hand can pinch an edge of the dough and fold it to the centre.  As you stretch and fold, try not to tear the dough; only stretch as far as it can go.
  9. After 45 minutes, do a second set of stretch and folds.  At the end of this stage, the dough will already feel silky and smooth.  As the dough is quite stiff, its strength develops very fast.  Be mindful that the bottom of the dough is the right side of the dough; and the right side of the dough always remain at the bottom in the bowl.
  10. After another 45 minutes, do a final set of stretch and folds.  As the dough feels quite strong, no more folding is necessary (unless you choose to increase total dough hydration, in which case, you may need one more set of stretch and folds).
  11. At the end of the 4 hour bulk fermentation, divide the dough to 3 - 4 pieces as you wish.  Be mindful that the bottom of the dough is the right side; sprinkle some flour on your work bench, and place the pieces right side down.
  12. Shape the pieces - gather the edges to the centre, flip it over (so the right side is now up) and shape it to a tight ball with both hands.  (As I find the dough is quite strong, I did not think pre-shaping is necessary.)
  13. Place the shaped boules in dusted baskets or couche, right side down and seam side up to encourage volume expansion.  Cover.
  14. Proof for 2 hours in room temperature of 18 - 21C / 65 - 70F.
  15. Into the refrigerator for retardation at the end of the 2 hour proofing (minimum 8 hours; I did 18 hours).


Bake Day

  1. Bake the boules cold for best result (ie, straight out of refrigerator).  Just before baking, sift flour on the dough and score it.  Bake at 190C / 380F (not higher due to honey) for 40 minutes.  Once the dough is loaded onto the baking stone, steam the oven with no more than 1 cup of boiling hot water.
  2. Note: I find better result when baked cold.  One boule was left at room temp while others were being baked, and it became quite puffy so when I scored, it deflated quite a lot and there was no noticeable oven spring with this bake.          


I sliced one of the boules and went down to the back yard to water the plants.  When I came back up, my son said to me, Mum, the chocolate sourdough was epic.  How I love his choice of words.  Well, you know how to please a growing boy - make a chocolate sourdough!

This is the first time that I made a chocolate sourdough - it is not sour at all because of the chocolate and honey, but it is very chewy.  And the crust!  Very crispy.  The crumb?  Very more-ish.

I don't imagine you find chocolate sourdough made this way in the shops - they would go bankrupt if they do - too much work (but absolutely worth the trouble for home bakers)!

Shiao-Ping

cake diva's picture
cake diva

Over the years, many people have said to me that I have all the luck:  loving husband, respectful, bright children, fulfilling career in a fun-filled industry, health and a relatively comfortable life.  So when I took a voluntary separation package at the end of last year, it  might have seemed that my luck had stalled.  I never for a second believed that: I had been feeling so burned out at my last workplace that I felt more than half a year of paid vacation was exactly what I needed at this point in my life.

With my retraining allowance, I signed up for short breadmaking and pastry courses at SFBI.  I jetted back and forth from the Midwest to the West Coast to spend long stretches of quality bonding time with my parents, siblings and children.  I travelled to my childhood hometown in Asia and spent a month there visiting relatives and friends, feeling for the first time in a long time like the carefree child that I was when I lived there.  Back at home, I went on a bread and pastry self-enrichment extravaganza- with occasional detours in chocolate and ice cream, tackling recipes that I didn't have the time and confidence to make before.  I am proud to say that I have come out this last 10 months happier, wiser, richer in non-material things.

My lazy, hazy days are coming to a close.  I have a solid offer and another one in the works, both back in the big, cosmopolitan city that was home to me for the greater part of my life.... Maybe that's why lately I have been baking more frenzily than usual.  Yesterday's bake yielded the below.

sept bake

The banetton-risen bread is from Janedo's recipe of Pane de Genzano;  the loaf is cinnamon-raisin using the sourdough challah recipe I found on this site.

Below is my attempt at the Pearl Bakery's (Maggie Gleazer, Artisan Baking) fig-anise panini.  It has a definite tang from the starter, and the bread is hearty with a dense crumb and hard crust.  The anise gives it a heady aroma and the figs some sweetness but the bread itself is not sweet.

fig anise SD

I prefer Columbia's Sweet Perrin, also from Artisan Baking.

sweet perrin

The bread contains plenty of firm pears (mine came from a friend's tree), figs, and Brazilian nut instead of hazelnuts.  The crumb and crust are soft just as I like them.  The fruit and nut combination makes this bread a  delightful snacking treat. 

sweet perrin crumb

Maybe I'll make panetonne today.

SylviaH's picture
SylviaH

I finally got around to making some of my favorite bread, oatmeal.  I tweaked J.H. Oatmeal bread formula by using KA Organic Whole White Wheat and KA Baker's Special Dry Milk/water instead of regular milk.  The loaves turned out delicious and tender with a lovely flavor.  I will definately be making this bread again and again! 

Sylvia


wally's picture
wally

This past June marked the 42nd anniversary of the release of the Beatles seminal "Sgt. Pepper's Lonely Hearts Club Band," and with it, one of my favorite songs of the album, "Getting Better."

Today marked my umpteenth attempt at successfully scoring poolish baguettes, and to my utter joy a success at last!  So now I'm humming the tune in my head....over and over.

I did two bakings actually: My first mix this morning was for the baguettes with poolish, and I followed that up with another poolish-based rustic bread: Hamelman's Pain Rustique by way of James MacGuire and Raymond Calvel.  I love the fact that this no-knead, no-shape bread is ready to bake in just over two hours (not counting the overnight fermentation of the poolish).  What other bread can be created in such a short time with the distinctive nuttiness of the poolish-based dough?

As for the baguettes, I think I'm getting closer to the secret of getting my gringes to open consistently.  The biggest factor, I believe, has been the transition to a couche for final proofing.  And in particular, allowing the baguettes to rise seam-side up, as we did at King Arthur Flour.  Although I've repeatedly heard and read that allowing the dough to develop a "skin" will defeat successful scoring, my experience since using a couche has been that the up-side of the dough gains more surface tension, and it's been obvious to me in that my cuts are no longer dragging the dough, but (for the most part), cleanly cleaving it.

The second factor, I think, is a quick misting of the loaves just after scoring and before loading.  Finally, I've started consistently throwing 3-4 ice cubes into my cast iron skillet in the bottom of the stove about 1 minute before loading.  That's followed by a cup of boiling water onto the skillet once the bread is just in.  And then at 2 minute intervals I'm again misting the loaves very quickly - just twice.  So when I set the timer for 24 minutes, which with my gas stove is a full bake at about 460°, I'll mist at 22 minutes and then at 20.  After that I leave well enough alone.

Tomorrow I'm off to pick up a bag of lava rocks at David Synder's suggestion to see if I can successfully generate steam that lasts longer - as opposed to one scorching burst.

Anyhow, as the Beatles put it so well those many years ago: "Getting so much better all the time."

Larry


Pages

Subscribe to Recent Blog Entries