The Fresh Loaf

A Community of Amateur Bakers and Artisan Bread Enthusiasts.

Recent Blog Entries

wakeandbake's picture
wakeandbake

Here are some of the breads that I bake regularly and offer to customers!

Recipies are surely to come.

Rick

Wake and Bake Bread Company.

Wake and Bake Bread Company

L to R; Back Row: Mixed-Grain Levain, Sourdough Rye, Pain Au Levain.
Middle Row: Pain Au Levain, Sourdough Rye, Mixed-Grain Levain.
Front Row: Pumpernickel Rye


Wake and Bake Bread Company

Pumpernickel Rye


Wake and Bake Bread Company

My favorite!  Mixed-Grain Levain!  Even better with rosemary!


wakeandbake's picture
wakeandbake

This is my first post on here, with much more to come I hope!  :)

Just thought I'd start by posting a pic of some Stout Beer Sourdough Rye Baguettes I made with a homemade stout beer.

They turned out wonderfully!

Rick

Wake and Bake Bread Co.


Beer Stout Sourdough Rye

inlovewbread's picture
inlovewbread

Inspired by Farine's beautiful Sweet Potato Bread, I made a few adjustments and am calling this bread, "Warm Comfort Bread."

I made this a couple weeks ago when it was 1 degree outside. Yes, 1. Super cold and snowy. Perfect weather for this bread with a hint of cumin and the taste of sweet potato. I'm normally not a huge fan of cumin, and so when I saw this as an ingredient I considered omitting it altogether. Instead, I decreased the amount to 1 gram. I was glad I included it because it gave the bread such a great taste- something you can't quite identify, but warm. Yeah, it sounds funny, but the bread actually "tasted" and felt warm- not temperature wise, but in the combination of flavors and I think the cumin contributes a lot to that. And it's surprising how just one gram can compliment the flavor of the sweet potato so nicely. 

My formula for this bread: (modified from Farine's original Sweet Potato Bread recipe)

230g 100% hydration starter 

*you could use your white starter here, I used a 50% white/rye starter and liked the little bit of rye flavor it added. If you don't have a rye starter you may want to add a little rye flour along with your white and whole wheat flours for added flavor.

510g unbleached ap flour

200g whole wheat flour (I used a combination of freshly-milled white and red wheats)

350g cold water (or use all or part cooled sweet potato water depending on how much you have left from boiling the potato)

280g sweet potato puree

35g wheat germ

1 to 1.5g ground cumin

16g sea salt* (original recipe is for 18g, but I chose to decrease the salt)

*be sure to decrease the % of salt if you are using salted sweet potatoes left over from dinner 

Method:

1. Bake or boil sweet potatoes, mash, cool and set aside. Save sweet potato water (if desired) for use as all or part of the water.

2. Mix everything but salt in the bowl of a mixer on first speed until all ingredients are incorporated. Cover and rest 10 minutes. Add salt, then mix until medium gluten development- another 5 minutes or so.

3. Remove dough from bowl, knead it for a minute by hand and then place it in an oiled, covered container. 

4. Ferment at room temp for one hour, fold dough and put back in container.

5. Place container in the fridge and retard overnight.

The next day:

1. Turn out dough and divide into three pieces (or into 2 as I did). Preshape into boules or batards. Rest 15 minutes.

2. Shape into tight boules or batards, place int brotforms and retard in the refrigerator again for 6- 10 hours.

3. Preheat oven to 500f. Pull out loaves from the fridge and set on counter while oven preheats.

4. Load breads in the oven with steam (I left the steam pan in for 7 minutes then removed)

5. Reduce oven temp to 450 and bake for 35 minutes. I then left the loaves in the turned-off oven for 5 minutes with the door open.

6. Cool completely. 

I enjoyed this bread with a cup of coffee, looking out the window and watching it snow. In front of a fireplace would be good too :-)


milwaukeecooking's picture
milwaukeecooking

Sun-dried parmesan bread

This was my kitchen sink recipe.  I accidentally made too much baguette dough so I decided to throw some of it in my banneton with a few added extras.  I had sun-dried tomatoes around and I had recently ground up some parmesan.  So, I thought, why not mix it into my extra dough.  Before putting it into the oven I spritzed it with water and gave it a sprinkling of cracked pepper.  Out of all the breads I have made this one actually made my mouth water when it was baking.  The smell was incredible.  Here is how I made it. 

Follow my poolish recipe for the dough.  I made 900 grams of dough for this recipe.

After the second rise lightly flatten out the dough into a square that is roughly 12"x12".  On one half of it sprinkle 1/4 cup ground parmesan cheese and then, on top of that, gently press in 1 cup of chopped sun-dried tomtatoes.  Leave 1/2 inch of dough around the edges so that you can seal it back up again.  Fold the empty side over the top of the tomatoes and press down on the edges to seal.  Flatten the dough slightly and business fold it into thirds (like you are mailing a business letter).  Let your dough rest for 5 min and business fold again.  I folded mine three times. 

At this point you should have a few layers of tomato and you will want to shape your dough into a boule.  You don't need a banneton for this because all of the folding and shaping has made your dough fairly tough and it will stand on its own.  However, let your boule rise for an hour, until doubled, before baking. 

Pre-heat the oven to 500F while your dough is rising.

Right before baking spritz your boule with water and top with pepper.  You need the pepper...trust me. 

 Spray the walls of your oven with water and bake for 2 minutes.  Repeat.  Repeat.  Turn the heat down to 425

Bake again for 20 min at 425.

Rotate your bread 180 degress and turn the heat down to 400 and bake for 20 min.  

Check the temp of your bread.  If the internal temperature isn't over 195 it isn't done.  The optimal temp is between 195 and 205. 

I wanted to take pictures of the crumb so you could see the tomato goodness inside but it got eaten before I could remember.  Next time I will post a picture of the crumb.  This is a recipe that I would like to re-create again. 

sun-dried parmesan bread

http://veggieinmilwaukee.wordpress.com

txfarmer's picture
txfarmer

It all started with that chestnut pie I made, amazing pie really, how can it not be? It had chestnut cream, chestnut puree, candied chestnut, creme fraiche, mascarpone, heavy cream all loaded in one flaky all butter crust!

But then I had these yummy chestnut puree and whole roasted chestnuts left over, as delicious as that pie was, it was also very rich and had a lot of added flavors, this time I want to make the chestnuts themselves shine. Of course I COULD eat the puree straight out of the jar, but I digress. ;) Here's what I came up with: a chestnut sourdough with loads of chestnut puree kneaded in; whole chestnuts boiled then soaked in fruity white wine overnight, then mixed into the dough; also used the soaking wine as part of the liquid, the result is a bread full of chestnut flavor. The wine brought out the subtle sweetness of chestnut, but the flavor of alcohol was minimal (a good thing since my husband doesn't drink). Chunks of chestnuts studded the soft and spongy crumb. I am pretty happy with the result, with the slight nutty sweetness, and almost "custardy" mouth feel, it's like eating a giagantic chestnut!

One thing I didn't expect is how sticky the chestnut puree made the dough to be. I had to decrease the liqud amount that I had planned to add in, even then, I still had to do quite a few S&F to build up the dough strength. I later found out that chestnuts have a lot of starch, double of what potatoes have, comparable to wheat flour, minuse the gluten of course. Even though it made kneading and fermentation a bit challenging, the final crumb was similar to those breads with potatoe puree mixed in, soft and songy, very moist.

Here's my formula for the bread:


The night before:

mixing 170g of roasted, peeled, and roughly chopped chestnuts with 140g of white wine (I used a fruity cheap one), bring to boil, remove from stove, cover and let sit overnight.


2nd day:

starter, 180g (100% hydration)

salt, 7.5g

bread flour, 300g (I used KA)

wine soaking liquid from above + water, 175g

chestnuts above, drained

chestnut puree, 240g (unsweetened, just chestnut and water)

honey, 22g


1. Mix together everything but chestnuts, autolyse 30minutes, knead until gluten starting to develope.

2. Add in chestnuts, knead them in evenly.

3. Cover and bulk fermentation for 4 hours, at 30, 60, 90, and 120 minutes, S&F.

4. Round and relax the dough for 15 minutes, shape into a boule, put into brotform, smooth side down, cover and put into fridge for overnight

5. About 15 hours later, take out the dough and leave in room temperature for 90 minutes, perhead the oven with stone to 550F

6. Slash and bake, steam as normal, reduce the oven temperature to 450F, bake for 45 minutes in total, at minute 15, take out the steam pan, and rotate bread for even baking.

The taste is pretty on target, the slashing effect was a bit lost due to all the chestnut pieces peaking out underneath

DownStateBaker's picture
DownStateBaker

Introduction to bread baking

Bread has been baked since 4000 BCE. Keep this in mind while reading this and other bread books or information. So really all you need is some simple tools, flour (in this intro flour quality won't be a huge issue), salt, water, an oven, and most importantly time.

Tools

Hands- These are your greatest tools. Their most important attribute is what they can tell you. They can tell you how strong, moist, warm, cool, and proofed your dough is. You will develop how to interperet these tactile sensations through practice.

The Bowl- While not entirely necessary, it was one of the earliest and best development in baking. When choosing one look for durability (I use a steel bowl) and size (big but not too big to hold under your arm while mixing, but big enough to have a lot of space for mixing).

A Mixing Implement- I use a wooden short handed flat spoon thing I found somewhere (pictured).My implement

Oven- In this introduction I use an electric oven.

Flour- We could go on and on about flour, but for the sake of brevity I'll keep it short. At home when I don't always have good bread flour I use King Arthur All-Purpose or Gold Medal All-Purpose flours. I am not above using store brand all-purpose if money and the availability of these flours are an issue.

Salt- A nice unrefined sea salt containing calcium and magnesium is best. If this isn't available then I would go with Diamond Crystal Kosher salt. In a pince non-iodized table salt will do fine (iodine is no good for yeast or other microbes that we might like in our bread).

Water- I am lucky enough to live in a house where I get really nice water from a well. I don't know the chemistry of my water but it works well. In general acidic water weakens gluten and alkali strengthens it. Hard water helps create stronger gluten networks because of the presence of calcium and magnesium. Less water makes denser easier to work with loaves and more water lighter more difficult to handle dough.

Yeast- In this introduction we're going to be catching some wild yeast. But store bought yeast will work if you want bread ASAP (this goes against my bread philosophy, but I understand when you want bread and you want it now). Dry yeast has a longer shelf life than cake yeast. So if you are unsure of the freshness of the yeast in your local store go for the packaged dry yeast. Check the expiration date.

Digital Scale- I am also lucky enough to have a scale in my home kitchen. I suggest anyone serious enough to be on a baking forum get one. Grams are what I use when writing my recipes. I like the exactness making rounding a rare occurence. If you don't have one on hand this website has good conversions http://www.veg-world.com/articles/cups.htm

Time- The more the better.

Lets Begin

First get your bowl and mixing implement ready and clean.

Next get some flour and water (I use 80 F at this step). Weigh out 300g of flour and 300g of 80 F water. Now you can also get creative and add some ripe fruit or some bottle conditioned beer if you want a little help in cultivating the yeast. Water and Flour first added

Mix the water and flour until combined (Picture).

Keep the mixture covered in a clean warm spot in your house. Stir every few hours for the next 24 hours. Four or five times should do it. Don't worry if the mixings aren't equally spaced apart just so long as there is about 5-6 hours between mixings. We are mixing it this many times not so much to develop more strength in the dough but because we want to expose more of the mixture to the air containing ambient yeast as well as spreading out yeast that has begun colonizing the mixture.

Tommorow I will update.

wojo723's picture
wojo723

These are some pics of whole wheat ciabatta with fermented wheat berries and flax seed loaves I made the other day.  I made them with a sourdough I started by using the leftover water from boiled potatoes, whole wheat, and white flour.  The culture sprung up very quickly using this method.  I wasn't originally intending to make ciabatta, but the dough was so wet i needed to fold it in flour and use a couche to keep it together.  I only had enough room in the oven for three smaller loaves and one large monster that I proofed in a basket.  Has anyone else used potato water in their starters?  I have another culture forming now now using rye flour and potato water that looks quite nice.


jgrill's picture
jgrill

Friday was my first bake of the new year, and I tried my hand a BBA's Italian bread.


I mixed the biga Thursday afternoon, before heading of to the South Alabama basketball game (we lost, by 3, in OT), and put into the fridge during halftime in the BCS championship game ("Bama won, if you hadn't heard—Roll, Tide, Roll).


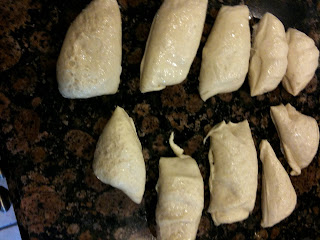
Friday morning I took the biga out of the fridge, cut it into 10 pieces, and let it warm up while I had coffee, and read the paper.


I mixed the flour, yeast, malt, sugar, and salt in the bowl of my KA mixer, immediately after cutting the biga into pieces.


When the biga was about room temp, I completed mixing—adding the biga pieces to the bowl, adding the olive oil, and some of the water. and began mixing on first speed with the paddle, adding more water gradually until the dough came together in a ball. I then switched to the dough hook, and kneaded at 2nd speed for about eight minutes, and put the dough in an oiled plastic bowl with a lid, for a two hour rise. 

I gently removed the dough to the counter and divided it into two more or less equal pieces (one was 19.3 oz., the other 19.6 oz), and shaped each piece into a bâtard.


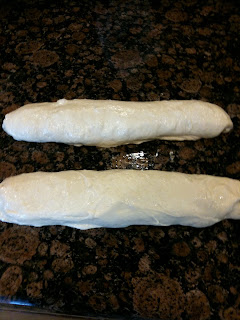
I put a sheet of parchment on my wooden Super Peel (without the cloth gizmo) and dusted it with cornmeal, and then gently placed the bâtards on the dusted parchment to rise, for about an hour.


My oven is not as wonderful as I would like it to be, and it doesn't reach temperature when it claims to reach temp. So, even though I set it for 500°, it finally reached 475° after about 40 minutes. By the time I added water to the pan on the bottom rack for steam, and then slid the bâtards (still on the parchment) onto the stone, the temp had dropped to just over 400°.

I baked the loaves for about 13 minutes, and then turned them, and baked them for about 8 minutes more, tenting with aluminum foil for the last 5 minutes because they were getting darker than I had expected.


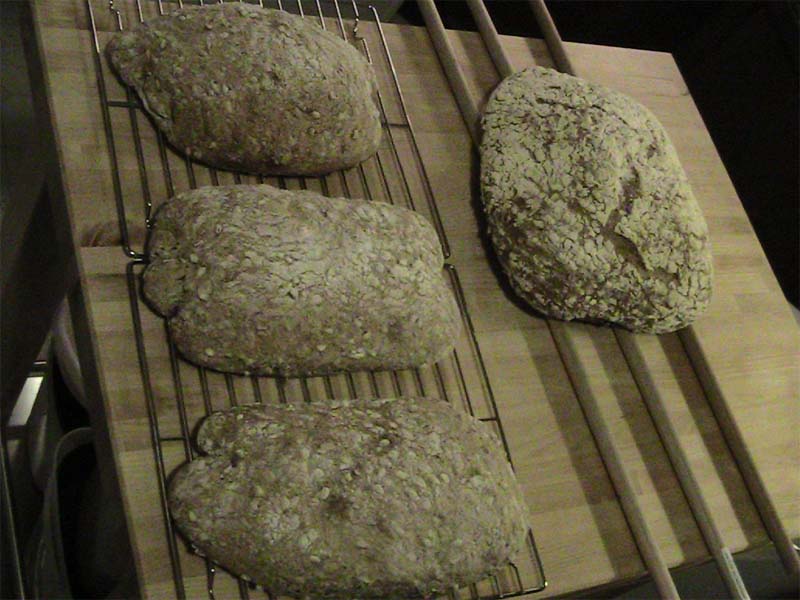
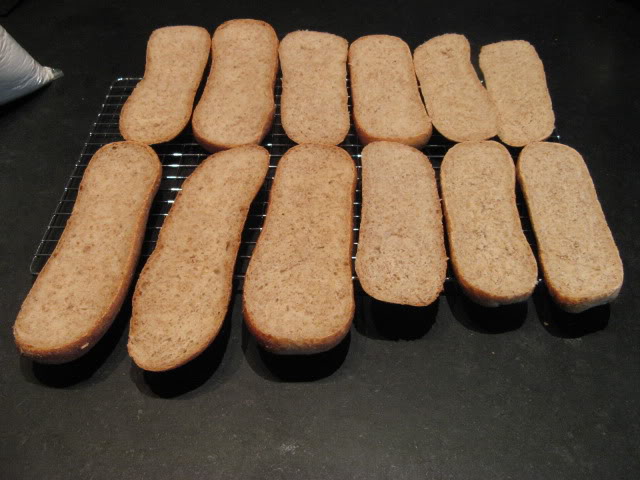
I took the bâtards out of the oven and placed them on wire racks to cool.


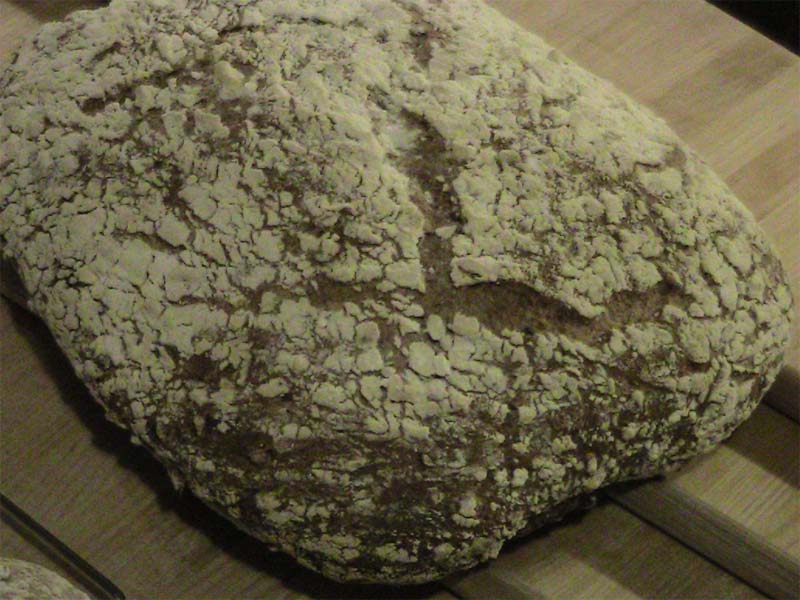
I think I'm getting better at scoring loaves, but I still need more practice. For this I used a single-edged razor blade, and I seem to do better with that then with either of my lames.

If anyone can offer advice on scoring, I will welcome your wisdom.

I used KAF unbleached bread flour, SAF Instant yeast, Morton Coarse Kosher salt, KAF diastatic malt powder, and Carbonnell extra virgin olive oil.

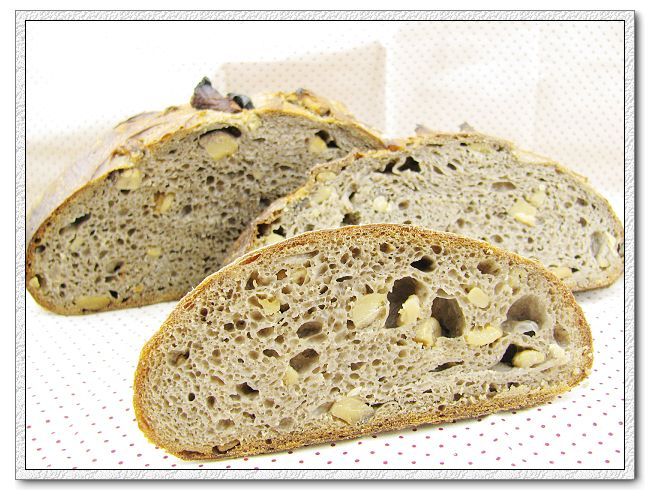
The loaves turned out well, with fairly tight crumb, nice flavor, and a chewy crust.

I've sent this along to Susan for possible inclusion in Yeast Spotting at her great blog, Wild Yeast.


Here's the recipe for BBA's Italian Bread.


Biga

21⁄2 cups      (11.25 oz.)      unbleached bread flour

1⁄2 tsp.         (.055 oz.)        instant yeast

3⁄4 C + 2 TB

to 1 C           (7 to 8 oz.)      water at room temp.


1. Stir together flour and yeast in 4-qt. bowl or bowl of a mixer. Add 3/4 cup plus 2 TB water, and stir or mix at low speed with paddle attachment until everything comes together in a coarse ball. Adjust flour and water as needed so that dough is neither too sticky nor too stiff.

2. Sprinkle some flour on counter and transfer dough to counter. Knead for 4 to 6 minutes (or use dough hook and mix on medium speed for 4 minutes).

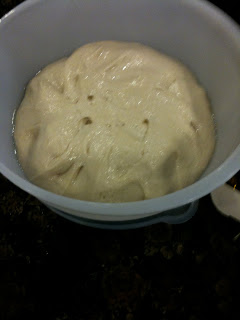
3. Lightly oil a bowl and transfer the dough to the bowl, rolling it around to coat it with oil. cover bowl with plastic wrap and ferment at room temp for 2 to 4 hours, until dough nearly doubles in size.

4. Remove dough from bowl, knead it lightly to degas, and return it to the bowl, covering the bowl with plastic wrap. Place the bowl in the refrigerator overnight. According to BBA, you can keep this in the refrigerator for up to 3 days, or you can freeze it in an airtight plastic bag for up to 3 months.


Italian Bread

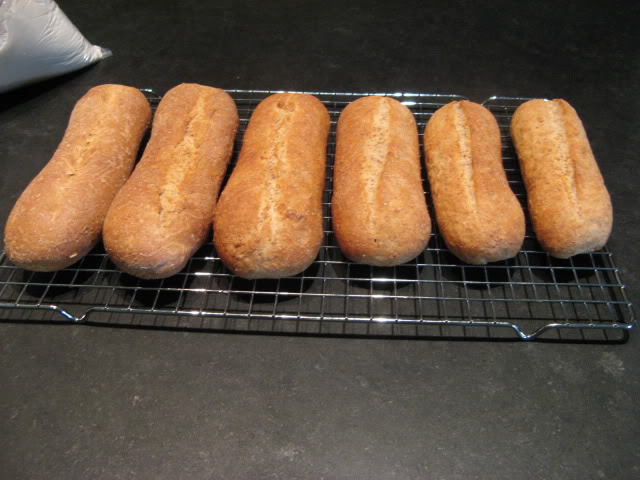
Makes 2 one-pound loaves or 9 torpedo (hoagie) rolls


3 1⁄2 Cups      (18 oz.)      biga (see previous recipe—use the entire recipe

2 1⁄2 Cups      (11.25 oz.) unbleached bread flour

1 2⁄3 tsp.        (.41 oz.)     salt

1 TB               (.5 oz.)     sugar

1 tsp               (.11 oz.)    instant yeast

1 tsp               (.17 oz.)    diastatic barley malt powder (optional)

1 TB               (.5 oz.)     olive oil, vegetable oil or shortening

3⁄4 cup to

3⁄4 cup+2 TB   (7 to 8 oz.) water (or milk, if making rolls) , lukewarm (90° to 100° F)


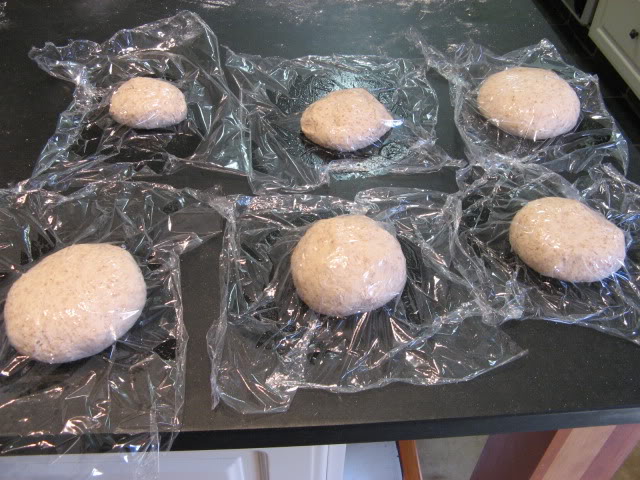
1. Remove biga from refrigerator 1 hour before making dough. Cut biga into about 10 pieces, with a pastry scraper. cover pieces with plastic wrap and let sit for 1 hour to take chill off.


2. Stir together the flour, salt, sugar, yeast , and malt powder in a 4-qt. bowl or the bowl of an electric mixer. Add the biga pieces, the olive oil, and 3⁄4 cup of water and stir together (or mix on low speed with paddle attachment) until a ball forms, adjusting water or flour as needed. The dough should be slightly sticky and soft.


3. Sprinkle flour on the counter and transfer the dough to the counter and knead (or mix on medium speed with the dough hook) Knead for about 10 minutes (I mixed for about 8 minutes with dough hook at speed tow or three on my KA six-qt. mixer), adding flour as needed. Dough should pass the window pane test, and be tacky but not sticky. Lightly oil a large bowl and transfer the dough to it, rolling it around to coat all surfaces. cover the bowl with plastic wrap.


4. Ferment at room temperature for about 2 hours, or until dough doubles in size.


5. Gently divide the dough into two equal pieces of about 18 oz. each, or into 9 pieces of about 4 oz. each for torpedo rolls. Carefully form the dough pieces into bâtards or or rolls, degassing the dough as little as possible.  Lightly dust with a sprinkle of flour, cove with a towel or plastic wrap, and let rest for 5 minutes (a step I neglected). then complete the shaping extending the loaves to about 12 inches or shaping the torpedo rolls. Line a sheet pan with baking parchment (I placed the parchment on a large wooden peel) and dust with semolina flour or cornmeal. Place the loaves on the dusted parchment and lightly mist with spray oil. Cover loaves loosely with plastic wrap.


6. Proof at room temp. for about 1 hour or until loaves have grown to about 11⁄2 times their original size.


7. Prepare oven for hearth baking. Place baking stone on middle rack, remove racks above that rack. Place pan for water for steam on bottom rack or floor of the oven. Preheat the oven to 500°F. Score the breads with 2 parallel diagonal slashes or one long slash.


8. Rolls can be baked directly on the sheet pan. For loaves, generously dust a peel or back of a sheet pan with semolina flour or cornmeal and very gently transfer the loaves to the peel or pan. Transfer the loaves to the stone (or bake on the sheet pan). Pour one cup of hot water into the steam pan and close the door. Lower oven temp. to 450°F and bake for about 20 minutes, or lower temp to 400°F and bake a bit longer. rotate loaves 180° if necessary for even baking. Rolls should bake for about 15 minutes.

Note: BBA suggests spraying the walls of the oven twice at 30 second intervals and then lowering the temp. to 450°, but I don't do this because I've fond that so much opening and closing the oven door causes too great a loss of heat at a time when I want maximum heat.


9. Transfer loaves or rolls to a cooling rack for at least 1 hour before slicing and serving.


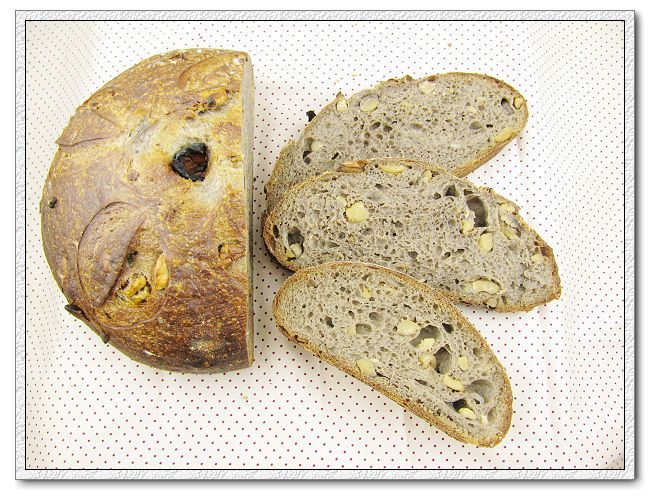
I think it's now time to slice and taste.


pmccool's picture
pmccool

After several not-so-happy outcomes, and one pleasing outcome, it was obvious that I needed to get better acquainted with the South African flours that I have.  Previous bakes seemed to indicate that the flours' absorbency was different than I was anticipating, based on my previous experience with U.S.-produced flours.  The only way to find out what was going on with any certainty was to do side-by-side bakes of identical breads, adjusting only one variable (hydration, in this case) at a time so that I could compare the outcomes.

For this bake, I decided to use a 50/50 mix of brown bread flour (protein content in the 12%-12.5% range) and bread flour (protein content in the 11.5%-12% range).  Although the label isn't altogether clear, I think that the brown bread flour is either whole wheat, or possibly de-germed wheat.  It contains large particles of bran.  Note that the same miller also produces a "Nutty Wheat" flour that they describe as white flour with the bran mixed back in.  I used 2% salt and 1.6% yeast (IDY).  Hydration levels ranged from 55% to 80%, in 5% increments.  Each dough contained 100g flour, to make the math easy.  (It also makes a pretty decent size roll for sandwiches.)  The dry ingredients for all of the doughs were premixed in one batch, then weighed out for individual mixing with the selected quantity of water.  These are straight, lean doughs; no preferments or enrichments were used.  This was to eliminate the potential for other ingredients masking the effects of differing levels of hydration.  Autolyse was not used for any of the doughs.  All mixing was by hand.  No bench flour or water was used.  Room temperature was 75ºF-77ºF.  The temperatures of the ingredients and the finished doughs were not measured but are assumed to be within 3ºF-5ºF of room temperature. The water came straight from the tap, compliments of the City of Pretoria.  All doughs were fermented on a lightly oiled granite countertop and covered with oiled plastic wrap.  Each was preshaped after the bulk ferment, then given 15-20 minutes to rest before final shaping.  Breads were baked for 25 minutes on a sheet pan in a 400ºF oven, with light steam.  

Observations are as follows:

55% hydration - this dough was very stiff and did not want to come together in the bowl.  The dough was dumped out on the countertop to finish mixing/kneading.  All flour was incorporated and after several minutes of kneading, the dough smoothed out and became pliable with almost no tackiness.  This dough was the slowest to rise.  Due to an interruption in the process, this dough had approximately 2 hours of bulk fermentation and barely doubled in that time.  The finished bread was the smallest of any in this test bake, having risen less after shaping even though it had the longest final fermentation duration.  The crust was thick, hard, and tough; the crumb very tight and dense and slightly gummy, even though the bread was thoroughly cooled before slicing.

60% hydration -  This dough was also somewhat stiff, although it was fully mixed in the bowl, unlike the 55% dough.  Pliability was better than the 55% dough and the dough was just slightly tacky at the conclusion of kneading.  The bulk ferment was slightly less than 2 hours and the dough was a bit more than doubled in that time.  The finished bread was only slightly larger than the 55% hydration bread, exhibiting a similarly hard/tough crust and dense crumb.  However, the crumb was not gummy in the finished bread.  

65% hydration - Early in the mix, this dough was sticky, although that improved to being moderately tacky by the end of kneading.  The dough cleaned the bowl with all flour being absorbed.  The bulk ferment was approximately 1:20 and the dough inflated to about 2.5 times its original volume in that period.  The finished bread still has a tight crumb, but the crust is thinner and less resistant to cutting.  Size is slightly larger than the two preceding breads.

70% hydration - This dough was noticeably stickier during mixing and kneading than the previous doughs.  It did clean the bowl during mixing.  I wound up using a combination of standard kneading and stretch and fold to manage this dough (not easy with such a small sample).  I don't think it would have come together without the stretch and fold technique.  At the end of kneading, it was still more sticky than tacky, with some sticking to my fingers.  It had about a 1 hour bulk ferment, during which time it nearly trebled in volume.  This bread also rose more after shaping, and was significantly larger in volume than the preceding breads (and, consequently, felt "lighter" because of the reduced density).  The crumb was the most open of any the breads made to this point.

Intermission - a co-worker stopped by to drop off some things just as I was finishing kneading the 70% hydration dough.  That inserted about an hour's delay between the 70% dough and starting the 75% dough.  All of the first four doughs were baked on the same sheet pan at the same time.  The last two doughs were baked on a separate sheet pan.

75% hydration - This dough never stopped being sticky.  It did not entirely clean the mixing bowl.  Standard kneading techniques were not working, so I switched to using the French Fold.  Kind of a challenge with such a small quantity of dough.  This bulk proofed about 45-50 minutes, easily doubling in that time.  Slashing before baking was problematic because of the dough's stickiness.  The finished bread was larger than its predecessors, felt "lighter" still, had a thinner crust and a more open crumb.  

80% hydration - This was an extremely sticky dough.  It had to be scraped out of the bowl after mixing and repeatedly scraped from the bench while kneading.  The only kneading technique that worked was the French Fold method.  Even that took several minutes (not several cycles) before the dough started to exhibit some structure.  This dough expanded the fastest during the bulk ferment and grew the largest after shaping, even though it had the shortest times in both ferments.  The knife dragged a trench in the dough, but did not actually slash it.  The finished bread had the thinnest crust and most open crumb of any of the breads in this test bake.

Follow-up thoughts:

1. One of the notions going into this test was that the city water might be a culprit in some of the former bakes.  Based on the results of this test bake, I think I can get good bread using city water, without going to the effort of running a similar test using bottled water.

2. For this blend of these particular flours, a hydration of approximately 70% seems to offer the best dough handling traits and a pleasing finished bread.

3. None of the doughs experienced much oven-spring.  I would attribute that to handling during shaping that was not gentle enough (too much degassing) and to baking on a cold sheet instead of on a hot stone.

4. It appears that the jury is still out on my starter.  Most (not all) of the previous bakes that experienced problems were sourdoughs, rather than yeasted breads.  This starter may be too acidic or too enzymatically active, either of which might be leading to gluten attack.  I'll see how it behaves after a few days of rye feedings.

5. I'm still not sure how much effect, if any, altitude is having on the results (I'm at approximately 4200 feet elevation in Pretoria, compared to having been at about 800 feet elevation in Kansas City).  I can't control for that, so I'll use the results of this test as an indicator of what to do with future bakes.

6. Weather today was mostly sunny, with outdoor temperatures nearing 80ºF while I was running this test.  I didn't think to check the relative humidity while running the test.  It's now 47% at 75ºF, about 7 hours after starting the test.

7. Since this is a whole wheat blend, I'll be interested to see whether I can get better results at either the 65% or 70% hydration levels by utilizing an autolyse step in the process.

Front row: right, 55%; center 60%; left 65%.  Back row: right 70%, center 75%, left 80%.  The 75% and 80% doughs have just been mixed and kneaded.  The others have been on the bench anywhere from nearly 2 hours (55%) to just over an hour (70%).  It's a good illustration of how hydration affects the fermentation rate.

Right to left, finished breads, lowest (55%) to highest (80%) hydration.  Note that these were initially shaped to be the same size.  Growth occurred during final proof and baking.

Crumb of, right to left, lowest (55%) to highest (80%) hydration.  I think the crumb of the three higher hydration breads (70%, 75% and 80%) ought to have been more open than this.  That they aren't is probably an indication that I was too forceful during shaping and degassed the breads too much.  An autolyse step might also help.

That's today's effort.  It's one datum, not a trend, but I can use it as a benchmark for future bakes for gauging how much hydration is required and to make some educated guesses about the effects of added fats or sweeteners for enriched doughs.  Now I suppose I should do something similar for panned breads...

Paul


jacobsbrook's picture
jacobsbrook

So I was inspired by a very eloquent baker to try my hand at the SJ Sourdough.  We made our Vermont Cheddar and Broccoli soup also.  I can't wait to cut in to the loaf tomorrow to see how it tastes. 

Happy Baking to all!


Pages

Subscribe to Recent Blog Entries