The Fresh Loaf

A Community of Amateur Bakers and Artisan Bread Enthusiasts.

Recent Blog Entries

inlovewbread's picture
inlovewbread

The first rye that I made can be found here. It was a 80% Rye with a Rye Flour Soaker from Hamelman's Bread. I have to add to my previous post, that the flavor developed over the next few days and the crust softened up. I liked the bread a lot and it was good with just a little butter on it :-) At first I wasn't that impressed but as time went on I came to really like it. I saved the last third or so of the loaf for use as altus. 

The next rye I tried was a 70% Rye. The formula for this loaf can be found here. It is Hansjoakim's favorite rye using dmsnyder's write-up. (thanks for the clear instructions!) 

I really liked this rye! The taste was really good- hard to describe, but better than my last rye. I think this was partly due to the fact that I had used Hodgson Mills whole rye flour with the first loaf (which is course ground) and with this loaf here I used an organic medium whole rye flour from PCC. The texture was dense but moist and the crust was perfect- not too hard. I was happy to get this "cracked" pattern on the bread from placing the dough seam side down in the brotform. I love how it looks- Hansjoakim's turn out way better of course.

Overall, I like this bread. I think I may use it as a base in the future for a bread with caraway seeds, anise and something else in it- cardamom maybe. 

Third Rye:

This is a Jewish Deli Rye using (again) dmsnyder's write-up which can be found here. I didn't know if I like caraway seeds or not, turns out....I do! This bread is really good and would make a great sandwich. Very flavorful.

I used First Clear Flour for the first time with these loaves, and again used the organic PCC medium rye flour. I built-up my rye starter over the preceding three days to make this loaf which calls for 750 grams rye sour. I'd like to try this bread again with a WHITE rye sour instead of the whole rye starter/sour that I used. I think it would have been lighter in color and more authentic? tasting. I don't know- I have nothing to go off of since I have not had rye breads before except the ones that I have made!

It is important to me to try different breads, and rye bread in particular. I appreciate history and learning of different people groups, their culture and heritage, and making these rye breads is a tiny way to be better connected to them. Every country in the world has their own breads, and I find it interesting and poignant to eat the same types of flavors they did/do, and learn the "why" behind the ingredients they use. Fascinating to me.

So, I'm going to keep on with rye for a while. I was going to move on to the Detmolder Rye's but I think I may wait until I can fashion a proofing box for that (you have to keep certain temperatures for each sour build). Next rye? I'll take suggestions. Maybe "Eric's Favorite Rye" or a swedish rye...we'll see.


Doughtagnan's picture
Doughtagnan

My 1st attempt at the Nury (very) Rustic Light Rye and Bouabsa (non) Ficelle's,  I found both dough's quite challenging to work with as i'm not used to such wet dough's but they tasted great!, will have to work on my shaping/slashing  technique!

dmsnyder's picture
dmsnyder


Multigrain sourdoughs have a delightful complexity of flavor, wonderful texture and phenomenal keeping quality because of the moisture retained in the soaker, as well as the effect of the levain. They are delicious fresh-baked, but their flavor only fully develops after a day or two when the distinctive flavors of the grains and seeds have had a chance to meld.

I had made Jeffrey Hamelman's 5-grain Levain from “Bread” a number of times. Hamelman describes the flavor as “delectable,” which is not an over-statement. So, although my original intent was to make the Sourdough Whole Wheat Bread from Michel Suas' “Advanced Bread and Pastry” this weekend, when I saw his formula for “Sourdough Multigrain Bread” a few pages later, I couldn't resist it.


Levain


Ingredient

Amount (Lbs & Oz)

Bakers' %

Bread flour

2 5/8

95

Medium rye flour

1/8

5

Water

1 3/8

50

Starter (stiff)

2 1/8

80

Total

6 1/4

230

  1. Mix all ingredients well with a DDT of 70ºF. (Tip: First mix the water and starter completely. I find a dough whisk is great for this. Then add the flours and mix thoroughly.)

  2. Ferment 12 hours at room temperature.


Soaker


Ingredient

Amount (Lbs & Oz)

Bakers' %

Flax seeds

1 1/2

39.13

Sunflower seeds

1 1/2

39.13

Rolled oats

1 1/2

39.13

Sesame seeds

1 1/2

39.13

Water

3 7/8

100

Total

9 7/8

256.52

  1. Toast the Sunflower and Sesame seeds for 4-6 minutes at 350ºF to bring out their flavor.

  2. Suas says to soak the seeds and oats for at least two hours. I soaked them overnight.


Final Dough


Ingredient

Amount (Lbs & Oz)

Bakers' %

Bread flour

10 1/8

65

Whole wheat flour

3 7/8

25

Medium rye flour

1 1/2

10

Water

11 3/8

72.8

Yeast (instant)

1/8

0.16

Salt

3/8

2.53

Soaker

9 7/8

59

Levain

6 1/4

40

Total

2 lb

274.49


Method

  1. Make the levain the night before baking and ferment it overnight, as above.

  2. Mix the flours, water, yeast and salt.

  3. Add the levain and mix thoroughly.

  4. Mix to medium gluten development, then add the soaker and mix only until incorporated. DDT is 75-78ºF (24-25ºC).

  5. Ferment for 2 hours.

  6. Divide into two equal pieces and pre-shape into loose balls.

  7. Rest the pieces, covered, for 20-30 minutes.

  8. Shape as bâtards. (Gently pat each ball of dough into a disc. Fold the right and left sides to meet in the middle. Then, roll the pieces up, away from you. Make sure the seam is sealed as you roll the loaves into bâtards and place in well-floured bannetons or on a floured couche.)

  9. Cover tightly and proof f

    or 60-90 minutes at 80ºF.


  10. One hour before baking, pre-heat the oven to 500ºF with a baking stone and your preferred steaming method in place.


  11. When the loaves are expanded by 75%, transfer them to a peel and to the baking stone.


  12. Immediately steam the oven and turn the temperature down to 460ºF.


  13. Bake for 30-40 minutes or until the internal temperature is at least 205ºF and the bottom sounds hollow when thumped.


  14. When the loaves are fully baked, turn off the oven, but leave the loaves on the stone with the oven door ajar for 5-10 minutes to dry the crust.


  15. Transfer the loaves to a cooling rack, and cool thoroughly before slicing.


This bread has a crunchy crust and chewy crumb. There is a distinct but mild sourdough tang, and the flavor of the oats and seeds is very present. Compared to Hamelman's 5-grain Levain, Suas' bread has a higher proportion of seeds, and I toasted the sesame and sunflower seeds darker than I had for Hamelman's bread. Suas also uses a firm starter while Hamelman uses a liquid starter, which accounts for the relative sourness of Suas' bread.


While the comparisons are interesting, I can't say either is “better.” Both are outstanding breads and highly recommended.  


David


Submitted to YeastSpotting

Doc Tracy's picture
Doc Tracy

Well, another rainy day in Arizona. I'm getting the tiniest bit of cabin fever. Having a rare treat, a glass of shiraz. Not a great wine but it sure tastes good. My husband ran to the store to get it while I was baking a pizza. Pouring down rain and wind. Even my doberman refuses to go take a potty!

I threw together a dough today and it turned out awfully wet. (maybe our humidity?) Anyway, it was a made up recipe and I threw in too much starter so I probably just miscalculated. I was feeding my white starter, being lazy and decided to make a 1-2-3 bread. But instead of being careful, I threw the rest of my starter in so it was probably a 2-2-3 bread. I decided to use a whole durum flour for 50% and white whole wheat for the other 50%, the starter fed on AP. (Have I mentioned I don't like white bread?)

So, I ended up with this gloppy, soft dough. It smelled so nice, but was really wet! I decided to use half for a pizza and put the other half in the oven. The half that I made into a bread was really flat, kind of strange looking but tasted oh, so sweet!

The pizza, one of my better pizzas! I used fennel seed in the sauce, with a lot of wine and canned tomatoes. (I now have decided I like fennel seed, after an unsure beginning) Had some dried porcini mushrooms in my spice box so I soaked those in water, threw the water in the sauce and the mushrooms on the pizza. Some black forest ham, onions, mozarella. And---a fresh habanero from the garden. Now, if you've never had a garden fresh habanero, you have no idea what flowery aroma and taste they can produce. In the winter ours are not that hot. (in comparision I guess) But the flavor they add is a miracle! They smell like flowers! Hot, spicy flowers! Mixed with fennels, wine, mushrooms and the flowery habaneros, this was a meal from above.

Maybe I just have cabin fever, LOL!!

No dessert tonight, maybe just a cup of hot mint tea. A movie with my wonderful husband, some reading and to bed. I've been reading the Julie/Julia project for my bedtime reading. What a wonderful blog. I highly recommend it. I can really relate in my RV situation right now.

smasty's picture
smasty

I made my first foccacia today.  It is from Maggie Glezer's "Artisan Baking" book.  It is fabulous!  It has fresh rosemary and olive oil in the dough that give it wonderful flavor.  They use a technique where the loaf is flipped over after 5 minutes to keep it very flat.  Everything came out just wonderfully.  This recipe uses a poolish with a very small amount of yeast, then 1/4 tsp additional yeast in the dough.  Here's my question--the book recommends a bulk ferment of 6 hours, followed by 3.5 hours of proofing.  Since I'm in Denver, yeasted bulk ferments usually take about half to 2/3rds the amount of time reccommended (I forgot to adjust the yeast down for that reason).  I found I was fully proofed by 6 hours and ready to bake.  I can't imagine the mess I would have had if I'd waited the full 9.5 hours.  Why would they recommend that amount of time for a yeasted bread?  Is foccacia supposed to be overproofed?  Next time I will make some adjustments to slow down the ferment (just a pinch of yeast). 

jennyloh's picture
jennyloh

My Olive Bread....I think this time I got it right in terms of the proofing.  I used the finger test as per the advices by some.  Well,  it was really really useful.  Thank you so much for the video link that shows it.


The fluff inside seems quite even,  except that my olives are not evenly spread out......things to improve the next time.  The taste was great...love the olive smell....


More details attached:http://sites.google.com/site/jlohcook/home/breadmaking/olive-bread


Shiao-Ping's picture
Shiao-Ping

I dedicate my Gérard Rubaud Miche to MC.

(I wish that it could be transported across the Pacific Ocean to reach the other shore.)


It was one of those soulful Van Morrison nights.  The music in my tea room could not be any louder; any louder, the gods of silent teapots would have protested.  John Donne was in the air.  Van Morrison, my muse, dreamt of this miche for me.... 


I have neglected my teapots for the longest time now.  They have not been polished for ... dare I reveal ... a year?  Sounds criminal.  Just as well, with all that flour coming out of the surface of the miche, do I need to bother dusting my teapot stands?


Gérard Rubaud starter (re-sized to 2% of his formula as recounted HERE in MC's blog; my figures are for a final dough yield of 1.9 kg, you are welcome to half my quantity again)

First build

  • 6 g ripe stiff starter (at this quantity, any starter you've got going is fine, preferably not liquid starter)
  • 8 g water
  • 14 g flour (2 g WW, 1 g spelt, 1 g rye, and 10 g plain flour)

Note: Gérard Rubaud's starter hydration averages 55.5%.  The main thrust of his starter is three refreshes and built with the same flour compositions as for his final dough; ie. 30% whole grains flours (60% wheat, 30% spelt, and 10% rye) and 70% all-purpose flour.

At 30 degree C, this build took 10 1/2 hours for me (overnight temperature might have dropped to 24 - 25 degree C in my kitchen).

Second build

  • 28 g starter (from the first build above)
  • 16 g water
  • 30 g flour (5 g WW, 3 g spelt, 1 g rye, and 21 g plain flour)

At 30 degree C, this build took 6 hours for me..

Third build

  • 74 g starter (from the second build above)
  • 56 g water
  • 100 g flour (18 g WW, 9 g spelt, 3 g rye, and 70 g plain)

Note:  Watch your starter fermentation carefully, depending on your room temperatures.  As flour (fresh food) is not even 1.5 times the starter, it is very easy to over-ferment at this stage.  It was not an issue for the previous two builds as the yeast adjusted to the new flour compositions and began its activity slowly.  

At 30 degree C, this build took 4 hours for me (and it was already too long because when I touched my starter, it shrank back very quickly; 3 1/2 hours would have been better).  It rose 2 1/2 times.

Gérard Rubaud Final Dough

Main points about the final dough construction are (1) final dough flour is 30% whole grain flours and 70% all-purpose flour as for starter; (2) starter is 25% of final dough flour (ie, 25% baker's percentage); and (3) overall dough hydration is 80%.

  • 230 g starter (all from the third build above)
  • 920 g flour (165 g WW, 83 g spelt, 28 g rye, and 644 g plain flour)
  • 772 g water (every 10 -11 g of water is 1% dough hydration; feel free to reduce water if you wish)
  • 20 g salt

Total dough weight was 1,920 grams (minus 150 g as pâte fermentée = 1,770 g, see below) and overall dough hydration was 80%. 

Note:

(1) I did double my own formula here (both starter and final dough) because I wanted to do a stencil with Gérard Rubaud initials and I wasn't sure if it would be successful. 

(2) I reserved 150 grams from each dough and I had 300 grams as pâte fermentée (old dough) in total from the two doughs. I wanted to try a Poilâne style of miche.  Giovanni has done extensive research on Poilâne Miche.  Without going into the specifics, all that I wanted to do at this stage was to use Gérard Rubaud's stiff starter and dough with the addition of a reserved old dough to make a miche and see what happens, which I did.  

(3) So, in total I made three x my own formula here at two separate occasions, the last being a Gérard Rubaud Miche with pâte fermentée.  

Procedure - without pâte fermentée

Gérard Rubaud autolyse flour and water, then he cuts up his stiff levain into small pieces and adds them to the autolysed flour and water mixture.  However, the way I did the bread in this post was that I first diluted my starter with water, then I added flour and salt into the diluted starter, then I followed the procedure below.

  1. Autolyse 20 minutes.
  2. Five sets of S&F's of 30 strokes each at 30 minutes intervals.  
  3. At the end of the last S&F's, section off a piece of dough weighing 150 grams (and placed it in the fridge) to be used as pâte fermentée (more below).
  4. Pre-shape and shape, then place the dough in the fridge for overnight retarding.  (My room temperature was 30 degree C.  It was exactly three hours from the time the ingredients were mixed to the time the shaped dough was placed in the fridge.  You may need longer depending on your dough temperature and room temperature.  Gérard Rubaud does not like to retard dough, but I did 9 hour retarding for convenience).
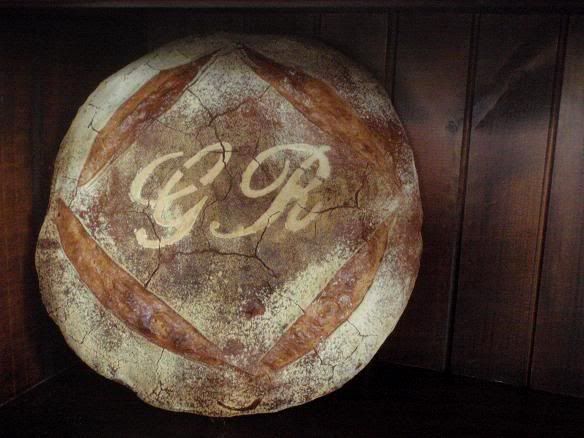
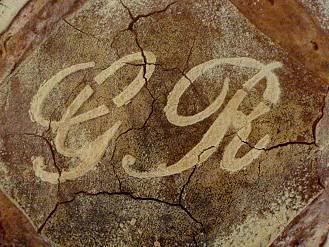
  5. The next morning, stencil, then score the dough.  Pre-heat your oven to as hot as it can go.  Bake with steam at 230 C for 50 minutes.


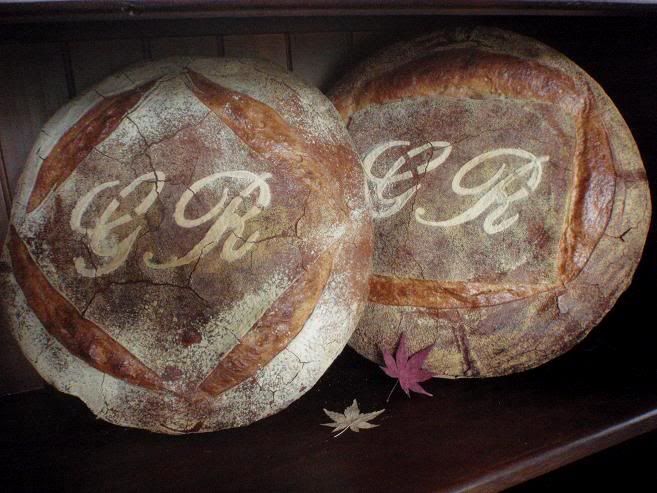
       Gérard Rubaud Miche (without pâte fermentée) 


Only one of the two miches that I made is shown here, as the stencil of the other one was completely smeared.  The proved dough of that one was quite high (its profile was like a tall hill); when I placed the stencil on its surface and dusted flour on it, the flour did not sit well on the surface.  I knew there might be problem but went ahead any way.  I should have tried to press the stencil closer to the surface of the dough before I dusted flour.

Notwithstanding the above, the aroma was most amazing when the miche was being baked.  When the oven door opened, the whole house was filled with the wonderful whole grains roasting fragrance.

The loaves cooled down to have the cracks all over their surface - the top and all around the sides.  Part of the reason for that is because these are very high hydration doughs, but more because I tend NOT to leave my dough in the oven with the oven turned off for the last 5 - 10 minutes of baking as many of TFL home bakers do.  I tend to give my dough full but shorter bake.  The extreme difference in temperatures inside and outside the oven results in the crackling effect on the crusts.


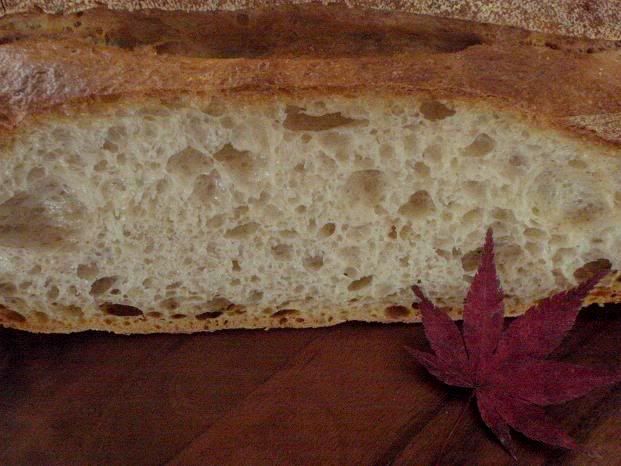
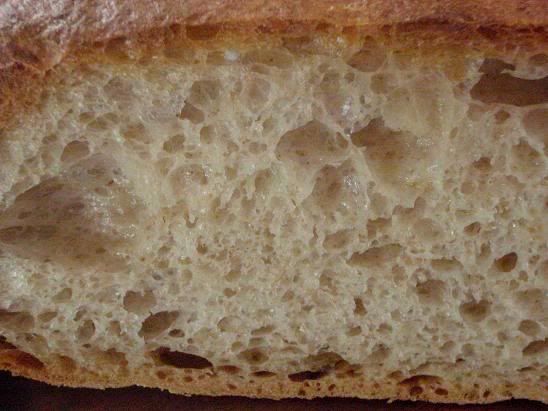
With this Gérard Rubaud formula, I am witnessing the most amazing crumb that I have never seen before.  It has a translucent quality about it.  It is almost as if each and every particle of the flour had been fermented and each and every cell of the dough has been aerated.  I have never seen anything quite like it.  It is light and yet a slice of it on you palm feels a weight, a substance.  While the crumb looks translucent, it has a sheen as if it is oily (but it is not).  You can clearly see the specks of the whole grain flours in the crumb.  Had I not made this bread myself, I would not have believed that 30% whole grain flours would give me a crumb like this. 

So that is the texture.  What about the flavor?  I cannot tell you any single flavor.  No one taste stands out.   I cannot say that it is sour because sourness does not stand out.  The taste is very "creamy" if I may use that word.  The creaminess and the sourness are beautifully balanced. 

MC said of her Rustic Batard that it tastes more whole grains than Gérard's and she wondered if temperature had made a difference as Gérard's bakery is a good 15 degree F warmer than her place.  Now, my miche does NOT taste whole grains or wheaty at all.  I cannot single out a wheaty taste, but it is there, blended in with all the other flavors.  I wonder if my high temperature indeed had made a difference in this.  Or, put another way, had MC bulk fermented and proved her Rustic Batard in a proofing box to control temperatures, would she have gotten a closer taste in her Rustic Batard to Gérard's.


Procedure - with pâte fermentée

(Note: the formula is exactly the same as above except with the inclusion of 300 grams of pâte fermentée)

Follow the procedure as for miche without pâte fermentée except for the following:

  1. One hour after the dough was mixed (ie, at the end of the second set of S&F's, section off a piece of dough weighing 300 g ( reserve it as future pâte fermentée);
  2. Total fermentation time is shorter by 1/2 hour because fermentation happens faster with this dough.  (From the very first set of S&F's, you can already see some strength in the dough because of the acidity from the pâte fermentée.  To me, this is quite something, considering the way I mix my dough is that there is no kneading whatsoever, merely stirring to hydrate the flours.) 
  3. As this is a slightly bigger dough (1,920 grams as opposed to 1,770 grams), bake it for one hour. 


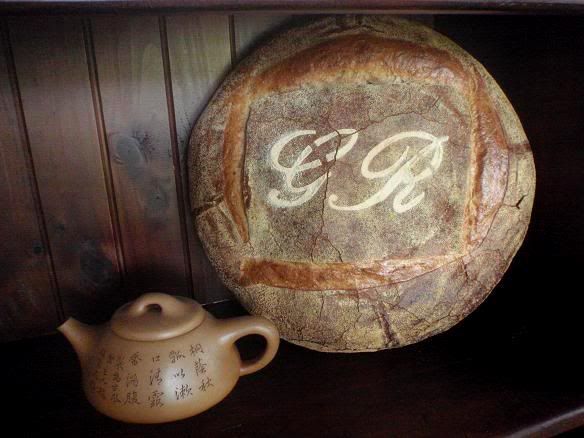
        Gérard Rubaud Miche (with pâte fermentée)


I learned something in this bake:  that sourdough pâte fermentée will give you extra dough strength because of the acidity in the old dough (provided it is not over-fermented to start with).  I am amazed at the volume that I get in this miche.  (Let's recap: this dough went through 2 1/2 hours of fermentation at room temperature of 30 degree C, then went into the refrigerator for 9 hour retardation, then baked at 230 C for 1 hour. That's all.) 

The taste of this miche is a lot sourer than the previous miche.  


This has been a very fulfilling exercise for me.   Thank you, MC, for the wonderful experience.


Shiao-Ping

ejm's picture
ejm

Isn't this gorgeous?
buttermilk cluster - ejm January 2010

It seems ridiculous that it took me so long to make this bread. I’ve been staring at the photo of Floyd's buttermilk cluster for ages. Every time I thought, "I've GOT to make that!" And then The Fresh Loaf website was featured in this year’s SAVEUR 100. Which bread did the SAVEUR kitchen choose to feature? Buttermilk cluster, of course.

I was really surprised when I saw a scathing review of the loaf on the SAVEUR site because all of the reviews on the FreshLoaf say the complete opposite. I examined both versions of the recipe and saw that the SAVEUR recipe calls for 5 cups flour rather than the 6 – 6½ cups flour on the Freshloaf recipe.

I assumed that SAVEUR had made a typing mistake.

I just couldn’t believe that all of these rave reviews on The FreshLoaf would be wrong, nor could I believe that SAVEUR would have added the FreshLoaf into the 100 list if the bread were no good.

I used whole wheat and unbleached all-purpose flour and a little less yeast, but otherwise pretty much stuck to Floyd's version. After some tribulation (I had to add more liquid because the dough was so dry), the final result was stellar!

buttermilk cluster

Well!! As you must have guessed from the photo, we were thrilled after pulling this bread out of the oven.

It looked and smelled fabulous!! I removed the outer ring and stuck the thermometer in – huh! only 180F. So back into the oven it went for 5 more minutes to drive the internal temperature up to 200F.

We left it to cool overnight and had it for breakfast this morning with butter, goat’s cheese and black currant jam. It was crusty on the outside and soft and springy on the inside.

It. Was. Delicious.

Thank you, Floyd!

-Elizabeth

P.S. For more photos and details about what I did, please see buttermilk cluster (bookmarked, YS)

CaptainBatard's picture
CaptainBatard

When making Pan D'oro recently I realized...it being winter in the North East and my house hovering around 62-65*(by choice)I had to come up with a better way of keeping a constant temperature for my sweet starter. I could always fall back on the old pot holder trick (3 folded pot holders=76*) in the stove door with the light on. It works in a pinch but, I always run into this problem of proofing temperature. In the summer it is too hot (I can't bake or i have to use ice water baths) and in the winter it is too cold. I've been tooling around with many ideas on how to make a proofer work... a plug-in car refrigerator/cooler or wine vault for the summer and a heater/light bulb for the winter. The Pan D'oro made it happen. I turned again to the internet and with the help of MC@Farine  I found a design for a proofer that Steve@Bread cetera posted @Fresh Loaf, and I took it a step further. I went looking for a thermostat for reptiles.... and ended up at Craigs list with the perfect solution... a Ranco ETC microprocessor  temperature controller thermostat that plugs into the heating unit or refrigeration system. It really takes the prize and i got it for a good price from a home brewer who started making babies and his wife made him stop making suds. After fooling around with it...I have found... I can control  the internal temperature within a degree of where i want it to be......the only thing I would consider changing is the probe. I have found that i can insert it into the dough and and get spot on readings...a new tip to the probe would make it perfect! The rest of the proofer is make shift.  I got a sheet of insulation board from Home Depot and cut it to fit my in my pantry. The heat source is a 75 w light bulb. I also have an indoor outdoor thermometer i had laying around that sound an alarm if it goes past a set temperature...just as a fail safe.My original intention was to get a small refrigerator or wine vault so I could bake all summer without a problem. The project has been put on hold...I have been busy packing my house to rent for an extended trip to France in the very near future. Iam going to try to find a way to take it with me! If you have any question comment below...or drop my a note...

Cheers...


yozzause's picture
yozzause

Whilst dividing my sour dough culture the other evening a sudden urge to take advantage of the cooler weather (36 deg it has been over 40) and bake came over me. I decided to make a small dough and was thinking of making some bread sticks so added a goodly amount of olive oil to the mix.

Any way as the stretch and folds were done and the time wore on i decided to change to a loaf instead so the dough was shaped and later put into the fridge as i went to bed.

I awoke at 3am so took the dough from the fridge to allow time to warm up before baking b4 work, 6.30 into the oven and then just enough time to cool.  pictures taken at work and available for morning tea.

the small loaf did not go that far but it was enjoyed by us all. i currently have a sour dough rye that i bought to work and will bake either tonigh when i get home or will refrigerate for tomorrow morning  to take along to a bbq with friends we haven't seen for years

yozza


Pages

Subscribe to Recent Blog Entries