The Fresh Loaf

A Community of Amateur Bakers and Artisan Bread Enthusiasts.

Recent Blog Entries

ananda's picture
ananda

A while ago Debra Wink asked for information on English Muffins.

I attach details below, mostly from a Practical Class with my Foundation Degree students from last academic year.

The attached video is from very early days, and was prepared entirely by the students.   You can hear me advising other students in the background; that's how I know I wasn't directly involved.

Recipe specifications are attached [many thanks to my baking mentor and tutor during my time studying for my bakery qualifications for letting me have a commercial recipe specification to use], and I will dig out some photos and attach manufacturing instructions below.

Here goes:


CRUMPETS


Material

Formula [% of flour]

Recipe [grammes]

Strong Flour

100

500

Salt

2

10

Yeast

6

30

Water

110

550

TOTAL

218

1090

Bicarbonate of Soda

0.3

1.5

Cold Water

28

140

TOTAL

246.3

1231.5


Yields 20

Set plate to Mk4. and pre-heat.   The temperature of the hot-plate should be just below 200*C


Method:


  • Sieve together the flour and salt.
  • Dissolve the yeast in tempered water [30°C]
  • Combine these 2 in a mixer and beat on first speed for 2 minutes to form a batter
  • Beat on second speed for 6 minutes
  • Cover the batter and keep warm for 1 hour bulk fermentation
  • Dissolve the bicarb in the cold water and mix this solution well through the batter.
  • Use immediately, piping the mix into lightly-greased hoops, ready-placed onto the prepared griddle surface.   Hot-plate should be clean and un-greased


English Muffins


Material

Formula [% of flour]

Recipe [grammes]

1. Sponge


Strong Flour

50

750

Water

30

450

Yeast

0.5

7.5

TOTAL

80.5

1207.5

2. Final Dough


Sponge

80.5

1207.5

Strong Flour

50

750

Salt

2

30

Milk Powder

8

120

Yeast

8

120

Butter

10

150

Water

30

450

TOTAL

188.5

2827.5

makes 40 muffins @ 65g

This is based on Rose Levy Barenbaum's recipe if I'm not mistaken; one of my Foundation Degree students was very keen to learn how to make these, so we did the developmental work together, and he had a go at making them; quite successfully I believe.

We made the sponge on an overnight basis.   This would mean the sponge would be cool, so final dough water would need to be tempered accordingly to achieve a DDT of around 30*C.   I would refer you to Walter T. Banfield's text "Manna; A Comprehensive Treatise on Bread Manufacture." London: Maclaren. 1947, which states one essential to success as warming the flour.   Elizabeth David's English Bread and Yeast Cookery has some useful comments made over the years on English muffins too.

It is strange how we ended up basing our recipe on the work of a modern day American author, rather than on the works discussed above.   I am pretty sure it is because we wanted to use a pre-ferment to make these, and all the recipes I came across used bulk fermentation.   From my own studying time 6 years ago, working for my bakery quals, we definitely made these with a ferment.   Given that my FdA students were working on complex fermentation methods, I specifically asked for English Muffins made using an Overnight sponge.   this is what we came up with.

The dough should be soft, although hydration in the formula does not look alarmingly high.   But, given you have plate-work, be wary of the dough being too soft; if this is the case, you will end up with crumpets, as shown in the first recipe.   These are made from a batter which is piped onto the griddle: see video.

It is just a case of combining the sponge with all other ingredients and mixing to form a soft, warmish, and well-developed dough.   I am aware American flours generally have a higher level of hydration, but please note the flour I used in this formula is strong, and one of the best commercial specs available over here.   It is milled from 100% Strong Canadian Wheat.

Debra Wink indicated wanting to experiment with Wholegrain.   I am sure this would work well, although I have only ever come across these goods made with all-white flour.   The essence of the product is to have a soft and chewy "breadcake" like texture, where the dough rises substantially on the plate thanks to conduction.   That is why we wanted to use a pre-ferment rather than a bulk-fermented straight dough.   So, wholegrain flour: yes with the following provisos:   the wholemeal would need to be strong, and finely milled.   A brown flour, say of 85% extract would be excellent.   Do not go above 50% brown flour in the flour "grist".   The water content will need to be adjusted upwards to take account of extra absorption from the bran.   Obviously, the formula can be adapted to use milk rather than the water/milk powder combination.

The dough should have a resting time of upto 30 minutes, then scale and divide, and mould each piece round.   Dust the bench with rice cones, flatten slightly and rest the dough pieces on the rice dust, covered, for 45 minutes to an hour.   Cook in batches on the griddle; they should take about 10 minutes, being flipped over half way through cooking.   The gritty rice cones on the outside of the muffin are a wonderful contrast to the soft and chewy centre.   The dough should rise slowly on the griddle as the muffin cooks; that was why we sought to use a pre-ferment in the formula.


Here's the video:


Best wishes

Andy


jennyloh's picture
jennyloh

A week ago,  I bought my first rye and whole wheat flour, they were imported from Germany.  I could not understand a word on the description,  but I was determined to try my hand on these flour.  Here I am trying my first rye and whole wheat bread.  Honestly,  I have no idea what it is suppose to look like or taste like,  as I'm not a fan of rye bread usually,  I'm a white loaf freak.  Surprisingly,  this recipe is easy, and the taste is really good.  I still need to work on my shaping and proofing timing though.  

It;s a wet dough to work with,  I'm now aching all over from the kneading,  3 different types of kneading just to get dough ready.  Wish I have a machine to help me with.  I'm still waiting for my birthday present...


The taste is pretty good though,  seems like the poolish had helped with this outcome.  Is it suppose to look like that?  Unfortunately,  Barry's artisan did have any pictures of the dough he made, and I found many rye and whole wheat that are more dense.  Am I getting this right?


Jenny

Recipe Here:

Jenny's Blog on Poolish Rye and Whole Wheat Bread


dmsnyder's picture
dmsnyder


Shiao-Ping's beautiful miches, based on MC's interviews with Gérard Rubaud, inspired me to attempt Rubaud's pain au levain myself.


Rubaud's bread is made with 3 very firm levain builds, the final being incorporated in his final dough. He uses a flour mix with 70% AP flour and the remaining 30% a mix of whole wheat, spelt and rye flours. Remarkably, he grinds the flours to feed his levain fresh for each build, and he uses the same flour proportions for each levain build as used in his final dough. Not having a grain mill, I used store-bought flours. I measured out each flour for each build. If I make this bread again, I would make one batch of mixed flour for all the builds and the final dough. This would save time and also be more precise, given the very small amounts of flour in the levain builds.

Note that MC's interviews also indicate Rubaud salts his levain builds at 1% of the flour weight, in order to control their speed of ripening. I did not do this.

My formula is taken from Shiao-Ping's calculations which were taken from MC's interviews. I divided her quantities in half and, rather than a miche, made two smaller (480 gm) bâtards. Rubaud mixes his dough by machine. Shiao-Ping mixed her dough entirely by hand. I started my mixing in a stand mixer, but continued developing the gluten by hand, as described below.


First build


Ingredient

Amount (gms)

Ripe levain (stiff)

3

AP flour

5

Whole wheat flour

1

Spelt flour

0.5

Rye flour

0.5

Water

4

Total

14


Second build


Ingredient

Amount (gms)

Ripe levain (stiff)

14

AP flour

10.5

Whole wheat flour

2.5

Spelt flour

1.5

Rye flour

0.5

Water

8

Total

37


Third build


Ingredient

Amount (gms)

Ripe levain (stiff)

37

AP flour

35

Whole wheat flour

9

Spelt flour

4.5

Rye flour

1.5

Water

28

Total

115

Notes for levain builds

  1. The first levain was made with my usual firm sourdough starter which I feed 1:3:4 (starter:water:flour) with a flour mix of 70% AP, 20% Whole wheat and 10% Whole rye flours.

  2. To mix each build, dissolve the firm starter in the water in a small bowl. (I use a small dough whisk.), then add the flours and mix thoroughly into a ball.

  3. The first build was fermented for 10 hours, the second and third for about 8 hours each. This was in a cool kitchen, so your times my vary with the activity of your starter and the ambient temperature.


Final dough


Ingredient

Amount (gms)

Ripe levain (stiff)

115

AP flour

322

Whole wheat flour

82.5

Spelt flour

41.5

Rye flour

14

Water

377

Salt

10

Total

962


Method

  1. Mix the flours and the water. Cover and let it sit to autolyse for 20-60 minutes.

  2. Divide the starter into about 6 pieces and add them to the autolyse. Sprinkle the salt over all and mix thoroughly.

  3. In a stand mixer, mix with the dough hook on Speed 2 for about 10 minutes. There should be some gluten development, but the dough will be very gloppy. It will not clean the sides of the bowl.

  4. Transfer the dough to an oiled bowl. Cover the bowl tightly.

  5. After 20 minutes, stretch and fold in the bowl for 30 strokes. Cover the bowl tightly.

  6. Repeat Step 5. twice more.

  7. Transfer the dough to the board and stretch it to a large rectangle and fold it like an envelope. Replace it in the bowl and cover.

  8. After 45 minutes, transfer the dough to a floured board and do another stretch and fold.

  9. After another 45 minutes, transfer the dough to the board and divide it into two equal pieces.

  10. Pre-shape each piece into a round and let them rest, covered, for 15 minutes.

  11. Shape each piece into a bâtard.

  12. Proof en couche until expanded by 50-75%.

  13. One hour before baking, pre-heat the oven to 500ºF with a baking stone and steaming apparatus in place.

  14. When the loaves are ready to bake, pre-steam the oven.

  15. Transfer the loaves to a peel. Score them, and then transfer them to the baking stone.

  16. Steam the oven again. Turn down the oven to 450ºF.

  17. Bake for about 30 minutes, until the internal temperature of the loaves is at least 205ºF, the bottom gives a hollow sound when thumped and the crust is nicely browned.

  18. Transfer the loaves to a cooling rack.

  19. Cool completely before slicing.


Although I got good gluten development, the dough remained very loose. This was expected, given its high degree of hydration. However, I did not expect how the loaves stuck to the “well-floured” couch and transfer peel. The loaves deflated significantly in the process of transferring them to the Super Peel ™. The latter handled the loaves beautifully in transferring to the stone. No additional sticking.

There was very good oven spring, and the cuts on the loaf which didn't stick to the transfer peel as much opened up reasonably well, suggesting that the loaves were not as over-proofed as their deflation on transferring had suggested.

By time the bread had cooled, the crust was chewy with just a bit of crunch. (I did not follow my customary practice of drying the loaves in the cooling oven for a few minutes after they are fully baked.) The crumb was very well aerated. It had an aroma that seemed whole-wheaty, yet different. The flavor was excellent – complex and wheaty with some sweetness and more sourdough tang than I expected.


Wonderful bread. I want to make it again, but next time I'll flour the couche more heavily.

David


Matt H's picture
Matt H

I'm a longtime bread-lover and baker, and have been checking out the site for about a year now. What to post for a first entry on the amazing Fresh Loaf Bakers Blogs?

Whenever I'm invited to a potluck, I generally volunteer to bring the bread. This time, it was a friend's birthday. I asked my fiancé, "What kind of bread should I make?" while flipping through "The World Encyclopedia of Bread".

"How about this one?", I asked jokingly, pointing to a picture of the most complicated, ornate loaf I've ever seen. Needless to say, she thought it was a great idea, and couldn't be dissuaded. (She is also the type who will spend an entire Sunday afternoon trying to make perfect homemade "xiao long bao" or Shanghai soup dumplings, probably the hardest dish to get right in all of gastronomy.)

The result was our first Harvest Sheaf Loaf. The recipe called for 100% white flour, but I used about 1/2 whole wheat, and included some pre-fermented French-bread style dough. I love how self-referential this bread is: a wheat loaf made to look like a bundle of wheat. As you might expect, the shaping and sculpting is time-consuming. Best not to attempt solo!

Not knowing much about this bread, I did a bit of research on the web. It turns out that in England, they bake these for the harvest festival, and they often end up on a church altar. I also learned that they're popular with Wiccans. That's right, the old-time, mother earth, fertility goddess, witchcraft folks. There must be quite a few of them in the San Francisco area, so we're thinking of selling these on craigslist for next year's solstice! :)

We were so excited to eat it, that we never got a great photo after taking it out of the oven. And the mouse, poor fellow, got a bit deformed by oven spring! :(

I'd be curious if anyone else has tried one of these. It was fun to make, but once a year would certainly be enough for me.

Happy baking!

Matt

Snipping a sheaf

Harvest Festival Sheaf under construction


Harvest Festival Sheaf before baking


smasty's picture
smasty

I woke up this morning wanting to try making sourdough pancakes with my leftover starter.  I looked up the KAF recipe that people mentioned here, and saw that it used an overnight sponge.  I wanted to whip something out fast and simple, and spontaneous.  So...no sponge for me!  I love the result...light, fluffy (they rose quite a bit), healthy (well, the plate that is pictured is my husband's...mine was healthier).  I had some pumpkin in the freezer that went into the mix.  I don't have exact measurements because I was just tossing stuff in, but here goes: 

About 1/4 c. starter, cold from the fridge (just dump in a big glop)

about 3/4c milk (made from dry)

1 egg

about 1/2 t. baking soda

2 t sugar

about 1/4 c pumpkin

about 1/2 c whole wheat flour

1 packet stevia

Mix it all up until you have a batter (make adjustments if it's too thin or thick)....This made 5 pretty big cakes. 


thespencers06's picture
thespencers06

Hello all,

My Name is Michelle and I am new here. The past few weeks I have taken a shine to baking, especially yeast breads. I started making fresh pizza dough a while back but never did find the perfect recipe. I have searched thru many websites and tried more recipes than I can count. I started to become intrested in make some yeast rolls for a WV pepperoni roll craving of my husbands. Found a few ok recipes for yeast rolls but stumbled upon an italian bread recipe that I kinda liked. Then I hit buttermilk biscuits. We don't have a panera bread here like in FL and I had some asiago cheese I needed to use so I went in search of a copy cat panera bread asiago cheeese bagel recipe. That's when I found The Fresh loaf. I read in awe thru the handbook and started making a sourdough starter and some poolish. I have tried my hand first at a ciabatta. amazing! then today I made some asiago rolls, to die for. now I have a ocuple bagettes in the oven! I am amazed by the whole process and enjoying learning as I go. Plus my family is pretty happy about it too!


http://farm5.static.flickr.com/4059/4360127411_4a5d0ae67f_m.jpg here's some pictures of my fun in the kitchen

txfarmer's picture
txfarmer

This bread is inspired by a Japanses baking book (translated into Chinese since I don't read Japanese at all):《日本人气面包店天然酵母的美味面包物语》.Japan has a very exciting and innovative artisan bread baking scene, which heavily influences Taiwan, Hongkong, and most recently China. I am originally from China (live in Texas now), still keep a baking blog in Chinese (http://blog.sina.com.cn/txfarmerying), and am pretty closely connected to the ever growing Chinese baking community, so I am lucky enough to have access to some Japanese/Chinese bread baking books/resources. 


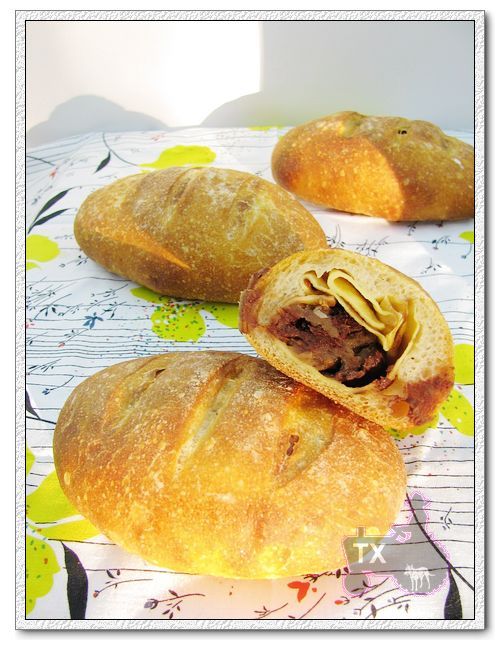
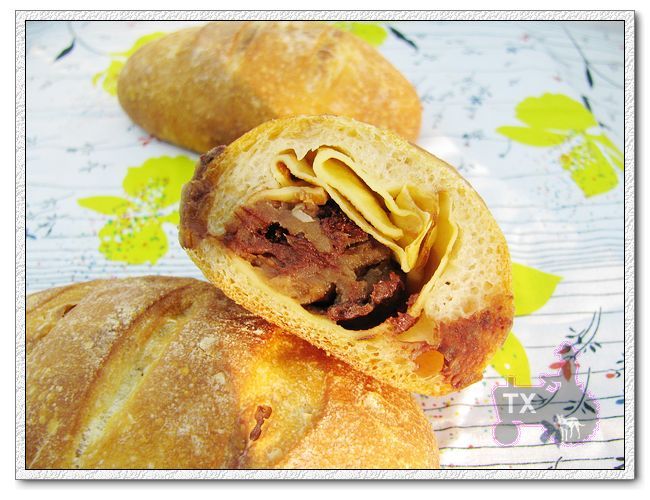
This bread is interesting in that it combines the classic lean sourdough bread and Asian style sweet buns in an unique way (typical of Japanese baking, which is very inventive and exciting). On the outside, it's a very typical sourdough baguette dough, on the inside, a sweet paste filling is first wrapped in a crepe, then wrapped in the dough, the bun is then baked on stone with steam just like a lean sourdough bread. In each bite, you get 3 different texture and flavor layered together: crusty and chewy baguette, soft crepe dough, then melt in your mouth sweet filling, unlike anything I've tried before! Since the recipes in the book are from a big-ish bakery in Japan, it's not practical to follow it in my US home kitchen, so I simply took the concept, and used my own formulas for the components, with satisfactory results.


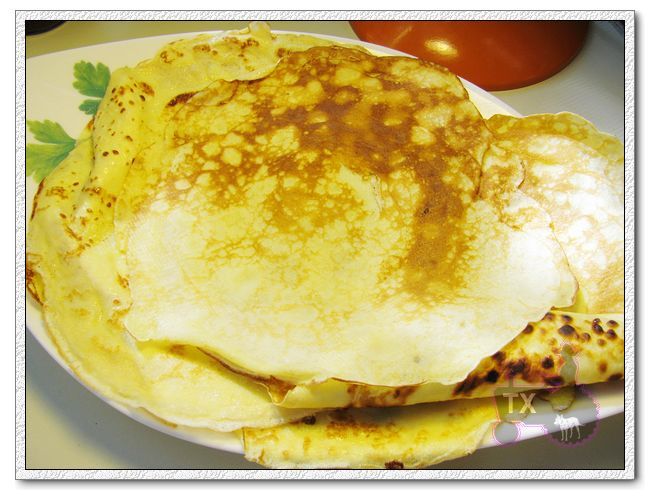
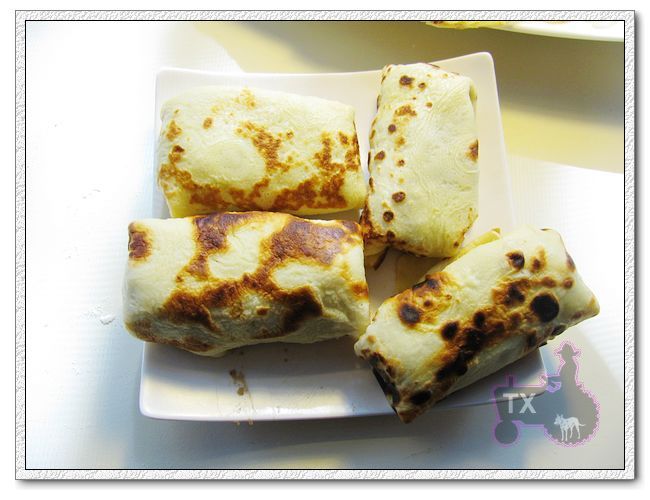
First, make the crepes, the following formula makes 6 to 7 crepes in my 10 inch pan, I only needed 2 for the buns, ate the rest with some nutella and bananas.

cake flour, 90g

eggs, 2

sugar, 10g

milk, 180ML

butter, 30g, melted

- mix everything together, cover and rest at room temperature for 1 hour or more, pour 1/4cup of mixture into a lightly oiled pan, fry on both sides until done.

Now the buns,  the dough is a typical baguette dough @ about 70% hydration, the following forumla makes only 4 buns (each around 140g), mostly because it's the last bit of my chestnut paste.


starter, 85g (100% hydration)

instant yeast, 1/4tsp

salt, 4.7g

bread flour, 190g

water, 120g


chestnut paste (lightly sweetened), 120g

bittersweet chocolate, 40g, chopped (I used baking chocolate pieces)

crepes, 2 (from recipe above)


- mix starter, flour, water, autolyse for 30min

- add salt and yeast, knead until gluten starts to develope. 3 minutes in my KA at medium speed.

- cover and fermentate at room temperature for 2.5 hours, with S&F at 30, 60, and 90 minutes. dough is very elastic and beautiful by the third fold, though still pretty wet.

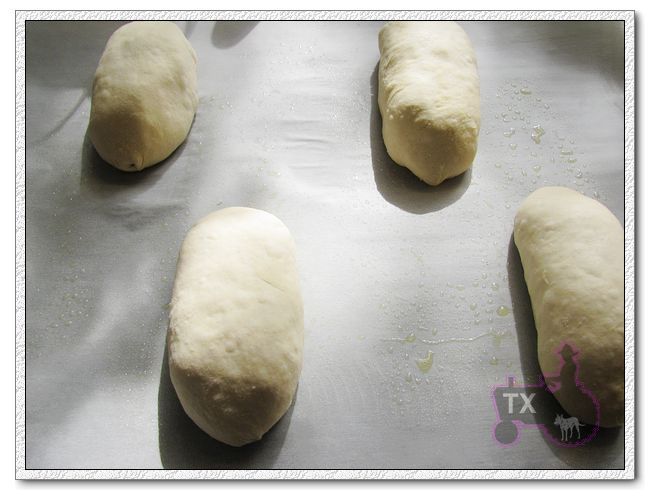
- divide into 4 parts, each about 100g. round and rest for 20 minutes.

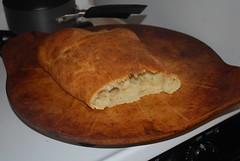
- take HALF of the crepe, wrap 30g of chestnut paste and 10g of chocolate inside

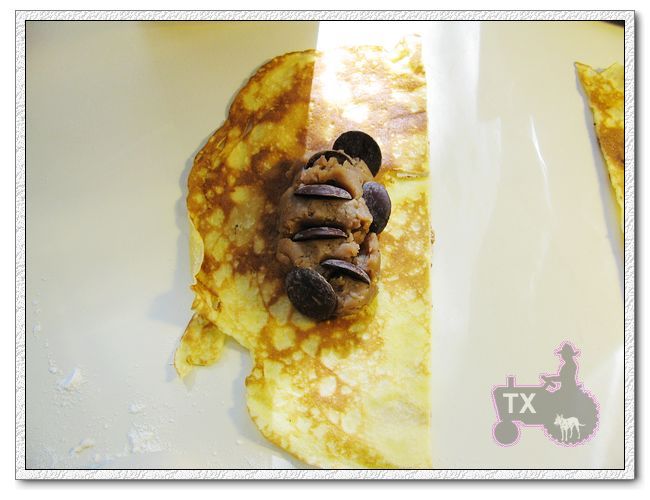
- take a piece of dough, press flat, and wrap the filled crepe inside, seal the seam, roll into a small batard

- slash on top, take care not of cut the crepe layer

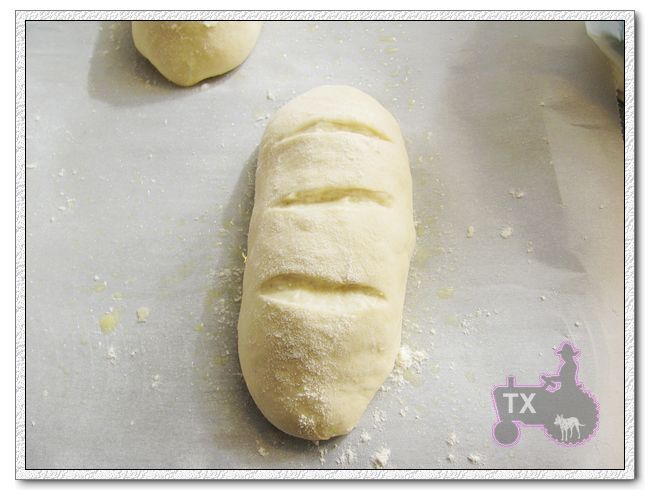
- proof for 1.5 hour @ room temperature

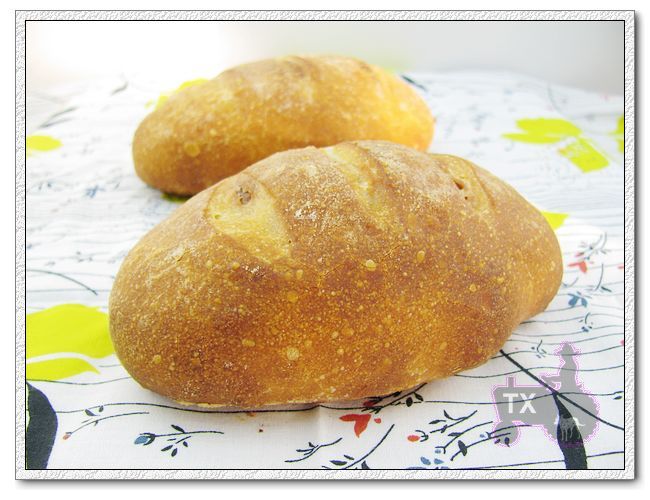
- bake on stone with steam, 450F, 30 minutes. I preheated to 550F, decreased to 450F after steaming. At 10 minutes, I took out the steam pan.

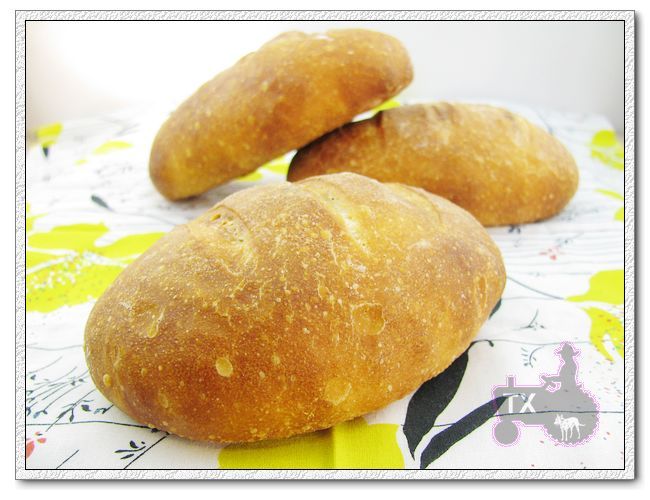
Makes a great snack or dessert. There are a lot more innovative recipes in that book, can't wait to try more. My last white wine chestnut sourdough also uses the same ingredients, yet it tastes vastly different from this bread, very interesting.


veganthyme's picture
veganthyme

Hello! I am new. I love this site! So many brilliant bread tips! In the few weeks I have lurked (my first encounter was in looking for a Kaiser Roll recipe)--I found Floyd's, made and loved it! I stuck around a bit longer in search of something else: pizza dough. Found Floyd's post on that, too. Loved it. Purchased the Bread Baker's Apprentice last week. I just made Peter Reinhart's Ciabatta yesterday. I know I am behind the curve on that one--the book having been published a while ago--but new to me! There was flour everywhere! But the crust, from the look of it and from what I've seen so far, seems to have baked up perfectly. My house smelled so good while it baked. I'm no professional baker by any stretch, but can honestly say, it was some of the finest bread I've ever had. I also have: The Bread Bible by Beth Hensperger and Healthy Bread in Five Minutes A Day (made roasted garlic potato bread from it) very good. I'm having trouble getting a photo to load to accompany this post. Sorry! But I have ciabatta pics on my blog! http://veganthyme.blogspot.com.

Doc Tracy's picture
Doc Tracy

I've been looking at this formula for a couple of weeks now. The mix of rye and whole wheat looks so darn inviting! Even the starter is 50/50. Finally, I get the chance to bake it!

This poor loaf was doomed from the start. I was so excited about this formula. To begin with, I had to retard the starter because I needed more than 12 hours (more like 24) between the last build and starting my final dough. So, I did as the book says and added salt, put it in a cool place. (outdoors) Ok, so it was nicely domed and looks good at this point, we're doing fine.

Next, I can't get to the final dough until 5pm rather than first thing in the morning as originally planned. So, it's actually more like 30 some odd hours for the poor starter. But, it's still looking pretty good at this point. I start final dough, look at recipe and count hours. Looks like I'll be baking at 10pm so maybe I'll just put it in the fridge or outside until morning.

Nope, last sentence in the recipe says "this dough does not lend itself to overnight retardation".

This must be the first bread I've ever made that "doesn't lend itself to overnight retardation. Oh well, 11pm is about my bedtime so that's fine. I can still do this. Onward we go. My third fold is 30 minutes late (on an every 40 minute schedule) because I have a 7pm meeting. Dough is looking really nice, goes from unbelievably extensible on 2nd fold to nice and strong but still stretchy on the third fold. Hasn't risen much though, hmmm.

9pm, still hasn't risen much and it should have already been shaped? Hmm, not too sure about this. I go ahead and give it a preshape, make it into a boule. Put upside down in a steel bowl, covered with plastic. 10pm, no rise. I'm not baking it this way! I would be baking a brick! Ok, now what? Stay up until it rises? The phrase "this does not lend itself to overnight rise" keeps going off in my head!!

Finally, at 11pm I take a "drop dead" look to make the final decision. It does not look ready. It's going to have to rise overnight. My life is not revolving around this loaf of bread! I stick it outside the door to the RV on a table. Should be about 45 degrees tonight, it will be totally "retarded" by morning.

Wake up and it looks very nice, ready to bake! Yeah!! Now, bought new pizza stone for the camper oven last week. I've had some problems with it. Burned a couple of loaves of Eric's Fav Rye but I moved the stone up to the next shelf so I think I have that solved. Last nights pizza was "so, so" but I think maybe the oven didn't preheat long enough. Now I'm going to try putting a loaf directly on the stone for the first time ever. I put the corn meal on the peel. Carefully shape my loaf into a nice "torpedo". Slash with the best slashes I've ever made. I even garnish with some poppy seeds. This is looking really good. My fanciest loaf ever. (except my braided Finnish pulla) Getting excited now!

I open oven, put peel in. Loaf sticks. Grab pastry knife. Push loaf. It squishes up. Folds over. Plops onto stone in a squished up mound. I try to unsquish the mound and push farther into the oven but it's stuck to the stone. Oh no!! Well, Maybe best thing is to leave it until it drys out and unsticks?

Mist oven for steam, close door. Open door to check. Bread has stuck to the door. Crap! Peel parts of bread off of door, try to push loaf back a little bit farther by squishing with pastry knife again.

Alright, nothing I can do now but wait and bake. 30 minutes later, I smell burned bread. I check and have a perfectly scorched loaf, insides are 170 degrees. I flip the loaf over and turn the oven off.

After about 50 minutes, bring the loaf out. Cut off the bottom with a bread knife. How sad! But, let me tell you that this bread tastes so good! The best sourdough I've ever made. I'm glad I didn't retard it any longer as it would have been too sour but as it is, perfection! Very chewy crust, dense but big holes. Complex flavor.

This will be my "go to" everday bread from now on. Eric's Fav Rye will be our sandwich bread and Hamelman's Oatmeal Cinnamon bread is the one I will make for my husband's treat. I will use this mixed flour bread to practice, work on technique. What a nice bread!

Now, about that stone. I think it's going to have to go. It's just too big for my little tiny oven. Back to the old cookie sheet solution until we're back in the house. I think I'll try pizzas on the grill this weekend sometime. For now, I'm already building starter for two more of these mixed flour miches to take to my parent's house on Saturday. Scheduling when I will build/bake these will be a challenge as I'm working a 12 hour shift tomorrow. Why does work always have to get in the way of our important hobbies?

CaptainBatard's picture
CaptainBatard


I am totally exhausted after packing and cleaning my house for the last three weeks in anticipation of perspective renters coming to look at it on Saturday....I can see the light end of the tunnel with my fingers crossed. One more day of cleaning and then a quick trimming of my sleeping garden and I can get to the real business at hand, taxes, getting a plane ticket, studying French, once again packing and of course, the weekly bread fix!

I want to really thank all the people at FreshLoaf for making this site what it is, a place to learn and exchange ideas about the one thing that brings us all together... the passion for flour, water and salt!

This weeks bread, MC's Gerard Rubaud Miche ala Shiao-Ping is probably the tastiest bread that I have made in my limited baking experience. I used to be a by the book Loafer, but that has all changed since I became aware of the talented baker here at The FreshLoaf and out in the Blogosphere who have expanded my knowledge and comfort zone. The Gerard Rubaud Miche with a whopping 80% hydration had me second guessing myself  the whole time, talk about comfort zone! Will it come together or will it remain the blob that came from the deep lagoon? I have tried several of Shiao-Ping's recent posts, so a wet dough was nothing new and I should of realized it would come together in the end. I followed her basic methodology with a few variations. I used a KA for a quick mix to get the dough into shape for a autolyse and poured it into wood bin to develop the structure with 5 sets of stretch and folds. At this point I thought the dough would yield to a good gentle shaping...but it had other plans! At this point I just laughed...looking down into the bin and said "You want to be difficult do you?" and remained calm. I had to remember that is was 80% hydration after all and to be patient. In the back of my mind I remembered a comment that MC made to Shiao-Ping about the way Gerard treats wet doughs....so I turned out the dough onto a floured surface and did several more gentle full S+Fs at 10' intervals and that was the ticket!  The rest of the process was uneventful, after an overnight rest in the frig., they went into a hot oven with plenty of steam. When they came out of the oven they began to sing and crackle...and oh.... the smells. I watched the crumb shrink as  the loaves cooled and the crackel pattern become more prominent like a crackle glaze pattern on a fine celandine porcelain vase. The taste was nutty, creamy and moist with a slight tang to the mouth. This is definitely one that will become a favorite.

Thank you Gerard, MC and Shiao-Ping for this wonderful bread.


                                                            "Heavenly....your bread put my head in the clouds..."


This is being sent to Susan@YeastSpotting


Pages

Subscribe to Recent Blog Entries