The Fresh Loaf

A Community of Amateur Bakers and Artisan Bread Enthusiasts.

Recent Blog Entries

darren1126's picture
darren1126

I've read that sugar will "feed the yeast"... I'm not exactly sure what that means. How does sugar affect the rise process, density of the bread, etc.. If I add honey to a recipe that calls for sugar, should I reduce the amount of sugar? Also, does milk and butter cause bread to be more dense? What's the benefits to adding milk and butter? I've made bread with and without and I don't notice too much of a flavor difference. The biggest difference I find is in the texture.


Thank you!


Darren

dmsnyder's picture
dmsnyder

Hansjoakim described this gorgeous rye bread in his blog last Fall, and I made Hansjoakim's Favorite 70% Sourdough Rye myself in September. I made it again today, inspired by the delicious-looking ryes Mini and Eric have showed us recently.

This time, I made a few changes: I used KAF First Clear flour rather than AP flour. I mixed the dough a bit longer (6 minutes). And I proofed the loaf seam-side down in the brotform, expecting the folds to open up during baking. As you can see, I must have sealed the loaf too well and, perhaps, proofed it too long. The result was an intact loaf with no bursting at all. And I got pretty good oven spring, too. Sometimes you can't get those attractive "imperfections," even when you try for them.

The crust was pleasantly chewy. The aroma of the cut bread was earthy-rye with a definite subtle sourness. The crumb was moist and tender. The flavor was earthy-sweet. It was wonderful, thinly sliced with cream cheese and smoked salmon for breakfast. It was also good open-faced with a bit of mayo and smoked turkey breast, accompanied by a bowl of lentil soup, for lunch.

David

davidg618's picture
davidg618

I finally invested in a new baking stone, one that fills an oven shelf with only a couple of inches to spare. Now I can make baguettes that approach 18" to 20" in place of the stubby ones I baked before. Consequently, along with sourdough, sticky buns, foccacia, and getting familiar with spelt, I've been baking my own baguette formula that has borrowed heavily from Anis Bouabsa's formula and especially his process, and, in the most recent batch, Peter Reinhart's pain a' l'ancienne procedures. I've made this formula three times, tweaking a little each time, not the ingredients, the procedures. I've nicknamed them "Overnight Baguettes.

Formula for 1000 g finished dough

              All purpose flour    575g    100%

              Water                   414g      72%

              Salt                        12g        2%

              Instant Yeast         1/4 tsp.   ???

I mix all the dry ingredients together in a wide bowl, and add the water. Using a plastic dough scraper I incorporate the water into the dry mix, cover and rest it for one-half hour.I turn the dough out onto a very lightly dusted board and French fold until dough passes the window pane test. Chill (details follow: I tweaked here.). Remove from chiller. Bring to room temperature (details follow: tweak #2). Preshape, rest, shape, and final proof. Preheat oven to 500°F. Pre-steam oven. Load slashed loaves reduce temperature to 450°F immediately. After ten minutes remove steam source (if you can do it safely), vent oven and finish baking.

I did all my mixing with ingredients at room temperature (low seventies-ish) for the first two batches. For the first batch, ala Bouabsa, I left the dough in the refrigerator 21 hours @ 38°F. For the second batch I placed it in our wine closet @ 55°F for seventeen hours. For both batches I did two stretch-and-folds after the first 50 and 100 minutes. These two S&F's leave the dough very elastic and smooth (I think it feels "silky").

In both cases, after I turned out the chilled dough (again, following Bouabsa) I immediately divided the dough into three equal amounts, preshaped, and let the dough rest for one hour.

The first batch's dough increased about one-and-a-half its original volume in the refrigerator. Despite dividing and resting the dough was still chilled when I final-shaped it, and final proofing took two hours and fifeteen minutes.

The second batch's volume tripled in the wine closet (I worried about losing any chance of oven-spring). The dough was particulary puffy after resting an hour (more oven-spring worry). Final proofing took 90 mins. My worries were dispelled in the first ten minutes in the oven. Both batches exhibited good oven-spring, but the flavor of batch #1 was distinctly more bland then batch #2. The crumb of both batches was open, light, and slighty chewy.

I was generally happy with both batches, but the second batch's flavor won out. Whatever flavoring chemistry goes on in retarded dough appeared to work harder at the wine closet's elevated temperature.

Despite the oven-spring experienced in batch #2, I was still worried I was setting myself up for future failures letting the dough triple in volume during its retarded proof at 55°F. I recently broke down and bought Peter Reinhart's  "The Bread Baker's Apprentice". His anecdote about capturing the hearts and minds of his more reluctant students when they are first introduced to pain a' l'acienne dough pushed me to skip to its formula. I was intrigued by his "shock retardation" using ice water to mix the dough.

I mixed the third batch's dough with ice water, and also placed it in the wine closet during its autolyse rest. I checked the dough a couple of times after performing the two S&F, and was a little worried by almost no apparent action. Encouraged by the few little bubbles I could see through the bottom of the plastic container I went to bed, but set the alarm to remove the dough after fifeteen hours chilling. The dough was just short of doubled when removed.  Following Reinhart's directions I let the dough sit, undivided at room temperature (high sixties-ish) for two hours. When I got out of bed the second time the dough was well doubled and the top of the dough was stretched in a couple of places by large gas bubbles. I liked what I saw, and felt.

I divided the dough, preshaped, and let it rest twenty minutes. Following, I shaped, and final-proofed for ninety minutes (I use a poke test to decide proofing status, but I keep track of time too.) Baking proceeded as described above.

The results:

We are delighted with the flavor, and crumb! This is going to be our "go to" baguettes: no more tweaking. 

David G


reyesron's picture
reyesron

One night my wife and her friend had dinner in a local French restaurant.  The owner/chef came out to speak with them about their dinner and offered desserts.  My wife mentioned to him that I had been making Madeleines that night before she left.  The chef got very enthusiastic and took my wife and her friend on a tour of his kitchen, offering them free desserts and sending a suggestion home to me that I should try to make canneles (kan-nuh-lay), which he did not make.  I started researching canneles online and not only found many different recipes with slight variations, but also a rich history of folklore and fact, but, geez, I needed yet another specific mold to make them.  The options for molds were either the tin lined, individual copper molds which ran about $12 each, or the silicone mold which was over $20 but had 8 openings.  I was skeptical of the silicone molds having never used them, but bought them anyway.  About a week later, they arrived.

I like watching youtube for creations as watching holds my attention a lot better than reading, however, there weren't alot of videos to watch, and they were all pretty much in French, which I don't speak.  As things French, you can either make them easy, or you can make them hard, hard being individual cups lined with bees wax, so I chose the easy way out.  I looked online for recipes and found what looked like a fairly simple one.  I would like to cite the blogger that I copied it from but I haven't been able to relocate the site again after having written it down.  Basically, its a custard recipe, baked in a mold giving it a unique outcome.  My first attempt using the recipe was a failure because the cooking times and temperatures simply didn't work.  It also didn't help that I'd never had these before, ever, even though I've been to France on a number of occasions.  Using the posted directions the first time out, they did not cook enough, they didn't achieve the proper color, and internally, they weren't done.  Lastly, they rose of their molds, stayed out,  and didn't really look like they should.  A second reading of a different recipe had me cooking them 100 degrees hotter, but that also created problems.   Before I get to the actual recipe I will say that no matter what the temperature, they want to cook themselves outside of the mold.  They rise out of it, and lean like the leaning tower of Pisa.  It says in recipes that they'll go back down, but they haven't for me.  Perhaps its the silicone molds, or perhaps its the temperature, I don't know.  What I do know is that if I take them out of the oven near finish time, and trick them back down, then finish them, they will mostly come out right.  You can see the creases on my picture.

2 Cups of milk  Heat to a simmer, adding

3 tablespoons of butter.  Chill the milk down to warm, setting the pan in cold water before combining.

In a mixing bowl, whisk

2 eggs, plus 3 egg yolks, add

1 cup of sugar

3/4 cup all purpose flour

1 tsp vanilla extract, or 1 vanilla bean split and warmed in the milk, then scrape the pulp out, however, I went with the extract.

3 tbsp of dark rum.  Then add the chilled milk mixture, whisking in very well. 

Cover with plastic wrap, chill overnight.  The next day, before filling molds, give it a good whisking.

Fill each mold almost to the top, and place the mold on a cooking sheet with a lip.  Place into the oven, preheated to 400 degrees, and let it cook.  I put a little melted butter in the mold first.  Cooking times will vary between 30 and 45 minutes.  As they begin to form, you'll see them rising out of the molds.  As I said before, several places write that they'll fall back in.  Mine haven't, so I remove it from the oven, and I take a wooden spoon, to gently push in the sides, and another, to push it back down.  Once they're down and they stay down, I simply wait for the crowns to turn a fairly dark brown. 


bakinbuff's picture
bakinbuff

Today's baking was one basic sourdough batard and a yeasted mostly white sandwich/toast loaf.  Very pleased with the white yeasted loaf, not overly thrilled about the batard, only because my starter's sourness has dropped off of late (will have to work on that) and the crumb was fairly tight, which was unexpected.  I attribute it to the hydration being too low.  Nonetheless, a nice tasty loaf (and a more delicate sour taste seems to be more to the family's liking, I am the only one apparently, who likes it good and sour).  The white loaf is excellent, very fluffy and light, and I managed to sneak half a cup of fresh ground whole wheat into it.  Looking forward to tomorrow's loaf (rising in the kitchen now), it is a Green olive, rosemary and thyme sourdough.


Sourdough


bakinbuff

txfarmer's picture
txfarmer


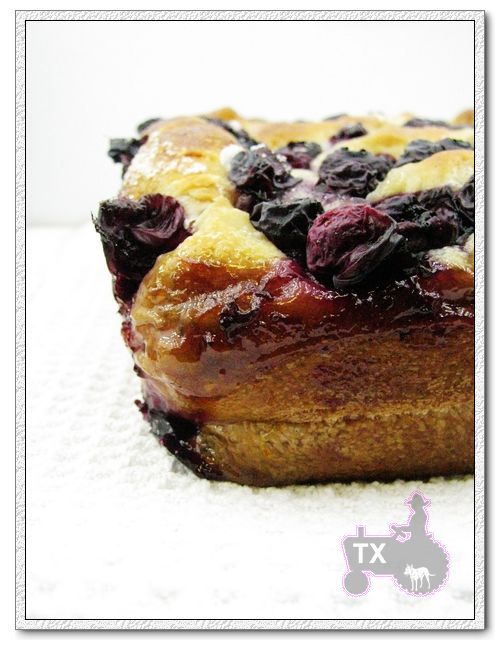
I have seen Schiacciata recipes from several books, as a big fan of savory focaccia, I've always wanted to try it. Recently we bought a lot of fresh blueberries on sale, so I combined several recipes, used blueberries instead of the usual concord grapes, added some rosemary flavor, and here's a beautiful schiacciata (i.e. sweet focaccia) that's delicious too. 


- The night before, make sponge:

instant yeast, 1/2tsp

bread flour, 125g

water, 160g


mix well, cover, and sit at room temperature (70F) for 12 to 24 hours. I used it after 14, it had reached its max volume then, was very bubbly.


- Baking day:

sugar, 3tbsp

instant yeast, 1.25tsp

water, 205g

bread flour, 345g

salt, 1.5tsp

olive oil, 5tbsp (3tbsp for the dough, the rest for brushing the top)

fresh rosemary, 1 bunch

blueberries, 1lb

sugar for spreading on top, 3tbsp

honey for spreading on top, to taste


1. Put rosemary in olive oil, heat, cool to room temperature and soak for about an hour, discard rosemary.

2. Mix 3tbsp of sugar, yeast, water, flour, salt, 3tbsp of oil, sponge, autolyse for 20 minutes. Knead well until gluten is strong. The dough is pretty wet.

3. Bulk fermentation for 90 to 120 minutes, until double. (If it's not very well kneaded at step 2, some stretch and fold would be necessary. I prefer my focaccia crumb to be fine and even, so I kneaded quite a bit.)

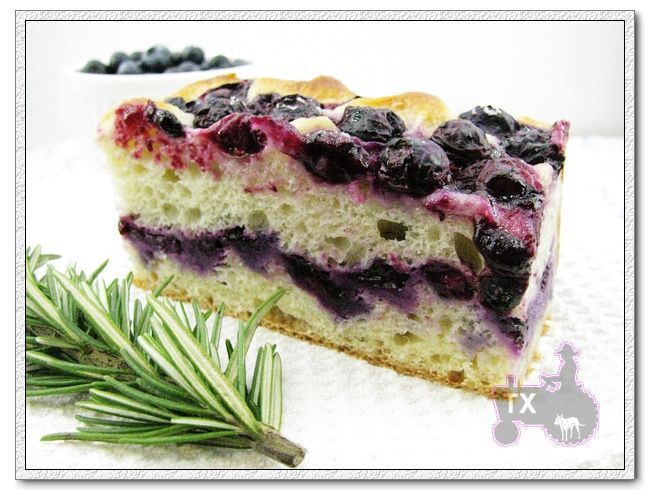
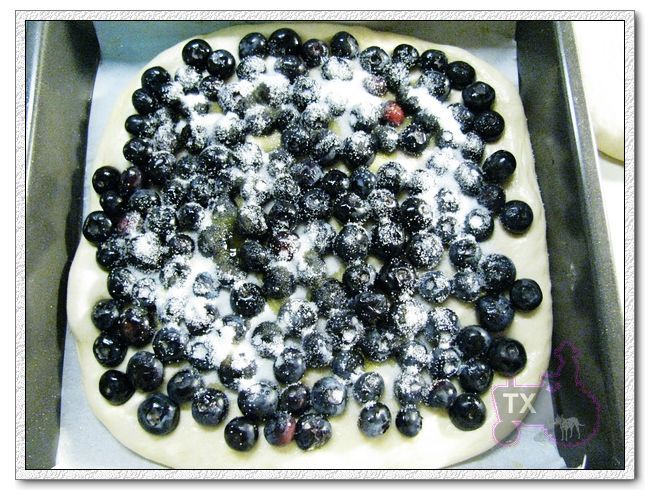
4. Divide into 2, round and rest for 10 minutes. Take one piece and roll it out to about 9X9 inch, put into a prepared 9inch square pan. (I like my focaccia thicker, so I used this pan to give it a square shape and limit its spread, of course you can use any other pan or just a large pizza pan to let the dough spread out more.)

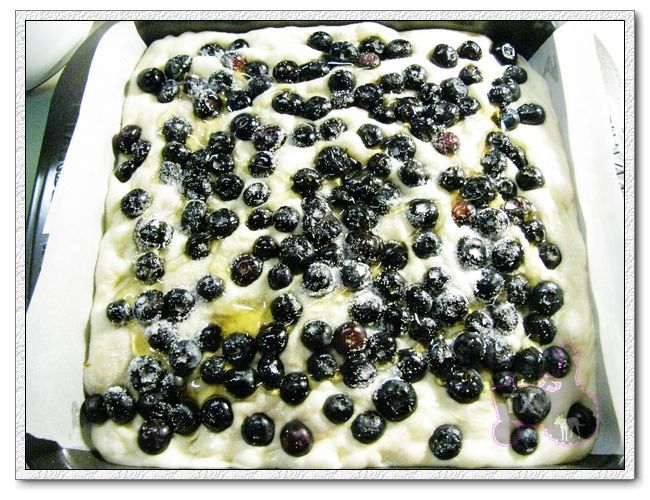
5. Spread half of the blueberries and 2tbsp of sugar on top, use fingers to press the berries down into dough, ideally break up the berries a little

6. Roll out the other piece of dough and cover on top, pinch together the seams

7. Proof until double again, 30 to 60 minutes. Use fingers to dimple the dough again, make it spread to fill the pan. Spread the other half of blueberries and 1tbsp of sugar on top, press down to make sure the berries sit into the dough, wont' fall off during baking. Drizzle honey on top.

8. Bake at 400F for 45 minutes.


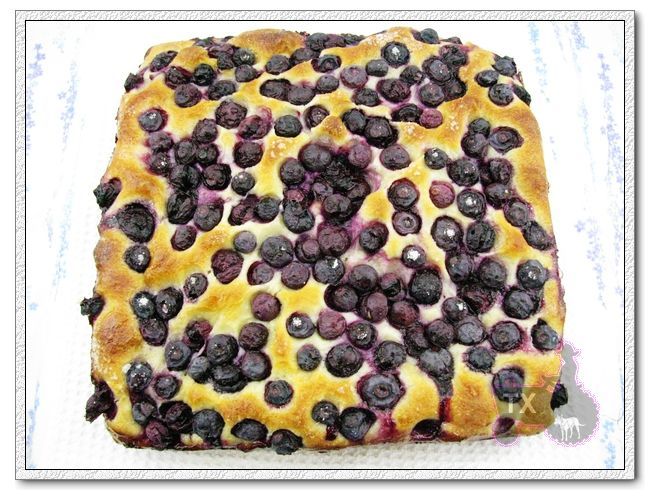
I love how the blueberries got baked "into" the dough, it's like making blueberry jam and the bread in one step! I like the crumb, soft, open with even holes, if you prefer your foccacia to have big irregular holes, you might want to knead less, fold more, and dimple a bit less in the end.

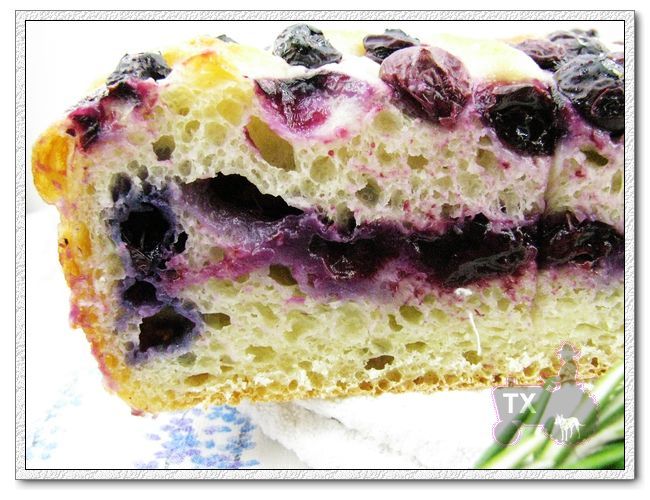
What elevates the bread from good to great is the rosemary! Combined with olive oil, it provides a savory background to the sour and sweet taste of blueberries, very Italian, very delicious.

With the amount of sugar and honey I put in, the bread is not that sweet, mostly from the natural taste of blueberries, you can certainly use more sugar/honey if you like it sweeter. I am so happy with the result I want to make the mroe traditional version too, using concord grapes and raisins.

Doughtagnan's picture
Doughtagnan

 After discovering the delights of home baking sourdough well over a year ago there is one recipe I love to bake as it always provides consistent results and seems to be happy with whatever flour mix I have in the cupboard.  The recipe is based around the sourdough section in The River Cottage Bread Handbook by Daniel Stevens plus some tips from Dan Lepard. Hmmm a lot of bakers seem to be called Dan. 

The night before baking I mix 250grms flour, usually at least 200g strong or very strong white, the rest a mix/combo of wholemeal, spelt or rye depending on what's festering in the cupboard, along with 320-350ml of warm water and a couple of good heaped tablespoons of rye starter, mix well and leave to brew overnight.

The next morning I am greeted by a nice lively looking, bubbly bowl which always gives me confidence as it confirms all is active and lives! I then add the remaining 300grms of flour which once more is usually a mix of whatever, but with at least -200-250grms or so of the white stuff.  I always add a lug of olive oil and just a few twists of the salt mill (high BP!) then mix and knead for 5-10mins, leave in a oiled bowl for an hour or so then depress and lightly knead/stretch a further 3-4 times hourlyish (if I remember) then shape, dust with rye flour & prove in a linen lined basket for 2-3 hours in  warm spot (nr the boiler!) 

When ready to bake, I whack the oven on  full, turn the beastie onto some baking parchment (non-stick - I learnt from using the wrong stuff!!) score/slash and lift into in my large Le Cruset cast iron casserole, which is then put into the cool oven and baked for 45mins plus a further 5mins or so with the lid off to finish browning, the results are always fine.

It's great to try the recipes on The Fresh Loaf, last week I did the Dan Lepard Walnut bread - a brilliant recipe and one I am certain to do again, but it's always nice to do the one you know best and can do without even looking at the recipe. Oh and here are some pics of my last bake..........


merlie's picture
merlie

I was interested to read the different recipes found for Malt Bread. On trips back to England I have always brought back loaves of this yummy sticky bread. I kept the list of ingredients from the wrapper of one of these loaves and after some trial and error have come pretty close to the real thing! At the time I had a bread machine so made it in that - but now make it like any other bread. I believe the most important ingredient is the diastatic malt flour - this is what makes it sticky. I have not been able to find caramel colouring since I recently moved to BC. (anyone know where it is available in the Okanagan Valley ? )

MALT BREAD

7/8 cup water + 1 teaspoon caramel colour

1 tablespoon Vegetable oil

2 tablespoons golden corn syrup

1 teaspoon salt

2 3/4 cups unbleached flour

1 generous tablespoon Diastatic Malt Flour

1 tablespoon powdered malt extract

1 tablespoon dried whey powder

1 1/2 teaspoons dried yeast

1/2 to 3/4 cup raisins

This of course is the order the ingredients would go into the bread machine. I now make it with my Kitchenaide letting the yeast rise in the warmish water with a teaspoon of sugar before adding the rest of the ingredients.                                                                                                          merlie

breadbakingbassplayer's picture
breadbakingbass...

Hey All,

Catching up again on my blogging here and post some pics of some ciabatta and country miche from my 1/21/10 bake.  I'll post recipes if requested...

Enjoy!

Tim

Ciabatta Recipe:

Ingredients:

60% AP Flour (674g)

35% Bread Flour (674g)

3% WW Flour (34g)

2% Rye Flour (22g)

75% Water (842g)

2.2% Kosher salt (24g)

10% Firm Sourdough Starter (60% Hydration) (112g)

1/2 tsp Active Dry Yeast

Makes 2100g dough.

Directions:

Night 1:

11:10pm - Mix all ingredients into shaggy dough with no dry bits, transfer to oiled plastic bin, cover, autolylse for 30 mins.

11:40pm - Turn dough in bin, cover.  (Do not use extra flour.  Use lightly wet hands)

12:10am - Turn dough in bin, cover.

12:40am - Turn dough in bin, cover.

1:10am - Turn dough in bin, cover /refrigerate overnight (40F)

Morning 2:

6:45am - Remove from fridge, turn out on to floured surface, divide into 4 and stretch out to approx 15”-16”, proof on to well floured linen couche, cover with cloth towels and plastic, proof for 1 hr.  Arrange baking 2 stones on separate levels (1 one space from bottom, 1 two spaces down from top, and the long side of the stone should be front to back) and steam pan in oven, preheat to 550F with convection. (I use an aluminum loaf pan filled with lava rocks for my steam pan)

7:55am – Gently and quickly transfer loaves to a peel or flipping board, place directly onto stone in oven.  When all the loaves are in, Add 1 cup of water to steam pan, close oven.  Turn down to 450F with convection and bake for 12 minutes.  Rotate, turn down to 425F with convection and bake for another 13 minutes or until internal temp reaches 210F.  Cool completely for about 2-3 hours before cutting and eating...


Country Miche Recipe:

Ingredients:

70% AP Flour (504g)

25% WW Flour (180g)

5% Rye Flour (36g)

5% Wheat Germ (36g) 

85% Water (612g)

2% Kosher salt (14g)

25% Firm Sourdough Starter (60% Hydration) (180g)

1/8 tsp Active Dry Yeast

Makes 1562g dough.

Directions:

Night 1:

11:15pm - Mix all ingredients into shaggy dough with no dry bits, transfer to oiled plastic bin, cover, autolylse for 30 mins.

11:45pm - Turn dough.

12:15am - Turn dough.

12:45am - Turn dough.

1:15am - Turn dough/refrigerate overnight

Morning 2:

6:40am - Remove from fridge, divide into 2, preshape, rest 20 minutes.

7:00am - Final shape, proof in linen lined baskets, place basket inside plastic bag for 2 hours.

8:40am - Arrange baking stone and steam pan in oven, preheat to 550F with convection. (I use an aluminum loaf pan filled with lava rocks for my steam pan)

9:00am - Turn boules onto peel, slash as desired, place directly onto stone in oven.  Add 1 cup of water to steam pan, close oven.  Turn down to 450F with convection and bake for 22 minutes.  Rotate, turn down to 425F with convection and bake for another 28 minutes or until internal temp reaches 210F.  Cool completely for about 3-4 hours before cutting and eating...


breadbakingbassplayer's picture
breadbakingbass...

Hey All,

Just wanted to catch up on my blogging here and post some pics of some 80% WW bread and ciabatta from my 1/19/10 bake.  I'll post recipes if requested...

Enjoy!

Tim

Ciabatta Recipe: http://www.thefreshloaf.com/node/16361/12210-ciabatta-and-country-miche

80% Whole Wheat Bread Recipe:

Ingredients:

80% WW Flour (1014g)

20% Bread Flour (254g)

85% Water (1078g)

2.2% Kosher salt (30g)

8% Firm Sourdough Starter (60% Hydration) (100g)

1 1/8 tsp Active Dry Yeast

Makes 2500g dough.

Directions:

7:30pm - Mix all ingredients into shaggy dough with no dry bits, transfer to oiled plastic bin, cover, autolylse for 30 mins.

8:05pm – Knead dough using French fold method 8x, cover, rest.  (Do not use extra flour.  Use lightly wet hands)

8:35pm - Turn dough in bin, cover.

9:05pm - Turn dough in bin, cover.

9:35pm - Turn dough in bin, cover.

10:15pm – Divide into 4, preshape.

10:30pm – Divide into 4, final shape, place into linen lined baskets, proof 45-60 minutes.  Arrange baking 2 stones on separate levels (1 one space from bottom, 1 two spaces down from top, and the long side of the stone should be front to back) and steam pan in oven, preheat to 550F with convection. (I use an aluminum loaf pan filled with lava rocks for my steam pan)

11:30pm – Gently and quickly transfer loaves to a peel, slash as desired, place directly onto stone in oven.  When all the loaves are in, Add 1 cup of water to steam pan, close oven.  Turn down to 450F with convection and bake for 20 minutes.  Rotate, turn down to 425F with convection and bake for another 18 minutes or until internal temp reaches 210F.  Cool completely for about 3-4 hours or overnight before cutting and eating...


Pages

Subscribe to Recent Blog Entries