The Fresh Loaf

A Community of Amateur Bakers and Artisan Bread Enthusiasts.

Recent Blog Entries

ehanner's picture
ehanner

Yesterday I made 2 loaves of my favorite rye with caraway seeds and bread spices. I decided to skip the sugar and swap with Black Strap Molasses. It was delicious as usual and the party I brought it to devoured most until the puppy got his way when no one was watching. I'll take that as a complement I guess.

After staying up last night watching the late coverage of the Olympics (3:30) ugh, the last thing I did before closing my eyes was assemble the rye sour for the next day. Today I re-hydrated some dry onions in hot water and using the water from that process, mixed a batch of Onion Rye. The crust appears dark, partially because I baked it a little hard to crisp the crust and partially due to the dark sesame and poppy seeds. I use my everything seed mix usually reserved for bagels. There are garlic chips, salt white and black sesame and poppy seeds. All held in place with an egg wash.

This makes a great sandwich if it lasts that long. I gave the second loaf to a helpful neighbor for dinner.

maryserv's picture
maryserv

In the ever-constant quest for a sandwich bread my picky 7 year old will eat, I search and try a lot of breads.  Yesterday I came upon Farmhouse White from A Year in Bread blog.  It sounded good to me, so I entered the info into my sourdough converter (first time using it) that I downloaded from Mike on SourdoughHome.com. I made smaller loaves and ended up with 4 so, so oh darn I made that one cinnimon swirl bread.  My starter is 100% hydration started and I put in about one cup of whole wheat flour and then 5 tsp of Vital wheat gluten since I was using Gold Medal AP Flour along with the C of WW.  I almost broke my Kitchenaid while mixing the dough and had to move to a stretch and fold form of kneading before bulk fermentation for a couple of hours.  I then shaped the loaves and covered them with a damp cloth in the fridge for a slow rise over night. 

So, I start the quest for a good, high-powered higher capacity dough mixer.  But, the bread turned out GREAT!

Most of the content is Susan's from the blog and all of the pictures are hers.  I have included hyperlinks to the 2 websites to which I refer.  Enjoy!

Susan's Farmhouse White Sandwich Bread - from A Year in Bread
Makes 3 loaves, approximately 1-1/2 pounds each

Ingredient US volume Metric Volume US weight Metric
organic all-purpose flour 4 cups - 940 ml - 1 lb, 4 ounces - 566 grams
instant yeast** 2 Tablespoons - 30 ml - 22 grams
granulated sugar 2 Tablespoons - 30 ml - 28 grams
canola oil 2 Tablespoons - 30 ml - 30 grams
warm milk (or water) 4 cups - 940 ml - 2 lbs - 908 grams
organic bread flour (approximately) 6 cups - 1,410 ml - 1 lb, 13-1/8 ounces - 825 grams
salt 1½ Tablespoons - 22 ml - 3/4 ounce - 22 grams

**To bake an even better loaf, you can reduce the amount of yeast to 1½ Tablespoons (or even 1 Tablespoon). This will make your dough rise more slowly, so you'll just need to increase the fermenting and proofing times. You can reduce the yeast in pretty much any bread recipe—a lot of bakers go by the formula 'half the yeast and double the rising time.'

MY Changes were: 

0.43 Kilos Starter      
0.56 Kilos Milk or water    
0.27 Kilos all purpose White Flour  
0.71 Kilos Bread Flour (or high protein flour)
0.02 Kilos Salt      
0.02 Kilos Sugar      
0.02 Kilos Canola Oil      
2/3 Cups Dried mild powder can be added to the recipe
May add vital gluten to AP flour to increase protein/glutein of 
flour at 1.5 tsp per C of AP flour (especially if using a wholemeal) 


Mixing and fermentation


Autolyse
Autolyse (pronounced AUTO-lees and used as both a noun and a verb) is a French word that refers to a rest period given to dough during the kneading process. When making your dough, mix together only the water, yeast, flour, and grains until it forms a shaggy mass. Knead it for several minutes, and then cover the dough and let it rest for 20 minutes. (I simply leave the dough on the floured counter and put my wooden bowl over it.) During this time, the gluten will relax and the dough will absorb more water, smoothing itself out so that it is moist and easier to shape. After the autolyse, knead the dough for several more minutes, mixing in any other ingredients such as herbs or nuts or dried fruit.

In a very large bowl, stir together the all-purpose flour, yeast, and sugar (I use a wooden spoon). Make a small well in the middle of the flour mixture and pour in the canola oil and then the milk. Mix well, then continue to stir vigorously, slowly adding 1 cup of the bread flour at a time, until you've added about 5 cups, or until you have a soft, slightly sticky dough; this should take several minutes.

Turn the dough out onto a floured surface and knead for about 6 or 7 minutes, adding more flour as necessary to keep the dough from sticking to your hands or the work surface.

Place the mixing bowl over the dough, and let it rest for 20 minutes. This rest period is called the autolyse.


Remove the bowl, flatten out the dough with your hands, and sprinkle about half of the salt over it. Begin kneading the salt into the dough. After a few turns, sprinkle on the rest of the salt and continue to knead for 5 to 7 minutes, until the salt is completely incorporated and the dough is soft and smooth.

Sprinkle flour in the dough bowl, place the dough in it, liberally dust it with flour, and cover it with a damp tea towel (not terry cloth, as it will shed lint on your dough). Or put it in a straight sided plastic container with a snap-on lid and mark the spot on the container that the dough will reach when it has doubled in volume.

Set the dough somewhere that is preferably between 70°F and 75°F until it has doubled in size, about 60 to 75 minutes. Ideally, the dough should also be between 70°F and 75°F. It's fine if your dough is cooler; it'll just take longer to rise and will end up even tastier. It's easy to check the temperature of your dough and ingredients with an inexpensive instant read thermometer.

When the dough is ready to be shaped, you should be able to push a floured finger deep into it and leave an indentation that doesn't spring back. Unless your dough is rising in a straight-sided container, it can be difficult to judge whether it has "doubled in size" which is the guideline most recipes use. I find the finger poking method to be more reliable, though lately I've been letting all my doughs rise in plastic containers.

Shaping and final rise (proof)
Turn the risen dough out onto a lightly floured work surface, flattening gently with your hands to break up any large air bubbles. Divide the dough into three equal pieces.

Shape the dough into loaves and dust the tops with flour. There are dozens of ways to do this; for the way I like to do it, check out this post on how to shape dough into sandwich loaves. Place loaves seam side down in greased loaf pans. I like my sandwich breads to be tall, so I use smaller loaf pans. I can't say enough good things about these commercial loaf pans from Chicago Metallic. They call this size a 1-pound loaf pan, and it measures 8-1/2 inches x 4-1/2 inches and is just under 3 inches tall. For the price of a few loaves of bread, they're definitely worth the investment—and with a 25-year warranty. Chicago Metallic also makes this larger 1½ pound size pan for those of you who prefer a wider, shorter loaf.

Cover the loaves with a damp tea towel and let them rise for 45 to 60 minutes. When you lightly poke the dough with a floured finger it should spring back just a little.

If you let the loaves rise too long, they may not have enough energy left to rise once they're in the oven--and they may even collapse. I was always so afraid this would happen that for years I unknowingly under-proofed my loaves of Farmhouse White.


While the bread was still delicious, you can see that the dough had so much 'oven spring' that it basically blew apart the side of the loaf. I finally started letting the loaves rise a little longer and was rewarded with the more evenly shaped and visually appealing bread that you see in the top two photos.

Bake at 375° for 35 minutes or until the loaves are golden brown and the bottoms sound hollow if tapped. Remove immediately from pans and let cool on a wire rack. Try to wait at least 40 minutes before cutting into a loaf. Store at room temperature or freeze in zipper freezer bags. Make sure loaves are completely cooled before sealing in bags.

Update: I've started baking all of my pan loaves on a heated baking stone (in order to simulate the ceramic hearth deck of my 7-foot wide commercial deck oven in the someday-bread-bakery-to-be), and the results have been wonderful. The bottoms of the loaves are nice and evenly brown, and I think that extra initial burst of heat makes the loaves end up even taller. Just like with pizzas and freeform loaves, you need to preheat your stone so that it's nice and hot when you put the bread in. Since Farmhouse White bakes at just 375°, 30 to 45 minutes is usually enough.

cpc's picture
cpc

Today I baked the Mixed-flour miche from Hamelman's Bread.  I really like the Miche Pointe-a-Calliere, and this bread seems similar, so I wanted to try it.  I stuck to Hamelman's instructions, except I increased bulk fermentation to 3 hours (3 folds at 45 minute intervals) because my bulk fermentations always seem to take longer than the times given in Bread.  Final fermentation was 2.5 hours.  I steamed the oven as usual after putting the loaf in (by pouring hot water into a hot frying pan on the bottom rack), but also put a roasting pan over the bread for the first 15 minutes to try to keep it in a moist environment and encourage a thinner, crispier crust.

The crust seems thinner than on my previous miches, which I attribute to the roasting pan.  Like my previous attempt at the Miche Pointe-a-Calliere the crumb seems a bit less open than it ought to be.  Tastewise, I think the mixed flour miche has a bit more sour tang than the Point-a-Calliere.

I also tried a Rubaud-inspired no knead bread this week (sorry, no photos).  I followed the standard NYT no knead formula, but used the same mix of flours as the Gerard Rubaud formula.  I omitted the yeast, and added 16 grams of 100% hydration whole wheat starter.  (I reduced the amount of water and whole wheat flour accordingly).  It produced a loaf with an intense sour flavour that overwhelmed all the other flavours in the bread.  This was a fun experiment, but I'm not sure I would recommend it.

SylviaH's picture
SylviaH

This is a very simple recipe 'White-Wheat Rolls' from Maggie Glezer's book Artisan Baking!  Great easy recipe for using up that little extra sourdough.  I made bun shaped rolls using King Arthur Organic White Wheat and King Arthur All Purpose Flour.  I hand mixed the dough using stretch and folds.  Adding sesame seeds and poppy seeds with the suggested sourdough gave nice flavorful buns with a crispy thin crust and a nice chew...great for sandwiches.  I doubled the recipe and also have 2 loaves baking.


Two small 41/2 X 81/2 loaves and 10 buns.

Sylvia


dmsnyder's picture
dmsnyder


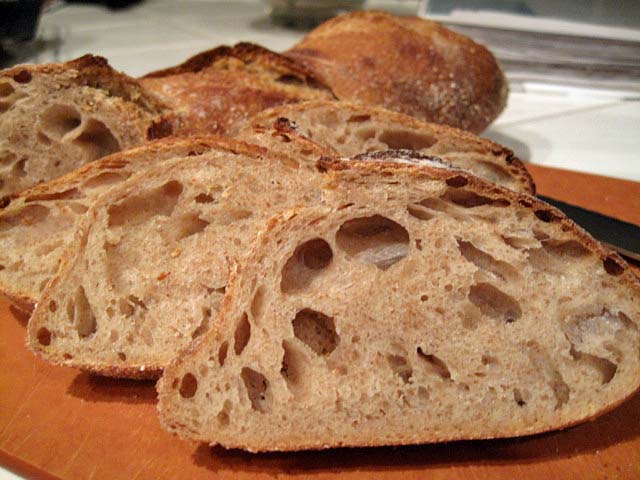
The "San Joaquin Sourdough" evolved from Anis Bouabsa's formula for baguettes. Most of my deviations developed in discussion on TheFreshLoaf.com with Janedo, who first suggested adding sourdough starter and rye, and, then, leaving out the baker's yeast and making it as a "pure" pain au levain.

I have been using that formula – a 70-75% hydration dough with 90% white flour and 10% whole rye, raised with wild yeast – for the past 18 months, and it has been my favorite bread. However, I have recently begun using the mix of flours employed by Gérard Rubaud, as reported on Farine.com. The result is a bread with a wonderful aroma and flavor that can be easily made in two three to four hour blocks of time on two consecutive days.

San Joaquin Sourdough made with Gérard Rubaud's flour mix (Scaled for 1000 gms of dough)

Gérard Rubaud's flour mix

Flour

Baker's %

Levain

Final dough

Total dough


All Purpose

70

98

295

393


Whole Wheat

18

25

76

101


Spelt

9

13

38

51


Whole Rye

3

4

13

17


Total Flour

562


Total Dough

Baker's %

Weight

Flour

100

562

Water

76

427

Salt

2

11


Total

1000


Levain

Baker's %

Weight

Flour

100

140

Water

75

105

Active starter

20

28


Total

273


Final Dough

Baker's %

Weight

Flour

100

421

Water

76

322

Salt

2

11

Levain

58

246


Total

1000


Procedures

Mix the flours

Because the levain and the final dough use the same mix of four flours, it is most convenient to weigh them out and mix them ahead of time and use the mix, as called for in the formula.

Prepare the levain

Two days before baking, feed the starter in the evening and let it ferment at room temperature overnight.

Mixing

In a large bowl, mix the levain with the water to dissolve it. Add the flours and salt and stir to form a shaggy mass. Cover tightly and let rest (autolyse) for 20 minutes.

Using a rubber spatula or a plastic scraper, stretch and fold the dough 30 times, rotating the bowl 1/5 turn between each stroke. Cover tightly. Repeat this stretch and fold procedure 3 times more at 20 minute intervals.

 After the last series of stretches and folds, scape the dough into a lightly oiled 2 quart/2 liter container and cover tightly. (I use a 2 quart glass measuring pitcher with a tightly fitting plastic lid manufactured by Anchor Glass.)

After 45 minutes, transfer the dough to a lightly floured board and do a stretch and fold. Return the dough to the bowl. Let it rest 45 minutes and repeat the stretch and fold on the board. Return the dough to the bowl.

Fermentation

Ferment at room temperature for an hour or until it has expanded 25% or so. If you are using a glass bowl or pitcher, you should see small bubbles forming in the dough. Then place in the refrigerator and leave it there for 21 hours.

Dividing and Shaping

Take the dough out of the refrigerator and scrape it gently onto a lightly floured work surface. Gently pat it into a rectangle. Divide as desired or leave in one piece. To pre-shape for a bâtard, fold the near edge up just past the center of the dough and seal the edge by gently pressing the two layers together with the ulnar (little finger) edge of your hand or the heel of your hand, whichever works best for you. Then, bring the far edge of the dough gently just over the sealed edge and seal the new seam as described.

Cover the dough with plastic wrap and/or a kitchen towel and let it rest for 30-60 minutes, with the seams facing up. (The time will depend on ambient temperature and how active your starter is. The dough should have risen slightly, but not much.)

To shape a bâtard, fold the near edge of the dough and seal the edge, as before. Now, take the far edge of the dough and bring it towards you all the way to the work surface and seal the seam with the heel of your hand. Rotate the loaf gently toward you 1/4 turn so the last seam you formed is against the work surface and roll the loaf back and forth, with minimal downward pressure, to further seal the seam. Then, with the palms of both hands resting softly on the loaf, roll it back and forth to shape a bâtard. Start with both hands in the middle of the loaf and move them outward as you roll the loaf, slightly increasing the pressure as you move outward, so the bâtard ends up with the middle highest and the ends pointed .


Preheating the oven

One hour before baking, place a baking stone on the middle rack and prepare to steam the oven. Heat the oven to 500F.


Proofing

After shaping the loaf, transfer it to parchment paper liberally dusted with semolina or a linen couche, liberally dusted with flour. Cover the loaf with plastic wrap and a kitchen towel or a fold of the linen. Proof until the loaf has expanded to about 1-1/2 times it's original size. (30-45 minutes) Do not over-proof, if you want good oven-spring and bloom!


Baking

Pre-steam the oven.

Slip a peel or cookie sheet under the parchment paper holding the loaf or transfer to a peel, if you used a couche. Score the loaf.

Transfer the loaf (and parchment paper, if used) to the baking stone, Steam the oven and turn the oven down to 460F.

After 12-15 minutes, remove your steam source from the oven. Rotate the loaf 180 degrees, if it is br

owning unevenly. Close the oven door.

Bake for another 12-15 minutes, then remove the loaf and place on a cooling rack. Check for doneness. (Nice crust color. Internal temperature of at least 205F. Hollow sound when you thump the bottom of the loaf.) If necessary, return to loaf to the oven to bake longer.


When the loaf is done, leave it on the baking stone with the oven turned off and the door ajar for 5-10 minutes to dry and crisp up the crust.


Cooling


Cool on a rack for two hours before slicing.


David


Elagins's picture
Elagins

On top: black pepper and parmesan

Underneath: fresh rosemary and garlic

12.5% protein flour, 66% hydration, 5% olive oil, 2% salt, 2% fresh yeast, baked on a stone at 400 for 18 minutes.

Stan Ginsberg
www.nybakers.com

breadbakingbassplayer's picture
breadbakingbass...

Hey All,

Just wanted to share with you some more stuff.  This is my own improvisation of Pain de Beaucaire.  I decided to make them more stick like, which actually made them resemble the Chinese fried doughnut "yauh tiuh".  For more info, please check out the following websites:

http://www.breadcetera.com/?p=121

http://www.wildyeastblog.com/2009/04/13/pain-de-beaucaire/

Enjoy!

Tim

Pain de Beaucaire Sticks

Ingredients:

95% AP Flour (1194g)

3% WW Flour (38g)

2% Rye Flour (26g)

63% Water (792g)

2.2% Kosher salt (28g)

10% Firm Sourdough Starter (60% Hydration) (126g)

1/2 tsp Active Dry Yeast

Coarse wheat bran

Makes 2204g dough.

Directions:

6:55pm - Mix all ingredients into a ball with no dry bits, transfer to oiled plastic bin, cover, autolylse for 30 mins.

7:30pm – Turn dough in bin, cover.

8:00pm - Turn dough in bin, cover.

8:30pm - Turn dough in bin, cover.

10:30pm – Divide dough into 2 equal pieces, roll out each piece into an 8” x 15” rectangle.  Make slurry with water and some AP flour.  Brush slurry onto each piece of dough, sprinkle coarse wheat bran on one piece, and turn the other dough piece on to the other.  Cut into 4 strips that are approx 2” wide, transfer to lightly floured linen couch and proof for 1 hour.  Strips should be proofed with each layer on top of each other.  Cover in cloth and plastic.  Arrange baking 2 stones on separate levels (1 one space from bottom, 1 two spaces down from top, and the long side of the stone should be front to back) and steam pan in oven, preheat to 550F with convection. (I use an aluminum loaf pan filled with lava rocks for my steam pan)

11:40pm – Gently turn loaves onto side transfer loaves to a peel or flipping board, place directly onto stone in oven.  When all the loaves are in, Add 1 cup of water to steam pan, close oven.  Turn down to 450F with convection and bake for 15 minutes.  Rotate, turn down to 450F with convection and bake for another 15 minutes or until internal temp reaches 210F.  Cool completely for about 2 hours or overnight before cutting and eating...


heidet's picture
heidet

Living in southern Japan, where even the most basic of ovens, beloved from childhood , are rare and extraordinarily expensive makes a baker's life challenging, and a home baker's more than just a bit frustrating. In need of crusty, heavy, unsweet breads, my sweetheart of a husband purchased  an 'oven' for me quite a few years ago. At least he thought it was an oven. Really its internal measurements are about double of an oven toaster, and it can- microwave, top and bottom electrically heat, convection heat but only if the round microwave ceramic plate is used, top toast, grill, heat sake to the exact temperature required, proof bread, and yes, talk to you. I never would have believed then how comfortable and devoted to this bizarre machine I have become. Together, we have baked as many as 20 loaves in a day, a therapeutic response to having left my work in Europe and wanting to keep my skills on par, I sent my spouse to work with paperbags full of breads almost every week for months .

And then I found them, after weeks and months and constant vigilence lest they close suddenly; bakeries making quite good baguettes, whole grain malt breads, rye breads. The sad part was they closed often, unable to find a wide enough market willing to part from supersoft, superwhite supersquare 'bread'. Those that did not close modified their recipes to meet the taste and texture that would sell better and in some cases, simply stopped making the breads I craved. I special ordered one bread in particular- Pan d'Fruilli was their name, pronounced as padufrui.And I experimented at home, until I got it almost exactly as remembered,but not perfect. And then, one day, I went to order and they had closed. In its place was a German bakery, which often made one or two very nice creations but! not my rye bread that barely rises and is filled with chopped nuts, cherries, peel and spices.

Unable to give up my morning ritual of thinly sliced and toasted bread with butter and a cup of tea, I set out to recreate it once again, only half the standard size so it might fit inside my oven. I searched recipes high and low, Laurel's KitchenRustic European Breads to name a few of many,  and hours on the internet. I even wrote my fellow bakers overseas,and finally I sat down with my very first bread book I ever used, Tassajara's Bread Book and significantly modified their recipe . I cut the measurements in half so it would fit in my little oven and waiting for the results. After much tampering with the recipe, and allowing for vast variations in the supplies of flour and ingredients  that were available, I am happy to say, I now have my bread and tea again.

  •  3c.warm water            
  • 1tsp yeast
  • 1/4c.corn syrup/honey mixture
  • 1/4c. dry milk powder
  • 2-5 cups unbleached white flour
  • 2-4 cups rye flour
  • 1/4 cup melted butter or oil
  • extra white and rye flour for kneading
  • 1 cup dried marinated mixed fruits(cherries, raisins, orange and lemon peel)
  • 1/2 cup chopped nuts-walnuts
  • orange liquer/rum as soaking agent for fruit
  • cinnamon
  • 1tsp salt

Dissolve the yeast in water. Stir in sweetener and dry milk. Stir in enough white flour  mixed with salt until a thick batter is formed. Beat well (I use the kitchenaid mixer).Let rise 60 minutes until frothy and spongey.

Fold in salt and oil and additional flour-rye, until it comes away from the bowl. Knead in machine or on a board until smooth. Alternatively, the throwing method works well. Let rise until double,about 50 minutes. Punch down.

take 3/4 of the bread and flatten, mix fruits and nuts with cinnamon, spread on dough and roll up. Make a round shape and wrap remaining dough around it.

Let rise about  until 2/3rds about 25 minutes.

Bake at 175 c.350f. Bake until hollow sound and hard tapping, nicely browned, about one hour.

rest and cool.


AnnieT's picture
AnnieT

The first "real" bread book I ever read was Amy's Bread, borrowed from the library. I copied out some of the recipes and over the years looked for it again in different libraries with no luck. There were copies on Amazon but they were out of my price range, so I was thrilled to find the new version. I haven't read every page yet but one item caught my eye - they have increased the hydration in most of the recipes "because we believe that today's home bakers are more sophisticated and are ready to work with bread dough that is exactly as we make it in the bakery." Hooray for us, TFL members! The book has good clear directions and ingredients are listed in grams, ounces and volume. I especially like the biographies of some of the bakers, most of whom have been with Amy for many years. In fact my only disappointment with the book is that they no longer give directions for shaping the cute little teddy bears although they include the recipe which uses a Rye Salt Sour Starter. Two dough whisks up! A.

fstedy13's picture
fstedy13

I just recently started baking bread and I'm having trouble with flat loaves. The bread recently baked was San Francisco Sourdough from Peter Reinharts book Artisan Breads Every Day. The dough rose fine overnight in the refridgerator and when it was proofed. I was careful not to deflate  it during forming or handling but the loaves are 2 1/2" high and 10" round after baking. The bread does have a nice crumb large irregular holes and a great taste. Thanks for any help

Ed

Pages

Subscribe to Recent Blog Entries