The Fresh Loaf

A Community of Amateur Bakers and Artisan Bread Enthusiasts.

Recent Blog Entries

ritav's picture
ritav

Following is a sweet tarali recipe for all seasons.  They are light, sweet and delightful...you can't stop eating them.  They are also great dunked in red wine.


Sweet Taralli

6 large eggs

1-1/2 t. salt

½ cup shortening preferable Crisco

1/2 envelope of dry yeast

1/2-cup water

6 to 6-1/2 cups all-purpose flour (Do not use all the flour if not needed.)


Glaze

2 egg whites or Just Whites equal to 2 eggs (4 t. Just Whites & 4 T. water)

4 cups of sifted confectioners sugar

2 t. lemon extract


Instructions
  •  Proof yeast in water heated to 110 degrees
  •  Beat eggs until fluffy and mix with shortening, salt. Then add the yeast mixture and flour.
  •  Place on floured board and knead for 5 minutes. Let set for 10 minutes.
  •  In the meantime, bring a large pot of water to a boil.
  •  After 5 minutes, knead the dough again for 5 minutes and rest for 10 minutes.
  •  Preheat oven to 450 degrees.
  •  Cut pieces of dough the size of a golf ball and shape as desired (twists, circles or whatever you wish). Do not overwork the dough.
  •  Drop into boiling water until taralli floats to the top. Remove and set on clean dishtowel to drain.
  • äWhen all the taralli have been boiled, place on baking sheets lined with parchment paper and bake for 10 minutes. Reduce temperature to 350 degrees and continue to bake for 10 minutes or until they are brown in color.
  •  Cool completely on a rack. 

Icing Glaze

  •  In a mixer bowl beat egg whites and confectioner's sugar until very stiff. Add the lemon extract and beat to blend. If too stiff for dipping, add a little water and beat again.  Dip each tarali in the glaze and set on a rack with a pan underneath for dripping.

Makes approximately 30 to 35 taralli.

 www.ritaventurino.com


nirbeltran's picture
nirbeltran

well i have to admit i am hardly using yeast any more - all my breads are now based on my sourdough and its been living in my fridge for a few good months now .

i use the basic starter formula from Barry Harmon's site with a few changes for this bread :

60g of sourdough @ 75% hidration - i fed mine one day before mixing .

mix with 80g ap flour

20g whole grain rye flour

20g spelt flour

and 120g water


let is rest on the kitchen counter overnight ( i waited about 12 hours )


then add

200g ap flour

50g whole grain rye flour

50 spelt flour

and 300g of water

again let it sit for 12 hours


then i mixed the final dough

to the 900g of starter i added 

25g salt

380g water

600g ap flour

100g whole grain flour

90g spelt flour

mixed all and let it rest for about 6 hours


then did a stretch and fold .

divied in two loafes , shaped and into the fridge for 12 hours or so


baked  covered for 30 minutes amd then 15 more uncovered - i used an iron cast pot .

my oven is a stove gas oven and its a little warmer then normal kitchen stoves - i bake 2 280-300 c

but i guess it will work the same with a normal 250 c baking heat 


yozzause's picture
yozzause

With a forecast temperature of 42 degrees CENTIGRADE  for the following day you would have to be mad to even thinking of lighting the oven, BUT that's what i did, my sourdough starter was looking pretty vigourus so i decided to put it to use. This bread EVOLVED,  i decided to use 500g white flour and 200g of my starter i then thought i would add my home brew lager beer, unfortunately i opened my dark stout by mistake. Not normally a problem to drink but it was warm and aussies do like their beer cold.especially in hot weather so rather than waste it and open a lager i decided to add it to the dough. I then thought it would be a good idea to add some course rye that i had.

so what went in

500g white flour    

200g s/d starter

100g course rye

14g salt 30g olive oil

412ml dark stout

dough was mixed and given a bulk ferment for 3 and a half hours then given a stretch and fold it was about half proofed at that time. Much later that night i devided the dough into 2 pieces and shaped 1 piece went into the fridge and was retarded the other was formed and allowed to rise (slowly).

At 5.00am i got up and popped the oven on  and 30 minutes later it went into the oven  the other dough was pulled from the fridge and was going to be baked at work later.

The end result was acceptable i thought there might have been a more noticable difference between the two, there was a difference in the taste and the consensus was the retarded one was slightly better tasting.  

  so we had a dough that was 12 hours from start to finish and the other half was a further 5 or more hours

 THE


TEMPERATURE OUTSIDE HAS NOW REACHED 42 AS THEY FORECAST, COOLER FOR THE NEXT FEW DAYS 36,36 & 35

kind and warm regards especially those that are in the snow YOZZA

ehanner's picture
ehanner

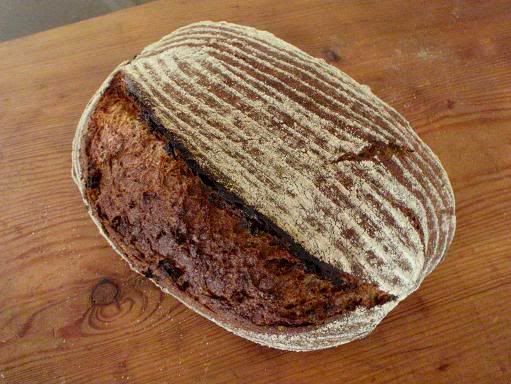
Last week, I posted about my Horst Bandel bread from Hamelman's Bread. At first glance the crumb images looked good and the flavor was very good. However after some reflection on the bread and the process I decided my initial declaration of victory may have been over stated. While my first attempt was acceptable for a first try, I suspect I have much to learn about this style of bread.

I have been having conversations with Mini and Andy (ananda) about the process and specifically the temperature profile to arrive at a well baked loaf. Along the way I have been talking with qahtan about puddings of various types. There was a most interesting thread on puddings which made me wonder if Pumpernickel isn't really just another steamed pudding without the fruits. After all you cook it in a closed pan at low extended heat and after wards stabilize the moisture by wrapping in towels. The word Pudding has me first thinking about chocolate or lime and a box of Jello but apparently the British and many other Europeans refer to steamed bread by the same term.

I looked at some videos on how to make a proper Christmas Pudding. The example was shown placing a quantity of wet looking dough in a glass pan, covering it with parchment and foil, then tying a string around the foil cover. The whole thing gets placed in a hot oven and slowly cooked in a lowering oven to arrive at a well caramelized crumb, deep in color and full of flavor with a soft crust. That's exactly what I want for my Pumpernickel.

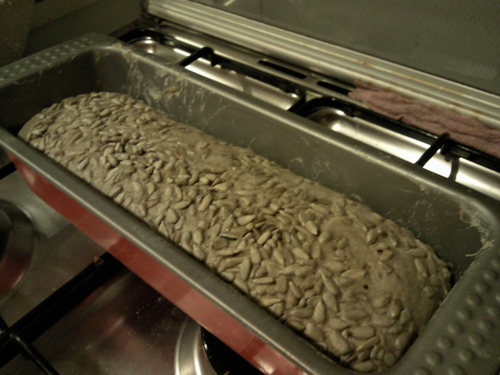
So, to sum up. I discovered that the bottom of my crust from my first try was quite a bit drier and harder than the sides. I decided to place the pan on a wire roasting rack instead of directly on the hot stone. Thinking is that I'll get a less direct and harsh heat. I took my best guess on how much dough to load in the pan and let it proof. When it was again within 1/4 inch of the top, I removed some of the dough from the top as you can see in the photo. That shot is taken after proof and after I removed an additional amount. Next I placed a piece of parchment over the bread and slid the cover on. It was then weighted down with a cast iron griddle to be sure it didn't pop off again and also to be sure it was sealed.

I made additional dough so I would have enough to try a glass pan at the same time. My thinking was that the thicker walls of the glass pan would temper the direct heat and not dry out the bottom crust. Also I had the chance to try out the paper/foil cover tied on with a string.

The breads were loaded into a preheated 350F oven and baked as above for 30 minutes. At this time the heat was lowered to 250F for 2 hours. The final reduction was to 220F for another 6 hours approximately. At this time (6AM) I turned the oven off and let the heat coast down for the next 4 hours. The internal temp was 204F when I checked after the 6 hours at 220F. Both loaves popped out of the pan easily and were well shaped. They are now wrapped in a towel awaiting the Pumpernickel Fairy to tap me on the head and say they are ready to eat. I will post the crumb images when available. Some of these are a little out of order, sorry but they should make sense. I thought anyone who might be thinking of making this bread might like to see the steps I used to get this far.

Eric

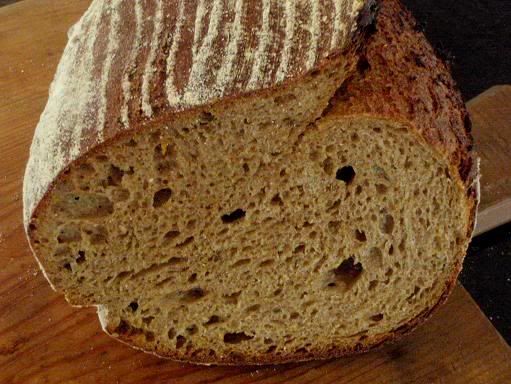
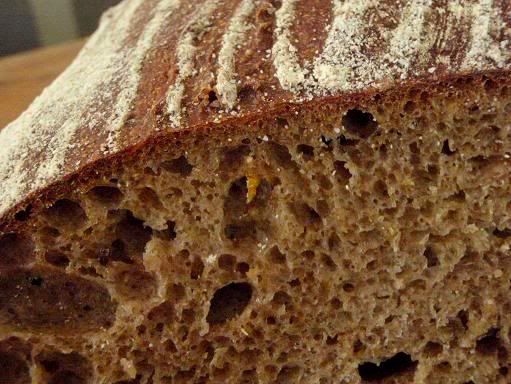
Added the Crumb Image by edit:

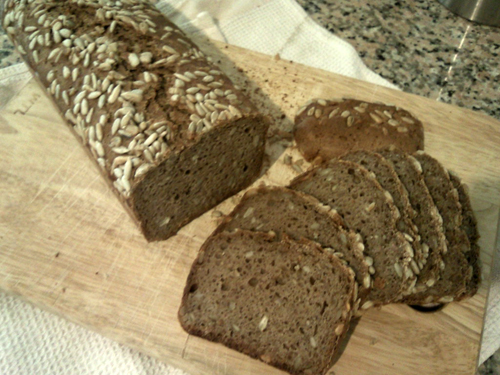
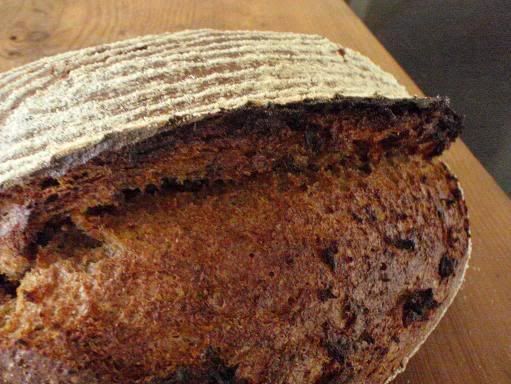
The Pumpernickel Fairy made a low pass on the flight deck this morning and gave me a frown. It has been 24 hours since I wrapped the bread in a towel and placed it on the wire rack (thanks Mini). I unwrapped it and sliced off a few slices to see the results. First, I will now confess I made a mistake with the mix, which was in following the directions as written. On page 223 Item 4.) Mixing, Hamelman says "Add all the ingredients to the bowl, including the sour-dough and both of the soakers, but do not add any of the final dough water reserved from squeezing the liquid from the old bread soaker". I take that to mean that I should add the amount of water in the final dough segment of ingredients (page 222 bottom). The water amount is 12.8 Oz (1-5/8 cups). The first time I made this I with held that water and found I didn't need it. This time I needed an additional 16+ Oz of bread flour to get to a reasonable dough. The amount must be a misprint as I can not see where the differences in rye flours would make that much of a difference. JH goes on to say "It is entirely possible that no additional dough water will be required".

So, bottom line is that this batch has way more white flour in it than was called for, percentage wise. It isn't nearly as flavorful as the last batch. The edges are hard now but they will soften up some after it has sat a day or so in a plastic bag. It has a nice flavor and my wife and are enjoying some with cream cheese. Turn the page and start over she said (Pumpernickel Fairy)

Pleated paper over glass pan

Proofed, removed some dough, ready to cover

Wrapped and tied.

In oven covered and weighted down

Pullman ready to cover

Covered with paper ready to bake

After bake, paper is wet from steaming.

Perfectly formed top.

After bake, foil removed, wet paper.

Clean slightly domed top.

Side view of glass pan shows solid loaf.

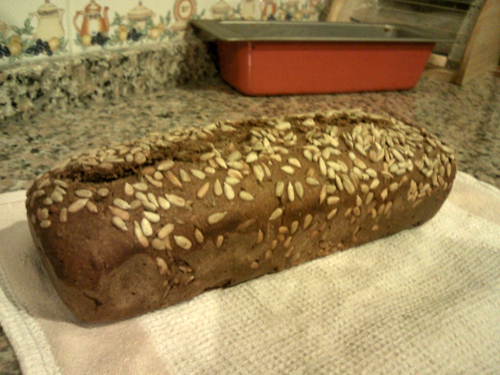
Turned over on board. Well shaped loaves

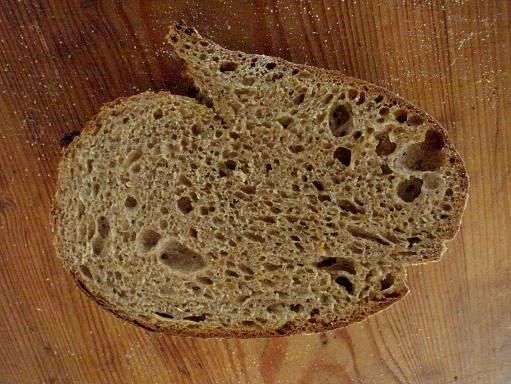
I think this is the way they should look?

Waiting for the Pumpernickel Fairy!

Janice Boger's picture
Janice Boger

Okay, now I have a starter and need a jar.  Do I need something special.  Certainly can do better than the expensive one from KA.  My big question is does it have to have air flowing or does it need a tight seal?  Can I use a mason jar with the metallic lid?  Can I use a quart canister that has a rubber seal and a small metal clamp?  Maybe it is not that important, but I want to do this right.  Thanks for your help.


New Baker

davidg618's picture
davidg618

Inspired by Shiao-Ping and David (dmsnyder) I decided to try out my new bannetons (bought from SFBI) with two 1-kilo loaves made ala Gerard Rubaud. Rather than copy/scale either of their formulae, I went to the source http://www.farine-mc.com/ and did my own adaptation of Msr. Rubaud's formula. In a phrase...

I messed up!

I made up a quantity of his whole-grain flour mix--10% rye, 30% spelt, 60% Whole Wheat-according to plan; noted his comment he mixed his levain in the same ratio as his final dough: 30% flour mix, 70% All purpose, and proceeded to make my levain entirely fed with the whole-grain flour mix, except for the 18g of seed starter that got it going. Wrong!

The levain contributed 25% of the total flour. Of course it was essentially all whole grain, not the 30/70 split with AP intended. To further exacerbate the error I diligently added 5% more of the flour mix so that now my final dough was 30% whole grain. At 78% hydration the final dough was decidely slack. Applying a zillion French folds, I believe the dough's gluten developed good strength, probably as much as possible, but the dough remained extremely extensible. Nonetheless, I proofed my two basketed boules, and baked them.

And, it was about midway through the early steam cycle my mistake hit me. I went back to the source, and reread Master Baker Gerard's interview. Yep, I'd got it wrong. Bigtime!


The Good News. This bread is tasty! The prefermented rye, spelt, and whole wheat combination lend a distinct flavor unlike anything I've tasted before, but reminiscent of each of them: nutty like spelt, a wheaty base note throughout, and a gentle bite to it all from the rye. I'm going to do it again, rightly, following Shiao-Ping to the letter. But I'm also going to keep this mistake in my formula ecard-file.

David G

turosdolci's picture
turosdolci

Traditional Italian Eastser desserts, the taralli is a treasure from Apuglia.


http://turosdolci.wordpress.com


Mebake's picture
Mebake

A Loaf of 100%Rye sourdough in a pan.

lovely!

Shiao-Ping's picture
Shiao-Ping

Since my Pure Rye, 1939 post, I had wanted to do light rye.  In the past, I have done a few (this, this and this most recent one).  The challenge of rye for me is the stickiness, hard to handle, and hard to score.  In this post is a pain au levain with 50% rye.  I solved the problems with very minimal handling of the dough and always with a light dusting of flour, and most importantly, I made sure the surface was very dry before I scored.   Also, to solve the browning issue that I sometimes encounter with the crust, I turned on my oven full blast for the whole time of baking (ie, 250 ºC).  I had to rotate the dough several times during baking, so not one spot got too much heat for too long in one go... what we do for our dough....

This was a 1 kg dough.  Main points of my formula were:

  1. Stiff starter was 15% of final dough flour, which was 50% stoneground organic rye flour and 50% organic plain flour. 
  2. My starter was fed the same flour combination as the final dough.
  3. Overall hydration was 80% (without counting molasses, which was another 8%).
  4. In addition to one teaspoon each of caraways, fennels and coriander powders, I had zest of one large navel orange. 
  5. (The orange juice was part of the 80% hydration.)


I think I finally found the light rye formula that I like.


The crumb would have been more open if I had given my dough longer bulk ferment time.  Rather than the usual 3 hours bulk at my room temperature of 26 ºC, this dough should have had much longer bulk time, say 5 - 6 hours or even overnight at room temperature, as the starter was quite low in terms of the final dough flour.   


You could see the orange zest peeping out in the crumb shot above (almost in the centre).  Like the herbs, orange can be a dominating flavour.  Any more than one orange zest would have been too much.   I am very happy and excited with the way this bread has turned out.  The excitement I have got from this bread reminds me of the very first sourdough I posted here at The Fresh Loaf last June.


Shiao-Ping

breadbakingbassplayer's picture
breadbakingbass...

Hey All,

Just wanted to share with you my Big Bad Batards from my 2/22/10 bake.  These are approximately 850g-900g and 16" long.  They are big!  Some of the nicest looking breads I have made in while.  I could have let the bulk fermentation go a little longer and upped my hydration... These were about 70% hydration.

I did some interesting stuff with these.  I used a still levain, along with instant yeast.  I mixed the levain the night before and refrigerated it until I was ready to mix the dough.  Also, I mixed all the remaining flour and water the night before and refrigerated it for about 24hrs.  On the bake day, I kneaded in the salt, stiff levain, salt, instant yeast, and went about my normal procedure...  I'm not sure I would do it this way again as it was difficult to knead in the levain and salt.  I was not sure if I kneaded it all in evenly...  Anyways...

Enjoy!

Tim

Pages

Subscribe to Recent Blog Entries