The Fresh Loaf

A Community of Amateur Bakers and Artisan Bread Enthusiasts.

Recent Blog Entries

Monkeyphish32081's picture
Monkeyphish32081

Well I had to throw out my sourdough starter again today because it was dead.  This is starting to get frusterating.  My first starter I was able to get a loaf out of and before I could test out another loaf, I wake up to find flies in the starter and the lid off!  ARG!!  So that same day, I start up a new batch and after a week, it smelled of mildew.  I am VERY determined to make it work this time...No matter what it takes. 

Jw's picture
Jw

I've been away from baking (took only time for lazy bread), so I started again with something simple (I thought): French bread 1 (Crust and Crumb, Peter Peinhart). I kind of recall that the proposed mix off all-purpose vs bread flour was not ideal for me, but I didn't find a note on that in my bread diary. I get my flour at a windmill, the flourtype (T) is not constant. I added flaxseed as an ingredient.


The result: taste is ok, not too strong. The looks: I have to get into the gaming of scoring again, couldn't find a proper (razor)knife. As for the holes: chopsticks! I do recall some Austrian breads with holes like these, so this is my variation on the recipe. I would expect a crumb with more holes. Anyway, could to be baking again!

Talking about French bread: check out these videos (if you haven't already..): http://www.boulangerie.net/forums/bnweb/videobn.php

Cheers,
Jw.

Smita's picture
Smita

A couple weekends worth of sourdough sandwich breads. Heres what we do:

1. Friday night (or morning, depending on room temperature) - feed starter with 2 oz each of water and AP flour. I use 8-hour two builds if possible, to get 8 oz of 100% hydration starter.

2. Saturday am - When the starter is ripe (bubble with fruity smell), add 12 oz flour and 8 oz water. Including 4 oz each of flour and water in the starter, this amounts to 16 oz flour and 12 oz water (75% hydration dough). We're flexible with the 12 oz of flour. Of the two loaves below, the top loaf was made with 5, 4 and 3 oz of whole wheat, white whole wheat and AP flour. The bottom loaf was made with 7 and 5 of whole wheat and white whole wheat flour respectively.

Notes: I store our flours in the freezer. I use the formula for desired dough temperature (DDT) to calculate water temperature.

3. Mix flour, water, 2 teaspoons gluten and starter - autolyse 30 minutes.

Note: I also added 1 tablespoon flax seeds to the bottom loaf.

4. Knead by hand for 10 minutes, till windowpane.

5. Rest, add salt and knead gently.

6. First rise for about 3 hours or till dough doubles. We did three stretch and folds for the top loaf. Went and got brunch while the bottom loaf was rising!

7. Deflate and roll real tight (such a lovely americanism) tp shape into sandwich loaf. Place in a greased 9 x 5 pan.A slightly smaller pan will give you a higher loaf. I don't worry too much about this.

8. Final proof for 3 hours or until it crests above the loaf pan. Note: We've also done overnight retards with good results.

9. Bake at 375 for 40 minutes. Internal temperature should read around 200 degrees F when done, the loaf should sound hollow.

Cool for an hour and slice. 


Taste and appearance: We have grown quite fond of this formula. The loaves have no butter / oil at all, and made for a perfect morning toast / sandwich bread. Sometimes, I will add a half cup of mashed potato or buttermilk, which tenderizes the loaf. These loaves showcase whole wheat - so if you enjoy whole wheat, this is a good recipe to try. IMHO, the critical steps were: 1) Working out 16:12 flour to water is a good size loaf for us, that resulted in the right crumb texture, 2) Knead till windowpane to coax gluten development in whole wheat, 3) I have to be flexible about rise times. Gotta run one's day by the dough's schedule and not vice-versa. If I add a teaspoon or less of yeast, I can cut down rising time to about 90-120 minutes. The best loaves we've made usually take 3-5 hours. I'm sure this will change as we apprach warmer weather.

Feel free to share your thoughts! All feedback welcome!


koloatree's picture
koloatree

Greeting TFL,

Just logging another attempt at baguettes w/ pizza for the lost finale. These baguettes are underproofed because I was simply in a hurry to bake off the pizzas before 9pm. I followed the poolish baguette version from "Bread". I baked 2 baguettes at a time. I shaped the last bagutte (left)pair ~30 minutes before the first 2 baguettes were sceduled to finish baking.


I made this pizza dough this morning. Typically, I like to use poolish and/or retard overnight. I belive that gives the bread a nice golden caramel color. However, tasty nonetheless.


hmcinorganic's picture
hmcinorganic

I just found this site.  I have been making (trying to make) artisan style bread following Reinharts book "the bread bakers apprentice" for the last 4-5 years with varying success.  I know that my bread has improved, and it certainly tastes great.  However, I want it to look good too, and that is where I am working now.  I stumbled onto this website searching for "oven spring problems" which is what happened to my sandwich bread loaf tonight.  It exploded out of the pan and cracked beyond the edge of the score during the first 10 minutes of baking.  However, I'm sure it will taste great.

I am looking forward to reading my way through this website!

hmcinorganic

Floydm's picture
Floydm

I was preparing to make a couple of loaves of French Bread this weekend when I noticed we had some pesto sauce in the fridge that I needed to use up.  I went ahead and dumped it into the mixer to see what would happen.

Well, it definitely turned green.  The flavor?  Not bad, but not as compelling as I'd hoped.  It  seems like something is missing... maybe bits of sun-dried tomatoes?  Or cubes of mozzarella and salami mixed in?  Or parmesan cheese melted and browned on top?  I'm not sure.  It is worth further experimentation with this, but I don't feel like I've struck gold yet. 

My formula (or at least my notes, since this was one of those "measuring everything by the handful" kinds of recipes).

Preferment:

1 cup AP flour

1 cup water

1/8 teaspoon instant yeast


Final dough:

All the Preferment

16 oz AP flour

10 oz water

1 teaspoon salt (less than normal since I figured there was quite a bit in the pesto)

1 teaspoon instant yeast

1 cup pesto sauce

Enough additional flour to make the ingredients bind together properly (which in my case was nearly 1 1/2 more cups, but it would be less if your pesto was less runny).


Sedlmaierin's picture
Sedlmaierin

I have not been able to blog for a bit now, so a few bakes have lined up that I want to share.

#1 Vermont SD

I won't even go into details of this bake, because frankly NOTHING went according to schedule and therefore I couldn't possibly talk about what I did.Let it just suffice to say that I did the mixing of ingredients at 8am and the poor bread didn't get baked until about 8 or 9pm.....travelling in and out of the fridge all day (that's what happens when I think I can have a few toddlers over and go through the simple things like folding and shaping when needed-yeah, right!)

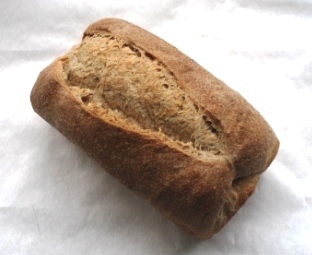
I only took a picture of one loaf-the other one actually was prettier but was devoured at a little girl's b-day party. This guy, for some reason would have benefitted from a tad more proofing, since one of the slashes blew out a tad.The flavor was great-it is amazing what that small amount of rye flour does!

#2 Vermont SD with increased Whole Grain

I went by the metric column and just used 1/10 of it..so that means my percentages were as stated in the Baker's percentage column. I really like the flavor of this bread,even yummier than the original Vermont SD

I had a bit of a shaping issue;as we munched our way through one of the loaves I noticed one big fat hole...........seems to me, momma's shaping can use a lot of practice! I used Bob's redmill organic flour and organic whole rye flour from Organic Wheat Products, MN

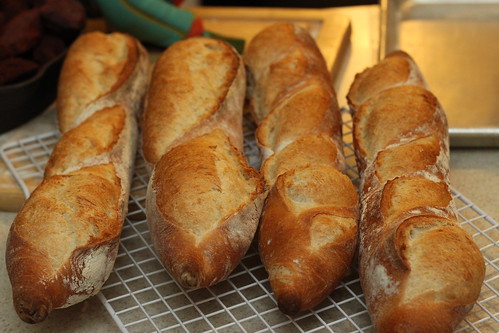
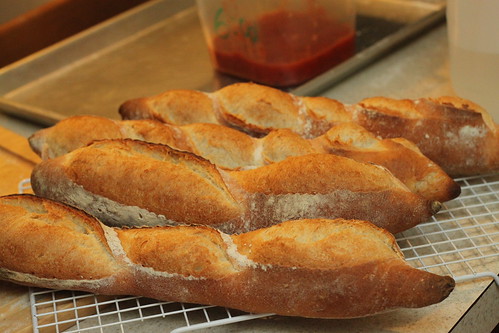
Both of them were proofed seams side down, but the one on the left got baked seam side up and I did not slash it.The one on the right actually showed some cracking of the crust-very exciting!crumb shot of the unslashed loaf.

As you can see at the bottom left, I had some issues-the main one, I think, being that I somehow did not mix the salt in as well as needed and when I went to form the loaves in this loaf, there seemed to be small pockets of dense flour---really strange. I think the other loaf will be more uniform, but alas, it is taking a sojourn in the freezer.

#3 A variation of the 80% SD Rye with rye flour soaker

This bread I am super proud of! Since I had already made the three stage 90% rye I thought I would take some leeway with this bake and combine a few methods and add a dash of my own ideas-in pursuit of a childhood bread.

So, I built the SD according to the three stage method with the proportions set forth in the three stage 80% rye. I used 200g water and 200g Rye flour for the soaker, I subsituted sifted high gluten red hard whole wheat flour for the bread flour and I added 70g of ground Sunflower seeds. I added the sunflower seeds because that used to be one of my most favorite breads we bought from the Hofpfisterei in Munich and when I went on their website it stated that the bread was a 90%Rye10% wheat bread with ground up sunflower seeds.I ground them in my coffee grinder.

I added the optional yeast, since I figured the bread could stand the extra aeration with the whole wheat flour and sunflower seeds present. I almost want to say this is THE yummiest rye I have made so far-but let me be reasonable and say it is one of the most delicious ryes. It is nice and moist, can be cut very thinly, it had great ovenspring and the taste is very complex-it almost tastes as if some spices were in it-maybe a hint of caraway.

Ok and now off to work..............

Happy Sunday to all of you!

Christina

jsk's picture
jsk

Fot quite a while now I was working with whole grain doughs producing flavorful breads with strong aromas from the various flours. A few days ago I decided to bake a proper baguette after seeing the beautiful baguettes you TFL members are showing here.

I have never made a baguette in my life but have read about it quite a bit. So I searched TFL and found dozens of recipes but I rememberd that I wanted to give Bouabsa's baguettes a shot back then so I went for it. It was my first time using the strech and fold in the bowl technique wich I found very easy and effective.

I used 94% AP flour and 6% whole rye as I was stuck without additional AP flour. I increased the hydration accordingly to 78% as I wanted to preserve the texture of the dough. I also added a final fold on the counter after the 3 S&F in the bowl as I felt the gluten was not developed enough.

The dough was retarded for only 16 hours because of my working schedule. Shaping was done by Hamelman instructions in "Bread" and the baguettes were proofed in a couche for an hour.

Anis Bouabsa's Baguettes:


Crumb:


The results were very good. The taste was sweet with a great arome of fermented flour. The baguettes were eated warm with a variety of cheeses. Delicious!

Have a Good Week!

Jonathan.

 Submitted to YeastSpotting.

turosdolci's picture
turosdolci

A lightly sweet taralli, made with a full-bodied red wine such as Cabernet, Merlot, Barolo, Zinfandel, and Primativo etc. Perfect for a wine tasting party.


http://turosdolci.wordpress.com/2010/05/23/double-dip-red-wine-taralli/


dmsnyder's picture
dmsnyder

Vermont Sourdough with Increased Whole Grain

I felt like baking something new this weekend, but I like the breads I make most often. That's why I bake them most often. So, I wanted something I would really like as much as those, but different. I settled on the Vermont Sourdough with Increased Whole Grain from Hamelman's “Bread.”

In the sidebar of this recipe, Hamelman talks about the “two small changes” in this formula compared to the “regular” Vermont Sourdough resulting in “surprisingly large” effects. The two changes are an increase in the whole grain flour from 10 to 15% and in the pre-fermented flour from 15 to 20%. These changes result in “a sharper tang and more or a whole-grain taste.” Well, that sounded terrific.

Then, I recalled the errata sheet for “Bread” that Paul (rainbowz) got from Jeff Hamelman and shared with us. I consulted it and found that the corrections decreased the pre-fermented flour which seemed in conflict with the description in the sidebar. Not having a clear sense of how to deal with this discrepancy, I ended up using the ingredient amounts as printed, resulting in a larger batch of dough than that printed in the book.

The Vermont Sourdough with Additional Whole Grain was made with KAF Bread Flour and 15% KAF Medium Rye Flour. It had 20% pre-fermented flour in the form of a 125% hydration starter fed with a mix of 70% AP, 20% WW and 10% whole rye flour. The total dough was 65% hydration. The loaves were scaled to 810 gms and shaped as boules.

The oven was pre-heated to 500ºF on convection bake for 60 minutes, with a baking stone on the middle shelf, pushed to the left, and a 7 inch cast iron skillet filled with lava rocks at the right front of the lower shelf. The oven was pre-steamed by pouring about 1/3 cup of boiling water over the lava rocks. The loaves were then transferred to a peel, scored and loaded onto the stone. Another ½ cup of water was poured over the lava rocks and the oven door quickly closed. The oven was immediately turned down to 460ºF, conventional bake. The skillet was removed after 15 minutes, and the oven was re-set to 435ºF, convection bake. The loaves were baked for an additional 25 minutes. Then, the oven was turned off, and the loaves were left on the stone with the oven door ajar for another 7 minutes before being transferred to a cooling rack.

I baked this bread as part of an experiment to see if I could reliably produce a crackly crust. My results were most satisfactory. (See Consistent Crackly Crust Conundrum Conquered?)

Crackly Crust

The crumb was fully aerated but without huge holes - good for a 65% hydration sourdough.

The crust was crunchy with a caramel-like nutty sweetness. The crumb was tender-chewy. The flavor had both a sweetness and a moderately assertive sourness. This is a bread that is quite sour, but there is a lot of complexity that also comes through. I'll have to make it again, but based on today's bake, I prefer it to the "regular" Vermont Sourdough.


David

Submitted to YeastSpotting


Pages

Subscribe to Recent Blog Entries