The Fresh Loaf

A Community of Amateur Bakers and Artisan Bread Enthusiasts.

Recent Blog Entries

Mebake's picture
Mebake

This is a 50% Wholewheat Loaf, Which involves a BIGA (Preferment/sponge) around 30% of total Flour Weight.

I love the final taste of the bread, it was the best sandwich loaf i ever made so far! Soft, Airy, Light, Tastey, and Nutritious.

"Hey don't mind the background, my appartment is not bright enough"

My wife said: i could snack on toasted slices of this bread all day.

Mebake


SylviaH's picture
SylviaH

Today I fired up my wfo oven to make pizza and this morning I made the recipe for my 'Sandwich Buns'.  I needed hot dog buns for Mondays cookout and since the wfo was hot I retarded the shaped hot dog buns in the refrigerator until tonight when the oven had reached a temperature of apx. 400F and falling.  I removed them for about one hour to finish proofing and placed them into the wfo for 20 minutes to bake.  I wanted to get them into the oven right away because they had proofed a little more than I wanted, so as I brushed them with an egg yolk glaze and asked my husband to sprinkle on the seeds..I think he actually enjoyed it and I enjoyed watching him enjoying it ;)  I will post a crumb shot later. 


                                                     Beginning to brown


                                                   20 minutes baked


                                                         Added crumb photo   

                                                      Ready for tomorrows hot dogs...I haven't had a hot in ages and looking forward to toasting these on the grill!


             Sylvia


RobinGross's picture
RobinGross

Croissants made with 100% wild yeast (captured in Paris).  5 rises over 2 days and enough folding and turning to create 55 layers of butter and dough in the final croissant.  Tasty too.

trailrunner's picture
trailrunner

My husband is a master at pasta making. He retired on May 14th 2010 and we have been indulging pretty often since then. I made the sauce and the bread...my starters survived my 3 months away on my bicycle ride across the US. He made the lovely pasta you see below. It is 1/2 semolina and 1/2 reg old AP. It is delicious...


Photobucket

hanseata's picture
hanseata

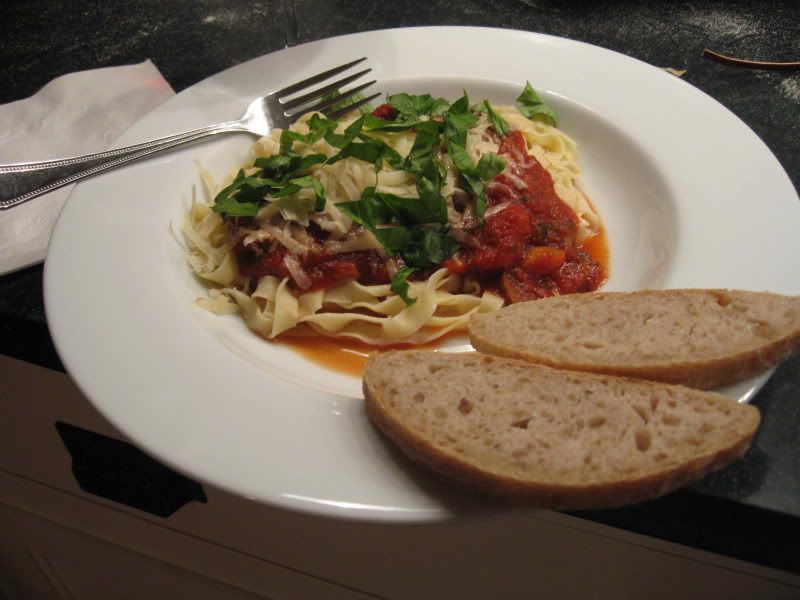
There are two things members of our patchwork family have in common - we love good food and we hate olives!

Even the pickiest of our kids, Valerie, producer of the famous "square mouth" whenever I made her try at least one bite before she said she didn't like it; and Francesca who ordered "just white rice" when we ate at a restaurant, ended up as foodies. Valerie even became a chef!

The Andersons and their offspring pick olives off pizzas, and leave them untouched in the salad bowl. They don't order tapenade and don't drink martinis. But then something strange happened...

Knowing that a lot of people are olive fans and crave them in all kinds of foods, I looked for an olive bread recipe to satisfy those die-hards among my customers.

I found one in my favorite "Brot aus Südtirol" and decided to give it a try, tweaking it a bit (using a preferment and overnight refrigeration).

It was quite a struggle to force the slippery olives into the dough (maybe they sensed my negative vibes).

I also found it not very easy to roll the dough into the right shape for dividing it into equal sized pieces, without a lot of leftover cut-offs.

No wonder, my first batch of "Pane di Olive" looked like misshapen scones, with dark bruises (from my abuse?), but they didn't smell bad.

                Chef Valerie and proud Mom

With some misgivings and no great expectations I bit in an olive studded roll. Took another unbelieving bite and was deeply shocked - the olive bread tasted good, really good, incredibly good!

I gave one to Richard, the most willing guinea pig of all husbands (but, also, staunchest olive hater of us all) who eyed it with visible distrust. "You should probably call that "Malfatti" (Italian for "badly made") he suggested, but then, just to please me, nibbled gingerly at one corner.

IN NO TIME THE OLIVE BREAD WAS GONE!

Making the olive bread again and again - it proved to be a big hit with my customers at the natural food store, too - I learned a few tricks to make the mixing and shaping easier.

It is very important to use good quality olives, like Kalamata. The bread's taste depends on those olives, so don't skimp on this essential ingredient.

Good quality olives are a must!

Not only draining, but letting the olives dry for several hours on kitchen paper towels, makes them less slippery, and much more willing to embrace the dough. Killing two birds with one pit stone,
this simple measure also takes care of the ugly "bruising" of the bread.

Instead of using a preferment, I find it easier to work the dough with stretch and fold, with an overnight stay in the fridge. This method requires less yeast, so I reduced it a bit.

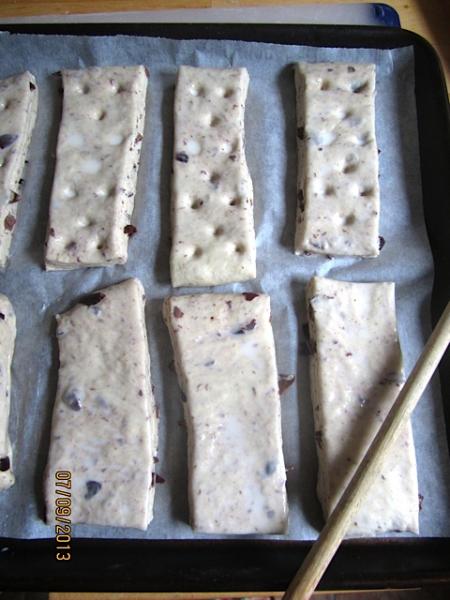
A template makes rolling the dough to the right size much easier

And, finally, a bit of calculation (not my strongest point) and a paper template made the rolling and cutting of the dough a cinch!

OLIVE BREAD   (adapted from Richard Ploner: "Brot aus Südtirol")
(10 pieces

250 g/8.8 oz Italian 00 flour
250 g/8.8 oz all-purpose flour
    4 g/0.14 oz instant yeast
    9 g/0.3 oz salt
    5 g/0.18 oz honey
  30 g/1.6 oz olive oil
100 g/3.5 oz Kalamata olives, pitted
240 g/8.5 oz water

TOPPING
12 g/0.4 oz milk
12 g/0.4 oz whipping cream
7 g/0.25 oz sugar


DAY 1:
Drain olives in a strainer, chop coarsely, place on kitchen paper towels, and let dry for several hours.

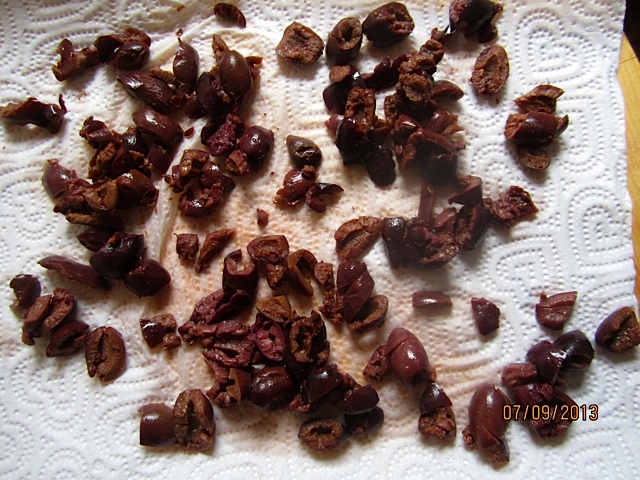
Drying the drained olives kills two birds with one stone

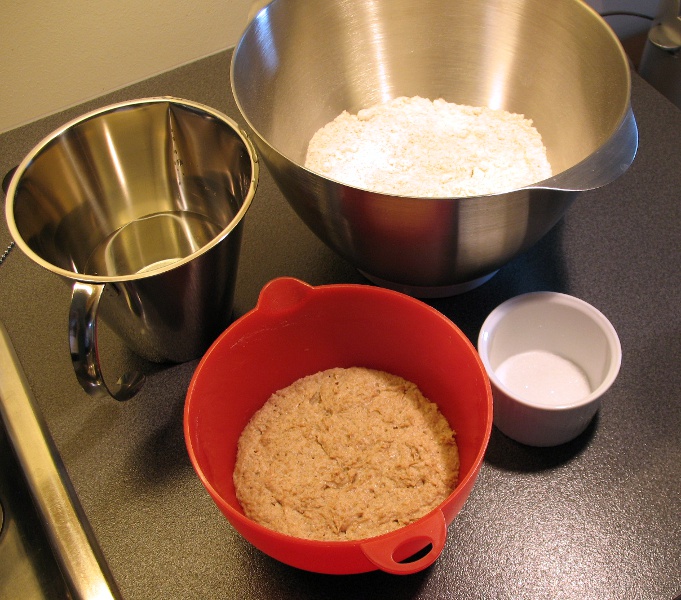
Mix all ingredients, except for olives, at low speed (or with large wooden spoon) for 1-2 minutes until all flour is hydrated. Let dough rest for 5 minutes.

Knead at medium-low speed (or by hand) for 2 minutes, adjusting with a little more water, if necessary (dough should be a bit sticky.) Knead for another 4 minutes, while feeding olives slowly to dough. It should still be somewhat sticky rather than just tacky.

Starting with the top, fold dough in thirds like a business letter

Transfer dough to a lightly oiled work surface. With oiled or wet hands, stretch and pat it into rough square. Fold from top to bottom in thirds, like a business letter. Then fold the same way from both sides. Gather dough into ball, and place, seam side down, into lightly oiled bowl. Cover, and let rest for 10 minutes.

After folding you have a neat little dough package

Repeat this stretching and folding 3 more times, at 10-minute intervals. After the last fold,  place dough, well covered, in refrigerator overnight. (It doesn't have to warm up before using.)

DAY 2:
Preheat oven to 410º F/210º C.  Cut parchment paper into a 24 x 30 cm/12 x 9.5" template. Line baking sheet with parchment paper.

Over night the dough has doubled in the frigde

In a little bowl, mix topping ingredients, place in microwave, and bring to a boil. Remove, and set aside.

Rolled out and marked


On a lightly floured surface, roll out dough to a square (24 x 30 cm/12 x 9.5"), using the template (about 1.5 cm/0.5" thick). Trim edges. Using pizza cutter or knife, cut dough square first lengthwise in half, then each half into in 5 equal pieces. The dough will be very soft.

Brush with milk mixture and dock with wooden spoon, so that the breads can't inflate.

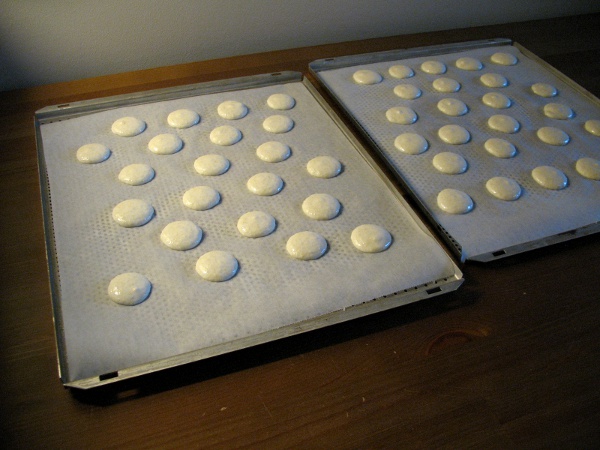
Transfer pieces to parchment lined baking sheet. Brush with milk wash. Using the handle of a wooden spoon, press deep holes in the dough, evenly spaced. Cover, and let it rise for 30 - 45 minutes, or until breads stays dimpled when poked with finger.

Bake breads (no steam) for 10 minutes, rotate pan 180 degrees, and continue baking for another 10 minutes, until they are golden brown (internal temperature at least 200ºF/93ºC),

To this day we are still amazed that we Andersons do like olives - when they come with Olive Bread!

Post was completely updated 7/16/13

Submitted to Panissimo:  Bread & Companatico

                                         Indovina chi viene a cena                                            

wally's picture
wally

This weekend I decided to return to the scene of my previous crimes in the name of croissants and have another go at them.  I've been spurred on in part by hansjoakim's magnificant croissants he shared with us a few weeks back, as well as by ensuring conversations involving him and ananda about differences in puff pastries and in the levels of butter and lamination involved in each.

One lesson I took away, is that my previous attempts have involved greater amounts of butter than is standard for croissants - about 38% of total dough weight, versus what I now understand to be 25% in classic croissant dough.

With this in mind, I went back to the drawing board and adapted a recipe from Dan DiMuzio's excellent textbook, Bread baking: An Artisan's Perspective.  It is quite similar to that of SteveB's which can be found on his blog, bread cetera.

As with previous attempts, I've deliberately frozen the croissants after shaping. 

When needed, I move them from the freezer to refrigerator for about 12 hours (usually overnight), and then allow them to proof at room temperature for about 2 1/2 hours before applying eggwash and baking.

I've also followed DonD's method of baking, which involves starting the bake with steam at 425°F for 5 minutes, then turning the oven down to 400° for another 5 minutes, and finishing up at 375° for 5 minutes.  The resulting croissants turn a nice golden color, while the interior remains moist.

I also thawed and baked a half dozen croissants previously made with the higher butter percentage of 38% of dough weight to see how the results differed.  (And I threw in some pains au chocolat as well). 

Thus armed, I head over to my brothers, confident that between he and his wife and my nephew and niece I'd have an objective tasting audience :>)... well, at least an enthusiastic one.

So, here are the results.  First up, crumb shots of the latest batch of croissants with butter content equal to 25% of dough weight:

As you can see, the lamination is pretty distinct and my first reaction was that the decrease in butter shows in the crumb structure.

Ok, so on to my more buttery croissants:

Not bad, but it seems clear to me that the crumb is not as well-defined, and I attribute this to the higher butter content.  (Although, I must confess, strictly from a taste standpoint, I prefer these - they just melt in your mouth).

Finally, my pain au chocolat, which is a definite improvement over past attempts at resurrecting from a frozen state:

So, this has been an interesting and very instructive introduction for me to laminated pastries, to which I owe thanks again to hansjoakim, ananda and DonD for sharing their knowledge, insights and enthusiasm for this most wonderful viennoiserie!

Larry

Jw's picture
Jw

That would be the French Bread II (with Pâte fermentée), also from Crust and Crumb. I mixed more all-purpose flour (4.5 of 7 cups) then bread flour. Added flaxseed. What's new: I used a razorblade to do the scoring, still have to get used to that. I allow for deeper scoring then the surgeon's knife, but it is more difficult to make a regular pattern. I'll have to find a straw to attach the blade too....

The inner-outside of the crumb is really good, in the middle it is getting close to ‘too thick'. Notes to myself: just do the ‘ready test' again (by pushing in a straw of wood), add more salt (this is too low for our taste), wait as long as possible with adding salt (let the yeast do it's word first). Otherwise: doing fine for a second batch of bread, doing great for the looks of bread.


One bread is already gone... (with salmon and other fish, really great tast). I used all of mine pâte fermentée, next time I'll save some for a next bake.

Happy baking,
Jw.


hansjoakim's picture
hansjoakim

Well, I'm not suggesting putting rye flour into your macaron batter, although that could be interesting for savoury macarons...if such a crazy thing as a "savoury macaron" exists... Let's do the rye thing first and then look at the macarons afterwards.

This week I've been playing around with a very simple recipe for a 40% rye. I wanted a formula that I could mix and bulk ferment in the afternoon/early evening, and then bake straight out of the fridge, first thing next morning. I also wanted a bread with a subtle, pleasing rye taste - nothing overtly sour or aggressive on my plate, thank you very much. So after some fiddling around, I ended up with this recipe.

Here's my mise en place (clockwise from bottom): Ripe rye sourdough, lukewarm water, flour mix and salt.

40% rye mise en place

The modest 72% overall hydration makes this dough easy to work with, and shaping is straightforward. The dough was noticeably gassy both during the fold and when it came time to preshape and shape. I'm not really sure if a fold is necessary for this kind of dough, but I still like to pull it out from the bowl, place it on the table and feel its consistency. I ended up with simply degassing it lightly, and then stretching the sides ever so carefully before folding the sides up as usual. Make sure you don't tear or rip the dough - the rye flour makes this kind of dough a bit tough and not particularly extensible.

First thing next morning:

40% rye


And here's the crumb shot (from a little later in the day):

40% rye crumb

The formula yielded a bread that was pretty much as I expected it would be: Delicate rye flavour, hints of rye sour and a rather light crumb. The crust packs much flavour on its own, and it even had clear signs of crackles along the sides of it. I've been enjoying a couple of these loaves with sausages and smoked salmon all week long.


Now, for the (as advertised) macaron part. Macarons is a great way to get rid of leftover egg whites (should you have any). The batter is merely whites, sugar (powdered and granulated) and almond meal. There's no such thing as almond meal around here, so I had to buy whole almonds, blanch them, grind them and then process until a very fine consistency together with powdered sugar. I'm not sure if grinding fresh almonds yields a better macaron, but it took me over an hour to produce that almond meal... better be worth it... better be worth it...

To some, there are two things that require all the stars to be perfectly aligned to get right (not to mention the humidity, temperature and performing several sacrificial ceremonies): Starting a sourdough culture from scratch and getting the macaron batter to the right "flowing like lava" consistency...

There seems to be (at least) two schools re: macaron making, depending mainly on what kind of meringue the batter is prepared with. Most internet sources and textbooks (including ABAP), settle for a simple French meringue. Non-compromising, hardcore macaron aficionados never settle for anything less than a full Italian meringue. The Italian meringue is supposed to give more consistent results, less lopsided feet, no cracked shells, a batter less prone to overmixing and shells that can be baked immediately (as opposed to the French meringue ones, which benefit from at least 20 mins. rest between piping and baking, in order to produce a firm shell). It is also claimed that success with the French meringue method hinges on using either aged egg whites or egg white powder. Phew. Such a simple, straightforward list of ingredients and then these detailed, scientific instructions, no wonder the stars need to be aligned to get these guys right.

I had enough egg whites over to try two batches, so I decided to make one with a French meringue and one with an Italian. Some remarks:

  • I did not use aged egg whites for either method, and I did not add any egg white powder. All eggs were separated merely hours before mixing the batter, so there shouldn't be any "aging" effect in either mix.
  • For both mixes, the shells sat approx. 20 mins between piping and baking, in order to toughen up their shells.
  • I found it easier to mix the French meringue batter than the Italian one. The batter made with Italian meringue took quite some time to come together, while the French was easier and quicker to get to the "flowing like lava" consistency.
  • I followed the recipes and baked the French meringue macarons at 180C for 10 mins, with the door slightly ajar the entire time. The Italian meringue macarons were baked at 160C for 15 mins with the door closed. I baked them in a conventional oven (no convection/fan-forced bake), and the shells were baked on the thin, perforated baking sheets shown below:

Piped macarons


I'm not sure how to explain it, other than either blind luck or being blessed with a macaron-friendly oven, but both batches had close to 100% success rate. Of approx. 40 shells in either batch, only one or two came out with lopsided feet. No cracks. I couldn't believe it.

Of the two recipes, I was most pleased with the one with the French meringue method. I think that baking at 180C produced a better interior body in those macarons than those that were baked at 160C. Some of the latter had air pockets close to the top shell, whereas the first ones had a full, lovely chewy body. I bet the Italian meringue macarons, baked at 180C, would've produced equally good interior bodies in the shells. I also feel that baking with the door slighly ajar produced a more even heat in the oven, at least a more even colouration was noticeable.

Filled macarons


The macarons were filled with a dark chocolate ganache (with a hint of Grand Marnier thrown in for good measure).

Breakfast for champions:

Macaron breakfast


jennyloh's picture
jennyloh

Somehow,  my miche was NOT quite a miche,  as it had a darker brown.  I wonder if my flour has a mixed of rye,  it turns my bread dark brown.  I went into the website - Aurora - Weizen Vollkornmehl.  But there was no indication of rye mix,  it just indicated whole grain whole wheat.  I guess it has more bran than other whole wheat flour?

My bread cracked up as well,  I guess because I baked it cold,  and its suppose to flat out,  but I put it into a claypot?

Perhaps someone can enlighten me?


The crumbs were denser than I like.  Somehow, most of my whole wheat breads turn out like that,  I've changed my technique to stretch and fold,  the white breads turn out very very well,  but not whole wheat.  Why?  Do I have to do more stretch and fold?  


Last question:  We seldom eat wholemeal bread.  What does wholemeal bread goes well with besides cheese?


More details - click here.


Jenny

dmsnyder's picture
dmsnyder

SD Psomi after Greenstein's "Psomi Bread"

On page 151-153 of Greenstein's “Secrets of a Jewish Baker,” there is a recipe for what he calls “Psomi Bread.” He says he had this from a bakery in New Hampshire and made his own version. His formula is as follows (The weights are my estimates. Greenstein only provides volume measurements.):

Sponge (150% hydration)

½ cup warm water (120 gms)

2 packages active dry yeast

1 ½ cups buttermilk or sour milk at room temperature (357 gms)

3 cups whole wheat flour, preferably stone ground (384 gms)


Dough (67% to 82% hydration, depending on am't of AP flour added)

4 tablespoons honey (84 gms)

2 tablespoons butter or shortening (24.5 gms)

2 to 3 cups unbleached all-purpose flour (266-399 gms)

2 teaspoons salt (9.24 gms)

½ cup toasted sesame seeds

Flour, for dusting work top

Oil, for greasing bowl

Additional sesame seeds, for topping (optional)

Shortening, for greasing pans

Procedures

  1. Dissolve yeast in water. Add other sponge ingredients and mix. Cover and ferment for 45 minutes.

  2. Mix dough ingredients into sponge using 2 cups AP flour. Mix and add more flour as necessary. In stand mixer, dough should clean bowl sides. Mix 8-10 minutes. Dough should be smooth and elastic.

  3. Transfer dough to oiled bowl. Cover and ferment until double.

  4. Divide dough into two equal pieces and preshape. Rest 10 minutes.

  5. Shape into pan loaves or free form.

  6. Proof until doubled. Score with 3 diagonal cuts and brush with water.

  7. Bake in pre-heated 375ºF oven 35-45 minutes.

  8. Brush again with water and cool on a rack.


Now, over the past year, I've been trying to find recipes that would produce the kind of Greek bread that my daughter-in-law has described having in Greece. About the first thing I learned is that the Greek word for bread is … Psomi. So, Greenstein's formula surely was for a bread of Greek origin. I gather he had no clue that he was making “Bread Bread.”

I also learned that the typical Greek village bread was always made with a sourdough and that it used whole-grain flour. Inclusion of fat – either lard or olive oil – was common, as was the addition of honey. Sesame seeds and at least some, if not all, durum flour were also commonly used.

So, looking at Greenstein's formula, I see he uses a yeasted sponge made with buttermilk or sour milk. I think it's safe to assume this was to acidify the dough to taste somewhat like sourdough would. I see Greenstein uses both AP and WW flour, but all the WW is pre-fermented. I decided to take Greenstein's recipe a step back towards it's presumed origin. More steps may follow in the future.

I also decided to apply some of what I'd learned about whole-grain bread baking from Peter Reinhart's books and used both a soaker and a levain and pre-fermented 25% of the total flour. Following Reinhart's formulas in “Whole Grain Breads,” I divided the whole wheat flour equally between a soaker at 87.5% hydration from milk and a levain at 75% hydration, with the seed culture 20% of the flour. I used my stock sourdough starter which, as it happens, is kept at 75% hydration. I also followed Reinhart's guidance and used 1.8% salt for the total dough, with some of the salt in the soaker (to inhibit enzymatic activity).

So, this is the formula I developed:


Levain

Wt. (gms)

Baker's %

Whole wheat flour

192

100

Water

144

75

Active starter (75% hydration)

38.5

20

Total

374.5

195


Soaker

Wt. (gms)

Baker's %

Whole wheat flour

192

100

Milk

168

87.5

Salt

3.35

1.7

Total

363.35

189.2


Final dough

Wt. (gms)

All of the levain

374.5

All of the soaker

363.35

Bread flour

384

Water

241

Honey (4 T)

84

Olive oil (2T)

24.5

Salt

10.45

Toasted sesame seeds

½ cup

Total

1481.8


Procedure

  1. The night before baking, mix the soaker. Cover the bowl and leave at room temperature for 12 to 24 hours. (If not then ready to mix the final dough, the soaker can be refrigerated for up to 3 days.)

  2. Mix the levain and allow to ferment until ripe (at least doubled and volume, with a domed top) – 4 to 6 hours. (This can be refrigerated for up to 3 days.)

  3. If either (or both) the levain and soaker were refrigerated, take them out to warm to room temperature (about 1 hour) before mixing the dough.

  4. Cut the levain and the soaker into about 12 pieces and put them in the bowl of a stand mixer together with the other ingredients. Mix with the paddle until they form a shaggy mass (1-2 minutes at Speed 1).

  5. Switch to the dough hook, and mix to achieve moderate gluten development. (7 minutes at Speed 2)

  6. Transfer the dough to a lightly oiled bowl, cover the bowl, and ferment until increased 50% in bulk with folds at 50 minute intervals. (About 2 ½ hours)

  7. Divide the dough into two equal pieces and pre-shape into balls. Let the dough rest, covered for 10-15 minutes.

  8. Shape the pieces into boules, batards or pan loaves and place them in bannetons or pans or on a couche.

  9. Proof until increased 50% in bulk. (2 hours, 15 minutes in my kitchen at 72ºF)

  10. While the loaves are proofing, pre-heat the oven to 425ºF with a baking stone in place and your steaming method of choice. (If baking pan loaves, the stone and steaming are not necessary.)

  11. When the loaves have proofed, transfer them to a peel. Pre-steam the oven. Optionally, brush or spritz the loaves' surface with water and sprinkle with sesame seeds. Score the loaves. Traditional scoring for a boule is 3 transverse cuts. Transfer to the oven.

  12. Steam the oven, turn the temperature down to 350ºF and bake for 40-50 minutes.

  13. Transfer the loaves to a cooling rack and cool completely before slicing.


The crust was chewy and the crumb chewy but tender. The flavor was "sweet and sour whole wheat." It was actually pretty sour - more than my wife liked. I have made sourdough whole wheat breads before and did not enjoy the combination of whole wheat and sour flavors, but I did like this bread. This tasting was when the bread was just ... well ... almost cool. It will no doubt mellow by morning. I'm eager to taste it again after a good night's sleep.

Enjoy!

David

Submitted to YeastSpotting


Pages

Subscribe to Recent Blog Entries