The Fresh Loaf

A Community of Amateur Bakers and Artisan Bread Enthusiasts.

Recent Blog Entries

sortachef's picture
sortachef

Pizza with quick-rise dough


A newly minted yeast showed up on my grocer's shelves last week. Made specifically for pizza crust by Fleischmann's, a venerable yeast company now owned by Associated British Foods, Pizza Crust Yeast promises a fully risen crust in just 30 minutes. Turbo-charged in other words. I just had to give it a spin.

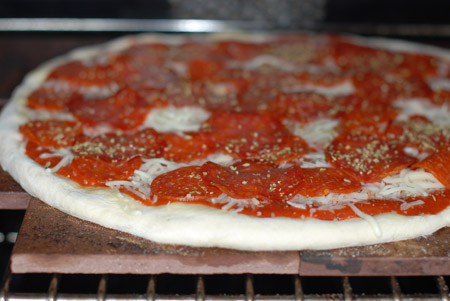
Before I get too specific, let me tell you this: the yeast performed admirably. We made test runs with two different doughs using the specialized yeast, both in the conventional oven and in the woodfired oven, and every pizza came out beautifully. The crusts were puffy and mature despite the brief rise. My favorite was made with half caputo flour and had a longer rise time than the promised 30 minutes, while the meat-lovers in my family gave two thumbs up to the fast rising pepperoni pizza made with a crust recipe very similar to the one on the package. (The pizza in the photo above is in the oven after only 27 minutes!)

What's different about this yeast? Besides dry yeast granules, the package contains a cocktail of emulsifiers, antioxidants and enzymes that speed the growth of the yeast. You also add water that is 10 or 20 degrees warmer than normal - in the 125º range - that gets the process off to a very fast start. Turbo charged, indeed!

If you're familiar with yeast doughs, you will notice a difference as soon as the hot water is mixed with the dry ingredients. Because of the boosted heat and the emulsifiers involved, the gluten in the dough forms quickly, adding a spring to the dough that you wouldn't feel for 20 minutes or more if using conventional yeast. With the pizza crust yeast, the dough after a few minutes puts out an earthy smell, almost as if it is cooking. This smell alarmed me a little at first, but did not linger throughout the forming and baking processes, and was not apparent at all in the finished pizzas.


So here's the skinny:

  • If you want the fastest yeast crust pizza available, use the dough recipe in my 40 Minute Pepperoni Pizza. The 30-minute dough (plus about 10 minutes of baking) held together better than any quick dough I've ever made. For best results, bake the pizza directly on quarry tiles on the center rack of your preheated oven.
  • If you want a more mature crust that tastes like a high-quality pizzeria pizza, in the same recipe use caputo flour for half the flour and cut the amount of yeast in half. Knead well and let dough sit for an hour before forming your pizza. This 90-minute dough will rival an artisan crust, although it will lack the nutty flavor that comes with an overnight rise.


Meanwhile, before you rush to the store to get some of this whiz bang pizza crust yeast, you might want to know what the added ingredients are and what they do. As far as I can tell, these are well-accepted additives in the food world; you can google any one of them for more info.

Sorbitan Monostearate - a waxy derivative of sorbitol that aids yeast cells in their ability to absorb water. This one is found in active dry yeast as well.

Ascorbic acid - an antioxidant food additive group that contains as one of its members vitamin C. This is an accepted dough enhancer which I have used in small quantities to nourish and freshen the flavor of breads. Fruit Fresh is one brand, available as an additive to preserve color in canned fruits and vegetables.

L-cysteine - a nonessential amino acid that has antioxidant properties.

Enzymes - proteins that speed the rate of chemical reactions.


Conclusion: If you're in a hurry for a good homemade crust, this yeast will do the job of speeding things up. And since it does that in about the time it would take to bake a frozen pizza, I say the decision is a no-brainer. After all, the best pizza is the one you make yourself!

So go on. Give it your own test drive. I think you'll agree at the finish line that pizza crust yeast is a real winner!

For original post, see www.woodfiredkitchen.com

charisma's picture
charisma

hi,

Im a beginner at baking...cooking actually.

Id like to know if there is a permanent substitute that i can use  for egg as im vegetarian, so it seems like i have to give up on lots of good recipes and takes a lot of ti,e looking up for substitutes!!!!

i want to know an egg substitute in cakes, breads and tarts. Please help.


Charisma

hansjoakim's picture
hansjoakim

I thought I'd give a brief update on what I've been tinkering with in my kitchen over the weekend. I baked a nice rye loaf on Saturday morning - it's based on my regular 70% rye recipe, but I added some toasted sunflower seeds and whole-rye flour to a cold soaker. The dough is a breeze to mix and work with, without being terribly sticky or otherwise up to no good. You can find the recipe here. The loaf is pictured below:

70% rye with toasted sunflower seeds


For dessert, I prepared some princess pastries. I had a genoise cake in the freezer just waiting for one application or other. I split the genoise into thin cake layers, brushed them with Grand Marnier cake syrup, and spread raspberry jam on top of one layer. Rounds were cut out with a 5cm cookie cutter, and pink coloured marzipan wrapped around the two sandwiched genoise layers. Some pastry cream on top of the genoise and then whipped cream to fill up the marzipan cylinders. The pastries were then decorated with fresh raspberries and chocolate figurines and shared with co-workers :)

Princess pastries


And here's the assembling stages; raspberry jam on genoise layer:

Princess pastries


... and the pastries before and after pastry cream:

Princess pastries

RobinGross's picture
RobinGross

Sourdough chocolate cherry Love Loaves

I baked some sourdough chocolate donuts and heart shaped muffins this weekend.  At last the fresh cherries are flowing so I chopped up a pound of fresh Bing Cherries to fold into the batter (and some chocolate chips too).  

Sourdough Chocolate Cherry Donuts

The wild culture (sourdough starter) that I used in these donuts and "love loaves" was captured in Mexico City last year and is one of my favorite cultures for baking (especially for pairing with chocolate).  The sourdough keeps them moist and tender.  They are disappearing fast!

sastalnaker's picture
sastalnaker

A lurker finally comes out. I just baked my first loaves from my "new" (about 5 days old) wild yeast starter. They came out great. I used Shiao Ping's version of Chad Robertson's Country Sourdough. I tweaked the schedule a bit to fit my personal commitment, but generally followed her schedule and formula. I did replace about 20% of the total flour with King Arthur Traditional Whole Wheat Flour.

The loaves turned out beautifully. I was completely surprised by the amount of oven spring. I baked the first two loaves and the slashes were obliterated by the amount of spring that occurred. On the second set I slashed even deeper, but they were almost completely filled in. I know I should have waited to slice them, but I was curious about the crumb and so cut one loaf as soon as it was cool to the touch. Very pleasantly surprised by the openness of the crumb, and the crust seems nice and crisp with a bit of tooth to it. I think the "fresh" flavor was quite nice, especially for a new starter. It will be interesting to see how the flavor develops as the bread ages a bit.


Pre and Post bake

This is a comparison of the proofed loaves to the baked ones.

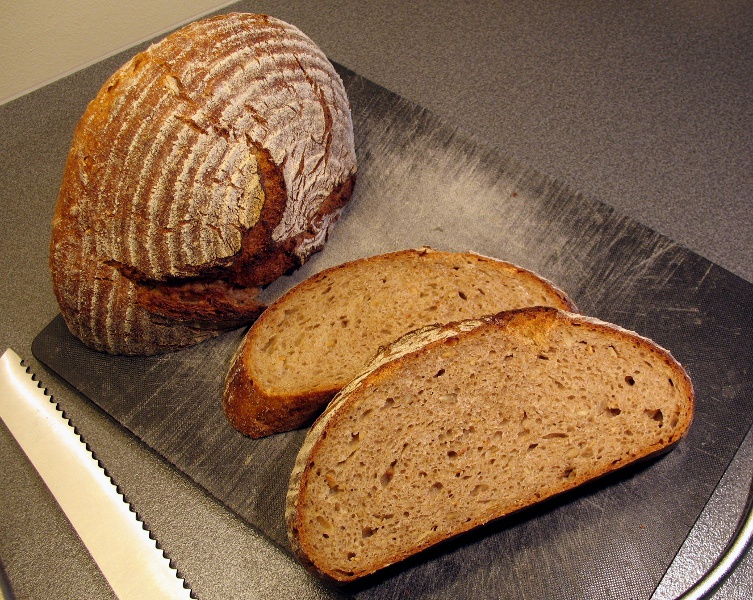
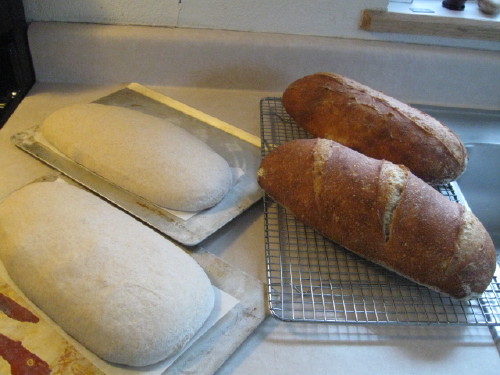
This is the second set of loaves and even though I made a concerted effort to cut deeper the slashes still filled in a lot.

Crumg
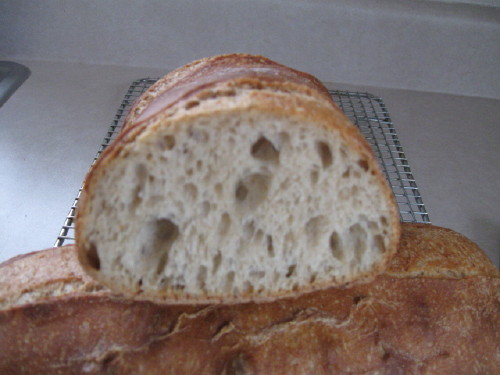
And finally the crumb. (Sorry for the poor focus).

So there it is. My first loaves and my first blog post. I'd like to express my appreciation to the folks who make and maintain TFL website. It is truly an approachable and yet impressive resource for bread bakers everywhere. Thanks for the amazing array of expertise, the encouragement, and the inspiration.

Cheers everyone,

Scott


zpak's picture
zpak

I have a wolfgang mill and would like to know if I would be losing

much nutritional value by milling 5 pounds of wheat at a time and keeping it 

in an air tight refrigerated container.  Is there anything I should be aware of

before I do it ?...   It would be used up in about two weeks and much more 

convenient for me. 

Thanks

JoeVa's picture
JoeVa

Two months ago I bought a new oven so I had to learn how it works, I mean what is the best setup for sourdough heart baking. This led me to change my setup: no more covered baking!

Have you ever seen the incredible oven spring, great crust color, beautiful ears you have with a professional steam injected deck oven? Just take a look at these photos from Wally's excellent post "My Excellent Adventures at King Arthur Flour".

                                                      589064849_img_1023

                                                      [James scoring Pain au Levain]

                                  589147293_img_1067

                                  [Jeffrey at the oven]

                                  589150951_img_1072

Don't you think this is incredible? How can this "flat dough" spring up so well? It must me the oven+steam system!

Here is one small (470g) test loaf, nothing special, just a white liquid sourdough and stone grounded Italian Tipo1 flour - very close to T80 French flour - a medium/soft+ dough at 66% hydration. I didn't take too much care of the dough because I was focused on my setup, but ...

                                  DSC03665

                                  DSC03666

                                  DSC03673

So, the new setup is simple: free steam in the oven generated with a pre-heated bread loaf pan filled with stones and a wet towel. Preheat the oven at 250°C for about 45 minutes with the stone and the pan inserted (the pan is on the same level with the stone) and put the wet towel in the pan just before inserting the bread in the oven. My oven is very well insulated and it traps all the steam, moreover the top heating element work well and doesn't get fire-hot. When I baked this dough with the lid it was very flat with no ears ...

I think I have finally removed THE variable that gave me somewhat inconsistent baking result.

dmsnyder's picture
dmsnyder


I've been baking the San Francisco Sourdough from Michel Suas' Advanced Bread and Pastry frequently over the past few months. It's very good. This weekend, I decided to try a couple of his other sourdough breads.

Right after the formula for “San Francisco Sourdough,” Suas gives two other formulas for Sourdough Bread, differing in the levain used. One uses a 100% hydration levain and the other a 50% stiff levain. Both differ from the San Francisco Sourdough in using a smaller starter inoculation for a levain that ferments for 24 hours. This week, I chose to make the one with the stiff levain, which Suas calls “Sourdough Bread One Feeding.”


Levain Formula

Wt (oz)

Baker's %

Bread flour

3 1/4

95

Medium rye flour

1/8

5

Water

1 ¾

50

Starter (stiff)

7/8

25

Total

6

175


Final dough

Wt (oz)

Baker's %

Bread flour

14 7/8

100

Water

10 7/8

72.8

Yeast (instant)

1/8 tsp

0.1

Salt

3/8

2.53

Levain

6

40

Total

2 lb

215.43

Note: The over-all hydration of this dough is 64%.


Procedure

  1. Mix levain thoroughly.

  2. Ferment for 24 hours at room temperature.

  3. Mix the dough ingredients to medium gluten development. DDT 75-78ºF.

  4. Transfer to an oiled bowl. Cover tightly and ferment for 2 hours.

  5. Divide into two equal pieces and pre-shape into balls.

  6. Rest for 20-30 minutes, covered.

  7. Shape as boules or bâtards.

  8. Proof in bannetons or en couche for 90-120 minutes at 80ºF.

  9. Pre-heat oven to 500ºF for 45-60 minutes, with baking stone and steaming apparatus in place.

  10. Pre-steam oven. Transfer loaves to the peel. Score with “chevron” or “sausage” pattern, and transfer to the baking stone.

  11. Steam oven and turn temperature down to 440ºF.

  12. Bake for 30-35 minutes or until done.

  13. Remove loaves to a cooling rack and cool completely before slicing.

Note: My oven has a convection mode and a conventional baking mode. My actual baking procedure is to pre-heat the oven on Convection-Bake to 500ºF. After the bread is loaded and the oven steamed, I turn the oven to the recommended temperature using conventional (non-convection) baking. When the bread has started to color and has had full benefit of the steam, I switch to Convection-Bake again and lower the temperature by 20-25ºF. (This assumes I'm not baking with “falling temperatures,” as with some rye breads.)

The loaves were proofed at 80ºF for 2 ½ hours and expanded by 50-75%. I was concerned about the long proofing. One of the boules did deflate slightly with scoring, but I got very nice oven spring and bloom.  

The crust was crunchy and the crumb was soft - not very chewy. (I made this bread with KAF AP flour.) The flavor was sweet and wheaty with the barest hint of sour, and that was of the lactic acid type ... I think. Frankly, I missed the tang and the flavor tones of whole grains, which my preferred breads all have. On the other hand, this may approach the French ideal of a pain au levain, which is not sour in flavor. 

For those who prefer a not-sour-sourdough, I would recommend this bread without hesitation.

David

Submitted to YeastSpotting


dmsnyder's picture
dmsnyder


I have some experience baking Jewish Sour Ryes and German-type rye breads. Suas' formula for “Sourdough Rye Bread” (Advanced Bread and Pastry, pp. 212-213) seems to me to be for a French-style “Pain de Seigle,” although Suas does not label it as such. It uses a stiff levain identical to the one Suas uses for his “San Francisco Sourdough,” but then the final dough is 60% rye flour. Overall, the rye content is 52% of the total flour. The overall dough hydration is 70%.


00">

Levain Formula

Wt (oz)

Baker's %

Bread flour

2 1/2

95

Medium rye flour

1/8

5

Water

1 1/4

50

Starter (stiff)

2 1/8

25

Total

6

230


Final dough

Wt (oz)

Baker's %

Bread flour

6

40

Medium rye flour

8 7/8

60

Water

10 7/8

72.8

Yeast (instant)

1/8 tsp

0.12

Salt

3/8

2.53

Levain

6

40

Total

2 lb

215.43


Procedure

  1. Mix levain thoroughly.

  2. Ferment for 12 hours at room temperature.

  3. Mix the dough ingredients to achieve some gluten development. DDT 75-78ºF. (I mixed for 7 minutes at Speed 2 in a KitchenAid stand mixer.)

  4. Transfer to an oiled bowl. Cover tightly and ferment for 2 hours.

  5. Divide into two equal pieces and pre-shape into balls.

  6. Rest for 20-30 minutes, covered.

  7. Shape as bâtards.

  8. Proof in bannetons or en couche for 90-120 minutes at 80ºF.

  9. Pre-heat oven to 500ºF for 45-60 minutes, with baking stone and steaming apparatus in place.

  10. Pre-steam oven. Transfer loaves to the peel. Score as desired, and transfer to the baking stone.

  11. Steam oven and turn temperature down to 450ºF.

  12. Bake for 30-35 minutes or until done.

  13. Remove loaves to a cooling rack and cool completely before slicing.

This dough does develop some gluten from the 12.7% protein bread flour used, but it otherwise handles like a high-rye bread. The dough is clay-like and sticky, although less so than if it had had higher hydration. It was easy to shape with a light dusting of flour on the board.

The loaves expanded by no more than 50% after over 2 hours proofing at 80ºF on a couche, and they had modest oven spring. The cuts opened up nicely, considering.


The crust was hard and crunchy. The crumb was soft and moist. This is a pretty thin loaf - marginally bigger than a baguette. The ratio of crust to crumb is relatively high with a marked contrast in texture, which makes it quite interesting in the mouth.

The flavor is mildly sour with a sweetish, earthy rye flavor. Very nice. The French prefer this type of bread with smoked meats, soft cheeses and fish. We are having salmon for dinner tomorrow, and I have a nice Laura Chanel Chevre in the fridge. This rye should be delicious with both.

David

Submitted to YeastSpotting


hmcinorganic's picture
hmcinorganic

this is the Italian bread from Bread Bakers Apprentice, made with my Uncle's home grown olive oil.  These loaves were too long for my peel and I had a devil of a time getting them in the oven.  I had to cook them diagonally one at a time.  The 2nd one was dusted with flour before scoring because the first one almost completely deflated when scoring.  This dough was very hard to move around;  it may have over proofed but I had to run some errands.  I try to schedule bread in between all my other activities but sometimes it just doesn't work.  

They cooked up well, and I forgot to turn the oven down on the 2nd loaf from 500 to 450 (as usual) so it cooked in only 20 minutes.  The first took 25 or 30.  Not much oven spring (because of overproofing?)

my shaping is getting better, but I still can't reproduce my breads at all.  They all taste fine, but they are different every time (and no, not only when I make different kinds :) )


Pages

Subscribe to Recent Blog Entries