The Fresh Loaf

A Community of Amateur Bakers and Artisan Bread Enthusiasts.

Recent Blog Entries

teketeke's picture
teketeke

 I found this recipe on Cookpad. ( Japanese)  It is very good to eat this in summer using juicy fresh tomatoes, fravorful fresh basil with your own baguettes. I love it without doubt. This recipe was posted by suru-zen. Thank you, suru-zen!!

 My favorite's Bruschetta recipe:

Ingredients  

*Large fresh tomatoes ( Peeled and diced)

2

*Basil

6-7 leaves

*Garlic (grounded)

1 clove

*Olive oil

4Tbsp

*Parmesan cheese

2Tbsp

*Salt

2 pinch

*Freshly grounded black pepper

1-2 tsp

French bread ( sliced and toasted)

 1  baguette

Cream cheese

As much as you want

1. Put * all ingredients in a medium bowl and mix lightly and refrigerate it

for 1 hour.

2. spread some cream cheese on the french bread and put some * tomato mixture on them.

Sprinkle parmesan cheese a little bit  and ready to serve.

Thanks to SylviaH & Sagharbormo, I could have another delicious version of bruschetta. I cut the baguettes lengthlwise and pulled  some soft crumb out and broiled them until golden brown. After that, squeezed 1/2 ripen fresh tomato in the crumb,  spread some cream chease over on it, and put  my *ingredients on, and sprinkle some olive oil and parmesan cheese ( I like cheese :))    It tated very good.  Thank you, folks!


Neo-Homesteading's picture
Neo-Homesteading


Anyone around me has come to figure out I have certain things that I'm obsessed about. Bread being the obvious but things such as mustards, vinegars and hot sauces are also on my list of things I compulsively crave. The desire for hot, sweet and sour drove me to this combination. I saw the balsamic jelly in bon appetit magazine and decided I had to try it. For the bread I used a standard wet dough boule recipe with the addition of pink and black peppercorns as well as red pepper flakes. (2-3 tablespoons of each pepper corn and a pinch of flakes). The outcome was a wonderful combination. The bread on its own was spicy and fragrant and the balsamic jelly was a "weird" but delicious flavor that I could not get enough of. I ate this bread and jelly for almost a week for breakfast, even after it had gone so far beyond stale I could not resist. The flavor is extremely unique, anyone who loves sweet and hot would love this combo. 


Link to external blog post and balsamic jelly recipe: http://neo-homesteading.blogspot.com/2010/08/balsamic-jelly-pepper-boule.html

Neo-Homesteading's picture
Neo-Homesteading


Every now and again I decide to really step outside of the box and stretch my comfort zone. Although Indian and oriental foods in general are among my favorite things to make generally the only ethnic "bread" I make is naan. I've made this type of flat bread on multiple occasions but this time instead of using mostly white flour I used almost all whole wheat flour. Served with chicken curry and mango chutney it was pretty delicious. 


Link to external blog post and recipe:http://neo-homesteading.blogspot.com/2010/08/delicious-indian-supper.html


dmsnyder's picture
dmsnyder

SFBI Artisan I day 2


Today's emphasis was on the differences between Short, Intermediate and Intensive mixing. Each of us baked 5 baguettes with each type of mix. The formulas for each batch was slightly different - the shorter the mix, the longer the fermentation, the greater the number of folds, the higher the hydration and the less yeast.


Our lab, aerial view


Today's project


Stretching and folding the Improved Mix dough (Miyuki demonstrated, then each of us did it on our own batch.)


Our breads, cooling


Assessing the breads


Comparing crumbs (from left to right, short, improved and intensive mix)


Of course, the practice handling the dough with personal critique from Miyuki continued. I was amazed that, with 16 students, she clearly remembered what she had told each of us yesterday and compared today's production to yesterday's in incredible detail. (I chatted with one of the SFBI interns at a break. He clearly worships Miyuki as a very highly skilled baker and teacher. It's like she knows everything and does everything better than anyone - not just breads, but also pastries, cakes, venoiserie … everything. I can see it.)


Assessing each student's baguettes


My baguettes


Miyuki cutting one of my baguettes


After all the breads were baked, we assessed each one that Miyuki had made. Then, she evaluated the breads each of the students had made. I need to work on shaping and scoring consistency. She really liked the crumb of my Improved Mix baguette. Her comment after looking at it was, "You have really good dough handling." Ooooooh. That felt good!


My intermediate mix baguette crumb


David


odinraider's picture
odinraider

Over the weekend I made some more baguettes as well as some Pane Toscano. In addition, I began development on a honey white wheat sourdough sandwich bread. More on that later.

The baguettes were not the best. I varied my fermentation time to only a few hours rather than the slow cold ferment I have grown to appreciate. I did the poolish thing, and I honestly have not made up my mind as to the benefit of the time lost in preparing it and waiting for it to ferment. Next weekend I will see when I combine the poolish and the long cold lonely fermentation into, hopefully, the best baguette ever.


Here's the recipe I'm trying next weekend for anyone who wants to play along:

poolish: 100 g water, 100 g flour, 3 g yeast

Autolyse: 400 g flour, 260 g water

Add poolish to autolysed flour after one hour.

Mix and then fold in 11 g salt.

ferment 30 minutes at room temp, stretch and fold, ferment another 30, stretch and fold, then cover and refrigerate 10-14 hours. Let return to room temp, divide, shape, and bake on a stone in a preheated oven at 500 degrees. After 12 minutes, reduce the heat to 475 and bake another 10-12 minutes, until the baguettes are dark and done.

If this needs more clarification, ask and I will try to provide some.

Another short note: I am trying different types of flour, and the best results for baguettes so far has come from the Kroger brand unbleached all purpose. strange, because it is rubbish for any other kind of bread.

The Pane Toscano is good. Not great. Good. I didn't devote the attention to it that it needs to be great. But mind you, it is good. I will cut up the last of it with some tomatoes for panzanella tomorrow with fresh garden tomatoes and cucumbers. That will be a delightful lunch.

Now on to the last. The taste of the honey white wheat sourdough is right on. The texture is not. The crust is nice and firm but pliant and yielding. The crumb is soft. Next weekend I will try this again without the small amount of oil I added, and I will bake it longer. Hopefully those two changes will get it right, because this will be a great one for the recipe books. I didn't take pictures of this majestically risen loaf because my &*%$ bread pan (which I really should replace, if only to clean up my vocabulary) decided it wanted to hold on to the sides of the loaf. I got most of it out but for a small section of each side. While not the end of the world, it is also not worthy of photography.

Next weekend: focaccia with fresh rosemary (before it all burns up in the summer heat), Julia Child's white sandwich loaves, a (hopefully) better version of the wheat. And, of course, baguettes.

Chausiubao's picture
Chausiubao

French dough made with poolish is a wonderfully extensible and easy to shape. Unfortunately for me this particular batch was a bit on the short side.


As a home baker I always have trouble getting a nice open crumb, usually whatever I was making whether enriched or lean would always be tight. Which is not to say that it was "bad" but it was a really troubling condition of my bakes. Baking in a bakery on the other hand is quite the opposite. Achieving a tight crumb in a spiral mixer requires intentionality, an oddity when we consider the fact that its one thing to mix doughs by hand and quite another to mix them in a machine. Mixers are rough, unyielding, and can go on as long as they have the power to; hand mixing with kneading or folding, depending on your bready sensibilities, is comparatively gentle and definitely not a process that you can do forever. So you would think that mixing a dough by hand would always give you a good open crumb. But my own experiences seem to invalidate that hypothesis. So stepping back, we say that your cell size is dependent on the level of gluten development (also dependent on how strong your flour is) because mixing, in addition to incorporating all your ingredients, primarily develops gluten, by hydrating flour.

So if there are additional factors besides pure gluten development and flour strength, what are they? The first and most obvious is the proof. It has to be, its the period of time when you allow your yeast to fill up cells with gas, and the more gas, the more these cells are stretched and thus bigger air cells. Which brings up another point, dough extensibility allows maximum volume. I would imagine bulk fermentation also plays a minor role in this, as without good fermentation (and momentum), a good proof will be longer and more difficult. A good hot oven as well promotes maximum oven spring as the yeast are introduced to so much heat.

The one thing I don't understand is the effect of shaping on air cells. I'm reasonably confident good shaping will facilitate an open crumb, but then again to a certain extent a "good" crumb is what you make of it. If you want a tight crumb, you will shape it such that your finished product has a tight crumb, and vice versa for an open crumb. It would make sense for the orientation of your air cells to be effected by the shaping. If you shape a baguette and overhandle it such that its twisted and uneven, the air cells you get are probably going to be destroyed or torn up.

Shaping and proof have a fundamental impact on the crumb of your bread, so lets stop worrying about gluten development and worry about the whole process instead!

teketeke's picture
teketeke

 My husband had been diagnosed with hypoglycemia. The worsest thing is that he has been suffering from panic attack  since he pasted out at the work 3 years ago. I was too silly that I hadn't tried to use 100% whole wheat flour on my recipe. ( My old recipe was 54%(Actually 54.5%)whole wheat bread)  And yet he likes 55% whole wheat bread more than than 85% or 100%.


So, this is My 100% whole wheat bread and 85% whole wheat bread and  55% whole wheat bread recipe

(23cm x 10.5cm x 10.5cm) 100% -13cm height and 85% -13-14cm height and 55%- 13-14cm height after baking. 

Note: When you proof the dough too much  before baking, You will have really tall bread, but the top part will be really light.


    写真 This is 55% whole wheat bread

*Yeast

5.3g

*Warm water  ( 40 or 100F)

180g

*Honey

24g

*Molasses

18g

*2 Egg yolk (L )  +Heavy whipping cream =

To warm up :10seconds in a microwave using normal mode.

80g

*Whole wheat flour for 100% or All purpose flour or bread flour for 85%

#All purpose flour for 55%

*100g

#200g

*Whole wheat flour for 100% and 85%

#whole wheat flour for 55%

*340g

#240g

Salt

8g

Butter

To soften :20 seconds in a microwave using defrost mode. 

18g

Melted butter for brushing after baking


#I always use all purpose flour. 

1.  Put * ingredients in order except *the flour in a big bowl and mix. Add *the flour and mix. Set aside.

2.手順2の写真  LEFT: Put whole wheat flour and salt in a midium bowl. Right: set the butter in a small bowl. Top: No.1.

3. 手順3の写真 Put the flour and salt mixture in the food processor and hit pulse 5.6 times until combine.

4. 手順4の写真Add *dough mixture and the butter run until combine about 40 seconds or so.

5. 手順5の写真Take the dough out from the food processor, and clean *dough mixture bowl. Put the dough back in the food processor and run until combine.

6.手順6の写真Time to knead by hand for 15 minutes.  Push it down and stretch and fold and repeat over and over. This is very important to get strong gluten development.

7.手順7の写真Put some shortening on a large bowl, and place the dough in. Proof at 28℃ or 32F  for 50 minutes or until the loaf double in size.

8.Punch down to degas gently,Turn the dough onto a counter and divide in 2 and shape. ( It is much better to have beautiful loaf when you measure it) rest for 20 minutes.]

9. Shape : Both oval's height should be around 20cm. * pinch very well!

.手順9の写真

手順2の写真: Japanese bakery way

手順1の写真: My way: to have taller loaf.  Rolling on the second process. Take a look below.

手順10の写真


10. Place each of the dough in a loaf pan like the picture below.( It will rise equally)

手順9の写真

11.Pace the dough have equal space in the pan.

手順10の写真: Japanese bakery way ( This picture is white sandwich bread version →http://www.thefreshloaf.com/node/19174/54-whole-wheat-sandwich-bread)

手順12の写真 :My way

12. Proof at 38℃ or 100F  until the dough rises up a little over  the top of the pan. ( around 1.2 hours for 100% whole wheat bread and 1hour for 85% whole wheat bread) * The time is vary depends on the temprature.


13.Preheat the oven to 200℃ or 400F.  Decrease 180℃ or 350F and bake for 30 minutes.

手順14の写真

14.Drop the pan with the loaf onto a ground about 15cm height to give the dough shock, and remove it immediately from the pan and cool on a rack for at least 1 hour or so, before slicing or serving. ( * Optional: Brush melted butter on the surface.)

100% whole wheat bread

85% whole wheat bread

MadAboutB8's picture
MadAboutB8

 This loaf turn out to taste really nice with the nutty flavour and texture from soybean & linseed.

The recipe is adapted from Hamelman's multigrain sourdough and Bourke Street Bakery's soy and linseed sourdough. I basically followed Hamelman's method and recipe but replace the grains with soy and linseed to the equal amount.

I also noticed that my loaves rise really well this time. The bread structure also appeared to be well-developed (I think and I hope). I figure that this could be a result from a more mature/developed culture. I left the culture to ripe for about 19 hours this bake as oppose to the usual 12 hours.


Bread baking never ceases to excite me. There are lots of flavours and texture to explore. I've been baking bread for over 4 months now....but I'm still sitting in front of the oven looking at my babies being baked and risen to its full growth...at every bake....and still get excited every time. It has been such a satisfying experience.


dmsnyder's picture
dmsnyder


Wow! There is no way possible to describe today in full, even with photos. I'll try a summary.

The day started with coffee and fabulous raspberry muffins and meeting some of the other students. Once the class convened, after a brief but very warm greeting by Michel Suas (hisself!) we each introduced ourselves. About half the class are culinary professionals - some professional bakers. They came from Portland, Seattle, Pittsburg (PA) and elsewhere. Other students were chefs who wanted to add bread making skills. The other half were home bakers, some of whom sold their bread on a small scale.

The teacher was not one of the regular faculty. Miyuki is a graduate of Johnson & Wales and has worked in production at SFBI for 4 years. She occasionally fills in as an instructor. She was knowledgable, organized, responsive and clearly expert.

About half the day was spent in the classroom reviewing "the basics." It was like an executive summary of the chapters on the baking process, dough handling and ingredients in Advanced Bread & Pastry, except we could ask questions when we didn't understand or wanted more information. The other half was in the "lab." We worked today with a straight baguette dough Miyuki scaled and mixed. (Tomorrow we do it all.) The hands-on part was scaling, pre-shaping, shaping, proofing, transferring, scoring and baking. For every step, Miyuki demonstrated for the class then wandered among us to monitor our own attempts, correcting errors and answering questions. At the end of the day, when we all had our 5 baguettes, she assessed each student's shaping, scoring and crumb structure. If something was not perfect, she told us exactly how to correct the problem tomorrow. She instructed us in the criteria by which baguettes are judged in competition, including how to taste them.

It was wonderful to see Miyuki handling dough and shaping, but the biggest surprise was feeling the dough at various stages of an improved mix. Miyuki did use the window pane to demonstrate the degree of gluten development. The surprise was how low a level of gluten development she took as her end point for mixing.

My greatest pleasure was being able to shape full-sized baguettes rather than the demi-baguettes I must shape at home because of the narrowness of my baking stone and oven.

My biggest challenge (so far) has been in scoring, but I'll have plenty of opportunity to practice over the remainder of the workshop.

Here are a few photos of people, equipment and product. The baguettes pictured are the ones I made. They had the best flavor of any baguettes I've every tasted anywhere, but I'm promised improvement as the week progresses.


The Front Door


Our instructor


Loader and deck oven


Some of my classmates


My first full-sized baguettes, waiting for judgement


David


wally's picture
wally


I shared in a forum recently that I've been wanting to try to make what is in essense a rye mash instead of using the standard hot soaker.  The inspiration for this is the distilling experiences using rye of my friends Scott and Becky Harris at their distillery in Purceville, VA - Catoctin Creek Distilling Company.  Here they make two wonderful certified organic and kosher ryes - one casked and the other an uncasked white whiskey, and a rye based gin. (Unabashed plug, their micro-distillery products are now available in Virginia, Maryland, Washington, DC, and yes, the Sacramento area of California.)  I've been able to taste their rye mash, and it's incredibly sweet.  Way beyond anything I've been able to achieve using a hot rye soaker.

With this goal in mind, I contacted one our of resident experts, Debra Wink, to see how I might proceed.  Debra, in turn, drew on some of her expert baking friends, and with her help and their advice I decided upon a plan of action - namely, to attempt to slowly cook a mash of whole rye flour and water for nearly 7 hours at a temperature just below 170°F, which, I believe, is the temperature at which amylase, which is responsible for converting the starches in rye to simple sugars, becomes denatured.

So this weekend I set aside a day and proceeded first to build a formula.  I decided upon a 40% rye, with a mash equivalent to 40% of the total dough weight and a starter just over 20% of dough weight (more on this later). I used Hamelman's rye recipes as general guidelines in determining what percentages both the starter and soaker would be, though I deviated downwards significantly in the percentage of the starter in relationship to overall dough weight, and as we'll see, that may not have been entirely a good idea.  The rye flour used throughout is Heartland Mill's Certified Organic Whole Rye Flour which I am able to procure from my friends Scott and Becky.  Although it is a whole rye flour, in texture and composition it seems comparable to medium rye flours I've seen.  The AP flour used is KA's Sir Galahad.

The total dough weight was to be 1004g, just a bit over 2 lbs.  My overall formula is:

Ingredient      Baker's Percent   Weight
Flour                   100%                       560 g
Water                   76%                        426 g
Salt                        2%                           11 g
Yeast                      1%                           6 g

Starter

Rye Flour               100%                  112 g
Water                      80%                     90 g
Levain                       5%                       6 g

Mash/Soaker

Rye Flour               100%                  109 g
Water                     264%                   288 g

Final Mix

AP Flour                 337 g
Water                        45 g
Salt                            11 g
Yeast                          6 g
Levain                    208 g
Mash/Soaker          397 g

I made up my starter approximately 10 hours before the final mix.  The soaker I began in early afternoon by mixing the flour and water in a double boiler and then bringing the temperature slowly up on my simmer burner.  My goal was to achieve and maintain a temperature of 160°F for approximately 7 hours.  This proved easier said than done.  I found it necessary to stir the covered double boiler every hour, after I achieved my desired temperature, which took me about an hour of stirring at 15 minute intervals until I was there.  However, maintaining a consistent temperature was difficult.  I had to add a small amount of cold water to the double boiler at hour intervals, and in the end, the temperature reached was 170°F which was cutting it close if not too high.

Frankly, a slow cooker would be the ideal way to do this.  Unfortunately, unless you are making mash for 15 loaves or so, there is insufficient volume to make this viable.  If anyone out there has any suggestions of other methods for maintaining a constant temperature under 170°F for 7 hours, by all means share.

I left the cooked rye mash covered overnight.  The next morning I uncovered it, and found that it was sweet - more so than my hot soakers, but less so than Catoctin Creek's mashes, and about the consistency of cream of wheat.  I realized after the fact that I should have taken some pictures, but....

The final mix was accomplished by mixing first soaker, starter and the final water, and then adding the AP flour, yeast and salt to the mixture.  I realized that during my hourly stirrings of the mash, a certain amount of liquid was being lost due to steam evaporation.  This was borne out as I mixed the dough, and I ended up adding an additional 20g of water, which is reflected in the formulas above.  I mixed the dough for 3 minutes on speed one, and then an additional 5 minutes on speed 3, at which point it showed definite signs of gluten development.

Using Hamelman's section on ryes in Bread I did a one hour bulk ferment, followed by shaping a batârd.  I couched it and left it for final proofing for one hour as I preheated my oven to 450°F.  I presteamed the oven, loaded the batârd and steamed with a cup of boiling water thrown on my lava rocks, then followed this again in two minutes with another steaming.

Bake was for 15 minutes at 450°F, then 20 min. at 425°F, and finally 15 min. more at 400°F.

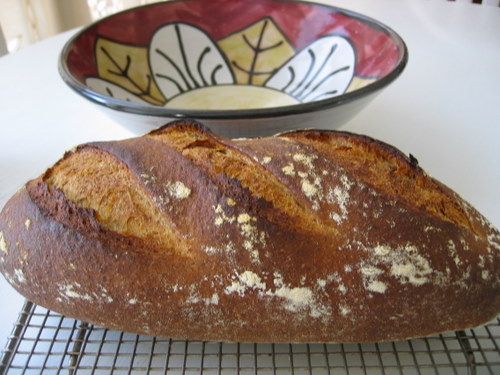
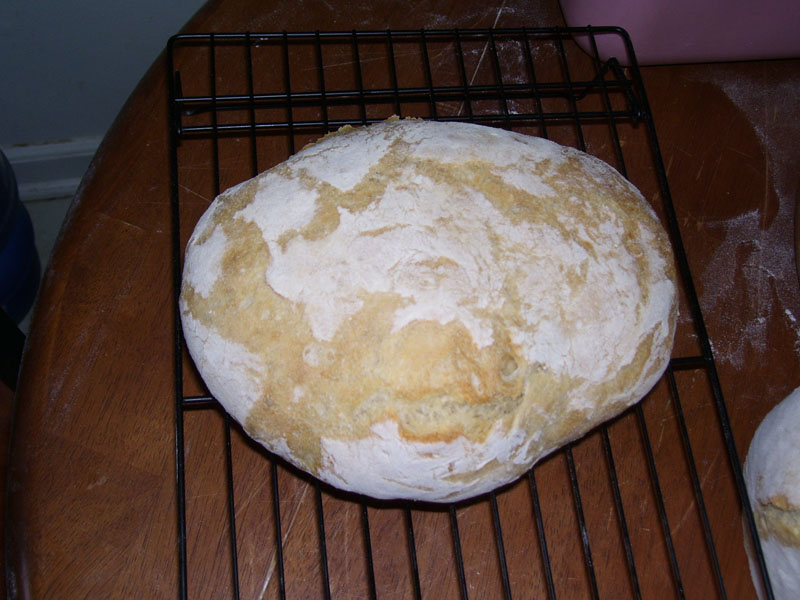
The loaf emerged from the oven looking nice.  I was pleased that my grignes had opened.  But the question that arose immediately in my mind was: So, would you do this again?  For the answer to that, I had to await a tasting.

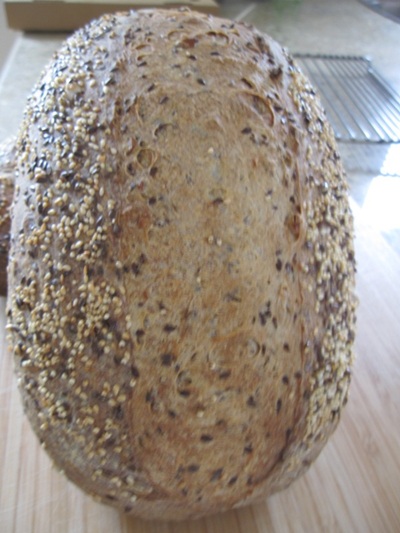
Here are a couple shots of the bread:


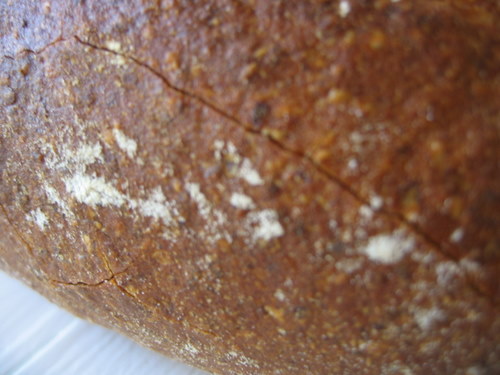
One of the grignes and the crackly crust that developed:


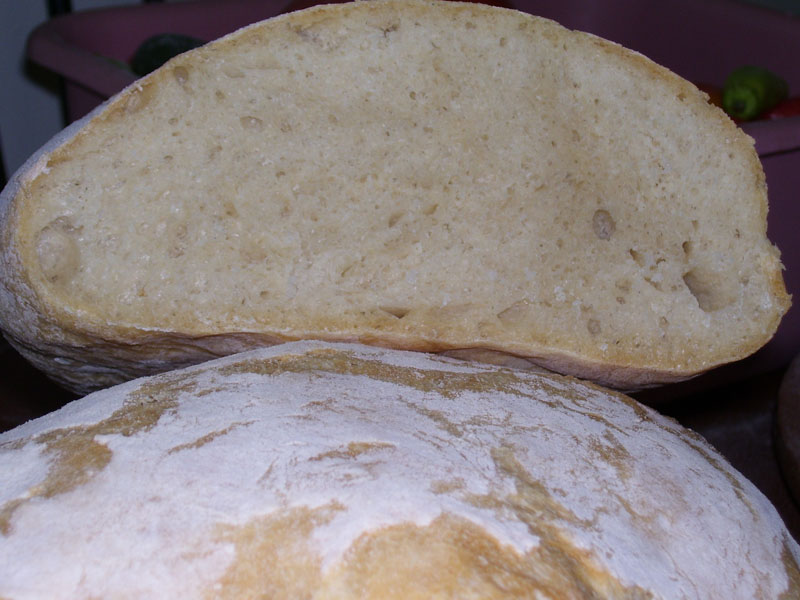
The crumb was somewhat more closed than I expected, given a mere 40% rye. 


However, thinking about it, I realized that I used a much lower proportion of starter than Hamelman does in his recipes.  This was intentional - I wanted to devote more rye resources to my mash/soaker.  But I think if I did this again, I'd either find a way to raise the percentage of starter to around 30%, or, I'd up the yeast from 1% to 1.5% to compensate.

Notwithstanding, the crumb is in no way what I would call dense; it's very moist and it does in fact have a sweetness I haven't been able to realize with a hot soaker.

So, would I do this again?  Maybe.  If I had a day with nothing to do but putter around the house and stir my mash hourly, yeah.  But it's a time intensive method I've utilized, and I would be more likely to repeat this on a frequent basis if I could find a better way (i.e., less labor intensive) way of cooking the mash.

But when all is said and done, there is nothing quite like sitting down at day's end, with some fresh rye spread with good goat's cheese, and a Catoctin Creek Roundstone Rye old fashioned.  Ahhh, the blessings of rye and mash!


Larry

Pages

Subscribe to Recent Blog Entries