The Fresh Loaf

A Community of Amateur Bakers and Artisan Bread Enthusiasts.

Recent Blog Entries

proth5's picture
proth5

 Even in what passes for "normal" in my life, mid-November to the end of December ranges from busy to insanely busy.  There are jams to package, candies to make, and cookies to bake.  Being the designated holder of family culinary traditions, the doing, packaging, and shipping can take on a life of its own.

As the one or two of you who read my blogs know, 2010 hardly started out as a "normal" year.  I had high hopes it would quickly settle to normal. But it was not to be.

 Doesn't mean I don't keep up with the bread, though.

 Lately I've been getting some big bear bites as I try to adjust my usual formulas to use two pre ferments.  I'll have to admit, my mental mise en place was somewhat lacking and some very, very odd things came out of that fancy, new oven.  Today, however, I looked over at the days baking and thought - "It's far from perfect, but that's some nice looking bread."

Twp Preferments - same day

I've been varying the percentage of flour in the preferment all over the map.  What I found, is that reverting to my old faithful of 12-15% of the total flour pre fermented once again, did the trick.  

 The formula (for 6 loaves of about 10 oz of dough per loaf) (And y'all are going to have to put up with ounces...):

 Total percentage of flour pre fermented: 15%

 Poolish

Percentage of flour in the poolish: 10%

 King Arthur All Purpose Flour           3.7 oz

Water                                            3.7 oz

Instant yeast                                        generous pinch

 Levain

Percentage of flour in the levain: 5%

Hydration: 100%


King Arthur All Purpose flour                   1.7 oz

Water                                                  1.7 oz

Seed                                                    0.35 oz

 Final dough

67% hydration

Desired Dough temperature 76F


King Arthur All Purpose Flour                   31.35 oz

Water                                                  19.2 oz

Instant Yeast                                         0.05 oz (Yes, that little - that's 0.135%)

Salt                                                        0.55 oz

All of the poolish

All of the levain


Mix the flour, water, polish and levain to a shaggy mass.  Autolyse for 30 mins.

Mix in mini spiral for 3 minutes at single speed.  Moderate gluten development. (Could also be mixed by hand or stand mixer.)

 (At this point I divided the dough in half, with one half receiving a normal bulk ferment, and the other half sent into the refrigerator for a retarded bulk ferment of about 10 hours.)

 Bulk ferment 4.5 hours at 72F, stretch and fold at 2 hours.

 Divide and pre shape.  Rest for 25 minutes.

Shape. (At a mere 7% of the flour in the levain, I achieved a dough that fought back during shaping.  This 5% of flour in the levain handled very nicely.)

 Proof for 1 hour 30 minutes.

 Slash and load.

 Bake 5 minutes with your favorite home steaming method at 500F conventional bake.

 Switch to convection bake at 480F (I love my new oven...) for 12-13 minutes.

 Since I have the convection oven, all my loaves (even the ones where the bear gets me) sing pretty nicely and the crusts are quite crispy even after the bread is cool.

 The taste?  Not a really assertive levain taste, but definitely more flavor there than a typical poolish baguette.  The crumb is much more yellow than I can capture with my negligible photographic skills.  I would describe the taste as "creamy."

This formula hasn't passed the "I baked this for many weeks and it is consistent" test, but I though I would share.

 We'll see how the other half turns out tomorrow (In general I've not been best pleased with shaping after retarding with these mixed pre ferment breads, but we shall see...)

 Happy Baking!

Added by edit:  The batch of baguettes that received the retarded bulk ferment were removed to a proofing box at about 72F for an hour and a half before shaping.  Thye still fought back a bit, but not nearly as badly as other batches.  Unfortunately time ran out for picture taking, but they had a more open crumb than the first batch.  My official bread tester declared them, the best bread, yet. I, of course, was unhappy with the shaping...

breadsong's picture
breadsong

Hello, I really love Rose's walnutty-oniony bread. I found a maple-veined cheese a few years ago and it paired amazingly well with this walnut bread! Any good cheese is great with this bread though.  This is a 69% hydration loaf using milk, with the addition of some roasted walnut oil. I like to substitute shallots for onions; I like their nice pink color and great flavor.  Regards, breadsong

breadsong's picture
breadsong

Hello, Here is an attempt at the Pear Buckwheat Bread from Advanced Bread and Pastry by Mr. Michel Suas.
What a wonderful book!!!!
The shaping instructions for this bread can be found here (thank you Susan!):
http://www.wildyeastblog.com/2010/01/31/pear-buckwheat-bread/

This recipe requires dried pears. I tried drying diced pears in the oven and it worked out OK; with thanks to Eric Kastel, who writes about drying apples in his book Artisan Breads at Home (I just did the same thing with the pears):
Preheat oven to 400F or 380F convection; start with twice the weight of dried fruit you require; peel, core and dice (1/2-inch) fruit; spread on baking rack and set on top of parchment lined baking sheet; bake 15 or 20 minutes (may need to move diced fruit around so it dries/browns evenly); turn oven off and let fruit dry for a bit longer (I left the fruit in for another 20 minutes or so to let it dry a bit more). I stored the fruit in the fridge until I was ready to make the bread.

I poured a couple of Tablespoons of pear liqueur over the dried pears and let the fruit absorb the liqueur before mixing the bread, and used toasted hazelnuts instead of walnuts. Here's how it turned out!:


Happy baking everyone!  This was a fun project.  I don't have a crumb shot yet, but will be cutting into one of these loaves later today & will try to take a picture then. Regards, breadsong

amolitor's picture
amolitor

This is the next in a series of blog posts, regarding my quest to reproduce Acme Bakery's Walnut Levain. See:

previous post

and

original post

I think I'm pretty much there. My loaf is quite large now, because we like it. There are two preferments, one "old dough" (yeast raised) and one a sour sponge for flavor. The loaf itself is basically yeast raised.

Day 0, Evening

Sour Sponge:

  • 3/4 cup rye flour
  • 3/4 cup bread flour
  • 1 and 1/2 cups warm water
  • 2-3 tablespoons active liquid sour culture ("enough")

Old Dough Preferment

  • 1 small ball old dough from any white (or mostly white) yeast-raised bread. I use a ball about 1 1/2 inches across, previously frozen (see: this post).
  • 1/3 cup warm water
  • enough bread flour to make a stiff dough (3/4 cup to 1 cup)

Thaw the old dough, if necessary, break it up into the warm water and let soften. Mix in the flour, knead to mix thoroughly (you don't care about gluten development at this point).

Let both preferments stand overnight, covered, at room temperature.

Day 1, Morning

Second Stage Old Dough Preferment

  • previous old-dough preferment
  • 1/3 cup warm water
  • enough bread flour to make a stiff dough (1 cup to 1 1/4 cups, probably)

Repeat the operation from the first stage: break up the now-risen old-dough preferment into the warm water, let soften. Mix in flour to make a stiff dough, knead to mix thoroughly.

Let this new old-dough preferment stand for another 4 hours or so, until soft and well-risen.

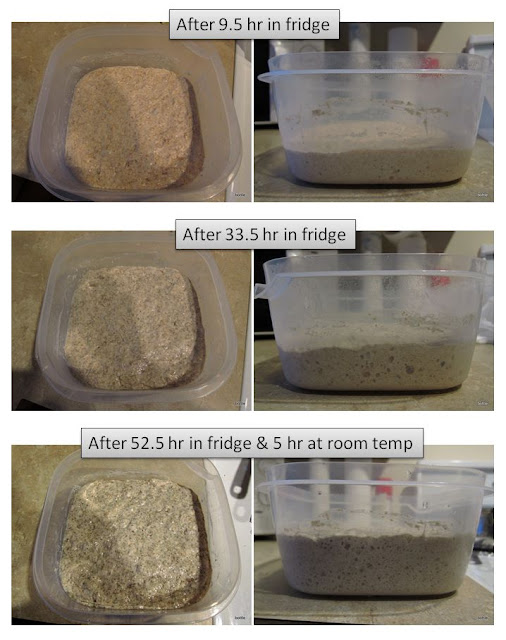
At this point the sour sponge should have had 12 hours or so to ferment, and should be well ripened, active and bubbly. When the old-dough preferment is also well risen, place BOTH preferments into the fridge for at least an hour.

Day 1, Afternoon

Now we're going to make up dough. Take the preferments out of the fridge and let them warm up, ideally to room temperature.

  • sour sponge preferment
  • old-dough preferment
  • 1 cup warm water (this might be QUITE warm, since you're working with cool preferments, but not so hot as to kill anything of course)
  • 1/2 to 1 tsp active dry yeast (I use a scant half tsp of "instant" which seems to be more vigorous than "active") depending on temperature (use more if cooler)
  • 1 tablespoon salt
  • sufficient bread flour to make a moist dough (about 3 cups, probably)
  • 2 to 2 1/2 cups coarsely chopped walnuts

Set aside all but 1/2 a cup of the chopped walnuts, and chop that half cup up Very Fine. I chopped mine to the consistency of very coarse sand (with a few large bits, consistency is not required).

Proof your yeast in a little bit of the warm water (which may be cooler than the rest of the water). Break the old-dough preferment up into a large bowl, and add the rest of the water, heated up as needed to bring the dough temperature up to at least room temperature (i.e. Quite Warm if your preferments are still cool, and Slightly Warm if everything is at room temperature), let soften.

Mix in the sour sponge, and stir well. You may still have some soft lumps of old dough preferment at this point.

Incorporate enough flour to make a wet dough. You're shooting for dough that will stick to the board and to your hands, but not excessively. I'd say more than 65% hydration, but less than 70%. I knead it by slapping the dough down on the board so it sticks, pull it out like taffy toward me, fold it away from me over the stuck down part. Scoop it off the board with my hands, turn 90 degrees. Repeat. It's sticky enough for that process, but not crazily sticky.

I mix thoroughly in the bowl, by hand, adding 1/3 of a cup of flour and the mixing 40-50 strokes, add the next 1/3 cup, etc. This gives some gluten development in the bowl.

Mix in the salt before it's too hard to stir, but before you've incorporated all the flour. Keep going until you can't stir any more, or until you've got enough flour worked in (that is, it's ok if you can't stir a 70 percent hydration dough by hand, not everyone can! The point is, get the salt in there before you can't stir and have to start kneading).

The last thing before you tip it out to knead, mix in that half cup of finely chopped walnuts.

Knead until it's pretty well developed. I only kneaded about 10 minutes. You don't need TOO much work to get good gluten development at this point, since your preferments are well developed; and if you use my (actually Joe Ortiz') technique of mixing in the bowl a lot, you're pretty well developed by the time you dump it out. Windowpaning will be hard with all the walnut bits, but the dough should want to windowpane even if the walnut won't let it!

Knead in the rest of the walnuts at this point, just to get them evenly distributed in the dough.

Bulk rise an hour and a half or so (until it poke tests). This last loaf I made, my dough was frankly too cold, since I didn't have time to warm my preferments up enough (I forgot about them!) so I did a couple of stretch and folds to warm more evening, and my bulk rise was more like 3 hours.

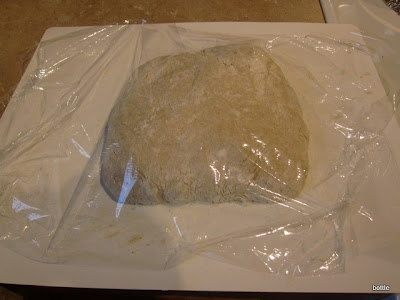
Shape into a boule and drop into a banneton. Final rise until poke-test. Expect about an hour.

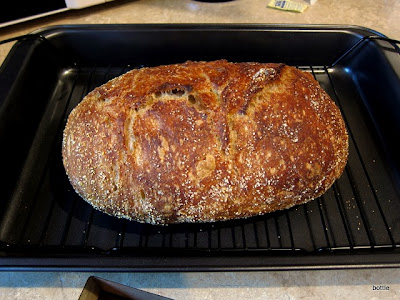
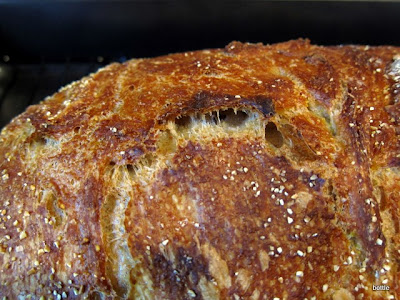
Bake at 450F for one hour, with steam for the first 10 minutes. The crust winds up quite dark brown.

Remarks

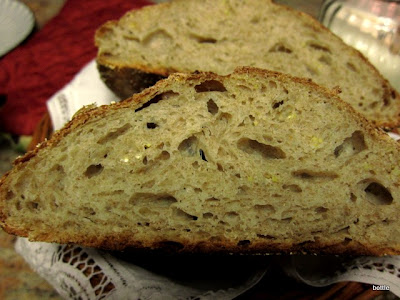
The key to getting a more or less evenly purple crumb seems to be kneading with the finely chopped walnuts in. Adding them after kneading doesn't seem to have an effect on flavor, but does make the purple color very blotchy and uneven. (see previous posts)

I make have overbaked this last loaf, I want the dark crust, but the crumb seems a trifle too dry.

At this point I am really quite happy with my imitation of Acme's bread. It's not a perfect copy, but it has all the properties that I like about the Acme product, and it's extremely tasty (especially toasted). Also, my version is Quite Big, this thing is about a 3 pound boule, so there's lot of bread to eat and even give some away!

Pictures

There's plenty of pictures of previous variations in the earlier posts, so this is really just about showing the color of the crumb and of the crust:

dmsnyder's picture
dmsnyder

Thanksgiving day 2010

Rotisserie barbecued turkey (okay, so it's not bread)

Glenn (on the left) meets turkey (on the right). 

Day after Thanksgiving breakfast

San Joaquin Sourdough Baguette

Cinnamon rolls & Pecan rolls (made in muffin tins using NY Baker's Babka dough)

Cinnamon rolls, for kids who don't eat nuts

Pecan rolls, for the rest of us

Glenn makes challah

He's on a roll!

You should have seen the one that got away!

Here's the proof

Ready to bake

Cooling

Challah c rumb

The challah made fantastic turkey sandwiches!

And, for dessert, the much anticipated Apple Crostada, inspired by trailrunner!

Apple Crostada!

Delicious! It had the flakiest, best tasting crust ever!

For better or worse, as I was enjoying a second slice while mentally reviewing the recipe, I realized a stick of butter actually is 8 tablespoons, not 4 tablespoons. That means I used 9 tablespoons of butter rather than the 5 T Caroline's recipe specified. No wonder the crust was so flakey!

David

Przytulanka's picture
Przytulanka

 I'm sure that many of TFL members remember the recipe -http://www.thefreshloaf.com/node/15778/g%C3%A9rard-rubaud-miche submitted by Shiao-Ping. 

On November I was experimenting with the recipe-changing flours, adjusting time of proofing and fermentation.

Whole Grain Miche

 Recipe: http://bochenkowo.blogspot.com/2010/11/whole-grain-miche-wiejski-razowy.html

Second-Pine Nut Rye Bread with  pâte fermentée

Recipe: http://bochenkowo.blogspot.com/2010/11/pine-nuts-rye-bread-with-pate-fermentee.html

Third Miche with Chestnuts


Recipe :http://bochenkowo.blogspot.com/2010/11/miche-with-chestnutschleb-z-kasztanami.html

Franko's picture
Franko

Pain au Levain with Red Fife Whole Wheat Flour

Every year in November Marie and I make a point of attending one of our local Christmas craft fairs in hopes of finding some unique items for gift giving as well as for ourselves. This year the fair had more vendors than I've seen in previous years, with lots of newcomers from various locales in BC as well as Washington state. One of the newcomers was a fellow by the name of Bruce Stewart who owns and operates a craft bakery called True Grain Bread in Cowichan Bay here on Vancouver Island .

http://truegrain.ca/

When I met Bruce he was handing out samples of his Christmas fruit cake to a group of folks and quickly offered some to Marie and I. Now I'm not usually a big fan of fruit cake but this was exceptional, and superior to any I've had in the past. Bruce is a very genial guy and clearly has a lot of enthusiasm and passion for his craft and product, so the two of us easily fell into a conversation when I mentioned that I was a professional baker as well. At his bakery Bruce mills most of the flour he uses on site, to make a wide variety of breads, including rye, spelt, kamut, emmer, and most interesting to me, Red Fife wheat . Red Fife is one of Canada's premier grains and listed on the Slow Food Organization's 'ark of taste' as Canada's first presidium. For more background on this click the link below.

http://www.slowfoodfoundation.org/eng/arca/dettaglio.lasso?cod=547&prs=PRINT_1192

If you look on the left of the page in the link above you'll find another link to the 'Ark of Taste' which lists all the various foods of countries that the Slow Food Org considers worthy of cataloguing and preserving for future generations. Our TFL members from the USA might find it interesting to note that they have 139 listings for various food groups, more I believe than any of the other nations listed.

While I was chatting with Bruce I noticed he had some bags of flour for sale and asked if he had any Red Fife that I could buy, as I've yet to run across it for sale at any of my usual sources for flour. Bruce smiled and asked me if I wanted the sifted or the whole grain and how many bags. I went with a bag of whole grain Red Fife and a bag of his unbleached organic white , which is one that he doesn't mill himself. I'm kicking myself now for not getting the Red Fife sifted, but it gives me an excuse to take a drive down Island and pick some up at his bakery and maybe get a tour of his shop as well.

Hamelman's Pain au Levain with Whole Wheat Flour was the formula I decided to use the Red Fife in since his formulas are so reliable and familiar to me. First I needed to convert some left over liquid whole wheat starter to a stiff starter using the Red Fife, and then to a levain for the final mix. This took a few days of feedings before it was good and active, and ready for use. I mixed the levain one night before going to bed , intending to use it the next day when I got home from work. Unfortunately Mother Nature had other plans. We've been having some record cold temperatures here on Vancouver Island this last week, making my 70k commute to work in the wee hours of the morning somewhat treacherous. While I was at work my wife called to tell me that another front was moving in and another dump of snow was expected to happen overnight. I decided to stay in town that night rather than try and do the drive back up Island the next morning in even worse road conditions than we already had. Realizing I'd probably have to start over again with the levain was slightly disappointing but preferable to finding myself off the road in a ditch... or worse. The next afternoon I managed to get home without any problems thankfully, and immediately tested the levain to see if it had any life left. Lo and behold it did, popping to the surface of a bowl of warm water I'd placed a few grams in. The rest of the mix went according to Hamelman's directions, but mixed by hand. I'd scaled the mix so that I'd have two 900 gram dough pieces for baking, which I then molded after a 3hr bulk ferment as a batard and a boule, covered with linen, and put overnight on a shelf in our very cold garage to finish a slow rise.

The next morning I checked the loaves and was surprised to find that they'd risen quite a bit more than I'd expected due to an overnight warming of the outside ambient temperature. I could tell the batard was over proofed, but not so far gone it wasn't worth baking off, and the boule looked to be fine in it's banneton. The batard was baked first, on the stone with a foil roasting pan covering it for the first 20 minutes, and the boule was baked using the Dutch oven method. The batard turned out as expected, with low volume and spring, but the boule baked off quite well I thought, with lots of expansion, a good jump, and no wild splits.

To my taste the Red Fife has a certain sweetness to it that I don't find in other whole wheat flours, and which helps to bring out it's rich wheat flavour. Combined with the white and medium rye flours called for in Hamelman's recipe it works nicely to boost the overall flavour of his very good formula. This bread will go perfectly with tomorrow nights meal of red wine braised short ribs and a white bean and tomato gratin that I'm making for our family dinner.

It looks like things are warming up a bit now and the roads are getting back to normal, so with any luck I'll be able to make the drive down to Cowichan Bay to pay Bruce and his bakery a visit sometime in early 2011.

Best Wishes,

Franko


bottleny's picture
bottleny

This was my first time to use oven to bake bread (before used bread machine). I had been wanting to try the no-knead bread receipe since it came out in 2006.

I followed the original receipe but tuned it to suit my case. Since my order of the digital scale hasn't arrived, I could only use volume to measure the quantities:

  • 3 Cup flour (2 AP + 1 WW)
  • 1 5/8 tsp salt
  • 3/8 tsp active dry yeast (direct into the mix)
  • 1 5/8 Cup filtered water

After mixing, it looked pretty sloppy.

Then went back to look at the video and realized that it's 1 1/2C water used in the video. This dough was way too wet. Anyway, I still continued the process. Atfer two hours at room temperature, I put the dough (inside a plastic bag) into the fridge.

Here are a series of photos of the long cold-fermentation process.

With another hour at room temperature (total 58.5 hr), I streched and folded the dough. It's so wet that even with plenty flour it's very difficult to handle the dough.

I let it sit for 15 min and then transferred it onto a kitchen towel with flour & cornmeals. Covered for 2.5 hr for the 2nd rise. The dough did rise quite a lot (but in a flat round shape).

When I tried to put it into the big stainless stew pot (preheated in the oven at 500F), I couldn't let it slide into the pot. The dough was so wet that it sticked to the towel. I tried to use the chopping mat but it still sticked to that. In the end, I had to scrabed the dough down.

I was worried that this might delate the dough quite a lot. But when I removed the cover after 30min, I noticed the bread was all right. So happy that I forgot to lower the oven temperature to 450 until 8 min later. I let it baked at 450 for another 8 min before took the bread out.

It looked not bad right? Initially I shaped it into a round "disk" (it's too soft to be shaped into a ball), but it became oval when I tried very hard to let it slide into the pot. I even slashed the dough but it's all gone during that process.

Look at this caramalized crust!

I brought this bread for the Thanksgiving dinner at my supervisor's house. I had the honor to cut my bread and took the picture.

When I saw the crumb like that, I knew it's going to be good. And indeed, it's very chewy inside! I was very proud of my bread. Well, for a newbie, this was a big success.

If I didn't have the trouble of sliding this extremely wet dough into the pot, the bread would likely rise higher than the above.

I estimate the hydration in my dough was around 90%, much higher than Mark Bittman's in his later note (80%). Next time I would definitely lower the water amount. I would like to try no-knead bageutte. :-)

yozzause's picture
yozzause

What a mouthfull of a title and what and what a mouth full of a bread

I have recently made a very nice Dark Irish Stout and retained the dregs from the bottom of the fermenter. The stout has just been sampled with  a very big tick of approval it was a very vigourous brew and performed very well indeed. i took 250 grams of stoneground wholemeal flour and added 250mls of my brewery sludge  and bought it together and set it aside as a soaker.

the container shows the brewing dregs that i have kept in the fridge for a few weeks now.

the above pic shows  the dough as it was taken after bulk fermentation marks on the bowl give an indication of the rise.

The soaker showed good signs of activity after 6 hours  but it was bed time so it ended up with a soak time of  15 hours, the soaker was still retaining its gas the nextmorning and so the to the mix was added 250grams of plain white flour (AP) just supermarket home brand stuff 10 grams of cooking salt 20 grams of blended oil 20 grams of malt extract and a further 100mls of stout giving a total hydration of 70% NO YEAST or other culture were added. the kenwood chef was employed for the mix and toward the end 100grams of sunflower seed kernals were mixed in the dough was finished at 9.30am  and from the picture above the dough was marked on the cling film and a good rise resulted after a bulk fermentation time of 5 and a half hours.

The dough was tinned up and was slightly small for the tin @ 900grams the loaf was given a full proof of about 5 hours and baked in a gas oven on 200 deg C for 35 to 40 minutes. little or no oven spring was evident.

The aroma was delightfull but i went to bed as soon as it came out of the oven but was delighted to have a wonderfully moist and full flavoured bread for both breakfast and again as sandwhiches for lunch.

So although we do not celebrate thanksgiving here in Australia i think this would have been a worthy loaf for such an occasion, perhaps Australia day in January when we have a big firework display over Perth city and  we watch it from the back of my Hartley yacht in the Canning River with a nice cold SAV BLANC

kind regards Yozzause

MadAboutB8's picture
MadAboutB8

Plain sourdough is not something I make often, though I intended to  but I seems to easily get distracted by multigrain and/or fruit breads. Somehow, I feel like one last weekend and I picked the Pain au Levain with whole wheat from jeffrey Hamelman's Bread cookbook.

The recipe uses stiff levain build which is also a good timing that I can convert my liquid starter (100% hydration) to stiff starter (60% hydration) before I am going away in the next two weeks for a month and won't have chances to feed my lovely pet starter, Jerry. I was afraid that he would be starving (for flour and water) and pass away while I'm away.


Thanks to a post on The Fresh Loaf about the sourdough starter feeding. Apparently, stiff starter is more resilient than liquid one. It is more likely that it will survive after not being fed for a while. I only need to feed Jerry a few times when I'm back from holiday to wake him up and come back to his cheerful and active self.

This bread has a pronounced sour flavour, which I believe is the result of stiff levain build with mixed flour in it (mixed of rye and bread flour). The crumb is soft, open and chewy. It's a good complement to olive oil with a bit of dukkah.  

For more details, you can visit ;  

http://youcandoitathome.blogspot.com/2010/11/sometimes-all-you-need-is-plain.html

Sue

http://youcandoitathome.blogspot.com/

Pages

Subscribe to Recent Blog Entries