The Fresh Loaf

A Community of Amateur Bakers and Artisan Bread Enthusiasts.

Recent Blog Entries

Franko's picture
Franko

A plate of pastries

January has seen me doing more reading about baking than actual home baking due to three new additions to my book collection. Advanced Bread and Pastry-Suas, Breadbaking-An Artisan's Perspective-DiMuzio and Swedish Breads and Pastries-Hedh are all fine books to own and I've been enjoying them immensely over the last few weeks for their technical information and variety of recipes and methods. AB&P is easily the best text on baking in general that I've ever read, making it my 'go to' reference for some time to come I imagine.


Well eventually the time comes to put the books down and get back in the kitchen for a little practical application, so it was welcome that early last week my wife Marie asked me if I could bake a few pastries or muffins for a breakfast meeting she had scheduled with some of her colleagues at the college where she works. Nothing large or too fancy just something to nibble on during the meeting. I decided I'd make the Danish dough with Sponge from AB&P, along with some apple turnovers and a few carrot muffins for anyone wanting something a little less rich. The carrot muffin formula I've always used is one from my old trade school text and is still one of the best tasting and easiest versions of this muffin I've run across yet. Recipe to follow. The puff pastry for the turnovers was made earlier last year and the last piece of it has been taking up space in the freezer since, so I was glad to have an excuse to finish it off at last.  As for the danish dough, it's been ages since the last time I made one but this mix went well, the only changes being that I used AP flour (the closest to white bread flour I had on hand), added some ground mace to the mix and increased the overall ratio of butter from 31% to 35%, requiring me to give it an extra fold for a total of four single folds. Whenever I've made danish dough in the past it's always been done using the straight method of mixing, so the sponge is an extra step to make, but worth it for the flavour boost in the finished product and one I'll use in any future danish mixes. While I didn't get anything near as flaky looking as what's pictured in the book, it did make a very passable danish with a nice soft crumb and plenty of flavour from the butter and preferment. For me, taste testing danish is an exercise in restraint, and a good reminder of why I rarely make this pastry for myself. I did manage to keep it reasonably (Marie laughing in the background) analytical....this time, however the real test will be this summer when we'll be taking a river cruise on the Danube through Austria, Slovakia and finally to Budapest. Something, or more accurately someone, tells me I'll be eating nothing but rice and vegetables for a long time after that vacation is over.

Franko

75 gram carrot muffin

blueberry and lemon twists

chocolate and hazelnut rolls

small apple turnovers

Danish Dough with Sponge-adapted from AB&P

Ingredients

%

Kg

Sponge Formula


Bread Flour

100

214

Water

62

131

Yeast-instant

0.1

4

Mix all ingredients with a DDT of 70F Ferment 12-16@ 65F-70F


Total


349

Final Dough


Bread Flour

100

500

Milk

40

200

Eggs

16

114

Sugar

17

121

Mace powder

0.2

1.4

Salt

1.8

13

Yeast-instant

1.8

13

Butter

4

28

Sponge

69.8

349

Butter for roll-in

31

221


PROCEDURE:

Mix all ingredients for final dough on 1st sped for 5 minutes and on 2nd speed for 3 minutes to a DDT of 72F-77F. Bulk ferment for 45-60 min. Laminate 4x single fold resting 30 minutes refrigerated between folds and final make up. Proof final product for 1.5-2 hrs. Bake at 385F 10-12 minutes


Carrot Muffins

Ingredients

%

Kg

Kg

Cake Flour

100

300

150

Vegetable Oil

100

300

150

Baking Soda

1.1

3.2

1.6

Baking Powder

1.3

4

2

Sugar

77

230

115

Eggs

72

216

108

Salt

1.6

3.2

1.6

Cinnamon

1.1

3.2

1.6

Carrots

128

300

150

Raisins

40

120

60

Walnuts/Pecans

20

60

30

Total


1539.6

769.8

PROCEDURE:

Sift flour and baking soda, add salt and reserve.

Blend all but flour mix, raisins, nuts. Mix well.

Add dry ingredients and mix on 1st speed to incorporation, then an additional 30 -60 seconds.

Fold in raisins and nuts.

Let rest for 10 minutes, then scale 60g per muffin cup.

Bake at 380 for 15-18 minutes


em120392's picture
em120392

Today, I made Peter Reinhart's Rich Man's Brioche from BBA. I've never made such a rich, buttey bread, but it was delicious. I could only eat one slice, but with raspberry jam, it made the best breakfast.

I posted this on the blog my brother and I share ( http://bakingacrosscountry.wordpress.com/ ) We're both trying to complete the Bread Baker's Apprentice challenge, and also, I'm completing a high school project about artisan breads.

Anyway, here's the post!

Nowadays, we know brioche as a rich bread, enriched with enormous amounts of butter and eggs. The name brioche is derived from the Norman verb, "to pound." The Norman region of France was well known for the butter which they produced, and excessive kneading was required to incorporate all the butter into the dough.

Brioche came to Paris in the 1600s as a much heavier and far less rich bread than the one we know today. Supposedly brioche became well known with Marie Antoinette's famous quote, "qu'ils manget de al brioche" during the 1700s, which translates to "let them eat cake." This referred to the peasants who rioted because there was a lack of bread. The different butter contents of bread were baked for different classes-even the food reflected the social-class divides in 18th century France.

In the Bread Baker's Apprentice, Peter Reinhart provides three different recipes which vary in the butter content. Rich Man's Brioche has about 88% butter to flour ratio, Middle-Class Brioche has about 50%, and Poor Man's Brioche has about 20%. Since I had never made brioche, I splurged and made Rich Man's-why not? The recipe makes three loaves- In my head, the idea of three loaves somehow justified the pound (?!) of butter in the bread.

Traditionally, brioche is baked in molds as brioche a tete, which are formed with two balls of dough. Served with jam, brioche makes a perfect breakfast, and topped with meats and cheese, it can be served for lunch or dinner, thus making brioche a truly versatile bread.

I began the brioche with a sponge of flour, yeast, and milk. After the sponge rose and collapsed, I added five eggs. Next, incorporated the dry ingredients (flour, salt, and sugar), and mixed until the flour was hydrated.

After a few minutes, I mixed in a stick of butter at a time, making sure they were fully incorporated before the next addition. The dough looked smooth, and almost icing-like, because of the butter. I had never worked with such a fluffy, light bread dough, so I felt kind of intimidated in new waters.

After all the butter was added, I mixed for a few more minutes until the dough was soft, and tacky, but not sticky. I spread the dough onto a cookie sheet and put it in the refrigerator to firm up and retard overnight.

Since I don't have brioche molds, I used three loaf pans. I cut the dough into three even pieces, and with a rolling pin, I formed a rectangle. Like sandwich bread, I rolled the dough up, and placed them seam-down in the pan, and let it rise for about two hours. After it had risen for the second time, I brushed it an egg wash, to form a shiny crust.

In a 350 degree oven, I baked the bread until it was golden brown, and the internal temperature reached 190 degrees. However, when I tried to take the bread out of the pan, it kind of stuck to my not-nonstick pans, which I didn't grease. With some slight prying, I got the bread out, but slightly crushed and deflated a loaf. Also, when forming the loaves, I didn't seal the seam well, and when baked, it split on the sides.

Once cooled, I cut the bread, which flaked like a croissant, and tasted so rich and delicious. Since there is so much butter, one slice is more than enough, but every bite was so delicate and smooth. I'm glad I splurged for Rich Man's brioche, but I'm not sure how often I'll make it because of it's richness. With raspberry jam, it honestly made the best breakfast.


Baking Mama's picture
Baking Mama

Kalanty was one of the many breads we made in class this week. I really liked this bread the best because of the toasted sesame seeds worked into the dough. Just before baking we rolled the tops in more sesame seeds and then scored the tops two different ways for different looks. We baked these breads in deck ovens with steam. One loaf was baked directly on oven bottom and the other was baked on a sheet pan. I could not tell much difference in the two loafs. I will do this bread again at home.


darren1126's picture
darren1126

Hello,


I'm going to try making an olive bread recipe and it calls for a "salt starter". I have no idea what this is. I'm not sure if this is just regular salt, sea salt, or something I'm supposed to create. I tried googling it but that wasn't any help. Could anyone offer some assistance.


Thank you!


Darren

dmsnyder's picture
dmsnyder


We baked a miche the last day of the SFBI Artisan II (sourdough baking) workshop. This was one of the breads we mixed entirely by hand. The students' miches were scaled to 1 kg, as I recall, but our instructor baked a couple larger ones, using the same dough.

These miches were among the favorites of all the students for the wonderful texture of their crust and crumb and their flavor. I gave one of mine to brother Glenn, who has stopped reminding me in the past few days that I promised him the formula.

This formula is substantially different from the miche formula in Advanced Bread and Pastry. I blogged about the background of that miche last month. This one is more similar to contemporary versions such as that of James McGuire, Hamelman's adaptation of which is found in Bread.

The formula we used at the SFBI calls for mostly white flour, with a little whole wheat in the levain refreshment and a little toasted wheat germ in the final dough. From my reading, a high-extraction flour is preferred for miches. I had some of Central Milling's “Organic Type 85” high-extraction flour on hand, so that is what I used.


Total formula


Ingredients

Wt (g)

Baker's %

High-extraction flour

702

100

Water

515

73.33

Wheat germ (toasted)

18

2.5

Salt

15

2.08

Total

1250

177.91

Notes

  • The SFBI formula used 96.67% “Bread flour” and 3.33% Whole wheat flour. All the whole wheat flour is used in the levain. I used Central Milling's “Organic Type 85 Flour” for both the levain and the final dough

  • I did not use wheat germ since I was using high-extraction flour, but this ingredient did contribute to the great flavor of this bread as we made it in Artisan II.


Levain


Ingredients

Wt (g)

Baker's %

High-extraction flour

93.7

100

Water

93.7

100

Liquid starter

50

46.8

Total

237.4

246.8

  1. Dissolve the starter in the water and mix in the flour. Desired Dough Temperature: 78ºF.

  2. Ferment for 8-12 hours.


Final Dough


Ingredients

Wt (g)

Baker's %

High-extraction flour

586

100

Water

398

68

Wheat germ (toasted)

18

3

Salt

15

2.5

Levain

234

40

Total

1251

213.5

Procedure

  1. Dissolve the levain in the water. Add the other ingredients and mix thoroughly by hand. DDT: 75-78ºF.

  2. Transfer the dough to a clean, lightly oiled bowl.

  3. Ferment for 3-4 hours with 4 folds at 50 minute intervals. (I did this by the “stretch and fold in the bowl” technique.)

  4. Transfer the dough to a lightly floured board. Pre-shape as a tight boule.

  5. Cover and let rest for 20-30 minutes to relax the gluten.

  6. Shape as a tight boule and place, seam side up, in a floured banneton.

  7. Cover with plastic and retard overnight in refrigerator.

  8. Remove the boule from the refrigerator and allow to warm and complete proofing for 1-3 hours. (Watch the dough, not the clock!)

  9. 45-60 minutes before baking, pre-heat the over to 500ºF with baking stone and steaming apparatus in place.

  10. When the loaf is proofed, transfer the boule to a peel. Slash the boule as desired, and transfer it to the baking stone. Steam the oven and reduce the temperature to 450ºF.

  11. Bake for 20 minutes, then remove any water remaining in your steaming apparatus.

  12. Continue baking for another 40-50 minutes. (If you have a convection oven, switch to “Convection Bake” and reduce the oven temperature to 430ºF at this point. But see my tasting notes.)

  13. Remove the boule to a cooling rack, and cool thoroughly before slicing.

Notes on procedure

  • Traditionally, we were told, this bread is scored in a diamond pattern, but any scoring pattern that pleases you is fine. Just be aware that the diamond pattern tends to yield a flatter profile loaf than a simple square or cross.

  • This bread benefits from a very bold bake. The crust should be quite dark. It may look almost burned, but the flavor and crunchiness that is desired requires this.

  • This type of bread often improves in flavor very substantially 24 hours after baking.

    Crust

    Crumb


    Crumb close-up

Tasting notes

I sliced and tasted the bread about 4 hours after removing it from the oven. The crust had crackled nicely and was very thick and crunchy – the kind that results in crust flying everywhere when you slice it. The crumb was well-aerated, but without any really large holes. The crumb structure is similar to that I got with the miche from BBA made with this flour, but a bit more open. The crumb is chewy-tender.

The flavor of the crust is very dark – caramelized-sweet but with a bitter overtone where it is almost black. The crumb is sweet, wheaty, nutty and absolutely delicious. My note above notwithstanding, it's hard to imagine the flavor getting any better in another day.

I am enormously impressed with the flavor of the breads I have baked with Central Milling's “Organic Type 85” flour. I want more of it, and I want to try some of their other specialty flours, including those they mill for baguettes.

I will definitely be baking this bread again. I would like to make it as a larger miche, say 2 kg. Next time, I will lower the oven temperature to 420 or 425ºF when I switch to convection bake for the crust to be slightly less dark.

David

Submitted to YeastSpotting

ronnie g's picture
ronnie g

Well, the other day when I wrote about the Queensland floods, I didn't actually get on to write about that, but that's what came out.  Thank you to those who offered encouragement and hope through your replies.

On Wednesday, after the floods, I baked my bread as I had started it the day before and it needed to be finished.  There was a lot of damage to roads and other infrastructure.  As well, lots of rescue people, emergency services, and local council doing repairs here and we were all advised to stay home if we could, so that they could do their jobs.  So baking bread it was for me.

I had decided on the Max Poilane style miche, however I struck a problem.  As we had been advised to stay home I realised that I didn't have all the ingredients for my loaf.  I didn't have enough wholewheat flour, only about a quarter of what I needed.  I had some wholewheat self-raising flour and some other unbleached bread flour.  I took the risk and used the self-raising flour in the mix, wondering if it would kill my yeast or blow my bread up too much.  Strangely it didn't seem to affect it at all.  My bread turned out so tasty, in fact I think it was the tastiest bread I've ever made to date!  Gorgeously flavoursome with a subtle, sweet wheatyness and chewy texture. 

Max Poilane style miche

It's a very big loaf!

A nice crackly crust.

With a nice crackly crust.

Crumb from Max Poilane style miche

This is a nice wheaty, chewy bread with an open(ish) crumb.  And I'm not sure if using the small amount of self-raising flour made it a little more open.  I'd love to taste the real thing!

GSnyde's picture
GSnyde

Saturday 1/15/11.  Today, I am musing on my bread-ucation.  Sort of a milepost marking.  I have been baking for five months.  But I am beginning to feel somewhat knowledgeable about a narrow category of breads, due in large part to (1) The Fresh Loaf and readings recommended here and advice given here, and (2) an enthusiasm for baking that has me making lots of bread as often as I can.  I learn stuff every time I handle dough and bake bread.

In that short span of baking experience, here are some things I've learned about baking simple sourdough breads:


  • To make bread the way you like it takes lots of study and gathering of general information (reading, watching videos, asking questions, and the like) and even more hands-on trial and error (the error part is very important). It's good to know some bread science--what factors have what results and why--but you can only improve your bread-baking by keeping track of what you do each time and making adjustments the next time.
  • You may like bread to be a certain way that others don't, and your tastes may change.  Some like big holes in the crumb, others don't; some like really dark crusts, others don't; some like sourer flavor than others do, etc.  Make it the way you like it and  be your own judge.
  • There are lots of variables that affect the crust, crumb and flavor: to name a few: flour choices; hydration; attributes of your starter culture; dough handling at each stage (including mixing, kneading and/or folding, dividing, pre-shaping, shaping, scoring and loading); time of each stage; temperature of ingredients; temperature of environment; type, quality and duration of steam during the bake; characteristics of the oven; attention to, understanding of, and reaction to the sensory information the dough provides; and luck, blessedness, karma, whatever you choose to call it.  All of these variables are important, but I think the last two in the list are the most important.  
  • There is no perfect loaf.  Striving for improvement can yield improvement, but can also yield higher expectations.  The Earth is round; the horizon keeps receding.
  • The more I learn, the more I realize how little I know.
  • Bread tastes better when it's been well photographed and shared, and your friends ooh and ahh at it.


This weekend, I am making San Francisco Sourdough from Reinhart's Crust and Crumb.  This is the first time I have made something called "San Francisco Sourdough".  I have made 20 or 30 sourdough breads, mostly variations on Hamelman's Vermont Sourdough (including Brother David's San Joaquin and my own San Francisco Country).  But I love the sour flavor, the crispy crust and the moist, chewy crumb of classic San Francisco Sourdough, and I've lived in San Francisco and environs for most of my life.  So isn't it time? 

I have read the formula and all the commentary in the book, and I've looked at several TFL blog posts on this bread.  What I learned: my brother David really likes this bread (or at least he did in 2008-09 when he blogged many times about it).  I chose the formula from Crust and Crumb because (1) I have the book, (2) the formula won some whoop-de-doo award, (3) my brother David really likes this bread and he has good taste, and (4) it's a weekend when I can focus on this formula which takes several days of attention.  

In comparison with most of the other sourdoughs I've made, this formula calls for a firmer starter, considerable kneading, and a more passive fermentation approach.  There are no stretch and folds during the long (4 hour) primary ferment.  I am also--for the first time--making a sourdough with all white flour, and no rye or whole wheat.  I am using BRM enriched white flour, made--according to the bag--from high gluten hard red wheat.  

I can't say I am following Professor Reinhart's formula exactly (I rarely follow anything exactly).  I made a liquid starter from my stock starter, and let it ripen, then chill (but not as long as the formula prescribes).  I then made a firm starter from the liquid starter, and let it ripen, then chill (but not as long as the formula prescribes).  I suspect the shortened retardation time on the starters will make the bread less sour than it would have been, but I will get to finish the process in time to enjoy the bread before the end of the weekend.  Some day I will give this formula all the time it asks, and see if the result is sourer or otherwise different.

I mixed the firm starter, flour, water and salt with my fingers and a plastic scraper.  At least 90% of the dough ended up in the bowl at the end of the mixing.  I then kneaded it on my granite counter, sprinkled with flour.  What I learned. I like kneading dough (I sort of knew that from a few past kneading experiences); it gives immediate visual and tactile feedback on dough development.  Unlike stretching and folding over several hours, when you knead dough, you feel the strengthening of the gluten with every few turns.  Also, I like kneading on floured granite.  Seems like just the right amount of sticky friction.  The dough is now fermenting.  Giving me time to muse.  What I learned as I mused and watched the activity in my sunny courtyard: voles and sparrows will riotously gorge themselves on scattered birdseed, while totally ignoring each other.  The sparrows will chase each other away, but the sparrows don't even seem to acknowledge the voles, and vice versa.

Later 1/1/5/11.  I have now shaped the 1 pound dough pieces into boules.  What I learned. This dough is loose and silky though the hydration is fairly low.  Is it because the gluten develops less strength when the dough is not stretched and folded periodically?  Or because the all white flour absorbs less water than my usual dough which has 15-25% whole grain?  Or because the fermentation (and looseness) is enhanced by the high proportion of stiff levain?  I also learned that un-floured granite is an excellent surface for using the boule shaping technique that Brother David has famously video-recorded.  I strove for a really taut sheath, but the little blobs seem to think they're 75% water when they're more like 60%.  

Now the boules are in their bannetons in their plastic bags, proofing.  They will proof in the kitchen until they have once-and-a-halfled (half a doubling).  Then they will go in the refrigerator for the night.

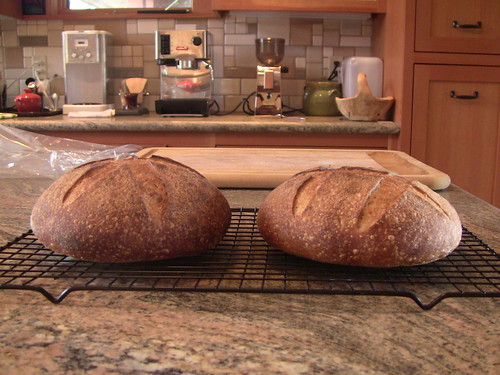
Sunday 1/16/11.  90 minutes after being taken out of the refrigerator, the boules were gently flopped from their bannetons onto pieces of parchment, then placed on a cookie sheet and scored.  The oven, with baking stone, was pre-heated at 475 F for an hour steamed using Sylvia's magic towels and a cast iron skillet with lava rocks. In addition, contrary to my usual procedure, I misted the loaves with water when they were loaded and again after a couple minutes.  After 15 minutes, I removed the steaming apparati and reduced the temperature to 425 F on convection setting.  After 30 minutes total (and a 207 F internal loaf temperature), I turned the oven off and left the loaves on the stone with the door ajar for another 10 minutes.

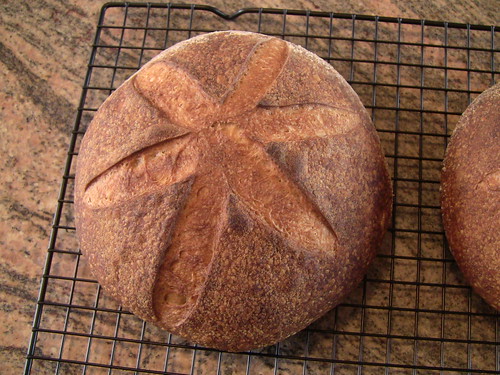
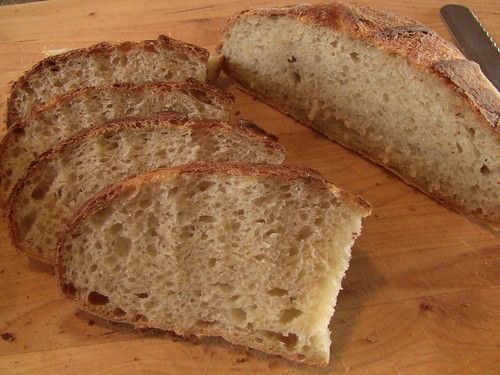
The oven spring was very good, though not the mighty spring of some other sourdoughs I've baked.  The loaf scored with a star rose about 20% more than the one with the hash mark (is this a commentary on telephone keypads?). The crust is perfectly colored, deep caramel and quite even, shiny, with little crust bubbles here and there. What I learned.  Spritzing loaves seems to add to shine and crust bubbles.  The star scoring pattern seems to encourage upward spring.  Convection baking (in a good oven) seems to enhance evenness of crust color.  I love my North Coast oven.

IMG_2022

IMG_2027

As the loaves cool, I can take a few minutes to look off to sea, where a large group of grey whales are commuting South, presumably looking for real Wharf Bread.  They are spouting off and waving hello with their flukes.

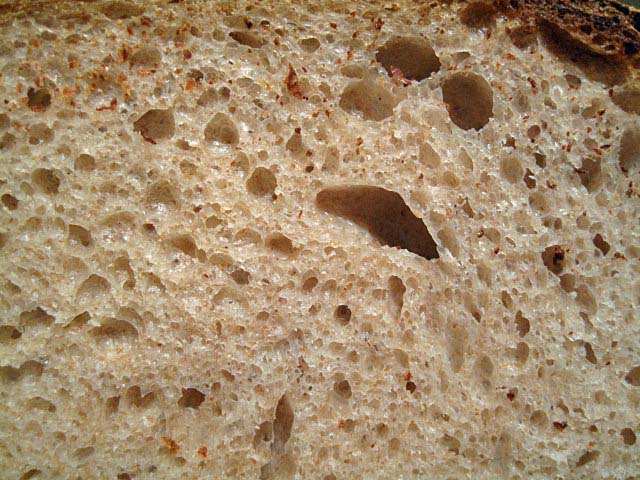
Later 1/16/11.  The loaves are mostly cooled.  They spray crust crumbs widely as they are sliced.  The crumb is moist, airy but chewy.  Very much a classic SF sourdough.  The holes are mostly small, with a few bigger pockets, but not what you'd call an open crumb.  This is just as I like it.  The flavor is simple but good.  Mildly sour.  What I learned.  Maybe the longer retardation of the starters is key to stronger sourness.  The less open crumb may be linked to the passive bulk retardation (with no stretch-and-folds and thus less gluten strength to hold bigger bubbles). 

IMG_2031

IMG_2032

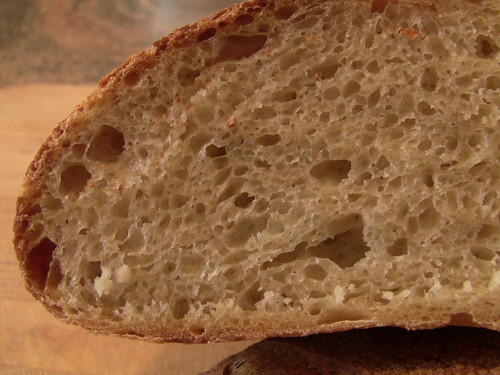
Update:  An hour later, the structure of the crumb has solidified and become a bit denser.  I'd say medium dense.  Good texture.  The flavor's also become a bit more sour.

All in all, this is a bread I'll make again, probably adding some stretch-and-folds and some whole grains.  And definitely trying the longer retardation of the starters that the recipe calls for. That would combine the more complex flavors, more gluten strength and the sourness I'm seeking.  I learned a lot from this bake.

Glenn


wassisname's picture
wassisname

Winter started with a bang this year and seemed like it would never let up!  After two months of slapdash, subsistence baking I finally managed to find enough time (and energy) to bake some decent sourdough.

A simple miche based on Leader's method in Local Breads seemed like just the thing so I mixed up a double batch using about 75% WW flour and 25% bolted "Turkey" flour.  With my kitchen being nice and cool the dough fermented for about 7.5 hours.  Loads of flavor.  Just what I've been craving.  I feel much better now.

Marcus

Jo_Jo_'s picture
Jo_Jo_

Ok, I admit, my bookshelves are literally crammed with books, and I know that I haven't finished reading the three I got for Christmas.  Bread Baker's Apprentice, King Arthur Flour Baker's Companion, and Taste of Home Baking... all really nice books and this gives me TONS of recipes.  I am doing the BBA Challenge, so that has slowed me down from simply reading the book from cover to cover. Thing is, now that I have those books, what ones are next?  I was thinking the the whole grain one from Peter Reinhart, but I see so many other books that people are talking about that I am wondering what is the next step?  Which ones would be better for me to start with and then continue through?  For having baked bread as many years as I have, you would think that I would have a ton of them, but most of the ones I have are simply recipe books and don't even show weighing the ingredients. 

I am interested in grinding my wheat and am planning on getting a Nutrimill pretty soon, so I am trying to factor that into my choices.  Having ground some of my wheat in the past I know that it can change tried and true recipes into total disasters.  I prefer books that give me the science and explanations rather than something that simply gives me a recipe.  Don't get me wrong, recipes are good but when you have so much learning to do and nobody with the experience to teach you the art of breadmaking then reading books and forums is where you get 100% of your knowledge from. 

I have read through a lot of the reviews on TFL, and see a lot of enthusiasm for certain books, but I am still not certain what to buy next and why this one would be better than that one etc.  I am only allowing myself a few books a year now, sorta a book diet.


davidg618's picture
davidg618

Desired DoughTemperature (DDT), at best only a gross-estimate of the temperature of a dough at the beginning of bulk fermentation (ref.: http://www.thefreshloaf.com/node/11719/ddt-calculation-question-daniel-t-dimuzio ) is too often ignored, or given only a brief word or two of non-specific, and often ambiguous explanation. (See, for example, BBA's Pain a l'Ancienne: this is the best I've found, and still, in my opinion, using ice-water is ambiguous in specificity, and lacks complete explanation, of effects and side-effects.) 

Within the usual range of factors, i.e., the newly mixed dough's temperature, Ph, hydration, and ingredients present; dough temperature, more than any other factor, controls yeast and bacteria activity. Secondly, dough temperature is hard to change, and especially hard to change in a controlled way. Thirdly--and not an issue, but a reality--the home baker has more direct control over temperature than any other factor. (Ingredients is, of course, the second, but you can't turn a brioche into a ciabatta.)

Addressing the latter issue first, having recently built a proofing box, early experiences supported my concern that a dough's initial temperature would dominate the dough's average temperature for hours. Stated differently, the heat energy in a light bulb, or heating pad--typical heat sources in homemade proofing boxes--is low. Furthermore, the transfer of heat into a dough mass (a complex function of the dough's mass, surface area, temperature differences, and its specific heat) is slow.

This is not a bad thing. If the heat source is cranked up too high, undesired side-effects will likely occur; e.g., the dough's surface will dry out, yeast cells at or near the dough's surface will produce gas at a reduced rate. The solution to avoiding both these problems is straight forward: Set the DDT to the temperature desired for bulk fermentation. If your going to proof at 76°F (the most common temperature invoked by bread book formulae), 80*F (Tartine Bread). 82.5°F (Zojurishi bread machine pre-heat, and proof temperature most favorable to yeast growth and activity), or 90°F (best temperature favoring bacterial vs. yeast growth in most sourdough cultures.) adjust the mixes' water temperature to reach a DDT as close as possible to the intended bulk fermenting temperature. Conversely, 40°F if you're going to retard the dough in the refrigerator, and finish proofing at room temperture, or 55°F if your using a wine cooler--my preferred retarding temperature. Then your proofing box (or chiller) is maintaining the dough's initial temperature: a much less energetic job.

The first issue, also stated in a different way: why? What's the reason for a specific DDT? Flavor, Scheduling, or Texture? I can't think of a fourth reason, and texture is the most tenuous.  Nonetheless, know why you've chosen a proofing temperature, and choose accordingly. And, if your writing a breadbook, fully explain why you chose a specificied initial dough temperature, including its benefits and downers.

David G

Pages

Subscribe to Recent Blog Entries